Husqvarna PG 820 RC Manuel D'utilisation
Masquer les pouces Voir aussi pour PG 820 RC:
Table des Matières

Publicité

Les langues disponibles

Les langues disponibles

Liens rapides

Please read the operator's manual carefully and make sure you understand the instructions before using the machine.
Lea detenidamente el manual de instrucciones y asegúrese de entender su contenido antes de utilizar la máquina
Manual de instrucciones
Lire attentivement et bien assimiler le manuel d'utilisation avant d'utiliser la machine.
Operator's manual
Manuel d'utilisation
PG 820 RC
PG 680 RC
U U U U S S S S C C C C A A A A E E E E S S S S
.

Publicité

Table des Matières
loading

Sommaire des Matières pour Husqvarna PG 820 RC

  • Page 1 Operator’s manual Manuel d’utilisation Manual de instrucciones PG 820 RC PG 680 RC U U U U S S S S C C C C A A A A E E E E S S S S Please read the operator’s manual carefully and make sure you understand the instructions before using the machine.
  • Page 2: Key To Symbols

    KEY TO SYMBOLS Symbols on the machine Explanation of warning levels WARNING! The machine can be a The warnings are graded in three levels. dangerous tool if used incorrectly or WARNING! carelessly, which can cause serious or fatal injury to the operator or others. WARNING! Used if there is a risk of Please read the operator’s manual serious injury or death for the operator...
  • Page 3: Table Des Matières

    CONTENTS Contents Changing/fitting the diamonds ......29 Speed and direction of rotation ......30 KEY TO SYMBOLS Variable speed drives/frequency converters ..31 Symbols on the machine ........2 Transport and storage ........... 32 Explanation of warning levels ....... 2 Support wheel ............
  • Page 4: Dear Customer

    Husqvarna is the global leader in outdoor power products for forestry, park maintenance and lawn and garden care, The Husqvarna PG 820 RC and PG 680 RC floor grinder as well as cutting equipment and diamond tools for the is designed for dry or wet grinding of concrete, marble, construction and stone industries.
  • Page 5 PRESENTATION • Robust steel frame. • Spring steel heads. • Strong single-piece aluminum cover. • Gel-filled rubber wheels • The 5-way sealing mechanism protects bearings and internal parts from concrete dust. This provides longer service intervals and longer life span of the machine. •...
  • Page 6: What Is What

    WHAT IS WHAT? What is what on the grinder? Chassis/Frame with support wheel 23 Electrical cabinet Motor terminal box 24 Wheel motor (2) Grinding disc motor 25 Rubber wheels, (gel-filled) Planetary head motor 26 Locking ring, wheels Main control panel 27 Lower lifting eye Cable connection 28 Locking pin...
  • Page 7: Control System

    CONTROL SYSTEM What is what on the remote control? Knob for direction of rotation and speed, grinding disc Drive Controls Knob for direction of rotation and speed, planetary Arrow keys (browse) head 10 Switch button (ON/OFF) Machine stop 11 Return button (previous menu) Display 12 CAN-cable connection Joystick...
  • Page 8: Machine´s Safety Equipment

    MACHINE´S SAFETY EQUIPMENT General Start/stop control on control panel WARNING! Never use a machine with STOP/RUN control used to start and stop the grinding faulty safety equipment. The machine’s unit. safety equipment must be checked and maintained as described in this section. Checking start/stop control on control If your machine fails any of these checks panel...
  • Page 9: Emergency Stop

    MACHINE´S SAFETY EQUIPMENT Emergency stop Testing the emergency stop on control panel The emergency stop is used to quickly switch off the engine. The emergency stop at the machine breaks the NOTICE! The machine is in operation during the check. mains power supply.
  • Page 10: Start/Stop Control On The Remote

    MACHINE´S SAFETY EQUIPMENT Start/stop control on the remote • Turn the STOP/RUN switch to STOP. Check that the grinding unit stops after approximately 2.5 seconds. STOP/RUN control used to start and stop the grinding unit. CAUTION! Always use STOP/RUN to stop the machine after grinding.
  • Page 11: Locking Pin, Wheel-Wheel Motors

    MACHINE´S SAFETY EQUIPMENT Checking the locking pins • Start the grinding unit by turning the STOP/RUN switch on the remote control to RUN. The grinding unit • Make sure the locking pins on the wheel to the wheel will then start smoothly and accelerate to the set motors are depressed (locked position).
  • Page 12: Assembling And Adjustments

    Connect the machine Connect the vacuum cleaner WARNING! The machine should be switched off with the power cable It is highly recommended to use the Husqvarna DC6000 disconnected from the outlet. dust extraction system for complete dust control. PG 820 RC Handle height Connect the dust extractor to the machine.
  • Page 13: Connect A Power Source

    ASSEMBLING AND ADJUSTMENTS Connect a power source • Connect the machine to a 3 phase power supply. • The power cable must suspended to avoid stress while the machine is working. When a concrete dust vacuum is connected to the grinder, it must be connected to a 3-phase power source.
  • Page 14: Battery Handling

    BATTERY HANDLING General POWER lamp, which goes out when charging is complete. WARNING! Risk of explosion if battery is replaced by an incorrect type. Dispose of used batteries according to the instructions. The batteries in the machine and the remote control are Li-ion type.
  • Page 15: Operating

    OPERATING Protective equipment General safety precautions This section describes basic safety directions for using General the machine. This information is never a substitute for Do not use the machine unless you are able to call for help professional skills and experience. in the event of an accident.
  • Page 16: Work Area Safety

    OPERATING • Observe your surroundings to ensure that nothing can WARNING! Unauthorized modifications affect your control of the machine. and/or accessories may lead to serious • The machine can be remote controlled over long injury or death to the user or others. Under no circumstances may the design distances.
  • Page 17: Work Safety

    The marking on the extension cable must be the same or higher than the value stated on the machine’s rating Battery safety plate. Use Husqvarna AB original batteries only. The battery is • Use grounded extension cables. software encrypted. •...
  • Page 18: Remote Control

    OPERATING Remote control General The floor grinder is controlled wirelessly with the remote control via radio communication between the remote control and the floor grinder, or alternatively via the CAN cable between the remote control and the floor grinder. For radio communication between the remote control and the floor grinder to work, the relevant remote control must be paired with the relevant floor grinder.
  • Page 19: Menu Overview

    OPERATING Menu overview Display texts are illustrated in English in the manual, but will appear in the chosen language on the product display. Jan 05 12:45 Jan 05 12:45 Jan 05 12:45 PG820 RC PG820 RC SPEED SPEED SEARCHING... READY POWER POWER MENU...
  • Page 20: Menu System Explanation

    OPERATING Menu system explanation TIME & DATE • Specify time, date and format for time and date Home screen respectively. Browse with the arrow keys and confirm with "OK". Jan 05 12:45 Jan 05 12:45 Jan 05 12:45 SET TIME PG820 RC PG820 RC [ 12:45 ]...
  • Page 21: Calibration Of Controls For Maneuvering

    OPERATING Calibration of controls for arrow key down (D). Turn the knob clockwise to stop (G) for the maximum value and confirm with 'OK' (B). maneuvering The controls on the remote and the control panel must be Jan 05 12:45 recalibrated if the machine starts to make involuntary MINIMUM movements without maneuvering.
  • Page 22: Pair The Remote Control With The Machine

    OPERATING JOYSTICK Y , remote control • Calibrated the same way as 'JOYSTICK X' but with the joystick moved up and down respectively. MACHINE DISC , operating panel • Calibrated the same way as 'DISC'. MACHINE HEAD , operating panel •...
  • Page 23: Explanation Of Display Symbols While Operating

    OPERATING Jan 05 12:45 SPEED SPEED POWER POWER Explanation of display symbols 10 Planetary head 11 Time and date while operating 12 Service indication Battery level , remote control 13 Machine battery indication , battery charging Anticlockwise direction of rotation on corresponding 14 Machine battery indication , battery missing or grinder motor damaged...
  • Page 24: Functions Menu

    OPERATING Functions menu • AMPLITUDE adjustment. Press the arrow keys to adjust seting for AMPLITUDE. Press OK to adjust FREQUENCY. Oscillation Jan 05 12:45 This function is used to get the machine to oscillate/swing during grinding to prevent edges/ridges between passes. •...
  • Page 25: Maneuvering

    OPERATING Maneuvering Recommended working position of the machine. General The machine can be maneuvered both manually and with a remote control. Moving with support wheel CAUTION! The support wheel should only be used for moving short distances within the work area and from a transport Remote maneuvering vehicle to the workplace.
  • Page 26: Grinding Guide

    OPERATING Recommended working position for the machine when Number of diamond tools under the maneuvering with remote control. machine An increased number of tools under the machine leads to: • Less pressure on each individual tool – less wear on the diamond tools.
  • Page 27: Determining The Hardness Of Concrete

    OPERATING Determining the hardness of Full and half sets of diamonds concrete General All concretes are measured by their compressive strength The way in which the diamond segments are mounted on and depending on which part of the world you are from, the grinding discs is very significant for how the machine different compressive strength indices (e.g.
  • Page 28: Diamond Selection

    Re-polish floors that have been ground before Polishing When polishing to HiPERFLOOR Premium with PG 820 RC/PG 680 RC, follow the process described in the ”HiPERFLOOR Premium” product sheet up until the polishing steps with 3000 grain. 28 – English...
  • Page 29: Changing/Fitting The Diamonds

    OPERATING Changing/fitting the diamonds • Put on gloves. • Use a hammer to remove the diamond segments. WARNING! The machine should be switched off with the power cable disconnected from the outlet. Have a set of gloves ready, as diamond tools can get very hot.
  • Page 30: Speed And Direction Of Rotation

    OPERATING Speed and direction of rotation Direction of rotation Seen from underneath the machine, the direction of General rotation is as follows: The planetary head and grinding discs are driven by • REV - Clockwise. separate motors, Dual Drive Technology™. This gives the •...
  • Page 31: Variable Speed Drives/Frequency Converters

    PIRANHA™ scraper tools. In this particular application the setting must be in the REV/REV direction. Variable speed drives/frequency converters Each Husqvarna PG820 RC is equipped with 2 variable speed drive or frequency converter. This unit is incorporated into the machine for the following reasons: Functional •...
  • Page 32: Transport And Storage

    OPERATING Transport and storage Raise/lower the support wheel • First, remove the locking pins (1) on each side of the • Be extremely careful when moving the machine with machine. Then loosen the locking bolt (2) and lower manual maneuvering or on inclined surfaces. Even the support wheel.
  • Page 33: Storage

    OPERATING Lift the machine Long-term storage of battery • When lifting the machine there is a risk of injuring • Maintenance charge the machine battery ever 6 persons or damaging the machine or the months in long-term storage. surroundings. Define the risk area and check that •...
  • Page 34: Starting And Stopping

    STARTING AND STOPPING Before starting • Turn the switch on the control panel to '0' for manual operation. • Switch the machine to run mode using the STOP/RUN WARNING! Please read the operator’s manual carefully and make sure you switch on the control panel. The machine should start understand the instructions before using smoothly and accelerate to the selected speed over a the machine.
  • Page 35: Stop (Remote Maneuvering)

    STARTING AND STOPPING Stop (remote maneuvering) • Turn the STOP/RUN switch to STOP. Continue keeping the machine in motion with the control lever until the grinding unit stops. – English...
  • Page 36: Maintenance And Service

    If you need further information please contact your nearest servicing dealer. Let your Husqvarna dealer regularly check the machine and make essential adjustments and repairs. Maintenance schedule...
  • Page 37: Functional Inspection

    MAINTENANCE AND SERVICE Functional inspection As the chain ring and planetary drive sprocket are located beneath the cover of the machine, yet on the outside of the machine, there lies the potential that they can be General inspection exposed to dust and other debris created during the •...
  • Page 38 Lift off machine cover to reveal chain ring and planetary seal. • If planetary seal is worn or needs replacement, contact your Husqvarna Construction Products distributor for a new planetary seal replacement kit. Service CAUTION! All types of repairs may only be carried out by authorised repairmen.
  • Page 39 MAINTENANCE AND SERVICE PG 680 RC • Place the power cables in front of the grinding head and dock the chassis. • Thread the power cables through the slot between the grinding head and the chassis. • Connect the power cables. –...
  • Page 40: Troubleshooting

    TROUBLESHOOTING Error messages , remote control When the machine stops and displays a fault message and a fault code, a more complicated fault has occurred. If the machine indicates error messages applicable to the traction motors or battery, the machine can only be operated manually, contact service! For more information regarding fault codes, see the following table.
  • Page 41 TROUBLESHOOTING Fault Message on the display Cause Code 0x010362 0x010363 VFD internal error 0x010367 0x010368 0x010369 Too high VFD temperature Grinding disc driver error, contact service if error persists! 0x01036C 0x01036D VFD internal error 0x010374 0x010375 VFD communication fault 0x010376 VFD internal error Planetary head driver error, contact service if error 0x010400...
  • Page 42: Warning Messages

    TROUBLESHOOTING Warning messages , remote control • The machine has detected a fault. Go to 'ERROR LOG' to see the faults that have been detected on the machine and possible measures to take. SERVICE Jan 05 12:45 ERROR LOG SPEED SPEED Jan 05 12:45...
  • Page 43: Faults And Trouble Shooting

    Machine needs to be checked by an electrician or by Husqvarna Construction Products. GRINDER IS HARD TO HOLD ON TO Remove belt tensioner cover plate on bottom of machine and check there is no water or dust on the Drive belt is slipping.
  • Page 44 OVERREVVING run command from witch on control panel. Machine needs to be checked by an electrician or Husqvarna Construction Products. The large motor is not working. This can be caused by fault with...
  • Page 45: Troubleshooting Table Frequency Converter

    Problem with the data and speed drive Re-programming required. Machine needs to be programming of the variable speed checked by a Husqvarna service agent drive Problem with the disc speed Check wires into potentiometer, as machine model potentiometer on the control panel schematic.
  • Page 46 Problem with the data and drive Re-programming required. Machine needs to be programming of the variable speed checked by a Husqvarna service agent drive DC link voltage (screen V1.18) is less then 550 Poor power supply coming into the...
  • Page 47 If one grinding discs rotate head individually a broken belt is causing an internal jam. Contact Husqvarna service agent. Tilt the machine back and try to rotate the planetary Mechanical jam on the planetary head by hand, to see if jam exists. This should be firm drive but not impossible.
  • Page 48: Technical Data

    TECHNICAL DATA Technical data PG 820 RC EU/AU PG 820 RC US PG 680 RC EU/AU PG 680 RC US Motor Power, hp/kW 17,5/13 17,5/13 17,5/13 17,5/13 Rated current, A Rated voltage, V 380-440 400-480 380-440 400-480 Phases 3 phase...
  • Page 49 TECHNICAL DATA Control system Control type Remote operation / Manual operation Signal transmission Wireless/cable Wireless short range communication protocol IEEE802.15.4 Frequency band, GHz 2,45 Max transmit power, mW Range up to, ft/m 100/30 Weight, lbs/kg 2,6/1,2 Size, (LxWxH), inch/mm 11,3x7,5x4,6 / 286x190x117 This device complies with the Part 15 of the FCC Rules.
  • Page 50: Explication Des Symboles

    EXPLICATION DES SYMBOLES Symboles sur la machine Explication des niveaux d'avertissement AVERTISSEMENT! La machine utilisée de manière imprudente ou Il existe trois niveaux d'avertissement. inadéquate peut devenir un outil dangereux, pouvant causer des AVERTISSEMENT! blessures graves voire mortelles à l’utilisateur et aux autres personnes AVERTISSEMENT! Symbole utilisé...
  • Page 51: Contrôler Les Points Suivants Avant La Mise En Marche

    EXPLICATION DES SYMBOLES Contrôler les points suivants avant la mise en marche: AVERTISSEMENT! La découpe, particulièrement la découpe à SEC soulève la poussière générée par le matériau coupé qui contient souvent de la silice. La silice est composée de sable, de quarts d’argile, de granit et de nombreuses autres substances minérales et rocheuses.
  • Page 52 SOMMAIRE Sommaire Demi-jeu et jeu complet de diamants ....77 Sélection des diamants ......... 78 EXPLICATION DES SYMBOLES Polissage ............... 78 Symboles sur la machine ........50 Remplacement/montage des diamants ....79 Explication des niveaux d'avertissement ....50 Vitesse et direction ..........80 Contrôler les points suivants avant la mise en Entraînements à...
  • Page 53: Présentation

    Responsabilité du propriétaire Il est de la responsabilité du propriétaire/de l’employeur La meuleuse Husqvarna PG 820 RC et PG 680 RC est de s’assurer que l’utilisateur possède les connaissances conçue pour le meulage à sec ou avec arrosage du béton, nécessaires pour manipuler la machine en toute sécurité.
  • Page 54 PRÉSENTATION tête planétaire et celle des disques à meuler de manière indépendante. • L’utilisation d’une meuleuse équipée de 3 disques à meuler permet d’appliquer une pression au sol plus importante sur les disques à meuler, et de parvenir à un rendement de travail très élevé. Cela permet également un fonctionnement plus stable sur des surfaces inégales.
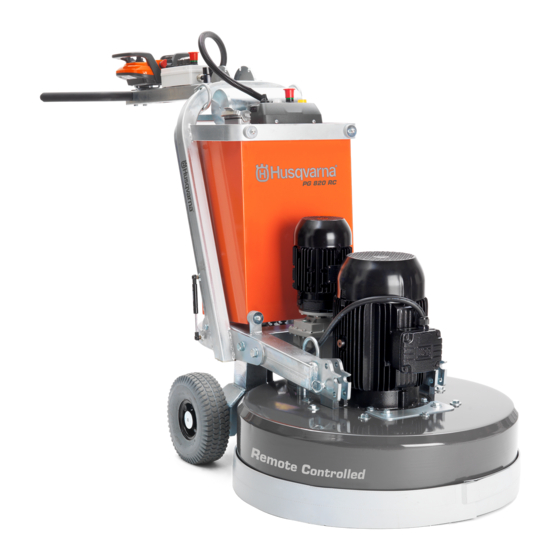
  • Page 55: Quels Sont Les Composants

    QUELS SONT LES COMPOSANTS? Composants de la meule Châssis / Cadre avec roue de support 22 Raccordement pour aspirateur Boîte de bornes du moteur 23 Armoire électrique Moteur de disques à meuler 24 Moteur de roue (2) Moteur de tête planétaire 25 Roues en caoutchouc, (remplies de gel) Panneau de commande principal 26 Bague de blocage, roues...
  • Page 56: Système De Contrôle

    SYSTÈME DE CONTRÔLE À quoi correspond quoi sur la commande à distance? Bouton de sens de rotation et de vitesse, disque à Touche Select meuler Pédales d’accélérateur Bouton de sens de rotation et de vitesse, tête Touches fléchées (navigation) planétaire. 10 Interrupteur (ON/OFF) Arrêt de la machine 11 Bouton de retour (menu précédent)
  • Page 57: Équipement De Sécurité De La Machine

    ÉQUIPEMENT DE SÉCURITÉ DE LA MACHINE Généralités • Placez l’interrupteur principal en position « 0 » pour couper l’alimentation et assurez-vous que la machine s’arrête. AVERTISSEMENT! Ne jamais utiliser une machine dont les équipements de sécurité sont défectueux. Contrôler et entretenir les équipements de sécurité...
  • Page 58: Arrêt D'urgence

    ÉQUIPEMENT DE SÉCURITÉ DE LA MACHINE • Positionnez l’interrupteur STOP/RUN sur STOP. • Placez l’interrupteur principal en position « 1 » pour Assurez-vous que l’unité de meulage s’arrête après démarrer la machine. environ 2,5 secondes. • Appuyez sur le bouton d’arrêt d’urgence. Vérifiez que le moteur s'arrête.
  • Page 59: Commande Marche/Arrêt De La Télécommande

    ÉQUIPEMENT DE SÉCURITÉ DE LA MACHINE • Appuyez sur le bouton d’arrêt d’urgence. Assurez- faisant pivoter dans le sens des aiguilles d’une vous que l’unité de meulage s’arrête après environ montre. 2,5 secondes. • Positionnez l’interrupteur du panneau de commande sur «...
  • Page 60: Vérification Du Bouton D'arrêt De La Machine

    ÉQUIPEMENT DE SÉCURITÉ DE LA MACHINE Vérification du bouton d’arrêt de la • Réinitialisez le bouton d’arrêt de la machine en le tournant dans le sens des aiguilles d’une montre. machine • Pour redémarrer la machine, positionnez le bouton STOP/RUN sur STOP. Appuyez ensuite sur le bouton ATTENTION ! La machine doit être en marche durant la «...
  • Page 61: Généralités

    AVERTISSEMENT! La machine doit être éteinte avec le câble électrique Il est fortement recommandé d’utiliser le système débranché de la prise. d’extraction de poussière Husqvarna DC6000 pour un contrôle optimal de la poussière. Hauteur de la poignée. PG 820 RC Branchez l’extracteur de poussière sur la machine.
  • Page 62: Branchez Une Source Électrique

    MONTAGE ET RÉGLAGES Branchez une source électrique • Connectez la machine à une alimentation électrique triphasée. • Le câble d’alimentation doit suspendu afin d’éviter des contraintes lorsque la machine fonctionne. Lorsqu’un aspirateur à poussière de béton est connecté à la meuleuse, il doit être relié à une source d’alimentation triphasée.
  • Page 63: Manipulation De La Batterie

    MANIPULATION DE LA BATTERIE Généralités indiqué sur la machine par un voyant clignotant qui s’éteint lorsque la charge est complète. AVERTISSEMENT! Risque d’explosion si la batterie est remplacée par un type incorrect. Mettez au rebut les batteries usagées conformément aux instructions. Les batteries de la machine et de la télécommande sont de type Li-ion.
  • Page 64: Commande

    COMMANDE Équipement de protection Autre équipement de protection Généralités AVERTISSEMENT! Lorsque vous travaillez avec la machine, des étincelles Ne jamais utiliser une machine s’il n’est pas possible peuvent se former et mettre le feu. d’appeler au secours en cas d’accident. Gardez toujours à...
  • Page 65: Sécurité Dans L'espace De Travail

    COMMANDE AVERTISSEMENT! Une exposition AVERTISSEMENT! La machine utilisée excessive aux vibrations peut entraîner de manière imprudente ou inadéquate des troubles circulatoires ou nerveux peut devenir un outil dangereux, pouvant chez les personnes sujettes à des causer des blessures graves voire troubles cardio-vasculaires.
  • Page 66: Sécurité Électrique

    COMMANDE Sécurité électrique Instructions de mise à la terre AVERTISSEMENT! Un mauvais AVERTISSEMENT! Il existe toujours un branchement risque de provoquer un risque de choc avec les machines choc électrique. Contactez un électricien électriques. Évitez de travailler par diplômé si vous n'êtes pas sûr que mauvais temps ainsi que tout contact du l'équipement soit correctement mis à...
  • Page 67: Consignes De Sécurité Relatives À L'utilisation De La Batterie

    à garantir le contrôle de la meuleuse par l'utilisation de la batterie une seule télécommande. La communication radio n’est Utilisez uniquement des batteries d’origine Husqvarna active que si cette mesure a été mise à exécution. Si AB. La batterie est codée par logiciel.
  • Page 68: Paramètres Du Logiciel, Télécommande

    COMMANDE Paramètres du logiciel, télécommande Pour en savoir plus sur FreeRTOS, consultez le site www.freertos.org Système de menu de la télécommande Utilisez les flèches (2) pour faire défiler les menus et le bouton « OK » (1) pour confirmer la sélection. Utilisez le bouton «...
  • Page 69: Vue D'ensemble Des Menus

    COMMANDE Vue d'ensemble des menus Sur les illustrations du manuel, les textes sont affichés en anglais, mais apparaissent dans la langue de votre choix sur l’écran du produit. Jan 05 12:45 Jan 05 12:45 Jan 05 12:45 PG820 RC PG820 RC SPEED SPEED SEARCHING...
  • Page 70: Présentation Du Système De Menus

    COMMANDE Présentation du système de TIME & DATE (Heure et date) • Spécifiez l’heure, la date et le format pour l’heure et la menus date, respectivement. Utiliser les flèches et confirmer avec "OK". Écran d’accueil Jan 05 12:45 Jan 05 12:45 Jan 05 12:45...
  • Page 71: Head (Tête) , Télécommande

    COMMANDE incontrôlés en dehors des manœuvres. Le calibrage aiguilles d’une montre pour arrêter (G) la valeur s’effectue avec la télécommande. maximum, et validez avec « OK » (B). • Pour calibrer les différentes commandes, veuillez consulter le menu de chaque fonction. Utiliser les Jan 05 12:45 flèches et confirmer avec "OK".
  • Page 72: Appairez La Télécommande Avec La Machine

    COMMANDE JOYSTICK Y (Levier commande Y) , télécommande • Calibré comme pour « JOYSTICK X » (Levier commande X) mais avec le levier de commande déplacé respectivement vers le haut et vers le bas. MACHINE DISC (Disque machine) , panneau de commande •...
  • Page 73: Interprétation Des Symboles Affichés Pendant L'utilisation

    COMMANDE Jan 05 12:45 SPEED SPEED POWER POWER Interprétation des symboles 10 Tête planétaire 11 Heure et date affichés pendant l’utilisation 12 Indication de réparation Niveau de charge de la batterie , télécommande 13 État de la batterie de la machine , chargement de la Sens de rotation dans le sens contraire des aiguilles batterie.
  • Page 74: Menu Des Fonctions

    COMMANDE Menu des fonctions • Réglage de l’AMPLITUDE. Appuyez sur les touches fléchées pour modifier le réglage de l’AMPLITUDE. Appuyez sur OK pour régler la FRÉQUENCE. Oscillation Jan 05 12:45 Cette fonction est utilisée pour entraîner l’oscillation/la rotation de la machine pendant le meulage afin d’éviter les bordures/arêtes entre les passages.
  • Page 75: Manœuvre

    COMMANDE Manœuvre Position de travail recommandée de la machine. Généralités La machine peut être manœuvrée manuellement et à l’aide d’une télécommande. Déplacement avec roue de support REMARQUE ! La roue de support doit être utilisée uniquement pour déplacer la machine sur de courtes distances dans Manœuvre à...
  • Page 76: Guide De Meulage

    COMMANDE Position de travail recommandée pour la machine Nombre d’outils diamantés sous la lorsqu’elle est manœuvrée avec la télécommande. machine Une augmentation du nombre d’outils sous la machine entraîne : • Moins de pression sur chaque outil – moins d’usure sur les outils diamantés.
  • Page 77: Déterminer La Dureté Du Ciment

    COMMANDE Déterminer la dureté du ciment Demi-jeu et jeu complet de diamants Tous les ciments sont mesurés par leur résistance à la compression et les unités d’évaluation de cette résistance Généralités sont différentes en fonction de la partie du monde dans laquelle vous vivez (ex.
  • Page 78: Sélection Des Diamants

    Re-polissage des sols ayant été meulés précédemment Polissage Lors d’un polissage HiPERFLOOR Premium avec la machine PG 820 RC/PG 680 RC, suivez la procédure décrite dans la fiche produit « HiPERFLOOR Premium » jusqu’aux étapes de polissage avec un grain 3000. 78 – French...
  • Page 79: Remplacement/Montage Des Diamants

    COMMANDE Remplacement/montage des • Mettez les gants. diamants • Utilisez un marteau pour retirer les segments en diamant. AVERTISSEMENT! La machine doit être éteinte avec le câble électrique débranché de la prise. Veiller à avoir une paire de gants à disposition. Les éléments diamant peuvent en effet être très chauds.
  • Page 80: Vitesse Et Direction

    COMMANDE Vitesse et direction Sens de rotation Vu de sous la machine, le sens de rotation se présente Généralités comme suit : Les disques à meuler et la tête planétaire sont entraînés • REV (AR) - Sens des aiguilles d’une montre. par un système de moteurs séparés : Dual Drive •...
  • Page 81: Entraînements À Vitesse Variable / Convertisseurs De Fréquence

    REV/REV. Entraînements à vitesse variable / convertisseurs de fréquence Toutes les machines Husqvarna PG820 RC sont équipées de 2 entraînements à vitesse variable ou d’un convertisseur de fréquence. Cette unité est intégrée à la machine pour les raisons suivantes : Fonctionnalité...
  • Page 82: Transport Et Rangement

    COMMANDE Transport et rangement Relevage/abaissement de la roue de support • En mode manuel ou sur les surfaces inclinées, il convient de manœuvrer la machine avec une extrême • Commencez par retirer les goupilles de blocage (1) de prudence. Même les pentes les plus faibles peuvent chaque côté...
  • Page 83: Transport De La Machine Sur Un Moyen De Transport

    COMMANDE Soulevez la machine Stockage à long terme de la batterie • Lorsque vous soulevez la machine, vous risquez de blesser des personnes ou d'endommager la machine • Effectuez une charge d’entretien de la batterie de la ou les environs. Définissez la zone de risque et machine tous les 6 mois en cas de stockage à...
  • Page 84: Démarrage Et Arrêt

    DÉMARRAGE ET ARRÊT Avant le démarrage mode manuel pour libérer la surface de friction des outils diamantés. • Assurez-vous que la commande STOP/RUN située AVERTISSEMENT! Lire attentivement et sur le panneau de commande est positionnée sur bien assimiler le manuel d’utilisation ARRÊT.
  • Page 85: Stop (Mode À Distance)

    DÉMARRAGE ET ARRÊT • Placez l’interrupteur principal en position « 1 » pour démarrer la machine. Positionnez l’interrupteur du panneau de commande sur « 0 » pour activer le mode à distance. Démarrez l’unité de meulage en positionnant l’interrupteur STOP/RUN de la télécommande sur RUN.
  • Page 86: Entretien Et Réparation

    Pour obtenir de plus amples informations, contacter l'atelier de réparation le plus proche. Faites régulièrement contrôler la machine par votre revendeur Husqvarna afin qu’il procède aux installations et réparations adéquates. Schéma d’entretien...
  • Page 87: Contrôle Fonctionnel

    ENTRETIEN ET RÉPARATION Contrôle fonctionnel Système d’entraînement planétaire Le système d’entraînement planétaire se compose du Inspection générale pignon (qui entraîne le plateau) et du plateau. Ce système est un système à sec (c.-à-d. qu’aucune lubrification n’est • Contrôler que le câble et la rallonge sont entiers et en nécessaire entre la roue de l’entraînement planétaire et la bon état.
  • Page 88: Système D'entraînement Pour Disques À Meuler

    Retirez le capot de la machine pour révéler la bague de chaîne et le joint planétaire. • Si le joint planétaire est usé ou doit être remplacé, contactez votre distributeur Husqvarna Construction Products pour obtenir un kit de remplacement du joint planétaire. 88 – French...
  • Page 89 ENTRETIEN ET RÉPARATION PG 680 RC • Placez les câbles d’alimentation à l’avant de la tête de meulage et amarrez le châssis. • Faites passer les câbles d’alimentation à travers la fente entre la tête de meulage et le châssis. •...
  • Page 90: Recherche De Pannes

    RECHERCHE DE PANNES Messages d’erreur , télécommande Lorsque la machine s’arrête et affiche un message d’erreur accompagné d’un code d’erreur, cela signifie qu’une erreur plus complexe s’est produite. Si la machine indique des messages d’erreur applicables aux moteurs de traction ou à la batterie, et que la machine ne peut être actionnée qu’en mode manuel, contactez le service après-vente ! Pour plus d’informations concernant les codes d’erreur, veuillez consulter le tableau suivant.
  • Page 91 RECHERCHE DE PANNES Code d’erreur Message à l'écran Origine 0x010362 0x010363 Erreur interne du variateur de vitesse électrique 0x010367 0x010368 Température trop élevée du variateur de vitesse Erreur d’entraînement du disque à meuler, si 0x010369 électrique l’erreur persiste, contactez le service après- vente ! 0x01036C 0x01036D...
  • Page 92: Messages D'avertissement

    RECHERCHE DE PANNES Messages d'avertissement , télécommande • La machine a détecté une erreur. Veuillez consulter le « ERROR LOG » (JOURNAL D’ERREURS) pour voir les erreurs détectées sur la machine ainsi que des mesures à prendre. SERVICE Jan 05 12:45 ERROR LOG SPEED...
  • Page 93: Recherche De Pannes Et D'erreurs

    Si la valeur reste sur zéro, le grand entraînement à vitesse variable ou convertisseur de fréquence ne reçoit pas de commande de mise en marche du panneau de commande. La machine doit être vérifi ée par un électricien ou par Husqvarna Construction LA MACHINE DE Products. SURFAÇAGE EST DIFFICILE À...
  • Page 94 RÉGIME du panneau de commande. La machine doit être vérifi ée par un électricien ou par Husqvarna Construction Products. Le moteur de grande puissance ne fonctionne pas. Cela peut être dû à...
  • Page 95: Tableau De Dépannage, Convertisseur De Fréquence

    80 Hz. Problème de saisie des données et Reprogrammation requise. La machine doit être de programmation du variateur de examinée par un atelier spécialisé Husqvarna. vitesse Problème au niveau du Contrôlez les câbles pénétrant à l’intérieur du potentiomètre de vitesse du disque potentiomètre, conformément au schéma du modèle...
  • Page 96 100 Hz. Problème de saisie des données et Reprogrammation requise. La machine doit être de programmation du variateur de examinée par un atelier spécialisé Husqvarna. vitesse La tension du courant continu (écran V1.18) Alimentation électrique insuffisante Contrôlez la tension et les phases de la machine au est inférieure à...
  • Page 97 – ventilation. Si nécessaire, faites tester les variateurs l’environnement de travail ou en surchauffe de l’appareil de vitesse par un atelier spécialisé Husqvarna. raison d’une panne du capteur de température. Vérifiez que du courant est prélevé lorsque la machine est en marche. Réduisez le régime des La protection anti-calage du moteurs via les potentiomètres situés sur le panneau...
  • Page 98: Caractéristiques Techniques

    CARACTÉRISTIQUES TECHNIQUES Caractéristiques techniques PG 820 RC EU/AU PG 820 RC US PG 680 RC EU/AU PG 680 RC US Puissance du moteur, hp/kW 17,5/13 17,5/13 17,5/13 17,5/13 Courant nominal, A Tension nominale, V 380-440 400-480 380-440 400-480 Phases 3 phases...
  • Page 99: Exposition Aux Radiofréquences (Rf)

    CARACTÉRISTIQUES TECHNIQUES Système de contrôle Type de contrôle Fonctionnement à distance / Fonctionnement manuel Transmission de signaux Sans fil/avec câble Protocole de communication à courte portée sans fil IEEE802.15.4 Bande fréquence, GHz 2,45 Puissance transmise max., mW Portée max., pi/m 100/30 Poids, lbs/kg 2,6/1,2...
  • Page 100: Aclaracion De Los Simbolos

    ACLARACION DE LOS SIMBOLOS Símbolos en la máquina Explicación de los niveles de advertencia ¡ATENCION! La máquina, si se utiliza de forma errónea o descuidada, puede Las advertencias se clasifican en tres niveles. ser una herramienta peligrosa que puede causar daños graves e incluso ¡ATENCION! la muerte al usuario y a otras personas.
  • Page 101: Antes De Arrancar, Observe Lo Siguiente

    ACLARACION DE LOS SIMBOLOS Antes de arrancar, observe lo siguiente: ¡ATENCION! El material que se corta a menudo contiene sílice y, al cortarlo en SECO particularmente, desprende polvo. La sílice es un componente básico de la arena, la arcilla para ladrillos, del cuarzo, del granito, y de varios otros minerales y rocas.
  • Page 102 INDICE Índice Pulido ..............129 Cambio/colocación de los diamantes ....130 ACLARACION DE LOS SIMBOLOS Velocidad y dirección ..........131 Símbolos en la máquina ........100 Discos de velocidad variable/convertidores de Explicación de los niveles de advertencia .... 100 frecuencia ............. 132 Antes de arrancar, observe lo siguiente: ....
  • Page 103: Presentación

    Los supervisores y los usuarios deben haber leído y La pulidora de suelos Husqvarna PG 820 RC y PG 680 entendido el manual de instrucciones. Deben tener RC está diseñada para pulido en húmedo o en seco de conocimiento de lo siguiente: hormigón, mármol, terrazo y granito.
  • Page 104 PRESENTACIÓN control absoluto e independiente del régimen tanto del cabezal planetario como de los discos de pulido. • Una pulidora con 3 discos permite una mayor presión hacia abajo sobre los discos, lo que proporciona una tasa de trabajo elevada. También ofrece más estabilidad en superficies irregulares.
  • Page 105: Que Es Que

    ¿QUE ES QUE? Elementos de la amoladora Chasis/Bastidor con rueda de soporte 23 Armario eléctrico Caja terminal del motor 24 Motor de rueda (2) Motor del disco de pulido 25 Ruedas de goma (rellenas de gel) Motor del cabezal planetario 26 Anillo de bloqueo, ruedas Panel de control principal 27 Argolla de elevación inferior...
  • Page 106: Sistema De Control

    SISTEMA DE CONTROL Elementos del control remoto Mando de sentido de rotación y velocidad, disco de Botón de selección pulido Mando de velocidad Mando de sentido de rotación y velocidad, cabezal Teclas de flecha (Examinar) planetario 10 Botón interruptor (ON/OFF) Parada de la máquina 11 Botón de retroceso (menú...
  • Page 107: Equipo De Seguridad De La Máquina

    EQUIPO DE SEGURIDAD DE LA MÁQUINA Generalidades Mando de arranque y parada del panel de control ¡ATENCION! Nunca utilice una máquina que tenga un equipo de seguridad Control de parada/funcionamiento para arrancar y parar defectuoso. Efectúe el control y la unidad de pulido. mantenimiento del equipo de seguridad Comprobación del mando de arranque y de la máquina como se describió...
  • Page 108: Parada De Emergencia

    EQUIPO DE SEGURIDAD DE LA MÁQUINA Parada de emergencia Comprobación de la parada de emergencia en el panel de control El botón de emergencia se utiliza para apagar rápidamente el motor. La parada de emergencia de la AVISO La máquina está en funcionamiento durante la máquina corta el suministro eléctrico.
  • Page 109: Mando De Arranque Y Parada Del Control Remoto

    EQUIPO DE SEGURIDAD DE LA MÁQUINA Mando de arranque y parada del se detiene después de aproximadamente 2,5 segundos. control remoto Control de parada/funcionamiento para arrancar y parar la unidad de pulido. ¡NOTA! Utilice siempre STOP/RUN para detener la máquina al finalizar el pulido. Comprobación del interruptor de parada/ funcionamiento en el control remoto Parada de la máquina en el...
  • Page 110: Pasador De Bloqueo, Motores De Las Ruedas

    EQUIPO DE SEGURIDAD DE LA MÁQUINA • Para arrancar la máquina, ponga el interruptor Pasador de bloqueo, motores de principal en la posición '1'. las ruedas • Gire el interruptor del panel de control a la posición '0' para el modo de funcionamiento remoto. Los pasadores de bloqueo de las ruedas se utilizan para fijarlas a los motores cuando se vaya a operar la máquina •...
  • Page 111: Generalidades

    ¡ATENCION! Cuando apague la máquina, debe desconectar el cable de Se recomienda vivamente usar el sistema de extracción alimentación de la toma de corriente. de polvo Husqvarna DC6000 para un control completo del polvo. Regule la altura PG 820 RC Conecte el extractor de polvo a la máquina.
  • Page 112: Conexión De Una Fuente De Alimentación

    MONTAJE Y AJUSTES Conexión de una fuente de alimentación • Conecte la máquina a una fuente de alimentación trifásica. • El cable de alimentación debe permanecer suspendido para evitar tirones mientras la máquina está funcionando. Cuando se acopla un aspirador de polvo a la pulidora, debe conectarse a una fuente de alimentación trifásica.
  • Page 113: Manejo De La Batería

    MANEJO DE LA BATERÍA Generalidades 3-4 horas. La carga se indica en la máquina mediante una luz de alimentación (POWER) intermitente, que se apaga cuando concluye la carga. ¡ATENCION! Riesgo de explosión si se sustituye la batería por otra de tipo incorrecto.
  • Page 114: Funcionamiento

    FUNCIONAMIENTO Equipo de protección Instrucciones generales de seguridad Generalidades No use nunca una máquina si no tiene posibilidad de Este apartado trata las normas de seguridad básicas pedir auxilio si se produce un accidente. para trabajar con el dispositivo. Esta información no sustituye en ningún caso los conocimientos y la Equipo de protección personal experiencia de un profesional.
  • Page 115: Seguridad En El Área De Trabajo

    FUNCIONAMIENTO debe tener mucho cuidado en la zona de riesgo ¡ATENCION! Las modificaciones y/o el durante el funcionamiento de la máquina. uso de accesorios no autorizados comportan riesgo de daöos personales graves y peligro de muerte para el usuario y otras personas. Bajo ninguna circunstancia debe modificarse la configuración original de la máquina sin autorización del fabricante.
  • Page 116: Seguridad En El Trabajo

    FUNCIONAMIENTO • El control y/o mantenimiento de la máquina debe enredados incrementan el riesgo de descarga hacerse con el motor parado y el enchufe eléctrica. desenchufado. • Compruebe que los cables están intactos y en buen • Apague siempre la máquina antes de desenchufarla. estado.
  • Page 117: Seguridad De La Batería

    FUNCIONAMIENTO Seguridad de la batería Utilice sólo baterías originales Husqvarna AB. La batería está codificada mediante cifrado por software. ¡ATENCION! Mantenga la batería lejos de la luz directa del sol, de fuentes de calor o de llamas abiertas. Existe el riesgo de que la batería explote si se arroja a un...
  • Page 118: Mando A Distancia

    FUNCIONAMIENTO Mando a distancia Generalidades La pulidora de suelos se puede controlar de dos maneras: bien de forma inalámbrica con el control remoto mediante comunicación por radio, o bien por cable, conectando el cable CAN entre el control remoto y la pulidora de suelos. Para poder establecer comunicación por radio entre el control remoto y la pulidora de suelos, el control remoto debe emparejarse con la pulidora de suelos pertinente.
  • Page 119: Vista General Del Menú

    FUNCIONAMIENTO Vista general del menú Los textos de la pantalla aparecen en inglés en el manual, pero en la pantalla del producto estarán en el idioma que corresponda. Jan 05 12:45 Jan 05 12:45 Jan 05 12:45 PG820 RC PG820 RC SPEED SPEED SEARCHING...
  • Page 120: Explicación Del Sistema De Menús

    FUNCIONAMIENTO Explicación del sistema de menús TIME & DATE (Hora y fecha) • Especifica el tiempo, la fecha y el formato de hora y Pantalla de inicio fecha respectivamente. Desplácese con las flechas de dirección y confirme con «OK». Jan 05 12:45 Jan 05 12:45...
  • Page 121: Calibración De Los Controles De Maniobra

    FUNCIONAMIENTO Calibración de los controles de DISC (Disco) , control remoto maniobra • Gire el mando hacia la izquierda hasta el final (A) para el valor mínimo y confirme con 'OK' (Aceptar) (B). Es preciso recalibrar los controles en el control remoto y Seleccione 'CENTER' (Central) (C), tecla de flecha el panel de control si la máquina realiza movimientos no hacia abajo (D).
  • Page 122: Panel De Control

    FUNCIONAMIENTO • Para calibrar la posición 'CENTER' (Central) (A), Empareje el control remoto con la suelte el joystick para que regrese a la posición máquina central (B) y confirme con 'OK' (Aceptar) (C). Si el control remoto incluido se reemplaza o si es necesario intercambiar los controles remotos de dos Jan 05 12:45...
  • Page 123: Explicación De Símbolos En Pantalla Durante El Funcionamiento

    FUNCIONAMIENTO Jan 05 12:45 SPEED SPEED POWER POWER Explicación de símbolos en 10 Cabezal planetario 11 Fecha y hora pantalla durante el 12 Indicación de servicio funcionamiento 13 Indicación de batería de la máquina , batería Nivel de carga de la batería , control remoto cargando El motor correspondiente de la pulidora gira en el 14 Indicación de batería de la máquina , la batería falta o...
  • Page 124: Menú De Funciones

    FUNCIONAMIENTO Menú de funciones • Ajuste de la AMPLITUD. Pulse las teclas de flecha para ajustar los valores de AMPLITUD. Pulse OK para ajustar la FRECUENCIA. Oscilación Jan 05 12:45 Esta función se utiliza para hacer que la máquina oscile/ gire durante el pulido para evitar bordes/salientes entre pasadas.
  • Page 125: Realización De Maniobras

    FUNCIONAMIENTO Realización de maniobras Posición de trabajo recomendada para la máquina. Generalidades La máquina se puede maniobrar tanto de forma manual como mediante un control remoto. Movimiento con rueda de soporte ¡NOTA! La rueda de soporte sólo debe utilizarse para desplazamientos cortos dentro de la zona de trabajo o entre el Maniobra por control remoto vehículo de transporte y el lugar de...
  • Page 126: Guía Para El Amolado

    FUNCIONAMIENTO Posición de trabajo recomendada para la máquina al Cantidad de discos de diamante bajo la máquina maniobrar con control remoto. Un aumento en la cantidad de discos bajo la máquina provoca: • Menos presión en cada herramienta individual: menos desgaste en los discos de diamante. •...
  • Page 127: Determinación De La Dureza Del Hormigón

    FUNCIONAMIENTO Determinación de la dureza del Discos diamantados con ligante de metal hormigón Disco de soporte Redi Lock: se utiliza para sujetar discos de diamante con liga de metal. Todo hormigón se mide por su resistencia a la compresión y, dependiendo de qué zona del mundo sea Discos diamantados con ligante de cada uno, se medirá...
  • Page 128 FUNCIONAMIENTO Medio juego de diamantes Cuando los diamantes se configuran como medio juego, tienden a seguir la superfi cie del suelo. Es parecido a un trípode para una cámara, que se puede colocar en una superfi cie irregular y puede encontrar un apoyo estable. La configuración de medio juego de diamantes sólo se deberá...
  • Page 129: Selección De Diamantes

    Repulido de suelos que se han rectificado antes Pulido Al pulir según el método HiPERFLOOR Premium con la PG 820 RC/PG 680 RC, siga el proceso descrito en la hoja de producto de ”HiPERFLOOR Premium” hasta los pasos de pulido con grano 3000.
  • Page 130: Cambio/Colocación De Los Diamantes

    FUNCIONAMIENTO Cambio/colocación de los • La máquina debe quedar apoyada en las ruedas y el chasis. diamantes ¡ATENCION! Cuando apague la máquina, debe desconectar el cable de alimentación de la toma de corriente. Póngase unos guantes protectores, ya que los útiles de •...
  • Page 131: Velocidad Y Dirección

    FUNCIONAMIENTO Asegúrese de que el faldón antipolvo está intacto y limpio Velocidad y de que forme una junta perfecta contra el suelo. Si el Al arrancar la máquina por primera para realizar cualquier faldón antipolvo está deteriorado, debe reemplazarse. tarea, se aconseja que, en un principio, el ajuste de la velocidad no sea superior a 7.
  • Page 132: Discos De Velocidad Variable/Convertidores De Frecuencia

    REV / REV. Discos de velocidad variable/convertidores de frecuencia Las Husqvarna PG820 RC están equipadas con doble variador de velocidad o conversor de frecuencia. Esta unidad se incorpora a la máquina por las siguientes razones: Funcionalidad •...
  • Page 133: Transporte Y Almacenamiento

    FUNCIONAMIENTO Transporte y almacenamiento Subida/bajada de la rueda de soporte • En primer lugar, retire los pasadores de bloqueo (1) a • Tenga mucho cuidado al mover la máquina cada lado de la máquina. A continuación, afloje el maniobrando en modo manual o en superficies perno de bloqueo (2) y baje la rueda de apoyo.
  • Page 134: Transporte De La Máquina En Un Medio De Transporte

    FUNCIONAMIENTO Levantamiento la máquina Almacenamiento a largo plazo de la batería • Cuando se eleva la máquina existe un riesgo de provocar daños en las personas o las máquinas • Efectúe una carga de mantenimiento de la batería de colindantes. Defina la zona de riesgo y compruebe la máquina cada 6 meses durante periodos de que no haya nadie presente en dicha zona cuando almacenamiento prolongados.
  • Page 135: Arranque Y Parada

    ARRANQUE Y PARADA Antes del arranque fricción de superficie de las herramientas de diamante. • Asegúrese de que el control STOP/RUN del panel de ¡ATENCION! Lea detenidamente el control esté en posición STOP. manual de instrucciones y asegúrese de entender su contenido antes de utilizar la •...
  • Page 136: Parada (Maniobra Con Control Remoto)

    ARRANQUE Y PARADA • Para arrancar la máquina, ponga el interruptor principal en la posición '1'. Gire el interruptor del panel de control a la posición '0' para el modo de funcionamiento remoto. Ponga en marcha la unidad de pulido girando el interruptor de parada/ funcionamiento del control remoto a la posición RUN.
  • Page 137: Mantenimiento Y Reparación

    Para más información, consulte con el taller de servicio oficial más cercano. Encargue al distribuidor de Husqvarna la revisión regular de la cortadora y los ajustes y reparaciones necesarios. Programa de mantenimiento Mantenimiento Diario...
  • Page 138: Inspección Funcional

    MANTENIMIENTO Y REPARACIÓN Inspección funcional Sistema de transmisión planetario El sistema de transmisión planetario está compuesto por Inspección general el piñón (que acciona el disco dentado de la cadena) y el disco dentado de la cadena. Este sistema es un sistema •...
  • Page 139 MANTENIMIENTO Y REPARACIÓN • Quite los pernos. Husqvarna Construction Products para un nuevo kit de repuesto de junta planetaria. Servicio ¡NOTA! Las reparaciones de todo tipo deben ser efectuadas por técnicos autorizados, únicamente. De este modo se evita someter a los operadores a grandes riesgos.
  • Page 140 MANTENIMIENTO Y REPARACIÓN PG 680 RC • Coloque los cables de alimentación delante del cabezal de pulido y acople el chasis. • Pase los cables de alimentación a través de la ranura situada entre el cabezal de pulido y el chasis. •...
  • Page 141: Localización Y Corrección De Averías

    LOCALIZACIÓN Y CORRECCIÓN DE AVERÍAS Mensajes de fallo , control remoto Cuando la máquina se detiene y aparece un mensaje de error y un código de error, se ha producido un fallo más complicado. Si la máquina indica mensajes de error aplicables a los motores de tracción o la batería, la máquina sólo podrá...
  • Page 142 LOCALIZACIÓN Y CORRECCIÓN DE AVERÍAS Código Mensaje en pantalla Causa de fallo Error de batería de la máquina; póngase en 0x010240 La batería está conectada incorrectamente contacto con el servicio técnico Sobrecarga de tracción; compruebe que la máquina 0x010115 Los motores de tracción están sobrecargados no está...
  • Page 143 LOCALIZACIÓN Y CORRECCIÓN DE AVERÍAS Código Mensaje en pantalla Causa de fallo 0x010362 0x010363 Error interno de VFD 0x010367 0x010368 Error de controlador del disco de pulidora; póngase 0x010369 Temperatura de VFD demasiado alta en contacto con el servicio técnico si el error 0x01036C persiste 0x01036D...
  • Page 144: Mensajes De Advertencia

    LOCALIZACIÓN Y CORRECCIÓN DE AVERÍAS Mensajes de advertencia , control remoto • La máquina ha detectado un fallo. Vaya a 'ERROR LOG' (Registro errores) para ver los errores detectados en la máquina y las medidas que se pueden tomar. SERVICE Jan 05 12:45 ERROR LOG...
  • Page 145: Fallos Y Localización De Fallos

    LA DESBASTADORA está recibiendo el comando de funcionamiento del interruptor del panel de control. Hará falta que un electricista o Husqvarna Construction Products comprueben la máquina. Quite la placa de cubierta del tensor de la correa en la parte inferior de la máquina y compruebe que no La correa de transmisión está...
  • Page 146 SOBRERREVOLU funcionamiento del interruptor del panel de control. Hará CIONADA falta que un electricista o Husqvarna Construction Products comprueben la máquina. El motor grande no funciona. Puede deberse a un error del...
  • Page 147: Tabla De Resolución De Problemas Del Convertidor De Frecuencia

    Hay un problema con los datos y la Se debe volver realizar la programación. Un programación del disco de representante de Husqvarna debe comprobar la velocidad variable. máquina. Hay un problema con el Compruebe los cables que van hacia el potenciómetro de velocidad de los...
  • Page 148 Hay un problema con los datos y la Se debe volver realizar la programación. Un programación del disco de representante de Husqvarna debe comprobar la velocidad variable. máquina. La tensión de corriente continua (pantalla El disco de velocidad variable Compruebe la tensión y las fases de la desbastadora...
  • Page 149 Si fuera necesario, haga que un temperatura debido a una alta pantalla: temperatura representante de Husqvarna compruebe los discos temperatura de trabajo o a un excesiva de la unidad. de velocidad variable. sensor de temperatura defectuoso.
  • Page 150: Datos Tecnicos

    DATOS TECNICOS Datos técnicos PG 820 RC EU/AU PG 820 RC US PG 680 RC EU/AU PG 680 RC US Potencia del motor, CV/kW 17,5/13 17,5/13 17,5/13 17,5/13 Amperaje nominal, A Tensión nominal, V 380-440 400-480 380-440 400-480 Fases Trifásica Trifásica...
  • Page 151 DATOS TECNICOS Sistema de control Tipo de control Funcionamiento remoto / Funcionamiento manual Transmisión de la señal Inalámbrico / cable Protocolo de comunicación inalámbrica de corto IEEE802.15.4 alcance Banda de frecuencia, GHz 2,45 Potencia máxima de transmisión, mW Rango de hasta, ft/m 100/30 Peso, lbs/kg 2,6/1,2...
  • Page 152 US - Original instructions, CA - Instructions d’origine, ES - Instrucciones originales 1140202-49 ´®z+H48¶9l¨ ´®z+H48¶9l¨ 2016-04-18...

Ce manuel est également adapté pour:

Pg 680 rc

Table des Matières