Table des Matières
Publicité
Les langues disponibles
Les langues disponibles
Liens rapides
Panikgegenkasten
Passive Leaf Lock
Serrure à crémone
Serratura ad aste-chiavistello
Passief slot
Montageanleitung / Assembly instructions / Notice de Montage
Instruzioni di montaggio / Handleiding voor montage
D0082402
www.assaabloy.de
DE Seite
EN Page
FR Page
IT Pagina 50
NL Pagina 66
Mit Easy-Installation Montagesystem
With Easy-Installation Assembly System
Avec système de montage Easy-Installation
Con sistema di montaggio Easy Installation
Met Easy-Installation montagesysteem
2
18
34
The global leader in
door opening solutions
Publicité
Chapitres
Table des Matières

Manuels Connexes pour Assa Abloy OneSystem Série


Sommaire des Matières pour Assa Abloy OneSystem Série
- Page 1 www.assaabloy.de DE Seite EN Page FR Page IT Pagina 50 NL Pagina 66 Mit Easy-Installation Montagesystem With Easy-Installation Assembly System Avec système de montage Easy-Installation Con sistema di montaggio Easy Installation Met Easy-Installation montagesysteem Panikgegenkasten Passive Leaf Lock Serrure à crémone Serratura ad aste-chiavistello Passief slot Montageanleitung / Assembly instructions / Notice de Montage...
- Page 2 Diese Dokumentation einschließlich aller ihrer Teile ist urheberrechtlich geschützt. Jede Verwertung bzw. Veränderung außerhalb der engen Grenzen des Urheberrechtsgesetzes ist ohne Zustimmung von ASSA ABLOY Sicherheitstechnik GmbH unzulässig und strafbar. Das gilt insbesondere für Vervielfältigungen, Übersetzungen, Mikroverfilmungen und die Einspeicherung und Verarbeitung in elektronischen Systemen.
-
Page 3: Table Des Matières
Panikgegenkasten............4 ASSA ABLOY Montagesystem Easy-Installation ....... 4 Der OneSystem Panikgegenkasten bietet . -
Page 4: Produktinformation
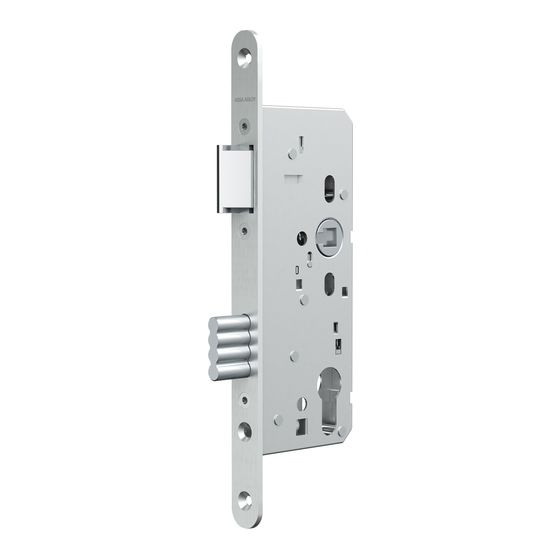
Treibriegel ausgestattet. Verriegelung ASSA ABLOY Montagesystem Easy-Installation Der OneSystem Panikgegenkasten bietet das einzigartige ASSA ABLOY Montagesys- tem Easy-Installation. Die beiden Treibriegel können durch einfachen Zug an einer Einfädelhilfe sehr leicht am Schloss positioniert und verschraubt werden. Der OneSystem Panikgegenkasten bietet ·... - Page 5 Abb. 1 : Der OneSystem Panikgegenkasten- besitzt immer einen oberen Treibriegel, der untere Treibriegel ist optional lieferbar Produktinformation...
-
Page 6: Hinweise
Hinweise Zu dieser Anleitung Diese Montageanleitung wurde für Handwerksfachkräfte sowie eingewiesenes Personal geschrieben. Lesen Sie diese Anleitung, um das Gerät sicher zu montie- ren, zu betreiben und die zulässigen Einsatzmöglichkeiten, die es bietet, auszunutzen. Die Anleitung gibt Ihnen auch Hinweise über die Funktion wichtiger Bauteile. Bedeutung der Symbole Gefahr! Sicherheitshinweis: Nichtbeachtung führt zu Tod oder schwerer Verletzung. -
Page 7: Sicherheitshinweise
Sicherheitshinweise Warnung! Lebensgefahr, Verletzungsgefahr und Sachschaden durch verminderte Feuer- schutzfunktion: Feuerschutztüren verhindern den Durchtritt von Feuer. Feuer- schutztüren werden als Ganzes geprüft: · Bauaufsichtliche Vorschriften müssen eingehalten werden, · die Zertifizierung der Tür muss zum Schloss passen, · ein Austausch gegen ein anderes Modell oder Nachrüstung des Schlosses muss mit dem Türhersteller abgesprochen werden, ·... -
Page 8: Begriffserklärung
Begriffserklärung Begriff Beschreibung – Gehflügel Der Gehflügel ist der zuerst zu öffnende Türflügel einer zweiflügeligen Tür. – Standflügel Der Standflügel kann nach Öffnen des Standflügel einer zweiflügeligen Tür geöffnet werden. – Funktionsluft Die Funktionsluft ist der Abstand zwischen Stulp und Schließblech (Abb. 3). 1,6 Schließgegen- Schließgegenstücke sind das Schließblech oben und die Excenterschließmul- stück... - Page 9 Abb. 2 : Schematische Ansicht des Panikgegenkastens Abb. 3 : Funktionsluft 3 mm Hinweise...
-
Page 10: Klassifizierungsschlüssel
Klassifizierungsschlüssel DIN EN 1125 Über den zehnstelligen Klassifizierungsschlüssel werden die Eigenschaften von Schlössern nach DIN EN 1125 beschrieben. Der Klassifizierungsschlüssel dieses Schlosses lautet: Tab. 1 erläutert den Klassifizierungsschlüssel. Objektschloss Bedeutung Tab. 1 : Klassifizierungs- Hohe Nutzungshäufigkeit, begleitet von nur wenig Anreiz schlüssel zur Sorgfalt, das heißt wo die Möglichkeit eines Unfalls oder eines Missbrauchs gegeben ist... -
Page 11: Din En 179
DIN EN 179 Über den zehnstelligen Klassifizierungsschlüssel werden die Eigenschaften von Schlössern nach DIN EN 179 beschrieben. Der Klassifizierungsschlüssel dieses Schlosses lautet: Tab. 2 erläutert den Klassifizierungsschlüssel. Objektschloss Bedeutung Tab. 2 : Klassifizierungs- Hohe Nutzungshäufigkeit, begleitet von nur wenig Anreiz schlüssel zur Sorgfalt, das heißt wo die Möglichkeit eines Unfalls oder eines Missbrauchs gegeben ist... -
Page 12: Bestimmungsgemäßer Gebrauch
Der untere Treibriegel kann in Türen mit absenkbaren Bodendichtungen nicht eingebaut werden. Das Gerät ist für den Einbau entsprechend Montageanleitung und Nutzung entsprechend Funktionsbeschreibung geeignet. Jede darüber hinausgehende Verwendung gilt als nicht bestimmungsgemäß. CE-Kennzeichnung ASSA ABLOY Sicherheitstechnik GmbH Bildstockstraße 20 72458 Albstadt DEUTSCHLAND www.assaabloy.de /DoP Prüfverfahren läuft noch... -
Page 13: Montage
(durch Ausblasen oder Aussaugen). Funktionseinschränkung durch verspannte Montage: Das Schloss muss ver- spannungsfrei eingebaut werden. Den Panikgegenkasten montieren Die Montage erfolgt mit dem ASSA ABLOY Montagesystem Easy-Installation. Dazu ASSA ABLOY wird jeweils ein Kunststoffdraht durch die Riegelstangen gezogen und im Montagesystem Schlosskasten an der Anschraubposition eingefädelt. -
Page 14: Die Riegelstangen Ablängen
Die Riegelstangen ablängen Die Länge der oberen Riegelstange ist von der Türhöhe abhängig. Die Schlossnuss ist üblicherweise 1 m über dem Fußboden. Achtung! Verwechseln der beiden Treibriegel macht die Treibriegel unbrauchbar: Der obere Treibriegel (ist innen hohl) muss abgesägt werden, der untere Treibriegel (ist massiv) normalerweise nicht. -
Page 15: Die Treibriegelstangen Ablängen
Stangenlänge plus etwa 30 cm. Den Panikgegenkasten montieren Befolgen Sie die Arbeitsschritte des ASSA ABLOY Montagesystems Easy-Instal- lation (Abb. 7 bis Abb. 22, ab Seite 84). Prüfen Sie alle Funktionen des Panikgegenkastens und der Tür. Stellen Sie sicher, dass die passende Funktionsluft eingestellt ist (Abb. -
Page 16: Technische Daten
Technische Daten Eigenschaft Ausprägung Zulassung nach DIN EN 1125 DIN EN 179 Verriegelung oben (optional auch unten) zulässige Türmaße 1500 mm x 4000 mm zulässige Türmasse 300 kg zulässige Schließkraft maximal 50 N Stulp - Breite 20 mm, 24 mm - Länge 270 mm, 320 mm, 370 mm - Dicke... -
Page 17: Zubehör, Wartung, Gewährleistung, Entsorgung
Zubehör, Wartung, Gewährleistung, Entsorgung www.assaabloy.de Zubehör · Obenverriegelung F3 x 20 mm x 54 mm N 5 1 1 0 0 0 0 0 0 0 0 0 0 1 · Obenverriegelung F3 x 24 mm x 54 mm N 5 1 1 0 0 0 0 0 0 0 0 0 0 2 ·... - Page 18 This document and all its parts are copyrighted. Any use or changes outside the strict limits of the copyright are prohibited and liable to prosecution unless prior consent has been obtained from ASSA ABLOY Sicherheitstechnik GmbH. This particularly applies to any copying, translations, microforms, or storing and...
- Page 19 Passive leaf lock ............20 ASSA ABLOY Easy-Installation assembly system ......20 The OneSystem passive leaf lock features .
-
Page 20: Product Information
ASSA ABLOY Easy-Installation assembly system The OneSystem passive leaf lock features the unique ASSA ABLOY Easy-Installation assembly system. The two rods can easily be positioned and connected to the lock by simply pulling on a threading aid. - Page 21 Fig. 1 : The OneSystem passive leaf lock always has an upper locking point, the bottom rod is optionally available Product information...
-
Page 22: Notes
Notes About this manual These assembly instructions were written for skilled technicians and trained personnel. Read these instructions in order to install and operate the device safely, and make full use of the permitted range of uses which it has to offer. The instructions also provide information on how key components work. -
Page 23: Safety Instructions
Safety instructions Warning! Diminished fire protection function may result in life-threatening danger, risk of injury, and property damage: Fire doors prevent fire from spreading and are tested as a complete unit with accessories: · regulations established by inspection authorities must be complied with, ·... -
Page 24: Explanation Of Terms
Explanation of terms Term Description – Active leaf The active leaf is the first door leaf that is opened on a two-leaf door. – Inactive leaf The inactive leaf can be opened after the active leaf of a two-leaf door is opened. - Page 25 Fig. 2 : Schematic view of the passive leaf lock Fig. 3 : Rebate gap 3 mm Notes...
-
Page 26: Classification Key
Classification key DIN EN 1125 The properties of locks are described by the ten-digit classification key according to DIN EN 1125. The classification key for this lock is: Tab. 1 explains the classification key. Project lock Meaning Tab. 1 : Classification key High usage frequency in situations when there is little incen- tive to be careful, thus posing the possibility of accidents or... -
Page 27: Din En 179
DIN EN 179 The properties of locks are described by the ten-digit classification key according to DIN EN 179. The classification key for this lock is: Tab. 2 explains the classification key. Project lock Meaning Tab. 2 : Classification key High usage frequency in situations when there is little incen- tive to be careful, thus posing the possibility of accidents or misuse. -
Page 28: Intended Use
The device is suitable for installation according to the installation instructions and use according to the functional description. It is not intended for any other type of use. CE marking ASSA ABLOY Sicherheitstechnik GmbH Bildstockstraße 20 72458 Albstadt GERMANY www.assaabloy.de... -
Page 29: Installation
Functional limitation due to distorted installation: The lock must be installed free of torsion. Installing the passive leaf lock Installation takes place with the ASSA ABLOY Easy-Installation assembly system. ASSA ABLOY For this purpose, a synthetic wire is pulled through each of the the bolt rods and Easy-Installation threaded in the lock case in the fastening position. -
Page 30: Shortening The Bolt Rods
Shortening the bolt rods The length of the upper bolt rod depends on the door height. The follower is normally 1 m above the floor. Attention! Mixing up the bolt rods with one another will render them useless: The top rod (hollow inside) must be cut to size, whereas the bottom rod (solid) is nor- mally not. -
Page 31: Shortening The Shoot Bolts
30 cm. Installing the passive leaf lock Follow the ASSA ABLOY Easy-Installation steps (Fig. 7 to Fig. 22, starting on page 84). Test all functions of the passive leaf lock and the door. Make sure that the appropriate rebate gap is adjusted (Fig. -
Page 32: Technical Data
Technical data Property Characteristic Approval in accordance with DIN EN 1125 DIN EN 179 Locking top (also bottom, as an option) Permitted door dimensions 1500 mm x 4000 mm Permitted door weight 300 kg Permissible closing force maximum 50 N Face plate - Width 20 mm, 24 mm... -
Page 33: Accessories, Maintenance, Warranty, Disposal
Accessories, maintenance, warranty, disposal www.assaabloy.de Accessories · Top locking device F3 x 20 mm x 54 mm N 5 1 1 0 0 0 0 0 0 0 0 0 0 1 · Top locking device F3 x 24 mm x 54 mm N 5 1 1 0 0 0 0 0 0 0 0 0 0 2 ·... - Page 34 D0082402 12.2015 Copyright © 2015, ASSA ABLOY Sicherheitstechnik GmbH Cette documentation et toutes les parties annexes sont protégées par la loi sur les droits d’auteur. Toute exploitation et modification dépassant les limites du cadre d’usage conforme prévu par la loi sur les droits d’auteur sont interdites et passibles de peine, sans autorisation préalable de la société...
- Page 35 Serrure à crémone ............36 Système de montage Easy-Installation d’ASSA ABLOY ..... . . 36 La serrure à...
-
Page 36: Information Sur Le Produit
Système de montage Easy-Installation d’ASSA ABLOY La serrure à crémone OneSystem bénéficie du système de montage unique Easy-Installation d’ASSA ABLOY. Les deux crémones peuvent être positionnées et vissées très simplement sur la serrure grâce à une astucieuse aide de mise en place. - Page 37 Fig. 1 : La serrure à crémone OneSys- tem est toujours équipée d'une crémone supé- rieure. La crémone inférieure est livrable en option. Information sur le produit...
-
Page 38: Avis
Avis À propos de cette notice Cette notice de montage a été écrite à l’attention des professionnels de l’artisanat et du personnel initié. Lisez-la pour monter et utiliser l’appareil en toute sécurité et pour pouvoir exploiter toutes les possibilités de mise en œuvre proposées. Cette notice vous fournit également des indications relatives aux fonctions de composants importants. -
Page 39: Consignes De Sécurité
Consignes de sécurité Avertissement ! Danger de mort, risque de blessure et de dommages matériels en cas de réduction de la fonction de protection incendie : Les portes coupe-feu empêchent la propagation du feu. Les essais relatifs aux portes coupe-feu sont effectués sur le système complet de porte coupe-feu : ·... -
Page 40: Explication De La Terminologie Employée
Explication de la terminologie employée Terme Description – Vantail de Le vantail de passage est le vantail à ouvrir en premier sur une porte à deux passage battants. – Vantail fixe Le vantail fixe peut être ouvert après l'ouverture du vantail de passage d'une porte à... - Page 41 Fig. 2 : Vue schématisée de la serrure à crémone Fig. 3 : Jeu de feuillure 3 mm Avis...
-
Page 42: Clé De Classification
Clé de classification DIN EN 1125 La clé de classification à dix caractères indique les caractéristiques des serrures selon la norme DIN EN 1125. La clé de classification de cette serrure est : Le Tab. 1 indique les significations des diverses positions de la clé de classification. Serrure Signification Tab. -
Page 43: Din En 179
DIN EN 179 La clé de classification à dix caractères indique les caractéristiques des serrures selon la norme DIN EN 179. La clé de classification de cette serrure est : Le Tab. 2 indique les significations des diverses positions de la clé de classification. Serrure Signification Tab. -
Page 44: Utilisation Conforme
L’appareil convient à un montage conforme à la notice d’installation et à une utilisation correspondant à la description du fonctionnement. Toute autre utilisation est considérée comme non conforme. Marquage CE ASSA ABLOY Sicherheitstechnik GmbH Bildstockstraße 20 72458 Albstadt ALLEMAGNE www.assaabloy.de... -
Page 45: Montage
Montage de la serrure à crémone Le montage est effectué à l’aide du système d’ASSA ABLOY Easy-Installation. Pour Système de ce faire, un fil en plastique est tiré à travers les barres de verrouillage pour s’enfiler montage dans le boîtier de la serrure à... -
Page 46: Écourter Les Barres De Verrouillage
Écourter les barres de verrouillage La longueur de la barre de verrouillage supérieure dépend de la hauteur de la porte. Le fouillot est généralement à un mètre au-dessus du sol. Attention ! Confondre les deux crémones les rend inutilisables : la crémone supérieure (creuse) requiert en règle générale une mise à... -
Page 47: Écourter Les Barres De Crémone
Procédez selon les opérations de montage décrites pour le système de montage Easy-Installation d’ASSA ABLOY (Fig. 7 à Fig. 22, à partir de la Page 84) Contrôlez toutes les fonctions de la serrure à crémone et de la porte. Veillez à... -
Page 48: Caractéristiques Techniques
Caractéristiques techniques Désignation Caractéristique Homologué selon DIN EN 1125 DIN EN 179 Verrouillage supérieur (en option également inférieur) Dimensions admissibles de la porte 1500 mm x 4000 mm Masse admissible de la porte 300 kg Force de fermeture admissible 50 N max. Têtière - largeur 20 mm, 24 mm... -
Page 49: Accessoires, Entretien, Garantie, Élimination
Garantie La durée de garantie légale et les conditions générales de vente et de livraison de ASSA ABLOY Sicherheitstechnik GmbH (www.assaabloy.de) s’appliquent. Élimination Éliminer les composants selon les instructions relatives au système EPD (Environ- mental Product Declaration). - Page 50 Questa documentazione è protetta in tutte le sue parti dal diritto d'autore. Qualsiasi utilizzazione e/o modifica non strettamente contemplata dalla legge in tema di protezione del diritto d'autore senza previa autorizzazione di ASSA ABLOY Sicherheitstechnik GmbH costituisce un illecito ed è punibile secondo la legge.
- Page 51 Serratura ad aste-chiavistello..........52 Sistema di montaggio Easy Installation di ASSA ABLOY ..... 52 Caratteristiche delle serratura ad aste-chiavistelli OneSystem: .
-
Page 52: Informazioni Sul Prodotto
Sistema di montaggio Easy Installation di ASSA ABLOY La serratura ad aste-chiavistello OneSystem offre l’esclusivo sistema di montaggio Easy-Installation di ASSA ABLOY. Basta inserire un filo nelle aste-chiavistello e tirarlo per posizionare facilmente i due chiavistelli sulla serratura, e quindi fissarli con le apposite viti. - Page 53 Fig. 1 : La serratura ad aste-chiavistelli OneSystem presenta sempre un'asta-chiavistello superiore; l'asta-chiavistello inferiore è fornita su richiesta. Informazioni sul prodotto...
-
Page 54: Indicazioni
Indicazioni Nota sulle presenti istruzioni di montaggio Le presenti istruzioni di montaggio sono rivolte a chi è del mestiere e al personale addestrato. Per montare la serratura in sicurezza, farla funzionare correttamente e adoperarla secondo le modalità d’impiego consentite, leggere le presenti istruzioni per l’uso. -
Page 55: Precauzioni
Precauzioni Avvertenza! Pericolo di morte, pericolo di lesioni e danni materiali dovuti a una resistenza al fuoco ridotta. Le porte tagliafuoco impediscono alle fiamme di propagarsi negli ambienti adiacenti. Le porte tagliafuoco vengono testate per intero: · devono essere conformi alle regolamentazioni edili; ·... -
Page 56: Terminologia
Terminologia Termini Descrizione – Anta attiva L'anta attiva è quella che deve essere aperta sempre per prima in una porta a due ante. – Anta passiva L'anta passiva è quella che viene aperta dopo aver aperto l'anta attiva di una porta a due ante. - Page 57 Fig. 2 : Rappresentazione schematica della serratura ad aste-chiavistello Fig. 3 : Aria 3 mm Indicazioni...
-
Page 58: Codice Di Classificazione
Codice di classificazione DIN EN 1125 Il codice di classificazione composto da 10 caratteri descrive le caratteristiche delle serrature conformemente alla norma DIN EN 1125. Il codice di classificazione di questa serratura è: Tab. 1 spiega il codice di classificazione. Serratura per Significato Tab. -
Page 59: Din En 179
DIN EN 179 Il codice di classificazione composto da 10 caratteri descrive le caratteristiche delle serrature conformemente alla norma DIN EN 179. Il codice di classificazione di questa serratura è: Tab. 2 spiega il codice di classificazione. Serratura per Significato Tab. -
Page 60: Uso Previsto
La serratura è indicata per essere installata come da apposite istruzioni di montaggio e utilizzata come da apposita descrizione del funzionamento. Ogni utilizzo fuori dai limiti d’impiego sopra descritti è da considerarsi un uso non previsto. Marchio CE ASSA ABLOY Sicherheitstechnik GmbH Bildstockstraße 20 72458 Albstadt GERMANIA www.assaabloy.de... -
Page 61: Montaggio
Montaggio della serratura ad aste-chiavistelli Per montare la serratura ad aste-chiavistelli, utilizzare il sistema di montaggio Sistema di Easy-Installation di ASSA ABLOY. A tal fine, inserire un filo di plastica in ciascuna montaggio delle aste-chiavistello e sistemarlo in posizione di fissaggio nella scatola serratura. -
Page 62: Taglio Su Misura Delle Aste-Chiavistello
Taglio su misura delle aste-chiavistello La lunghezza dell’asta-chiavistello superiore dipende dall’altezza della porta. Il nottolino si trova normalmente ad 1 m dal pavimento. Attenzione! Se le due aste-chiavistello vengono scambiate tra di loro, diventano inuti- lizzabili. L’asta-chiavistello superiore (cava) deve essere tagliata alla lunghezza necessaria utilizzando una sega, mentre quella inferiore (piena) normalmente non va tagliata. -
Page 63: Taglio Su Misura Delle Aste-Chiavistello
Taglio su misura delle aste-chiavistello ± 1 Con una sega per metalli, tagliare le aste-chiavistello alle lunghezze calcolate (tolleranza: ± 1 mm). Smussare i bordi taglienti dell’estremità tagliata per mezzo di carta vetrata o di una lima per metalli a taglio fine. ... -
Page 64: Dati Tecnici
Dati tecnici Caratteristica Spiegazione/Dimensioni Omologazione in base alla norma DIN EN 1125 DIN EN 179 Chiusura superiore (optional anche inferiore) Dimensioni porta ammesse 1500 mm x 4000 mm Peso porta ammesso 300 kg Forza di chiusura ammessa max 50 N Testiera - Larghezza 20 mm, 24 mm... -
Page 65: Accessori, Manutenzione, Garanzia, Smaltimento
Garanzia commerciale Si applicano i termini di garanzia a norma di legge e le condizioni generali di vendita e consegna di ASSA ABLOY Sicherheitstechnik GmbH (www.assaabloy.de). Smaltimento Smaltimento secondo EPD (Dichiarazione Ambientale di Prodotto). Consegnare i materiali di imballaggio a un centro di riciclaggio. - Page 66 Deze documentatie incl. al haar delen is auteursrechtelijk beschermd. Elk gebruik en elke wijziging die verder gaat dan de door het auteursrecht gestelde nauwe grenzen, is zonder de uitdrukkelijke toestemming van ASSA ABLOY Sicherheitstech- nik GmbH verboden en strafbaar. Dit geldt vooral voor de vermenigvuldiging, de vertaling, de vastlegging op...
- Page 67 Passief slot ..............68 ASSA ABLOY montagesysteem Easy-Installation......68 Het OneSystem passief slot biedt.
-
Page 68: Productinformatie
ASSA ABLOY montagesysteem Easy-Installation Het OneSystem passief slot maakt gebruik van het unieke ASSA ABLOY montagesys- teem Easy-Installation. De beide grendels kunnen door eenvoudig aan een invoerhulp te trekken zeer gemakkelijk in het slot gepositioneerd en vastge- schroefd worden. - Page 69 Afb. 1 : Het OneSystem passief slot heeft altijd een bovenste grendelstang, de onderste grendel- stang is als optie leverbaar Productinformatie...
-
Page 70: Aanwijzingen
Aanwijzingen Over deze handleiding Deze handleiding werd geschreven voor deskundige vakmensen en geïnstrueerd personeel. Lees deze handleiding om het product veilig te kunnen monteren en gebruiken, en om de toegelaten gebruiksmogelijkheden die het biedt, in hun volle omvang te kunnen benutten. De handleiding omvat ook aanwijzingen over de functie en werking van belang- rijke componenten. -
Page 71: Veiligheidsaanwijzingen
Veiligheidsaanwijzingen Waarschuwing! Levensgevaar, risico op lichamelijk letsel en materiële schade door vermin- derde brandwerende werking: Brandwerende deuren voorkomen het overslaan van een brand. Brandwerende deuren worden als geheel getest: · de bouwtechnische voorschriften moeten opgevolgd worden, · de certificering van de deur moet bij die van het slot passen, ·... -
Page 72: Betekenis Van De Begrippen
Betekenis van de begrippen Begrip Beschrijving – Gangvleugel De gangvleugel is de als eerste te openen deurvleugel van een dubbele deur. – Standvleugel De standvleugel kan na het openen van de gangvleugel van een dubbele deur worden geopend. – Sponningruimte De sponningruimte is de afstand tussen de stolp en de sluitplaat (Afb. - Page 73 Afb. 2 : Schematisch aanzicht van het passief slot Afb. 3 : Sponningruimte 3 mm Aanwijzingen...
-
Page 74: Classificatiecode
Classificatiecode DIN EN 1125 Via de 10 karakters tellende classificatiecode worden de eigenschappen van sloten volgens DIN EN 1125 beschreven. De classificatiecode van dit slot luidt: Tab. 1verduidelijkt de classificatiesleutel. Bouwslot Betekenis Tab. 1 : Classificatiecode Hoge gebruiksfrequentie, waar slechts een geringe neiging tot zorgvuldigheid bestaat, d.w.z. -
Page 75: Din En 179
DIN EN 179 Via de 10 karakters tellende classificatiecode worden de eigenschappen van sloten volgens DIN EN 179 beschreven. De classificatiecode van dit slot luidt: Tab. 2verduidelijkt de classificatiesleutel. Bouwslot Betekenis Tab. 2 : Classificatiecode Hoge gebruiksfrequentie, waar slechts een geringe neiging tot zorgvuldigheid bestaat, d.w.z. -
Page 76: Gebruik Voor Het Beoogde, Toegelaten Gebruiksdoel
De onderste grendel kan niet worden ingebouwd bij vloerafdichtingen die zich in laten drukken. Het slot is geschikt voor inbouw volgens deze montagehandleiding en voor gebruik volgens de functie- en werkingsbeschrijving. Elk verdergaand gebruik geldt als oneigenlijk, niet toegelaten gebruik. CE-keurmerk ASSA ABLOY Sicherheitstechnik GmbH Bildstockstraße 20 72458 Albstadt DUITSLAND www.assaabloy.de /DoP Certificeringsprocedure loopt nog. -
Page 77: Montage
Werkingsbelemmering door montage waarbij mechanische spanning ont- staat: het slot moet spanningsvrij worden ingebouwd. Montage van het passief slot De montage vindt plaats met het ASSA ABLOY montagesysteem Easy-Installation. ASSA ABLOY Daarbij wordt een kunststof draad door de grendelstangen getrokken en in de montagesysteem slotkast in de bevestigingspositie ingeregen. -
Page 78: De Grendelstangen Op Maat Maken
De grendelstangen op maat maken De lengte van de bovenste grendelstang is afhankelijk van de deurhoogte. De kruknoot bevindt zich gewoonlijk 1 m boven de vloer. Let op! Een verwisseling van de beide grendelstangen maakt de stangen onbruikbaar: De bovenste grendelstang (van binnen hol) moet worden ingekort, de onderste grendelstang (massief) gewoonlijk niet. -
Page 79: De Grendelstangen Op Maat Maken
Lengte: telkens het dubbele van de stanglengte plus ca. 30 cm extra. Montage van het passief slot Verricht de arbeidsstappen van het ASSA ABLOY-montagesysteem Easy-Instal- lation (Afb. 7 t/m Afb. 22, vanaf pagina 84) Controleer alle functies van het passief slot en de deur. Verzeker u ervan dat de passende sponningruimte ingesteld is (Afb. -
Page 80: Technische Gegevens
Technische gegevens Eigenschappen Kenmerken Goedgekeurd volgens DIN EN 1125 DIN EN 179 Vergrendeling boven (optioneel ook onder) goedgekeurde deurafmetingen 1500 mm x 4000 mm Toegelaten deurgewicht 300 kg Toegelaten sluitkracht maximaal 50 N Slotplaat - Breedte 20 mm, 24 mm - Lengte 270 mm, 320 mm, 370 mm - Dikte... -
Page 81: Toebehoren, Onderhoud, Garantie, Afvoer Als Afval
Toebehoren, onderhoud, garantie, afvoer als afval www.assaabloy.de Toebehoren · Bovenvergrendeling F3 x 20 mm x 54 mm N 5 1 1 0 0 0 0 0 0 0 0 0 0 1 · Bovenvergrendeling F3 x 24 mm x 54 mm N 5 1 1 0 0 0 0 0 0 0 0 0 0 2 ·... -
Page 82: Abbildungen Zur Montage
Abbildungen zur Montage DE / EN / Figures for mounting FR / NL / IT Illustrations relatives au montage Disegni di montaggio Afbeeldingen voor de montage Abb. 5 : Montagemaße Rohrrahmen Fig. 5 : mounting dimensions narrow stile 5 , 2 Fig. - Page 83 Abb. 6 : Montagemaße Vollblatt Fig. 6 : mounting dimensions wide stile Fig. 6 : cotes de montage Portes Pleines Fig. 6 : Misure di montaggio Porta cieca Afb. 6 : Montagematen breedstijl Ø 5 Markierungslinie Drückerhöhe Follower height – indication line Trait de niveau Altezza della maniglia Tuimelaarhoogte –...
-
Page 84: Assa Abloy Montagesystem „Easy-Installation
ASSA ABLOY Montagesystem „Easy-Installation“ ASSA ABLOY „Easy-Installation“ assembly system Système de montage « Easy-Installation » ASSA ABLOY Sistema di montaggio ”Easy Installation” di ASSA ABLOY ASSA ABLOY montagesysteem “Easy-Installation” Abb. 7 : Achtung! Stopfen einschlagen Sachschaden durch Hammer aus Metall: Das Gewinde kann durch einen Hammer aus Metall beschädigt werden. - Page 85 Attention! Property damage from metal hammers: The thread can be damaged by a metal hammer. Use a rubber hammer. Property damage due to hard, rough installation surface: The plug can be dam- aged by a hard and rough (uneven) installation surface. Use a level surface as an installation surface.
- Page 86 Abb. 8: Draht einfädeln Fig. 8: Thread the wire Fig. 8: Enfiler le fil Fig. 8: Infilare il filo Afb. 8: Draad inrijgen Abb. 9: Abstand 14 mm abmessen und einstellen Fig. 9: Measure and adjust a distance of 14 mm Fig.
- Page 87 Abb. 10: Abstandshalter Position der Distance piece Riegelstange mit Abstandshalter Entretoise einstellen Distanziatore Fig. 10: Afstandhouder Adjust the position of the bolt bar with the distance piece. Fig. 10: Ajuster la position de la barre de verrouillage à l‘aide d‘une entretoise Fig.
- Page 88 Abb. 11: Riegelstangen in Türblatt einsetzen Fig. 11: Insert rod bolts in the door leaf Fig. 11: Poser les barres de verrouillage sur le battant de porte Fig. 11: optional: untere Riegelstange Infilare le optional: lower rod bolt aste-chiavistello en option : barre de verrouillage nel pannello porta opzionale: asta-chiavistello inferiore Afb.
- Page 89 Abb. 13: Türblatt mit eingesetzten Stangen Fig. 13: Door leaf with rods inserted Fig. 13: Battant de porte avec les barres posées Fig. 13: Pannello porta con aste inserite Afb. 13: Deurblad met geplaatste stangen Abb. 14: Drahtschlingen in Schloss einfädeln Fig.
- Page 90 Abb. 15: Schloss einsetzen Fig. 15: Insert he lock Fig. 15: Monter la serrure Fig. 15: Inserire la serratura Afb. 15: Slot plaatsen Abb. 16: Gewindebacken schließen Fig. 16: Close the threading die Fig. 16: fermer les nur bei Rohrrahmen coussinets de only with narrow stile filetage...
- Page 91 Abb. 17: nur bei Vollblatt Schloss mit zwei only with wide stile Schrauben fixieren uniquement sur les portes pleines Fig. 17: solo porte con pannello cieco Fixing lock with two screws alleen bij breedstijl Fig. 17: Fixer serrure avec deux vis Fig.
- Page 92 Abb. 19: Drähte entfernen- und Schloss festschrauben Fig. 19: Remove wires and screw the lock in place Fig. 19: Retirer les fils et visser fermement la serrure Fig. 19: Rimuovere i fili e fissare la serratura mediante viti Afb. 19: draden verwijde- ren en slot vastschroeven...
- Page 93 Abb. 21: Montage und Justierung des Schließblechs oben und der Boden- schließmulde unten Fig. 21: Installation and adjustment of the striking plate on top and floor strike plate on the bottom Fig. 21: Montage et ajustage de la têtière de gâche en haut et de la gâche au sol Fig.
- Page 94 Abb. 22 : Schloss in der eingehängten Tür horizontal justieren Fig. 22 : Adjust the lock horizontally in the hung door Fig. 22 : Ajuster la serrure horizontalement sur la porte suspendue Fig. 22 : Regolare orizzontalmente la serratura nella porta agganciata Afb.
- Page 95 DE / EN / FR / NL / IT D E / E N / F R / N L / I T...
- Page 96 ASSA ABLOY is the global leader in door opening solutions, dedicated to satisfying end-user needs for security, safety and convenience ASSA ABLOY Sicherheitstechnik GmbH Bildstockstraße 20 72458 Albstadt DEUTSCHLAND albstadt @ assaabloy.com Tel. + 497431 123-0 Fax + 497431 123-240...