Brother P-Touch 9500PC Guide De Référence Rapide
Table des Matières
Les langues disponibles
Les langues disponibles
Liens rapides
Chapitres
Table des Matières

Manuels Connexes pour Brother P-Touch 9500PC


Sommaire des Matières pour Brother P-Touch 9500PC
- Page 1 Quick Reference (English) Guide de référence rapide (Français)
- Page 2 Quick Reference (English)
- Page 121 Guide de référence rapide (Français)
- Page 122 Introduction Merci d'avoir choisi la PT-9500PC. Raccordée à un ordinateur, la PT-9500PC (ci-après dénommée “cette imprimante”) est une imprimante d'étiquettes qui permet d'imprimer aisément des étiquettes personnalisées. Ce manuel décrit diverses précautions et procédures de base relatives à l'utilisation de cette P-touch. Lisez-le attentivement avant d'utiliser la P-touch.
-
Page 123: Utilisation De Ce Manuel
Utilisation de ce manuel Le guide de référence rapide est fourni avec la PT-9500PC. Consultez-le pour utiliser la PT-9500PC selon vos besoins. Guide de référence Fichiers d'aide du Guide d'utilisation sur Manuel rapide logiciel CD-ROM (le présent manuel) Pour la préparation et l'utilisation de la Non disponible Non disponible... -
Page 124: Précautions Importantes
■ Ruban (cassette de ruban) ● N'utilisez que des rubans Brother TZ ou des étiquettes Brother/Avery AV avec cette imprimante. N'utilisez pas de rubans ne portant pas la marque ● Ne tirez pas sur le ruban, sinon vous risquez d'endommager la cassette de ruban. - Page 125 élevée ou à la poussière. Rangez les cassettes dans un endroit frais et sombre. Utilisez les cassettes de ruban peu de temps après les avoir déballées. ● Il convient de noter que la société Brother International Corp. ne peut être tenue responsable de tout dommage, etc. résultant du non-respect des précautions susmentionnées. ®...
- Page 126 Table des matières 1 Avant l'utilisation de l'imprimante ............9 Vérification des accessoires fournis .................10 Termes relatifs à la PT-9500PC ..................12 Vue avant ............................12 Vue arrière .............................12 Affichage des voyants ........................13 Préparatifs avant la création d'étiquettes ................14 Raccordement de la PT-9500PC ..................15 Raccordement à...
- Page 127 Création d'étiquettes à l'aide du logiciel P-touch Quick Editor ........77 Lancement du logiciel P-touch Quick Editor ...................77 Utilisation simple ...........................78 Autres fonctions ..........................78 Après l'impression ......................82 Retrait de l'endos de l'étiquette ......................82 4 Création d'étiquettes : version Macintosh ..........85 Création d'étiquettes .......................86 Création d'étiquettes à...
-
Page 129: Avant L'utilisation De L'imprimante
Avant l'utilisation de l'imprimante Ce chapitre contient des informations à vérifier avant l'utilisation de la PT-9500PC. Vérification des accessoires fournis ..............10 Termes relatifs à la PT-9500PC ..............12 Préparatifs avant la création d'étiquettes ............14 Raccordement de la PT-9500PC..............15 Insertion de la cassette de ruban..............20 Mise en place du bac de récupération............22... -
Page 130: Vérification Des Accessoires Fournis
Vérification des accessoires fournis Ouvrez l'emballage et vérifiez que les éléments suivants sont fournis. Si l'un des éléments est manquant ou endommagé, veuillez contacter le point de vente où vous avez acheté la PT-9500PC. ■ PT-9500PC ■ Câble d'interface série Imprimante d'étiquettes Ce câble permet de raccorder la PT-9500PC au port série d'un PC. - Page 131 ■ Guide de référence rapide (le présent manuel) À conserver pour référence ultérieure. ■ CD-ROM Le CD-ROM contient le logiciel, etc., à installer sur un PC. ■ Catalogue de cassettes de ruban Ce catalogue contient une liste des cassettes de ruban conçues exclusivement pour les imprimantes de la gamme P-touch.
-
Page 132: Termes Relatifs À La Pt-9500Pc
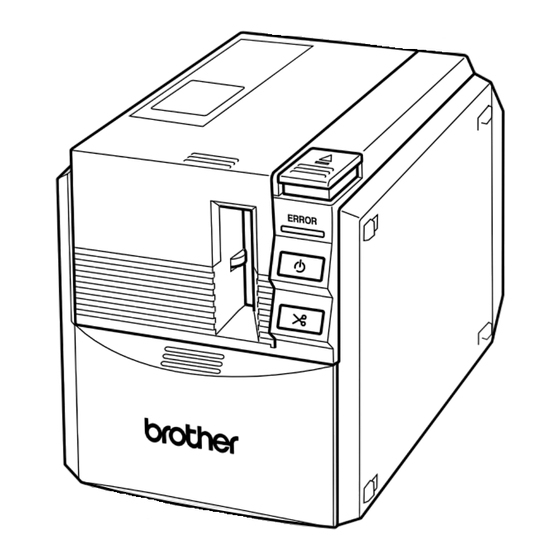
Termes relatifs à la PT-9500PC Cette section identifie les principaux termes relatifs à la PT-9500PC. Vue avant Couvercle du logement de la cassette Touche de libération du couvercle Voyant ERROR Sortie d'étiquette Touche on/off (voyant) Touche avance/coupe Support du bac de récupération Remarque ●... -
Page 133: Affichage Des Voyants
Affichage des voyants Le voyant de la touche on/off (vert) et le voyant ERROR (rouge) déterminent l'état de la PT-9500PC. État du voyant Voyant État Solution Touche on/off ERROR (voyant vert) (rouge) Allumé Éteint PT-9500PC en veille — Clignote Éteint Réception de données —... -
Page 134: Préparatifs Avant La Création D'étiquettes
Préparatifs avant la création d'étiquettes Avant de créer des étiquettes avec la PT-9500PC, vous devez effectuez les préparatifs suivants. Remarque ● Les procédures de raccordement varient en fonction du système d'exploitation du PC et selon la connexion utilisée (série ou USB). Pour plus d'informations, reportez-vous à la section “Installation du logiciel”... -
Page 135: Raccordement De La Pt-9500Pc
Raccordement de la PT-9500PC Raccordez la PT-9500PC à la source d'alimentation et à un PC. Branchez le cordon d'alimentation à une Raccordement à la source prise secteur (120 V c.a.). d'alimentation Branchez le cordon d'alimentation fourni à l'adaptateur secteur. Remarque Insérez le connecteur de l'adaptateur ●... -
Page 136: Raccordement À Un Pc
Raccordement à un PC Raccordez la PT-9500PC à un PC à l'aide des câbles d'interface fournis. Les câbles d'interface permettant de raccorder l'imprimante à un port USB ou à un port série sont différents. ® Windows 98/98 SE/ Mac OS 8.6-9.x ®... - Page 137 ■ Raccordement à un port USB Insérez la fiche de l'extrémité du câble Respectez les procédures suivantes pour d'interface USB dans le port USB à raccorder la PT-9500PC au port USB d'un PC l'arrière de la PT-9500PC. ® fonctionnant sous Windows 98/98 SE/Me/ 2000 Pro/XP en “Configuration de base”...
- Page 138 ■ Raccordement à un port série Veillez à ce que la PT-9500PC et le PC ® Un PC fonctionnant sous Windows 95/NT soient hors tension. 4.0 doit être raccordé au port série. S'ils ne le sont pas, mettez-les hors Pour un raccordement à des PC fonctionnant tension.
- Page 139 Appuyez sur la touche on/off de la PT-9500PC. Touche on/off → La touche on/off s'allume (voyant vert). Mettez l'ordinateur sous tension. Remarque ● Pour utiliser la PT-9500PC, le logiciel doit être installé sur le PC. Reportez-vous à la section “Installation du logiciel” ( → P.
-
Page 140: Insertion De La Cassette De Ruban
Insertion de la cassette de ruban Cette section présente les types de rubans susceptibles d'être utilisés avec la PT-9500PC et décrit les procédures d'insertion des cassettes de ruban. Rubans autorisés Insertion de la cassette de ruban Les types de rubans pouvant être utilisés avec la PT-9500PC sont les suivants. - Page 141 Vérifiez la cassette de ruban. Appuyez sur la touche on/off de la Veillez à ce que l'extrémité du ruban ne PT-9500PC. soit pas pliée et qu'elle passe bien sous les guides de ruban. Extrémité du ruban Guides de ruban Touche on/off →...
-
Page 142: Mise En Place Du Bac De Récupération
Mise en place du bac de récupération Fixez le bac de récupération. Celui-ci permet de récupérer les étiquettes éjectées par la PT-9500PC. Utilisez-le lorsque vous imprimez une importante quantité d'étiquettes, etc. Assemblez le bac de récupération. Fixez le bac de récupération sur la Procédez comme illustré... -
Page 143: Installation Du Logiciel
Installation du logiciel Ce chapitre décrit les procédures d'installation du logiciel nécessaire à l'utilisation de la PT-9500PC. Types de logiciels utilisés ................24 Sous Windows....................25 Sous Mac OS 8.6-9.x ..................47 Sous Mac OS X 10.1 ou version ultérieure ............54... -
Page 144: Types De Logiciels Utilisés
Types de logiciels utilisés Pour utiliser la PT-9500PC, le logiciel suivant doit être installé sur le PC. Reportez-vous aux pages correspondant au type de système d'exploitation installé sur le PC. P-touch Quick Logiciel P-touch Editor Pilote d'imprimante Editor Logiciel Logiciel permettant d'impression Logiciel de création Système... -
Page 145: Sous Windows
Sous Windows ® Cette section décrit les procédures d'installation du logiciel sur les PC fonctionnant sous Windows 95/98/98 SE/Me/NT 4.0/2000 Pro/XP. Le logiciel est installé Insérez le CD-ROM dans le séparément. lecteur et lancez l'installation. Respectez ces procédures pour installer/ Configu- Le pilote désinstaller le pilote... -
Page 146: Précautions Relatives À L'installation
Démarrez le PC, puis insérez le CD-ROM Pour plus d'informations, reportez-vous à la dans le lecteur. section “Raccordement à un PC” ( → P. 16). → La boîte de dialogue Brother ® ■ Sous Windows NT 4.0/2000 Pro Sélection de la langue s'affiche. - Page 147 → Une fois les préparatifs terminés, la boîte de dialogue InstallShield Wizard affiche le message “Bienvenue dans l'InstallShield Wizard de Brother P-touch Editor version 4.0.” Lisez le contenu de la boîte de dialogue, puis cliquez sur [Suivant]. → La boîte de dialogue de sélection du logiciel à...
- Page 148 Lisez attentivement le contrat de licence, Sélectionnez le dossier de destination puis cliquez sur [Oui]. dans lequel vous souhaitez installer les fichiers, puis cliquez sur [Suivant]. Pour sélectionner un autre dossier de destination, cliquez sur [Parcourir]. → La boîte de dialogue Informations client s'affiche.
- Page 149 • En fonction du système d'exploitation installé sur le PC, il se peut que la boîte de dialogue ne s'affiche pas. → La boîte de dialogue Configuration du pilote (Brother PT-9500PC) s'affiche. → La boîte de dialogue Installer le pilote d'imprimante s'affiche.
- Page 150 Cliquez sur [Suivant]. Sélectionnez “Installer le logiciel automatiquement (recommandé)”, puis cliquez sur [Suivant]. → Les préparatifs de l'installation commencent. → Les programmes nécessaires sont détectés. → Une fois les préparatifs de l'installation terminés, vous êtes invité à raccorder la PT-9500PC au Raccordez la PT-9500PC au PC à...
- Page 151 [Suivant]. Cliquez sur [Terminer]. → Une fois l'installation du logiciel → La boîte de dialogue Configuration P-touch Editor terminée, la boîte de du pilote (Brother PT-9500PC) dialogue InstallShield Wizard s'affiche de nouveau. terminé s'affiche. Cliquez sur [Terminer].
-
Page 152: Installation Du Logiciel P-Touch Editor Uniquement
Sélectionnez “Oui, afficher la page.”, Démarrez le PC, puis insérez le CD-ROM puis cliquez sur [Suivant]. dans le lecteur. → La boîte de dialogue Brother Setup s'affiche. • L'affichage de cette boîte de dialogue peut prendre un certain temps. • Si celle-ci ne s'affiche pas, double- cliquez sur l'icône Poste de travail, puis... -
Page 153: Installation Du Logiciel P-Touch Quick Editor Uniquement
Démarrez le PC, puis insérez le CD-ROM → Les préparatifs de l'installation dans le lecteur. commencent. → La boîte de dialogue Brother Setup s'affiche. • L'affichage de cette boîte de dialogue peut prendre un certain temps. • Si celle-ci ne s'affiche pas, double- →... - Page 154 → La boîte de dialogue Installation Saisissez votre nom et celui de la société dans les champs correspondants, puis s'affiche et l'installation commence. cliquez sur [Suivant]. → La boîte de dialogue Confirmation d'enregistrement s'affiche. → Pendant l'installation, la boîte de dialogue Ajout d'un raccourci Confirmez le nom d'utilisateur et celui de s'affiche.
-
Page 155: Installation Du Pilote D'imprimante Uniquement
étapes suivantes. ■ Raccordement à un port USB Démarrez le PC, puis insérez le CD-ROM dans le lecteur. → La boîte de dialogue Brother Setup s'affiche. • L'affichage de cette boîte de dialogue peut prendre un certain temps. - Page 156 étapes suivantes. Démarrez le PC, puis insérez le CD-ROM dans le lecteur. → La boîte de dialogue Brother Setup s'affiche. • L'affichage de cette boîte de dialogue → La boîte de dialogue Confirmation peut prendre un certain temps.
- Page 157 [OK]. corrects, puis cliquez sur [Suivant]. Pour corriger les informations d'installation, cliquez sur [Précédent]. → La boîte de dialogue Réglage du pilote - (Brother PT-9500PC) qui → L'installation commence. indique le début de l'installation s'affiche. Sélectionnez “Installez”, puis cliquez sur [Suivant].
- Page 158 115 200 bps, sélectionnez la vitesse de transmission appropriée. → La boîte de dialogue Changement de vitesse de transmission automatique (Brother PT-9500PC) s'affiche. Sélectionnez le port série approprié, puis cliquez sur [Suivant]. → Une boîte de dialogue de confirmation des paramètres de vitesse de transmission s'affiche.
- Page 159 ■ Utilisation en tant qu'imprimante réseau Sélectionnez “Oui, je veux redémarrer mon ordinateur maintenant”, puis Cette section décrit les procédures cliquez sur [Terminer]. d'installation du pilote d'imprimante en cas d'utilisation du serveur d'impression PS-9000 (vendu séparément) conçu exclusivement pour les imprimantes de la gamme P-touch. En cas d'utilisation du serveur d'impression PS-9000, la PT-9500PC peut être utilisée en tant qu'imprimante réseau.
- Page 160 Démarrez le PC, puis insérez le CD-ROM Sélectionnez “Connexion réseau”, puis dans le lecteur. cliquez sur [OK]. → La boîte de dialogue Brother Setup s'affiche. • L'affichage de cette boîte de dialogue peut prendre un certain temps. • Si celle-ci ne s'affiche pas, double- cliquez sur l'icône Poste de travail, puis...
-
Page 161: Réglage De La Vitesse De Transmission Du Pc Et De La Pt-9500Pc
Cliquez sur [Suivant]. → La boîte de dialogue indiquant la fin Réglage de la vitesse de de l'installation s'affiche. transmission du PC et de la PT-9500PC Respectez les étapes suivantes pour changer ou confirmer la vitesse de transmission du PC et de la PT-9500PC. - Page 162 Cliquez avec le bouton droit de la souris sur l'icône Brother PT-9500PC, puis sélectionnez “Propriétés”. ® Sous Windows 95/98/98 SE/Me, cliquez sur [Utilitaires]. → La boîte de dialogue Brother PT-9500PC Utilitaire s'affiche. → La fenêtre de la Brother PT-9500PC Propriétés s'affiche.
- Page 163 PT-9500PC sur 9 600 bps. Pour plus d'informations, reportez-vous à la section “Changement de la vitesse de transmission” ( → P. 101). Cliquez sur [Quitter]. → La fenêtre de la Brother PT-9500PC Propriétés s'affiche de nouveau.
-
Page 164: Désinstallation Du Logiciel
Sélectionnez le logiciel Brother P-touch Désinstallation du logiciel Editor Version 4.0 ou le logiciel P-touch Quick Editor. Si vous n'utilisez plus la PT-9500PC avec le PC, respectez les étapes suivantes pour désinstaller le logiciel. Double-cliquez sur l'icône Poste de travail, puis cliquez sur Ajouter ou supprimer des programmes. -
Page 165: L'imprimante N'est Plus Utilisée
Cliquez sur le bouton du Pilote. L'imprimante n'est plus utilisée Supprimez le pilote d'imprimante PT-9500PC. Pour supprimer la PT-9500PC, sélectionnez P-touch 9500PC dans la fenêtre Imprimantes du Panneau de configuration (Imprimantes et ® télécopieurs sous Windows XP) et effectuez l'opération de suppression. - Page 166 PT-9500PC avec le même PC. ® Sous Windows 98/98 SE/Me, seul un nouveau port est ajouté, pas une nouvelle imprimante. Cliquez sur [Oui]. → La suppression du pilote d'imprimante commence. → La boîte de dialogue la Brother PT-9500PC a été supprimée correctement s'affiche.
-
Page 167: Sous Mac Os 8.6-9.X
Sous Mac OS 8.6-9.x Respectez la procédure suivante pour installer le logiciel sur unMacintosh fonctionnant sous Mac OS 8.6-9.x. ■ Création d'étiquettes avec différents motifs Reportez-vous à la section “Installation du logiciel P-touch Editor et du pilote d'imprimante” ( → P. 47) ■... - Page 168 Les programmes pouvant être installés Cliquez sur [Restart]. sont présentés ci-dessous. Programme Description P-touch Editor 3.2 Logiciel P-touch Editor → L'installation du logiciel P-touch Pilote d'imprimante de la PT-9500PC Driver Editor est terminée et le Macintosh PT-9500PC redémarre. Fonts Permet d'installer des (13 styles de polices pour l'anglais Une fois le Macintosh redémarré,...
-
Page 169: Installation Du Logiciel P-Touch Quick Editor Et Du Pilote D'imprimante
Confirmez le lecteur sur lequel vous souhaitez installer le logiciel, puis Installation du logiciel P-touch cliquez sur [Install]. Quick Editor et du pilote Pour modifier le lecteur, cliquez sur d'imprimante [Drive]. Installez le logiciel P-touch Quick Editor pour l'impression d'étiquettes à l'aide d'opérations simples ainsi que le pilote d'imprimante. -
Page 170: Installation Du Pilote D'imprimante Uniquement
→ L'installation commence. Installation du pilote d'imprimante uniquement Installez uniquement le pilote d'imprimante nécessaire pour utiliser la PT-9500PC en tant qu'imprimante. Remarque ● Ne raccordez pas le câble d'interface USB au Macintosh tant que le pilote → Une fois l'installation terminée, le d'imprimante n'a pas été... - Page 171 Double-cliquez sur l'icône P-touch Editor Cliquez sur [Install]. 3.2 Installer. → L'installation commence. → Le programme d'installation démarre. Confirmez le lecteur sur lequel vous → Une fois l'installation terminée, le souhaitez installer le logiciel, puis message “Installation is done” cliquez sur [Custom Install]. s'affiche.
-
Page 172: Sélection De L'imprimante
Sélection de l'imprimante Désinstallation du logiciel Sélectionnez la PT-9500PC en tant Si vous n'utilisez plus la PT-9500PC avec le qu'imprimante. Macintosh, respectez les étapes suivantes pour désinstaller le logiciel. Dans le menu Pomme , sélectionnez ■ Désinstallation du logiciel P-touch Editor Sélecteur. - Page 173 ■ Suppression du pilote d'imprimante Débranchez le câble d'interface USB raccordé à la PT-9500PC du port USB du Macintosh. Double-cliquez sur le lecteur d'installation du système d'exploitation Macintosh. Dans le dossier Système, ouvrez le dossier Extensions et supprimez PT-9500PC et USB PT-9500PC Extension.
-
Page 174: Sous Mac Os X 10.1 Ou Version Ultérieure
Sous Mac OS X 10.1 ou version ultérieure Respectez la procédure suivante pour installer le logiciel sur un Macintosh fonctionnant sous Mac OS X 10.1-10.2.6. Installez le pilote d'imprimante après le logiciel P-touch Editor ou le logiciel P-touch Quick Editor. ■... - Page 175 Double-cliquez sur l'icône P-touch Editor Sélectionnez l'élément approprié dans la 3.2 Installer. liste Feature Set et les programmes à installer, puis cliquez sur [Next]. → Le programme d'installation démarre. Cliquez sur [Next]. Les programmes pouvant être installés sont présentés ci-dessous. Programme Description P-touch Editor 3.2...
- Page 176 Sélectionnez l'emplacement de création de l'alias, puis cliquez sur [Next]. → Une fois l'installation terminée, la • Sous Mac OS X 10.2, sélectionnez un boîte de dialogue Install Complete autre emplacement que Dock. Si vous s'affiche. avez cliqué sur Dock et si vous poursuivez l'installation, l'alias n'est Cliquez sur [Done].
-
Page 177: Installation Du Logiciel P-Touch Quick Editor
Double-cliquez sur le dossier P-touch Quick Editor. Installation du logiciel P-touch Quick Editor Installez le logiciel P-touch Quick Editor pour imprimer des étiquettes à l'aide d'opérations simples. Remarque ● Lors de l'installation du logiciel, connectez-vous en utilisant un nom → La fenêtre P-touch Quick Editor d'utilisateur avec droits d'administrateur. - Page 178 Cliquez sur [Next]. Cliquez sur [Install]. → La boîte de dialogue Choose Alias → L'installation commence. Folder s'affiche. Sélectionnez l'emplacement de création de l'alias, puis cliquez sur [Next]. → Une fois l'installation terminée, la boîte de dialogue Install Complete s'affiche. •...
-
Page 179: Installation Du Pilote D'imprimante
Saisissez le nom et le mot de passe de l'administrateur, puis cliquez sur [OK]. Installation du pilote d'imprimante. Installez le pilote d'imprimante nécessaire pour utiliser la PT-9500PC en tant qu'imprimante. Remarque ● Ne raccordez pas le câble d'interface USB au Macintosh tant que le pilote d'imprimante n'a pas été... - Page 180 Confirmez le contenu, puis cliquez sur Pour poursuivre l'installation, cliquez sur [Continue]. [Agree]. → La boîte de dialogue Software → La boîte de dialogue Select a License Agreement s'affiche. Destination s'affiche. Lisez son contenu, puis cliquez sur Sélectionnez le lecteur sur lequel vous [Continue].
- Page 181 Cliquez sur [Install]. Cliquez sur [Restart]. → La boîte de dialogue de confirmation → L'installation du pilote d'imprimante de l'installation s'affiche. est terminée et le Macintosh redémarre. Pour poursuivre l'installation, cliquez sur [Continue Installation]. Une fois le Macintosh redémarré, raccordez la PT-9500PC au Macintosh à l'aide du câble d'interface USB, puis mettez la PT-9500PC sous tension.
-
Page 182: Sélection De L'imprimante
Double-cliquez sur l'icône Print Center. Sélection de l'imprimante Sélectionnez la PT-9500PC en tant qu'imprimante. Double-cliquez sur le lecteur d'installation de Mac OS X. Double-cliquez sur le dossier Applications. Aucune imprimante disponible pour la sélection Le message “Vous ne disposez d'aucune imprimante”... -
Page 183: Désinstallation Du Logiciel
Sélectionnez “PT-9500PC”, puis cliquez sur [Add]. Désinstallation du logiciel Si vous n'utilisez plus la PT-9500PC avec le Macintosh, respectez les étapes suivantes pour désinstaller le logiciel. ■ Désinstallation du logiciel P-touch Editor Double-cliquez sur le dossier Applications du lecteur d'installation de Mac OS X. - Page 184 → Le logiciel est supprimé. Double-cliquez sur le dossier Uninstall P-touch Editor. → La fenêtre Uninstall P-touch Editor s'affiche. → Une fois la désinstallation terminée, Double-cliquez sur Uninstall P-touch la boîte de dialogue Uninstall Editor. Complete s'affiche. Cliquez sur [Quit]. →...
- Page 185 ■ Désinstallation du logiciel P-touch Quick Double-cliquez sur Uninstall Quick Editor Editor. Double-cliquez sur le dossier Applications du lecteur d'installation de Mac OS X. → Le programme InstallAnywhere Uninstaller démarre. Cliquez sur [Uninstall]. → La fenêtre Applications s'affiche. Double-cliquez sur le dossier P-touch Quick Editor.
- Page 186 Cliquez sur [Quit]. Double-cliquez sur le dossier Utilities. → La fenêtre Utilities s'affiche. Double-cliquez sur le dossier Préférences dans Macintosh HD/Utilisateurs/Nom de Double-cliquez sur l'icône Print Center. l'utilisateur/Bibliothèque/Préférences. Supprimez P-touch Quick Editor Prefs. → Le logiciel P-touch Quick Editor est supprimé.
-
Page 187: Création D'étiquettes : Version Windows
Création d'étiquettes : version Windows Ce chapitre décrit les procédures de conception et d'impression d'étiquettes sous Windows. Création d'étiquettes..................68 Création d'étiquettes à l'aide du logiciel P-touch Editor .......69 Création d'étiquettes à l'aide du logiciel P-touch Quick Editor.....77 Après l'impression..................82... -
Page 188: Création D'étiquettes
Création d'étiquettes Une fois le logiciel chargé sur l'ordinateur, vous pouvez créer les étiquettes. ■ Conception et impression d'étiquettes Reportez-vous à la section "Création d'étiquettes à l'aide du logiciel P-touch Editor" ( → P. 69). ■ Impression d'étiquettes simple Reportez-vous à la section "Création d'étiquettes à l'aide du logiciel P-touch Quick Editor" ( → P. 77). -
Page 189: Création D'étiquettes À L'aide Du Logiciel P-Touch Editor
Création d'étiquettes à l'aide du logiciel P-touch Editor Vous pouvez créer des étiquettes de différents motifs à l'aide du logiciel P-touch Editor. Remarque ● Ce chapitre décrit brièvement le logiciel P-touch Editor. Vous pouvez accéder aux informations relatives à l'utilisation du logiciel P-touch Editor depuis le menu d'aide en ligne. Reportez-vous à la section "Utilisation de l'aide"... -
Page 190: Fenêtre De Mise En Page
Propriétés de la page Fenêtre de mise en page Permet de définir les dimensions, les marges et l'orientation des étiquettes. Une fois le logiciel P-touch Editor lancé, une boîte de dialogue permettant de sélectionner la méthode de mise en page initiale s’affiche. Sélectionnez la mise en page. - Page 191 ■ Barre des objets Capture d'écran La barre des objets contient des icônes qui Permet de capturer une image à partir du permettent d'ajouter des illustrations et bureau et de l'ajouter à l'étiquette. similitudes à une étiquette. Texte Permet de saisir des lignes de texte. Clip Art Permet d'insérer différents graphiques.
-
Page 192: Création D'un Badge D'identité
Sélectionnez la Catégorie et le Style. Création d'un badge Dans cet exemple, Simple est sélectionné pour la catégorie et un cadre d'identité rectangulaire aux bords arrondis (bordure fine) est sélectionné pour le style. Cette section décrit les procédures de création d'un badge d'identité. -
Page 193: Impression De L'étiquette Créée
Spécifiez les options d'impression. Impression de l'étiquette créée ■ Impression Cliquez sur → La zone des propriétés d'impression s'affiche. Cliquez sur dans la Sortie zone des propriétés d'impression. Standard : à sélectionner pour l'impression → L'étiquette s'imprime. haute vitesse. Options ■... -
Page 194: Utilisation De L'aide
Rubriques Barre d'outils Utilisation de l'aide Des informations Boutons de la barre s'affichent pour chaque d'outils permettant élément sélectionné d'utiliser l'aide Une aide détaillée est fournie avec le logiciel P-touch Editor. Cette section décrit les procédures d'utilisation de l'aide. ® Sous Windows XP, cliquez sur le bouton Démarrer de la barre des tâches, pointez... - Page 195 ■ Impression de l'aide Sélectionnez le contenu à imprimer. Le contenu des fichiers d'aide peut être imprimé. Les fichiers d'aide s'impriment sur une imprimante standard et pas sur la P-touch. Sélectionnez l'onglet Sommaire. Sélectionnez la rubrique à imprimer dans Impression de la rubrique sélectionnée la liste affichée.
-
Page 196: Création D'autres Types D'étiquettes
Création d'autres types d'étiquettes Des exemples de création des différentes étiquettes figurant ci-dessous sont présentés dans la section Description des opérations de l'aide de P-touch Editor. Exemple Fonction décrite • Définition des dimensions de l'étiquette • Centrage du texte de Création de badges d'identité... -
Page 197: Création D'étiquettes À L'aide Du Logiciel P-Touch Quick Editor
Création d'étiquettes à l'aide du logiciel P-touch Quick Editor Vous pouvez créer simplement des étiquettes à l'aide du logiciel P-touch Quick Editor. Remarque ● Les exemples de boîtes de dialogue principalement utilisés dans ce chapitre concernent ® Windows Lancement du logiciel Barre d'outils P-touch Quick Editor Lancez le logiciel P-touch Quick Editor. -
Page 198: Utilisation Simple
Utilisation simple Autres fonctions Cette section décrit les procédures de création Cette section décrit les autres fonctions du simple d'étiquettes. logiciel P-touch Quick Editor. Remarque Lancez le logiciel P-touch Quick Editor. ● Si vous cliquez avec le bouton droit de la Cliquez sur la vue de l'étiquette, puis souris sur la vue de l'étiquette ou sur la saisissez du texte. - Page 199 ■ Définition de la forme du texte ■ Utilisation de l'historique de texte Indiquez la forme et saisissez du texte. Vous pouvez enregistrer jusqu'à 10 textes précédemment imprimés. Vous pouvez les Cliquez sur la flèche saisir facilement. → La zone de liste déroulante s'affiche. Cliquez sur →...
- Page 200 ■ Insertion de symboles ■ Changement de la couleur de fond Les symboles contenus dans le logiciel Vous pouvez changer la couleur de fond de P-touch Quick Editor peuvent être insérés la vue de l'étiquette. dans des étiquettes. Cliquez avec le bouton droit de la souris Cliquez avec le bouton droit de la souris sur la vue de l'étiquette, puis pointez sur sur la vue de l'étiquette, pointez sur...
- Page 201 ■ Impression de l'étiquette ■ Réduction en icône du logiciel P-touch Spécifiez les options d'impression et Quick Editor imprimez l'étiquette. Cliquez sur → Le logiciel P-touch Quick Editor est Cliquez sur la flèche supprimé du bureau et réduit sous → La zone de liste déroulante s'affiche. forme de bouton sur la barre des tâches.
-
Page 202: Après L'impression
Après l'impression Cette section décrit les procédures de retrait de l'endos de l'étiquette imprimée. Tenez l'extrémité de l'étiquette imprimée Retrait de l'endos de d'une main et le bâtonnet de lettrage de l'autre. l'étiquette Insérez la moitié de l'étiquette imprimée Si l'endos d'une étiquette imprimée n'est pas dans le trou du bâtonnet de lettrage, face coupé, utilisez le bâtonnet de lettrage fourni. - Page 203 Après avoir utilisé le bâtonnet de lettrage, replacez-le à l'intérieur du couvercle du logement de la cassette de la PT-9500PC. Fermez le couvercle. Remarque ● Dans certains cas, l'utilisation du bâtonnet de lettrage peut déchirer une partie du texte imprimé. ●...
-
Page 205: Création D'étiquettes : Version Macintosh
Création d'étiquettes : version Macintosh Ce chapitre décrit les procédures de conception et d'impression d'étiquettes sous Macintosh. Création d'étiquettes..................86 Création d'étiquettes à l'aide du logiciel P-touch Editor .......87 Création d'étiquettes à l'aide du logiciel P-touch Quick Editor.....95 Après l'impression..................96... -
Page 206: Création D'étiquettes
Création d'étiquettes Une fois les préparatifs de Macintosh effectués, vous pouvez créer les étiquettes. ■ Conception et impression d'étiquettes Reportez-vous à la section "Création d'étiquettes à l'aide du logiciel P-touch Editor" ( → P. 87). ■ Impression d'étiquettes simple Reportez-vous à la section "Création d'étiquettes à l'aide du logiciel P-touch Quick Editor" ( → P. 95). -
Page 207: Création D'étiquettes À L'aide Du Logiciel P-Touch Editor
Création d'étiquettes à l'aide du logiciel P-touch Editor Vous pouvez créer des étiquettes de différents motifs à l'aide du logiciel P-touch Editor. Remarque ● Ce chapitre décrit brièvement le logiciel P-touch Editor. Vous pouvez accéder aux informations relatives à l'utilisation du logiciel P-touch Editor depuis le guide d'utilisation sur CD-ROM. Reportez-vous à... -
Page 208: Fenêtre De Mise En Page
Propriétés de mise en page Fenêtre de mise en page Permet de définir l'alignement des figures ou du texte. La fenêtre de mise en page s'affiche au démarrage du logiciel P-touch Editor. Propriétés de texte Permet de définir l'alignement du texte, l'interligne, etc. -
Page 209: Création D'un Badge D'identité
■ Barre des objets La barre des objets contient des icônes qui Création d'un badge d'identité permettent d'ajouter des illustrations et similitudes à une étiquette. Ce chapitre décrit un exemple de création d'un Code à barres badge d'identité à l'aide de Mac OS 8.6-9.x. Permet de configurer un code à... -
Page 210: Impression De L'étiquette
Dans la zone de taille de police, sélectionnez 36. Impression de l'étiquette Imprimez l'étiquette que vous avez créée. ■ Impression Cliquez sur → La boîte de dialogue d'impression Cliquez sur dans la barre d'outils. s'affiche. → L'outil de texte est sélectionné. Cliquez sur [Print]. - Page 211 ■ Définition des options d'impression et Spécifiez les options d'impression. impression d'étiquettes (Mac OS X 10.1 ou version ultérieure) Cliquez sur → La boîte de dialogue d'impression s'affiche. Cliquez sur “Copies & Pages”, puis sélectionnez les éléments à modifier. Pages La plage d'impression est spécifiée par page.
- Page 212 Output Options Halftone/Color À définir si vous souhaitez imprimer des Permet d'indiquer les demi-tons, la données dans un fichier. luminosité et le contraste. Tape Setting Length: Permet d'indiquer la longueur du ruban utilisé. Margin: Permet d'indiquer l'espace à P-touch Editor insérer à...
-
Page 213: Guide D'utilisation Sur Cd-Rom
Double-cliquez sur l'icône main.htm dans P-touch Editor 3.2/User's Guide du Guide d'utilisation sur lecteur d'installation du guide CD-ROM d'utilisation sur CD-ROM. → Le navigateur démarre et le menu Le guide d'utilisation sur CD-ROM contenant principal du guide d'utilisation sur des informations détaillées sur l'utilisation du CD-ROM s'affiche. - Page 214 La fenêtre d'informations présente l'utilisation des éléments de chaque menu. Les méthodes d'utilisation sont classées par fonction. Cliquez sur les méthodes pour afficher la fenêtre d'informations. Cliquez sur Home pour revenir au menu principal. Les informations Les éléments de chaque relatives à...
-
Page 215: Création D'étiquettes À L'aide Du Logiciel P-Touch Quick Editor
Création d'étiquettes à l'aide du logiciel P-touch Quick Editor Vous pouvez créer simplement des étiquettes à l'aide du logiciel P-touch Quick Editor. Lancement du logiciel Utilisation du logiciel P-touch Quick Editor P-touch Quick Editor Lancez le logiciel P-touch Quick Editor. Les opérations de base du logiciel P-touch Quick Editor sous Macintosh sont identiques à... -
Page 216: Après L'impression
Après l'impression Pour plus d'informations, reportez-vous à la section "Après l'impression" ( → P. 82) du chapitre Création d'étiquettes : version Windows. -
Page 217: Annexes
Annexes Ce chapitre contient des informations relatives à la détection des pannes et présente une liste des accessoires et fournitures disponibles. Création d'étiquettes de code à barres............98 Changement des paramètres P-touch ............100 Entretien......................102 Détection de pannes ...................106 Spécifications ....................108 Accessoires....................110 Index ......................114 INFORMATION SUR LES CONTACTS POUR LE PT-9500PC (CANADA SEULEMENT)....................116... -
Page 218: Création D'étiquettes De Code À Barres
Création d'étiquettes de code à barres Les étiquettes de code à barres servant au contrôle des produits et aux ventes peuvent être créées simplement avec la PT-9500PC. Les normes relatives aux codes à barres étant très diverses, vous devez créer les étiquettes de code à barres après confirmation des normes de création et de numérisation pour le lecteur de code à... -
Page 219: Précautions Relatives À L'impression D'étiquettes De Code À Barres
** Pour les codes à barres laser, le premier chiffre des données saisies correspond au chiffre de contrôle. Précautions relatives à l'impression d'étiquettes de code à barres Les imprimantes d'étiquettes Brother P-touch ne sont pas spécialement conçues pour les codes à barres. Respectez les recommandations suivantes lorsque vous créez/imprimez des étiquettes de code à... -
Page 220: Changement Des Paramètres P-Touch
Changement des paramètres P-touch Cette section décrit les procédures de changement de vitesse de transmission de la PT-9500PC et fournit les informations pour les exécuter dans un environnement LAN. Changez le commutateur USB ID situé à Changement de mode USB ID l'arrière de la PT-9500PC. -
Page 221: Utilisation De Plusieurs Ordinateurs
Utilisation de plusieurs Changement de la vitesse ordinateurs de transmission Bien que la méthode recommandée La vitesse de transmission de l'interface série est d’impression depuis plusieurs ordinateurs vers réglée à l'usine sur 115 200 bps. la PT-9500PC préconise l’utilisation du serveur En cas d'utilisation d'un PC ne prenant pas en d’impression Ethernet PS-9000 en option, vous charge une vitesse de transmission du port série... -
Page 222: Entretien
Entretien Les pièces internes de la PT-9500PC s'encrassent au fur et à mesure de l'utilisation de l'imprimante. Cette section décrit les procédures d'entretien de la PT-9500PC. Appuyez sur la touche avance/coupe. L'impression de l'étiquette n'est pas nette Si une ligne blanche horizontale apparaît sur l'étiquette imprimée ou si les caractères ne sont pas nets, il se peut que la tête d'impression et le cabestan soient sales. - Page 223 ■ Nettoyage de la tête d'impression et du Cabestan cabestan Si vous n'utilisez pas la fonction d'auto- nettoyage pour nettoyer la tête d'impression, respectez les procédures suivantes pour nettoyer la PT-9500PC. Mettez la PT-9500PC hors tension. Appuyez sur la touche de libération du couvercle et ouvrez le couvercle du logement de la cassette.
-
Page 224: Nettoyage De La Coupeuse
■ Ruban de nettoyage Utilisez le ruban de nettoyage TZ-CL6 de 1 1/2 Nettoyage de la coupeuse po (36 mm) de largeur (vendu séparément) pour nettoyer facilement la PT-9500PC. Si les étiquettes imprimées ne sont pas éjectées correctement de la PT-9500PC, nettoyez la Appuyez sur la touche de libération du coupeuse pour couper les étiquettes. - Page 225 Réinsérez la cassette de ruban, puis refermez le couvercle du logement de la cassette. Remarque ● Veillez à ne pas toucher la coupeuse lorsque vous nettoyez la PT-9500PC. ● La tête d'impression est brûlante pendant et immédiatement après l'utilisation de l'imprimante.
-
Page 226: Détection De Pannes
Détection de pannes Pour la détection des pannes de la PT-9500PC, reportez-vous à la liste suivante des problèmes possibles. Questions et réponses Problème Cause Mesure Le câble d'interface n'est pas branché correctement. La cassette de ruban n'est pas Vérifiez que le câble d'interface est correctement insérée. - Page 227 PT-9500PC à un port COM non utilisé. changement de la vitesse de transmission ou à l'aide des Selon le PC, le port COM peut être utilitaires de la Brother désactivé par défaut. Consultez le mode PT-9500PC. d'emploi du PC ou contactez son Erreur 1 ou Erreur 5 : le port fabricant pour activer le port COM.
-
Page 228: Spécifications
Spécifications PT-9500PC Élément Spécification Écran Voyants LED (vert/rouge) Impression sur ruban laminé pour transfert thermique/ Méthode d'impression impression thermique Tête d'impression 360 ppp/384 points Résolution Impression Pour les cassettes de ruban TZ : 360 ppp d'impression Vitesse d'impression Pour les cassettes de ruban TZ : 20 mm/s maximum Largeur d'impression 27,1 mm maximale... -
Page 229: Environnement D'exploitation
Environnement d'exploitation Élément Spécification Pour une connexion série ® Windows /98/98 SE/Me/NT 4.0* /2000 Pro* (périphérique pré-installé) Périphérique de port série (RS-232C) IBM PC ou compatible Système Pour une connexion USB ® Windows 98/98 SE/Me/2000 Pro/XP d'exploitation (périphérique pré-installé) Périphérique de préparation de port USB Mac OS 8.6-9.x, Mac OS X 10.1-10.2.6 Macintosh Périphérique de préparation de port USB... -
Page 230: Accessoires
Accessoires Les fournitures et accessoires suivants sont disponibles pour votre imprimante P-touch et peuvent être commandés directement auprès de Brother si votre revendeur ne les a pas en stock. ■ Etiquettes Avery pour P-touch : Parfaites pour l'impression d'étiquettes sur papier Avery une par une (impression noire sur étiquettes blanches) No. - Page 231 No. de stock Description Qté/Paquet Prix** TZ-344 Caractères dorés sur adhésif noir 28,99$ TZ-345 Caractères blancs sur adhésif noir 28,99$ TZ-545 Caractères blancs sur adhésif bleu 28,99$ TZ-641 Caractères noirs sur adhésif jaune 24,99$ *TZ-B41 Caractères noirs sur adhésif orange fluorescent 29,99$ Rubans laminé...
- Page 232 Rubans non laminés No. de stock Description Qté/Paquet Prix** 3/4 pouce (18 mm) TZ-N641 Caractères noirs sur adhésif jaune 21,99$ TZ-N541 Caractères noirs sur adhésif bleu 21,99$ TZ-NF41 Caractères noirs sur adhésif violet 21,99$ 1/2 pouce (12 mm) TZ-N631 Caractères noirs sur adhésif jaune 17,99$ TZ-N531 Caractères noirs sur adhésif bleu...
- Page 233 Ruban ID souple : Adhésif spécial pour pliage, emballage et signalisation No. de stock Description Qté/paquet Prix TZFX231 Caractères noirs sur fond blanc de 1/2 pouce (12 mm) 23,99$ TZFX241 Caractères noirs sur fond blanc de 3/4 pouce (18 mm) 27,99$ TZFX251 Caractères noirs sur fond blanc de 1 pouce (24 mm)
-
Page 234: Index
Index Détection de pannes ........106 Droits............. 54, 57 Accessoires .......... 10, 110 Droits d'administrateur ........ 26 Adaptateur secteur ......... 10, 15 Administrateur ..........26 Aide ............. 74 Entretien ............ 102 Ajout/suppression de programmes....44 Environnement d'exploitation ....109 Ajouter ou supprimer des programmes..44 Étiquettes .......... - Page 235 Paramètres P-touch ........100 Table ............71 Photo ............. 71, 89 Tête d'impression........103 Pilote d'imprimante....24, 35, 47, 50 Texte............71 Port série..........12, 18 Touche Avance/coupe ......... 21 Port USB ..........12, 17 Touche avance/coupe........12 Précautions importantes ......... 4 Touche de libération du couvercle..
-
Page 236: Information Sur Les Contacts Pour Le Pt-9500Pc (Canada Seulement)
Accessories & Supplies / Accessoires et fournitures Pour commander les accessoires et les fournitures Brother en utilisant votre carte Visa ou MasterCard, vous pouvez téléphoner sans frais au 1-877-BROTHER (1-877-276-8437), ou pour commander par la poste, veuillez remplir le bon de commande des accessoires que vous trouverez dans votre manuel d’emploi et postez-le accompagné... -
Page 237: Bon De Commande Pour Les Accessoires
Ce bon de commande vous est fourni pour votre utilisation si votre concessionnaire n’a pas les articles nécessaires en stock ou si vous préférez commander par téléphone. Pour com- mander par téléphone, appelez Brother International au 1-877- BROTHER (1-877-276- 8437) et donnez votre numéro de Visa ou MasterCard. - Page 238 Accessories & Supplies / Accessoires et fournitures Pour commander les accessoires et les fournitures Brother en utilisant votre carte Visa ou MasterCard, vous pouvez téléphoner sans frais au 1-877-BROTHER (1-877-276-8437), ou pour commander par la poste, veuillez remplir le bon de commande des accessoires que vous trouverez dans votre manuel d’emploi et postez-le accompagné...
- Page 239 Ce bon de commande vous est fourni pour votre utilisation si votre concessionnaire n’a pas les articles nécessaires en stock ou si vous préférez commander par téléphone. Pour com- mander par téléphone, appelez Brother International au 1-877- BROTHER (1-877-276- 8437) et donnez votre numéro de Visa ou MasterCard.
- Page 240 Printed in China LN4251001...