Masquer les pouces Voir aussi pour Antamatic Open 2.0:

Publicité

Les langues disponibles

Les langues disponibles

Liens rapides

Open
MANUALE DI INSTALLAZIONE
MANUEL D'INSTALLATION • MANUAL DE INSTALACIÓN • INSTALLATION MANUAL
KIT DI AUTOMAZIONE PER
PORTE INTERNE SCORREVOLI
KIT D'AUTOMATISATION POUR
PORTES COULISSANTES INTERIEURES
KIT DE AUTOMATIZACIÓN PARA
PUERTAS INTERIORES CORREDERAS
AUTOMATION KIT FOR
INTERIOR SLIDING DOORS
rev. 17 may 2018
scheda 7CA20200-sw.0.03
2.0

Publicité

Table des Matières
loading

Sommaire des Matières pour Scrigno Antamatic Open 2.0

  • Page 1 Open MANUALE DI INSTALLAZIONE MANUEL D'INSTALLATION • MANUAL DE INSTALACIÓN • INSTALLATION MANUAL KIT DI AUTOMAZIONE PER PORTE INTERNE SCORREVOLI KIT D'AUTOMATISATION POUR PORTES COULISSANTES INTERIEURES KIT DE AUTOMATIZACIÓN PARA PUERTAS INTERIORES CORREDERAS AUTOMATION KIT FOR INTERIOR SLIDING DOORS rev. 17 may 2018 scheda 7CA20200-sw.0.03...
  • Page 2: Informazioni Generali Di Sicurezza

    Questa tipologia di automazione, con funzionamento Low Energy, può essere installata in ambienti in cui la porta viene utilizzata da persone disabili, anziane, o con limitate capacità motorie, dopo aver e ettuato l'analisi dei rischi e considerato che il rischio per questo tipo di utenza è basso. R1387 DCM2461/SCRIGNO | pagina 2...
  • Page 3: Contenuto Del Kit

    fi no ad un peso massimo di 80kg. OPEN 2.0 SCRIGNO è la soluzione ideale per tutte le aperture dove non è richiesto un utilizzo intensivo, ma viene privilegiata l’assoluta invisibilità del sistema; la motorizzazione, infatti, è completamente integrata nel controtelaio Scrigno.
  • Page 4: Verifiche Preliminari

    Il sistema non permette la totale scomparsa della porta nel controtelaio. Resteranno in vista circa 65mm. Motoriduttore con sta a di aggancio al controtelaio Puleggia condotta con tendicinghia 27 30 30mm Distanza corretta fra porta e binario R1387 DCM2461/SCRIGNO | pagina 4...
  • Page 5: Fasi Di Installazione

    Avvitare, senza serrare a fondo, la vite di Smontare il blocchetto fi ssaggio della puleggia, rispettando la misura posteriore. minima di 30mm. Versione DOORTECH: Smontare entrambi i blocchetti e sostituirli con quelli per la versione Doortech. Rimontare il blocchetto anteriore. 30mm R1387 DCM2461/SCRIGNO | pagina 5...
  • Page 6 Spingere il gruppo motore fi no in fondo al binario, trattenendo la cinghia. Vedi punto successivo per posizione corretta. Posizione corretta di montaggio: 1: il motore è sul fondo del binario 2: la cinghia è ALL'ESTERNO del cavo del motore R1387 DCM2461/SCRIGNO | pagina 6...
  • Page 7 ATTENZIONE: Non usare il fermo di battuta! Allentare il bullone (A) Inserire i 2 carrelli nel binario. Inserire la puleggia condotta nel binario. Avvitare le 2 viti autoforanti Allineare la sta a della puleggia e la fi ne dell'asola. R1387 DCM2461/SCRIGNO | pagina 7...
  • Page 8 Segnare la posizione dei 2 fori al centro della porta, utilizzando la della cinghia in base al modello sta a come riferimento. Forare la porta con una punta adeguata. di controtelaio SCRIGNO Per kit Essential PRO. Battuta di Battuta di...
  • Page 9 Predisporre la sta a di giunzione Inserire la vite nella sta a della della cinghia in base al modello di porta e nella sta a di giunzone controtelaio SCRIGNO Per kit Essential PRO. Per kit BASE e DOORTECH (rimuovere il...
  • Page 10 Passare la cinghia dietro alla puleggia condotta. nella foto IMPORTANTE!! La sta a di giunzione deve essere dalla parte opposta del binario, rispetto al passaggio cavo. R1387 DCM2461/SCRIGNO | pagina 10...
  • Page 11 Verifi care periodicamente lo stato di usura della cinghia e il suo tensionamento. Intervenire periodicamente con spray al silicone, nel caso dovesse diventare rumorosa. Non utilizzare detersivi, solventi, spray contro la ruggine, o prodotti come Svitol o WD40 . R1387 DCM2461/SCRIGNO | pagina 11...
  • Page 12 Ingressi pulsanti: (contatti puliti non alimentati) Chiude Apre Comune Forare con una punta adeguata la scatola di derivazione, montare il passacavo PG fornito con il kit, e far passare il cavo dei pulsanti al suo interno. R1387 DCM2461/SCRIGNO | pagina 12...
  • Page 13 (vedi anche punto 32, interruttore di dopo 2” di inutilizzo blocco porta) DIP SWITCH 1=OFF, 2=ON: DIP SWITCH 1=ON, 2=ON: La porta si chiude automaticamente La porta si chiude automaticamente dopo 5” di inutilizzo dopo 10” di inutilizzo R1387 DCM2461/SCRIGNO | pagina 13...
  • Page 14 Collegare la porta ai carrelli, ed inserire la indicazioni del manuale di installazione della sta a di giunzione nelle due viti montate porta e del controtelaio Scrigno precedentemente, serrandole a fondo. VERIFICARE: - il corretto allineamento della cinghia, che deve muoversi su un piano perfettamente orizzontale.
  • Page 15 La programmazione va a buon fi ne, ma la porta si arresta in richiusura e torna indietro - cinghia troppo tesa: diminuire la tensione - attriti meccanici: rimuoverli R1387 DCM2461/SCRIGNO | pagina 15...
  • Page 16 Open R1387 DCM2461/SCRIGNO | pagina 16...
  • Page 17 Open R1387 DCM2461/SCRIGNO | pagina 17...
  • Page 18: Informations Generales De Securite

    Cette typologie d'automatisation, avec fonctionnement Low Energy, peut être installée dans des pièces dans lesquelles la porte est utilisée par des personnes handicapées, âgées ou présentant des capacités motrices limitées, après avoir e ectué l'analyse des risques et considéré que le risque, pour ces types d'utilisateurs, est réduit. R1387 DCM2461/SCRIGNO | page 2...
  • Page 19: Description Du Kit

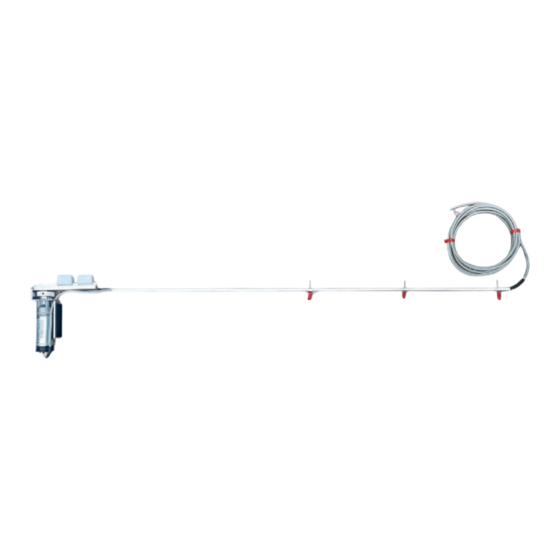
    OPEN 2.0 SCRIGNO est un kit d'automatisation complet pour portes coulissantes intérieures, adapté à l'installation sur les contre-châssis Scrigno Base, Essential Pro et Doortech; il peut être aisément installé sur des portes existantes et ne nécessite pas de travaux de maçonnerie.
  • Page 20: Verifications Preliminaires

    Le système ne permet pas la disparition totale de la porte dans le contre-châssis. Elle restera visible sur environ 65 mm. Motoréducteur avec bride d'enclenchement sur le Poulie de guidage par tendeur de courroie contre-châssis 27 30 30mm Distance correcte entre porte et rail R1387 DCM2461/SCRIGNO | page 4...
  • Page 21: Phases D'installation

    Démonter le bloc fi ssaggio della puleggia, rispettando la misura postérieur. minima di 30mm. Version DOORTECH: Démonter les deux blocs et les remplacer par les blocs prévus pour la version Doortech. Remonter le bloc antérieur. 30mm R1387 DCM2461/SCRIGNO | page 5...
  • Page 22 Voir le point successif pour la position correcte. Position de montage correcte: 1: le moteur se trouve sur le fond du rail 2: la courroie se trouve A L’EXTERIEUR du câble du moteur R1387 DCM2461/SCRIGNO | page 6...
  • Page 23 Desserrer le boulon (A) Insérer les 2 chariots dans le rail. Insérer la poulie de guidage dans le rail. Visser les 2 vis autoforeuses Aligner la bride de la poulie sur la fi n de l'ouverture. R1387 DCM2461/SCRIGNO | page 7...
  • Page 24: Montage De La Bride De Jonction Pour Contre-Chassis Base Et Doortech

    Prévoir la bride de jonction de la Marquer la position des 2 trous au centre de la porte, utilisant la bride courroie en fonction du modèle comme référence. Percer la porte à l'aide d'une mèche appropriée. de contre-châssis SCRIGNO. Pour kit Essential PRO. Butée de Butée fermeture d’ouverture...
  • Page 25: Montage De La Bride De Jonction Pour Contre-Chassis Essential Pro

    Prévoir la bride de jonction de la Insérer la vis dans la bride de la courroie en fonction du modèle de porte et dans la bride de jonction contre-châssis SCRIGNO. Pour kit Essential PRO. Pour kit BASE et DOORTECH (enlever la rondelle en caoutchouc) Butée...
  • Page 26 Insérer la courroie dans la bride de jonction, comme Passer la courroie derrière la poulie de guidage. sur la photo IMPORTANT ! La bride de jonction doit se trouver sur la partie opposée du rail, par rapport au passage du câble. R1387 DCM2461/SCRIGNO | page 10...
  • Page 27 Vérifi er périodiquement l'état d'usure de la courroie ainsi que sa tension. E ectuer périodiquement des interventions à l'aide d'un spray silicone au cas où elle devienne bruyante. Ne pas utiliser de détersifs, solvants, sprays contre la rouille ou produits comme Svitol ® ou WD40®. R1387 DCM2461/SCRIGNO | page 11...
  • Page 28: Boite De Derivation

    Entrées des boutons: (contacts propres non alimentés) Ferme Ouvre Commun Percer la boîte de dérivation à l'aide d'une mèche appropriée, monter le passe-câble PG fourni avec le kit et faire passer le câble des boutons à l'intérieur. R1387 DCM2461/SCRIGNO | page 12...
  • Page 29: Connexion

    (voir également le point 32, après 2" d’inutilisation interrupteur de bloque-porte) DIP SWITCH 1=OFF, 2=ON: DIP SWITCH 1=ON, 2=ON: La porte se ferme automatiquement La porte se ferme automatiquement après 5" d’inutilisation après 10" d’inutilisation R1387 DCM2461/SCRIGNO | page 13...
  • Page 30 Raccorder la porte avec les chariots et insérer aux indications du manuel d'installation de la la bride de jonction dans les deux vis montées porte et du contre-châssis Scrigno. précédemment, en les serrant à fond. VERIFIER: - l'alignement correct de la courroie, qui doit se déplacer sur un plan parfaitement horizontal.
  • Page 31: Erreurs Et Questions Communes

    à la poulie du moteur et à la poulie de guidage. La programmation est réussie mais la porte s'arrête en refermeture et revient en arrière. - courroie trop tendue: diminuer la tension - frottements mécaniques: les éliminer. R1387 DCM2461/SCRIGNO | page 15...
  • Page 32 Open R1387 DCM2461/SCRIGNO | page 16...
  • Page 33 Open R1387 DCM2461/SCRIGNO | page 17...
  • Page 34: Información General De Seguridad

    Este tipo de automatización, con funcionamiento Low Energy, se puede instalar en espacios en los que la puerta es utilizada por personas discapacitadas, ancianas o con capacidad motora limitada, tras haber efectuado el análisis de los riesgos y haber considerado que el riesgo para este tipo de usuarios es bajo. R1387 DCM2461/SCRIGNO | pág. 2...
  • Page 35: Descripción Del Kit

    80 kg. OPEN 2.0 SCRIGNO es la solución ideal para todas las aperturas en las que no se requiera un uso intensivo y al mismo tiempo se desee priorizar la absoluta invisibilidad del sistema. La motorización, en efecto, está completamente integrada en el premarco Scrigno.
  • Page 36 El sistema no permite la total ocultación de la puerta en el premarco. Permanecerán visibles unos 65 mm. Motorreductor con abrazadera de enganche al Polea guiada con tensor premarco. 27 30 30mm Distancia correcta entre la puerta y el riel R1387 DCM2461/SCRIGNO | pág. 4...
  • Page 37: Fases De Instalación

    Desmontar el bloque fi ssaggio della puleggia, rispettando la misura trasero. minima di 30mm. Versión DOORTECH: Desmontar los dos bloques y reemplazarlos por los de la versión Doortech. Volver a montar el bloque delantero. 30mm R1387 DCM2461/SCRIGNO | pág. 5...
  • Page 38 En el punto siguiente se ilustra la posición correcta. Posición correcta de montaje: 1: el motor está en el fondo del riel 2: la correa se encuentra FUERA del cable del motor R1387 DCM2461/SCRIGNO | pág. 6...
  • Page 39 Afl ojar el perno (A) Introducir los dos carros en el riel. Introducir la polea guiada dentro del riel. Alinear la abrazadera de la polea y el fi nal de la Fijar los dos tornillos autoperforantes ranura. R1387 DCM2461/SCRIGNO | pág. 7...
  • Page 40 Marcar la posición de los dos orifi cios en el centro de la puerta, unión de la correa según el utilizando la abrazadera como referencia. Perforar la puerta con una modelo de premarco SCRIGNO. broca adecuada. Kit Essential PRO Tope de...
  • Page 41 ESSENTIAL PRO Predisponer la abrazadera de unión Introducir el tornillo en la de la correa según el modelo de abrazadera de la puerta y en la premarco SCRIGNO. abrazadera de unión Kit Essential PRO Kit BASE y DOORTECH (quitar el anillo de...
  • Page 42 Pasar la correa por detrás de la polea guiada. como se ilustra en la foto. IMPORTANT! La abrazadera de unión tiene que estar en el lado contrario al del riel, con respecto al paso del cable. R1387 DCM2461/SCRIGNO | pág. 10...
  • Page 43 Comprobar periódicamente el estado de desgaste de la correa y su tensión. Intervenir periódicamente con aerosoles de silicona en caso de que haga demasiado ruido. No utilizar detergentes, disolventes, aerosoles contra la herrumbre ni productos como Svitol ® o WD40®. R1387 DCM2461/SCRIGNO | pág. 11...
  • Page 44 Entradas botones: (contactos limpios no alimentados) Cerrar Abrir Común Perforar con una broca adecuada la caja de derivación, montar el pasacable PG suministrado con el kit, y hacer pasar el cable de los botones su interior. R1387 DCM2461/SCRIGNO | pág. 12...
  • Page 45 INTERRUPTOR DIP 1=OFF, 2=ON: INTERRUPTOR DIP 1=ON, 2=ON: La puerta se cierra automáticamente La puerta se cierra automáticamente tras cinco segundos de inactividad tras diez segundos de inactividad R1387 DCM2461/SCRIGNO | pág. 13...
  • Page 46 Conectar la puerta a los carros, e introducir a las indicaciones del manual de instalación de la la abrazadera de unión en los dos tornillos puerta y del premarco Scrigno. montados anteriormente, apretándolas a fondo. COMPROBAR: - La correcta alineación de la correa, que ha de moverse en un plano perfectamente horizontal.
  • Page 47 La programación se termina con éxito, pero la puerta se detiene en posición de cierre y vuelve atrás. - courroie trop tendue: diminuer la tension - frottements mécaniques: les éliminer. R1387 DCM2461/SCRIGNO | pág. 15...
  • Page 48 Open R1387 DCM2461/SCRIGNO | pág. 16...
  • Page 49 Open R1387 DCM2461/SCRIGNO | pág. 17...
  • Page 50: General Safety Information

    This type of automation, with Low Energy operation, can be installed in environments where the door is used by disabled or elderly people, or people with limited mobility, after carrying out a risk analysis and considering that the risk for this type of user is low. R1387 DCM2461/SCRIGNO | page 2...
  • Page 51 80 kg. OPEN 2.0 SCRIGNO is the ideal solution for all openings where intensive use is not required, but the absolute invisibility of the system is a must; the motorization, in fact, is fully integrated into the Scrigno frame.
  • Page 52: Preliminary Checks

    The system does not allow the total disappearance of the door in the frame. About 65 mm will remain visible. Gearmotor with bracket for mounting on frame Driven pulley with belt tensioner 27 30 30mm Correct distance between door and rail R1387 DCM2461/SCRIGNO | page 4...
  • Page 53: Installation Steps

    Remove the rear block. fi ssaggio della puleggia, rispettando la misura minima di 30mm. DOORTECH version: Remove both blocks and replace them with those for the Doortech version. Fit the front block back on. 30mm R1387 DCM2461/SCRIGNO | page 5...
  • Page 54 Push the motor unit all the way into the rail, holding back the belt. See next step for correct position. Correct mounting position: 1: the motor is on the bottom of the rail 2: the belt is ON THE OUTSIDE of the motor cable R1387 DCM2461/SCRIGNO | page 6...
  • Page 55 IMPORTANT: Do not use the endstop! Loosen bolt (A) Fit the 2 hangers on the rail. Fit the driven pulley in the rail. Tighten the 2 self-tapping screws Align the pulley bracket and the slot end. R1387 DCM2461/SCRIGNO | page 7...
  • Page 56 Prepare the belt joint bracket Mark the position of the 2 holes in the centre of the door, using the according to the SCRIGNO frame bracket as a reference. Drill a hole in the door with a suitable drill bit.
  • Page 57 Open MOUNTING THE JUNCTION BRACKET FOR ESSENTIAL PRO FRAME Prepare the belt joint bracket Fit the screw into the door bracket according to the SCRIGNO frame and into the junction bracket model. For Essential PRO kits. For BASE and DOORTECH kits...
  • Page 58 Fit the belt in the jointing bracket, as shown in the Pass the belt behind the driven pulley. picture. IMPORTANT!! The jointing bracket must be on the opposite side of the rail, with respect to the cable transit. R1387 DCM2461/SCRIGNO | page 10...
  • Page 59 A belt which is too slack tends to jump over the gears. Periodically check the belt for wear and tension. Periodically use silicone spray if it becomes noisy. Do not use detergents, solvents, rust sprays, or products such as Svitol ® or WD40 ® R1387 DCM2461/SCRIGNO | page 11...
  • Page 60: Junction Box

    Jumper on connector J3 Button inputs: (dry contacts not powered) Close Open Common Drill the junction box using a suitable bit, fi t the PG cable gland supplied with the kit, and route the button cable through it. R1387 DCM2461/SCRIGNO | page 12...
  • Page 61 The door closes automatically after also point 32, door lock switch) 2" of inactivity DIP SWITCH 1=OFF, 2=ON: DIP SWITCH 1=ON, 2=ON: The door closes automatically after The door closes automatically after 5" of inactivity 10" of inactivity R1387 DCM2461/SCRIGNO | page 13...
  • Page 62: Limit-Switch

    -the correct alignment of the belt, which must move on a perfectly horizontal plane. -the absence of friction or obstacles during door movement, for the entire door travel distance. The Antamatic OPEN 2.0 kit is now ready to be put into operation. LIMIT-SWITCH...
  • Page 63 - the belt is not aligned: check the height of the belt jointing bracket with respect to the motor pulley and the driven pulley. rogramming is successful, but the door stops in reclosing and moves back. - belt too tight: reduce tension - mechanical friction: remove. R1387 DCM2461/SCRIGNO | page 15...
  • Page 64 Open R1387 DCM2461/SCRIGNO | page 16...
  • Page 65 Open R1387 DCM2461/SCRIGNO | page 17...
  • Page 66 SIR S.r.l. Via Gasdotto 65 T +39 0445 431607 info@antamatic.com 36078 Valdagno Vicenza Italia F +39 0445 431427 www.antamatic.com www.amergroup. it...

Table des Matières