Table des Matières
Publicité
Les langues disponibles
Les langues disponibles
Liens rapides
Publicité
Table des Matières

Manuels Connexes pour Ayce HW-26MC05


Sommaire des Matières pour Ayce HW-26MC05
- Page 1 BEDIENUNGSANLEITUNG | MODE D‘EMPLOI | ISTRUZIONE D‘USO | ORIGINAL INSTRUCTIONS 1.2017 Standventilator mit Spruehnebelfunktion | Ventilateur sur pied avec fonction brumisation | Ventilatore con 7 613164 455215 funzione di foschia| Mist fan airěo 2017.01.02...
-
Page 2: Beschreibung Der Symbole
02 | 3 0 BESCHREIBUNG DER SYMBOLE Bei der Verwendung des Gerätes befolgen Sie bitte die Anweisungen zu Montage, Gebrauch und Wartung sowie die Sicherheitshinweise zum Gebrauch: Entspricht den anwendbaren EU-Richtlinien für dieses Produkt. • Lesen Sie diese Bedienungsanleitung sorgfältig durch und bewahren Sie sie auf. - Page 3 04 | 5 0 • Dieses Gerät kann von Kindern im Alter ab 8 Jahren sowie von elterlicher Aufsicht ist. • Schalten Sie den Ventilator mit Sprühnebelfunktion bei Personen mit eingeschränkten körperlichen, sensorischen oder schlechtem Wetter bitte ab und bringen Sie ihn in einen sicheren geistigen Fähigkeiten bzw.
-
Page 4: Bezeichnung Der Einzelteile
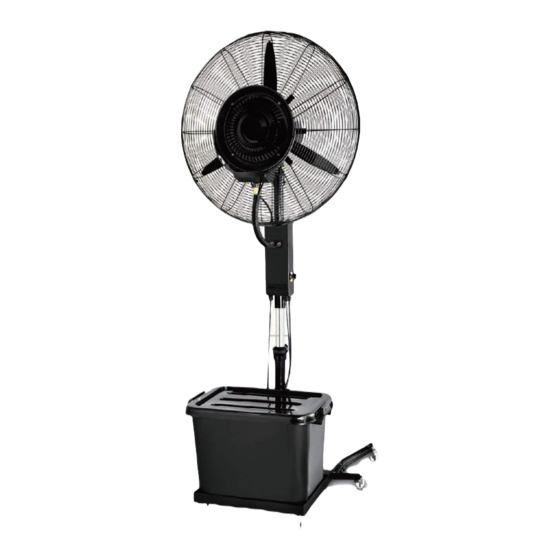
06 | 7 0 VOR DER MONTAGE BEZEICHNUNG DER EINZELTEILE Bitte bewahren Sie immer die Originalverpackung auf, damit Sie das Gerät ausserhalb der Nutzungssaison wieder verpacken können. grosse Befestigungs- schrauben und Muttern (4 Stck) Metallbasis kleine Befestigungs- schrauben und Muttern (8 Stck) innerer Stab mit Aussenstab festem Knauf... -
Page 5: Montage
08 | 9 0 MONTAGE Abbildung Anmerkung Warnhinweis! Vergewissern Sie sich bitte, dass die Stromversorgung unterbrochen ist, bevor Sie das Gerät montieren. Lösen Sie die 4 Schrauben und bringen Sie das hintere Wählen Sie einen ebenen Bereich von etwa 2 x 2 m für die Montage dieses Ventilators. Gitter an, befestigen Sie es dann, indem Sie die 4 Abbildung Anmerkung... -
Page 6: Technische Daten
Tuch ab. Lassen Sie den Ventilator mit Sprühnebelfunktion kein Wasser ansaugen. Stecken Sie den Schlauch B in den Wassertank. Füllen Sie TECHNISCHE DATEN genügend Wasser in den Wassertank. Arretieren Sie die beiden Räder mit der Arretiervorrichtung. Modell HW-26MC05 Leistung 260 W Nennspannung (V/Hz) 220-240 V~50 Hz BETRIEB... - Page 7 Fall in Rechnung gestellt. Zusätzlicher Hinweis: Schadhafte Produkte können während des Garantiezeitraums in jedem Jumbo-Markt abgegeben werden. Nach Ablauf des Garantiezeitraums werden die ayce-Produkte in jedem Jumbo-Markt zur entsprechenden Überprüfung angenommen. CH-Import und Distribution exklusiv durch: Jumbo-Markt AG, 8305 Dietlikon www.jumbo.ch...
-
Page 8: Technische Zeichnung
14 | 15 ERSATZTEILLISTE TECHNISCHE ZEICHNUNG BESCHREIBUNG BESCHREIBUNG NEBELSCHUTZ VENTILATORGESTELL NEBELSCHEIBE NEBELMENGENREGLER NEBELGEHÄUSE WASSERRÜCKFÜHRSCHLAUCH SCHRAUBE EINLASSSCHLAUCH WASSERRÜCKFÜHRSCHALE WASSERRÜCKFÜHRSCHLAUCH SCHALENHALTERUNG EINLASSSCHLAUCH VORDERER VENTILATORSCHUTZ STROMKABEL SCHUTZKLEMME FIXIERUNGSSCHRAUBE DES INNEREN STABES FLÜGEL PUMPENKABEL SCHRAUBE INNERER STAB HINTERER VENTILATORSCHUTZ FIXIERUNGSSCHRAUBE DES INNEREN STABES VENTILATORMOTOR UNTERES VENTILATORGESTELL GESCHWINDIGKEITSSCHALTER WASSERTANK... -
Page 9: Description Des Symboles
16 | 17 DESCRIPTION DES SYMBOLES Pour utiliser cet appareil, veuillez suivre les instructions d’assemblage, d’utilisation et d’entretien ainsi que les précau- tions d’utilisation : Conformément aux directives européennes applicables à ce produit. • Lisez attentivement et conservez ces instructions. Avant de brancher l’appareil, assurez-vous que la tension du •... - Page 10 18 | 19 intellectuelles réduites ou sans expérience et connaissances, s'ils brumisateur et déplacez-le dans un environnement sécurisé. En sont sous surveillance ou s'ils ont été informés quant à cas de fuite d’eau ou d’électricité, le ventilateur brumisateur peut l'utilisation sûre de l'appareil et s'ils comprennent les risques provoquer un incendie ou d’autres accidents graves.
-
Page 11: Identification Des Composants
20 | 21 AVANT L'INSTALLATION : IDENTIFICATION DES COMPOSANTS Veuillez toujours conserver l’emballage d’origine afin de pouvoir réemballer l’appareil pour le stockage après votre utilisation saisonnière. Grosses vis de fixation et écrous (4 pièces) Base en métal Petites vis de fixation et écrous (8 pièces) Pôle interne avec bouton fixe... -
Page 12: Assemblage
22 | 23 ASSEMBLAGE N° Photo Remarque Avertissement ! Assurez-vous que l’alimentation est déconnectée avant l’assemblage. Choisissez une zone plane d'au moins 2 x 2 m environ pour l’installation de ce ventilateur. Desserrez les 4 vis et installez la grille arrière, puis resserrez les 4 vis. -
Page 13: Entretien
SPÉCIFICATIONS TECHNIQUES Utilisez la même méthode, connectez le tuyau de l’assemblage de moteur de brumisation à la connexion Modèle HW-26MC05 D. Ajustez le tuyau de connexion séparé C et la connexion D sur l’assemblage de moteur de brumisation. Puissance 260 W... -
Page 14: Certificat De Garantie
également notre service de réparation. Prénom Nom de famille Jumbo o re un excellent service de réparation, pour tous les produits ayce. Si, contre toute attente, vous rencontrez un problème dû à un défaut Rue/N° Téléphone de fabrication ou de matériau dans le cadre d’un usage privé... -
Page 15: Schéma Technique
28 | 29 LISTE DES PIÈCES DE RECHANGE SCHÉMA TECHNIQUE N° DESCRIPTION N° DESCRIPTION PROTECTION DE BRUMISATION PIED DE VENTILATEUR DISQUE DE BRUMISATION BOUTON DE VOLUME DE BRUMISATION BOÎTIER DE BRUMISATION TUYAU DE RECYCLAGE D’EAU TUYAU D’ALIMENTATION GOBELET DE RECYCLAGE D’EAU TUYAU DE RECYCLAGE D’EAU PORTE-GOBELET TUYAU D’ALIMENTATION... -
Page 16: Descrizione Dei Simboli
30 | 31 DESCRIZIONE DEI SIMBOLI • Leggi attentamente e conserva queste istruzioni. • Prima di collegare il dispositivo, assicurati che il voltaggio disponibile corrisponda a quello collocato sulla targhetta d’identificazione dell’unità. In conformità alle Direttive Europee applicabilia questo prodotto. •... - Page 17 32 | 33 riscaldanti. non continuare a usarlo. • Scollega o disconnetti il dispositivo dall’alimentazione principale • La spina deve essere scollegata prima di pulizia, manutenzione o quando non è in uso o prima della pulizia. riempimento d’acqua. • Conserva il dispositivo in un luogo fresco e asciutto se non intendi usarlo per un lungo periodo.
-
Page 18: Identificazione Delle Componenti
34 | PRIMA DELL’INSTALLAZIONE: IDENTIFICAZIONE DELLE COMPONENTI Si prega di conservare sempre la confezione originale in modo da rimpacchettare e conser- vare, dopo l’uso stagionale. Viti e dadi di fissaggio Grandi (4pcs) Base in metallo Viti e dadi di fissaggio Piccole (8pcs) Tubo interno con manopola per... - Page 19 36 | 37 MONTAGGIO Immagine Commento Attenzione! Assicurati che l’alimentazione sia disconnessa prima del montaggio. Seleziona un’area pianeggiante di circa 2 x 2 m per installare il ventilatore. Svita le 4 viti e attacca la griglia posteriore, quindi stringi nuovamente le 4 viti. Immagine Commento Usa le 4 viti di fissaggio grandi fornite...
-
Page 20: Specifiche Tecniche
SPECIFICHE TECNICHE Usa un metodo simile, connetti il tubo dal gruppo motore del vapore al connettore D; Attacca il tubo di collegamento Modello HW-26MC05 separato al connettore C e D sul gruppo motore del vapore. Potenza 260 W Voltaggio Nominale(V/Hz) 220-240V~50 Hz Inserisci il Tubo B nella vaschetta dell’acqua. -
Page 21: Certificato Di Garanzia
40 | 41 CERTIFICATO DI GARANZIA SCHEDA DI GARANZIA Congratulazioni per avere acquistato questo prodotto di alta qualità. Il nostro impegno per la qualità include anche l'assistenza. Nome Cognome Jumbo dispone di un eccellente servizio di riparazione, per tutti e prodottiayce. Qualora si riscontrino difetti relativi ai materiali o alla fabbricazione Via/Num. - Page 22 42 | 43 LISTA DELLE COMPONENTI SCHEMA TECNICO DESCRIZIONE DESCRIZIONE PROTEZIONE VAPORE PIANTANA VENTILATORE DISCO DEL VAPORE MANOPOLA VOLUME VAPORE ALLOGGIAMENTO VAPORE TUBO RICICLO DELL’ACQUA VITE TUBO D’INGRESSO TAPPO DI RICICLO DELL’ACQUA TUBO RICICLO DELL’ACQUA SUPPORTO DEL TAPPO TUBO D’INGRESSO PROTEZIONE FRONTALE VENTILATORE CAVO DI ALIMENTAZIONE MORSETTO PROTETTIVO...
-
Page 23: Description Of The Symbols
44 | 45 DESCRIPTION OF THE SYMBOLS • Carefully read and retain these instructions. • Before connecting the appliance, make sure that the mains volt- age available matches that stipulated on the units’ rating plate. In accordance with European directives applicable to this product. •... -
Page 24: Identification Of Parts
46 | 47 • Unplug or disconnect the appliance from the mains power supply IDENTIFICATION OF PARTS when not in use or before cleaning it. • Store the appliance in a clean, dry location if you do not plan to use it for a long period. -
Page 25: Before Installation
48 | 49 BEFORE INSTALLATION: ASSEMBLY Please always keep original package, so after your seasonal use, you can re-pack them for Warning! Please make sure the power supply is disconnected before assembly. storage. Select a flat area about at least 2 x 2 m to install this fan. Picture Remark Fixing Big screws &... - Page 26 50 | 51 Picture Remark Picture Remark While push the connect on the electrical pump, fit the Loose the 4 screws and fit the rear grille, then re-tight them by the 4 screws. hose A about 5mm into the electrical pump connect, then release the connect.
-
Page 27: Technical Specifications
Additional note service center: Defect products can be returned to every jumbo store during the warranty period. After the warranty period, the ayce products are accepted in any jumbo store, so the product may be tested in accordance. CH-Import & Distributed exclusively by: Jumbo-Markt AG, 8305 Dietlikon www.jumbo.ch... -
Page 28: Warranty Card
54 | 55 TECHNICAL DRAWING WARRANTY CARD First name Last name Street/No. Telephone Postal City Mobil Code Item-number Barcode (EAN) Sales receipt number/Date Warranty (please mark with a cross) (please also attach a copy of the sales receipt) Purchased at Jumbo store Which error occurred (please specify) (Please describe the problem or malfunction of your device as accurately as possible. -
Page 29: Spare Parts List
56 | 57 SPARE PARTS LIST DESCRIPTION DESCRIPTION MIST GUARD FAN STAND MIST DISK MIST VOLUME KNOB MIST HOUSING WATER RECYCLING HOSE SCREW INLET HOSE WATER RECYCLING CUP WATER RECYCLING HOSE CUP HOLDER INLET HOSE FRONT FAN GUARD POWER CORD GUARD CLAMP INNER POLE FIXED SCREW BLADE...