Table des Matières

Publicité

Les langues disponibles
  • FR

Les langues disponibles

  • FRANÇAIS, page 38

Liens rapides

INSTRUCTIONS
FOR USE
MANUAL
GEBRUIKS-
AANWIJZING
MODE
D'EMPLOI
BEDIENUNGS-
ANLEITUNG
MANUAL DE
INSTRUCCIO-
NES DE USO
Assembly diagram - Anschlussschema -Sché-
ma de montage - Verbindingsschema - -Cro-
PODRĘCZNIK
quis de conexiones- Schemat połączeń dla
INSTRUKCJI
nomenklatury
OBSŁUGI

Publicité

Table des Matières
loading

Sommaire des Matières pour FLAEM Smarty P0315EM

  • Page 1 INSTRUCTIONS FOR USE MANUAL GEBRUIKS- AANWIJZING MODE D’EMPLOI BEDIENUNGS- ANLEITUNG MANUAL DE INSTRUCCIO- NES DE USO Assembly diagram - Anschlussschema -Sché- ma de montage - Verbindingsschema - -Cro- PODRĘCZNIK quis de conexiones- Schemat połączeń dla INSTRUKCJI nomenklatury OBSŁUGI...
  • Page 2 Visit our website www.flaem.it to view the whole range of Flaem’s products. Read these instructions carefully in order to use the device correctly. We recommend that you store this manual for future consultation.
  • Page 3: Device Components

    DEVICE COMPONENTS 2G- Nebuliser head 6 - 2 1.5V AA 2- Removable alkaline batteries medication chamber 1- Main Unit 4- Child mask 5- Adult mask 3- Mouthpiece 1A - ON DEMAND nebulisation button 1B - CONTINUOUS nebulisation START AND STOP button 1C - Medication chamber release button 2A - Medicine cup 2B - Nebulising chamber...
  • Page 4: Important Warnings

    1 year (Component subject to wear) • Should your device fail to provide the expected performance, contact the authorised service centre for clarifications. • Repairs must be performed by authorised FLAEM personnel only, by complying with the information provided by the manufacturer. Any...
  • Page 5: Battery Installation

    • Only use original accessories and spare parts by Flaem, we disclaim any liability in the event of using non original spare parts or accessories OPERATING INSTRUCTIONS 1 - BATTERY INSTALLATION 1.a Use a small coin to open the Battery...
  • Page 6: Preparation

    DISASSEMBLY, CLEANING, SANITISATION, DISIN- FECTION instructions (paragraph 5/6) We recommend personal use, both of the nebuliser and accessories to avoid possible risk of infection. Use only FLAEM original accessories. Wash your hands thoroughly before preparing the medication 2.1 Lift the locking clip (2C) of the...
  • Page 7 3 - UNIT CONFIGURATION 3.1 Connect the desired accessory to the Accessories connection port (2F): - Mouthpiece (3) - Child mask (4) - Adult mask (5) If a mask is used, place it on the face as shown in the picture 4 - OPERATION For effective therapy, after setting the appliance up, sit in a comfortable and relaxed position and...
  • Page 8 To switch off the unit, press the button (1B) again. 4.4 Sit comfortably holding the device in your hand, place the Mouthpiece (3) in your mouth then breath in and out slowly through the mouth. Alternatively, you can use the Child Mask (4) or the Adult Mask (5).
  • Page 9 5 - DISASSEMBLY When treatment is finished: 5.1 Press the Medication chamber release button (1C) positioned on the back of the unit. 5.2 Remove the Medication chamber (2). 5.3 To access the Nebuliser head (2G) in the Nebulising chamber(2B) re- lease the Medication cup locking clip and open the Medication cup cover (2D).
  • Page 10 WARNING • Do not use tools: this may cause irreparable damage to the Nebuliser head (2G). • Do not press the centre of the Nebuliser head (2G) with your fingers or tools from the inside: this may cause irreparable damage. 5.7 Carefully clean it according to the CLEANING, SANITISATION, DISIN- FECTION instructions in paragraph 6.
  • Page 11 6 - CLEANING, SANITISATION, DISINFECTION Before and after each use, the device and the accessories must be cleaned and disinfected properly as described below. If this is not done, some microorganisms may collect in the device, causing the risk of in- fection.
  • Page 12 6.2 CLEANING the Main Unit To clean the Main Unit(1) use a cloth slightly moistened with an antibacterial detergent, then dry it with a soft paper towel. WARNING Do not immerse the Main Unit (1) in water and do not wash it under running water. 6.3.
  • Page 13 6.4.1 METHOD A: DISINFECTION BY STEAM 6.4.1.a Disinfect the accessories provided in Table 1 following the disinfection procedure with device for feeding-bottle (without mi- crowave), it requires a treatment duration of at least 15 minutes. It is necessary to use demineralised or distilled water to prevent limestone deposits, which could impair the function of the nebuliser head.
  • Page 14 them with plenty of lukewarm drinkable water. 6.4.3.e DRYING: carefully perform all the operations described in paragraph 6.1.2. of the user manual. 6.4.3.f Dispose of the solution following the instructions provided by the disinfectant manufacturer. method a) method b) method c) method d) METHODS Equipment bot- Boiling with...
  • Page 15 7.3. Close complete pull-out medicine container (2) by rotating the Front Part (2B) towards the Drug Container (2A) until the two Container Buttons (2E) are hooked. 7.4. Close the Medication Cup Cover (2D) by means of the locking clip (2C) 7.5.
  • Page 16 • Used up or low Batteries. Replace or recharge. If after checking the aforementioned conditions, the unit still does not nebulise, we rec- ommend that you contact the dealer or an authorised Flaem service centre.
  • Page 17: Technical Characteristics

    Values shown for the aerosol delivery may also vary depending on the patients respiratory Capacity. * Please visit Smarty.Flaem.it or contact Flaem Nuova S.p.A Via Colli Storici, 221 25015 S. Martino della Battaglia (BS) Italy - Tel +39 030 9910168 for information concerning nebulisation characteristics.
  • Page 18: Disposal Of Device

    For further information visit www.flaemnuova.it website. The Device may be subject to electromagnetic interference if other devices are used for specific diagnosis or treatments. Flaem reserves the right to make technical and functional modifications to the product without notice.
  • Page 19 14 - EXPECTED DURATION Expected duration: The service life of the various components set out below refer to using the device for about 20 min a day (4 appli- cations of 5 min.) Main unit 5 years Masks and Mouthpiece 5 years Medication chamber 1 year...
  • Page 20 Vielen Dank, dass Sie unser Produkt erworben haben. Unser Ziel ist die Zufriedenheit unserer Kunden, indem wir ihnen innovative Produkte zur Vorbeugung und Behandlung der Atemwege anbieten. Informationen zu unseren Produkten finden Sie auf der Website www.flaem.it Lesen Sie diese Anleitung für eine korrekte Anwendung des Gerätes aufmerksam durch.
  • Page 21 BAUTEILE DES GERÄTES COMPONENTI DELL’ APPARECCHIO 2G- Testina di Zerstäubungskopf nebulizzazione 6 Alkalibatterien 2- Medikamentenbecher 6- Batterie Alcalin AA 2x1,5V 2- Serbatoio farmaco vollständig herausziehbar AA 2x1,5V completo estraibile 1- Corpo Gerätegehäuse apparecchio 4- Mascherina 5- Maske für 5- Mascherina 3- Mundstück 3- Boccaglio Maske für Kinder...
  • Page 22: Wichtige Hinweise

    WICHTIGE HINWEISE • Wie jedes andere elektrische Gerät verlangt Smarty vor allem in Anwesenheit von Kindern einige Vorsichtsmaßnahmen. • Das Gerät darf nicht als Spielzeug verwendet werden. Es ist absolute Vorsicht anzuwenden, wenn es von Kindern benutzt wird. • Kinder und pflegebedürftige Personen dürfen das Gerät nur unter strenger Aufsicht eines Erwachsenen verwenden, der die vorliegende Gebrauchsanweisung gelesen hat.
  • Page 23: Einlegen Der Batterien

    • Sollte das Gerät die Leistungen nicht einhalten, ist zur Klärung der autorisierte Kundendienst zu kontaktieren. • Reparaturen dürfen nur von autorisiertem FLAEM-Personal und unter Befolgung der Herstelleranweisungen ausgeführt werden. Nicht autorisierte Reparaturen führen zum Garantieverfall und können gefährlich für den Benutzer sein.
  • Page 24 DEMONTAGE, REINIGUNG, ENTKEIMUNG UND DESINFEKTION. Es wird ein persönlicher Gebrauch sowohl des Zerstäubers als auch der Zubehörteile empfohlen, um mögliche Risiken einer Infektion durch Ansteckung zu umgehen. Nur Originalzubehörteile von Flaem verwenden. Waschen Sie Ihre Hände gründlich, bevor Sie mit der Inhalationstherapie fortfahren.
  • Page 25 3 - GERÄTEKONFIGURATION 3.1 Auf dem Einspannschaft für Zubehör (2F) das gewünschte Zubehör anbringen: - Mundstück (3) - Maske für Kinder (4) - Maske für Erwachsene (5) Wenn Sie die Gesichtsmaske verwenden, bringen Sie sie wie in der Abbildung beschrieben am Gesicht an. 4 - BETRIEB Für eine wirksame Therapie setzen Sie sich nach der Einrichtung des Geräts bequem entspannt...
  • Page 26 (schnelle Anwendung). Zum Ausschalten des Gerätes erneut die Taste (1B) drücken. 4.4 Setzen Sie sich bequem und mit dem Zerstäuber in der Hand hin und setzen Sie das Mundstück (3) an den Mund. Als Alternative dazu kann die Maske für Kinder (4) oder die Maske für Erwachsene (5) verwendet werden.
  • Page 27 5 - DEMONTAGE DES GERÄTES 5.1 Die Taste für Freigabe (1C) auf der Geräterückseite drücken. 5.2 Den Medikamentenbecher (2) vollständig herausziehen. 5.3 Für den Zugriff auf den Zerstäubungskopf (2G) des vollständig herausziehbaren Medikamentenbechers (2) muss der Haken des Becherdeckels gelöst (2C) und der Becherdeckel (2D) geöffnet werden. 5.4 Gleichzeitig die beiden seitlichen Bechertasten (2E) eindrücken.
  • Page 28 ACHTUNG • In dieser Phase keine Werkzeuge verwenden, da dadurch der Zerstäubungskopf (2G) irreparabel beschädigt werden könnte. • Drücken Sie nicht mit den Fingern oder Werkzeugen von innen auf die Mitte des Zerstäubungskopfes (2G) , da dadurch das Gerät irreparabel beschädigt werden könnte.
  • Page 29 6 - REINIGUNG, ENTKEIMUNG UND DESINFEKTION Vor und nach dem Gebrauch müssen die Zubehörteile korrekt gereinigt und desinfiziert werden, siehe nachfolgende Beschreibung. Sollte dies unterlassen werden, können sich Mikroorganismen im Gerät ablagern und das Risiko einer Infektion verursachen. Für die Reinigung des Gerätes keinen Alkohol oder andere Lösungen verwenden.
  • Page 30: Reinigung Gerätegehäuse

    6.2 REINIGUNG Gerätegehäuse Für die Reinigung des Gerätegehäuses (1) verwenden Sie ein leicht mit antibakteriellem Reinigungsmittel angefeuchtetes Tuch . Danach muss es mit einem weichen Papiertuch abgetrocknet werden. ACHTUNG Tauchen Sie das Gerätegehäuse (1) nicht in Wasser und waschen Sie es nicht unter fließendem Leitungswasser.
  • Page 31 6.4.1 METHODE A: DESINFEKTION MIT DAMPF 6.4.1.a Desinfizieren Sie die in Tabelle 1 aufgeführten Zubehörteile mit Hilfe des Desinfektionsverfahrens für Babyflaschen (ohne Mikrowelle) und sorgen Sie für eine Behandlung von mindestens 15 Minuten. Es ist notwendig, demineralisiertes oder destilliertes Wasser zu verwenden, um Kalkablagerungen vermeiden, Betrieb des Zerstäubungskopfes beeinträchtigen...
  • Page 32 Desinfektionsmittels angegeben ist. 6.4.3.d Nehmen Sie das Zubehör und spülen Sie es gründlich mit lauwarmem Trinkwasser aus. 6.4.3.e TROCKNUNG: Alle in Abschnitt 6.1.2 der Bedienungsanleitung beschriebenen Vorgänge sorgfältig ausführen. 6.4.3.f Die Lösung gemäß den Angaben des Herstellers des Desinfektionsmittels entsorgen. Methode a) Methode b) Methode c)
  • Page 33 7.3. Den kompletten herausnehm- baren Medikamentenbecher (2) schließen, dazu den vorderen Teil (2B) zum Medikamentenbe- cher (2A) drehen bis die beiden Bechertasten (2E) eingerastet sind. 7.4. Den Becherdeckel 2D schließen und mit dem Becherdeckelhaken (2C) verriegeln. 7.5. Den kompletten herausnehm- baren Medikamentenbecher (2) auf das Gerätegehäuse (1) setzen und die Führungen an den...
  • Page 34 Stromversorgung • Batterie verbraucht bzw. entladen. Auswechseln oder wieder aufladen. Sollte das Gerät auch nach der Überprüfung der oben beschriebenen Zustände immer noch nicht zerstäuben, empfehlen wir Ihnen, sich an Ihren örtlichen Händler oder ein autorisiertes Flaem-Kundendienstzentrum zu wenden.
  • Page 35: Technische Merkmale

    65% approx Fassungsvermögen Medikamentenbecher 8 ml Die Zerstäubungsrate wurde gemäß dem internen Verfahren von Flaem I29-P07.5 mit 0,9%iger Kochsalzlösung bei 23° C gemessen. Sie kann je nach dem mitgelieferten Zerstäubungskopf, dem Medikament und den Umgebungsbedingungen variieren. Abgabegeschwindigkeitswerte können auch entsprechend der Atmungskapazität des Patienten variieren.
  • Page 36: Entsorgung Des Gerätes

    Für weitere Informationen besuchen Sie die Internetseite www.flaemnuova.it. Das Gerät könnte, wenn andere Vorrichtungen für spezifische Diagnosen oder Behandlungen vorhanden sind, elektromagnetische Interferenzen erfahren. Flaem behält sich das Recht vor, ohne Vorankündigung technische und den Betrieb betreffende Änderungen am Produkt vorzunehmen.
  • Page 37 14 - VORGESEHENE LEBENSDAUER Vorgesehene Lebensdauer Die Lebensdauer der verschiedenen unten aufgeführten Bauteile bezieht sich auf einen Gebrauch des Gerätes von circa 20 Minuten pro Tag (4 Anwendungen von je 5 Min.) Haupteinheit 5 Jahre Masken und Mundstück 5 Jahre Kompletter Medikamentenbecher 1 Jahr Zerstäubungskopf...
  • Page 38: Appareil Portable Pour Aérosolthérapie Avec Technologie Pmvt (Passive Mesh Vibrating Technology)

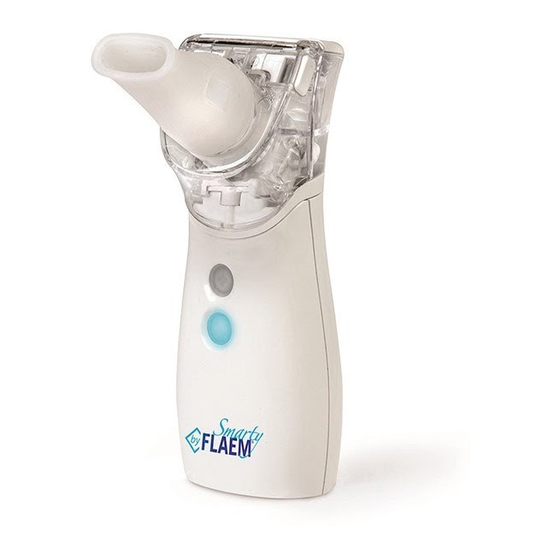
    Nous vous remercions pour votre achat. Nous avons pour objectif l'entière satisfaction de nos clients en leur offrant des produits à l'avant-garde pour la prévention et la thérapie des voies respiratoires. Pour plus d'informations sur nos produits, visitez le site www.flaem. Veuillez lire attentivement ces instructions afin d'utiliser correctement l’appareil.
  • Page 39 COMPOSANTS DE L'APPAREIL COMPONENTI DELL’ APPARECCHIO 2G- Tête de 2G- Testina di nébulisation nebulizzazione 6- Piles alcalines 2- Réservoir médicament 6- Batterie Alcaline AA 2x1,5V 2- Serbatoio farmaco amovible complet AA 2x1,5V completo estraibile 1- Corpo 1- Corps apparecchio appareil 4- Masque 4- Mascherina 5- Mascherina...
  • Page 40: Avertissements Importants

    AVERTISSEMENTS IMPORTANTS • Comme tout appareil électrique, spécialement en présence d'enfants, Smarty requiert certaines précautions. • L'appareil ne doit pas être utilisé comme jouet. Il est recommandé de faire très attention lorsqu'il est utilisé par des enfants. • Si l’appareil est utilisé par ou en présence d'enfants et de personnes non autonomes, la surveillance étroite d'un adulte ayant lu ce manuel est nécessaire.
  • Page 41: Instructions Pour L'emploi

    éclaircissements. • Les réparations doivent être effectuées uniquement par le personnel FLAEM, en suivant les informations fournies par le fabricant. Les réparations non autorisées annulent la garantie et peuvent constituer un danger pour son utilisateur.
  • Page 42 NETTOYAGE, ASSAINISSEMENT ET DÉSINFECTION. L’usage personnel aussi bien des nébuliseurs que des accessoires est conseillé pour éviter les éventuels risques d'infection par contagion. Utilisez uniquement des accessoires Flaem d'origine. Lavez-vous soigneusement les mains avant de procéder à la préparation de la thérapie par inhalation.
  • Page 43: Configuration De L'appareil

    3 - CONFIGURATION DE L’APPAREIL 3.1 Appliquez l’ergot raccord Accessoires (2F), l’accessoire souhaité : - Embout (3) - Masque pédiatrique (4) - Masque adulte (5) Si vous utilisez l'accessoire masque, appliquez-le sur le visage comme illustré sur la figure. 4 - FONCTIONNEMENT Pour une thérapie efficace, après avoir configuré...
  • Page 44 du médicament en mode « CONTINUER » (application rapide). Pour éteindre l’appareil, appuyez à nouveau sur la Touche (1B). 4.4 Asseyez-vous confortablement en tenant le nébuliseur dans la main, posez l'embout (3) sur la bouche. Vous pouvez également utiliser le Masque pédiatrique (4) ou le Masque adulte (5) 4.5 Pour augmenter l'efficacité...
  • Page 45: Démontage De L'appareil

    5 - DÉMONTAGE DE L'APPAREIL 5.1 Appuyez sur le bouton de décrochage (1C) situé sur l’arrière de l’appa- reil. 5.2 Sortez le réservoir de médicament amovible complet (2). 5.3 Pour accéder à la tête de nébulisation (2G) du réservoir de médica- ment amovible complet (2), décrochez le crochet du couvercle du ré- servoir (2C) et ouvrez le couvercle du réservoir (2D).
  • Page 46 ATTENTION • N'utilisez pas d'outils au cours de cette phase car vous pourriez endommager irrémédiablement la tête de nébulisation (2G). • N'appuyez pas sur le centre de la tête de nébulisation (2G) avec vos doigts ou des outils, car vous pourriez l'endommager irrémédiablement. 5.7 Effectuez le nettoyage complet comme indiqué...
  • Page 47: Nettoyage, Assainissement, Désinfection

    6 - NETTOYAGE, ASSAINISSEMENT, DÉSINFECTION Avant et après chaque utilisation, l'appareil et les accessoires doivent être nettoyés et désinfectés correctement, comme décrit ci-dessous. Si cela n’est pas effectué, certains micro-organismes peuvent se déposer dans l'appareil, entraînant un risque d'infection. N'utilisez pas d'alcool ou d’autres solvants pour nettoyer le dispositif.
  • Page 48: Nettoyage Corps Appareil

    6.2 NETTOYAGE Corps appareil Utilisez un chiffon légèrement humidifié avec un détergent antibactérien pour nettoyer le corps de l'appareil (1). Puis séchez-le avec une serviette en papier essuie tout. ATTENTION Ne plongez pas le corps de l'appareil (1) dans l'eau et ne le lavez pas sous le jet d'eau du robinet.
  • Page 49: Méthode A : Désinfection À La Vapeur

    6.4.1 MÉTHODE A : DÉSINFECTION À LA VAPEUR 6.4.1.a Désinfectez les accessoires prévus dans le tableau 1 à l’aide de la procédure de désinfection avec un appareil pour biberons (sans micro- ondes), il faut prévoir un traitement d'au moins 15 minutes. L'utilisation d'eau déminéralisée ou distillée est nécessaire pour éviter les dépôts calcaires, qui pourraient compromettre le fonctionnement de la tête de nébulisation.
  • Page 50: Remontage De L'appareil

    abondamment à l'eau potable tiède. 6.4.3.e SÉCHAGE : effectuez soigneusement toutes opérations décrites paragraphe 6.1.2. du mode d’emploi. 6.4.3.f Éliminez la solution selon les indications fournies par le fabricant du désinfectant. méthode a) méthode b) méthode c) méthode d) MÉTHODES Appareil pour Ébullition PARTIES...
  • Page 51: Insérez Le Réservoir

    7.3. Fermez réservoir médicament amovible complet (2) en tournant la partie avant (2B) vers le réservoir de médicament (2A) jusqu'à ce que les deux boutons du réservoir (2E) soient accrochés. 7.4. Fermez le couvercle du réservoir (2D) et bloquez-le avec le crochet du couvercle du réservoir (2C).
  • Page 52: Identification Des Pannes

    • Piles usées ou déchargées. s'allume pas électrique Remplacez-les ou rechargez- les. Si, après avoir vérifié les conditions susmentionnées, l'appareil ne nébulise toujours pas, nous vous recommandons de contacter votre revendeur de confiance ou un centre de service agréée Flaem.
  • Page 53: Caractéristiques Techniques

    8 ml La vitesse de nébulisation a été mesurée avec une solution saline à 0,9% à 23 °C selon la procédure interne Flaem I29-P07.5., elle peut varier en fonction de la tête de nébulisation fournie, du médicament et des conditions environnementales.
  • Page 54: Élimination De L'appareil

    électro-médicaux. Pour plus d'informations, visitez le site Web www.flaemnuova. it. L’appareil peut être sensible aux interférences électromagnétiques en présence d’autres dispositifs utilisés pour des diagnostics ou des traitements spécifiques. Flaem se réserve le droit d'apporter des modifications techniques et fonctionnelles au produit sans aucun préavis.
  • Page 55: Durée Prévue

    14 - DURÉE PRÉVUE Durée prévue : La durée des différents composants reportés ci-dessous est liée à une utilisation du dispositif d'environ 20 minutes par jour (4 applications de 5 minutes). Unité principale 5 ans Masques et embout 5 ans Réservoir de médicament complet 1 an Tête de nébulisation 1 an...
  • Page 56 Bezoek voor informatie over onze producten de website www.flaem.it Lees deze instructies aandachtig om correct gebruik te maken van het apparaat.
  • Page 57 ONDERDELEN VAN HET APPARAAT COMPONENTI DELL’ APPARECCHIO 2G- Testina di 2G- Vernevelings- nebulizzazione Alkalinebatterijen 2- Geneesmiddelen 6- Batterie Alcalin AA 2x1,5V 2- Serbatoio farmaco reservoir volledig AA 2x1,5V completo estraibile uitneembaar 1- Corpo 1- Romp apparecchio apparaat 4- Masker 3- Mondstuk 5- Volwassenemasker 4- Mascherina 5- Mascherina...
  • Page 58: Belangrijke Waarschuwingen

    BELANGRIJKE WAARSCHUWINGEN • Met als ieder ander elektrisch apparaat vereist Smarty enkele bijzondere voorzorgsmaatregelen, vooral wanneer kinderen aanwezig zijn. • Het apparaat mag niet als speelgoed gebruikt worden. Er wordt aanbevolen maximaal alert te zijn wanneer het door kinderen gebruikt wordt. •...
  • Page 59: Plaatsing Van De Batterijen

    • De reparaties mogen uitsluitend uitgevoerd worden door geautoriseerd personeel van FLAEM, volgens de informatie die door de fabrikant verstrekt is. Niet geautoriseerde reparaties zullen leiden tot het verval van de garantie en kunnen gevaar opleveren voor de gebruiker.
  • Page 60 DEMONTAGE, REINIGING, ONTSMETTING EN DESINFECTIE. Er wordt een persoonlijk gebruik aangeraden van zowel de vernevelaar als de accessoires, om eventuele risico’s van infecties en besmetting te voorkomen. Gebruik alleen originele accessoires van Flaem. Was uw handen zorgvuldig alvorens de inhalatietherapie gereed te maken.
  • Page 61 3 - CONFIGURATIE VAN HET APPARAAT 3.1 Breng op de Steel voor Aankoppeling Accessoires (2F) het gewenste accessoire aan: - Mondstuk (3) - Kindermasker (4) - Volwassenemasker (5) Als u het masker wilt gebruiken, houd het dan tegen het gezicht zoals de afbeelding toont.
  • Page 62 toepassing). Druk om het apparaat uit te schakelen opnieuw op de Toets (1B). 4.4 Ga gemakkelijk zitten en houd de vernevelaar in de uw hand, plaats het Mondstuk (3) op uw mond. Als alternatief kunt u het Kindermasker (4) of het Volwassenemasker (5) gebruiken 4.5 Om de doeltreffende werking van de therapie te verhogen, ademt u langzaam diep in en houd u uw adem na de inademing even in, zodat...
  • Page 63 5 - DEMONTAGE VAN HET APPARAAT 5.1 Druk op de Ontkoppelingsknop (1C) op de achterkant van het apparaat. 5.2 Trek het volledig uitneembare Geneesmiddelenreservoir (2) naar buiten. 5.3 Om toegang te krijgen tot de vernevelingskop (2G) van het volledig uitneembare Geneesmiddelenreservoir (2), moet de Haak van het Reservoirdeksel (2C) ontkoppeld worden en het Reservoirdeksel (2D) geopend worden.
  • Page 64 LET OP • Gebruik geen werktuigen in deze fase, daarmee kan de Vernevelingskop (2G) op onherstelbare wijze schade berokkend worden. • Druk niet van binnenuit met uw vingers of met werktuigen op het midden van de Vernevelingskop (2G), deze kan hierdoor op onherstelbare wijze schade berokkend worden. 5.7 Ga over tot de volledige reiniging, zoals geïllustreerd wordt in hoofdstuk 6.
  • Page 65: Reiniging Accessoires En Uitneembare Bovenkant

    6 - REINIGING, ONTSMETTING EN DESINFECTIE Voor en na ieder gebruik moeten het apparaat en de accessoires correct gereinigd en gedesinfecteerd worden zoals hierna beschreven wordt. Gebeurt dat niet, dan kunnen enkele micro-organismen in het apparaat terechtkomen en een risico op infecties veroorzaken. Gebruik geen alcohol of andere oplosmiddelen voor de reiniging van het hulpmiddel.
  • Page 66 6.2. REINIGING Romp Apparaat Gebruik een doek die een beetje vochtig gemaakt is met een antibacterieel reinigingsmiddel voor de reiniging van de Romp van het Apparaat (1). Droog het vervolgens met een zachte papieren servet. LET OP Dompel de Romp van het Apparaat (1) niet onder in water en was het niet onder de waterstraal van de kraan.
  • Page 67 6.4.1 METHODE A: DESINFECTIE MET STOOM 6.4.1.a Desinfecteer de accessoires die aangeduid worden in Tabel 1 door middel van de desinfectieprocedure met het apparaat voor zuigflesjes (zonder magnetron), laat de behandeling minstens 15 minuten duren. Het is nodig gebruik te maken van gedemineraliseerd of gedestilleerd water om kalkaanslag te voorkomen, wat de werking van de vernevelingskop zou kunnen compromitteren.
  • Page 68 overvloedig lauw drinkwater. 6.4.3.e DROGING: voer met aandacht alle handelingen uit die beschreven worden in paragraaf 6.1.2. van de handleiding voor het gebruik. 6.4.3.f Verwijder de oplossing volgens de aanwijzingen van de fabrikant van het ontsmettingsmiddel. methode a) methode b) methode c) methode d) METHODEN Apparaat voor de...
  • Page 69 7.3. Sluit het volledig uitneembare Geneesmiddelenreservoir door de Voorkant (2B) naar het Geneesmiddelenreservoir (2A) te draaien tot aankoppeling van de twee Reservoirknoppen (2E) plaatsvindt. 7.4. Sluit het Reservoirdeksel (2D) e en blokkeer het met de Haak van het Reservoirdeksel (2C). 7.5.
  • Page 70: Storingen Opsporen

    • Batterijen uitgeput of leeg. Vervangen of opladen. Als het apparaat na controle van bovenstaande omstandigheden nog niet vernevelt, raden wij aan dat u zich tot uw vertrouwensverkoper wendt, of tot een erkend assistentiecentrum van Flaem.
  • Page 71: Technische Kenmerken

    De waarden van de afgiftesnelheid kunnen ook variëren op grond van de ademhalingscapaciteit van de patiënt. * Zie voor de vernevelingskenmerken de website Smarty.Flaem.it of vraag ze aan bij Flaem Nuova S.p.A. Via Colli Storici, 221 25015 S. Martino della Battaglia (BS) Italy - Tel. +39 0309910168...
  • Page 72: Elektromagnetische Compatibiliteit

    Bezoek voor meer informatie de website www.flaemnuova.it. Het apparaat kan gevoelig zijn voor elektromagnetische interferentie als andere hulpmiddelen aanwezig zijn die gebruikt worden voor specifieke diagnoses of behandelingen. Flaem behoudt zich het recht voor zonder voorafgaande kennisgeving technische en functionele wijzigingen op het product aan te brengen.
  • Page 73: Beschikbare Reserveonderdelen En Accessoires

    14 - BEOOGDE DUUR Beoogde duur: De tijden van de duur van de diverse onderdelen, die hier- na vermeld worden, hebben betrekking op een gebruik van het hulpmiddel van circa 20 mi per dag (4 toepassin- gen van 5 min.) Hoofdeenheid 5 jaar Maskers en mondstuk...
  • Page 74 Para informaciones sobre nuestros productos visite el sitio web: www.flaem.it Lea atentamente estas instrucciones para utilizar correctamente el aparato. Le aconsejamos que guarde con atención este manual para posibles consultas.
  • Page 75 COMPONENTES DEL APARATO COMPONENTI DELL’ APPARECCHIO 2G- Cabezal de 2G- Testina di nebulización nebulizzazione 6- Pilas Alcalinas 2- Depósito de 6- Batterie Alcalin AA 2x1,5V 2- Serbatoio farmaco medicamento AA 2x1,5V completo estraibile completo extraíble 1- Corpo 1- Cuerpo del aparato apparecchio 4- Mascarilla...
  • Page 76: Advertencias Importantes

    ADVERTENCIAS IMPORTANTES • Como cualquier aparato eléctrico, sobre todo en presencia de niños, Smarty requiere algunas precauciones. • El aparato no debe usarse como un juguete. Se recomienda prestar la máxima atención cuando lo usan niños. • Si el aparato se usa por o en presencia de niños y de personas no autosuficientes, el aparato se debe usar bajo la estricta supervisión de un adulto que haya leído este manual.
  • Page 77 • Utilice solo accesorios y partes de recambios originales Flaem, se declina cualquier responsabilidad en caso de que se utilicen recambios o accesorios no originales.
  • Page 78 HIGIENIZACIÓN Y DESINFECCIÓN. Se recomienda el uso personal del nebulizador y de los accesorios, para evitar posibles riesgos de infección por contagio. Utilice únicamente accesorios originales Flaem. Lávese bien las manos antes de comenzar la terapia de inhalación. 2.1 Suba el Gancho (2C) de la Tapa (2D) 2.2 Abra la Tapa (2D) completamente...
  • Page 79: Configuración Del Aparato

    3 - CONFIGURACIÓN DEL APARATO 3.1 Coloque el accesorio que se quiere en el Acoplamiento de codo Accesorios (2F): - Boquilla (3) - Mascarilla pediátrica (4) - Mascarilla para adultos (5) Si utiliza el accesorio de la mascarilla apóyela en la cara como se muestra en la figura.
  • Page 80 rápida). Para apagar el aparato presione de nuevo la Tecla (1B). 4.4 Siéntese cómodamente sujetando con la mano el nebulizador y apoye la Boquilla (3) en la boca. Como alternativa puede usar la Mascarilla Pediátrica (4) o la Mascarilla para Adulto (5) 4.5 Para aumentar la eficacia de la terapia respire lentamente y a fondo y tras la inspiración, retenga la respiración durante unos segundos, para que el...
  • Page 81: Desmontaje Del Aparato

    5 - DESMONTAJE DEL APARATO 5.1 Presione el Botón de Desenganche (1C) situado en la parte trasera del aparato. 5.2 Saque el Depósito de medicamento completo extraíble (2). 5.3 Para llegar al Cabezal de nebulización (2G), del Depósito de medicamento completo extraíble (2), desenganche el Gancho de la Tapa del Depósito (2C) y abra la Tapa del Depósito (2D).
  • Page 82 ATENCIÓN • En esta fase no use herramientas que puedan dañar el Cabezal de nebulización (2G), de manera irremediable. • No presione el centro del Cabezal de nebulización (2G) desde el interior, con los dedos o con las herramientas, puede dañarlo de forma irremediable.
  • Page 83 6 - LIMPIEZA, HIGIENIZACIÓN Y DESINFECCIÓN Antes y después de cada uso deben limpiarse y desinfectarse el aparato y los accesorios, correctamente, como se describe a continuación. Si no se hace, se pueden depositar algunos microorganismos en el aparato, provocando infecciones. No use alcohol u otros solventes para limpiar el dispositivo.
  • Page 84: Limpieza Del Cuerpo Del Aparato

    6.2 LIMPIEZA del Cuerpo del Aparato Use un trapo un poco humedecido con detergente antibacteriano, para limpiar el Cuerpo del Aparato (1). A continuación séquelo con una servilleta de papel suave. ATENCIÓN No sumerja el Cuerpo del Aparato (1) en agua y no lo lave debajo del grifo.
  • Page 85 6.4.1 MÉTODO A: DESINFECCIÓN CON VAPOR 6.4.1.a Desinfecte los accesorios que se incluyen en la Tabla 1 mediante el procedimiento de desinfección para biberones (sin microondas), se necesita un tratamiento de 15 minutos por los menos. Es necesario usar agua desmineralizada o destilada, para evitar depósitos de cal que podrían comprometer el funcionamiento del cabezal de nebulización.
  • Page 86 6.4.3.d Tome accesorios enjuáguelos con abundante agua potable templada. 6.4.3.e SECADO: haga atentamente todas las operaciones descritas en el apartado 6.1.2. del manual de uso. 6.4.3.f Elimine la solución siguiendo las instrucciones suministradas por el fabricante del desinfectante. método a) método b) método c) método d)
  • Page 87 7.3. Cierre Depósito medicamento completo extraíble (2) girando la Parte delantera (2B) hacia el Depósito de medicamento (2A) hasta que se activen los dos Botones de Depósito (2E). 7.4. Cierre la Tapa del Depósito (2D) y bloquee con el Gancho de la Tapa del Depósito (2C).
  • Page 88: Localización De Averías

    • Pilas gastadas o descargadas. Cambie o recargue. Si, después de haber comprobado las condiciones descritas anteriormente, el aparato todavía no nebuliza, aconsejamos que se ponga en contacto con su distribuidor de confianza o con el centro de asistencia autorizado Flaem más cercano.
  • Page 89: Características Técnicas

    Los valores de Velocidad de distribución pueden variar también, en base a la capacidad respiratoria del paciente. * Para las características de nebulización vea el sitio web de Smarty.Flaem.it o solicítelas a Flaem Nuova S.p.A. Via Colli Storici, 221 25015 S. Martino della Battaglia (BS) Italia - Tel. +39 0309910168...
  • Page 90: Eliminación Del Aparato

    Para más información, visite el sitio de Internet www.flaem.it. El aparato puede ser susceptible de interferencia electromagnética en presencia de otros dispositivos utilizados para diagnósticos o tratamientos específicos. Flaem se reserva el derecho de realizar modificaciones técnicas y funcionales al producto sin necesidad de previo aviso.
  • Page 91 14 - DURACIÓN ESTIMADA Duración estimada: Los tiempos de duración de cada uno de los componentes indicados a continuación, se refieren a un uso del dispositivo de 20 min al día aproximadamente (4 aplicaciones de 5 min.) Unidad principal 5 años Mascarilla y boquilla 5 años Depósito de medicamento completo 1 año...
  • Page 92 Jednostka ta może być wykorzystywana w strukturach leczniczych (szpitale, kliniki itp.) oraz w domu. UWAGA ABY ZAPOBIEC USZKODZENIU NASADKI DO NEBULIZACJI, STOSOWAĆ RYGORYSTYCZNIE KOLEJNOŚĆ PODANĄ PONIŻEJ W PUNKTACH OD 1 DO 4 Więcej informacji można uzyskać, oglądając tutrial wideo, który jest dostępny po kliknięciu w link smarty.flaem.it...
  • Page 93 CZĘŚCI SKŁADOWE URZĄDZENIA COMPONENTI DELL’ APPARECCHIO 2G – Nasadka 2G- Testina di do nebulizacji nebulizzazione 6 – Baterie 2 – Zbiornik na lek 6- Batterie Alcali alkaliczne 2- Serbatoio farmaco kompletny wyjmowany AA 2 x 1,5 V AA 2x1,5V completo estraibile 1- Corpo 1 –...
  • Page 94: Ważne Ostrzeżenia

    WAŻNE OSTRZEŻENIA • Jak każde urządzenie elektryczne, szczególnie stosowane w obecności dzieci, tak i Smarty wymaga zachowania pewnych środków ostrożności. • Urządzenie nie może być używane w charakterze zabawki. Podczas używania urządzenia przez dzieci należy zachować szczególną ostrożność. • Jeżeli urządzenie używane jest przez dzieci lub w ich obecności, powinno znajdować...
  • Page 95: Instrukcja Obsługi

    Jeśli to konieczne, skontaktować się z nim również w celu uzyskania wyjaśnień związanych z użyciem i/lub konserwacją/czyszczeniem. • Należy używać wyłącznie oryginalnych akcesoriów i części zamiennych Flaem. Producent nie ponosi żadnej odpowiedzialności w przypadku stosowania nieoryginalnych części zamiennych lub akcesoriów.
  • Page 96 5/6. DEMONTAŻ, CZYSZCZENIE, ODKAŻANIE I DEZYNFEKCJA. Zarówno nebulizator, jak i akcesoria powinny być stosowane do użytku osobistego, aby zapobiec ewentualnemu ryzyku zakażenia kontaktowego. Należy używać wyłącznie oryginalnych akcesoriów Flaem. Przed rozpoczęciem przygotowywania terapii inhalacyjnej dokładnie umyć ręce.
  • Page 97 3 – KONFIGURACJA URZĄDZENIA 3.1 Nałożyć na końcówkę do mocowania akcesoriów (2F) jedno z wybranych akcesoriów: - Ustnik (3) - Maskę dla dzieci (4) - Maskę dla dorosłych (5) W przypadku używania maski należy umieścić ją na twarzy w sposób pokazany na rysunku. 4 –...
  • Page 98 podawanie leku w trybie „CIĄGŁYM” (szybka aplikacja). Aby wyłączyć urządzenie, nacisnąć ponownie przycisk (1B). 4.4 Usiąść wygodnie, trzymając nebulizator w ręku, i przytknąć ustnik (3) do ust. Opcjonalnie można użyć maski dla dzieci (4) lub maski dla dorosłych (5) 4.5 Aby zwiększyć...
  • Page 99: Demontaż Urządzenia

    5 – DEMONTAŻ URZĄDZENIA 5.1 Nacisnąć przycisk odłączania (1C), który znajduje się z tyłu urządzenia. 5.2 Wysunąć kompletny wyjmowany zbiornik na lek (2). 5.3 Aby uzyskać dostęp do nasadki do nebulizacji (2G), kompletnego wyjmowanego zbiornika na lek (2), odłączyć zaczep pokrywy zbiornika (2C) i otworzyć...
  • Page 100 UWAGA • W fazie tej nie używać narzędzi. Mogłoby to spowodować nieodwracalne uszkodzenie nasadki do nebulizacji (2G). • Nie naciskać od wewnątrz nasadki do nebulizacji (2G) palcami ani narzędziami. Mogłoby to spowodować nieodwracalne jej uszkodzenie. 5.7 Wykonać kompletne czyszczenie, zgodnie z opisem w rozdziale 6. CZYSZCZENIE, ODKAŻANIE I DEZYNFEKCJA.
  • Page 101 6 – CZYSZCZENIE, ODKAŻANIE I DEZYNFEKCJA Przed każdym użyciem i po jego zakończeniu akcesoria należy wyczyścić i prawidłowo zdezynfekować, zgodnie z poniższym opisem. W przypadku niewykonania tych procedur w urządzeniu mogą osadzać się mikroorganizmy, powodując zagrożenie infekcją. Do czyszczenia urządzenia nie używać alkoholu ani innych rozpuszczalników. 6.1.
  • Page 102 6.2. CZYSZCZENIE korpusu urządzenia czyszczenia korpusu urządzenia używać ściereczki lekko zwilżonej detergentem antybakteryjnym. Osuszyć serwetką z miękkiej bibuły. UWAGA Nie zanurzać korpusu urządzenia (1) w wodzie i nie myć go pod strumieniem wody z kranu. 6.3. ODKAŻANIE 6.3.1. Zanurzyć na co najmniej 30 min. otwarty kompletny zbiornik na lek (2) oraz akcesoria 2G-3-4-5 w roztworze przygotowanym z 50% wody i 50% octu...
  • Page 103 6.4.1 METODA A: DEZYNFEKCJA PAROWA 6.4.1.a Zdezynfekować akcesoria wskazane w tabeli 1 z wykorzystaniem procedury dezynfekcji za pomocą urządzenia do butelek dla niemowląt (bez mikrofali). Procedura powinna trwać co najmniej 15 minut. Należy używać wody demineralizowanej lub destylowanej, aby zapobiec odkładaniu się kamienia, który mógłby zakłócać...
  • Page 104 odpowiednio do wybranego stężenia roztworu. 6.4.3.d Następnie akcesoria obficie wypłukać letnią wodą o jakości wody pitnej. 6.4.3.e SUSZENIE: wykonać uważnie wszystkie czynności opisane w punkcie 6.1.2. instrukcji obsługi. 6.4.3.f Usunąć roztwór zgodnie z zaleceniami producenta środka dezynfekującego. metoda a) metoda b) metoda c) metoda d) METODY...
  • Page 105 7.3. Zamknąć kompletny wyjmowany zbiornik na lek ( 2 ), obracając część przednią ( 2B ) w kierunku zbiornika leku ( 2A ) aż do zatrzaśnięcia dwóch przycisków zbiornika ( 2E ). 7.4. Zamknąć pokrywę zbiornika (2D) i zablokować za pomocą zaczepu pokrywy zbiornika...
  • Page 106: Wyszukiwanie Usterek

    Urządzenie nie • Problem z zasilaniem prawidłowej biegunowości. włącza się elektrycznym • Wyczerpane lub zużyte baterie Wymienić lub naładować Jeżeli po sprawdzeniu wyżej opisanych warunków urządzenie nadal nie aktywuje nebulizacji, należy skontaktować się z odsprzedawcą lub z najbliższym autoryzowanym serwisem Flaem.
  • Page 107: Charakterystyka Techniczna

    Wartości prędkości podawania mogą zmieniać się w zależności od zdolności oddechowej pacjenta. *Aby uzyskać informacje o charakterystyce nebulizacji, należy odwiedzić stronę internetową Smarty.Flaem. it lub zwrócić się do Flaem Nuova S.p.A. Via Colli Storici, 221 25015 S. Martino della Battaglia (BS) Italy – Tel. +39 0309910168 WYKORZYSTANE CZĘŚCI...
  • Page 108: Kompatybilność Elektromagnetyczna

    Aby uzyskać więcej informacji, zapraszamy na stronę internetową www.flaemnuova.it. Urządzenie może być podatne na zakłócenia elektromagnetyczne w obecności innych urządzeń używanych do diagnostyki lub leczenia. Flaem zastrzega sobie prawo do wprowadzania w produkcie zmian technicznych i funkcjonalnych bez obowiązku uprzedzenia.
  • Page 109 14 – PRZEWIDZIANY OKRES EKSPLOATACJI Przewidziany okres eksploatacji: Podane poniżej okresy eksploatacji poszczególnych komponentów odnoszą się do urządzenia pracującego ok. 20 min. dziennie (4 aplikacje 5-minutowe). Jednostka główna 5 lat Maski i ustnik 5 lat Kompletny zbiornik na lek 1 rok Nasadka do nebulizacji 1 rok (komponent ulegający zużyciu)
  • Page 110 MEMO...
  • Page 111 MEMO...
  • Page 112 Gwarancja: Gwarancja zostaną dostarczone przez lokalnego sprzedawcy, zgodnie z obowiązującymi przepisami prawa. Fabbricante 0051 FLAEM NUOVA S.p.A. Via Colli Storici, 221 25015 S. MARTINO DELLA BATTAGLIA (Brescia) – ITALY Tel. +39 030 9910168 r.a. Fax +39 030 9910287 © 2019 FLAEM NUOVA® All rights reserved Cod. 17014C0 rev. 10/2019...

Table des Matières