ALFRA ROTABEST RB 35 SP Manuel D'utilisation

Masquer les pouces Voir aussi pour ROTABEST RB 35 SP:

Publicité

Les langues disponibles
  • FR

Les langues disponibles

Liens rapides

Bedienungsanleitung / Operation Instructions / Manuel d'utilisation /
Manual de instrucciones / Istruzioni per l'uso
ALFRA ROTABEST RB 35 SP
Metallkernbohrmaschine
Metal Core Drilling Machine
Perceuse à socle magnétique
Taladro electromagnético
Carotatore a base elettromagnetica
Artikel Nr. 18801 / Prod.-No. 18801 / Art.-n° 18801 / Nº de producto 18801 / N. articolo 18801

Publicité

Table des Matières
loading

Sommaire des Matières pour ALFRA ROTABEST RB 35 SP

  • Page 1 Bedienungsanleitung / Operation Instructions / Manuel d'utilisation / Manual de instrucciones / Istruzioni per l’uso ALFRA ROTABEST RB 35 SP Metallkernbohrmaschine Metal Core Drilling Machine Perceuse à socle magnétique Taladro electromagnético Carotatore a base elettromagnetica Artikel Nr. 18801 / Prod.-No. 18801 / Art.-n° 18801 / Nº de producto 18801 / N. articolo 18801...
  • Page 2 Inhaltsverzeichnis / Contents / Table des matières / Índice Sicherheitshinweise, Bestimmungsgemäße Verwendung, Technische Daten, Verfügbares Zubehör, Gerätebeschreibung, Inbetriebnahme, Magnetsensor LED, Motor Not Aus, Deaktivieren des Sensors und des automatischen Motor Not Vor Inbetriebnahme Aus, Motor LED auf dem Bedienfeld, Kohlen- lesen und Seite 3 Verschleißkontrolle, Arbeiten mit Kernbohrern, Besonderheiten...
  • Page 3: Sicherheitshinweise

    Sicherheitshinweise Beim Arbeiten mit dieser Maschine entstehen durch unsachgemäße Handhabung und / oder schlechte Wartung erhebliche Gefahren, die zu schweren Unfällen mit erheblichen körperlichen Schäden und Zerstörung der Maschine führen können. Bitte lesen und befolgen Sie die folgenden Informationen und Sicherheitshinweise dieser Bedienungsanleitung sehr genau und wenden Sie sich bei Fragen an den Hersteller.
  • Page 4 Technische Daten Artikel – Nr.: 18801 Bezeichnung: Rotabest RB 35 SP Leistungsaufnahme: 1100 Watt Lastdrehzahl: -min Werkzeugaufnahme: ¾“ ; 19mm Weldon Spannung: 230 V 50/60 Hz Bohr Ø max. in Stahl - Kernbohrer: 12 - 35 mm - Spiralbohrer: bis Ø13 mm DIN 338 Hub: 105 mm + 80 mm Höhenverstellung an Schlitten...
  • Page 5: Gerätebeschreibung

    Gerätebeschreibung Die Magnetkernbohrmaschine kann mit einem mechanisch schaltbaren Permanentmagneten an ferromagnetischen Werkstücken befestigt werden. Hierfür muss der Hebel des Magneten herunter gedrückt werden und die Sicherheitslasche korrekt einrasten. Über das Bedienfeld mit großen Tasten kann der Motor ein- und ausgeschaltet werden. Die LEDs auf dem Motorbedienfeld und an der Maschine verdeutlichen den Betriebszustand des Motors und die Haftkraft des Magneten.
  • Page 6 Inbetriebnahme Sie erhalten eine vollständig montierte Magnetkernbohrmaschine und eine detaillierte Bedienungsanleitung. Bitte prüfen Sie bei erhalt der Ware den Zustand auf etwaige Transportschäden und einen vollständigen Lieferumfang. Andernfalls kontaktieren Sie umgehend den Hersteller. Vor dem ersten Gebrauch unbedingt die Bedienungsanleitung lesen! Zuerst Kabel und Stecker auf Beschädigung prüfen und den Netzstecker einstecken.
  • Page 7 Magnet-Sensor LED Die LED über dem Bedienfeld signalisiert den Zustand der Maschine und die Haftung des Magneten. Magnet aus LED aus Motor aus Magnet an und ausreichende Haftkraft LED grün Motor kann beliebig ein/aus – geschaltet werden Magnet an und sehr geringe Haftkraft. Arbeiten Sie nur mit sehr niedrigem Vorschub LED rot Motor kann beliebig ein/aus –...
  • Page 8 Hierbei wird auch die Motor-Not-Aus Funktion deaktiviert. Verletzungsgefahr. Ausschließlich der Anwender ist für einen sachgerechten, sicheren Umgang mit der Kernbohrmaschine verantwortlich. Motor LED auf dem Bedienfeld Die LED auf dem Bedienfeld signalisiert den Zustand des Motors und der Kohlebürsten. Motor aus LED aus Motor an LED grün...
  • Page 9 Arbeiten mit Kernbohrern Schnellwechselaufnahme nur auf der planen Spannfläche des Kernbohrers nutzen. • Auswerferstift (Zentrierstift) durch den Kernbohrerkopf schieben. • Plane Spannfläche des Kernbohrers an der Markierung im Drehring ausrichten und den Drehring der Schnellwechselaufnahme vollständig nach rechts drehen um den Spannstein zu öffnen. •...
  • Page 10 Besonderheiten im Umgang mit schaltbaren Permanentmagneten Auf der Unterseite der Magnetkernbohrmaschine befindet sich die Magnethaftfläche, welche im aktivierten Zustand über den Magnetfluss die Haftkraft erzeugt. Der Magnet lässt sich unabhängig von der Netzspannung über das Herunterdrücken des Hebels aktivieren. Zum Lösen muss die schwarze Sicherheitslasche mit dem Handballen hineingedrückt und der Hebel nach oben gezogen werden.
  • Page 11 Gleitflächen regelmäßig reinigen, neu ölen und die Vorspannung des Schlittens einstellen • Jährlich… das Getriebeöl oder Getriebefett erneuern. • Warten, prüfen und reparieren dürfen nur Elektrofachkräfte nach den im jeweiligen Land gültigen Vorschriften. Nur Original ALFRA Ersatzteile verwenden. Ersatzteilübersicht am Ende dieser Bedienungsanleitung.
  • Page 12 EG Konformitätserklärung Hiermit erklären wir, Alfred Raith GmbH 2. Industriestr. 10 68766 Hockenheim dass die Metallkernbohrmaschine ALFRA Rotabest RB 35SP folgenden Richtlinien entspricht: Maschinenrichtlinie: 2006/42/EG Niederspannungsrichtlinie: 2006/95/EG Elektromagnetische Verträglichkeit (EMV): 2004/108/EG Folgende Normen oder normative Dokumente wurden angewandt: EMV- Richtlinie:...
  • Page 13: Safety Instructions

    Safety instructions During work with this machine, improper handling and/or poor maintenance result in significant hazards which can lead to serious accidents with considerable injuries and destruction of the machine. Please read and observe the information and safety instructions contained in this operating manual very carefully and contact the manufacturer should you have any questions.
  • Page 14: Technical Data

    Technical data Prod. no.: 18801 Designation: Rotabest RB 35 SP Power consumption: 1100 Watt On-load speed 450 rpm Tool holder: ¾"; 19mm Weldon Voltage: 230 V 50/60 Hz Max. drilling Ø in steel - Core drill: 12 - 35 mm / - Twist drill: up to Ø13 mm DIN 338...
  • Page 15: Device Description

    Device description The magnetic core drilling machine can be attached to ferromagnetic workpieces using a mechanically switchable permanent magnet. For this purpose, the magnet lever must be pressed downwards and the safety tab must latch into place correctly. The motor can be switched on and off using the large keys on the operator panel. The LEDs on the motor operating panel and the machine clearly indicate the operating state of the motor and the magnet’s holding force.
  • Page 16 Start-up You receive a completely assembled magnetic core drilling machine and detailed operating manual. Please check the condition of the goods on receipt for any transport damage, and make sure the delivery is complete. Otherwise contact the manufacturer immediately. Always read the operating manual before using the device for the first time! First, check the cable and plug for damage and insert the plug in the mains socket.
  • Page 17 Magnet sensor LED The LED above the operating panel signals the state of the machine and the holding of the magnet. Magnet off LED off Motor off Magnet on and sufficient holding force LED green Motor can be switched on/off as required Magnet on and very low holding force.
  • Page 18 The motor emergency stop function is also deactivated. Risk of injury. The user bears sole responsibility for the proper, safe handling of the core drilling machine. Motor LED on the operating panel The LEDs on the operating panel signal the state of the motor and the carbon brushes. Motor off LED off Motor on...
  • Page 19: Working With Core Drills

    Working with core drills Only use quick-change tool holder on the flat clamping face of the core drill. • Push the ejector pin (centring pin) through the core drill head. • Align the flat clamping face of the core drill on the marking in the swivel and turn the swivel of the quick-change tool holder completely clockwise to open the tensioning block.
  • Page 20 Special information on handling switchable permanent magnets The magnetic surface is located on the underside of the magnetic core drilling machine and generate the magnetic holding force through magnetic flow when activated. The magnet can be activated independently of the mains voltage by pressing the lever down.
  • Page 21 Maintenance, testing and repair work may only be carried out by qualified electricians according to the regulations valid in the respective country. Only use genuine ALFRA spare parts. An overview of spare parts can be found at the end of this operating manual.
  • Page 22 EC Declaration of Conformity Alfred Raith GmbH 2. Industriestr. 10 68766 Hockenheim/Germany hereby declare that the metal core drilling machine ALFRA Rotabest RB 35SP complies with the following directives: Machinery Directive: 2006/42/EC Low Voltage Directive: 2006/95/EC Electromagnetic Compatibility (EMC): 2004/108/EC...
  • Page 23: Consignes De Sécurité

    Consignes de sécurité Des risques considérables peuvent se produire sur la machine à cause d'une manipulation non conforme et / ou d'une mauvaise maintenance et entraîner des dommages corporels graves ainsi qu'une destruction de la machine. Veuillez lire attentivement les informations et les consignes de sécurité suivantes et adressez-vous au fabricant pour toutes les questions éventuelles.
  • Page 24: Données Techniques

    Données techniques Référence: 18801 Désignation: Rotabest RB 35 SP Puissance absorbée: 1100 watts Rotation en charge: -min Prise d'outil: ¾“ ; 19 mm Weldon Tension: 230 V 50/60 Hz Ø max. de perçage dans l'acier - Fraise à carotter: 12 - 35 mm - Foret hélicoïdal:...
  • Page 25: Description De L'appareil

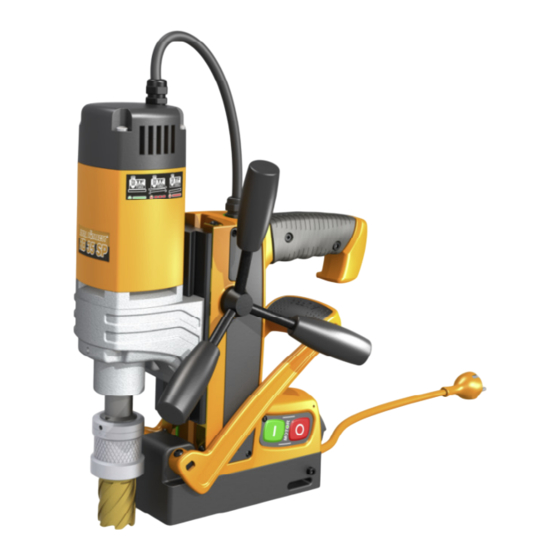
    Description de l'appareil La perceuse à socle magnétique peut être fixée mécaniquement avec des aimants permanents commutables sur des pièces ferromagnétiques. Le levier de l'aimant doit être enfoncé et la languette de sécurité doit être correctement enclenchée. Le moteur peut être allumé ou éteint par le pupitre de commande équipé de grandes touches.
  • Page 26 Mise en service Vous recevez une perceuse à socle magnétique complètement assemblée et un manuel d'utilisation détaillé. Veuillez contrôler l'état de la marchandise sur des éventuels dommages dus au transport et le contenu exhaustif de la commande dès réception de la marchandise. Contactez immédiatement le fabricant en cas de problème. Lire impérativement le manuel d'utilisation avant la première utilisation ! Vérifier tout d'abord si les câbles et les connecteurs sont endommagés et brancher le connecteur réseau.
  • Page 27 LED du capteur magnétique La LED située au-dessus du pupitre de commande signale l'état de la machine et l'adhérence des aimants. Aimant éteint LED éteinte Moteur éteint Aimant activé et adhérence suffisante LED verte Le moteur peut être allumé/éteint de manière aléatoire. Aimant activé...
  • Page 28 Ici, la fonction d'arrêt d'urgence du moteur est désactivée. Risque de blessures. L’utilisateur est le seul responsable d'une manipulation conforme et sécurisée de la perceuse à socle magnétique. LED du moteur sur le pupitre de commande Les LED sur le pupitre de commande signalisent l'état du moteur et des charbons. LED éteinte Moteur éteint LED verte...
  • Page 29 Travaux avec les fraises à carotter Utiliser le porte-outil uniquement sur la surface de serrage plane de la fraise à carotter. • Insérez la tige d'éjection (pointeau de centrage) par la tête de la fraise. • Orienter la surface plane de serrage de la fraise avec le marquage de la bague pivotante et tourner complètement la bague vers la droite pour ouvrir le bloc de serrage.
  • Page 30 Particularités lors de la manipulation des aimants permanents commutables Une surface adhérente aimantée se trouve sur la face inférieure de la perceuse qui produit l'adhérence par le flux magnétique lorsqu'il est activé. L'aimant peut être activé indépendamment de la tension réseau en abaissant le levier.
  • Page 31 Seuls les électriciens sont habilités à entretenir, vérifier et réparer l'appareil conformément aux prescriptions légales en vigueur dans le pays. Utiliser uniquement les pièces de rechange d'origine ALFRA. Nomenclature des pièces de rechange à la fin du présent manuel d'utilisation.
  • Page 32 Alfred Raith GmbH 2. Industriestr. 10 68766 Hockenheim Que la perceuse à socle magnétique ALFRA Rotabest RB 35SP est conforme aux directives ci-après : Directive sur les machines : 2006/42/CE Directive basse tension : 2006/95/CE Compatibilité électromagnétique (CEM) : 2004/108/CE Les normes suivantes ou les documents normatifs ont été...
  • Page 33: Indicaciones De Seguridad

    Indicaciones de seguridad Al trabajar con esta máquina se generan, ante una manipulación indebida y / o mantenimiento deficiente, considerables peligros que pueden conducir a graves accidentes con considerables lesiones físicas y deterioro de la máquina. Por favor, lea y cumpla exactamente la siguiente información e indicaciones de seguridad de este manual de instrucciones y en caso de dudas diríjase al fabricante.
  • Page 34: Datos Técnicos

    Datos técnicos Artículo Nº: 18801 Denominación: Rotabest RB 35 SP Consumo de potencia: 1100 Watt Revoluciones de carga: 450 r.p.m. Asiento de la herramienta: ¾“ ; 19mm Weldon Tensión: 230 V 50/60 Hz Perforación Ø máx. en acero: - Broca sacanúcleos...
  • Page 35: Descripción Del Dispositivo

    Descripción del dispositivo La perforadora sacanúcleos puede ser fijada a piezas ferromagnéticas con imanes permanentes conmutables mecánicamente. Para ello se debe presionar la palanca de los imanes hacia abajo y la pletina de seguridad encastrar correctamente. A través del panel de mando con grandes teclas se puede conectar y desconectar el motor.
  • Page 36 Puesta en servicio Usted recibe una perforadora sacanúcleos completamente montada y un detallado manual de instrucciones. Por favor compruebe el estado de la mercancía a cualquier daño de transporte y a la integridad del volumen de suministro. En caso contrario contacte inmediatamente con el fabricante. ¡Antes del primer uso leer imprescindiblemente el manual de instrucciones! Primero comprobar si existen daños en el cable y la clavija y enchufarlo a la red.
  • Page 37 LED Sensor de imán El LED sobre el panel de mando señaliza el estado de la máquina y la adherencia del imán. Imán off LED off Motor off Imán on y suficiente fuerza de adherencia LED verde El motor puede ser conectado/desconectado a voluntad Imán on y fuerza de adherencia muy reducida.
  • Page 38 En este caso también se desactiva la función de parada de emergencia del motor. Peligro de lesiones. Exclusivamente el usuario es responsable de una manipulación correcta y segura de la perforadora sacanúcleos. LED Motor en el panel de mandos El LED sobre el panel de mando señaliza el estado del motor y de las escobillas de carbono. Motor off LED off Motor on...
  • Page 39 Trabajar con broca sacanúcleos Utilizar alojamientos de cambio rápido solo sobre la superficie de sujeción plana de la broca sacanúcleos. • Empujar el pasador de expulsión (pasador de centrado) a través del cabezal de la perforadora de núcleo. • Alinear la superficie de sujeción plana de la perforadora sacanúcleos en la marcación del anillo giratorio y girar el anillo giratorio del alojamiento de cambio rápido, completamente hacia la derecha para abrir la pieza de sujeción.
  • Page 40 Grosor del material El flujo magnético de los imanes permanentes TML necesita de un grosor de material mínimo de aprox. 8 mm para fluir completamente a través de la pieza. Si no está dado este grosor de material se reduce la fuerza de adhesión máxima dependiendo del grosor del material.
  • Page 41 • Mantener, comprobar y reparar solo puede ser realizado por profesionales electricistas de acuerdo a las normas vigentes en el país correspondiente. Emplear únicamente repuestos ALFRA. Sinopsis de repuestos al final de estas instrucciones de servicio.
  • Page 42 Por la presente nosotros, Alfred Raith GmbH 2. Industriestr. 10 D-68766 Hockenheim declaramos que la perforadora sacanúcleos metálicos ALFRA Rotabest RB 35SP cumple las siguientes directivas: Directiva de máquinas: 2006/42/EG Directiva de baja tensión: 2006/95/EG Compatibilidad electromagnética (CEM): 2004/108/EG Se han aplicado las siguientes normas o documentos normativos:...
  • Page 43: Avvertenze Sulla Sicurezza

    Avvertenze sulla sicurezza Durante l’uso di questa macchina, in seguito a un uso improprio e/o una cattiva manutenzione possono nascere considerevoli pericoli che possono causare gravi infortuni con seri danni fisici e la rottura della macchina. Leggere attentamente e rispettare scrupolosamente le seguenti informazioni e avvertenze sulla sicurezza di queste istruzioni per l’uso e in caso di domande contattare il produttore.
  • Page 44: Dati Tecnici

    Dati tecnici N. articolo: 18801 Denominazione: Rotabest RB 35 SP Potenza assorbita: 1100 watt Numero di giri sotto carico: 450 giri/min. Portautensile: ¾” ; 19mm Weldon Tensione: 230 V 50/60 Hz Ø di foratura max. in acciaio - punta cava:...
  • Page 45: Descrizione Dell'apparecchio

    Descrizione dell’apparecchio Il carotatore a base elettromagnetica può essere fissato a pezzi ferromagnetici con un magnete permanente commutabile meccanicamente. A tal fine la leva del magnete deve essere spinta verso il basso e la linguetta di sicurezza deve scattare correttamente in posizione. Il motore può essere acceso e spento con grandi tasti applicati sul pannello di comando.
  • Page 46 Messa in funzione Vengono fornite un carotatore a base elettromagnetica completamente montato e istruzioni per l’uso dettagliate. All’atto del ricevimento, controllare se la merce ha subito danni causati dal trasporto e se la fornitura è completa. In caso contrario, contattare immediatamente il produttore. Prima dell’uso iniziale leggere assolutamente le istruzioni per l’uso! Dapprima controllare il cavo e la spina per verificare la presenza di eventuali danni e inserire la spina elettrica.
  • Page 47 LED del sensore del magnete Il LED sopra il pannello di comando indica le condizioni della macchina e l’aderenza del magnete. Magnete OFF LED OFF Motore OFF Magnete ON forza di adesione sufficiente LED verde Il motore può essere acceso/spento a piacere Magnete ON e scarsissima forza di adesione.
  • Page 48 In questo caso viene disattivata anche la funzione di arresto d’emergenza del motore. Pericolo di lesioni. Solo l’utente risponde di un uso corretto e sicuro del carotatore a base elettromagnetica. LED del motore sul pannello di comando Il LED sul pannello del comando indica le condizioni del motore e delle spazzole di carbone. Motor OFF LED OFF Motor ON...
  • Page 49 Lavorare con punte cave Usare l’attacco rapido sulla superficie di serraggio piana della punta cava. • Spingere l’espulsore (spina di centraggio) attraverso la testa della punta cava. • Allineare la superficie di serraggio piana della punta cava con il contrassegno nella ghiera e per aprire il blocco di serraggio, girare completamente verso destra la ghiera dell’attacco rapido.
  • Page 50 Particolarità nell’uso di magneti permanenti commutabili Sul lato inferiore del carotatore a base elettromagnetica c’è una superficie magnetica che nello stato attivato genera la forza di adesione attraverso il flusso magnetico. Il magnete può essere attivato indipendentemente dalla tensione di rete abbassando la leva. Per la disattivazione, con le eminenze del palmo della mano premere la linguetta di sicurezza nera e alzare la leva.
  • Page 51 • I lavori di manutenzione, riparazione e controllo devono essere eseguiti solo da elettricisti specializzati in conformità con le norme vigenti nel relativo Paese. Usare solo ricambi originali ALFRA. Elenco dei ricambi alla fine di queste istruzioni per l’uso.
  • Page 52 Con la presente noi, la Alfred Raith GmbH 2. Industriestr. 10 D-68766 Hockenheim dichiariamo che il carotatore a base elettromagnetica ALFRA Rotabest RB 35SP è conforme alle seguenti direttive: direttiva sulle macchine: 2006/42/CE direttiva sulla bassa tensione: 2006/95/CE compatibilità elettromagnetica (CEM): 2004/108/CE...
  • Page 53 Ersatzteile / Spare Parts / Pièces de rechange / Piezas de recambio...
  • Page 54 Menge Pos. Art.Nr. Beschreibung Description Qty. 18041 Motor MBN 16.3.1 A 230 Volt Motor MBN 16.3.1 A 230 Volt 18041.110 Motor MBN 16.3.1 A 110 Volt Motor MBN 16.3.1 A 110 Volt 189415011 Unterlegblech für Feder washer for spring 189415012 Federblech flat spring ISO7380-M3X8-10.9...
  • Page 55 Senkkopfschraube countersunk screw 189490612 Kabelverschraubung PG9x15 cable gland PG9 189414044 Alu-Typenschild 40P type plate W1452-3,5x10-10.9-P3R Linsenkopfschraube SW lens head screw 189414039 Aufkleber Alfra Doming sticker 189414072 Seitenblende -rechts- side cover-right- 189301003 Zahnstange -152mm- rack 189414033 Kühlmitteleinrichtung coolant unit 189414019 Magnetschutz magnet safety plate Explosionszeichnung Motor / Exploded drawing motor / Vue éclatée moteur / Despiece del motor...
  • Page 56 Stückliste Motor / Parts list motor / Liste des pieces moteur / Lista de componentes del motor Menge Pos. Art.Nr. Beschreibung Description Description Qty. 189622018 Blechschraube HC 4,8x45 screw 4,8 x 45 vis à tôle 4,8 x 45 189502050 Motorkappe cap for motor housing couvercle du moteur Motorgehäuse kpl.
  • Page 60 Alfred Raith GmbH Tel. 06205-3051-0 2. Industriestr. 10 Fax 06205-3051-150 D-68766 Hockenheim Internet: www.alfra.de E-mail: info@alfra.de...

Ce manuel est également adapté pour:

18801

Table des Matières