SCHOLTES CP 965 R Mode D'emploi
Table des Matières
Les langues disponibles
Les langues disponibles
Mode d'emploi
GB
FR
English, 13
Français, 1
CP 965 R
Sommaire
AVERTISSEMENTS, 2-3
ELECTRIQUE), 9
NETTOYAGE ET ENTRETIEN, 10-11
CUISINIERE
FR
Chapitres
Table des Matières

Manuels Connexes pour SCHOLTES CP 965 R


Sommaire des Matières pour SCHOLTES CP 965 R
-
Page 1: Table Des Matières
English, 13 Français, 1 INSTRUCTIONS RESERVEES A L’INSTALLATEUR, 4 RACCORDEMENT ELECTRIQUE, 5 CARACTERISTIQUES TECHNIQUES DESCRIPTION DE L’APPAREIL, 6 MODE D’EMPLOI, 7 FOUR ELECTRIQUE MULTIFONCTION, 8 PROGRAMMATEUR (FOUR ELECTRIQUE), 9 CP 965 R NETTOYAGE ET ENTRETIEN, 10-11 CONSEILS DE CUISSON, 12... -
Page 2: Avertissements
AVERTISSEMENTS 1 Cet appareil a été conçu pour un usage familial, de • ne jamais utiliser de rallonges ou bien le faire avec type non professionnel. un maximum de précautions; 2 Avant d’utiliser l’appareil, lisez attentivement cette • ne jamais tirer sur le cordon d’alimentation ou sur notice car elle contient des instructions très l’appareil pour débrancher la fiche de la prise de importantes concernant la sécurité... -
Page 3: Enlèvement Des Appareils Ménagers Usagés
32S'assurer que les enfants ne jouent pas avec peut se dégager au cours des premières heures l'appareil. d’utilisation mais elle disparaîtra très vite. 33 Cet appareil n’est pas prévu pour être utilisé par 24 Ne fixez pas intensément les foyers halogènes des personnes (y compris les enfants) dont les pendant leur fonctionnement : ils produisent une capacités physiques, sensorielles ou mentales sont... -
Page 4: Instructions Reservees A L'installateur
INSTRUCTIONS RESERVEES A L’INSTALLATEUR Les instructions qui suivent s’adressent à l’installateur qualifié afin qu’il exécute les opérations d’installation, réglage et entretien technique conformément aux normes en vigueur. Important : avant d’effectuer toute opération de réglage, entretien, etc., assurez-vous que l’appareil soit déconnecté... -
Page 5: Raccordement Electrique
RACCORDEMENT ELECTRIQUE Branchement du câble d’alimentation au réseau Branchement du câble d’alimentation au réseau L’APPAREIL DOIT OBLIGATOIREMENT ETRE RELIE Branchement du câble d’alimentation au réseau Branchement du câble d’alimentation au réseau Branchement du câble d’alimentation au réseau é l e c t r i q u e é... -
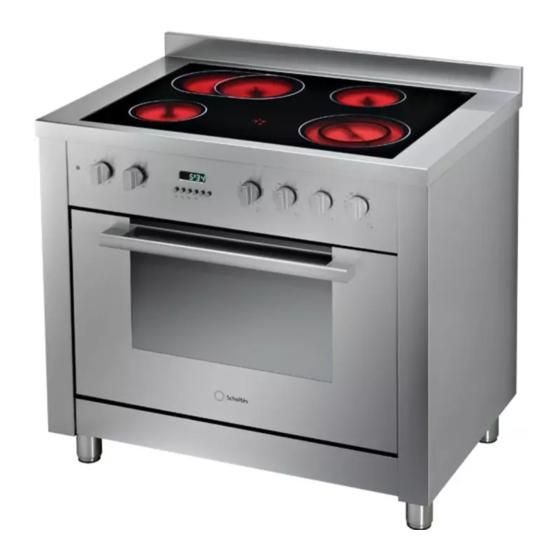
Page 6: Description De L'appareil
DESCRIPTION DE L’APPAREIL 2400/1500W A Elément radiant B Elément radiant C Elément radiant/halogène D Voyants de chaleur résiduelle E Commandes sélection foyers F Thermostat G Sélecteur de fonctions H Minuteur électronique I Voyant de mise sous tension du four électrique... -
Page 7: Mode D'emploi
MODE D’EMPLOI Description des éléments de chauffe Description des éléments de chauffe Le voyant de chaleur résiduelle (D) Le voyant de chaleur résiduelle (D) Description des éléments de chauffe Description des éléments de chauffe Description des éléments de chauffe Le voyant de chaleur résiduelle (D) Le voyant de chaleur résiduelle (D) Le voyant de chaleur résiduelle (D) Il indique que la température d’un ou de plusieurs... -
Page 8: Four Electrique Multifonction
FOUR ELECTRIQUE MULTIFONCTION Ce four permet de combiner les résistances Pour cuire au gril amenez le sélecteur “G” sur l’une électriques entre elles dans neuf combinaisons des positions suivantes (gril), (maxi gril), différentes et de choisir par conséquent celle qui (maxi gril ventilé). -
Page 9: Programmateur (Four Electrique)
PROGRAMMATEUR (FOUR ELECTRIQUE) Il permet de programmer le four ou le gril comme suit: L’inscription auto allumée rappelle qu’il y a programmation • départ cuisson différé avec durée établie; de la durée et de l’heure de fin de cuisson en automatique. •... -
Page 10: Nettoyage Et Entretien
NETTOYAGE ET ENTRETIEN Important : débranchez l’alimentation électrique de • Si les surfaces autonettoyantes du four sont l’appareil avant de procéder à toute opération de abîmées ou s’avèrent inutilisables, par défaut nettoyage. d’entretien ou entretien mal exécuté ou après de Pour prolonger la durée de vie de votre appareil, nous nombreuses années d’utilisation, vous pouvez vous conseillons d’exécuter fréquemment un... -
Page 11: Entretien Du Verre Vitrocéramique
Entretien du verre vitrocéramique Entretien du verre vitrocéramique Entretien du verre vitrocéramique Entretien du verre vitrocéramique Entretien du verre vitrocéramique Avant de commencer à cuisiner, nettoyez la surface de la table à l’aide d’un chiffon humide pour enlever la poussière ou les restes d’aliments cuisinés précédemment. -
Page 12: Conseils De Cuisson
CONSEILS DE CUISSON Les temps de cuisson peuvent varier en fonction de la nature des aliments, de leur homogénéité et de leur volume. Il est donc conseillé de choisir, lors de la première cuisson, les valeurs les plus basses parmi les temps de cuisson indiqués et de les augmenter par la suite si nécessaire. Cuisson au four TRADITIONNEL Température Temps de cuisson...