Warm Tech CAC20KW Instructions D'origine

Warm Tech CAC20KW Instructions D'origine

Canon a chaleur diesel
Masquer les pouces Voir aussi pour CAC20KW:

Publicité

Les langues disponibles

Les langues disponibles

Liens rapides

CAC20KW
FR
CANON A CHALEUR DIESEL
TRADUCTION DES INSTRUCTIONS D'ORIGINE
NL
DIESELVERWARMER
VERTALING VAN DE ORIGINELE INSTRUCTIES
GB
DIESEL OIL HEATERS
ORIGINAL INSTRUCTIONS
NAFTOVÁ HORKOVZDUŠNÁ TURBÍNA
CZ
ORIGINÁLNÍ NÁVOD
CAC30KW
S28 M07 Y2014
1

Publicité

Table des Matières
loading

Sommaire des Matières pour Warm Tech CAC20KW

  • Page 1 CAC20KW CAC30KW CANON A CHALEUR DIESEL TRADUCTION DES INSTRUCTIONS D’ORIGINE DIESELVERWARMER VERTALING VAN DE ORIGINELE INSTRUCTIES DIESEL OIL HEATERS ORIGINAL INSTRUCTIONS NAFTOVÁ HORKOVZDUŠNÁ TURBÍNA ORIGINÁLNÍ NÁVOD S28 M07 Y2014...
  • Page 2: Fr Canon A Chaleur Diesel

    CANON A CHALEUR DIESEL LE BENZÈNE EST INTERDIT UTILISÉ DANS DES ENDROITS AÉRÉS LE MANUEL DOIT ÊTRE LU ATTENTIVEMENT AVANT D'UTILISER L'APPAREIL, PUIS IL CONVIENT DE LE GARDER POUR UN USAGE ULTÉRIEUR Contenu Guide des précautions de sécurité ………………………………… Vue d'ensemble du radiateur et de son installation ……………… Dimension des paramètres techniques ……………………………...
  • Page 3: Guide Des Précautions De Sécurité

    【Guide des précautions de sécurité】 Pour votre sécurité et celle des tiers, veuillez lire attentivement le présent MODE D'EMPLOI et respecter scrupuleusement son contenu. ▲ Danger 1、L'utilisation d'essence est strictement interdite, car il s'agit d'un carburant hautement volatile susceptible de provoquer une explosion ou des flammes incontrôlées. 2、N'utilisez jamais le radiateur lorsque des vapeurs inflammables peuvent se produire, sous peine d'explosion, d'incendie et de brûlures.
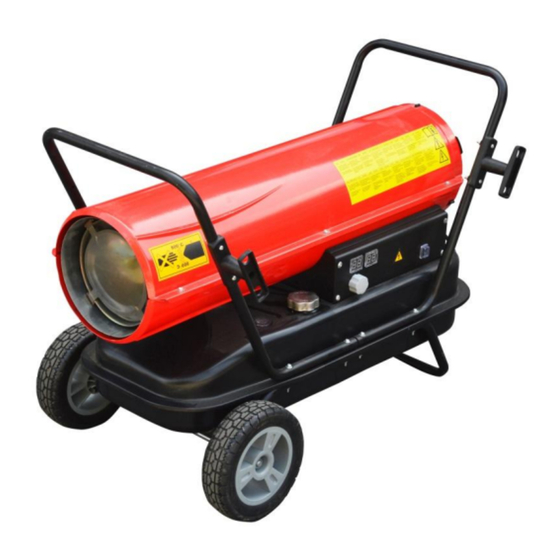
  • Page 4: Vue D'ensemble Du Radiateur

    K. Ecran numérique des températures L. Bouton du thermostat M. Commutateur d'alimentation N. Armature inférieure en tube O. Réservoir P. Cordon d'alimentation Q. Grille arrière * CAC20KW : model sans les parties : C,D, I,N 【 Montage des roues et de l'armature en tube 】...
  • Page 5: Paramètres Techniques

    【 Dimensions 】 【Paramètres techniques】 CAC20KW PUISSANCE DU PERFORMANCES MOTEUR PRESSE Btu/h 68240 Durée d'utilisation en Kcal/h 17200 continu hr AIR DE SORTIE 14,3 m3/h Tension, fréquence, CONTENU DU AC230V 50Hz 1.2A RÉSERVOIR L courant, HUILE BRULANTE CARBURANT Diesel, L/hr kérosène...
  • Page 6: Lorsqu'aucun Carburant (Kérosène Ou Diesel) Ne Se Trouve Dans Le Réservoir

    【préparation avant l'utilisation】 1、 N'utilisez jamais de carburant hautement volatile tel que de l'essence, etc. ; 2、 Remplissez le réservoir uniquement lorsque le radiateur est hors tension et qu'on ne voit plus de flamme ; 3、 N'utilisez pas de kérosène JIS1 ni de diesel léger antigel, ni de kérosène ou diesel impur, dégénératif ;...
  • Page 7: Extinction De La Flamme

    Allumage : insérez la fiche dans la prise, placez le commutateur de tension sur "1", le témoin lumineux s'allume, l'appareil s'allume automatiquement lorsque la température fixée est supérieure à la température ambiante sur l'écran numérique LED des températures. Attention:lorsque le radiateur fonctionne, ne laissez jamais le sol surchauffer sous peine de provoquer un incendie.
  • Page 8 Ouvrez le bouchon du carburant pour ajouter du kérosène/diesel dans le réservoir, remettez ensuite le bouchon et branchez le cordon d'alimentation dans la prise. Placez le commutateur d'alimentation sur “1”, le moteur commence à tourner et l'écran numérique de la température s'allume à ce moment. La fenêtre gauche de l'écran détermine la température de réglage et la fenêtre droite, la température ambiante.
  • Page 9: Introduction À La Construction

    【Introduction à la construction】 ◆ tête du brûleur A.Montage du brûleur B.Tuyau d'admission de l'air B.Tuyau d'admission de l'huile D.Plaque pour la flamme E.Ligne de haute tension F.Etincelle ◆ étincelle la distance entre l'électrode devrait être de 4-5 mm, afin d'obtenir les meilleurs résultats lors de l'allumage.
  • Page 10 Lors de la maintenance, il faut que la pompe à air soit correctement montée, afin d'éviter toute fuite d'air ou une faible pression d'air. A. Lame de la pompe B. Couvercle de la pompe C. Filtre d'admission de l'air D. Couvercle de pression E.
  • Page 11: Analyse Des Pannes

    【 】 Analyse des pannes Avant d'envoyer le radiateur à la réparation, vérifiez les points suivants, qui ne sont pas assimilés à des pannes: Problème raison C'est normal. Car au début, de l'air et de la Odeur, fumée ou étincelle absente lors de la poussière sont mélangé...
  • Page 12: Service Après-Vente Et Assistance

    Vous trouverez des vues éclatées ainsi que des informations concernant les pièces de rechange également sous : www.eco-repa.com Les conseillers techniques et assistants WARM TECH sont à votre disposition pour répondre à vos questions concernant nos produits et leurs accessoires : sav@eco-repa.com ENTREPOSAGE _ Nettoyez soigneusement toute la machine et ses accessoires.
  • Page 13 DIESELVERWARMER HET IS VERBODEN BENZINE TE GEBRUIKEN GEBRUIK OP EEN VERLUCHTE PLAATS LEES DE HANDLEIDING ZORGVULDIG ALVORENS HET APPARAAT TE GEBRUIKEN EN HOUD ZE GOED BIJ. Inhoud Voorzorgen-veiligheidsgids………… ……………………………… Overzicht van het ontwerp van de verwarmer en installatie …… Afmetingen en technische parameters …………………………… Technische parameters ……………………………………………...
  • Page 14 Lees deze GEBRUIKSAANWIJZING voor uw eigen veiligheid en die van anderen en volg de instructies nauwkeurig op. ▲ Gevaar 1、Het gebruik van benzine is strikt verboden, dit is een uiterst vluchtige brandstof die een explosie of oncontroleerbare vlammen kan veroorzaken. 2、Gebruik de verwarmer nooit waar brandbare dampen kunnen aanwezig zijn, er is gevaar voor ontploffingen, brand en verbranding.
  • Page 15 L. Thermostaatknop M. Aan/Uit-schakelaar N. Onderste buisframe O. Brandstoftank P. Stroomsnoer Q. Achterste rooster * CAC20KW : model zonder dat partijen: C,D, I,N 【 Montage van wielen en buisframe 】 1、Steek de wielas in het overeenstemmende gat in het onderste buisframe, zet doorvoerbus G op de twee uiteinden, schuif wiel F over de wielas H, zet wieldop E erop.
  • Page 16 【Technische parameters】 CAC20KW MOTORVERMOGEN W VERMOGEN DRUK BThU/u 68240 Ononderbroken Kcal/u 17200 gebruik (uren) LUCHTDEBIET 14,3 m3/u Spanning, frequentie, TANKINHOUD L AC230V 50Hz 1,2A stroom, VERBRANDE OLIE BRANDSTOF Dieselolie, l/uur kerosine GROOTTE 750x315x415mm CAC30KW MOTORVERMOGEN W OUTPUT DRUK BThU/h 102360...
  • Page 17: Voorbereidingen Voor Gebruik

    【Voorbereidingen voor gebruik】 1、 Gebruik nooit zeer vluchtige brandstof zoals benzine enz.; 2、 Vul de brandstoftank enkel wanneer de verwarmer gestopt is met werken en de vlammen uit zijn; 3、 Gelieve No JIS1 kerosine of lichte diesel met antivries te gebruiken. Gebruik nooit degeneratieve, onzuivere kerosine of diesel;...
  • Page 18 Waarschuwing bij het aansteken: 1、 Controleer de brandstoftank en zorg ervoor dat er genoeg brandstof in zit; 2、 Kom na het aansteken niet te dicht met uw gezicht bij het verwarmingsgedeelte van het apparaat. Bewaar een veilige afstand van min. 3 meter aan de voorkant van de heteluchtuitlaat, 2 meter aan de bovenkant en meer dan 2 meter aan de linker- en rechterkant.
  • Page 19 A.Verbrandingskamer B. Bougie C. Ventilatorblad D. Motor E. Pomp F. Luchtinlaatfilter G. Luchtuitlaatfilter H. Brandstoftank I. Bediening J. Luchtinlaatpijp K. Vlamplaat L. Oliespuitstuk M. Olieaanzuigpijp Beschrijving van de werkingsprincipes: Verwijder de brandstoftankdop om kerosine/diesel toe te voegen aan de tank, breng de brandstoftankdop opnieuw aan en steek de stekker in het stopcontact.
  • Page 20 【Voorstelling van de montage】 ◆ branderkop A. Branderassemblage B.Luchtinlaatpijp C.Olie-inlaatpijp D.Vlamplaat E.Hoge bedrijfsspanning F.Bougie ◆ bougie de afstand tussen de elektroden zou ongeveer 4-5 mm moeten zijn om het beste ontstekingsresultaat te krijgen. Afstand tussen de elektroden:4-5mm ◆ montage van de oliespuit...
  • Page 21 A.Oliespuit B.Spuitkern C.Dichtingsring D.Vlamplaat E.Montagestuk luchtpijp F.Montagestuk oliepijp ◆ Drukregeling A.Platte schroevendraaier B.Drukregelingsschroef ◆ Luchtpomp Tijdens het onderhoud moet de luchtpomp juist gemonteerd worden om een lage persluchtdruk en luchtlekken te voorkomen. J. Pompblad K. Pompdeksel L. Luchtinlaatfilter M. Drukdeksel N.
  • Page 22 ◆ Verbinding tussen pomplichaam en pompkern De vier pompblade’n zijn op vier groeven van de pompkern geplaatst. Deze bewegen centrifugaal in uurwijzerzin in de pomp. De vrije ruimte tussen de pompomhulling en de pompkern zou tussen 06~0,08mm moeten blijven om te verzekeren dat de luchtpomp genoeg druk kan produceren. A.Pomplichaam B .
  • Page 23: Servicedienst

    【Foutopsporing—oorzaken en oplossingen】 Probleem Mogelijke reden Oplossing 1. Onjuiste druk 1. Pas de pompdruk aan 2. Inlaat, uitlaat of het weefsel 2. Reinig of vervang de van de luchtfilter is vuil luchtfilter 3. Dieselfilter is vuil 3. Reinig of vervang de 4.
  • Page 24 Onze klantenservice beantwoordt uw vragen over reparatie en onderhoud van uw product en over vervangingsonderdelen. Explosietekeningen en informatie over vervangingsonderdelen vindt u ook :www.eco-repa.com Het WARM TECH-team voor gebruiksadviezen helpt u graag bij vragen over onze producten en toebehoren : sav@eco-repa.com OPSLAG Berg de machine op buiten het bereik van kinderen, in een stabiele en veilige positie en op een droge plaats met een gematigde temperatuur.
  • Page 25 DIESEL OIL HEATERS BENZINE WILL BE FORBIDDEN USED IN AERATION YOU SHOULD READ THE MANUAL CAREFULLY BEFORE USING, AND KEEP THE MANUAL WELL Contents Precautions-safety guide …………………………………………… Overview of heater design and Installation ……………………… Dimension t echnical parameters…………………………………… Technical parameters ……………………………………………… Prepare before using …………………………………………………...
  • Page 26: Overview Of Heater Design

    A.Hot air outlet B. Upper shell C. Rear handle D. Front handle E. Cord wrap F. Lower shell G. Fuel gauge H. Fuel cap I.Wheel J. Side cover K. Digital temperature display L. Thermostat knob M. Power switch N. Lower tube frame O. Fuel tank P.power cord Q. Rear grill * CAC20KW : model without this parts: C,D, I,N...
  • Page 27: Dimensions

    【 Assembling wheels and tube frame 】 1、insert the wheel axle to the corresponding hole of lower tube frame,set bushing G at the two ends, slide the wheel F over the wheel axle H,put on wheel cap E。 2、Put the heater body on the lower tube frame B, make sure the 4 holes of handle frame point towards the corresponding 4 holes on the lower tube frame respectively.
  • Page 28 MOTOR POWE W OUTPUT Btu/h 68240 PRESS Kcal/h 17200 Continous using time hr OUTPUT AIR 14.3 m3/h TANK CONTENT Voltage,frequency,currenc AC230V 50Hz 1.2A BURNING OIL L/hr FUEL Diesel oil, kerosene SIZE 750x315x415mm MOTOR POWE W OUTPUT Btu/h 102360 PRESS Kcal/h 24000 Continoususing time hr OUTPUT AIR...
  • Page 29: Safety Device

    A. Fuel tank cap B. Fuel gauge ◆ When there is some fuel (kerosene or diesel) in the tank Attention 1、 Only check the appliance after flameout and removal of the power plug from power source; 2、 Before the ignition make sure there is no oil leakage, when oil leaks please don’t use the appliance and contact your dealer;...
  • Page 30 Flame-out protection:Utilizes a photocell to monitor the flame in burn chamber during normal Electrovalve Assy ,will stop operation.The photosensitive resistor will become infinite big , cut off offer oil automatic. Electrical power breakdown protection:when the power breaks down the heater stops working without the plug being removed from the socket .
  • Page 31 Notice 1、Before the maintenance shut off the heater and pull out the plug; 2、Never maintain the heater with fuel in tank. ◆ check the fuel tank When there is waste and water in the tank, clean and drain the fuel tank. How to drain the fuel tank(see below figure)...
  • Page 32 ◆ assembling the oil nozzle A.Oil nozzle B.Nozzle core C.Seal ring D.Flame steady plate E.Air pipe fitting Oil pipe fitting F. ◆ Pressure adjustment A. Minus screw driver B.Pressure adjustment screw ◆ Air pump By maintenance the air pump must be proper assembled, to prevent low air pressure or air leakage. A.
  • Page 33 clockwise in the pump,the cooperation gap between the pump enclosure and the pump core should be kept in 06~0.08mm,to ensure that the air pump can produce sufficient pressure. A.pump body B . gap 0.06~0.08mm C.pump core D.screw E.pump blade ◆ fixation of the fan blades Install fan blade on motor shaft und use set screw to tighten them firmly A.fan blade B.motor shaft...
  • Page 34: Service Department

    Problem Possible reason Solution 1. Pressure not correct 1. Adjust the pump pressure 2. Inlet, outlet or the cotton of 2. Clean or exchange a new air the air filter is dirty filter 3. Diesel filter is dirty 3. Clean or exchange a new fuel 4.
  • Page 35 Our after-sales service responds to your questions concerning maintenance and repair of your product as well as spare parts. Exploded views and information on spare parts can also be found under:www.eco-repa.com WARM TECH application service team will gladly answer questions concerning our products and their accessories : sav@eco-repa.com STORAGE _ Store it out of the reach of children, in a stable and secure position, in a cool and dry place, avoid too high and too low temperatures.
  • Page 36 CZ NAFTOVÁ HORKOVZDUŠNÁ TURBÍNA ZAKÁZÁNO POUŽÍVÁNÍ BENZÍNU POUŽITÍ PRO PROVZDUŠŇOVÁNÍ PŘED POUŽITÍM SI PEČLIVĚ PŘEČTĚTE NÁSLEDUJÍCÍ NÁVOD K POUŽITÍ A USCHOVEJTE Obsah Bezpečnostní opatření, bezpečnostní příručka Přehled designu a instalace topení Nastavit technické parametry Technické parametry Příprava před použitím Provoz Pracovní...
  • Page 37 Spodní plášť; G. Palivoměr; H. Víčko; I. Kola; J. Boční plášť; K. Digitální displej teploty L. Ovladač termostatu; M. Vypínač; N. Spodní rám; O. Palivová nádrž; P. Přívodní kabel; Q. Zadní kryt * CAC20KW : model bez následujících součástí: C, D, I, N...
  • Page 38 【 Montáž kol a trubkového rámu 】 1、Zasuňte osu kola do odpovídajícího otvoru spodního rámu trubky, nastavte pouzdro G na obou koncích, posuňte kola F přes kola nápravy H, nasaďte kryt na kolo E. 2、Položte těleso topení na spodní trubku rámu B a ujistěte se, že 4 otvory rámu rukojeti odpovídají 4 otvorům na spodní...
  • Page 39 【Technické parametry 】 VÝKON MOTORU W VÝKON Btu/h 68240 TLAK Kcal/h 17200 Doba stálého provozu hod VÝSTUP VÁHA 14.3 VZDUCHU m OBJEM NÁDRŽE Napětí,frekvence,proud AC230V 50Hz 1.2A SPOTŘEBA L/hod Nafta, olej, PALIVO petrolej VELIKOST 750x315x415mm VÝKON MOTORU W VÝKON Btu/h 102360 TLAK Kcal/h...
  • Page 40 Obrázek (naplnění palivové nádrže) A. Víčko nádrže; B. Palivoměr ◆ Když je část paliva (petrolej nebo nafta) v nádrži Upozornění 1、 Zkontrolujte, zda je přístroj vychladlý a odpojte jej od zdroje energie; 2、 Před zapalováním se ujistěte, že nedochází k úniku oleje. Pokud ano, nepoužívejte přístroj a obraťte se na svého prodejce;...
  • Page 41: Bezpečnostní Opatření

    bezpečnostní opatření ◆ Ochrana vypnutí plamenu: Využívá fotonku pro sledování plamene při hoření v komoře při běžném provozu. Pokud se zvětší fotosenzitivní odpor, elektroventil Assy automaticky ukončí dodávku paliva Ochrana vypnutí elektrické energie: pokud dojde k poruše na napájení, přístroj přestane pracovat bez odpojení...
  • Page 42 【Údržba】 Poznámka: 1、Před údržbou vypněte ohřívač a vytáhněte zástrčku; 2、Nikdy neprovádějte údržbu ohřívače s palivem v nádrži. ◆ kontrola palivové nádrže Pokud jsou nečistoty nebo voda v nádrži, vypusťte ji a vyčistěte. Jak vypustit palivovou nádrž (viz obrázek níže) 1、umístěte topení na pracovní stůl a umístěte nádobu na olej pod palivovou nádrž; 2、použijte klíč...
  • Page 43 ◆ montáž olejové trysky A. Olejová tryska B. Jádro trysky C. Těsnící kroužek D. Deska E. Vzduchová spojka Olejová spojka ◆ Nastavení tlaku A. Otočte šroubovákem B. Šroub nastavení tlaku ◆ Vzduchové čerpadlo Po provedené údržbě musí být vzduchové čerpadlo správně sestaveno tak, aby se zabránilo nízkému tlaku vzduchu nebo jeho úniku.
  • Page 44: Problémy A Řešení

    ◆ část mezi tělem a jádrem čerpadla Čtyři lopatky čerpadla jsou umístěny ve čtyřech drážkách jádra čerpadla, které se pohybují ve směru hodinových ručiček v odstředivém čerpadlu, mezera mezi krytem a jádrem čerpadla by měla být do 06 ~ 0,08 mm, aby bylo zajištěno, že vzduch může v čerpadle vytvářet dostatečný tlak. A.
  • Page 45 【průvodce řešení problémů – důvod a řešení 】 Možná příčina Řešení Problém 9. Nesprávný tlak 9. Upravte tlak čerpadla 10. Vstupní, výstupní nebo 10. Vyčistit nebo vyměnit vnitřek vzduchového filtru je vzduchový filtr znečištěn 11. Vyčistit nebo vyměnit 11. Palivový filtr je znečištěn palivový...
  • Page 46: Životní Prostředí

    SERVISNÍ ODDĚLENÍ _ Poškozené spínače musí být nahrazeny naším servisním oddělením. _ Pokud je nutné vyměnit napájecí kabel, mělo by být provedeno výrobcem nebo jeho zástupcem, aby se zabránilo nebezpečí. POPRODEJNÍ SERVIS A SERVISNÍ SLUŽBY Náš servisní technik odpoví na vaše dotazy týkající se údržby a oprav vašeho produktu, stejně jako poskytne informace o náhradních dílech.
  • Page 47 Ne jamais laisser un enfant ou une autre personne n’ayant pas pris connaissance des instructions d’utilisation se servir de la machine. Il est possible que les réglementations locales fixent une limite d’âge minimum de l’utilisateur. Gardez la machine non utilisée hors de la portée des enfants. Cet appareil n’est pas prévu pour être utilisé...
  • Page 48 Nikdy nedovolte, aby děti nebo osoby, které nejsou seznámeny s těmito pokyny, používali tento přístroj. Místní předpisy mohou omezovat věk obsluhy. Když přístroj nepoužíváte, uložte jej mimo dosah dětí. Tento přístroj není určen pro používání osobami (včetně dětí) se sníženými fyzickými, smyslovými nebo duševními schopnostmi, nebo s nedostatkem zkušeností...
  • Page 49: Déclaration Ce De Conformité

    EG-verklaring van overeenstemming WARM TECH verklaart dat de machines: WARM TECH certifie que les machines : DIESELVERWARMER « CAC20KW« CANON A CHALEUR DIESEL « CAC20KW « sont en conformité avec les normes in overeenstemming zijn met de volgende normen: suivantes :...
  • Page 50 België, juli 2014 Belgique , Juillet 2014 Mr Joostens Pierre Mr Joostens Pierre Président-Directeur Général Directeur WARM TECH, rue de Gozée 81, 6110 Montigny-le-Tilleul, WARM TECH, rue de Gozée 81, 6110 Montigny-le-Tilleul, Belgique Belgique EC declaration of conformity EG-Konformitätserklärung WARM TECH prohlašuje, že přístroj WARM TECH declares that the machines: Naftová...
  • Page 51 CAC20KW...
  • Page 52 CAC30KW...
  • Page 53: Záruční List

    ZÁRUČNÍ LIST Na tento výrobek se vztahuje 24 měsíců záruka. Platný záruční list musí být správně vyplněn a odeslán s kopií faktury nebo pokladního bloku. ZÁRUČNÍ LIST Výrobek: Naftová horkovzdušná turbína Model: ......Datum prodeje ..........Dodavatel: M.A.T.A. Czech s.r.o. Radlická...
  • Page 54 81, rue de Gozée 6110 Montigny-le-Tilleul Belgique Tél : 0032 71 29 70 70 Fax : 0032 71 29 70 86 S.A.V sav@eco-repa.com Service Parts separated 32 / 71 / 29 . 70 . 83 32 / 71 / 29 . 70 . 86 Fabriqué...

Ce manuel est également adapté pour:

Cac30kw

Table des Matières