Dometic CS 160 Manuel D'utilisation
Masquer les pouces
Voir aussi pour CS 160:
- Manuel d'utilisation (10 pages) ,
- Notice d'instructions (36 pages) ,
- Notice d'instruction (13 pages)
Table des Matières
Les langues disponibles
Les langues disponibles
Liens rapides
DE
GEBRAUCHSANWEISUNG
EN
USER MANUAL
ES
MANUAL DEL USUARIo
FR
MANUEL D'UTILISATIoN
IT
MANUALE pER L'UTENTE
pT
MANUAL DE USUáRIo
SE
BRUkSANvISNING
Type C...
825129800
©2008 Dometic, LLC
LaGrange, IN 46761
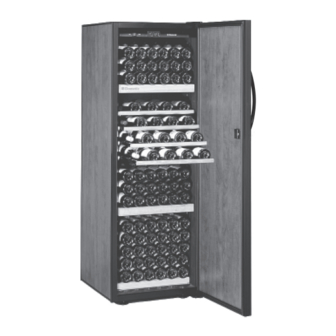
CS 160
CS 200
Weinklimaschrank
Wine cellar
cava para envejecimiento del vino
cave à vins de vieillissement
cantina per l'invecchiamento dei vini
cave para envelhecimento de vinhos
vinlagringsskåp
3
7
11
15
19
23
27
MO-M 0833
Table des Matières

Manuels Connexes pour Dometic CS 160


Sommaire des Matières pour Dometic CS 160
- Page 1 CS 160 CS 200 GEBRAUCHSANWEISUNG Weinklimaschrank USER MANUAL Wine cellar MANUAL DEL USUARIo cava para envejecimiento del vino MANUEL D’UTILISATIoN cave à vins de vieillissement MANUALE pER L’UTENTE cantina per l’invecchiamento dei vini MANUAL DE USUáRIo cave para envelhecimento de vinhos BRUkSANvISNING vinlagringsskåp...
-
Page 2: Waste Management
Waste management* Geräte, die mit diesem Symbol gekennzeichnet sind, müssen an dem örtlichen Sammelpunkt für die Ent- sorgung von elektrischen und elektronischen Geräten abgegeben werden. Dieses Produkt darf nicht über den normalen Haushaltsabfall entsorgt werden. Appliances bearing this symbol must be deposited at the designated local reception point for the disposal of electrical and electronic equipment. -
Page 15: Avaries De Transport
Veuillez vérifier la présence des accessoires sui- support. vants, certains se trouvent dans la boîte en carton à l’intérieur de la cave à vin. canada Dometic, LLc 46 Zatonski, Unit 3 Brantford, ON N3T 5L8 cANADA ENTRETOISE Téléphone : 519-720-9578... - Page 16 utilisez les deux vis pour fixer l’entretoise installation des deux côtés à l’arrière de la cave à vin. Veuillez suivre ces instructions d’installation : L’entretoise assure un espace suffisant • Pour assurer le meilleur fonctionnement pos- pour une bonne ventilation. sible, l’air doit pouvoir circuler librement vers l’unité...
-
Page 17: Branchement Électrique
La cave à vin est munie d’une fiche électrique avec Nous vous recommandons de maintenir votre cave prise de terre. Dometic et ses filiales se dégagent à vin le plus propre possible. Débranchez la cave de toute responsabilité en cas d’incident dû à... -
Page 18: Montage Des Guides Et Des Supports De Clayette Guides
Nb. de bouteilles Si la cause n’est pas citée ci-dessus, vous devez faire appel à un technicien agréé. CS 160 CS 200 La cave à vin est équipée d’une sécurité en cas de surchauffe. un technicien agréé peut vérifier si elle S´est déclenché... - Page 31 appendix a appEndix a - EinlagErung untEr- appEndicE a - coME consErvarE schiEdlichEr flaschEntypEn divErsi tipi di bottigliE appEndix a - hoW to storE diffErEnt apêndicE a - coMo arMaZEnar vários typEs of bottlEs tipos dE garrafas appéndicE a - Modo dE alMacEnar appEndix a - hur Man lagrar oliKa distintos tipos dE botEllas flasKtypEr...
- Page 32 appendix a SChIEBERREgAL Lagern Sie Flaschen mit Spezialform auf dem Schieberegal. Nur eine Lage Flaschen. HINWEIS! SLIDINg ShELF Use the sliding shelf when storing specially shaped bottles. Only one layer of bottles. NOTE! ESTANTERíA DESLIzANTE Utilice la estantería deslizante cuando se disponga a almace- nar botellas con formas especiales.
- Page 33 appendix B appEndix b - griffMontagE appEndicE b - istruZioni pEr il Montaggio dElla Maniglia appEndix b - instruction for Mounting thE handlE apêndicE b - instruçõEs dE MontagEM da pEga appéndicE b - instrucción para MontajE dEl tirador appEndix b - MontEringsanvisning handtag annExE b - instructions pour lE MontagE dE la poignéE...
- Page 34 appendix B Vom Innere der Tür, führen Sie die zwei ange- brachten Schrauben (M4x60) zuerst durch den Tür- rahmen hindurch (1), dann durch den Abstand Stab (2) und klopfen dann die Schraube in die Gewinde im vertikalen Handgriffstab (3). From the inside of the door, put the two attached screws (M4x60) first through the door frame (1), then through the distance bar (2) and then tap the screw into the threads in the vertical handle bar (3).
- Page 35 appendix B Setzen Sie die Türdichtung wieder ein, indem Sie sie per Hand zurück in den Schlitz drücken. Verge- wissern Sie sich, dass der ursprüngliche Dichtungs- zustand wieder hergestellt wird. aCHtung verwenden sie beim Einsetzen der dichtung kei- nesfalls scharfe oder spitze Werkzeuge. andernfalls kann die dichtung beschädigt werden und die Kühl- leistung des Weinklimaschranks beeinträchtigen.
- Page 37 appendix C appEndix c - ElEKtrischEs schaltbild appEndicE c - schEMa ElEttrico appEndix c - ElEctric diagraM apêndicE c - diagraMa Eléctrico appéndicE c - diagraMa Eléctrico appEndix c - ElschEMa annExE c - schéMa élEctriquE Regler/Regulador/ Régulateur/Regolatore/ Grau/Gris/Gris/Grigio/cinzento/Grå Regulador/Regulator Weiß/ Blanco/Blanc/Bianco/Branco/Vit Schalter/ Interruptor/Interrupteur/Interruttore/ Schwarz/ Negro/Noir/Nero/Preto/Svart...