Sony AC-VQL1BP Mode D'emploi

Sony AC-VQL1BP Mode D'emploi

Adaptateur secteur/chargeur
Table des Matières

Publicité

Les langues disponibles

Les langues disponibles

Liens rapides

AC Adaptor/Charger
Adaptateur secteur/
chargeur
Operating Instructions
Mode d'emploi
Manual de instrucciones
AC-VQL1BP
© 2008 Sony Corporation
3-292-271-13(1)
GB
FR
ES
CS

Publicité

Table des Matières
loading

Sommaire des Matières pour Sony AC-VQL1BP

  • Page 1 3-292-271-13(1) AC Adaptor/Charger Adaptateur secteur/ chargeur Operating Instructions Mode d’emploi Manual de instrucciones AC-VQL1BP © 2008 Sony Corporation...
  • Page 2 The model and serial numbers are located on the bottom of the unit. Record the serial number in the space provided below. Refer to these numbers whenever you call upon your Sony dealer regarding this product. Model No. AC- Serial No.
  • Page 3: Important Safeguards

    IMPORTANT SAFEGUARDS For your protection, please read these Cleaning safety instructions completely before Unplug the set from the wall outlet before operating the appliance, and keep this cleaning or polishing it. Do not use liquid manual for future reference. cleaners or aerosol cleaners. Use a cloth Carefully observe all warnings, precautions lightly dampened with water for cleaning and instructions on the appliance, or the...
  • Page 4 Ventilation – When the set exhibits a distinct change in performance – this indicates a need for The slots and openings in the cabinet are service. provided for necessary ventilation. To ensure reliable operation of the set, and to Servicing protect it from overheating, these slots and Do not attempt to service the set yourself openings must never be blocked or...
  • Page 5 The recycling of materials will help to conserve natural resources. For more detailed information about recycling of this product, please contact your local Sony office or visit Sony Europe’s web site for business customers: http://www.sonybiz.net/environment...
  • Page 6 < Notice for the customers in the countries applying EU Directives > The manufacturer of this product is Sony Corporation, 1-7-1 Konan Minato-ku Tokyo, 108-0075 Japan. The Authorized Representative for EMC and product safety is Sony Deutschland GmbH, Hedelfinger Strasse 61, 70327 Stuttgart, Germany. For any service or guarantee matters please refer to the addresses given in separate service or guarantee documents.
  • Page 7: Table Des Matières

    Table of contents CAUTION ......................... 8 Notes on Use ......................10 Using this unit abroad ................... 12 Features ........................13 Functions ......................... 14 Identifying the part ....................15 Using as AC adaptor ..................... 16 Charging the battery pack ..................18 Charging check ......................
  • Page 8: Caution

    • Do not attempt to disassemble or modify the unit. These can cause a fire or an electric shock. Contact your nearest Sony dealer about inspections or repairs.
  • Page 9 Using the supplied grounding wire enables safety ground connection. If the grounding wire cannot be connected, contact your nearest Sony dealer. • Check the power consumption of the equipment used with this unit so that the rated outlet will not be exceeded.
  • Page 10: Notes On Use

    This unit does not have dust-proof, splash-proof or water-proof specifications. Charging •Be sure to use genuine Sony battery packs with this unit. •Do not charge any other battery pack than the one meant for this unit. •Attach the battery pack firmly.
  • Page 11: Precautions On Use

    Precautions on use •Attach the battery pack to this unit firmly when you charge the battery pack. •The battery terminal may be damaged if the battery pack is not attached correctly. •Do not use this unit in the location with strong electromagnetism or rays. Electromagnetic waves can cause the unit not to record or playback video correctly.
  • Page 12: Using This Unit Abroad

    Using this unit abroad Use a commercially available AC plug Adaptor (not supplied), if necessary, depending on the design of the wall outlet. Do not connect this unit to a voltage adaptor (travel converter) for overseas travel. It can cause fires or damages.
  • Page 13: Features

    Features AC-VQL1BP is an AC adaptor/charger that can supply DC power to the Sony external equipment and be attached and charge the four Sony lithium ion battery packs*. * This unit can charge a maximum of two battery packs simultaneously (one of each by A slot and B slot).
  • Page 14: Functions

    We recommend that you use an “InfoLITHIUM” battery pack (L series) with electronic equipment that has the mark. “InfoLITHIUM” is a trademark of Sony Corporation. “BATTERY LOG” This unit can display the information recorded on the battery packs.
  • Page 15: Identifying The Part

    Identifying the part Slot (A1, A2, B1, B2) Charging mode change switch AC input terminal 10 DC OUT connector B Output change switch A 11 Output change switch B DC OUT connector A 12 DISPLAY change button (A1, A2, B1, B2) Display window A 13 CHARGE lamp (A1, A2, B1, B2) Log indicator lamp A...
  • Page 16: Using As Ac Adaptor

    Using as AC adaptor For details, refer to the instruction manual of the video equipment. To the wall outlet Switches and settings have two systems for A system and B system. Set the switch for the system you are using. 1 Set the output change switch to “VCR/CAMERA.”...
  • Page 17 Notes •Setting the output change switch to “CHARGE” while operation this unit cuts the power supply to the video equipment. •You cannot charge the battery pack attached to this unit in “VCR/CAMERA” mode. •You can use one system of this unit as an AC adaptor and use the other system as a charger. •Keep this unit away from your video equipment if the image is distorted.
  • Page 18: Charging The Battery Pack

    Charging the battery pack For details, refer to the instruction manual of the video equipment. To the wall outlet Switches and settings have two systems for A system and B system. Set the switch for the system you are using. 1 Set the charging mode change switch to “NORMAL CHARGE”...
  • Page 19: Charging Time

    Notes •If the output change switch is set to “VCR/CAMERA” during charging, charging stops. •If the CHARGE lamp does not light up or it flashes, check that the battery pack is attached to this unit correctly. If the battery pack is not attached firmly, it will not be charged. •Quick charging is only performed with “InfoLITHIUM”...
  • Page 20 Attaching two or more battery packs simultaneously •This unit can be attached up to four battery packs simultaneously. (This unit has two systems A and B and each system has two slots.) •The two battery packs attached to each one of the slot of the A system (A1 or A2) and attached to each one of the slot of the B system (B1 or B2) (the two battery packs attached to the different systems) can be charged simultaneously.
  • Page 21: Charging Check

    Attaching and removing the battery pack 1 Place the battery pack on this unit with the B mark facing the terminal shutter. 2 Slide the battery pack in the direction of the arrow. Press the battery pack until the terminal shutter completely enters this unit. Removing the battery pack Slide the battery pack in the opposite direction of attaching and lift it straight out.
  • Page 22: Battery Life

    Each time that you press the DISPLAY change button, the information displayed can be changed as following. Battery life The battery life of the battery pack attached to the slot A1 is indicated. Normal charging time Remaining time until normal charging of the battery pack attached to the slot A1 will be completed is indicated.
  • Page 23 Battery life Approximate battery life using with the last used video equipment etc. indicated. Normal charging time Approximate remaining time until normal charging is completed is indicated. Full charging time Approximate remaining time until full charging is completed is indicated. TTL CHG (total charging time) Approximate total charging time since the first charging of the battery pack is indicated.
  • Page 24: Troubleshooting

    Troubleshooting Please check the following before contacting your nearest Sony dealer. If this unit does not operate correctly after check, contact your nearest Sony dealer. The video equipment does not work. •The power plug is disconnected from the wall outlet.
  • Page 25 There is a problem with this unit. If the CHARGE lamp turns off after the charging time has passed, there is a problem with the first attached battery pack. Please contact your nearest Sony dealer regarding the product that has a problem.
  • Page 26: Specifications

    Approx. 770 g (1 lb 11 oz.) Hot switching inrush current, measured in accordance with European standard EN55103-1: 14 A (230 V) Included items AC adaptor/charger (AC-VQL1BP main body)..(1) Power cord..(1) Connecting cord (DK-215) ... (1) Connecting cord (DK-415) ... (1) Set of printed documentation Design and specifications are subject to change without notice.
  • Page 28: Consignes De Sécurité Importantes

    AVERTISSEMENT Afin de réduire les risques d’incendie ou de décharge électrique, n’exposez pas cet appareil à la pluie ou à l’humidité. Pour prévenir les risques d’électrocution, ne pas ouvrir le boîtier. Ne confier l’entretien de l’appareil qu’à un technicien qualifié. Cet appareil doit être raccordé...
  • Page 29 Protection du cordon Service d’alimentation En cas de dommage Disposez le cordon d’alimentation de sorte qu’on ne risque pas de marcher dessus ou Débranchez l’appareil de la prise secteur et qu’il ne soit pas coincé par des objets placés faites appel à un personnel qualifié dans les dessus ou contre, et faites particulièrement situations suivantes : attention aux fiches, douilles et à...
  • Page 30: Pour Les Clients Residant En Europe

    < Avis aux consommateurs des pays appliquant les Directives UE > Le fabricant de ce produit est Sony Corporation, 1-7-1 Konan Minato-ku Tokyo, 108-0075 Japon. Le représentant agréé pour la compatibilité électromagnétique et la sécurité du produit est Sony Deutschland GmbH, Hedelfinger Strasse 61, 70327 Stuttgart, Allemagne.
  • Page 31 Table des matières ATTENTION ......................6 Remarques sur l’utilisation ..................8 Utilisation de cet appareil à l’étranger ............... 10 Caractéristiques ...................... 11 Fonctions ......................... 12 Identification des pièces ..................13 Utilisation comme adaptateur secteur ..............14 Recharge de la batterie ..................16 Pour vérifier la charge ...................
  • Page 32: Attention

    Cela risque de provoquer un incendie ou une décharge électrique. Contactez votre revendeur Sony le plus proche concernant les révisions ou les réparations. • Evitez les chocs ou les impacts, tels que des coups de marteau, des coups de pied ou une chute.
  • Page 33 Raccordez le conducteur de terre comme suit. L’utilisation du conducteur de terre offre un raccordement à la terre sûr. Si le conducteur de terre ne peut pas être raccordé, contactez votre revendeur Sony le plus proche. • Vérifiez la consommation électrique de l’appareil utilisé avec cet appareil afin de ne pas dépasser la sortie nominale.
  • Page 34: Remarques Sur L'utilisation

    Cet appareil n’est pas étanche à la poussière, aux projections d’eau et à l’eau en général. Mise en charge •N’utilisez que des véritables batteries rechargeables Sony avec cet appareil. •Ne rechargez pas d’autres batteries que celles prévues pour cet appareil.
  • Page 35: Précautions D'utilisation

    Précautions d’utilisation •Lorsque vous changez la batterie, installez-la fermement sur cet appareil. •Le connecteur de la batterie peut être endommagé si la batterie rechargeable n’est pas placée correctement. •Cet appareil ne doit pas être utilisé dans un endroit soumis à de l’électromagnétisme ou des ondes fortes.
  • Page 36: Utilisation De Cet Appareil À L'étranger

    Utilisation de cet appareil à l’étranger Utilisez si nécessaire un adaptateur de fiche secteur (non fourni), en fonction du modèle de la prise murale. Ne raccordez pas cet appareil à un adaptateur de tension (convertisseur) pour les voyages à l’étranger. Cela peut entraîner des incendies ou des dégâts matériels.
  • Page 37: Caractéristiques

    Caractéristiques L’AC-VQL1BP est un adaptateur secteur/chargeur pouvant fournir une alimentation CC à l’appareil externe Sony et être raccordé et charger les quatre batteries rechargeables au lithium- ion Sony*. * Cet appareil peut charger maximum deux batteries simultanément (une dans le logement A et l’autre dans le logement B).
  • Page 38: Fonctions

    « InfoLITHIUM » (série L) avec les appareils électroniques portant la marque « InfoLITHIUM » est une marque commerciale de Sony Corporation. « BATTERY LOG » Cet appareil peut afficher les informations enregistrées sur les batteries.
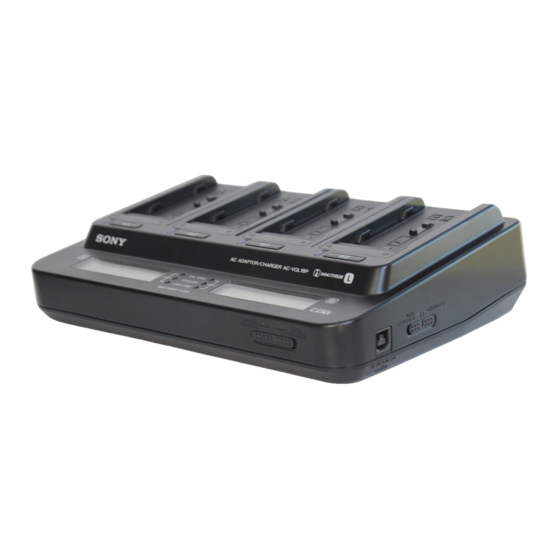
  • Page 39: Identification Des Pièces

    Identification des pièces Logement (A1, A2, B1, B2) Sélecteur du mode de charge Borne d’entrée secteur 10 Connecteur DC OUT B Commutateur de sortie A 11 Commutateur de sortie B Connecteur DC OUT A 12 Touche de réglage DISPLAY (A1, A2, B1, B2) Fenêtre d’affichage A 13 Témoin CHARGE (A1, A2, B1, B2) Témoin d’historique A...
  • Page 40: Utilisation Comme Adaptateur Secteur

    Utilisation comme adaptateur secteur Pour plus d’informations, reportez-vous au mode d’emploi de l’appareil vidéo. Vers la prise murale Les commutateurs et réglages fonctionnent sur deux systèmes (A et B). Réglez le commutateur sur le système que vous utilisez. 1 Réglez le commutateur de sortie sur « VCR/CAMERA ». 2 Raccordez le cordon d’alimentation à...
  • Page 41 Remarques •Si vous réglez le commutateur de sortie sur « CHARGE » pendant le fonctionnement de cet appareil, l’appareil vidéo est mis hors tension. •Vous ne pouvez pas charger la batterie rechargeable installée sur cet appareil en mode « VCR/ CAMERA ».
  • Page 42: Recharge De La Batterie

    Recharge de la batterie Pour plus d’informations, reportez-vous au mode d’emploi de l’appareil vidéo. Vers la prise murale Les commutateurs et réglages fonctionnent sur deux systèmes (A et B). Réglez le commutateur sur le système que vous utilisez. 1 Réglez le sélecteur du mode de charge sur « NORMAL CHARGE »...
  • Page 43: Temps De Charge

    Remarques •Si le commutateur est réglé sur « VCR/CAMERA » pendant la charge, celle-ci s’arrête. •Si le témoin CHARGE ne s’allume pas ou clignote, vérifiez que la batterie est installée correctement sur cet appareil. Si elle n’est pas installée correctement, elle ne sera pas chargée. •La charge rapide est uniquement effectuée avec des batteries «...
  • Page 44: Installation Simultanée De Deux Batteries Ou Plus

    Installation simultanée de deux batteries ou plus •Jusqu’à quatre batteries peuvent être installées simultanément sur cet appareil. (Cet appareil est doté de deux systèmes (A et B), comportant chacun deux logements) •Les deux batteries installées dans chaque logement du système A (A1 ou A2) et dans chaque logement du système B (B1 ou B2) (les deux batteries étant installées dans des systèmes différents) peuvent être chargées simultanément.
  • Page 45: Insertion Et Retrait De La Batterie Rechargeable

    Insertion et retrait de la batterie rechargeable 1 Placez la batterie sur cet appareil avec le repère B orienté vers l’obturateur de borne. 2 Faites glisser la batterie dans le sens de la flèche. Appuyez sur la batterie jusqu’à ce que l’obturateur de borne soit complètement introduit dans l’appareil.
  • Page 46: Autonomie De La Batterie

    Les informations affichées peuvent changer comme suit chaque fois que vous appuyez sur la touche de réglage DISPLAY. Autonomie de la batterie L’autonomie de la batterie insérée dans le logement A1 est indiquée. Temps de charge normale Le temps restant jusqu’à la fin d’une charge normale d’une batterie insérée dans le logement A1 est indiqué.
  • Page 47 Autonomie de la batterie L’autonomie approximative de la batterie utilisée avec le dernier appareil vidéo utilisé, etc. est indiquée. Temps de charge normale La durée restante approximative jusqu’à la fin d’une charge normale est indiquée. Temps de charge complète La durée restante approximative jusqu’à la fin d’une charge complète est indiquée. TTL CHG (temps de charge total) Le temps de charge total approximatif depuis la première charge de la batterie est indiqué.
  • Page 48: Dépannage

    Dépannage Vérifiez les éléments suivants avant de contacter votre revendeur Sony le plus proche. Si cet appareil ne fonctionne pas correctement après les vérifications, contactez votre revendeur Sony le plus proche. L’appareil vidéo ne fonctionne pas. •La fiche d’alimentation est débranchée de la prise murale.
  • Page 49 : Le problème vient de cet appareil. Si le témoin CHARGE s’éteint à la fin du temps de charge, la première batterie insérée présente un problème. Contactez votre revendeur Sony le plus proche et apportez-lui l’appareil qui ne fonctionne pas.
  • Page 50: Spécifications

    Courant d’appel commutation à chaud, mesuré conforme aux norms européennes EN55103-1: 14 A (230 V) Articles inclus Adaptateur secteur/chargeur (AC-VQL1BP, appareil principal) ..(1) Cordon d’alimentation ..(1) Cordon de raccordement (DK-215) ... (1) Cordon de raccordement (DK-415) ... (1) Jeu de documents imprimés...
  • Page 52 Nombre del producto: Adaptador/cargador de ca Modelo: AC-VQL1BP AVISO Para reducir el riesgo de incendio o descarga eléctrica, no exponga la unidad a la lluvia ni a la humedad. Para evitar una descarga eléctrica, no abra la unidad. Solicite servicio técnico únicamente a personal cualificado.
  • Page 53 El reciclaje de materiales ayuda a conservar las reservas naturales. Para obtener información detallada sobre el reciclaje de este producto,contacte con su oficina local de Sony o visite la página Web europea de Sony para empresas: http://www.sonybiz.net/environment <...
  • Page 55 Índice PRECAUCIÓN ......................6 Notas sobre el uso ....................8 Usar esta unidad en el extranjero ................ 10 Características ......................11 Funciones ........................ 12 Identificación de los componentes ..............13 Uso como adaptador de ca ................... 14 Carga de la batería ....................16 Comprobación de la carga ..................
  • Page 56: Precaución

    • No intente desmontar ni modificar la unidad. Esto podría causar incendios o descargas eléctricas. Póngase en contacto con el distribuidor de Sony más cercano para obtener información sobre inspecciones o reparaciones. • No intente romper o forzar la unidad con martillos, pisotones o golpes.
  • Page 57 Usar el cable de conexión a tierra suministrado proporciona una conexión a tierra para mayor seguridad. Si no puede conectar la toma de tierra, contacte con el distribuidor de Sony más cercano. • Compruebe el consumo de energía del equipamiento usado con esta unidad para no sobrepasar el límite de la toma a la que está...
  • Page 58: Notas Sobre El Uso

    Notas sobre el uso Esta unidad no posee especificaciones contra el polvo, las salpicaduras ni el agua. Carga •Cargue solamente baterías auténticas Sony con esta unidad. •No cargue baterías distintas de las designadas para esta unidad. •Fije firmemente la batería.
  • Page 59: Precauciones De Uso

    Precauciones de uso •Fije la batería a esta unidad firmemente cuando desee cargar la batería. •El terminal de la batería se puede dañar si la batería no está conectada correctamente. •No utilice la unidad cerca de lugares con fuerte electromagnetismo o radiaciones. Las ondas electromagnéticas pueden hacer que la unidad no grabe o reproduzca archivos de vídeo correctamente.
  • Page 60: Usar Esta Unidad En El Extranjero

    Usar esta unidad en el extranjero Utilice un adaptador de enchufe de ca disponible en el mercado (no suministrado), si es necesario, en función del diseño de la toma de corriente de pared. No conecte esta unidad a un adaptador de tensión (convertidor para viajes) cuando viaje al extranjero.
  • Page 61: Características

    Características El AC-VQL1BP es un adaptador/cargador de ca que puede proporcionar alimentación de cc a los equipos externos Sony y que permite conectar y cargar las cuatro baterías de iones de litio Sony*. * Esta unidad puede cargar un máximo de dos baterías simultáneamente (una en cada ranura, A y B).
  • Page 62: Funciones

    Se recomienda utilizar una batería “InfoLITHIUM” (serie L) con equipos electrónicos que posean la marca “InfoLITHIUM” es una marca comercial de Sony Corporation. “BATTERY LOG” Esta unidad puede mostrar la información almacenada en las baterías.
  • Page 63: Identificación De Los Componentes

    Identificación de los componentes Ranura (A1, A2, B1, B2) Selector de modo de carga Terminal de entrada de ca 10 Conector B de salida cc OUT Selector A de modo de salida 11 Selector B de cambio de salida Conector A de salida cc OUT 12 Botón DISPLAY de cambio de visualización Visor A (A1, A2, B1, B2)
  • Page 64: Uso Como Adaptador De Ca

    Uso como adaptador de ca Para obtener más información, consulte el manual de instrucciones del equipo de vídeo. A la toma de pared Los interruptores y los ajustes tienen dos sistemas, A y B. Cambie el selector según el sistema que esté...
  • Page 65 Notas •Si ajusta el selector de salida en “CHARGE” durante el funcionamiento, la unidad interrumpirá el suministro de alimentación al equipo de vídeo. •No podrá cargar la batería conectada a esta unidad mientras esté en modo “VCR/CAMERA”. •Puede usar un sistema de esta unidad como adaptador de ca y usar el otro sistema como cargador.
  • Page 66: Carga De La Batería

    Carga de la batería Para obtener más información, consulte el manual de instrucciones del equipo de vídeo. A la toma de pared Los interruptores y los ajustes tienen dos sistemas, A y B. Cambie el selector según el sistema que esté usando. 1 Ajuste el selector de modo de carga en “NORMAL CHARGE”...
  • Page 67: Tiempo De Carga

    Notas •Si ajusta el selector de salida en “VCR/CAMERA” durante la carga, ésta se detendrá. •Si el indicador luminoso CHARGE no se enciende o parpadea, compruebe si la batería está correctamente instalada en esta unidad. Si la batería no está bien colocada, no se cargará. •La carga rápida sólo está...
  • Page 68 Instalación simultánea de dos o más baterías •Esta unidad puede albergar un máximo de cuatro baterías simultáneamente. (Esta unidad tiene dos sistemas, A y B, y cada sistema tiene dos ranuras). •Las dos baterías instaladas en cada una de las ranuras del sistema A, (A1 o A2) y conectadas a cada una de las ranuras del sistema B (B1 o B2) (las dos baterías conectadas a sistemas diferentes) se pueden cargar simultáneamente.
  • Page 69: Colocación Y Extracción De La Batería

    Colocación y extracción de la batería 1 Coloque la batería en esta unidad con la marca B encarada hacia el obturador de terminales. 2 Deslice la batería en el sentido de la flecha. Presione la batería hasta que el obturador de terminales se introduzca completamente en la unidad.
  • Page 70 El contenido del visor cambia cada vez que se pulsa el botón de cambio de visualización DISPLAY como se muestra a continuación. Duración de la batería Se indica la duración de la batería conectada a la ranura A1. Tiempo de carga normal Se indica el tiempo restante hasta completar la carga normal de la batería conectada a la ranura A1.
  • Page 71 Duración de la batería Se indica la duración aproximada de la batería si se usa con el último equipo de vídeo al que ha sido conectada. Tiempo de carga normal Se indica el tiempo restante hasta alcanzar el nivel de carga normal. Tiempo de carga completa Se indica el tiempo restante hasta alcanzar el nivel de carga completo.
  • Page 72: Solución De Problemas

    Solución de problemas Compruebe los siguientes puntos antes de ponerse en contacto con su distribuidor Sony más cercano. Si esta unidad no funciona correctamente después de revisarla, contacte con su distribuidor Sony más cercano. El equipo de vídeo no funciona.
  • Page 73 La unidad tiene un problema. Si el indicador luminoso CHARGE se apaga porque ha transcurrido el tiempo de carga, el problema reside en la batería instalada en primer lugar. Póngase en contacto con su distribuidor Sony más cercano en relación con el producto afectado.
  • Page 74 Aprox. 770 g Corriente de entrada de conmutación caliente, medida según el estándar europeo EN55103-1: 14 A (230 V) Elementos incluidos Cargador/adaptador de ca (AC-VQL1BP cuerpo principal)..(1) Cable de alimentación..(1) Cable de conexión (DK-215)..(1) Cable de conexión (DK-415)..(1) Juego de documentación impresa...
  • Page 76 警告 为减少发生火灾或触电的危险,请勿让本装置淋雨或受潮。 为了避免触电,请勿打开机壳。 维修限找专业人员为您服务。 为减少火灾或触电的危险,请勿在本装置上放置如花瓶等盛有液体的物体。 本机必须接地 使用前须知 只要本装置连接在墙壁插座上,即使关闭装置本身的电源,也并未与交流电源断开。 标示牌位于该装置的底部。 请勿将本装置置于狭窄的空间,例如在墙壁与家具之间。 请在墙上电源插座附近使用本装置。这样可确保在使用中发生故障时,能够快速地将电源线从墙 上电源插座拔出以关闭电源。 索尼公司 出版日期:2010 年 6 月...
  • Page 77 目录 注意 ........................4 使用须知 ......................5 在海外使用本装置 .....................7 特 征 ........................8 功 能 ........................9 部件识别 ......................10 用作电源适配器 ....................11 给电池组进行充电 ...................13 检查充电 ......................16 故障排除 ......................19 规 格 ........................21...
  • Page 78 注意 • 请勿在潮湿、油腻、湿润或多尘的环境使用本装置。 此类环境可导致起火甚至触电。 • 请勿使水或异物进入本装置。 这样可能导致起火或者触电。如果此类物质进入本装置,请断开电源线与墙上电源插座的连 接,并请就近咨询 Sony 经销商。 • 请勿弄湿本装置或电池组。 这样可能导致起火甚至触电。 • 请勿将本装置置于水附近。 使水进入本装置或电池组、弄湿它们或者在浴室内使用它们,都可导致起火或者触电。 • 请勿试图拆卸或者改装本装置。 这样可能导致起火或者触电。关于检查或者修理,请就近咨询 Sony 经销商。 • 请勿试图击打或作用力于本装置,例如捶打、践踏或者掉落。 这样可能导致起火甚至触电。 • 请勿对非指定的电池组充电。 这样可能导致起火、冒烟、甚至触电。 • 请避免损坏电源线或者连接线。 损坏的交流电源线或直流电缆可导致起火甚至触电。 – 请勿试图改装或损坏电线或电缆。 – 请勿将任何重物置于电线或电缆上,或者拉扯电线或电缆。 – 请勿将本装置置于加热器附近。请勿试图对其进行加热。 – 在断开电线或电缆的连接时,请务必抓住插头。 如果电线发生损坏,请停止使用本装置并请就近咨询 Sony 经销商。...
  • Page 79: 使用须知

    使用须知 本装置不具备防尘、防溅湿或防水功能。 充电 •本装置请务必使用原装 Sony 电池组。 •除了适用于本装置的电池组以外,请勿对其他电池组进行充电。 •请稳固地装好电池组。 充电温度 • 为了发挥电池的最大效率,建议在 10℃ 到 30℃ 的温度范围内进行充电。如果温度较低, 充电将变得更加困难。 • 尽管本机允许快速充电,但如果不在建议的温度范围内进行充电,为了保护电池组,可能需 要较长的充电时间。充电时间一旦延长了,则即使恢复在建议的温度范围内进行充电,也不 能恢复快速充电。此时,请卸下并重装电池,重新开始进行充电。 不要把装置放在以下地方 无论本装置处于使用中或者存放中,都不要将其放在以下任何一种场所。否则可能导致故障。 •太热或太冷的场所 – 阳光直射的场所,例如仪表板上或加热器附近。在夏天密闭的车窗内或强烈日光下,汽车内 的温度会变得极高,此时若将本装置置于车内可能导致其变形或者发生故障。 •振动剧烈的场所 •有强电磁或射线的场所 •多沙的场所 – 在海滨或其他多沙的区域或沙尘暴发生的场所,请保护本装置不受沙尘侵蚀。沙尘可能导致 故障。...
  • Page 80 使用注意事项 •对电池组进行充电时,请将电池组稳固地安装到本装置内。 •如果电池组没有正确安装,电池端子可能被损坏。 •请勿在有强电磁或射线的场所使用本装置。 电磁波可能导致本装置无法正确录制或者播放视频。 •为保护电池组,请在充电完成后立即将电池组从本装置中卸下。 •请勿对本装置实施机械冲击或者掉落本装置。 •请将本装置远离电视机或 AM 收音机。 如果将本装置置于附近,设备噪音可能进入电视机或者收音机。 •慎防让金属件接触到装置的金属部分或连接板。否则可能发生短路。 •海外旅行时,切勿将本装置连接至电压转接器(旅行转接器) 。否则,可能导致起火或损坏。 •在充电过程中或充电刚刚完成时,电池组及本装置可能变热。 •使用后请将本装置从墙上电源插座拔出。断开电源线时,请抓住插头将其拔出。 •标示操作电压,功率消耗等的铭牌位于底面。 •在接地连接以后,将电源线连接到墙上电源插座。 在接地连接之前,请将电源线从墙上电源插座断开。 •请勿使本装置受潮。请勿将装有水的物品(例如花瓶等)放在本装置上。 保养 •本装置变脏时,请用一块干布进行擦拭。 •当本装置变得很脏时,请用布蘸上少量中性溶剂进行擦拭,然后再将其擦干。 •请勿使用稀释剂、汽油、酒精等。否则可能损伤本装置表面。 •当您使用化学清洁布时,请参阅其使用说明书。 •使用挥发性溶剂(例如杀虫剂) ,或使本装置长期解除橡胶或乙烯塑料制品,可能导致本装置 发生老化或损坏。...
  • Page 81: 在海外使用本装置

    在海外使用本装置 如有必要,请根据墙上电源插座的设计,使用市售的交流插头适配器(非附件) 。 海外旅行时,请勿将本装置连接到电压转接器(旅行转接器) 。否则可能导致起火或者损坏。...
  • Page 82 特征 AC-VQL1BP 是一种电源适配器/充电器,它能够为 Sony 外部设备提供直流电源,并可安装 四个 Sony 锂离子电池组 * 并为其充电。 * 本装置最多可同时为两个电池组进行充电(分别在 A 槽及 B 槽) 。 (将两个电池组同时安装到同一个系统的槽内时,本装置无法同时对两个电池组进行充电。 第一个电池组的充电完成以后,本装置自动切换为对同一系统内的另一个电池组进行充电。 ) •关于对锂离子型电池组充电。 不能用于对镍镉或镍氢(Ni-Cd 或 Ni-MH)电池进行充电。 •不能用于某些型号的设备(摄像机等) 。 使用前,请确认所用设备的兼容性。 特征 最多可同时安装四个电池组 本装置具有两个充电系统 A 和 B。本装置能够安装四个电池组。每个系统为一个电池组充电。充 电完成后,它将开始自动为安装到同一系统内的其他电池组进行充电。 双系统直流输出终端 本装置具有两个直流输出终端系统 A 和 B。本装置能够作为一个电源适配器运作外部设备。 (本...
  • Page 83 什么是“InfoLITHIUM”电池? “InfoLITHIUM”是一种锂离子充电池组,它可与兼容的视频装置交换其电池消耗数据。Sony 建议您采用“InfoLITHIUM”电池组(L 系列)来操作带有 标志的电子设备。 “InfoLITHIUM”是 Sony 公司的商标。 “BATTERY LOG” (电池日志) 本装置能够显示电池组上所记录的信息。 •总充电时间 •充电循环总量 •上次使用的年月 功能 各个显示的注意事项(使用前请仔细阅读。 ) 在对电池组充电时,只要满足以下条件,本装置将显示充电条件及电池组信息。 •使用“InfoLITHIUM”电池组 •使用带有 标记的电子设备 请确认正在使用带有 标记的电子设备。有关您的视频设备是否兼容 “InfoLITHIUM” ,请参阅随视频设备附送的使用说明书。 如果将电池组用于两个或更多的视频设备等,将显示上次使用设备的电池信息。 “BATTERY LOG” (电池日志)与充电电池组 NP-F970、NP-F770、NP-F570 兼容。 其他型号不兼容或者具在显示时受限制。...
  • Page 84: 部件识别

    部件识别 槽(A1、A2、B1、B2) 充电模式转换开关 交流输入端子 10 DC OUT(直流输出)连接器 B 输出转换开关 A 11 输出转换开关 B DC OUT(直流输出)连接器 A 12 DISPLAY(显示)转换按钮 显示窗 A (A1、A2、B1、B2) 日志指示灯 A 13 CHARGE(充电)灯(A1、A2、B1、B2) 日志指示灯 B 14 端子快门 显示窗 B 显示窗 VCR/CAMERA WARNING BATTERY LIFE TIME TO CHG NORMAL FULL 15 “InfoLITHIUM”...
  • Page 85: 用作电源适配器

    用作电源适配器 有关详情,请参阅视频设备的使用说明书。 连至电源插座 A 系统和 B 系统具有两套开关及设置系统。请为您正在使用的系统设置开关。 1 将输出范围开关设定于“VCR/CAMERA” 。 2 将电源线连接到本装置,并将电源线连接到墙上电源插座。 此时会发出一声“哔”声,同时出现显示窗。 注 稳固地将电源线一直插进墙上电源插座内。 3 将连接电缆连接到 DC OUT(直流输出)连接器。 4 将连接电缆连接到视频设备。 有关连接电缆的详情,请参阅视频设备的使用说明书。 使用连接电缆 DK-415 时 使用连接电缆 DK-215 时...
  • Page 86 注 •在作业中将输出转换开关设定于“CHARGE” (充电)会切断对视频设备的供电。 •无法在“VCR/CAMERA”模式下对连接到本装置的电池组充电。 •可以将本装置的一个系统用作电源适配器,并将另一个系统用作充电器。 •如果图像扭曲,请将本装置远离您的视频设备。 •图示是至 HVR-Z7,HVR-V1 数码 HD 视频摄像机的连接。...
  • Page 87: 给电池组进行充电

    给电池组进行充电 有关详情,请参阅视频设备的使用说明书。 连至电源插座 对于 A 系统和 B 系统具有两套开关及设置系统。请为您正在使用的系统设置开关。 1 将充电模式转换开关设定于“NORMAL CHARGE”或“FULL CHARGE” 。 需要对电池组进行完全充电时,请设定于“FULL CHARGE” 。 希望在标准充电完成后即停止时,请设定于“NORMAL CHARGE” 。 有关详情,请参阅“转换充电模式” (第 14 页) 。 2 将输出转换开关设定于“CHARGE” 。 有关详情,请参阅“同时安装两个或更多电池组” (第 15 页) 。 3 将电源线连接到本装置,并将电源线连接到墙上电源插座。 此时会发出一声“哔”声,同时出现显示窗。 注 稳固地将电源线一直插进墙上电源插座。 4 安装电池组。 有关安装及卸下电池组的详情,请参阅“安装和卸下电池组” (第 16 页) 。 5 充电完成后,卸下电池组。...
  • Page 88 注 •充电期间如果把输出转换开关设定于“VCR/CAMERA” ,充电即停止。 •如果 CHARGE 灯不点亮或闪烁,即请检查电池组是否正确地装在本装置上。如果电池组没有 安装稳固,将不能被充电。 •只有“InfoLITHIUM”电池组才可以进行快速充电。 •根据使用电池的种类,在显示窗所显示的信息可能受到限制。 •如果充电期间出现问题,CHARGE 灯将闪烁, “WARNING” (警告)将显示在显示屏中。 有关详情,请参见“故障排除” (第 19 页) 。 转换充电模式 充电模式有两种,分别是“标准充电”和“完全充电” 。 您可滑动充电模式转换开关,转换充电模式。 标准充电 当标准充电完成时,电池使用时间指示灯的显示如右图 (NORMAL 所示。 CHARGE) 当完全充电完成时,电池使用时间指示灯的显示如右图 完全充电 所示。此种模式用时长于标准充电,同时连接到完全充 (FULL 电的电池组上的视频设备可使用稍长一点的时间。 CHARGE) * 在标准充电模式下,当正常充电完成时不显示“FULL” 。 充电时间 NP-F970 NP-F770 NP-F570 标准充电时间...
  • Page 89 同时安装两个或更多的电池组 •本装置能够同时安装最多四个电池组。 (本装置具有两个系统 A 和 B,每个系统具有两个槽。 ) •能够对两个分别安装到 A 系统的任一槽(A1 或 A2)的电池组,及安装到 B 系统的任一槽 (B1 或 B2)的电池组同时进行充电(两个电池组分别安装在不同的系统) 。如果您希望快速对 两个电池组进行充电,请将一个安装到 A 系统的槽,另一个安装到 B 系统的槽。这样将会同时 开始对两个电池组进行充电。 将两个电池组安装到不同系统的槽中时 同时对两个电池组进行充电。 能够对两个分别安装到 A 系统的任一槽(A1 或 A2)的 电池组,及安装到 B 系统的任一槽(B1 或 B2)的电池 组同时进行充电(两个电池组分别安装在不同的系统) 。 1 1 1 1 1 1 将两个电池组安装到同一系统的槽中时...
  • Page 90: 检查充电

    安装和卸下电池组 1 让 B 标志面向端子快门,把电池组放在本装置上。 2 沿箭头方向滑入电池组。 按电池组直至端子快门完全进入本装置。 卸下充电池组 沿安装时的相反方向滑动电池组,然后垂直 将其取出。 注 •请勿抓住电池组提起本装置。 •请勿试图撞击端子快门。将电池组安装到本装置时,请确保不要让端子快门碰到电池组。 检查充电 充电开始时,电池使用时间显示在显示窗上。 根据所使用的视频设备,可能不显示电池使用时间。 请参阅视频设备的使用说明书。 •每按一次 DISPLAY 转换按钮,显示窗中的显示将发生变化。DISPLAY 转换按钮的灯和日志 指示灯显示出槽的编号及显示信息的信息条目。 •未充电的电池组的时间显示将在显示约 10 秒后自动转变为正在充电的电池组的时间显示。 此例说明安装到槽 A1 的电池组的充电检查及显示。其余槽同槽 A1。...
  • Page 91 每按一次 DISPLAY 转换按钮,显示窗中的显示变化如下: 电池使用时间 图示为安装到槽 A1 的电池组的电池使用时 间。 标准充电时间 图示为安装到槽 A1 的电池组距离标准充电 完成的剩余时间。 完全充电时间 图示为安装到槽 A1 的电池组距离完全充电 完成的剩余时间。 (当充电模式转换开关设定于“NORMAL CHARGE” (标准充电)时,不显示该时 间。 ) 总充电时间 图示为安装到槽 A1 的电池组的总充电时间。 充电循环总量 图示为安装到槽 A1 的电池组的充电循环总 量。 上次使用时间 图示为安装到槽 A1 的电池组上次随视频设 备等使用的年月。时间以月 - 年的顺序进行 显示。 注...
  • Page 92 电池使用时间 显示随上次使用的视频设备等的大约电池使用时间。 标准充电时间 显示距离标准充电完成所剩余的大约时间。 完全充电时间 显示距离完全充电完成所剩余的大约时间。 TTL CHG(总充电时间) 显示从电池组首次进行充电起开始的大约总充电时间。标示的最小单位为 5 小时。 CYCLE(充电循环总量) 显示从电池组首次进行充电起开始的大约充电循环总量。最小单位为 5,而且次数以 5 的倍数进 行显示。后续充电时间及充电过程中的停顿不算做充电次数。 LAST USE(上次使用的年月) 将电池组安装到本装置以后,将显示电池组上次随视频设备等使用的年月。时间以月 - 年的顺序 进行显示。 例如: 01 08 月 年 上次使用的年月为 2008 年 1 月。 本装置与未设置日历的视频设备搭配使用时,显示“-- --” 。 注 •BATTERY LOG” (电池日志)与充电电池组 NP-F970、NP-F770、NP-F570 兼容。 其他型号所能显示的内容受到限制。...
  • Page 93: 故障排除

    故障排除 在就近咨询 Sony 经销商之前,请先检查以下内容。如果本装置在检查后仍无法正确操作,请就 近咨询 Sony 经销商。 视频设备不起作用。 •电源插头没有接到墙上电源插座。 t 将电源插头插入墙上电源插座。 •连接器电缆没有正确连接。 t 正确连接连接器电缆。 •输出转换开关设定于“CHARGE” 。 t 将输出转换开关设定于“VCR/CAMERA” 。 电池组没有充电。 •电源插头没有接插到墙上电源插座。 t 将电源插头插入墙上电源插座。 •电池组没有正确地连接到本装置。 t 检查电池组的方向,并重新正确安装电池组。 •输出转换开关设定于“VCR/CAMERA” 。 t 将使用系统的输出转换开关设定于“CHARGE” 。 •首个安装的电池组正在充电。 t 在首个安装的电池组充电完成后,开始对其他电池组的充电。 •将完全充电或者几乎完全充电的电池组安装到了本装置中。 t 充电将跳过已完全充电的电池组。 •处于温度保护状态下。 t 请在建议温度范围下使用本装置。即使在开始充电时处于建议温度范围内,充电过程中温度...
  • Page 94 CHARGE 灯闪烁,并在显示窗中显示“WARNING” 。 •正在对一个长期未使用的电池组充电。 t 长期未使用的电池组可能没有留下足够的最小点亮以识别本装置及电池组。这种情况下,请 将电池组从本装置中取出并重新装入。 如果“WARNING”在重新装入电池组后出现,请通查下列图表。 从本装置卸下电池组,然后再重新 装上。 如果 CHARGE 灯仍然闪烁: 如果 CHARGE 灯不再闪烁而一直点亮: 请安装其他的“InfoLITHIUM”电 如果充电时间已过而 CHARGE 灯熄灭了, 池组。 便没有问题。 如果 CHARGE 灯仍然闪烁: 如果 CHARGE 灯不再闪烁而一直点亮: 说明本装置存在问题。 如果充电时间已过而 CHARGE 灯熄灭了, 说明安装的第一个电池组存在问题。 关于装置的问题,请就近咨询 Sony 经销商。...
  • Page 95 操作温度 0℃ 到 +40℃ 储藏温度 -20℃ 到 +60℃ 尺寸 约 220 mm × 61.0 mm × 155 mm(宽 / 高 / 深) 质量 约 770g 所含物品: 电源适配器/充电器(AC-VQL1BP 主体)..(1) 电源线 ..(1) 连接导线 (DK-215) ... (1) 连接导线 (DK-415) ... (1) 成套印刷文件 设计或规格如有变动,恕不另行通知。...

Table des Matières