Sony DPP-EX5 Mode D'emploi
Table des Matières
Les langues disponibles
Les langues disponibles
Digital Photo
Printer
Operating Instructions
Before operating this printer, please read this
manual thoroughly and retain it for future
reference.
Mode d'emploi
Avant d'utiliser cette imprimante, veuillez lire
attentivement ce manuel et le conserver pour toute
référence ultérieure.
DPP-EX5
2002 Sony Corporation
3-207-119-16 (2)
GB
FR
Chapitres
Table des Matières
Dépannage

Manuels Connexes pour Sony DPP-EX5


Sommaire des Matières pour Sony DPP-EX5
-
Page 86: Recommandations De Sauvegarde
PRO”, “MagicGate Memory Stick” sont ATTENTION des marques de Sony Corporation. Les images et/ou le son peuvent se •“MagicGate” est une marque de Sony déformer si ce produit est installé près Corporation. d’un matériel émettant un •Cette imprimante utilise la technologie rayonnement électromagnétique. -
Page 87: Enregistrement Utilisateur
Toute copie non autorisée de ce logiciel est sous une forme lisible par machine sans interdite suivant les lois sur les droits l’accord écrit préalable de Sony Corporation. d’auteur. La reproduction ou la modification non EN AUCUN CAS, SONY CORPORATION autorisée de portraits ou de travaux protégés... - Page 88 Table des matières Préparatifs Opérations d’impression avancée Caractéristiques .......... 6 Ajout d’effets à une image ....... 27 Déballage de l’imprimante ......8 Fonctions du menu EFFECT ......27 Identification des composants ....9 Modification de la taille et de la position d’une image ..........
- Page 89 Impression depuis votre Informations ordinateur complémentaires Utilisation de l’imprimante sous Précautions ..........73 Windows ..........56 A propos du “Memory Stick” ....75 Configuration du système ......56 Qu’est-ce que le “Memory Stick” ? ..... 75 IInstallation du pilote d’imprimante ..... 57 Types de “Memory Stick”...
-
Page 90: Caractéristiques
Préparatifs Caractéristiques A l’aide de l’imprimante photo numérique DPP-EX5, vous pouvez imprimer des images provenant d’un “Memory Stick” ou d’un ordinateur. Impression de qualité photographique Grâce à son système d’impression de teinte par sublimation, l’imprimante peut réaliser des impressions de qualité photographique en satisfaisant à un certain nombre d’exigences. -
Page 91: Encore Plus D'impressions D'images De "Memory Stick" Sans Utiliser D'ordinateur
Impression depuis votre ordinateur avec une liaison USB pratique (page 56) Vous pouvez imprimer des images à partir de votre ordinateur en raccordant l’imprimante à celui-ci à l’aide du câble USB fourni et en y installant le pilote d’imprimante DPP-EX5 fourni. -
Page 92: Déballage De L'imprimante
Assurez-vous que tous les accessoires suivants ont bien été livrés avec votre imprimante. • Cordon d’alimentation (1) • CD-ROM (1) – Pilote d’imprimante Sony DPP- • Câble de raccordement vidéo (1) EX5/EX7 pour Windows 98/98SE/ Me/2000 Professional/XP Home Edition/XP Professional –... -
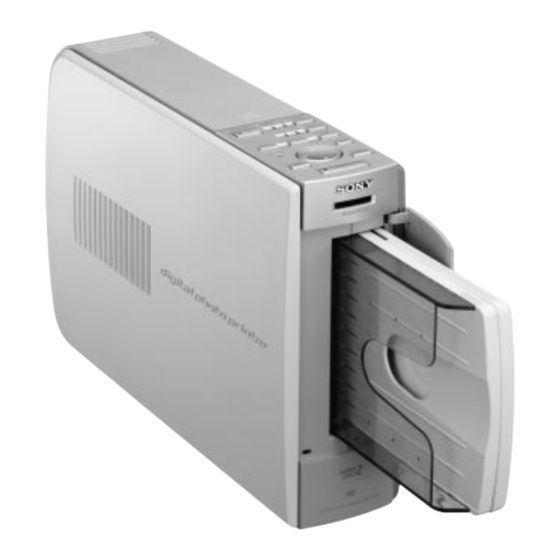
Page 93: Identification Des Composants
Identification des composants Pour davantage d’informations, voir les pages indiquées entre parenthèses. Panneau avant de l’imprimante 1 Touche POWER (pages 17) 2 Touche INPUT SELECT/Témoins d’entrée (pages 15, 21) Commute l’entrée. Le témoin du signal d’entrée en cours s’allume (“MEMORY STICK”/PC). -
Page 94: Panneau Arrière De L'imprimante
Identification des composants Panneau arrière de l’imprimante 1 Orifices de ventilation 2 Connecteur AC IN (page 13) 3 Connecteur VIDEO OUT (sortie) (page 12) Se raccorde à l’entrée vidéo de votre téléviseur. 4 Connecteur USB (page 15) Se raccorde au connecteur USB de votre ordinateur. - Page 95 Ecran 1 Numéro de l’image 2 Témoin de protection Liste d’images Indique que l’image est protégée par un appareil photo numérique. 4 5 6 3 Icône d’impression (indication DPOF) Indique que l’image est une présélection d’impression DPOF réalisée depuis un appareil photo numérique.
-
Page 96: Configuration
Configuration 1 Raccordement de l’imprimante Raccordement à un téléviseur Raccordez le connecteur VIDEO OUT (sortie) de l’imprimante à l’entrée vidéo du téléviseur pour afficher les images à imprimer. Téléviseur Réglez le sélecteur d’entrée VIDEO/TV sur VIDEO. Câble de raccordement vidéo (fourni) Vers l’entrée VIDEO Remarques... -
Page 97: Raccordement Du Cordon D'alimentation Secteur
Raccordement du cordon d’alimentation secteur Après avoir réalisé les raccordements, branchez le cordon d’alimentation fourni au connecteur AC IN de l’imprimante, puis à une prise secteur. Le témoin POWER s’allume en rouge. Cordon d’alimentation secteur (fourni) Vers la prise murale Suite... -
Page 98: Insertion D'un "Memory Stick
1 Raccordement de l’imprimante Insertion d’un “Memory Stick” Insérez le “Memory Stick” dans le logement “MEMORY STICK” jusqu’à ce qu’il s’encliquette. En ce qui concerne le “Memory Stick” que vous pouvez utiliser avec l’imprimante, reportez-vous à la page 75. “Memory Stick” Cran orienté... -
Page 99: Raccordement À Un Ordinateur (En Option)
Raccordement à un ordinateur (en option) Raccordez les connecteurs USB de l’imprimante à votre ordinateur (PC Windows ou Macintosh) à l’aide d’un câble USB disponible dans le commerce. En installant le logiciel de pilote fourni sur votre ordinateur, vous pouvez imprimer une image depuis le disque dur de votre ordinateur. -
Page 100: Préparation Du Kit D'impression
2 Préparation du kit d’impression Vous devez vous procurer le kit d’impression en option spécialement conçu pour cette imprimante. Ce kit contient un jeu de papier d’impression et une cartouche d’impression pour le format carte postale (10 x 15 cm), le format 3, 5 x 5 pouces (9 x 13 cm) ou le petit format (9 x 10 cm). -
Page 101: Chargement De La Cartouche D'impression
Le côté où se trouve le logo Sony doit être orienté vers le haut Pour remplacer la cartouche d’impression Lorsque la cartouche d’impression est épuisée, le témoin (erreur papier/cartouche) s’allume et un message d’erreur apparaît à... - Page 102 3 Chargement de la cartouche d’impression Remarques •N’introduisez jamais vos doigts dans le compartiment de la cartouche d’encre. La tête d’impression thermique atteint des températures élevées, en particulier après une impression prolongée. •Ne réutilisez pas une cartouche d’encre pour l’impression après en avoir rembobiné le ruban encreur.
-
Page 103: Insertion Du Papier D'impression
4 Insertion du papier d’impression Ouvrez le capot du magasin à papier et installez l’adaptateur papier 3,5 x 5 pouces et le séparateur suivant la taille du papier que vous souhaitez utiliser. x Pour utiliser le papier au format carte postale (10 x 15 cm) Retirez l’adaptateur papier 3,5 x Adaptateur à... - Page 104 4 Insertion du papier d’impression Fermez le capot du magasin à papier. Ouvrez ensuite le capot du compartiment du magasin à papier et insérez le magasin à papier dans l’imprimante. Insérez fermement le magasin jusqu’à ce qu’il s’enclenche. Remarques •Ne retirez pas ou n’insérez pas le magasin à papier en cours d’impression. •Si le papier d’impression ne se charge pas automatiquement, le témoin d’erreur s’allume.
-
Page 105: Opérations D'impression De Base
Opérations d’impression de base Impression d’images sélectionnées dans un “Memory Stick” Vous pouvez sélectionner une image enregistrée dans le “Memory Stick” et l’imprimer en pleine page. Impression standard sans marge Touche INPUT SELECT Touche ENTER Touche PICTURE Insérez un “Memory Stick” contenant des images enregistrées dans le logement d’insertion du “Memory Stick”... - Page 106 Impression d’images sélectionnées dans un “Memory Stick” En mode de démonstration Lorsque le connecteur USB de l’imprimante est déconnecté et que vous retirez le “Memory Stick” de l’imprimante, l’imprimante passe en mode de démonstration si vous appuyez sur INPUT SELECT. En mode de démonstration, une image apparaît sur l’écran.
- Page 107 Pour imprimer plusieurs images à la fois Vous pouvez sélectionner plusieurs images et le nombre de copies à imprimer. Insérez un “Memory Stick” contenant des images enregistrées dans le logement d’insertion du “Memory Stick” (page 14). Mettez l’imprimante et le téléviseur sous tension et réglez le sélecteur d’entrée du téléviseur sur “VIDEO”.
-
Page 108: Lorsque L'impression Se Termine Et Que Le Papier D'impression
Impression d’images sélectionnées dans un “Memory Stick” Appuyez sur PRINT. Lorsque vous lancez l’impression alors que l’image prévisualisée est affichée Seule l’image prévisualisée s’imprime. Pour arrêter l’impression Appuyez sur CANCEL. L’impression est annulée à partir de la page qui suit. Lorsque l’impression se termine et que le papier d’impression sort automatiquement, retirez-le du magasin à... -
Page 109: Impression De Toutes Les Images Ou Des Images Présélectionnées Dpof En Une Seule Fois
Impression de toutes les images ou des images présélectionnées DPOF en une seule fois Vous pouvez imprimer toutes les images enregistrées dans un “Memory Stick” en une seule fois. Vous pouvez aussi imprimer toutes les images portant l’icône d’impression ( ) dans la liste d’images qui sont des présélections DPOF (Digital Print Order Format) pour impression avec votre appareil photo numérique. -
Page 110: Lorsque Vous Raccordez Votre Imprimante Au Téléviseur
Impression de toutes les images ou des images présélectionnées DPOF en une seule fois Effectuez l’une des opérations suivantes : • Pour imprimer toutes les images, appuyez sur AUTO PRINT jusqu’à ce que le témoin ALL s’allume. • Pour imprimer toutes les images présélectionnées pour l’impression, appuyez sur AUTO PRINT jusqu’à... -
Page 111: Opérations D'impression Avancée
Opérations d’impression avancée Ajout d’effets à une image Fonctions du menu EFFECT Le menu EFFECT vous permet de modifier, d’ajuster ou d’ajouter des filtres spéciaux à une image dans le “Memory Stick”. Touche EFFECT Pour afficher le menu EFFECT, appuyez sur EFFECT. Curseur Barre de menu EFFECT Curseur... - Page 112 Ajout d’effets à une image Pour annuler les modifications dans le menu EFFECT Sélectionnez “RESET” dans le menu principal EFFECT, puis appuyez sur ENTER. La boîte de dialogue de confirmation pour annuler les modifications s’affiche. Appuyez sur la touche de direction (B/b) pour sélectionner “OK”, puis appuyez sur ENTER.
-
Page 113: Modification De La Taille Et De La Position D'une Image
Modification de la taille et de la position d’une image Sélectionnez l’image à modifier dans la liste des miniatures ou appuyez sur PICTURE pour afficher l’aperçu de cette image. Appuyez sur EFFECT. La barre de menu EFFECT s’affiche (page 27). Appuyez sur la touche de direction (B/b) pour sélectionner “3”... -
Page 114: Réglage Des Images
Ajout d’effets à une image Appuyez sur les touches de direction (V/v) pour déplacer le curseur vers l’élément souhaité du sous-menu EDIT, puis appuyez sur ENTER. Elément Procédures Move Déplacez l’image à l’aide de la touche de direction (B/b/v/V), puis appuyez sur ENTER. L’image est déplacée dans le sens choisi. -
Page 115: Réglez Le Niveau Comme Suit
Appuyez sur les touches de direction (V/v) pour déplacer le curseur vers l’élément de réglage souhaité, puis appuyez sur ENTER. Le curseur de réglage apparaît. Lorsque “BRIGHTNESS” est sélectionné. Curseur de réglage Réglez le niveau comme suit : Elément Réglages Brightness Appuyez sur V pour éclaircir l’image ou v pour l’assombrir. -
Page 116: Ajout D'un Filtre Spécial À Une Image
Ajout d’effets à une image Ajout d’un filtre spécial à une image Le sous-menu FILTER vous permet d’ajouter un effet spécial à une image pour imprimer en monochrome, en sépia ou en mode peinture. Sélectionnez l’image à modifier dans la liste des miniatures ou appuyez sur PICTURE pour afficher l’aperçu de cette image. -
Page 117: Saisie De Caractères Sur Une Image
Saisie de caractères sur une image Le sous-menu TEXT vous permet de saisir et de superposer des caractères sur une image. Les caractères sont saisis ligne par ligne. Sélectionnez l’image à modifier dans la liste des miniatures ou appuyez sur PICTURE pour afficher l’aperçu de cette image. Appuyez sur EFFECT. - Page 118 Ajout d’effets à une image Pour sélectionner la police et la couleur des caractères Les caractères sont saisis dans la police affichée à côté de “FONT” et la couleur à côté de “COLOR”. Pour appliquer une autre police ou une autre couleur aux caractères, sélectionnez “FONT”...
- Page 119 Appuyez sur la touche de direction (V/v) pour déplacer le curseur vers l’élément de réglage souhaité, puis appuyez sur ENTER pour ajuster la taille et la position des caractères. Pour effectuer plusieurs réglages, répétez cette étape. Elément Procédures REDRAW L’écran de saisie des caractères s’affiche de nouveau et vous pouvez saisir d’autres caractères.
-
Page 120: Création D'impressions Diverses
Création d’impressions diverses (CREATIVE PRINT) Fonctions du menu CREATIVE PRINT Le menu CREATIVE PRINT vous permet d’effectuer différentes impressions d’une image du “Memory Stick”. Pour afficher le menu CREATIVE PRINT, appuyez sur CREATIVE PRINT. Touche CREATIVE PRINT Appuyez sur les touches de direction (B/b/v/V) pour sélectionner le sous- menu souhaité. - Page 121 Pour annuler et recommencer les opérations à mi-chemin Appuyez sur CANCEL. L’écran revient à la procédure précédente, recommencez la procédure. Pour modifier les réglages de l’imprimante à mi-chemin Vous pouvez appuyer sur MENU et modifier les paramètres de l’imprimante pour “Finish”, “Beep” et “Clock Setting”. Vous ne pouvez pas modifier les autres éléments en mode CREATIVE PRINT et les paramètres antérieurs à...
-
Page 122: Création D'impressions Diverses (Creative Print)
Création d’impressions diverses (CREATIVE PRINT) Création d’une carte Vous pouvez ajouter des vœux et un message personnalisé à des images pour réaliser une carte originale, comme celle illustrée ci-contre. Appuyez sur les touches de direction (B/b/V/v) pour déplacer le curseur vers “CARD”, puis appuyez sur ENTER. - Page 123 Appuyez sur ENTER. La fenêtre de sélection d’un message s’affiche. Appuyez sur les touches de direction (B/b/v/V) pour déplacer le curseur vers le message souhaité, puis appuyez sur ENTER. La fenêtre de sélection de la couleur du message s’affiche. Appuyez sur les touches de direction (B/b/v/V) pour déplacer le curseur vers la couleur souhaitée, puis appuyez sur ENTER.
- Page 124 Création d’impressions diverses (CREATIVE PRINT) Appuyez sur les touches de direction (v/V) pour déplacer le curseur vers l’élément de réglage souhaité, puis appuyez sur ENTER. Pour effectuer plusieurs réglages, répétez cette étape. Elément Procédures A chaque fois que vous appuyez sur ENTER, l’image est agrandie. A chaque fois que vous appuyez sur ENTER, l’image est réduite.
- Page 125 Après avoir terminé la saisie des derniers caractères de la première ligne, appuyez sur la touche de direction (B/b/v/V) pour déplacer le curseur sur “NEXT”, puis appuyez sur ENTER. Répétez les étapes 11 et 12 pour saisir les lignes restantes. L’aperçu de l’impression s’affiche à...
-
Page 126: Création D'un Calendrier
Création d’impressions diverses (CREATIVE PRINT) Création d’un calendrier Vous pouvez ajouter un calendrier sélectionné à une ou plusieurs images pour créer un calendrier original. Appuyez sur les touches de direction (B/b/v/V) pour déplacer le curseur vers “CALENDAR”, puis appuyez sur ENTER. L’écran de sélection de taille apparaît (page 38). - Page 127 Répétez l’opération pour définir le mois. Appuyez ensuite sur ENTER. 2 Définissez le jour commençant la semaine (placé le plus à gauche dans le calendrier). Appuyez sur les touches de direction (v/V) pour sélectionner “Start day” (date de départ), puis appuyez sur les touches de direction (B/b) pour déplacer le curseur vers “Sunday”...
-
Page 128: Création D'un Autocollant
Création d’impressions diverses (CREATIVE PRINT) Pour imprimer l’image CREATIVE PRINT, appuyez sur PRINT. L’impression commence. Lorsque l’impression est terminée, l’écran de l’étape 9 apparaît de nouveau. Pour les opérations suivantes, reportez- vous à la page 37. Pour arrêter l’impression Appuyez sur CANCEL. Lorsque plusieurs copies sont imprimées, l’impression suivante est annulée. -
Page 129: Création D'une Image En Plusieurs Portions
Appuyez sur les touches de direction (B/b/V/v) pour déplacer le curseur vers le cadre souhaité. Vérifiez que le”Memory Stick” est bien inséré dans l’imprimante, puis appuyez sur ENTER. La liste des miniatures de sélection d’une image s’affiche. Appuyez sur les touches de direction (B/b/v/V) pour déplacer le curseur vers l’image souhaitée, puis appuyez sur ENTER. -
Page 130: Appuyez Sur Les Touches De Direction (B/B/V/V) Pour Déplacer
Création d’impressions diverses (CREATIVE PRINT) Appuyez sur une touche de direction (B/b/v/V) pour déplacer le curseur vers la taille utilisée pour l’impression, puis appuyez sur ENTER. Les modèles d’images en plusieurs portions s’affichent. Si vous sélectionnez “POSTCARD” Appuyez sur les touches de direction (B/b/v/V) pour déplacer le curseur vers le modèle souhaité, puis appuyez sur ENTER. -
Page 131: Configuration De L'imprimante (Menu)
Configuration de l’imprimante (MENU) Fonctions du MENU Le MENU vous permet de modifier les paramètres de l’imprimante, de supprimer des images, de réaliser des diaporamas ou d’imprimer un index. Pour afficher l’écran du MENU, appuyez sur MENU. Touche MENU Curseur Barre de MENU Curseur Sous-menu... -
Page 132: Modification Des Préférences De L'imprimante (Setup)
Configuration de l’imprimante (MENU) Pour afficher un autre sous-menu Appuyez sur V jusqu’à la disparition du sous-menu courant. Pour quitter le MENU au milieu de l’opération Appuyez sur CANCEL ou MENU. Les réglages effectués sont annulés et l’écran revient à celui affiché avant l’entrée dans le MENU. Modification des préférences de l’imprimante (SETUP) Le sous-menu SETUP vous permet de modifier les préférences d’impression, y compris les paramètres Auto Fine Print 2 (impression fine automatique), Date... - Page 133 Elément Réglages Fonctions Auto Fine Print 2 HI/LO* Permet de corriger automatiquement une image pour obtenir une impression de meilleure qualité. Vous avez le choix du niveau des réglages entre HI (supérieur) et LO (inférieur). Lorsque cette fonction est activée, une image prise par un appareil photo numérique compatible Exif Print (Exif 2.2) est automatiquement ajustée à...
- Page 134 Configuration de l’imprimante (MENU) Elément Réglages Fonctions Date Print Imprime la date de la prise de vue sur une image lorsque celle-ci est enregistrée au format de fichier JPEG (Design rule for Camera File system). Pour une impression indiquant la date de prise de vue, celle-ci doit être effectuée au format de fichier JPEG.
- Page 135 Elément Réglages Clock Setting Vous pouvez régler l’horloge interne pour enregistrer la date à laquelle vous avez enregistré l’image dans le “Memory Stick”. Appuyez sur les touches de direction (V/v) pour sélectionner “Clock Setting”, puis appuyez sur ENTER. L’imprimante passe en mode de réglage de l’horloge. Le curseur apparaît sur le mois (en NTSC) ou le jour (en PAL).
-
Page 136: Diaporama
Diaporama Vous pouvez réaliser un diaporama des images enregistrées dans un “Memory Stick”. Insérez le “Memory Stick”. La liste d’images du “Memory Stick” s’affiche. Appuyez sur les touches de direction (B/b) de l’écran de MENU (page 47) pour sélectionner “SLIDESHOW”, puis appuyez sur ENTER. -
Page 137: Création D'une Impression D'index
Création d’une impression d’index Vous pouvez imprimer une liste des images contenues dans un “Memory Stick” (impression d’un index). Insérez le “Memory Stick”. La liste d’images du “Memory Stick” s’affiche. Dans l’écran du MENU (page 47), appuyez sur les touches de direction (B/b) pour sélectionner “INDEX PRINT”, puis appuyez sur ENTER. -
Page 138: Suppression D'images
Suppression d'images Vous pouvez supprimer des images dans le “Memory Stick”. Vous pouvez également formater le “Memory Stick”. Remarques •Au cours de la suppression ou du formatage ne mettez pas l'appareil hors tension, ne retirez pas le “Memory Stick” de son logement, vous risqueriez de les endommager. •Si le “Memory Stick”... -
Page 139: Formatage D'un "Memory Stick
Icône de la corbeille Appuyez sur les touches de direction (V/v) pour déplacer le curseur vers “Delete Image”, puis appuyez sur ENTER. La liste des miniatures s’affiche. Si vous affichez un aperçu d’image à l’étape 1, l’icône de la corbeille est attachée à... -
Page 140: Impression Depuis Votre Ordinateur
Le pilote d’imprimante DPP-EX5 fourni vous permet d’imprimer des images enregistrées sur votre ordinateur à l’aide de l’imprimante photo numérique DPP-EX5. Pour imprimer une image à partir de l’ordinateur, vous devez disposer d’un logiciel d’impression disponible dans le commerce. Configuration du système Pour utiliser le logiciel fourni, vous devez disposer d’un ordinateur configuré... -
Page 141: Iinstallation Du Pilote D'imprimante
IInstallation du pilote d’imprimante Installez sur votre ordinateur le pilote d’imprimante contenu sur le CD-ROM fourni. Vérifiez que l’imprimante n’est pas raccordée à l’ordinateur. Mettez votre ordinateur sous tension et démarrez Windows. ® •Lorsque vous installez ou désinstallez le logiciel sous Windows 2000 Professional, connectez-vous à... -
Page 142: Suivez Les Instructions Apparaissant À L'écran Pour Configurer
3. •Si l’installation échoue, supprimez l’imprimante de l’ordinateur, redémarrez l’ordinateur, puis reprenez la procédure d’installation à partir de l’étape 3. •Une fois l’installation effectuée, l’imprimante “Sony DPP-EX5” n’est pas l’imprimante par défaut. Définissez l’imprimante que vous utilisez pour chaque application. -
Page 143: Pour Vérifier L'installation
Ouvrez “Imprimantes et télécopieurs” (Windows XP Home Edition/XP Professional uniquement) ou “Imprimantes” dans “Panneau de configuration”. Lorsque “Sony DPP-EX5” apparaît dans la fenêtre “Imprimantes et télécopieurs” ou “Imprimantes” , l’installation de l’imprimante DPP-EX5 est réussie. Si vous utilisez Windows Me La fenêtre “Assistant Ajout de nouveau matériel”... -
Page 144: Désinstallation Du Logiciel
Ouvrez “Imprimantes et télécopieurs” (Windows XP Home Edition/XP Professional uniquement) ou “Imprimantes” dans “Panneau de configuration”. Cliquez sur “Sony DPP-EX5” avec le bouton droit de la souris dans la fenêtre “Imprimantes et télécopieurs” ou “Imprimantes” et sélectionnez “Supprimer” à partir du menu contextuel. - Page 145 Configurez l’imprimante. La boîte de dialogue varie selon l’application. 1 Cliquez sur “Imprimante”. La boîte de dialogue “Mise en page” apparaît. 2 Sélectionnez “Sony DPP-EX5” comme nom d’imprimante. 3 Cliquez sur “Propriétés”. La fenêtre permettant de définir les propriétés du document apparaît.
- Page 146 Utilisation de l’imprimante sous Windows 5 Cliquez sur l’onglet “Papier”, puis configurez le papier en fonction du format de papier que vous souhaitez utiliser pour l’impression. Papier Sélectionnez le format de papier entre “Carte postale”, “3,5 x 5 pouces” ou “Petit” en fonction du format de papier d’impression que vous utilisez.
- Page 147 Arrête l’impression. Cliquez sur “Imprimer”. L’imprimante commence l’impression. L’écran de contrôle de l’imprimante DPP-EX5 apparaît et affiche le déroulement de l’impression. Pour imprimer à partir de Mes images (sous Windows XP Home Edition/Professional uniquement) Insérez les images que vous souhaitez imprimer dans “Mes images”.
- Page 148 “Imprimer les images”. Veillez à supprimer les coches des images que vous ne souhaitez pas imprimer. Sélectionnez “DPP-EX5” comme imprimante à utiliser, puis cliquez sur “Options d’impression”. La fenêtre des propriétés du document de l’étape 4 de la page 61 est affichée.
-
Page 149: Pour Arrêter L'impression
Professional uniquement) ou “Imprimantes” dans “Panneau de configuration”. Cliquez deux fois sur l’icône “Sony DPP-EX5”. La fenêtre “Sony DPP-EX5” apparaît. Dans cette fenêtre, les documents de la file d’impression sont affichés sous forme de liste. Cliquez sur le document dont vous souhaitez arrêter l’impression. -
Page 150: Utilisation De L'imprimante Avec Un Macintosh
Le pilote d’imprimante DPP-EX5 fourni vous permet d’imprimer des images enregistrées sur votre ordinateur à l’aide de l’imprimante photo numérique DPP-EX5. Pour imprimer une image à partir de l’ordinateur, vous devez disposer d’un logiciel d’impression disponible dans le commerce. Configuration du système Pour utiliser le logiciel fourni, vous devez disposer d’un ordinateur Macintosh... -
Page 151: Installation Du Pilote De L'imprimante
Installation du pilote de l’imprimante Lorsque vous utilisez Mac OS 8.6/9.0/9.1/9.2 Vérifiez que l’imprimante n’est pas raccordée à l’ordinateur. Mettez votre Macintosh sous tension et démarrez-le. Remarque Veillez à fermer tous les programmes en cours d’exécution avant d’installer le logiciel. Insérez le CD-ROM fourni dans votre lecteur de CD-ROM de votre ordinateur. - Page 152 Utilisation de l’imprimante avec un Macintosh Retirez le CD-ROM fourni du lecteur de CD-ROM de votre ordinateur. Remarques •Si vous annulez l’installation à mi-chemin, reprenez la procédure d’installation à partir de l’étape 4. •Si l’installation échoue, supprimez l’imprimante de l’ordinateur, redémarrez l’ordinateur, puis reprenez la procédure d’installation à...
- Page 153 Saisissez le nom et le mot de passe de l’administrateur de l’ordinateur, puis cliquez sur “OK”. Pour connaître le nom et le mot de passe, consultez l’administrateur de l’ordinateur. Cliquez sur “Continuer”. Cliquez sur l’endroit où vous souhaitez installer le pilote, puis cliquez sur “Continuer”.
-
Page 154: Désinstallation Du Pilote D'imprimante
Raccordez l’imprimante à votre ordinateur et mettez-la sous tension. Au bout de quelques instants, l’imprimante est détectée et prête à imprimer. A ce moment, l’indication “DPP-EX5” apparaît dans la liste des imprimantes du “Centre d’impression”. Démarrez votre application d’impression et sélectionnez l’image à... - Page 155 Choisissez les réglages de l’imprimante. Réglages Sélectionnez “Attributs de page”. Format Sélectionnez “DPP-EX5” à partir de la liste déroulante. Papier Sélectionnez l’un des formats de papier suivants à partir de la liste déroulante. • Carte postale: lorsque vous utilisez le papier d’impression au format Carte postale (10 x 15 cm) pour effectuer une impression avec des bordures.
-
Page 156: Paramètre Réglage
Utilisation de l’imprimante avec un Macintosh Menu Paramètre Réglage Copies Pages Pour imprimer toutes les pages, sélectionnez “Tout”. Pour et pages imprimer une partie des pages, spécifiez les pages de début et de fin de l’impression. Copies Saisissez le nombre de copies à imprimer. Disposition Sélectionnez l’orientation de la mise en page. -
Page 157: Informations Complémentaires
Informations complémentaires Précautions Sécurité Installation • Veillez à ne pas poser ou faire • N’installez pas l’imprimante dans un tomber des objets lourds sur le endroit soumis : cordon d’alimentation et à ne pas – aux vibrations endommager celui-ci de quelque –... -
Page 158: Condensation D'humidité
Précautions Condensation d’humidité Nettoyage Si l’imprimante est directement Nettoyez le boîtier, le panneau de transportée d’un endroit froid à un commande et les commandes avec un endroit chaud ou si elle est installée chiffon doux et sec ou avec un chiffon dans une pièce extrêmement chaude ou doux légèrement imbibé... -
Page 159: A Propos Du "Memory Stick
A propos du “Memory Stick” • “MagicGate Memory Stick” : le Qu’est-ce que le “Memory “MagicGate Memory Stick” utilise la Stick” ? technologie de protection des droits d’auteurs “MagicGate”. Le “Memory Stick” est un support de • “Memory Stick PRO” : le “ Memory stockage amovible évolué... -
Page 160: Types De "Memory Stick" Utilisables Par L'imprimante
A propos du “Memory Stick” L’appareil compatible “MagicGate” et le Types de “Memory Stick” “MagicGate Memory Stick” vérifient utilisables par l’imprimante qu’ils supportent tous deux la technologie “MagicGate” et codent les Cette imprimante vous permet données qu’ils échangent. d’effectuer les opérations suivantes avec L’imprimante ne supporte pas les normes chaque type de “... - Page 161 • Evitez de retirer le “Memory Stick” • Ne démontez pas le “Memory Stick” de l’imprimante lorsque cette et ne le modifiez pas. dernière est en train de lire ou • Evitez de renverser du liquide sur le d’écrire des données. “Memory Stick”...
-
Page 162: Dépannage
“Memory Stick”, insérez l’image est enregistrée en format de correctement celui-ci dans fichier incompatible que le DPP-EX5 l’imprimante. Vérifiez que les ne prend pas en charge ou l’image images enregistrées par un appareil elle-même est endommagée. - Page 163 Si cela ne résout pas le problème, aussi bonne que celle des images contactez le service clients Sony ou principales. Si vous supprimez les votre revendeur Sony. aperçus des images, les données des images principales risquent d’être...
-
Page 164: Bourrage Papier
•Vous pouvez également effectuer le nettoyage avec la feuille de protection contenue dans le kit d’impression de la DPP-EX5. Pour utiliser la feuille de protection pour procéder à un nettoyage, insérez le papier avec la surface marquée face à l’intérieur... - Page 165 Ouvrez le capot du compartiment de la cartouche et retirez la cartouche d’impression (page 17). Insérez la cartouche de nettoyage fournie (blanche) dans l’imprimante, puis fermez le capot du compartiment de la cartouche. Retirez le magasin à papier de l’imprimante. S’il y a du papier dans le magasin, retirez-le.
-
Page 166: Spécifications
Spécifications Système d’impression Formats de fichier image compatibles Impression de teinte par sublimation : Exif Ver. 2.1, 2.2 , compatible (Jaune/Magenta/Cyan en 3 passes) JPEG, TIFF -RGB (non compressé) JPEG : 4:4:4, 4:2:2, 4:2:0 (JPEG ligne de Résolution base) 403 (H) x 403 (V) ppp BMP : vraies couleurs 24 bits, format Windows Traitement de l’image par point... -
Page 167: Page D'accueil Du Support Clients
à modifications sans préavis. Page d’accueil du support clients Les dernières informations du support technique sont disponibles aux adresses suivantes : Pour les clients aux Etats-Unis : http://www.sel.sony.com/SEL/service/conselec/ Pour les clients au Canada : http://www.sony.ca/service Pour les clients en Europe : http://www.sony-imaging.com/support Pour les clients à... -
Page 168: Glossaire
Glossaire Auto Fine Print (impression fine norme mondiale dans le domaine du automatique) 2 tirage de photos numériques. Un appareil photo numérique prenant Cette fonction corrige en charge le système Exif Print automatiquement la qualité d’une mémorise les données image pour que celle-ci produise un correspondantes aux conditions de tirage plus éclatant, clair et naturel. -
Page 169: Index
Index Accessoires fournis 8 Dépannage 78 Images en plusieurs portions 45 ALL 26 Désinstallation du logiciel 62, 68, 70 Impression Aperçu d’une image 11, Diaporama 52 à partir d’un ordinateur Macintosh Auto Fine Print 2 49 DPOF 26 AUTO PRINT 26 à... - Page 170 Index Kit d’impression 16 Raccordements à un téléviseur 12 de l’ordinateur 15 Levier d’éjection 17 du cordon Liste d’images 11 d’alimentation secteur Réglage de l’horloge 51 Magasin à papier 10, 19 Réglage d’une image 30 Memory Stick Restrictions sur la reproduction 74 insertion/retrait 14 remarques d’utilisation...