Sharp R-270 Mode D'emploi
Masquer les pouces Voir aussi pour R-270:
Table des Matières

Publicité

Les langues disponibles
  • FR

Les langues disponibles

  • FRANÇAIS, page 38

Liens rapides

All manuals and user guides at all-guides.com
Achtung
Важно
Avertissement
Important
Importante
Pomembno
Ważne
Important
Fontos
R-270
MIKROWELLENGERÄT - BEDIENUNGSANLEITUNG
FOUR A MICRO-ONDES - MoDE D'EMpLoI
FORNO A MICROONDE - MANUALE D'ISTRUZIoNI
KUCHENKA MIKROFALOWA - INSTUKCJA oBSŁUGI
MIKROHULLÁMÚ SÜTŐ - KEZELÉSI ÚTMUTATÓ
МИКРОВЪЛНОВА ФУРНА - РЪКОВОДСТВО ЗА УПОТРЕБА
CUPTOR CU MICROUNDE - MANUAL DE UTILIZARE
MIKROVALOVNA PEČICA - NAVoDILA ZA UpoRABo
MICROWAVE OVEN - opERATIoN MANUAL
00_User manual - R270_9_languages.indb 1
2016-07-15 12:59:46

Publicité

Table des Matières
loading

Sommaire des Matières pour Sharp R-270

  • Page 1 Avertissement Important Importante Pomembno Ważne Important Fontos R-270 MIKROWELLENGERÄT - BEDIENUNGSANLEITUNG FOUR A MICRO-ONDES - MoDE D’EMpLoI FORNO A MICROONDE - MANUALE D’ISTRUZIoNI KUCHENKA MIKROFALOWA - INSTUKCJA oBSŁUGI MIKROHULLÁMÚ SÜTŐ - KEZELÉSI ÚTMUTATÓ МИКРОВЪЛНОВА ФУРНА - РЪКОВОДСТВО ЗА УПОТРЕБА CUPTOR CU MICROUNDE - MANUAL DE UTILIZARE MIKROVALOVNA PEČICA - NAVoDILA ZA UpoRABo...
  • Page 2 All manuals and user guides at all-guides.com Diese Bedienungsanleitung enthält wichtige Informationen, welche Sie vor Inbetriebnahme des Gerätes unbedingt sorgfältig durchlesen sollten. Achtung: Die Nichtbeachtung der Gebrauchs- und Serviceanweisungen sowie jeglicher Eingriff, der das Betreiben des Gerätes in geöffnetem Zustand (z.B. geöffnetes Gehäuse) erlaubt, führt zu erheblichen Gesundheitsschäden.
  • Page 3 All manuals and user guides at all-guides.com A kezelési útmutató fontos információkat tartalmaz. olvassa végig figyelmesen a mikrohullámú sütő használata előtt! Fontos: A jelen kezelési útmutató előírásainak be nem tartásával, illetve a mikrohullámú sütő nyitott ajtajú működését lehetővé tevő módosításával súlyos egészségkárosodási kockázatot vállal! БГ...
  • Page 4 1. In der EU Wenn das produkt für gewerbliche Zwecke benutzt wurde und Sie es entsorgen möchten: Kontaktieren Sie bitte Ihren SHARp-Händler, der Sie über die Zu- rücknahme des produkts informieren wird. Es könnten Ihnen dabei Rücknahme- und Recyclingkosten in Rechnung gestellt werden.
  • Page 5 All manuals and user guides at all-guides.com INHALTSVERZEICHNIS GERÄT UND ZUBEHÖR ............................3 BEDIENFELD ................................4 WICHTIGE SICHERHEITSHINWEISE......................5-12 AUFSTELLUNG .............................13-14 WIE FUNKTIoNIERT IHR GERÄT? ......................... 15 MIKRoWELLEN-LEISTUNGSSTUFEN ......................16 VoR DER INBETRIEBNAHME .......................... 16 BETRIEB DES GERÄTS ..........................17-18 GEWICHTABHÄNGIGES GAREN/AUFTAUEN ................... 19 GEWICHTABHÄNGIGES-GAREN-TABELLE ....................
  • Page 6: Gerät Und Zubehör

    Mal, wenn Sie das Gerät starten. Dies hat keinen Einfluss auf die Gar- leistung. • Wenn Sie Zubehör bestellen, nennen Sie bitte sowohl die ERSATZTEILBEZEICHNUNG als auch die MODELLNUMMER, wenn Sie sich an Ihren Händler oder den SHARp-Kunden- dienst wenden. WARNUNG: Die Tür, das Gehäuse, der Garraum, Zubehör und Geschirr werden beim Be- trieb sehr heiß.
  • Page 7 All manuals and user guides at all-guides.com BEDIENFELD 1. DIGITALANZEIGE 2. ZEIT-Tasten 3. GEWICHTSABHÄNGIGES GAREN- & AUFTAUEN-Taste 4. WENIGER/MEHR ZEIT-Tasten 5. LEISTUNGSSTUFEN-Taste 6. START/AUTO-MINUTE-Taste 7. STOP/LÖSCHEN-Taste 8. TIMER-Taste 9. GEWICHT-Tasten 10. AUTOGAREN-Taste DE-4 00_User manual - R270_9_languages.indb 4 2016-07-15 12:59:48...
  • Page 8: Wichtige Sicherheitshinweise

    All manuals and user guides at all-guides.com WICHTIGE SICHERHEITSHINWEISE BITTE SORGFÄLTIG DURCHLESEN UND ZUM SPÄTEREN NACHSCHLAGEN AUFBEWAHREN 1. Dieses Gerät ist nur für den Einsatz auf einer Arbeitsfläche vorge- sehen. Es ist nicht für den Einbau in einem Küchenschrank konzi- piert.
  • Page 9 11. Wenn das Netzkabel beschädigt ist, muss dieses gegen ein speziel- les Kabel ausgetauscht werden. Der Austausch darf nur durch einen qualifizierten SHARp- Kundendiensttechniker durchgeführt werden. 12. WARNUNG: Speisen in flüssiger und anderer Form dürfen nicht in ver- schlossenen Gefäßen erhitzt werden, da diese explodieren könnten.
  • Page 10 All manuals and user guides at all-guides.com WICHTIGE SICHERHEITSHINWEISE eventuelle Flammen erstickt werden. 20. Reinigen Sie das Gerät in regelmäßigen Abständen und entfer- nen Sie jegliche Essensreste. 21. Wird das Gerät nicht saubergehalten, kann dies zu einer Beschä- digung der oberfläche führen, was die Gebrauchsdauer des Ge- rätes nachteilig beeinflussen und möglicherweise zu einer Ge- fahrensituation führen kann.
  • Page 11 All manuals and user guides at all-guides.com WICHTIGE SICHERHEITSHINWEISE 3. Die Netzspannung muss 230 V Wechselstrom, 50 Hz sein und es sollte eine 13A-Sicherung oder ein 13A-Sicherungsautomat vorhanden sein. 4. Ein getrennter, nur für den Betrieb dieses Geräts dienender Stromkreis sollte vorliegen. 5.
  • Page 12 Lüftungsöffnungen gießen oder Gegenstände in diese Öffnun- gen stecken. Wenn Flüssigkeit indas Gerät gelangt ist, sollten Sie das Gerät sofort ausschalten, den Netzstecker ziehen und den SHARp-Kundendienst kontaktieren. 3. Niemals das Netzkabel bzw. den Netzstecker in Wasser oder an- dere Flüssigkeiten tauchen.
  • Page 13 5. Das Netzkabel von erhitzten oberflächen, einschließlich der Ge- räterückseite, fernhalten. 6. Auf keinen Fall versuchen, die Garraumlampe selbst auszutau- schen. Dies ist allein die Aufgabe eines von SHARp zugelassenen Elektrikers ! Wenn die Garraumlampe ausfallen sollte, wenden Sie sich bitte an Ihren Händler oder eine SHARp-Kundendienststelle! Zur Vermeidung von Explosionen und plötzlichem Sieden:...
  • Page 14 All manuals and user guides at all-guides.com WICHTIGE SICHERHEITSHINWEISE 3. Um Verbrennungen zu vermeiden, immer die Lebensmit- teltemperatur prüfen und umrühren, bevor Sie die Speisen servieren. Besondere Vorsicht ist geboten, wenn die Lebens- mittel oder Getränke an Babys, Kinder oder alte Menschen serviert werden.
  • Page 15 All manuals and user guides at all-guides.com WICHTIGE SICHERHEITSHINWEISE durch Hitze vermieden. Die für das Geschirr angegebene Vor- heizzeit darf nicht überschritten werden. 3. Keine Metall-Utensilien verwenden, die Mikrowellen reflektie- ren, da dies einen Lichtbogen zur Folge haben kann. Nur für das Gerät konzipierte Drehteller und Drehtellerträger verwenden.
  • Page 16 All manuals and user guides at all-guides.com AUFSTELLANWEISUNGEN 1. Entfernen Sie sämtliches Verpackungsmaterial aus dem Inneren des Gerätes und alle Schutzfolien von der Gehäuseoberfläche des Gerätes. Überprüfen Sie das Gerät auf eventuelle Beschädi- gungen. 2. platzieren Sie das Gerät auf einer sicheren, ebenen oberfläche, die stabil genug ist, das Gewicht des Gerätes und der darin zu- bereiteten Speisen zu tragen.
  • Page 17 Stecker kommen kann. • Stecken Sie den Stecker vollständig in die Steckdose. • Schließen Sie keine anderen Geräte an die gleiche Steckdose mit einer Mehrfachsteckdose an. • Wenn das Netzkabel beschädigt ist, muss es durch eine von Sharp zugelassene Serviceeinrichtung oder eine gleich qualifizierte per- son ersetzt werden, um Gefahren zu vermeiden. • Beim Entfernen des Steckers aus der Steckdose immer den Ste- cker und niemals das Kabel ergreifen, da dies das Netzkabel und die Anschlüsse innerhalb des Steckers beschädigen kann.
  • Page 18: Wie Funktioniert Ihr Gerät

    All manuals and user guides at all-guides.com WIE FUNKTIONIERT IHR GERÄT? Mikrowellen sind Energiewellen, wie z.B. Ra- Mikrowellen durchdringen bestimmte Ma- diowellen.. terialien, wie Glas und plastik, um Lebens- mittel zu erhitzen. (Siehe „Geeignetes Ge- Elektrische Energie wird in Mikrowellen- schirr“...
  • Page 19 All manuals and user guides at all-guides.com MIKROWELLEN-LEISTUNGSSTUFEN • Ihr Mikrowellengerät besitzt, wie dargestellt, Leistungsstufe Die LEIS- Prozentsatz 10 Leistungsstufen. TUNGSSTU- • Um die Leistungsstufe für Garen zu verändern, FEN-Taste gegeben Sie die benötigte Zeit ein und drü- drücken cken Sie dann die LEISTUNGSSTUFE-Taste, bis p100 das Display die gewünschte Stufe anzeigt. HoCH • Leistungsstufe Die Mikrowellenleistungsstufe variiert durch...
  • Page 20: Der Betrieb Ihres Geräts

    All manuals and user guides at all-guides.com DER BETRIEB IHRES GERÄTS Öffnen der Gerätetür: Drücken Sie auf den Türöffnungsknopf, um die Tür des Gerätes zu öffnen. Starten des Gerätes: Bereiten Sie Ihre Lebensmittel vor und platzieren Sie diese in einem geeig- neten Behälter direkt auf dem Drehteller.
  • Page 21 All manuals and user guides at all-guides.com DER BETRIEB IHRES GERÄTS MANUELLES ABTAUEN • Geben Sie die Garzeit ein und verwenden Sie zum Garen oder Auftauen die Leistungsstu- fen p10 bis p30 (siehe Seite DE-16). • Rühren Sie die Lebensmittel möglichst während des Garens zwei- bis dreimal um oder wenden Sie sie gegebenenfalls. • Decken Sie die Lebensmittel nach dem Auftauen mit Folie ab oder lassen Sie sie stehen, bis sie vollständig aufgetaut sind. Beispiel: Um 10 Minuten lang mit der Mikrowellenleistung p 30 abzutauen.
  • Page 22: Gewichtabhängiges Garen/ Auftauen

    All manuals and user guides at all-guides.com GEWICHTABHÄNGIGES GAREN/ AUFTAUEN AUTO-GEWICHT GAREN/-AUFTAUEN ermöglicht Ihnen das Garen oder Auftauen von hier aufgelisteten vorprogrammierten Gerichten. Befolgen Sie das unten angegebene Beispiel, um mehr über die Bedienung dieser Funktionen zu erfahren GEWICHTABHÄNGIGES GAREN ermöglicht Ihnen das Kochen von drei beliebten Menüs. Wenn Sie Rindfleisch garen, drücken Sie die GEWICHTABHÄNGIGES GAREN- Taste und 1x Coo1 wird auf dem Display erscheinen.
  • Page 23 All manuals and user guides at all-guides.com GEWICHTABHÄNGIGES GAREN-SCHAUBILD GEWICHTSSPANNE: • Das Lebensmittelgewicht muss auf die nächsten 0,1 kg aufgerundet werden, z. B. 0,34kg auf 0,3kg. • Sie können nur ein Gewicht innerhalb der Spanne eingeben (siehe die folgenden Schaubilder). HINWEISE: • Wenn eine Handlung erforderlich ist (um beispielsweise Speisen zu wenden), stoppt das Gerät, ein Signalton ertönt, die verbleibende Garzeit und ein Symbol blinken auf dem Dis- play auf.
  • Page 24: Schnell-Auftauen

    All manuals and user guides at all-guides.com SCHNELL-AUFTAUEN Diese Funktion erlaubt Ihnen, je nach Lebensmittel-Typ, ein schnelles Auftauen indem Sie eine geeig- nete Auftauperiode wählen. Im folgenden Beispiel erfahren Sie, wie Sie diese Funktion nutzen können. Beispiel: : Lebensmittel 10 Minuten lang auftauen. 1.
  • Page 25: Auto-Menü-Tabelle

    All manuals and user guides at all-guides.com AUTO-MENÜ-TABELLE MENÜAUSWAHL: Sie können das Menü direkt aus dem Bedienfeld auswählen, indem Sie die entsprechende Taste drücken. Autogar-Menüs: Lebensmittel Hinweis: 1. Für Getränke und Kartoffeln sind die dargestellten parame- pellkartoffel (jeweils 230g) ter nicht das Gewicht, sondern die portionenzahl. Tee/Kaffee wiedererwärmen (200ml/ 2.
  • Page 26: Nützliche Funktionen

    All manuals and user guides at all-guides.com NÜTZLICHE FUNKTIONEN GAREN MIT VERSCHIEDENEN GARFOLGEN Diese Funktion ermöglicht den anhaltenden und ununterbrochenen Betrieb in zwei unter- schiedlichen phasen. Beispiel: Um fünf Minuten lang: bei einer Leistung von p100 (phase 1) und 16 Minute bei einer Leistung von p30 (phase 2) zu garen PHASE 1 1.
  • Page 27 All manuals and user guides at all-guides.com NÜTZLICHE FUNKTIONEN 3. WENIGER () und MEHR ()ZEIT: Die WENIGER () ZEIT- und MEHR () ZEIT-Tasten ermöglichen Ihnen: • Die Gar-/Auftauzeit zu verringern oder zu erhöhen, während das Gerät in Betrieb ist (nur im Handbetrieb). DIE VERWENDUNG DER WENIGER- UND MEHR.TASTEN BEIM MANUELLEN GAREN Drücken Sie die WENIGER () oder MEHR () ZEIT-Taste, um die Gar- oder Auftauzeit in Ein-Minuten-Schritten zu verringern oder zu erhöhen, wenn das Gerät in Betrieb ist.
  • Page 28 All manuals and user guides at all-guides.com NÜTZLICHE FUNKTIONEN 4. TIMER: Verwenden Sie den TIMER als Küchenuhr oder um die Ruhezeit für gegarte/aufgetaute Speisen zu überwachen. Beispiel: Einstellen des Timers auf 5 Minuten. 1. Drücken Sie die TIMER- 2. Geben Sie die gewünsch- 3.
  • Page 29 Sie es nie länger als empfohlen. WARNUNG: Befolgen Sie jederzeit die Anweisungen aus dem SHARP-Benutzerhandbuch. Wenn Sie die empfohlenen Garzeiten und zu hohe Leistungsstufen verwen- den, können sich Lebensmittel überhitzen, brennen und unter Umständen Feuer fangen und das Gerät beschädigen.
  • Page 30 All manuals and user guides at all-guides.com MIKROWELLENGARTIPPS Lebensmittelmerkmale Zusammensetzung Speisen mit einem hohen Zuckergehalt (z.B. Früchtepuddings oder ge- fülltes Gebäck) benötigen weniger Garzeit. passen Sie also auf, denn Überhitzen kann zu Bränden führen. Knochen in Lebensmitteln sind Hitzeleiter, sodass das Lebensmittel schneller garen wird.
  • Page 31: Geeignetes Geschirr

    All manuals and user guides at all-guides.com GEEIGNETES GESCHIRR Beim Garen/Auftauen in einem Mikrowellengerät muss die Mikrowellenenergie den Behäl- ter durchdringen können, um auf die Lebensmittel wirken zu können. Daher ist es wichtig, geeignetes Geschirr zu wählen. Bevorzugen Sie runde/ovale Behälter, da Lebensmittel in den Ecken von quadratischen oder länglichen Behältern schnell übergaren.
  • Page 32 All manuals and user guides at all-guides.com AUFTAU-TIPPS Lebensmittel mit Ihrem Mikrowellengerät zu garen ist die schnellste Methode. Es ist eine einfache Methode, aber die folgenden Anweisungen sind essenziell, um zu ge- währleisten, dass Speisen vollständig aufgetaut werden. Neuanordnen Lebensmittel, die am Rand des Geschirrs liegen, tauen schneller auf als jene in der Mitte.
  • Page 33 All manuals and user guides at all-guides.com AUFWÄRM-TIPPS Für das Wiederaufwärmen von Speisen sollten Sie den unten angegebenen Ratschlägen und Hin- weisen folgen, um sicherzustellen, dass die Speisen vor dem Servieren vollständig erwärmt sind. Tellergerich- Entfernen Sie Geflügel- oder Fleischstücke und erwärmen Sie diese separat, wie unten beschrieben.
  • Page 34: Reinigung Und Pflege

    All manuals and user guides at all-guides.com REINIGUNG UND PFLEGE Garraum • Es ist wichtig, den Garraum nach jeder Benutzung zu reinigen. • Um den Garraum zu reinigen, sollten Sie ein sanftes Reinigungsmittel, wie z.B. In warmen Wasser aufgelösten Essigreiniger, mit einem weichen Tuch verwenden. • Lebensmittel- und Getränkespitzer lagern sich an den Wänden und der Decke des Geräts ab. Wenn sich Fett und Lebensmittelreste im Garraum abgelagert haben, könnten dieser bei der nächsten Verwendung des Geräts sich überhitzen, Rauch erzeugen oder sogar Feuer fangen.
  • Page 35 20 Minuten WARNUNG: Reparieren, modifizieren oder passen Sie das Gerät niemals selbst an. Die Durchführung von Reparaturarbeiten ist für alle Personen außer den ausgebildeten SHARP-Technikern gefährlich- Dies ist insofern wichtig, da die Entfernung von Schutzabdeckungen zur Freisetzung von Mikrowellen führen kann.
  • Page 36: Technische Daten

    Form weiterverbreitet werden, sei es auf elektronischem oder mechanischem Wege, mittels photokopien, Tonaufnahmen, Übersetzung oder anderen Mitteln, außer SHARp Vestel UK genehmigt dies. Die Abbildungen, technischen Informationen und Daten in dieser Veröffentlichung sind, nach unserem besten Wissen und Gewissen, zum Zeitpunkt der Drucklegung korrekt. Wir...
  • Page 37 All manuals and user guides at all-guides.com 00_User manual - R270_9_languages.indb 34 2016-07-15 12:59:57...
  • Page 38 Si ce produit est utilisé dans le cadre des activités de votre entreprise et que vous souhaitez le mettre au rebut : Veuillez contacter votre revendeur SHARp qui vous informera des condi- tions de reprise du produit. Des frais de reprise et de recyclage pourront vous être facturés.
  • Page 39 All manuals and user guides at all-guides.com TABLE DES MATIÈRES FoUR ET ACCESSoIRES ............................3 pANNEAU DE CoMMANDE ..........................4 INSTRUCTIoNS DE SÉCURITÉ IMpoRTANTES..................5-12 INSTALLATIoN ..............................13-14 CoMMENT VoTRE FoUR FoNCTIoNNE ....................15 NIVEAUX DE pUISSANCE MICRo-oNDES ....................16 AVANT LA MISE EN SERVICE ......................... 16 CoMMENT UTILISER VoTRE FoUR .......................17-18 CUISSoN/DÉCoNGÉLATIoN À...
  • Page 40: Four Et Accessoires

    Le sens de la rotation peut changer à chaque utilisation du four. Cela n’affecte pas les per- formances de cuisson. • Lorsque vous passez une commande d’accessoires, veuillez mentionner au revendeur ou au service d’entretien agréé par SHARp le NOM DE PIÈCE et le NUMÉRO DE MODÈLE. AVERTISSEMENT : La porte, le boîtier extérieur, la cavité du four et le plateau tournant peuvent devenir très chauds durant le fonctionnement.
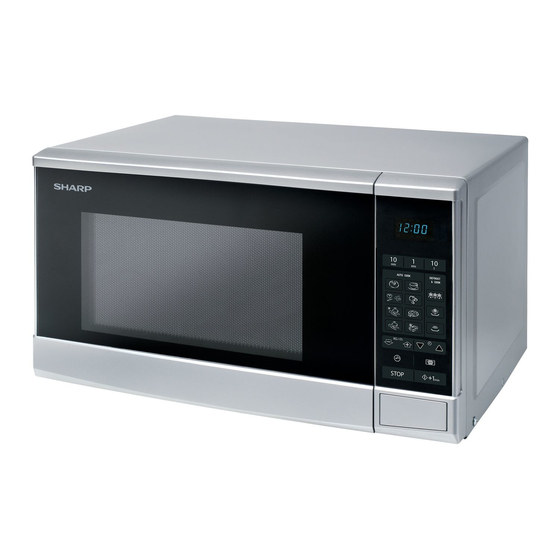
  • Page 41: Panneau De Commande

    All manuals and user guides at all-guides.com PANNEAU DE COMMANDE 1. AFFICHAGE NUMÉRIQUE 2. Touches d'HEURE 3. Touche CUISSON ET DÉCONGÉLA- TION PAR POIDS 4. Touches PLUS/MOINS DE TEMPS 5. Touche NIVEAU DE PUISSANCE 6. Touche DÉMARRER/DÉCOMPTE AUTO 7. Touche ARRÊT/EFFACER 8.
  • Page 42: Veuillez Les Lire Attentivement Et Les Conserver Pour Toute Référence Ultérieure

    All manuals and user guides at all-guides.com INSTRUCTIONS IMPORTANTES DE SÉCURITÉ VEUILLEZ LES LIRE ATTENTIVEMENT ET LES CONSERVER POUR TOUTE RÉFÉRENCE ULTÉRIEURE 1. Ce four est conçu pour être uniquement utilisé sur un plan de travail de cuisine. Il n'est pas conçu pour être installé dans un élé- ment de cuisine.
  • Page 43 11. Si le cordon d'alimentation de cet appareil est endommagé, il doit être remplacé par un cordon spécifique. L'échange doit être effectué par un agent d'entretien autorisé SHARp. 12. AVERTISSEMENT : Les liquides ou autres aliments ne doivent pas être réchauffés dans des récipients fermés, ceux-ci étant susceptibles d'exploser.
  • Page 44 All manuals and user guides at all-guides.com INSTRUCTIONS IMPORTANTES DE SÉCURITÉ 21. Le non-respect des consignes de nettoyage du four entraînera une détérioration des surfaces susceptible d'affecter le bon fonctionnement de l'appareil et de présenter des risques. 22. N'utilisez pas de nettoyeurs abrasifs agressifs ou de grattoirs mé- talliques pour nettoyer la partie vitrée de la porte du four, ceux-ci pouvant rayer les surfaces et provoquer l'éclatement du verre.
  • Page 45 All manuals and user guides at all-guides.com INSTRUCTIONS IMPORTANTES DE SÉCURITÉ 3. L'alimentation électrique doit être de type 230 V~, 50 Hz avec un fusible de distribution de 13 A ou un disjoncteur de 13 A. 4. Ce four doit être alimenté par un circuit électrique indépendant. 5.
  • Page 46: Pour Éviter Toute Blessure

    à un technicien d’entretien agréé par SHARp. 3. Ne plongez jamais la fiche du cordon d’alimentation dans l’eau ou tout autre liquide.
  • Page 47: Pour Éviter Toute Explosion Ou Ébullition Soudaine

    6. Ne tentez pas de remplacer vous-même la lampe du four et ne laissez personne d’autre qu’un électricien agréé par SHARp faire ce travail. Si la lampe du four grille, adressez-vous au re- vendeur ou à...
  • Page 48: Pour Éviter De Vous Brûler, Testez Toujours La Température

    All manuals and user guides at all-guides.com INSTRUCTIONS IMPORTANTES DE SÉCURITÉ 3. Pour éviter de vous brûler, testez toujours la température des aliments et mélangez avant de servir. Faites particuliè- rement attention à la température des aliments destinés aux bébés, enfants et personnes âgées. La température du récipient est trompeuse et ne reflète pas celle des aliments.
  • Page 49 All manuals and user guides at all-guides.com INSTRUCTIONS IMPORTANTES DE SÉCURITÉ 3. N'utilisez pas d'ustensiles en métal, qui réfléchissent les micro- ondes et peuvent causer des arcs électriques. Utilisez seule- ment le plateau tournant et le support conçus pour ce four. N'utilisez pas ce four sans plateau tournant.
  • Page 50 All manuals and user guides at all-guides.com INSTALLATION 1. Retirez tous les éléments d'emballage de l'intérieur de la cavité de four et enlevez le film protecteur protégeant la surface du boîtier du four à micro-ondes. Vérifiez soigneusement que le four ne présente aucun signe de dommages. 2.
  • Page 51 • Insérez correctement la fiche dans la prise. • Ne branchez pas d'autres appareils sur la même prise en utilisant une multiprise. • Si le cordon d'alimentation est endommagé, il doit être remplacé par un service d'entretien agréé Sharp ou par une personne simi- lairement qualifiée pour éviter tout risque. • Lorsque vous retirez la fiche de la prise, tirez toujours au niveau de la fiche et non du cordon, cela pouvant endommager le cordon d'alimentation et les branchements dans la fiche.
  • Page 52: Comment Votre Four Fonctionne

    All manuals and user guides at all-guides.com COMMENT VOTRE FOUR FONCTIONNE Les micro-ondes sont des ondes d'éner- Les micro-ondes passent à travers certains gie, semblables à celles utilisées pour les matériaux, comme le verre et le plastique, signaux de télévision et de radio. pour chauffer la nourriture.
  • Page 53: Niveaux De Puissance Micro-Ondes

    All manuals and user guides at all-guides.com NIVEAUX DE PUISSANCE MICRO-ONDES • Votre four possède 10 niveaux de puissance, Niveau de puis- Appuyez sur Pourcentage comme indiqué. sance la touche • Pour changer le niveau de puissance de cuisson, NIVEAU DE entrez le temps de cuisson requis puis appuyez PUISSANCE sur la touche NIVEAU E PUISSANCE jusqu'à ce p100 que l'écran affiche le niveau souhaité.
  • Page 54: Comment Utiliser Votre Four

    All manuals and user guides at all-guides.com COMMENT UTILISER VOTRE FOUR Ouverture de la porte : pour ouvrir la porte du four, poussez le bouton d'ouverture de la porte. Démarrage du four : préparez et placez les aliments dans un plat approprié sur le plateau ou placez-les directement sur le plateau.
  • Page 55 All manuals and user guides at all-guides.com COMMENT UTILISER VOTRE FOUR DÉCONGÉLATION MANUELLE • Entrez le temps de décongélation et utilisez les niveaux de puissance micro-ondes P10 à p30 pour décongeler (référez-vous à la page FR-16). • Mélangez ou tournez les aliments, lorsque cela est possible, 2 à 3 fois pendant la décongé- lation. • Après la décongélation, couvrez les aliments d’une feuille de papier aluminium et laissez- les reposer jusqu’à décongélation complète. Exemple : pour décongeler pendant 10 minutes à puissance de micro-ondes p30. 1.
  • Page 56 All manuals and user guides at all-guides.com CUISSON/DÉCONGÉLATION À POIDS AUTOMATIQUE La CUISSON/DÉCONGÉLATION À POIDS AUTOMATIQUE vous permet de faire cuire ou de décongeler les plats préprogrammés répertoriés. Suivez l'exemple ci-dessous pour plus d’informations sur l'utilisation de ces fonctions. La CUISSON À POIDS AUTOMATIQUE vous permet de cuire 3 menus populaires. Lorsque vous cuisinez du bœuf, appuyez sur la touche CUISSON À...
  • Page 57 All manuals and user guides at all-guides.com TABLEAU DE CUISSON À POIDS AUTOMATIQUE PLAGE DE POIDS : • Le poids des aliments doit être arrondi à 0,1 kg, par exemple, 0,3 kg pour 0,34 kg ou 0,7 kg pour 0,65 kg. • Vous devez saisir un poids au sein de la plage (voir les tableaux suivants). REMARQUES : • Lorsqu'une action est requise (par exemple retourner les aliments), le four s'arrête et émet un signal sonore audible. Le temps de cuisson restant et un indicateur clignotent sur l'écran. pour continuer la cuisson, appuyez sur la touche DÉMARRER/DÉCOMPTE AUTO. • La température finale varie en fonction de la température d'origine des aliments. Vérifiez que les aliments sont bien chauds après la cuisson.
  • Page 58: Décongélation Rapide

    All manuals and user guides at all-guides.com DÉCONGÉLATION RAPIDE Ce programme permet de décongeler la viande rapidement tout en vous autorisant à choisir un temps de décongélation approprié, en fonction du type de viande. Suivez les exemples ci-dessous pour plus de détails concernant la manière d'utiliser ce programme. Exemple : pour décongeler les aliments pendant 10 minutes.
  • Page 59 All manuals and user guides at all-guides.com TABLEAU DE CUISSON AUTOMATIQUE SÉLECTION DU MENU  : Vous pouvez sélectionner le menu directement sur la page de touches en appuyant sur la touche correspondante. Menus à cuisson automatique : Nourriture Remarque pommes de terre au four (230 g par 1.
  • Page 60: Fonctions Pratiques

    All manuals and user guides at all-guides.com FONCTIONS PRATIQUES 1. CUISSON PAR SÉQUENCE : Cette fonction permet un fonctionnement continu et ininterrompu pendant 2 étapes diffé- rentes. Exemple : pour cuisiner : 5 minutes à puissance p100 (Étape 1) 16 minutes à puissance p30 (Étape 2) Étape 1 1.
  • Page 61 All manuals and user guides at all-guides.com FONCTIONS PRATIQUES 3. MOINS () et PLUS () de TEMPS : Les touches MOINS () DE TEMPS et PLUS () DE TEMPS vous permettent de : • Réduire ou augmenter le temps de cuisson/décongélation pendant que le four est en cours d’utilisation (cuisson manuelle uniquement).
  • Page 62 All manuals and user guides at all-guides.com FONCTIONS PRATIQUES 4. MINUTERIE DE CUISINE : Utilisez la MINUTERIE DE CUISINE comme minuterie ou pour surveiller le temps de décon- gélation/cuisson de la nourriture. Exemple : pour régler la minuterie sur 5 minutes. 1. Appuyez sur la touche 2.
  • Page 63: Conseils Pour La Cuisson Au Micro-Ondes

    AVERTISSEMENT : Suivez les instructions du manuel d'utilisation de SHARP en toutes circonstances. Si vous dépassez les temps de cuisson recommandés et utilisez des niveaux de puissance trop élevés, la nourriture peut surchauffer, brûler et même prendre feu et endommager le four dans les cas extrêmes.
  • Page 64 All manuals and user guides at all-guides.com CONSEILS POUR LA CUISSON AU MICRO-ONDES Caractéristiques de la nourriture Composition Les aliments riches en gras ou en sucre (par ex. flans, pâtés) nécessitent moins de temps de chauffage. Attention pour éviter les surchauffes qui peuvent conduire à...
  • Page 65: Ustensiles Adaptés

    All manuals and user guides at all-guides.com USTENSILES ADAPTÉS pour cuire / décongeler des aliments dans un four à micro-ondes, l'énergie micro-ondes doit pouvoir pénétrer au travers du récipient contenant la nourriture. Il est ainsi important de choisir des ustensiles adaptés. Les plats ronds / ovales sont préférables à...
  • Page 66: Conseils Pour La Décongélation

    All manuals and user guides at all-guides.com CONSEILS POUR LA DÉCONGÉLATION La décongélation des aliments au micro-ondes est la méthode la plus rapide. Il s'agit d'un processus simple, mais il est essentiel de suivre les instructions suivantes pour assurer la bonne décongélation des aliments. Réarranger Les aliments placés vers l’extérieur du plat seront décongelés plus rapi- dement que ceux au centre.
  • Page 67: Conseils Pour Le Réchauffage

    All manuals and user guides at all-guides.com CONSEILS POUR LE RÉCHAUFFAGE pour réchauffer des aliments, suivez les conseils et les instructions ci-dessous pour vous assurer que la nourriture est complètement réchauffée avant de la servir. Plateaux- Enlevez les morceaux de viande ou de volaille, réchauf- repas fez-les séparément, voir ci-dessous.
  • Page 68: Nettoyage Et Entretien

    All manuals and user guides at all-guides.com NETTOYAGE ET ENTRETIEN INTÉRIEUR DU FOUR • Il est important de nettoyer l’intérieur de votre four à micro-ondes après chaque utilisa- tion. • Pour nettoyer l'intérieur du four, utilisez une solution détergente neutre, comme du li- quide vaisselle avec de l'eau chaude sur un chiffon doux. • Les éclaboussures de nourriture et de liquide s'accumulent sur les parois du four et le plafond.
  • Page 69: Dépannage

    Veuillez ne rien réparer ou remplacer par vous-même dans le four. Il est dangereux pour d'autres personnes que les techniciens formés de SHARP d'effectuer les réparations ou l'entretien. Cela est important, car il peut être nécessaire de retirer les couvercles qui assurent la protection contre l’énergie des micro-ondes.
  • Page 70: Fiche Technique

    Aucune partie de ce manuel ne peut être reproduite, stockée dans un système documen- taire ou transmise sous quelque forme que ce soit, électronique, mécanique, par photoco- pie, enregistrement, traduction ou autre, sans l'accord préalable écrit de SHARp Vestel UK. Les illustrations, informations techniques et données contenues dans cette publication sont, dans la mesure de nos connaissances, correctes au moment de l'impression.
  • Page 71 All manuals and user guides at all-guides.com Vestel UK Londres, Royaume-Uni Royaume-Uni : 0333 014 3055 Site Web : www.sharphomeappliances.com/support 00_User manual - R270_9_languages.indb 34 2016-07-15 13:00:03...
  • Page 72 Se questo prodotto è utilizzato per scopi professionali e volete eli- minarlo: Contattare il proprio rivenditore SHARp che la informerà a proposito del ritiro del prodotto. potrebbero essere addebitati i costi derivan- ti dal ritiro e dal riciclaggio. I piccoli prodotti (e le piccole quantità) possono essere ritirare presso la struttura di raccolta locale.
  • Page 73 All manuals and user guides at all-guides.com INDICE FoRNo E ACCESSoRI ............................3 pANNELLo DI CoNoTRoLLo ..........................4 ISTRUZIoNI IMpoRTANTI SULLA SICUREZZA ..................5-12 INSTALLAZIoNE ............................13-14 CoME FUNZIoNA IL FoRNo ......................... 15 LIVELLI DI poTENZA DELLE MICRooNDE ....................16 pRIMA DELLA MESSA IN FUNZIoNE......................16 CoME CoNTRoLLARE IL FoRNo ......................17-18 CUCINA/SCoNGELAMENTo pESo AUToMATICo ................
  • Page 74: Forno E Accessori

    Ciò non ha rilevanza sulla qualità della cottura. • Quando si ordinano gli accessori, indicare il NOME PARTE e il NUMERO MODELLO al pro- prio rifornitore o alla struttura di servizio approvata da SHARp. ATTENZIONE: Lo sportello, la copertura esterna, l'interno e gli accessori diventano molto caldi durante il funzionamento.
  • Page 75: Pannello Di Conotrollo

    All manuals and user guides at all-guides.com PANNELLO DI CONOTROLLO 1. DISPLAY DIGITALE 2. Tasti TEMPO 3. Tasto COTTURA PESO e SCONGELAMENTO 4. Tasti AUMENTO/DECREMENTO TEMPO 5. Tasto LIVELLI DI POTENZA DELLE MICROONDE 6. Tasti MINUTO AVVIO/AUTOMATICO 7. Tasto ARRESTO/ANNULLA 8. Tasto TIMER CUCINA 9.
  • Page 76: Istruzioni Importanti Sulla Sicurezza

    All manuals and user guides at all-guides.com ISTRUZIONI IMPORTANTI SULLA SICUREZZA LEGGETE ATTENTAMENTE E CONSERVATELO PER FUTURE CONSULTAZIONI 1. Questo forno è progettato per essere utilizzato solamente su un piano da lavoro. Non è progettato per essere incassato. Non mettete il forno in un armadio. 2.
  • Page 77 11. Se il cavo elettrico è rovinato, deve essere sostituito con un cavo speciale. La sostituzione deve essere effettuata da un tecnico specializzato SHARp. 12. ATTENZIONE: per evitare esplosioni o bolliture improvvise, non riscaldare liquidi o altri cibi in contenitori sigillati, perché...
  • Page 78 All manuals and user guides at all-guides.com ISTRUZIONI IMPORTANTI SULLA SICUREZZA 22. Non utilizzare pulitori abrasivi o raschietti appuntiti in metallo per pulire il vetro dello sportello perché potrebbero graffiarne la superficie, producendo schegge di vetro. 23. Non dovete usare un pulitore a vapore. 24.
  • Page 79 All manuals and user guides at all-guides.com ISTRUZIONI IMPORTANTI SULLA SICUREZZA 5. Non mettete il forno in aree in cui viene generato del calore. per esempio vicino ad un forno tradizionale. 6. Non installate il forno in un posto molto umido o dove si può formare della condensa.
  • Page 80 6. Non cercate di sostituire da soli la lampadina del forno, e non fatela sostituire da chi non sia un tecnico SHARp autorizzato. Se la lampadina si fulmina, rivolgetevi al rivenditore o ad un concessionario SHARp autorizzato.
  • Page 81 All manuals and user guides at all-guides.com ISTRUZIONI IMPORTANTI SULLA SICUREZZA Per evitare esplosioni ed ebollizioni improvvise: 1. Non usate mai recipienti sigillati. Togliete i sigilli e coperchi prima dell’uso. I recipienti sigillati possono esplodere a causa dell’au- mento della pressione, anche dopo lo spegnimento del forno. 2.
  • Page 82 All manuals and user guides at all-guides.com ISTRUZIONI IMPORTANTI SULLA SICUREZZA 4. per evitare le scottature causate dalla fuoriuscita del vapore e del calore, allontanarsi dallo sportello del forno durante l’apertura. 5. per far uscire il vapore ed evitare ustioni, praticare alcune inci- sioni sui cibi ripieni riscaldati.
  • Page 83 All manuals and user guides at all-guides.com ISTRUZIONI IMPORTANTI SULLA SICUREZZA NOTA: Se non siete sicuri di come collegare il forno, chiedete ad un elet- tricista autorizzato e qualificato. Né il produttore né il rivenditore si faranno carico di alcuna responsabilità per danni al forno o per infortuni a persone risultanti da una scorretta procedura di colle- gamento elettrico.
  • Page 84 All manuals and user guides at all-guides.com INSTALLAZIONE 1. Togliete tutti gli involucri dall'interno del forno e togliete le pellicole protettive sulle pareti esterne del forno. Con- trollate che il forno non sia in alcun punto danneggiato. 2. posizionate il forno su di una superficie sicura e piana, resistente a sufficienza per sostenere il peso del forno e il più...
  • Page 85: Collegamento Elettrico

    • Non collegate altri apparecchi ala stessa presa usando un adattatore. • Se il cavo di alimentazione è danneggiato, deve essere sostituito da un centro servizi autorizzato Sharp o da una persona ugualmente qualificata per evitare rischi. • Quando togliete la spina dalla presa, afferrate sempre la spina e mai il cavo, poiché questo potrebbe danneggiare il cavo e i collegamenti all'interno della spina.
  • Page 86: Come Funziona Il Forno

    All manuals and user guides at all-guides.com COME FUNZIONA IL FORNO Le microonde sono onde di energia, simili a Le microonde passano attraverso alcuni quelle usate per i segnali TV e radio. materiali, come vetro e plastica, per riscal- dare gli alimenti. (Vedere "Stoviglie adatte" L'energia elettrica viene convertita in ener- a pagina IT-28).
  • Page 87: Livelli Di Potenza Delle Microonde

    All manuals and user guides at all-guides.com LIVELLI DI POTENZA DELLE MICROONDE • Il forno ha 10 livelli di potenza, come illustrato. Livello di potenza Premere il ta- Percentuale • Per modificare il livello di potenza per la sto LIVELLO cottura, inserire il tempo richiesto e pre- DI POTENZA mere il tasto LIVELLO DI POTENZA fino p100 a che il display indica il livello desiderato.
  • Page 88: Come Usare Il Forno

    All manuals and user guides at all-guides.com COME USARE IL FORNO Aprire lo sportello: per aprire lo sportello del forno, premere il pulsante di apertura dello sportello. Avviare il forno: preparate il cibo e posizionatelo in un apposito contenitore da porre sul piatto rotante, oppure direttamente sul piatto rotante.
  • Page 89 All manuals and user guides at all-guides.com COME USARE IL FORNO SCONGELAMENTO MANUALE • Inserite il tempo di scongelamento utilizzando livelli di potenza delle microonde da P10 a p30 per (vedi pag. I-16). • Quando possibile, mescolate o girate il cibo 2 - 3 volte durante lo scongelamento. Dopo lo scongelamento, coprite il cibo con carta stagnola e lasciatelo riposare fino a scon- gelamento completo. Esempio: per scongelare per 10 minuti con potenza delle microonde p 30. 1.
  • Page 90 All manuals and user guides at all-guides.com COTTURA PESO AUTO/SCONGELAMENTO COTTURA PESO AUTO/SCONGELAMENTO consente di cuocere o scongelare i piatti pre- programmati elencati. Seguire il seguente esempio per sapere come usare queste funzioni. CUCINA PESO AUTOMATICO consente di cucinare tre popolari menu. Quando si cuoce manzo, premere il tasto COTTURA PESO AUTOMATICO una volta Coo1 appare sul display.
  • Page 91 All manuals and user guides at all-guides.com TABELLA COTTURA PESO AUTOMATICO INTERVALLO PESO: • Il peso del cibo dovrebbe avvicinarsi ai 0,1 kg più vicini, per esempio, 0,65KG a 0,7KG o 0,34kg a 0,3kg. • Esiste un intervallo di limitazione per il peso da inserire (consultare le tabelle seguenti). NOTE: • Quando è richiesta una azione (per esempio, girare gli alimenti), il forno si arresta, viene emesso un segnale acustico, il tempo di cottura rimanente e un indicatore lampeggiano sul display. per continuare la cottura, premere il tasto AVVIO/MINUTO AUTO. La temperatura finale varia in base alla temperatura iniziale.
  • Page 92: Scongelamento Rapido

    All manuals and user guides at all-guides.com SCONGELAMENTO RAPIDO Questa funzione scongela rapidamente il cibo, rendendo possibile la scelta di un tempo di scongelamento adatto, in base al tipo di cibo. Seguite l'esempio in basso per dettagli su come utilizzare questa funzione. Esempio: per scongelare il cibo in 10 minuti..
  • Page 93 All manuals and user guides at all-guides.com TABELLA COTTURA AUTOMATICA SELEZIONE MENU: è possibile selezionare direttamente il Menu sul Tastierino premendo il tasto pertinente. Menu cottura automatica: Alimenti Nota Jacket potato (ciascuna 230g) 1. per le bevande e le patate, i parametri sul display non sono il peso ma il numero delle portate.
  • Page 94: Funzioni Utili

    All manuals and user guides at all-guides.com FUNZIONI UTILI 1. COTTURA IN SEQUENZA Questa funzione consente un funzionamento continuo e ininterrotto per due diversi fasi. Esempio: per cuocere per: 5 minuti con potenza p100 (Fase 1) 16 minuti con potenza p30 (Fase 2) FASE 1 1.
  • Page 95 All manuals and user guides at all-guides.com FUNZIONI UTILI 3. MENO () e PIÙ ()TEMPO: I tasti MENO () TEMPO e PIÙ () TEMPO consentono: • ridurre o aumentare il tempo di cottura/scongelamento mentre il forno è in uso (solo cot- tura manuale). PER USARE MENO E PIÙ CON LA COTTURA MANUALE premere il tasto MENO () o PIÙ () TEMPO per ridurre o aumentare il tempo di cottura o di scongelamento in multipli di 1 minuto mentre il forno è...
  • Page 96 All manuals and user guides at all-guides.com FUNZIONI UTILI 4. TIMER DA CUCINA Usare il TIMER CUCINA come timer per i minuti o per monitorare il tempo di riposo per alimenti cotti/scongelati. Esempio: per impostare il timer per 5 minuti. 1.
  • Page 97 ATTENZIONE: Seguire sempre le istruzioni del manuale di istruzioni SHARP. Se si superano i tempi di cottura consigliati e si usano livelli di potenza trop- po elevati, gli alimenti potrebbero surriscaldarsi, bruciare e in circostanze estreme, prendere fuoco e danneggiare il forno.
  • Page 98 All manuals and user guides at all-guides.com RACCOMANDAZIONI PER CUCINA A MICROONDE Caratteristiche degli alimenti Composizione Gli alimenti ricchi di grasso o zucchero (p.es. budini, torte) richiedo- no meno tempo per la cottura. Fare attenzione perché un surriscal- damento può causare incendi. Le ossa negli alimenti conducono calore, e gli alimenti si cuociono più...
  • Page 99: Stoviglie Adatte

    All manuals and user guides at all-guides.com STOVIGLIE ADATTE per cucinare/scongelare cibo in un forno a microonde, l'energia a microonde deve poter passare at- traverso un contenitore perché penetri nel cibo. per questo è importante scegliere gli utensili adatti. I piatti rotondi o ovali sono preferibili a quelli quadrati o oblunghi, perché il cibo sui bordi tende a cuocere troppo.
  • Page 100 All manuals and user guides at all-guides.com CONSIGLI PER SCONGELAMENTO Scongelare gli alimenti usando il forno a microonde è il metodo più rapido. Si tratta do un processo semplice ma le seguenti istruzioni sono essenziali per assicurare che gli alimenti siano adeguatamente scongelati. Spostare Gli alimenti collocati verso l'esterno del piatto ricevono si scongelano più...
  • Page 101: Consigli Per Riscaldamento

    All manuals and user guides at all-guides.com CONSIGLI PER RISCALDAMENTO per il riscaldamento degli alimenti, seguire i consigli e le linee guida di seguito per garantire che gli alimenti siano ben riscaldati prima di servire. Pasti impiat- Rimuovere porzioni di carne o pollame, riscaldarle se- tati paratamente, vedere di seguito.
  • Page 102: Pulizia E Manutenzione

    All manuals and user guides at all-guides.com PULIZIA E MANUTENZIONE INTERNO DEL FORNO • È importante pulire l'interno del forno a microonde dopo ogni uso. • Per pulire l'interno del forno, usare una soluzione detergente delicata, come liquido deter- gente, con acqua calda su panno morbido. • Gli schizzi di cibo e liquidi si accumulano sulle pareti e il soffitto del forno. Se si consente l'accumulo di grasso, unto e residui di cibo nell'interno del forno, potrebbe surriscaldarsi o prendere fuoco.
  • Page 103: Risoluzione Problemi

    Non regolare, riparare o modificare il forno da soli. Qualsiasi intervento di assistenza o ripara- zione dell’apparecchio che non sia effettuato da un tecnico addestrato SHARP è pericoloso. È importante perché potrebbe includere la rimozione dei coperchi che proteggono dalle microonde.
  • Page 104: Dati Tecnici

    Nessuna parte di questa pubblicazione può essere riprodotta, conservata in un sistema di archiviazione o trasmessa in alcuna forma, elettronica, meccanica, fotocopia, registrazione, traduzione, o altri strumenti senza previa autorizzazione di SHARp Vestel UK. Le illustrazioni, le informazioni tecniche e i dati contenuti in questa pubblicazione sono, per scienza e coscienza, corretti al momento della stampa.
  • Page 105 All manuals and user guides at all-guides.com 00_User manual - R270_9_languages.indb 34 2016-07-15 13:00:08...
  • Page 106 W przypadku gdy produkt używany jest do celów biznesowych i zamierza- ją go państwo usunąć: Należy skontaktować się z autoryzowanym sprzedawcą firmy SHARp, który poinformuje o możliwości zwrotu wyrobu. Być może będą państwo musieli ponieść koszty zwrotu i recyklingu produktu. produkty niewielkich rozmiarów (i w małych ilościach) można zwrócić...
  • Page 107 All manuals and user guides at all-guides.com SPIS TREŚCI KUCHENKA I JEJ WYpoSAŻENIE ........................3 pANEL STERoWANIA ............................4 WAŻNE INFoRMACJE DoTYCZĄCE BEZpIECZEŃSTWA ..............5-12 INSTALACJA ..............................13-14 SpoSÓB DZIAŁANIA KUCHENKI ......................... 15 poZIoMY MoCY MIKRoFAL ........................16 pRZED pRZYSTĄpIENIEM Do pRACY ......................16 oBSŁUGA KUCHENKI ..........................17-18 AUToMATYCZNE GoToWANIE/RoZMRAŻANIE WEDŁUG WAGI ............
  • Page 108: Kuchenka I Jej Wyposażenie

    • Talerz obraca się w prawo lub w lewo. Kierunek obrotu może być inny przy każdym urucho- mieniu kuchenki. Nie wpływa to na efektywność gotowania. • W celu zamówienia wyposażenia dodatkowego należy skontaktować się ze autoryzowa- nym sprzedawcą lub serwisem produktów firmy SHARp podając NAZWĘ CZĘŚCI i NUMER MODELU. OSTRZEŻENIE: Drzwiczki, obudowa, komora operacyjna, talerz obrotowy i naczynia bardzo silnie się...
  • Page 109: Panel Sterowania

    All manuals and user guides at all-guides.com PANEL STEROWANIA 1. WYŚWIETLACZ CYFROWY 2. Przyciski CZAS 3. Przycisk GOTOWANIA i ROZMRAŻANIA WEDŁUG WAGI 4 Przyciski ZMNIEJSZANIA/ ZWIĘKSZANIA DZASU 5. Przycisk POZIOM MOCY 6. Przycisk START/AUTO MINUTA 7. Przycisk STOP/KASUJ 8. Przycisk TIMER KUCHENNY Przyciski WAGI 10. Przycisk AUTOMATYCZNEGO GOTOWANIA pL-4 00_User manual - R270_9_languages.indb 4 2016-07-15 13:00:09...
  • Page 110 All manuals and user guides at all-guides.com WAŻNE INFORMACJE DOTYCZĄCE BEZPIECZEŃSTWA PRZECZYTAJ UWAŻNIE I ZACHOWAJ NA PRZYSZŁOŚĆ 1. opisywana kuchenka została zaprojektowana do instalacji na blacie szafki. Nie jest przeznaczona do instalacji w zabudowie. Nie wolno umieszczać kuchenki wewnątrz szafki. 2. podczas pracy kuchenki jej drzwiczki bardzo się nagrzewają, dlatego kuchenkę...
  • Page 111 SHARp. 11. Jeśli ulegnie uszkodzeniu kabel zasilający, należy zainstalować nowy kabel tego samego typu. Wymianę musi przeprowadzić upoważniony pracownik serwisu firmy SHARp. 12. OSTRZEŻENIE: płynów i innych pokarmów nie wolno pod- grzewać w zamkniętych pojemnikach, ponieważ mogą one eksplodować.
  • Page 112 All manuals and user guides at all-guides.com WAŻNE INFORMACJE DOTYCZĄCE BEZPIECZEŃSTWA 19. Jeśli podgrzewane produkty zaczną dymić, nie otwieraj drzwi- czek, wyłącz kuchenkę lub odłącz wtyczkę i odczekaj, aż pod- grzewane produkty przestaną dymić. 20. Kuchenkę należy regularnie czyścić i usuwać z niej wszystkie pozostałości jedzenia.
  • Page 113 All manuals and user guides at all-guides.com WAŻNE INFORMACJE DOTYCZĄCE BEZPIECZEŃSTWA Żeby uniknąć niebezpieczeństwa pożaru: 1. Nie powinno się pozostawiać pracującej kuchenki bez nad- zoru. Ustawienie zbyt wysokiego poziomu mocy lub zbyt długiego czasu gotowania może doprowadzić do prze- grzania potrawy i spowodować pożar. 2. Gniazdko elektryczne, do którego podłączana jest kuchenka, musi być...
  • Page 114 All manuals and user guides at all-guides.com WAŻNE INFORMACJE DOTYCZĄCE BEZPIECZEŃSTWA 14. Nie przechowuj w urządzeniu żadnej żywności ani innych przed- miotów. 15. po uruchomieniu kuchenki sprawdź ustawienia, żeby upewnić się, że pracuje ona zgodnie z życzeniem. 16. Żeby uniknąć przegrzania lub pożaru, należy zachować szcze- gólną...
  • Page 115 Jeśli jakiś płyn rozleje się wewnątrz kuchenki, urzą- dzenie należy natychmiast wyłączyć, wyjąć wtyczkę przewodu zasilającego z gniazda i zwrócić się do serwisu firmy SHARp. 3. Kabla zasilającego ani wtyczki nie wolno zanurzać w wodzie ani jakiejkolwiek innej cieczy.
  • Page 116 All manuals and user guides at all-guides.com WAŻNE INFORMACJE DOTYCZĄCE BEZPIECZEŃSTWA 3. przed gotowaniem należy przekłuć skórkę takich produktów jak ziemniaki, parówki i owoce – w przeciwnym razie mogą eksplodować. Żeby uniknąć poparzeń: 1. podczas wyjmowania potraw z kuchenki należy używać chwy- tek do garnków lub rękawic kuchennych. 2.
  • Page 117 All manuals and user guides at all-guides.com WAŻNE INFORMACJE DOTYCZĄCE BEZPIECZEŃSTWA Żeby zapewnić niezawodną pracę kuchenki i uniknąć uszko- dzeń: 1. Nigdy nie należy włączać pustej kuchenki, o ile nie jest to wy- raźnie zalecone w instrukcji obsługi. Uruchomienie pustego urządzenia może spowodować jego uszkodzenie. 2.
  • Page 118 All manuals and user guides at all-guides.com INSTALACJA 1. Wyjmij ze środka kuchenki wszystkie elementy opakowania i zdej- mij warstwę ochronną znajdującą się na obudowie urządzenia. Sprawdź uważnie, czy na kuchence nie ma śladów uszkodzeń. 2. Ustaw kuchenkę na równym i płaskim podłożu, dostatecznie wy- trzymałym, by mogło unieść...
  • Page 119 • Poprawnie włóż wtyczkę do gniazdka elektrycznego. • Nie podłączaj innych urządzeń do tego samego gniazdka korzy- stając z rozgałęziacza. • Jeśli ulegnie uszkodzeniu kabel zasilający, musi on zostać wymie- niony przez upoważnionego pracownika serwisu firmy SHARp lub inną osobę o podobnych kwalifikacjach. • Wyjmując wtyczkę z gniazdka elektrycznego zawsze trzymaj za nią, a nigdy za kabel, ponieważ może to doprowadzić do uszko- dzenia kabla i połączeń...
  • Page 120 All manuals and user guides at all-guides.com SPOSÓB DZIAŁANIA KUCHENKI Mikrofale to fale energii, podobne do fal Mikrofale mogą przenikać przez pewne wykorzystywanych w sygnałach telewizyj- materiały, np. szkło i plastik, aby podgrze- nych i radiowych. wać potrawy. (patrz część „przydatne naczy- nia”...
  • Page 121: Przed Przystąpieniem Do Pracy

    All manuals and user guides at all-guides.com POZIOMY MOCY MIKROFAL • Opisywana kuchenka posiada 10 pozio- Poziom mocy Naciśnij Procent mów mocy, które opisano w tabelce obok. przycisk PO- • Żeby zmienić poziom mocy dla gotowania, ZIOM MOCY wprowadź żądany czas procesu. Następnie p100 naciskaj przycisk poZIoM MoCY, dopóki WYSoKI nie wyświetli się żądany czas. • Poziom mocy ŚREDNIo WY- Różne poziomy mocy są...
  • Page 122: Obsługa Kuchenki

    All manuals and user guides at all-guides.com OBSŁUGA KUCHENKI Otwieranie drzwiczek: Żeby otworzyć drzwiczki, należy nacisnąć przycisk otwierania drzwiczek. Uruchamianie kuchenki: przygotuj i włóż potrawę do odpowiedniego naczynia. Umieść naczynie na talerzu obrotowym lub umieść potrawę bezpośrednio na talerzu obroto- wym. Zamknij drzwiczki i naciśnij przycisk START/AUTO MINUTA. Przerywanie pracy kuchenki: Jeśli chcesz zatrzymać...
  • Page 123 All manuals and user guides at all-guides.com OBSŁUGA KUCHENKI RĘCZNE ROZMRAŻANIE • Wprowadź czas rozmrażania i ustaw poziom mocy mikrofal P10 lub P30 (patrz strona PL-16). • Jeśli to możliwe, zamieszaj lub obróć potrawę 2-3 razy podczas rozmrażania. • Po rozmrożeniu przykryj jedzenie folią aluminiową i pozostaw do całkowitego rozmrożenia. Przykład: Rozmrażanie przez 10 minut przy poziomie mocy mikrofal p30. 1. Wprowadź poziom mocy 2. Wprowadź czas rozmra- 3. Naciśnij jeden raz przycisk START/AUTO MINUTA, mikrofal naciskając osiem żania naciskając jeden raz razy przycisk POZIOM przycisk 10 MIN.
  • Page 124 All manuals and user guides at all-guides.com AUTOMATYCZNE GOTOWANIE/ROZMRAŻANIE WEDŁUG WAGI Funkcja AUTOMATYCZNE GOTOWANIE/ROZMRAŻANIE WEDŁUG WAGI pozwala na go- towanie lub rozmrażanie wymienionych potraw. Zapoznaj się z instrukcjami w poniższym przykładzie, żeby uzyskać szczegółowe informacje na temat obsługi tych funkcji. Funkcja AUTOMATYCZNE GOTOWANIE WEDŁUG WAGI pozwala na wykorzystanie 3 popu- larnych programów.
  • Page 125 All manuals and user guides at all-guides.com TABELA PROGRAMÓW AUTOMATYCZNEGO GOTOWANIA W EDŁUG W AGI ZAKRES WAGOWY: • Wagę potrawy należy zaokrąglić z dokładnością do 0,1 kg - na przykład 0,65 kg do 0,7 kg lub 0,34 kg do 0,3 kg. • Funkcja rozmrażania działa tylko dla zakresów wagowych podanych w tabelach. UWAGI: • Jeśli konieczne będzie przeprowadzenie czynności przez użytkownika (na przykład prze- wrócenie potrawy na drugą stronę), kuchenka zasygnalizuje to dźwiękiem, a odpowiednia informacja będzie widoczna na wyświetlaczu. Wykonaj odpowiednią czynność i naciśnij przycisk START/AUTO MINUTA.
  • Page 126 All manuals and user guides at all-guides.com CZAS ROZMRAŻANIA Ta funkcja służy do szybkiego rozmrażania potraw, umożliwiając wybór odpowiedniego cza- su rozmrażania w zależności od rodzaju potrawy. Zapoznaj się z instrukcjami w poniższym przykładzie, żeby uzyskać szczegółowe informacje na temat obsługi tej funkcji. Przykład: Rozmrażanie przez 10 minut.
  • Page 127 All manuals and user guides at all-guides.com TABELA PROGRAMU AUTOMATYCZNE GOTOWANIE WYBÓR PROGRAMU: program można wybrać bezpośrednio na panelu sterowania, naci- skając przycisk odpowiedniego programu. programy automatycznego gotowania: Produkt Uwaga Ziemniaki w mundurkach 1. W przypadku napojów i ziemniaków parametry nie odgry- (porcja o wadze 230 g) wają...
  • Page 128 All manuals and user guides at all-guides.com UŻYTECZNE FUNKCJE 1. GOTOWANIE SEKWENCYJNE: Funkcja umożliwia kontynuację i nieprzerwane gotowanie z 2 różnymi etapami. Przykład: Gotowanie: przez 5 minut przy poziomie mocy mikrofal p100 (etap 1)przez 16 minut przy poziomie mocy mikrofal p30 (etap 2) ETAP 1 1.
  • Page 129 All manuals and user guides at all-guides.com UŻYTECZNE FUNKCJE 3. Funkcja ZMNIEJSZANIA () i ZWIĘKSZANIA () CZASU: przyciski ZMNIEJSZANIA () CZASU i ZWIĘKSZANIA () CZASU umożliwiają: • Zwiększenie lub zmniejszenie czasu gotowania/rozmrażania w trakcie pracy kuchenki (tylko w trybie gotowania ręcznego). WYKORZYSTANIE FUNKCJI ZMNIEJSZANIA I ZWIĘKSZANIA CZASU W TRYBIE RĘCZNEGO GOTOWANIA Naciśnij przycisk ZMNIEJSZANIA () lub ZWIĘKSZANIA () CZASU, żeby zmniejszyć lub zwiększyć...
  • Page 130 All manuals and user guides at all-guides.com UŻYTECZNE FUNKCJE 4. TIMER KUCHENNY TIMER KUCHENNY może być wykorzystywany jako minutnik lub wspomagać nadzorowa- nie czasu po odstawieniu zagotowanych/rozmrożonych potraw. Przykład: Ustawienie timera na 5 minut. 1. Naciśnij jeden raz przy- 2. Wprowadź czas procesu 3. Naciśnij jeden raz przycisk cisk TIMER KUCHENNY.
  • Page 131 OSTRZEŻENIE: Zawsze przestrzegaj instrukcji zawartych w instrukcji obsługi firmy SHARP. Jeśli zostanie przekroczony maksymalny zalecany czas gotowania lub zostaną użyte zbyt wysokie ustawienia mocy, potrawy mogą ulec przegrzaniu, spaleniu, co skrajnych przypadkach może spowodować pożar i uszkodzenie kuchenki.
  • Page 132 All manuals and user guides at all-guides.com PORADY DOTYCZĄCE GOTOWANIA PRZY W YKORZYSTANIU MIKROFAL Charakterystyka potrawy Skład potrawy o dużej zawartości tłuszczu lub cukru (tj. budyń, kruche babeczki) wymagają krótszego czasu podgrzewania. Należy zacho- wać ostrożność, ponieważ przegrzanie może spowodować pożar Kości w mięsie przewodzą ciepło, powodując szybsze gotowanie się...
  • Page 133: Przydatne Naczynia

    All manuals and user guides at all-guides.com PRZYDATNE NACZYNIA Żeby możliwe było gotowanie/rozmrażanie w kuchence, promieniowanie mikrofalowe musi prze- niknąć przez pojemnik do naczynia. Z tego względu konieczne jest odpowiednie dobranie naczyń. Zalecane są naczynia owalne/okrągłe zamiast kwadratowych/prostokątnych, ponieważ żywność w ro- gach może się...
  • Page 134 All manuals and user guides at all-guides.com PORADY DOTYCZĄCE ROZMRAŻANIA Rozmrażanie żywności przy pomocy kuchenki mikrofalowej jest najszybszym sposobem rozmrażania. Jest to łatwy proces, ale należy przestrzegać poniższych instrukcji, żeby zapewnić całkowite rozmrożenie potraw. Przestaw Żywność ustawiona na brzegach talerza rozmraża się szybciej od żyw- ności umieszczonej w środku.
  • Page 135 All manuals and user guides at all-guides.com PORADY DOTYCZĄCE PODGRZEWANIA przy podgrzewaniu potraw przestrzegaj poniższych zaleceń, żeby zapewnić gruntowne podgrzanie przed podaniem. Dania na Zdejmij drób i mięso - podgrzej je osobno. Patrz poniżej. talerzu Umieść mniejsze kawałki jedzenia na środku talerza, a większe i grubsze na brzegu.
  • Page 136: Czyszczenie I Konserwacja

    All manuals and user guides at all-guides.com CZYSZCZENIE I KONSERWACJA WNĘTRZE KUCHENKI • Należy czyścić wnętrze kuchenki po każdym użyciu. • Do czyszczenia wnętrza kuchenki należy używać łagodnego detergentu, takiego jak my- dło do mycia w płynie, na szmatce zamoczonej w ciepłej wodzie. • Resztki jedzenia i płynów osadzają się na ściankach kuchenki. Nadmierna ilość nagroma- dzonego tłuszczu i resztek jedzenia może doprowadzić do przegrzania, powstania dymu lub nawet wywołania pożaru przy następnym uruchomieniu kuchenki. • Osłonę...
  • Page 137: Rozwiązywanie Problemów

    Dotknięcie ich grozi śmiercią. opisywana kuchenka nie została wyposażona w osłonę umożliwiającą dostęp do lampki oświetleniowej. W przypadku przepalenia lampki użytkownik nie powinien próbować wymienić jej samodzielnie, lecz skontaktować się z autoryzowanym serwisem firmy SHARp. PYTANIE ODPOWIEDŹ...
  • Page 138 Autoryzowany Serwis SHARP. 3.2 Wady urządzenia ujawnione w okresie gwarancji będą usunięte przez Autoryzowany Serwis SHARP w terminie nie dłuższym niż 14 dni roboczych liczonych od daty przyjęcia urządzenia do naprawy przez Autoryzowany Serwis SHARP. 3.3 W przypadku gdy naprawa wymaga importu części zamiennych, termin naprawy może zostać...
  • Page 139: Dane Techniczne

    Żadna część niniejszej publikacji nie może być odtwarzana, zapisywana w systemach od- zyskiwania ani przesyłana w jakiejkolwiek postaci, elektronicznej, mechanicznej, fotokopii, nagrania, tłumaczenia lub w inny sposób bez uprzedniej zgody firmy SHARp Vestel UK. Rysunki, dane techniczne i informacje zamieszczone za naszą zgodą w niniejszej publikacji były aktualne w momencie przekazania do druku.
  • Page 140 1. Az Európai Unióban Ha a terméket üzleti célokra használta, és ki kívánja selejtezni: Kérjük, forduljon a SHARp kereskedéshez, ahol tájékoztatják Önt a termék visszavételéről. Lehetséges, hogy a visszavételből és az újrahasznosításból eredő költségeket felszámítják. Előfordulhat, hogy a helyi hulladékbe- gyűjtő...
  • Page 141 All manuals and user guides at all-guides.com TARTALOMJEGYZÉK SÜTŐ ÉS TARToZÉKoK ............................3 KEZELŐpANEL ..............................4 FoNToS BIZToNSÁGI ELŐÍRÁSoK ......................5-12 ÜZEMBE HELYEZÉS .............................13-14 A SÜTŐ MŰKÖDÉSE ............................15 MIKRoHULLÁMÚ TELJESÍTMÉNYSZINTEK ....................16 HASZNÁLAT ELŐTT ............................16 A SÜTŐ HASZNÁLATA ..........................17-18 AUToMATIKUS SÚLYpRoGRAM /KIoLVASZTÁS ..................19 AUToMATA SÚLYpRoGRAMoK TÁBLÁZAT ....................
  • Page 142 és kárt okozhat a sütőben. • A forgótányér az óra járásával azonos és ellentétes irányba is foroghat. A forgási irány vál- tozhat a sütő minden egyes elindításával. Ez nem befolyásolja a főzés hatékonyságát. • Kiegészítők megrendelésekor kérjük, a kereskedőnek vagy SHARP márkaszerviznek hivat- kozzon az ALKATRÉSZ NEVÉRE és a MODELL SZÁMÁRA. FIGYELMEZTETÉS: Az ajtó, a külső borítás, a sütőtér, a forgótányér és az edények felforrósod- nak a sütő...
  • Page 143 All manuals and user guides at all-guides.com VEZÉRLŐLAP 1. DIGITÁLIS KIJELZŐ 2. IDŐ gomb 3. SÚLY SZERINTI FŐZÉS ÉS KIOLVASZTÁS gomb 4. IDŐ CSÖKKENTÉS/NÖVELÉS gombok 5. TELJESÍTMÉNYSZINT gomb 6. START/AUTO PERC gomb 7. STOP/TÖRLÉS gomb 8. KONYHAI IDŐZÍTŐ gomb 9. SÚLY gombok 10. AUTOMATIKUS ÉTELKÉSZÍTÉS gomb HU-4 00_User manual - R270_9_languages.indb 4 2016-07-15 13:00:17...
  • Page 144: Fontos Biztonsági Előírások

    All manuals and user guides at all-guides.com FONTOS BIZTONSÁGI ELŐÍRÁSOK OLVASSA EL ALAPOSAN ÉS TARTSA MEG KÉSŐBBI HASZNÁLATRA! 1. A sütőt kizárólag konyhapulton történő használatra tervezték. Konyhaszekrénybe nem beépíthető. Ne tegye a sütőt szekrénybe! 2. Használat közben a sütő ajtaja felmelegedhet. Úgy he- lyezze el a sütőt, hogy az alja legalább 85 cm magasan legyen a talajszinttől.
  • Page 145 11. Ha a készülék hálózati kábele sérült, speciális kábellel kell helyettesíteni. A cserét kizárólag a SHARp hivatalos márkaszervize végezheti el. 12. VIGYÁZAT: A robbanásveszély miatt tilos folyadékot, il- letve bármilyen ételt zárt dobozban melegíteni.
  • Page 146 All manuals and user guides at all-guides.com FONTOS BIZTONSÁGI ELŐÍRÁSOK elaludjon az esetlegesen keletkező láng. 20. Rendszeresen tisztítsa meg a sütőt és távolítsa el a lera- kódott ételmaradékokat. 21. Ügyeljen a sütő tisztán tartására. Ellenkező esetben a sütő felülete könnyen megrongálódhat, ami lerövidíthe- ti a készülék élettartamát és balesetet okozhat.
  • Page 147 All manuals and user guides at all-guides.com FONTOS BIZTONSÁGI ELŐÍRÁSOK 2. A hálózati csatlakozóaljzat legyen könnyen hozzáférhe- tő, hogy veszély esetén a készüléket könnyen ki lehessen húzni. 3. Az előírt hálózati feszültség 230-240V, 50 Hz, 13 amperes elosztó biztosítékkal, vagy 13 amperes elosztó áramköri megszakítóval.
  • Page 148 All manuals and user guides at all-guides.com FONTOS BIZTONSÁGI ELŐÍRÁSOK 16. Fokozatos elővigyázatosságra van szükség a magas cukor- vagy zsírtartalmú ételek (például kolbász, süte- mények, karácsonyi puding) készítése vagy melegítése esetén, a túlmelegedés és tűz keletkezésének elkerülése érdekében. 17. További tanácsokat a használati útmutatóban talál. Sérülés kockázatának elkerülése 1.
  • Page 149 és a szellőzőnyílásokba. Ha mégis folyadék jutna az említett helyekre, azonnal kap- csolja ki és húzza ki a sütőt, majd hívja a hivatalos SHARp szakszervizt. 3. Ne merítse a hálózati kábelt és a dugaszt vízbe vagy más folyadékba.
  • Page 150 All manuals and user guides at all-guides.com FONTOS BIZTONSÁGI ELŐÍRÁSOK 4. A sütési idő lejártával hagyja a folyadékot mintegy 20 másodpercig a mikrohullámú sütőben. Így elkerülheti az esetleges túlmelegítésből fakadó késleltetett, rob- banásszerű felforrást. 3. Burgonya, kolbász, gyümölcs és hasonló ételek héját mindig szúrja át főzés előtt, különben szétdurranhatnak.
  • Page 151 All manuals and user guides at all-guides.com FONTOS BIZTONSÁGI ELŐÍRÁSOK További figyelmeztetések 1. Tilos a sütő bármilyen módon történő átalakítása! 2. Tilos a sütőt működés közben áthelyezni! 3. A sütő kizárólag otthoni főzésre/sütésre szolgál, és kizá- rólag étel melegítésére, főzésére használható. Éttermi vagy laboratóriumi használatra nem alkalmas! A sütő...
  • Page 152: Üzembe Helyezés

    All manuals and user guides at all-guides.com ÜZEMBE HELYEZÉS 1. Távolítson el minden csomagolóanyagot a sütőtér bel- sejéből, és távolítsa el a védőfilmet a mikrohullámú sütő házának felületéről. Ellenőrizze, hogy nincs a sütőn sem- milyen sérülés jele. 2. Helyezze a sütőt stabil, vízszintes felületre, amely elbír- ja a készüléket az abba helyezendő...
  • Page 153: Elektromos Csatlakoztatás

    • Dugja be teljesen a csatlakozót az elektromos aljzatba. • Ne csatlakoztasson más készülékeket ugyanahhoz az alj- zathoz elosztó adapter használatával. • Ha a készülék hálózati kábele sérült, ki kell cserélni. Bal- esetek elkerülése érdekében a cserét kizárólag a SHARp hivatalos márkaszervize, vagy egy megfelelő szakképesí- téssel rendelkező személy végezheti el. • A csatlakozó elektromos aljzatból történő kihúzásakor mindig a csatlakozót fogja és ne a kábelt! Ha a kábelnél fogva húzza ki, az elektromos kábel vagy a csatlakozó...
  • Page 154 All manuals and user guides at all-guides.com A SÜTŐ MŰKÖDÉSE A mikrohullámok energiahullámok, hason- A mikrohullámok képesek áthatolni egyes lóak a TV és rádió jeleknél használtakhoz. anyagokon, mint például az üvegen és a műanyagon, így képesek az ételeket felme- Az elektromos energiát mikrohullámos legíteni.
  • Page 155: Használat Előtt

    All manuals and user guides at all-guides.com MIKROHULLÁMÚ TELJESÍTMÉNYSZINTEK • A sütő 10 teljesítményszinttel rendelkezik. Teljesítményszint Nyomja meg Százalék • A főzés teljesítményszintjének megváltozta- a TELJESÍT- tásához adja meg a szükséges időtartamot, MÉNYSZINT majd a MIKRoHULLÁMÚ TELJESÍTMÉNYSZINT gombot. gombbal állítsa be a kívánt szintet. p100 • Teljesítményszint MAGAS A mikrohullámú teljesítményszint a mikrohullá- mú...
  • Page 156: A Sütő Használata

    All manuals and user guides at all-guides.com A SÜTŐ HASZNÁLATA Az ajtó nyitása: A sütő ajtajának kinyitásához nyomja meg az ajtónyitó gombot. A sütő elindítása: Készítse elő és helyezze az ételt egy megfelelő edényben a forgótányérra vagy helyezze az ételt közvetlenül a forgótányérra. Csukja be az ajtót és nyomja meg a START/AUTo pERC gombot.
  • Page 157 All manuals and user guides at all-guides.com A SÜTŐ HASZNÁLATA MANUÁLIS KIOLVASZTÁS • Adja meg a kiolvasztás idejét és állítsa be a mikrohullámú teljesítményszintet P10 vagy P30 értékre a kiolvasztáshoz (lásd a HU-16 oldalt). • Ha lehet, kiolvasztás közben 2 - 3 alkalommal keverje vagy fordítsa meg az ételt. • Kiolvasztás után takarja le az ételt fóliával és hagyja állni, amíg teljesen ki nem olvad. Példa: Kiolvasztás 10 percig p30 mikrohullámú teljesítményszinten. 1. Adja meg a teljesítmény- 2. Adja meg a kiolvasztás 3. Nyomja meg egyszer a szintet a TELJESÍTMÉNY- idejét a 10 PERC gomb START/AUTO PERC gom-...
  • Page 158 All manuals and user guides at all-guides.com AUTOMATA SÚLYPROGRAMOK /KIOLVASZTÁS AUTOMATA SÚLYPROGRAMOK /KIOLVASZTÁS lehetővé teszi, hogy megfőzze vagy kiol- vassza a felsorolt előre beprogramozott ételeket. A funkciók használatához kövesse az aláb- bi példát. AUToMATIKUS SÚLYpRoGRAM funkció 3 népszerű étel elkészítését teszi lehetővé. Marha sütésekor nyomja meg az AUToMATIKUS SÚLYpRoGRAM gombot egyszer. Coo1 jelzés jelenik meg a kijelzőn.
  • Page 159 All manuals and user guides at all-guides.com AUTOMATA SÚLYPROGRAMOK TÁBLÁZAT SÚLYTARTOMÁNY: • Az étel tömegét kerekítse fel vagy le a legközelebbi egész 0,1 kg-ra. Például 0,65kg-ot 0,7kg-ra, vagy 0,34kg-ot 0,3kg-ra. • Csak olyan súlyt adhat meg, ami beleesik a tartományba (lásd az alábbi táblázatot). MEGJEGYZÉSEK: • Ha közbe kell avatkozni (pl. megfordítani az ételt), a sütő leáll, hangjelzést ad, és hátralévő idő, illetve a piktogram villog a kijelzőn. A főzés/sütés folytatásához nyomja meg a START/ AUTO PERC gombot.
  • Page 160 All manuals and user guides at all-guides.com GYORS KIOLVASZTÁS A funkció az ételek gyors kiolvasztását teszi lehetővé. Az étel típusának megfelelően Ön adhatja meg a megfelelő kiolvasztási időt. Kövesse az alábbi példát a funkció működésének megismeréséhez. Példa: Az étel 10 perces kiolvasztása. 1.
  • Page 161 All manuals and user guides at all-guides.com AUTOMATIKUS ÉTELKÉSZÍTÉS TÁBLÁZAT ÉTEL PROGRAM KIVÁLASZTÁSA: Kiválaszthatja a programot közvetlenül a kezelőpanelen a megfelelő gomb megnyomásával. Automatikus ételkészítés ételei: Étel Megjegyzés Héjában főtt krumpli (230g/db) 1. Italok és burgonya esetében a kijelzőn megjelenő számok nem súlyra vonatkoznak, hanem az adagok számát jelölik. Tea/kávé...
  • Page 162: További Hasznos Funkciók

    All manuals and user guides at all-guides.com TOVÁBBI HASZNOS FUNKCIÓK 1. FŐZÉSI MÓDOK KOMBINÁLÁSA: Ez a funkció 2 különböző üzemmód (szakasz) folyamatos és megszakítás nélküli használatát teszi lehetővé. Példa: Főzés: 5 percig p100 teljesítménnyel (1. szakasz), majd 16 percig p30 teljesítménnyel (2. szakasz) 1.
  • Page 163 All manuals and user guides at all-guides.com TOVÁBBI HASZNOS FUNKCIÓK 3. IDŐTARTAM CSÖKKENTÉS () és NÖVELÉS (): AZ IDŐTARTAM () CSÖKKENTÉSE és NÖVELÉSE () gombok lehetővé teszik, hogy: • Csökkentse vagy növelje a sütés/kiolvasztás idejét a sütő használata közben (csak manu- ális főzési módban). AZ IDŐTARTAM CSÖKKENTÉSE ÉS NÖVELÉSE FUNKCIÓ HASZNÁLATA MANUÁLIS FŐ- ZÉS/SÜTÉS MÓDBAN Nyomja meg az IDŐ...
  • Page 164 All manuals and user guides at all-guides.com TOVÁBBI HASZNOS FUNKCIÓK 4. KONYHAI IDŐZÍTŐ A KONYHAI IDŐZÍTŐT használhatja időzítőként vagy mérheti vele a megfőzött/kiolvasztott ételek állásidejét. Példa: Az időzítő beállítása 5 percre. 1. Nyomja meg egyszer 2. Adja meg a kívánt időt 3. Nyomja meg egyszer a a KONYHAI IDŐZÍTŐ...
  • Page 165 és sose készítse tovább a kukoricát, mint amit az utasítás tartalmaz. FIGYELMEZTETÉS: Mindig kövesse a SHARP használati útmutatójában leírt utasításokat! Ha túllépi az ajánlott főzési időt, vagy túl magas teljesítményszintet hasz- nál, az étel túlmelegedhet, megéghet és extrém körülmények között ki is gyulladhat, a sütő...
  • Page 166 All manuals and user guides at all-guides.com TANÁCSOK MIKROHULLÁMMAL VALÓ FŐZÉSHEZ Az étel jellemzői Összetétel A magas zsír és cukor tartalmú ételeknek (pl. karácsonyi puding, gyümölcskosár) rövidebb melegítési idő szükséges. Körültekintően kell eljárni, mivel a túlmelegítés tüzet okozhat. Az ételben található csontok vezetik a hőt, az étel így gyorsabban megsül/megfő.
  • Page 167 All manuals and user guides at all-guides.com A SÜTŐBEN HASZNÁLHATÓ EDÉNYEK Ételek mikrohullámú sütőben történő főzéséhez/kiolvasztásához a mikrohullámú energiá- nak át kell tudnia hatolni a tároló edényen és át kell járnia az ételt. Ezért fontos a megfelelő edény megválasztása. A kerek/ovális edények előnyösebbek, mint a szögletes/téglalap alakú edények, mivel az étel a sarkokban túlfőhet.
  • Page 168 All manuals and user guides at all-guides.com TANÁCSOK KIOLVASZTÁSHOZ A mikrohullámú sütővel történő kiolvasztás mind közül a leggyorsabb eljárás. A kiolvasztás egyszerű eljárás, ugyanakkor az alábbi lépések alapvetőek az étel teljes kiol- vasztásához. Átrendezés A tányér szélére helyezett ételek gyorsabban kiolvadnak, mint a közé- pen találhatók.
  • Page 169 All manuals and user guides at all-guides.com TANÁCSOK ÚJRAMELEGÍTÉSHEZ Ételek újramelegítésekor kövesse az alábbi tanácsokat, hogy felszolgálás előtt az étel telje- sen átmelegedjen. Ételek tá- Vegyen le minden húst a tányérról és ezeket külön me- nyéron legítse meg. Lásd az alábbiakban. A kisebb ételdarabokat a tányér közepére, a nagyobb és vas- tagabb darabokat a szélére helyezze.
  • Page 170: Tisztítás És Karbantartás

    All manuals and user guides at all-guides.com TISZTÍTÁS ÉS KARBANTARTÁS A SÜTŐ BELSEJE • Fontos, hogy minden egyes használat után megtisztítsa mikrohullámú sütője belsejét. • A mikrohullámú sütő külsejét meleg vízben feloldott enyhe tisztítószerrel (például moso- gatószerrel) átitatott puha ronggyal törölje át. • A kifröccsent étel és folyadék maradványok felhalmozódhatnak a sütő falán és tetején. Ha zsiradék és étel maradványokat hagyjuk összegyűlni a sütő belsejében, azok túlmeleged- hetnek, füstölhetnek, vagy akár lángra is kaphatnak a sütő következő használatakor. • Tartsa mindig tisztán a hullámvezető-fedőlemezt! A hullámvezető-fedőlemez érzékeny anyagból készült és óvatosan kell tisztítani (kövesse a fenti, tisztításra vonatkozó...
  • Page 171: Hibakeresési Útmutató

    20 perc FIGYELMEZTETÉS: Tilos a sütőt a felhasználónak magának módosítania, illetve javítania! A SHARP képzett szakembe- rén kívül bárki más számára veszélyes bármilyen szervizelést, vagy javítást eszközölni a készüléken. Tartsa be ezt az utasítást, mivel a mikrohullámú energia ellen védő borítások eltávolításával járhat a szerelés.
  • Page 172: Műszaki Jellemzők

    Folyamatos termékfejlesztési politikánk részeként fenntartjuk a műszaki adatok és kivitele- zés előzetes bejelentés nélküli megváltoztatásának jogát. A jelen kiadvány egésze vagy része a Sharp Vestel UK engedélye nélkül nem sokszorosítható, nem tárolható el visszakereshető rendszerekben, illetve nem továbbítható semmilyen for- mában (sem elektronikus, sem mechanikus), nem fénymásolható, nem rögzíthető...
  • Page 173 All manuals and user guides at all-guides.com 00_User manual - R270_9_languages.indb 34 2016-07-15 13:00:22...
  • Page 174 Ако този продукт се използва за стопански цели и искате да го изхвърлите: За информация относно обратно приемане на продукта се обърнете към най-близкия представител на SHARp. Възможно е да бъдете таксу- вани за разходите, произтичащи от обратно приемане и рециклиране.
  • Page 175 All manuals and user guides at all-guides.com СЪДЪРЖАНИЕ ФУРНА И АКСЕСОАРИ ............................3 ПАНЕЛ ЗА УПРАВЛЕНИЕ ..........................4 ВАЖНИ ИНСТРУКЦИИ ЗА БЕЗОПАСНОСТ ..................5-12 МОНТАЖ ...............................13-14 КАТЕГОРИЯ НА НАГРЯВАНЕ ........................15 КАК ФУНКЦИОНИРА ВАШАТА ФУРНА ....................15 НИВА НА МИКРОВЪЛНОВА МОЩНОСТ ....................16 ПРЕДИ...
  • Page 176 • Въртящата се чиния може да се върти по посока на часовниковата стрелка или об- ратно на нея. Посоката на въртене може да се променя винаги преди стартиране на фурната. Това няма отношение към приготвянето на храната. • При поръчка на аксесоари, моля посочете на търговеца или одобрения от SHARP сер- визен център НАИМЕНОВАНИЕ НА ЧАСТТА и НОМЕР НА МОДЕЛА. ВНИМАНИЕ: Възможно е вратата, външната кутия, вътрешната част на фурната, вър- тящата...
  • Page 177: Панел За Управление

    All manuals and user guides at all-guides.com ПАНЕЛ ЗА УПРАВЛЕНИЕ 1. ЦИФРОВ ДИСПЛЕЙ 2. Бутони за настройка на ВРЕМЕТО 3. Бутон за ГОТВЕНЕ и РАЗМРАЗЯВАНЕ СПРЯМО ТЕГЛО 4. Бутони ПО-МАЛКО/ПОВЕЧЕ ВРЕМЕ 5. Бутон НИВО НА МОЩНОСТ 6. Бутон СТАРТ/АВТОМАТИЧНА МИНУТА 7.
  • Page 178: Важни Инструкции За Безопасност

    All manuals and user guides at all-guides.com ВАЖНИ ИНСТРУКЦИИ ЗА БЕЗОПАСНОСТ ПРОЧЕТЕТЕ ВНИМАТЕЛНО И ЗАПАЗЕТЕ ЗА БЪДЕЩИ СПРАВКИ 1. Тази фурна е проектирана за използване единствено вър- ху кухненски плот. Не може да бъде вграждана в кухненски блок. Не я поставяйте в шкаф. 2.
  • Page 179 11. Ако захранващият кабел на този уред се повреди, трябва да бъде подменен със специален такъв. Смяната трябва да бъде извършена от упълномощен от SHARp техник. 12. ВНИМАНИЕ: Течности или други храни не трябва да бъдат нагрявани в запечатани опаковки, тъй като е възможно да...
  • Page 180 All manuals and user guides at all-guides.com ВАЖНИ ИНСТРУКЦИИ ЗА БЕЗОПАСНОСТ 19. Ако забележите дим, изключете фурната от захранването и дръжте вратата затворена, за да се задушат пламъците. 20. Почиствайте фурната редовно и отстранявайте всякакви остатъци от храна. 21. Липсата на поддръжка може да доведе до влошаване на състоянието...
  • Page 181 All manuals and user guides at all-guides.com ВАЖНИ ИНСТРУКЦИИ ЗА БЕЗОПАСНОСТ За да се избегне опасността от пожар: 1. Микровълновата фурна не трябва да бъде оставяна без надзор по време на работа. Когато нивата на мощ- ност са твърде високи или времената на готвене - твър- де...
  • Page 182 All manuals and user guides at all-guides.com ВАЖНИ ИНСТРУКЦИИ ЗА БЕЗОПАСНОСТ 16. За да се избегне прегряване и пожар, е необходимо да се обръща голямо внимание при приготвяне на храни с висо- ко съдържание на мазнини или захар, например наденич- ки, сладкиши...
  • Page 183 6. Не правете опити да подменяте вътрешното осветление на фурната самостоятелно и не позволявайте на лица, които не са електротехници, упълномощени от SHARp да правят това. В случай че вътрешното осветление изгори, моля кон- султирайте се с най-близкия търговски представител или...
  • Page 184 All manuals and user guides at all-guides.com ВАЖНИ ИНСТРУКЦИИ ЗА БЕЗОПАСНОСТ 4. Оставете течността да престои във фурната поне 20 се- кунди след изтичане на настроеното време за готвене, с цел предотвратяване на забавено кипене. 3. Преди приготвяне на храни като картофи, колбаси и плодо- ве, е...
  • Page 185 All manuals and user guides at all-guides.com ВАЖНИ ИНСТРУКЦИИ ЗА БЕЗОПАСНОСТ 3. Тази фурна е предназначена единствено за домашно при- готвяне на храни. Употреба в търговски или лабораторни условия не е подходяща. За насърчаване на безпроблемната работа на Вашата фур- на...
  • Page 186 All manuals and user guides at all-guides.com МОНТАЖ 1. Отстранете всички опаковъчни материали от вътрешността на фурната, както и всички предпазващи ленти по повърхно- стите. Проверете фурната внимателно за следи от повреди. 2. Поставете фурната върху обезопасена равна повърхност, достатъчно стабилна да издържи нейното тегло плюс това на най-тежкия...
  • Page 187: Електрическо Свързване

    • Поставете правилно щепсела в контакта. • Не включвайте други уреди в същия контакт, например с по- мощта на разклонител. • В случай че захранващият кабел бъде повреден, той трябва да бъде заменен от одобрен от SHARp сервизен център или от лице с подобна квалификация, с цел да бъде избегната евен- туална опасност. • При изключване от електрическата мрежа винаги хващайте...
  • Page 188 All manuals and user guides at all-guides.com КАК ФУНКЦИОНИРА ВАШАТА ФУРНА Микровълните са енергийни вълни, по- Микровълните преминават през матери- добни на тези, използвани за телевизи- али като стъкло и пластмаса, за да могат онни и радио сигнали. да затоплят храните. (Разгледайте "Под- ходящи...
  • Page 189 All manuals and user guides at all-guides.com НИВА НА МИКРОВЪЛНОВА МОЩНОСТ • Вашата фурна има 10 нива на мощност, как- Ниво на мощ- Брой натис- Процент то е показано. ност кания на бу- • За да промените нивото на мощност за тон НИВО НА готвене, въведете необходимото време- МОЩНОСТ...
  • Page 190 All manuals and user guides at all-guides.com КАК ДА РАБОТИТЕ С ВАШАТА ФУРНА Отваряне на вратата: За да отворите вратичката на фурната, натиснете бутона за отваряне. Стартиране на фурната: Пригответе и поставете храната в подходящ съд или направо върху въртящата се чиния. Затворете вратата и натиснете бутон СТАРТ/ АВ- ТОМАТИЧНА...
  • Page 191 All manuals and user guides at all-guides.com КАК ДА РАБОТИТЕ С ВАШАТА ФУРНА РЪЧНО РАЗМРАЗЯВАНЕ • Въведете времето за размразяване и използваното ниво на мощност Р10 или Р30 за размразяване (погледнете страница БГ-16). • Разбърквайте и обръщайте храната, когато е възможно, по 2 - 3 пъти по време на раз- мразяване. • След размразяване, покривайте храната с фолио и я оставяйте да престои до пълно размразяване. Пример: За 10-минутно размразяване на микровълнова мощност Р30. 1. Въведете ниво на 2. Въведете времетраене 3. Натиснете бутон СТАРТ/ мощност, натискайки...
  • Page 192 All manuals and user guides at all-guides.com АВТОМАТИЧНО ГОТВЕНЕ / РАЗМРАЗЯВАНЕ СПРЯМО ТЕГЛО АВТОМАТИЧНОТО ГОТВЕНЕ / РАЗМРАЗЯВАНЕ СПРЯМО ТЕГЛО позволява готвене или размразяване на предварително програмираните ястия в списъка. Следвайте при- мерите по-долу за повече информация относно употребата на тези функции. АВТОМАТИЧНОТО...
  • Page 193 All manuals and user guides at all-guides.com ГРАФИКА НА АВТОМАТИЧНО ГОТВЕНЕ СПРЯМО ТЕГЛО ГРАНИЦА НА ТЕГЛОТО: • Теглото на храната трябва да бъде закръгляно нагоре или надолу до най-близкия 0,1 кг, например 0,65 кг до 0,7 кг, 0,34 кг до 0,3 кг. • Необходимо е въвежданото тегло да се намира в диапазона на границите (погледнете следващата диаграма). БЕЛЕЖКИ: • Когато е необходимо действие (например обръщане на храната), фурната спира, прозвучава...
  • Page 194 All manuals and user guides at all-guides.com БЪРЗО РАЗМРАЗЯВАНЕ Тази функция размразява бързо храните, позволявайки Ви да изберете подходящото време за размразяване, в зависимост от типа храна. Следвайте примера по-долу за по- вече подробности как се работи с тази функция. Пример: Размразяване...
  • Page 195 All manuals and user guides at all-guides.com ТАБЛИЦА ЗА АВТОМАТИЧНОТО ГОТВЕНЕ ИЗБОР НА МЕНЮ: Можете да изберете меню направо от клавиатурата, натискайки съ- ответния бутон. Менюта за автоматично готвене: Храна Забележка Пълнени картофи (по 230 г) 1. За напитки и картофи, параметрите върху дисплея не се отнасят...
  • Page 196 All manuals and user guides at all-guides.com УДОБНИ ФУНКЦИИ 1. ПОСЛЕДОВАТЕЛНО ГОТВЕНЕ Тази функция позволява продължителна и непрекъсната работа за 2 различни етапа. Пример: За готвене: 5 минути при мощност p100 (Етап 1) 16 минути при мощност p30 (Етап 2) ЕТАП...
  • Page 197 All manuals and user guides at all-guides.com УДОБНИ ФУНКЦИИ 3. ПО-МАЛКО () и ПОВЕЧЕ () ВРЕМЕ: Бутоните за ПО-МАЛКО () и ПОВЕЧЕ () ВРЕМЕ Ви позволяват: • Намаляване или увеличаване на времетраенето на готвенето/размразяването, дока- то фурната работи (само при ръчно готвене). ЗА ИЗПОЛЗВАНЕ НА ПО-МАЛКО И ПОВЕЧЕ С РЪЧНО ГОТВЕНЕ Натиснете...
  • Page 198 All manuals and user guides at all-guides.com УДОБНИ ФУНКЦИИ 4. КУХНЕНСКИ ТАЙМЕР Използвайте КУХНЕНСКИЯ ТАЙМЕР като минутен таймер, или за да следите текущото време на готвене/размразяване. Пример: За задаване на таймера за 5 минути. 1. Натиснете веднъж бутон 2. Въведете желаното 3.
  • Page 199 мазнина, освен определената от производителя и никога не гответе по-дълго време от указаното. ВНИМАНИЕ: Винаги следвайте инструкциите от наръчника за експлоатация на SHARP. Ако надвишите препоръчителното времетраене за готвене и използвате нива на мощност, които са прекалено високи, храната може да се претопли, изгори...
  • Page 200 All manuals and user guides at all-guides.com ПРЕПОРЪКИ ЗА МИКРОВЪЛНОВО ГОТВЕНЕ Характеристики на храната Състав Храните, богати на мазнини или захар (напр. коледен пудинг, па- йове с кайма) изискват по-малко време за приготвяне. Внимавай- те да не надвишите времето, тъй като при прегряване е възмож- но...
  • Page 201 All manuals and user guides at all-guides.com ПОДХОДЯЩИ СЪДОВЕ ЗА ГОТВЕНЕ За да готвите/размразявате храна в микровълновата фурна, микровълновата енергия трябва да може да премине през съда и да влезе в храната. Затова е важно да се използ- ват подходящи съдове. Кръгли/овални...
  • Page 202 All manuals and user guides at all-guides.com ПРЕПОРЪКИ ЗА РАЗМРАЗЯВАНЕ Размразяването на храна чрез микровълнова фурна е най-бързия начин от всички. Това е елементарен процес, но следните инструкции са важни за да бъдете сигурни, че храната е изцяло размразена. Пренареждане Храните, разположени от външната страна на чинията се размра- зяват...
  • Page 203 All manuals and user guides at all-guides.com ПРЕПОРЪКИ ЗА ПРИТОПЛЯНЕ За претопляне на храната, следвайте препоръките и насоките по-долу, за да сте сигур- ни, че храната е изцяло затоплена преди сервиране. Основни Отстранете всякакви птици или части от месо, затоп- ястия...
  • Page 204: Почистване И Поддръжка

    All manuals and user guides at all-guides.com ПОЧИСТВАНЕ И ПОДДРЪЖКА ВЪТРЕШНОСТ НА ФУРНАТА • Важно е да почиствате вътрешността на фурната след всяко ползване. • Избърсвайте външната част на фурната с мек почистващ течен препарат, с помощта на топла вода и мека кърпа. • Храни и пръски от течности се натрупват по стените на фурната. Не позволявайте това да стане, тъй като е възможно при следващо ползване на фурната да се запалят. • Пазете капака...
  • Page 205: Отстраняване На Неизправности

    Никога не изпълнявайте корекции, ремонти или модификации върху фурната самостоятелно. Извършването на всякакви ремонтни дейности е опасно, освен ако не бъде извършвано от техник, обучен от SHARP. Това е много важно, тъй като е възможно тези дейности да включват сваляне на предпазните покрития, пре- доставящи...
  • Page 206 в информационна система или предавана под каквато и да е форма, електронни, ме- ханични, фотокопирни, записващи, преводни или други средства, без предварително разрешение от SHARp Vestel UK. Илюстрациите, техническата информация и данните, съдържащи се в настоящата пуб- ликация са, доколкото ни е известно, валидни в момента на отпечатването. Правото да...
  • Page 207 All manuals and user guides at all-guides.com 00_User manual - R270_9_languages.indb 34 2016-07-15 13:00:32...
  • Page 208 Dacă acest produs este utilizat în scopuri de afaceri şi doriţi să-l eli- minaţi: Vă rugăm să contactați distribuitorul SHARp, care vă va informa des- pre preluarea produsului. Este posibil să fiţi taxat pentru costurile generate de preluare şi reciclare. produsele mici (şi cantitățile mici) pot fi preluate de către centrele locale de colectare.
  • Page 209 All manuals and user guides at all-guides.com CUPRINS CUpToRUL ŞI ACCESoRIILE ..........................3 pANoUL DE CoMANDĂ .............................4 INSTRUCȚIUNI DE SIGURANȚĂ IMpoRTANTE ..................5-12 INSTALARE ..............................13-14 CUM FUNCŢIoNEAZĂ CUpToRUL DUMNEAVoASTRĂ ..............15 NIVELURILE DE pUTERE ALE MICRoUNDELoR ..................16 ÎNAINTE DE opERARE ............................16 UTILIZAREA CUpToRULUI DUMNEAVoASTRĂ...
  • Page 210 • Platoul rotativ se poate roti în direcţia acelor de ceasornic sau invers. Direcţia de rotire se poa- te schimba la fiecare pornire a cuptorului. Acest lucru nu afectează performanţa aparatului. • Atunci când comandați accesorii, vă rugăm să menționați atâtNUMELE PIESEI, cât şi NU- MĂRUL MODELULUI dealer-ului dumneavoastră, ori service-ului autorizat SHARp. AVERTIZARE: Uşa, carcasa exterioară, interiorul cuptorului, accesoriile şi vasele se vor în- cinge foarte mult în timpul utilizării. Pentru a evita arsurile, utilizați întot- deauna mănuşi groase pentru cuptor.
  • Page 211: Panoul De Comandă

    All manuals and user guides at all-guides.com PANOUL DE COMANDĂ 1. AFIŞAJ DIGITAL 2. Butoane TEMPORIZARE 3. Buton GREUTATE GĂTIRE & DEZGHEŢARE 4. Butoane AJUSTARE TEMPORIZARE – MAI LUNG/MAI SCURT 5. Buton NIVEL PUTERE 6. Buton TEMPORIZARE AUTOMATĂ 7. Buton OPRIRE/ANULARE 8. Buton CRONOMETRU BUCĂTĂRIE 9.
  • Page 212: Instrucţiuni Importante De Siguranţă

    All manuals and user guides at all-guides.com INSTRUCŢIUNI IMPORTANTE DE SIGURANŢĂ CITIŢI CU ATENŢIE ŞI PĂSTRAŢI PENTRU CONSULTARE ULTERIOARĂ 1. Acest cuptor este destinat numai pentru utilizarea pe blat. Cuptorul nu poate fi incorporat într-o unitate de bucătărie. Nu aşezaţi cuptorul în dulap. 2.
  • Page 213 11. În cazul avarierii cablului de alimentare, acesta trebuie înlocuit cu un cablu special. Înlocuirea poate fi realizată numai de către un agent de service autorizat SHARp. 12. AVERTIZARE: Lichidele şi alimentele nu pot fi încălzite în recipiente etanşe, deoarece pot exploda.
  • Page 214 All manuals and user guides at all-guides.com INSTRUCŢIUNI IMPORTANTE DE SIGURANŢĂ 20. Curăţaţi cuptorul la intervale regulate de timp şi înde- părtaţi resturile de alimente de pe el. 21. Nerespectarea instrucțiunilor de curățare a cuptorului poate duce la o deteriorare a suprafeței acestuia, care poate afecta durata de viață...
  • Page 215 All manuals and user guides at all-guides.com INSTRUCŢIUNI IMPORTANTE DE SIGURANŢĂ mari sau timpii de gătire foarte lungi pot supraîn- călzi alimentele, ceea ce poate duce la apariţia in- cendiilor. 2. priza trebuie să fie uşor accesibilă, astfel încât deconec- tarea aparatului în caz de pericol, să...
  • Page 216 All manuals and user guides at all-guides.com INSTRUCŢIUNI IMPORTANTE DE SIGURANŢĂ 15. După pornirea cuptorului, verificaţi toate setările pen- tru a vă asigura că acesta funcţionează corespunzător. 16. pentru a evita supraîncălzirea şi apariţia focului, ţineţi cuptorul sub observaţie în timpul gătirii sau încălzi- rii alimentelor cu mult zahăr sau cu multă...
  • Page 217 6. Nu încercaţi să înlocuiţi singuri becul cuptorului şi nu lă- saţi o persoană neautorizată de SHARp să facă acest lu- cru. Dacă becul este avariat, consultaţi furnizorul dum- neavoastră sau un agent de service autorizat SHARp.
  • Page 218 All manuals and user guides at all-guides.com INSTRUCŢIUNI IMPORTANTE DE SIGURANŢĂ 4. Lăsaţi lichidul în cuptor la finalul timpului de gătire pentru cel puţin 20 de secunde pentru a preveni fier- berea eruptivă. 3. Înţepaţi coaja cartofilor, cârnaţilor sau a fructelor înainte de gătire, pentru a evita pericolul de explozie a acestora.
  • Page 219 All manuals and user guides at all-guides.com INSTRUCŢIUNI IMPORTANTE DE SIGURANŢĂ Pentru utilizarea fără probleme a cuptorului şi evitarea avariilor: 1. Nu utilizaţi niciodată cuptorul când acesta este gol, cu excepţia situaţiei în care se recomandă în manualul de utilizare. În caz contrar, cuptorul se poate defecta. 2.
  • Page 220 All manuals and user guides at all-guides.com INSTALARE 1. Îndepărtaţi toate materialele de ambalare din interiorul cuptoru- lui şi îndepărtaţi folia de protecţie de pe suprafaţa carcasei cup- torului cu microunde. Verificaţi dacă produsul prezintă avarii. 2. Amplasaţi cuptorul pe o suprafaţă plată, sigură, îndeajuns de re- zistentă...
  • Page 221 • Introduceți corect ştecherul în priză. • Nu conectați alte aparate la aceeaşi priză folosind un prelungitor. • În cazul în care cablul de alimentare este deteriorat, acesta tre- buie înlocuit de o unitate de service aprobată de Sharp sau de o persoană cu calificare similară, pentru a evita riscurile. • Când scoateți ştecherul din priză, țineți întotdeauna de ştecher şi nu trageți niciodată de cablu, deoarece acesta şi conexiunile din interiorul ştecherului se pot deteriora.
  • Page 222 All manuals and user guides at all-guides.com CUM FUNCŢIONEAZĂ CUPTORUL DUMNEAVOASTRĂ Microundele sunt valuri de energie, simila- Microundele pot trece prin anumite materi- re semnalelor de TV şi radio. ale, cum ar fi sticla şi plasticul, pentru a în- călzi mâncarea. (Consultaţi „Veselă potrivită Energia electrică...
  • Page 223 All manuals and user guides at all-guides.com NIVELURILE DE PUTERE ALE MICROUNDELOR • Cuptorul are 10 niveluri de putere, aşa Nivel putere Apăsaţi bu- Procentaj cum se indică alăturat. tonul NIVEL • Pentru a schimba nivelul de putere pentru PUTERE gătit, introduceți timpul necesar şi apoi p100 apăsați tasta NIVEL PUTERE până când ÎNALT afişajul indică...
  • Page 224 All manuals and user guides at all-guides.com UTILIZAREA CUPTORULUI DVS. CU MICROUNDE Deschiderea uşii: pentru a deschide uşa cuptorului, împingeţi butonul de deschidere a uşii. Pornirea cuptorului: Gătiţi şi puneţi mâncarea într-un recipient adecvat. plasaţi recipientul pe platoul rotativ sau plasaţi alimentul direct pe platou. Închideţi uşa şi apă- saţi butonul TEMPORIZARE AUTOMATĂ...
  • Page 225 All manuals and user guides at all-guides.com UTILIZAREA CUPTORULUI DVS. CU MICROUNDE DECONGELARE MANUALĂ • Introduceţi timpul de decongelare şi utilizaţi nivelul de putere P10 sau P30 pentru a decon- gela (consultaţi pagina Ro-16). • Agitaţi sau amestecaţi mâncarea, când este posibil, de 2-3 ori în timpul decongelării. • După decongelare, acoperiţi mâncarea cu o folie şi lăsaţi-o până la decongelarea completă. Exemplu: pentru a decongela 10 minute la puterea de microunde p 30. 1. Setaţi nivelul de putere 2. Introduceţi timpul de de- 3.
  • Page 226 All manuals and user guides at all-guides.com GĂTIRE/DECONGELARE AUTOMATĂ GĂTIREA/DECONGELAREA AUTOMATĂ vă permite să gătiţi sau să decongelați mese pre- programate. Urmați exemplul de mai jos pentru detalii cu privire la modul în care să operaţi aceste funcții. GĂTIREA AUToMATĂ permite gătirea a 3 meniuri populare. pentru carnea de vită, apăsaţi butonul GĂTIRE AUTOMATĂ...
  • Page 227 All manuals and user guides at all-guides.com TABEL GĂTIRE AUTOMATĂ INTERVALUL DE GREUTATE: • Greutatea alimentelor trebuie rotunjită la cea mai apropiată 100 de grame, spre exemplu, de la 0.65kg la 0.7kg sau de la 0.34kg la 0.3kg. • Greutatea trebuie să corespundă cu cea descrisă în tabel (vezi tabelul următor). OBSERVAŢII: • Când este necesară o acţiune (de ex.: întoarcerea alimentului), cuptorul se va opri, va emite un semnal sonor, iar timpul rămas şi un indicator vor pâlpâi pe ecran. pentru a continua gătirea, apăsaţi butonul TEMPORIZARE AUTOMATĂ.
  • Page 228 All manuals and user guides at all-guides.com DECONGELARE RAPIDĂ Această funcţie este destinată decongelării rapide permiţând alegerea timpului dorit de decongelare, în funcţie de tipul alimentului. Urmaţi exemplul de mai jos pentru mai multe detalii. Exemplu: decongelaţi mâncarea în 10 minute. 1.
  • Page 229 All manuals and user guides at all-guides.com GRAFIC DE AUTO-GĂTIRE SELECTAREA MENIULUI: Yputeţi să selectaţi Meniul direct din lista de butoane prin apăsa- rea butonului relevant. Meniurile pentru gătire automată: Aliment Observaţie: Cartof umplut (fiecare 230g) 1. pentru băuturi şi cartofi, parametrii afişaţi nu reprezintă gre- utatea, ci numărul de porţii.
  • Page 230 All manuals and user guides at all-guides.com FUNCŢII UTILE 1. SEQUENCE COOKING (GĂTIRE SECVENŢĂ MULTIPLĂ) Această funcție permite o funcționare continuă şi neîntreruptă pentru 2 etape diferite. Exemplu: pentru a găti: 5 minute la nivelul de putere p100 (Etapa 1) 16 minute la nivelul de putere p30 (Etapa 2) ETAPA 1 1.
  • Page 231 All manuals and user guides at all-guides.com FUNCŢII UTILE 3. LESS (MAI PUŢIN) () şi MORE (MAI MUL)() TIME (TIMP): Butoanele LESS () TIME şi MORE () TIME vă permit să • Măriţi sau micşoraţi timpului de gătire/decongelare în timpul funcţionării cuptorului (nu- mai gătire manuală ). UTILIZAREA FUNCŢIILOR MAI PUŢIN ŞI MAI MULT LA GĂTIREA MANUALĂ Apăsaţi butonul LESS (MAI PUŢIN) () sau MORE (MAI MULT) () TIME (TIMP) pentru a mări sau a micşora timpul de gătire sau de decongelare în multipli de 1 minut în timpul func- ţionării cuptorului.
  • Page 232 All manuals and user guides at all-guides.com FUNCŢII UTILE 4. TEMPORIZATOR BUCĂTĂRIE Utilizați TEMPORIZATORUL DE BUCĂTĂRIE ca temporizator de minute sau pentru a moni- toriza timpul rămas pentru gătit/decongelat mâncarea. Exemplu: Setarea cronometrului pentru 5 minute. 1. Apăsaţi butonul CRONO- 2.
  • Page 233 şi nu gătiți niciodată pe o perioadă mai îndelungată decât cea din instrucțiuni. AVERTIZARE: Respectați întotdeauna instrucțiunile din manualul de utilizare SHARP. Dacă depăşiți timpii de gătire recomandați şi utilizați niveluri de putere prea ridicate, mâncarea se poate supraîncălzi, arde şi, în situații extreme, poate lua foc şi deteriora cuptorul.
  • Page 234 All manuals and user guides at all-guides.com SFATURI DE GĂTIRE LA CUPTORUL CU MICROUNDE Caracteristicile alimentelor Compoziție Alimentele bogate în grăsimi sau zahăr (de exemplu, budinca de Crăciun, carne tocată plăcinte) necesită mai puțin timp de încălzire. Trebuie avut grijă ca supraîncălzire poate duce la incendii. oasele din mâncare conduc căldura, iar mâncarea se prepară...
  • Page 235 All manuals and user guides at all-guides.com RECIPIENTE ADECVATE pentru a găti / decongela alimente în cuptorul cu microunde, energia microundelor trebuie să poată trece prin recipient pentru a penetra mâncarea. De aceea, este important să alegeți accesorii de gătit adecvate. Vasele rotunde / ovale sunt preferabile celor pătrate / dreptunghiulare deoarece mâncarea din colțuri tinde să...
  • Page 236 All manuals and user guides at all-guides.com SFATURI PENTRU DECONGELARE Decongelarea mâncării utilizând cuptorul cu microunde este cea mai rapidă metodă. Este un proces simplu, dar instrucțiunile următoare sunt esențiale pentru a vă asigura că mâncarea este bine decongelată. Rearanjați Mâncărurile poziţionate spre partea exterioară...
  • Page 237 All manuals and user guides at all-guides.com SFATURI PENTRU REÎNCĂLZIRE pentru reîncălzirea mâncării, urmați sfatul şi instrucțiunile de mai jos pentru a vă asigura că mâncarea este bine reîncălzită înainte de servire. Mâncăruri Scoateți puiul şi porțiile de carne şi reîncălziți-le sepa- plate rat, vezi mai jos.
  • Page 238: Curăţare Şi Întreţinere

    All manuals and user guides at all-guides.com CURĂŢARE ŞI ÎNTREŢINERE INTERIORUL CUPTORULUI • Este important să curățați interiorul cuptorului dvs. cu microunde după fiecare utilizare. • Pentru a şterge carcasa exterioară a cuptorului cu microunde,utilizaţi o soluție diluată cu detergent, cum ar fi lichidul de vase, apă caldă şi o lavetă moale. • Stropii de mâncare şi lichide se vor aduna pe pereții şi pe partea superioară a cuptorului. Dacă lăsați adunarea resturilor de grăsime şi alimente în interiorul cuptorului, acestea se vor supraîncălzi, vor genera fum şi se vor aprinde chiar la următoarea utilizare a cuptorului.
  • Page 239 înaltă tensiune din interior, care nu trebuie să fie atinse, deoarece acest lucru ar putea fi fatal. Cuptorul nu este prevăzut cu un capac de acces la lampă. În cazul în care lampa nu mai funcţionează, nu încercați să înlocuiți lampa, ci apelați la un service autorizat SHARp. ÎNTREBARE RĂSPUNS...
  • Page 240 230-240V, 50Hz. În cazul în care nu efectuați conexiunile electrice corespunzător, aţi putea deteriora cuptorul sau v-aţi putea răni. Nici SHARp, nici furnizorul nu va fi răspunzător în cazul în care se întâm- plă acest lucru.
  • Page 241 Sharp, sau service-ului desemnat, în termen de un an de la data la care produsul a fost achiziționat. Trebuie să furnizaţi dovada achiziției, cum ar fi o chitanță sau factură.
  • Page 242 Nici o parte a acestei publicații nu poate fi reprodusă, stocată într-un sistem de găsire sau transmisă sub orice formă, electronică, mecanică, prin fotocopiere, înregistrare, traducere sau alte mijloace fără permisiunea prealabilă din partea SHARp Vestel UK Ilustrațiile, informațiile tehnice şi datele conținute în această publicație sunt, din cunoştin- ţele noastre, corecte la momentul imprimării.
  • Page 243 All manuals and user guides at all-guides.com 00_User manual - R270_9_languages.indb 36 2016-07-15 13:00:40...
  • Page 244 1. V Evropski uniji Če izdelek uporabljate v poslovne namene in ga želite odvreči: posvetujte se s SHARp-ovim trgovcem, ki vam bo posredoval infor- macije o prevzemu izdelka. To storitev vam lahko zaračuna, upo- števajoč stroške reciklaže. Manjše izdelke (in manjše količine) boste morda lahko oddali v lokalnem centru za ločeno zbiranje odpadkov.
  • Page 245 All manuals and user guides at all-guides.com VSEBINA pEČICA IN pRIpoMoČKI ............................3 UpRAVLJALNA pLoŠČA .............................4 poMEMBNA VARNoSTNA NAVoDILA ....................5-12 NAMESTITEV ..............................13-14 KAKo DELUJE pEČICA ............................ 15 NIVoJI MoČI MIKRoVALoV .......................... 16 pRED UpoRABo ............................... 16 KAKo UpoRABLJATI pEČICo ........................17-18 AVToMATSKo KUHANJE GLEDE NA TEŽo/oDTAJEVANJE ..............
  • Page 246 Slabo nameščen vrtljivi krožnik lahko ople- ta, se ne vrti pravilno ter lahko poškoduje pečico. • Vrtljivi krožnik se lahko vrti v smeri ali v nasprotni smeri urinega kazalca. Smer vrtenja se spremeni ob vsakem vklopu pečice. To ne vpliva na učinkovitost kuhanja. • Če naročate pripomočke, trgovcu ali pooblaščenemu SHARP-ovemu zastopniku sporočite tako NAZIV DELA kot ŠTEVILKO MODELA. OPOZORILO: Med obratovanjem se vrata, ohišje pečice, vrtljivi krožnik, pripomočki in posoda zelo segrejejo.
  • Page 247: Nadzorna Plošča

    All manuals and user guides at all-guides.com NADZORNA PLOŠČA 1. DIGITALNI ZASLON 2. Tipka URA 3. Tipka za KUHANJE in ODTAJEVANJE GLEDE NA TEŽO 4. Tipka za POVEČANJE/ZMANJŠANJE ČASA 5. Tipka NIVO MOČI 6. Tipka START/AUTO MINUTE 7. Tipka STOP 8. Tipka ČASOVNIK 9. Tipka TEŽA 10. Tipka za AVTOMATSKO KUHANJE SI-4 00_User manual - R270_9_languages.indb 4...
  • Page 248: Pomembna Varnostna Navodila

    All manuals and user guides at all-guides.com POMEMBNA VARNOSTNA NAVODILA POZORNO PREBERITE IN SHRANITE ZA REFERENCO V BODOČNOSTI. 1. Ta pečica je namenjena samo uporabi na kuhinjskem pultu in ni namenjena vgradnji, zato je ne nameščajte v omarico. 2. Vrata pečice se med kuhanjem lahko segrejejo. pečico postavite ali namestite tako, da bo dno pečice najmanj 85 cm dvignjeno od tal.
  • Page 249 POMEMBNA VARNOSTNA NAVODILA 11. Če je napajalni kabel naprave poškodovan, ga je treba zamenjati s posebnim kablom. Zamenja ga lahko le po- oblaščen serviser SHARp. 12. OPOZORILO: Tekočin in drugih živil ni dovoljeno se- grevati v zaprtih posodah, saj lahko eksplodirajo.
  • Page 250 All manuals and user guides at all-guides.com POMEMBNA VARNOSTNA NAVODILA vljenjsko dobo naprave, hkrati pa lahko povzročijo ne- varne situacije. 22. Za čiščenje ne uporabljajte grobih čistilnih sredstev in ostrih, kovinskih strgalnikov, ki lahko povzročijo praske na steklu, ki se lahko zaradi tega tudi razbije. 23.
  • Page 251 All manuals and user guides at all-guides.com POMEMBNA VARNOSTNA NAVODILA 5. pečice ne postavljajte na vroča mesta, npr. blizu kon- vekcijske pečice. 6. Mikrovalovne pečice ne postavljajte na mesta z veliko vlage. 7. pečice ne shranjujte, niti ne uporabljate zunaj. 8.
  • Page 252 6. Lučke pečice ne menjajte sami in ne dovolite, da bi luč- ko menjal kdor koli, razen pooblaščen električar pod- jetja SHARp. Če se lučka pečice pokvari, se posvetujte s pooblaščenim servisom SHARp. SI-9 00_User manual - R270_9_languages.indb 9...
  • Page 253 All manuals and user guides at all-guides.com POMEMBNA VARNOSTNA NAVODILA Da se izognete nevarnosti eksplozije pri intenzivnem vrenju: 1. Nikoli ne uporabljajte zaprtih posod. pred uporabo odstranite tesnila in pokrove. Zaprte posode lahko ek- splodirajo, saj se v njih nabere tlak, tudi ko je pečica že izklopljena.
  • Page 254 All manuals and user guides at all-guides.com POMEMBNA VARNOSTNA NAVODILA 4. Ko odpirate vrata, se vedno umaknite nazaj, da prepre- čite opekline zaradi izhajajoče pare in vročine. 5. pečeno hrano po segrevanju narežite, da lahko para uide, saj boste tako preprečili nevarnost opeklin. Da preprečite napačno uporabe pečice otrok 1.
  • Page 255 All manuals and user guides at all-guides.com POMEMBNA VARNOSTNA NAVODILA OPOMBA: Če niste prepričani, kako priklopiti pečico, se posvetujte s pooblaščenim usposobljenim električarjem. Niti proizva- jalec niti prodajalec ne odgovarjata za škodo na pečici ali osebne poškodbe zaradi neupoštevanja postopkov za pra- vilen električni priklop.
  • Page 256 All manuals and user guides at all-guides.com NAMESTITEV 1. Iz prostora za kuhanje odstranite vso embalažo. odstra- nite tudi zaščitno folijo na zunanji strani pečice. preveri- te, če je pečica kjerkoli poškodovana. 2. pečico postavite na ravno, trdno podlago, ki je dovolj močna za težo pečice in najtežje živilo, ki ga boste v njej kuhali.
  • Page 257: Električni Priklop

    ELEKTRIČNI PRIKLOP • Preprečite, da voda pride v stik z napajalnim kablom ali vtičem. • Vtič na ustrezen način vstavite v vtičnico. • Z istim vtičem ne povezujte drugih naprav. • Če je napajalni kabel poškodovan, ga mora zamenjati po- oblaščen serviser Sharp ali usposobljen strokovni delavec, da se izognete tveganjem. • Pri odstranjevanju vtiča iz vtičnice vedno primite za vtič in ne za kabel, saj lahko s tem poškodujete kabel in notranje povezave. • Če je vtič, povezan s pečico, obnovljen in izhod v vašem domu ni kompatibilen z dobavljenim vtičem, ga ustrezno odstranite (ne odrežite).
  • Page 258 All manuals and user guides at all-guides.com KAKO DELUJE PEČICA Mikrovalovi so energetski valovi, podobni Mikrovalovi lahko prehajajo skozi določene tistim v TV- in radijskih signalih. materiale, kot sta steklo in plastika, da tako segrejejo hrano. (Glejte 'primerna posoda Električna energija se pretvori v energijo za pečico’...
  • Page 259: Pred Uporabo

    All manuals and user guides at all-guides.com NIVOJI MOČI MIKROVALOV • Vaša pečica ima 10 nivojev moči, kot je Nivo moči Pritisnite tipko Odstotki prikazano. NIVO MOČI • Za izbiro nivoja moči za kuhanje vnesite p100 želeni čas in pritisnite tipko za NIVo MoČI, VISoKo dokler na zaslonu ni prikazan želeni nivo. • Nivo moči SREDNJE VISoKo Nivo moči mikrovalov se spreminja glede na vklapljanje in izklapljanje Ko uporabljate mikrovalovno pečico z mo- SREDNJE...
  • Page 260 All manuals and user guides at all-guides.com KAKO UPORABLJATI PEČICO Odpiranje vrat: Vrata odprete tako, da pritisnite gumb za odpiranje vrat. Zagon pečice: pripravite in postavite hrano v primerni posodi na vrtljivi krožnik ali jo po- stavite neposredno nanj. Zaprite vrata in pritisnite gumb START/AUTO MINUTE.
  • Page 261 All manuals and user guides at all-guides.com KAKO UPORABLJATI PEČICO ROČNO ODTALJEVANJE • Vnesite čas odtajevanja in uporabite nivo moči od P10 do P30 (glejte stran SI-16). • Živilo med odtajevanjem 2 - 3 krat obrnite ali premešajte. • Po končanem odtajevanju pokrijte hrano s folijo in jo pustite stati, dokler se temeljito ne odtali. Primer: Za odtajevanje 10 minut pri moči mikrovalov p 30. 1. Vnesite nivo moči mi- 2. pritisnite tipko 10 MIN in 3. Za začetek kuhanja enkrat pritisnite tipko START/ krovalov tako, da 8-krat vnesite čas odtajevanja.
  • Page 262 All manuals and user guides at all-guides.com AVTOMATSKO KUHANJE GLEDE NA TEŽO/ODTAJEVANJE AVTOMATSKO KUHANJE GLEDE NA TEŽO/ODTAJEVANJE omogoča kuhanje ali odtajeva- nje predhodno nastavljenih navedenih jedi. Sledite spodnjim navodilom za podrobnosti o delovanju teh funkcij AVTOMATSKO KUHANJE GLEDE NA TEŽO omogoča kuhanje 3 popularnih menijev. pri kuhanju govedine 1x pritisnite tipko za AVTOMATSKO KUHANJE GLEDE NA TEŽO, na Coo1 zaslonu bo prikazano pri kuhanju jagnjetine 2x pritisnite tipko za AVTOMATSKO KUHANJE GLEDE NA TEŽO, na...
  • Page 263 All manuals and user guides at all-guides.com TABELA ZA AVTOMATSKO KUHANJE GLEDE NA TEŽO TEŽE: • Teže živil zaokrožite navzgor ali navzdol na 0,1 kg, na primer 0,65 kg na 0,7 kg ali 0,34 kg na 0,3 kg. • Teže živil, ki so težja od predpisanih v tabelah, ne smete vnašati. OPOMBE: • Ko je treba izvesti določeno opravilo (npr. obrniti jed), se pečica izklopi in odda zvočni si- gnal, preostali čas kuhanja in indikator pa začneta utripati. Za nadaljevanja kuhanja priti- snite tipko START/AUTO MINUTE.
  • Page 264 All manuals and user guides at all-guides.com HITRO ODTAJEVANJE Ta funkcija hitro odtaja hrano in vam pri tem omogoča, da izberete ustrezno časovno obdobje odtajevanja, glede na vrsto hrane. Sledite spodnjemu primeru za podrobnosti o tej funkciji. Primer: odtajevanje hrane v 10 minutah. 1.
  • Page 265 All manuals and user guides at all-guides.com TABELA AVTOMATSKEGA KUHANJA IZBIRANJE MENIJA: Meni lahko z ustrezno tipko izberete neposredno s seznama. Meniji avtomatskega kuhanja: Živilo Opomba Neolupljen krompir (po 230 g) 1. Za pijače in krompir parametri na zaslonu niso za težo, tem- več...
  • Page 266 All manuals and user guides at all-guides.com PRIROČNE FUNKCIJE 1. SEKVENČNO KUHANJE Ta funkcija omogoča neprekinjeno delovanje za 2 različni stopnji. Primer: Za kuhanje: 5 minut pri moči p100 (1. stopnja) 16 minut pri moči p30 (2. stopnja) 1. STOPNJA 1. Vnesite nivo moči mikro- 2.
  • Page 267 All manuals and user guides at all-guides.com PRIROČNE FUNKCIJE 3. ZMANJŠANJE () in POVEČANJE () ČASA: S tipkama za ZMANJŠANJE () ČASA in POVEČANJE () ČASA lahko: • Podaljšajte ali skrajšajte čas kuhanja/odtajevanja, ko pečica deluje (le ročno kuhanje). ZA UPORABO ZMANJŠANJA IN POVEČANJA ČASA Z ROČNIM KUHANJEM pritisnite tipko za ZMANJŠANJE () ali POVEČANJE () ČASA za zmanjšanje ali povečanje časa kuhanja ali odmrzovanja večkrat po 1 minuto, ko uporabljate pečico. Celotni čas kuha- nja lahko povečate na največ...
  • Page 268 All manuals and user guides at all-guides.com PRIROČNE FUNKCIJE 4. KUHINJSKI ČASOVNIK: KUHINJSKI ČASOVNIK uporabite kot minutni časovnik za spremljanje časa kuhanja/odta- jevanja. Primer: Za nastavitev časovnika za 5 minut. 1. Enkrat pritisnite tipko 2. Vnesite želeni čas 3. Za začetek delovanja en- KUHINJSKI ČASOVNIK. krat pritisnite tipko START/ kuhanja tako, da 5-krat pritisnete tipko 1 MIN.
  • Page 269 Nikoli ne uporabljajte olja, razen, če tako predpisuje proizvajalec in nikoli ne podaljšajte predpisanega časa kuhanja. OPOZORILO: Vedno sledite navodila v navodilih za uporabo SHARP. Če prekoračite priporočene normative, se hrana lahko pregreje, zažge in v ekstremnih primerih celo vžge, kar lahko poškoduje pečico. Tehnike kuhanja Uredite Debelejše kose jedi postavite na stranski del poso-...
  • Page 270 All manuals and user guides at all-guides.com NASVET ZA KUHANJE Z MIKROVALOVI Karakteristike živil Sestavine Živila z visoko vsebnostjo maščob ali sladkorja (npr. božični puding, sesekljano meso) zahtevajo krajši čas priprave. Zato morate paziti, da se pri kuhanju ne zažgejo. Kosti omogočajo hitrejše segrevanje hrane. Zato bodite pazljivi, da se bo hrana segrevala enakomerno.
  • Page 271 All manuals and user guides at all-guides.com PRIMERNI PRIPOMOČKI Za kuhanje/odtajevanje živil v mikrovalovni pečici morajo mikrovalovi enakomerno preha- jati skozi stene posode in vstopati v notranjost živila, ki ga pripravljate. Zato morate obvezno uporabljati predpisano posodo. priporočamo uporabo okroglih/ovalnih posod, saj se v oglatih posodah toplota zadržuje v vogalih in se hrana lahko prekuha.
  • Page 272 All manuals and user guides at all-guides.com NASVET ZA ODTALJEVANJE odtajevanje živil v mikrovalovni pečici je najhitrejša metoda za odtajevanje. Gre za enostaven postopek, za zagotavljanje temeljite odtalitve pa morate upoštevati nasle- dnja navodila. Razporedite Živila, ki so postavljena proti zunanjemu delu posode, se bodo odtali- la hitreje, kot tista na sredini.
  • Page 273 All manuals and user guides at all-guides.com NASVET ZA POGREVANJE pri pogrevanju jedi sledite spodaj navedenim nasvetom in priporočilom in tako zagotovite temeljito pogrevanje pred serviranjem. Sestavljeni Ločite kose živil in jih razporedite, kot je prikazano spo- obroki daj. Manjše koščke jedi razporedite po sredini posode, večje in debelejše pa po robu.
  • Page 274: Čiščenje In Vzdrževanje

    All manuals and user guides at all-guides.com ČIŠČENJE in VZDRŽEVANJE NOTRANJOST PEČICE • Pomembno je, da po vsaki uporabi očistite notranjost pečice. • Obrišite notranjost pečice z mehko krpo, namočeno v blago raztopino čistilnega sredstva. • Na stenah in stropu pečice se bodo kopičili ostanki hrane ali tekočin. Če se na notranjih površinah pečice nakopičijo maščobe in ostanki hrane, se slednji med kuhanjem pregre- jejo, povzročijo dim in celo požar. • Poskrbite, da bo pokrov magnetrona vedno čist. pokrov magnetrona je iz občutljivega materiala, zato morate biti pri čiščenju izjemno pazljivi (upoštevajte zgoraj navedena na- vodila).
  • Page 275: Odpravljanje Napak

    Vaša pečica ni opremljena s pokrovom za dostop do lučke. Če se lučka okvari, je ne poskušajte zame- njati sami, pokličite pooblaščenega serviserja podjetja SHARp. TEŽAVA REŠITEV...
  • Page 276 Nobenega dela te publikacije ni dovoljeno kopirati, shranjevati v podatkovnih sistemih ali prenašati v kakršni koli obliki; elektronski, mehanski, s fotokopijami, snemanjem, prevaja- njem ali na druge načine, brez predhodnega dovoljenja družbe SHARp Vestel UK Ilustracije, tehnični podatki in podatki v tej publikaciji so, glede na naše najboljše vedenje, v času tiska pravilni.
  • Page 277 All manuals and user guides at all-guides.com 00_User manual - R270_9_languages.indb 34 2016-07-15 13:00:46...
  • Page 278 1. In the European Union If the product is used for business purposes and you want to discard it: please contact your SHARp dealer who will inform you about the take- back of the product. You might be charged for the costs arising from take-back and recycling.
  • Page 279 All manuals and user guides at all-guides.com CONTENTS oVEN AND ACCESSoRIES ..........................3 CoNTRoL pANEL ..............................4 IMpoRTANT SAFETY INSTRUCTIoNS ..................... 5-12 INSTALLATIoN ..............................13-14 HoW YoUR oVEN WoRKS ..........................15 MICRoWAVE poWER LEVELS ........................16 BEFoRE opERATIoN ............................16 HoW To opERATE YoUR oVEN ......................17-18 AUTo WEIGHT CooK /DEFRoST ........................
  • Page 280: Oven And Accessories

    • The turntable rotates clockwise or anti-clockwise. The rotary direction may change each time you start the oven. This does not affect cooking performance. • When you order accessories, please quote both the PART NAME and MODEL NUMBER to your dealer or SHARp approved service facility. WARNING: The door, outer cabinet, oven cavity, turntable and dishes will become very hot during operation. To prevent burns, always use thick oven gloves.
  • Page 281: Control Panel

    All manuals and user guides at all-guides.com CONTROL PANEL 1. DIGITAL DISPLAY 2. TIME keys 3. WEIGHT COOK & DEFROST key 4. LESS/MORE TIME keys 5. POWER LEVEL key 6. START/AUTO MINUTE key 7. STOP/CLEAR key 8. KITCHEN TIMER key 9. WEIGHT keys 10.
  • Page 282: Important Safety Instructions

    All manuals and user guides at all-guides.com IMPORTANT SAFETY INSTRUCTIONS READ CAREFULLY AND KEEP FOR FUTURE REFERENCE 1. This oven is designed to be used on a countertop only. It is not designed to be built into a kitchen unit. Do not place the oven in a cabinet. 2.
  • Page 283 11. If the power supply cord of this appliance is damaged, it must be replaced with a special cord. The exchange must be made by an authorised SHARp service agent. 12. WARNING: Liquids and other foods must not be heat- ed in sealed containers since they are liable to explode.
  • Page 284 22. Do not use harsh abrasive cleaners or sharp metal scrapers to clean the glass on the oven door since they can scratch the surface, which may result in shattering of the glass.
  • Page 285 All manuals and user guides at all-guides.com IMPORTANT SAFETY INSTRUCTIONS the unit can be unplugged easily in an emergency. 3. The AC power supply must be 230-240V~, 50Hz, with a 13A distribution line fuse, or a 13A distribution circuit breaker. 4. A separate circuit serving only this appliance should be provided.
  • Page 286 In the event of a spill, turn off and unplug the oven immediately, and call an au- thorised SHARp service agent. 3. Do not immerse the power supply cord or plug in water or any other liquid.
  • Page 287 6. Do not attempt to replace the oven lamp yourself or allow anyone who is not an electrician authorised by SHARp to do so. If the oven lamp fails, please consult your dealer or an authorised SHARp service agent. To avoid the possibility of explosion and sudden boil- ing: 1.
  • Page 288: Other Warnings

    All manuals and user guides at all-guides.com IMPORTANT SAFETY INSTRUCTIONS 3. To avoid burns, always test food temperature and stir before serving and pay special attention to the temperature of food and drink given to babies, chil- dren or the elderly. Temperature of the container is not a true indication of the temperature of the food or drink;...
  • Page 289 All manuals and user guides at all-guides.com IMPORTANT SAFETY INSTRUCTIONS and may cause electrical arcing. Use only the turntable and the turntable support designed for this oven. Do not operate the oven without the turntable. 4. Do not place anything on the outer cabinet during op- eration.
  • Page 290 All manuals and user guides at all-guides.com INSTALLATION 1. Remove all packing materials from the inside of the oven cavity and remove any protective film found on the mi- crowave oven cabinet surface. Check the oven carefully for any signs of damage. 2.
  • Page 291: Electrical Connection

    • Insert the plug properly into the socket. • Do not connect other appliances to the same socket us- ing an adaptor plug. • If the power supply cord is damaged, it must be replaced by a Sharp approved service facility or a similarly qualified person to avoid a hazard. • When removing the plug from the socket always grip the plug, never the cord as this may damage the power sup- ply cord and the connections inside the plug.
  • Page 292: How Your Oven Works

    All manuals and user guides at all-guides.com HOW YOUR OVEN WORKS Microwaves are energy waves, similar to Microwaves will pass through certain mate- those used for TV and radio signals. rials, such as glass and plastic, to heat the food. (See 'Suitable ovenware’ on page GB- Electrical energy is converted into micro- 28).
  • Page 293: Microwave Power Levels

    All manuals and user guides at all-guides.com MICROWAVE POWER LEVELS • Your oven has 10 power levels, as shown. Power Level Press the Percentage • To change the power level for cooking, POWER enter the required time and then press LEVEL key the poWER LEVEL key until the display p100 indicates the desired level. HIGH • Power level The microwave power level is varied by the MEDIUM HIGH...
  • Page 294: How To Operate Your Oven

    All manuals and user guides at all-guides.com HOW TO OPERATE YOUR OVEN Opening the door: To open the oven door, push the door opening button. Starting the oven: prepare and place food in a suitable container onto the turntable or place directly onto the turntable. Close the door and press the START/AUTO MINUTE key.
  • Page 295 All manuals and user guides at all-guides.com HOW TO OPERATE YOUR OVEN MANUAL DEFROSTING • Enter the defrosting time and use microwave power levels P10 or P30 to defrost (refer to page GB-16). • Stir or turn the food, where possible, 2 - 3 times during defrosting. • After defrosting, cover the food in foil and leave to stand until thoroughly defrosted. Example: To defrost for 10 minutes on p 30 microwave power. 1. Input the power level 2. Enter the defrosting time 3. press the START/ AUTO by pressing the POWER by pressing the 10 MIN.
  • Page 296: Auto Weight Cook/ Defrost

    All manuals and user guides at all-guides.com AUTO WEIGHT COOK/ DEFROST AUTO WEIGHT COOK/DEFROST enables you to cook or defrost pre-proqrammed meals listed. Follow the example below for details on how to operate these functions. AUTO WEIGHT COOK allows you to cook 3 popular menus. When cooking beef, press the AUTO WEIGHT COOK key x 1 Coo1 will appear on the display.
  • Page 297: Auto Weight Cook Chart

    All manuals and user guides at all-guides.com AUTO WEIGHT COOK CHART WEIGHT RANGE: • Food weight should be rounded up or down to the nearest 0.1 kg, for example, 0.65kg to 0.7kg or 0.34kg to 0.3kg. • You are restricted to enter a weight within the range (see the following charts). NOTES: • When action is required (example, to turn food over), the oven stops, the audible signals sound, the remaining cooking time and an indicator will flash on the display. To continue cooking, press the START/AUTO MINUTE key. • The final temperature will vary according to the initial food temperature. Check food is pip- ing hot after cooking.
  • Page 298: Speed Defrost

    All manuals and user guides at all-guides.com SPEED DEFROST This function quickly defrosts food while enabling you to choose a suitable defrost period, depending on the food type. Follow the example below for details on how to operate this function. Example: defrost the food for 10 minutes.
  • Page 299: Auto Cook Chart

    All manuals and user guides at all-guides.com AUTO COOK CHART SELECTING MENU: You can select the Menu directly on the Key Sheet by pressing the rel- evant key. Auto cook menus: Food Note Jacket potato (each 230g) 1. For beverage and potatoes, parameters on display are not weight but number of servings.
  • Page 300: Convenient Functions

    All manuals and user guides at all-guides.com CONVENIENT FUNCTIONS 1. SEQUENCE COOKING: This function enables continued and uninterrupted operation for 2 different stages. Example: To cook for: 5 minutes on p100 power (Stage 1) 16 minutes on p30 power (Stage 2) STAGE 1 1.
  • Page 301 All manuals and user guides at all-guides.com CONVENIENT FUNCTIONS 3. LESS () and MORE ()TIME: The LESS () TIME and MORE () TIME keys enable you to: • Decrease or increase cooking/defrosting time whilst the oven is in use (manual cooking only). TO USE LESS AND MORE WITH MANUAL COOKING press the LESS () or MORE () TIME key to decrease or increase the cooking or defrost- ing time in multiples of I minute whilst the oven is in use.
  • Page 302 All manuals and user guides at all-guides.com CONVENIENT FUNCTIONS 4. KITCHEN TIMER: Use the KITCHEN TlMER as a minute timer or to monitor the standing time for cooked/ defrosted food. Example: To set the timer for 5 minutes. 1. press the KITCHEN 2.
  • Page 303: Microwave Cooking Advice

    WARNING: Fol low instructions in the SHARP operation manual at all times. If you exceed recommended cooking times and use power levels that are too high, food may overheat, burn and in extreme circumstances, catch fire and damage the oven.
  • Page 304 All manuals and user guides at all-guides.com MICROWAVE COOKING ADVICE Food Characteristics Composition Foods high in fat or sugar (e.g. Christmas pudding, mince pies) re- quire less heating time. Care should be taken as overheating can lead to fire. Bones in food conduct heat, making the food cook more quickly. Care must be taken so that the food is cooked evenly.
  • Page 305: Suitable Cookware

    All manuals and user guides at all-guides.com SUITABLE COOKWARE To cook/defrost food in a microwave oven, the microwave energy must be able to pass through the container to penetrate the food. Therefore it is important to choose suitable cookware. Round/oval dishes are preferable to square/ oblong ones, as the food in the corners tends to overcook.A variety of cookware can be used as listed below.
  • Page 306: Defrosting Advice

    All manuals and user guides at all-guides.com DEFROSTING ADVICE Defrosting food using your microwave oven is the quickest method of all. It is a simple proccess but the following instructions are essential to ensure the food is thor- oughly defrosted. Rearrange Foods that are placed towards the outside of the dish will defrost quick- er than foods in the centre.
  • Page 307: Reheating Advice

    All manuals and user guides at all-guides.com REHEATING ADVICE For the reheating of foods, follow the advice and guidelines below to ensure food is thor- oughly reheated before serving. Plated meals Remove any poultry or meat portions, reheat these sep- arately, see below.
  • Page 308: Cleaning & Maintenance

    All manuals and user guides at all-guides.com CLEANING & MAINTENANCE OVEN INTERIOR • It is important to clean the interior of your microwave oven after each use. • To clean the oven interior, use a mild detergent solution, such as washing-up liquid, with warm water on a soft cloth. • Food and liquid splashes will build-up on the oven walls and ceiling. If grease, fat and food debris is allowed to build-up in the oven interior it may overheat, smoke or even catch fire when next using the oven.
  • Page 309 Never adjust, repair or modify the oven yourself. It is hazardous for anyone other than a SHARP trained engineer to carry out servicing or repairs. This is important as it may involve the removal of covers that provide protection against microwave energy.
  • Page 310 No part of this publication may be reproduced, stored in a retrieval system or transmitted in any form, electronic, mechanical, photocopying, recording, translating or other means without prior permission from SHARp Vestel UK The illustrations, technical information and data contained in this publication are, to our best knowledge, correct at the time of going to print.
  • Page 311 Vous pouvez contacter notre service consommateur au 0969 390122 ESPANA Si tiene algún problema en el producto que ha adquirido de Sharp y desea contactar con un Servicio Oficial de Sharp; por favor póngase en contacto con el siguiente número de teléfono 902 10 13 88.
  • Page 312 All manuals and user guides at all-guides.com Vestel UK London, United Kingdom www.sharphomeappliances.com/support 00_User manual - R270_9_languages.indb 35 2016-07-15 13:00:53...

Table des Matières