Table des Matières
Publicité
Les langues disponibles
Les langues disponibles
Liens rapides
D
Betriebsanleitung
Operating manual ........... p. 22
Mode d'emploi ................. p. 44
Istruzioni per l'uso ........... p. 66
Airless Hochdruck-Spritzgerät
Airless high-pressure spraying unit
Groupe de projection à haute pression
Impianto per la verniciatura a spruzzo ad alta pressione Airless
Original operating manual
Ausgabe 5 / 2014
Edition
Edizione
GB
F
I
PS 3.29
Models:
0558005
0558006
0558037
0558038
0558 904H
Publicité
Chapitres
Table des Matières

Manuels Connexes pour WAGNER ProSpray 3.29


Sommaire des Matières pour WAGNER ProSpray 3.29
- Page 1 Betriebsanleitung PS 3.29 Operating manual ... p. 22 Mode d’emploi ....p. 44 Istruzioni per l’uso ... p. 66 Airless Hochdruck-Spritzgerät Airless high-pressure spraying unit Groupe de projection à haute pression Impianto per la verniciatura a spruzzo ad alta pressione Airless Models: 0558005 0558006...
- Page 2 Beschichtungssto oder das Lösemittel. Vor jeder Inbetriebnahme sind gemäß Betriebsanleitung folgende Punkte zu beachten: 1. Fehlerhafte Geräte dürfen nicht benutzt werden. 2. Wagner-Spritzpistole sichern mit Sicherungshebel am Abzugsbügel. 3. Erdung sicherstellen. 4. Zulässigen Betriebsdruck von Hochdruckschlauch und Spritzpistole überprüfen.
-
Page 3: Table Des Matières
Airless-Verfahren ..................4 12.1 Düsenauswahl ..................17 Funktion des Gerätes ................4 12.2 Wartung und Reinigung von Airless- Legende zum Erklärungsbild ProSpray 3.29 / 3.31 ..... 5 Hartmetall-Düsen ..................17 Erklärungsbild ProSpray 3.29 / 3.31 ..........5 12.3 Spritzpistolen-Zubehör ...............17 Technische Daten ..................6 12.4... - Page 4 Tuch abwischen. GEFAHR: Verletzung durch Flüssigkeiten besteht. unter Druck Aus Gründen der Funktion, Sicherheit und Lebensdauer nur WAGNER Original- Achtung: Verletzungsgefahr durch Injektion! Hochdruckschläuche verwenden. Eine unter hohem Druck stehende Flüssigkeit, wie sie von diesem Gerät erzeugt wird, kann die...
-
Page 5: Elektrostatische Au Adung
Sicherheitsvorschriften bespritzenden Gegenstand in einem gut belüfteten Bereich Verwendung von Teilen, die nicht die technischen aufstellen (gegebenenfalls einen Verlängerungsschlauch benutzen). Entzündliche Dämpfe sind oft schwerer als Risiken und die gesamte Haftung. Dies gilt auch für die Luft. Die Fläche über dem Boden muss besonders gut Sicherheitsvorrichtungen der Pumpe. -
Page 6: Anwendungsübersicht
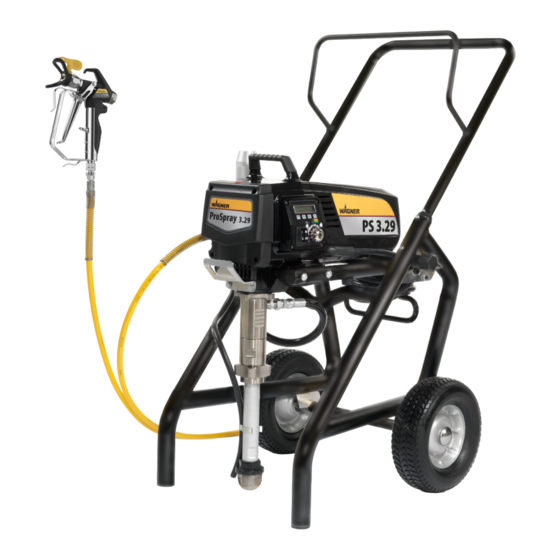
Anwendungsübersicht Gerätebeschreibung Anwendungsübersicht = empfohlen = nicht empfohlen Modell Materialien Objektgröße bis 200 m Trennmittel, Öle, Vorlacke, Grundierungen, Füller, Kunstharzlacke, Acryllacke 200 m - 800 m empfohlene Düsengröße: FineFinish 0,008“ - 0,014“ über 800 m bis 200 m 200 m - 800 m empfohlene Düsengröße: 0,017“... - Page 7 Gerätebeschreibung 8 Rücklaufschlauch 1 Spritzpistole 9 Hoher Wagen 2 Hochdruckschlauch 3 Einfüllö nung für EasyGlide 10 Entlastungsventil k Zirkulation) (EasyGlide verhindert erhöhten Verschleiß der Packungen) p Spritzen) 4 Ölstandsanzeige 5 Eimerhaken 11 Digital Electronic Spray Control (DESC) 6 Knopf für Ölzufuhr 12 Bedienfeld 7 Ansaugschlauch 13 Druckregler...
-
Page 8: Technische Daten
Gerätebeschreibung Inbetriebnahme Technische Daten Inbetriebnahme ProSpray 3.29 220-240 Volt, 50/60 Hz Spannung: Trennöl 7,5 A max. Stromaufnahme: 1. An den Beschichtungssto -Ausgang (Abb. 3, Pos. 1) den – 6 m Geräteanschlussleitung: Hochdruckschlauch (2) schrauben. 1725 Watt 1840 Watt Aufnahmeleistung: 2. Spritzpistole (3) mit ausgewählter Düse an den Hochdruckschlauch anschrauben. -
Page 9: Druckregler Einstellungen
übereinstimmt. mA ausgerüstet sein. Ständige gelbe Anzeige Wenn die Druckanzeige ständig gelb leuchtet, arbeitet das Im WAGNER Zubehörprogramm nden Sie mobile elektrische Personenschutzvorrichtungen, die Sie (120 bar). Eine ständige gelbe Druckanzeige bedeutet: auch mit anderen elektrischen Geräten verwenden können. -
Page 10: Bei Erstinbetriebnahme Reinigung Von Konservierungsmittel
Inbetriebnahme Bei Erstinbetriebnahme: Reinigung von Digital Electronic Spray Control (DESC) Konservierungsmittel Das Digital Electronic Spray Control (DESC) erhöht die Funktionalität des Spritzgerätes. Es ist direkt unter dem Druckregler am Bedienfeld 1. Ansaugschlauch (Abb. 7, Pos. 1) und Rücklaufschlauch (2) in installiert. - Page 11 EIN.ZEIT XXXX LAUFZEIT XXXX beginnt von vorn. Sollten Sie Ihren Sicherheitscode vergessen oder verlegt haben, setzen Sie sich bitte mit dem Wagner Kundendienst in Verbindung. Menüfenster Job Timer [Auftragszeitgeber] JOB-TIMER MENU-1 AUSWAHL-4 Geben Sie zur Deaktivierung der Sicherheitsfunktion [Neue Codenummer eingeben] ein (dies ist der zurücksetzen, um die Arbeitszeit bei bestimmten Aufträgen zu...
-
Page 12: Spritztechnik
Hochdruckschlauch nicht überfahren, sowie vor scharfen Gegenständen und Kanten schützen. Darauf achten, dass der Hochdruckschlauch sich nicht verdreht. Durch Verwendung einer Wagner Spritzpistole mit Drehgelenk und einer Schlauchtrommel kann dies verhindert werden. 25 - 30 cm Für die Handhabung des Hochdruckschlauches bei der Arbeit am Gerüst hat sich als am Vorteilhaftesten... -
Page 13: Gerätereinigung (Außerbetriebnahme)
Gerätereinigung (Außerbetriebnahme) Gerätereinigung (Außerbetriebnahme) Sauberkeit ist die sicherste Gewährleistung für einen störungsfreien keinen Fall dürfen Beschichtungssto e im Gerät antrocknen und Zuerst Netzstecker aus der Steckdose ziehen. sich festsetzen. Das zur Reinigung verwendete Reinigungsmittel (nur entsprechen. Spritzpistole sichern, siehe Betriebsanleitung der Kurzschlussgefahr durch eindringendes Wasser! Spritzpistole Gerät niemals mit Hochdruck- oder... -
Page 14: Reinigung Der Airless-Spritzpistole
Gerätereinigung (Außerbetriebnahme) Hilfe bei Störungen Reinigung der Airless-Spritzpistole Montage 1. Einsteck lter (3) mit dem längeren Konus in das 1. Airless-Spritzpistole bei niedrigem Betriebsdruck mit Pistolengehäuse stecken. geeignetem Reinigungsmittel durchspülen. 2. Gri (2) in das Pistolengehäuse einschrauben und anziehen. 2. Düse gründlich mit geeignetem Reinigungsmittel reinigen, so 3. - Page 15 ZU HOCH erkennt. Sobald ein Problem erkannt und eine Fehlermeldung ausgegeben wird, wird das Spritzgerät abgeschaltet. Spritzgerät zur Reparatur in eine Vertragswerkstatt von Wagner. Bevor Sie fortfahren, ist unbedingt der übrige Druck aus dem System abzulassen (k Zirkulation). Halten Menüfenster High Control Temperature [Hohe Reglertemperatur]...
- Page 16 Wartung Reparaturen am Gerät 1. Die vier Schrauben im Frontdeckel entfernen, Frontdeckel abnehmen. Die Wartung des Gerätes soll einmal jährlich durch den Wagner- Service durchgeführt werden. Quetschgefahr – nicht mit den Fingern oder Werkzeug 1. Hochdruckschläuche, Geräteanschlussleitung und Stecker auf zwischen die sich bewegenden Teile fassen.
- Page 17 Reparaturen am Gerät ausbauen. abschrauben, dabei am oberen Gehäuse (11) mit einem zweiten Rollgabelschlüssel gegenhalten. 16. Auslassventilgehäuse (14) mit Sechskantschraubendreher 3/8 Oberes Gehäuse innen nicht beschädigen. inch aus dem Kolben (15) herausschrauben. Achtung Auslassventilkugel (18), Scheibe (19) und Auslassventilsitz (20) ausbauen.
- Page 18 Reparaturen am Gerät einstreichen. Lippe (2) nach unten in das obere Gehäuse (6) einsetzen. 19. Kolben (4) durch die untere und obere Packung hindurchschieben bis das obere Kolbenende aus der Verschraubung (7) herausragt. auf der Schiebeeinheit (3). 22. Arretiermutter (5) bis zur Anlage am oberen Gehäuse (6) 13.
- Page 19 Anhang In vielen Fällen kann die richtige Düse nur über einen Spritzversuch ermittelt werden. Einige Regeln hierzu: Der Spritzstrahl muss gleichmäßig sein. Wenn Streifen im Spritzstrahl erscheinen, so ist der Spritzdruck zu gering oder die Viskosität des Beschichtungs-sto es zu hoch. Abhilfe Große Düse = niedriger Druck Es gilt grundsätzlich:...
- Page 20 Anhang ohne Düse ohne Düse Wagner TradeTip 3 Düse bis 270 bar für Wagner Spritzpistolen für Graco/Titan Spritzpistolen Best.-Nr. Best.-Nr. 0289390 Alle Düsen in der untenstehenden Tabelle werden zusammen mit dem passenden Pistolen lter geliefert. Anwendung Düsenmarkierung Spritz- Bohrung Spritzbreite mm Pistolen lter Bestell-Nr.
- Page 21 Anhang Pistolen lter Bestell-Nr. Anwendung Düsenmarkierung Spritz- Bohrung Spritzbreite mm winkel inch / mm Dachbeschichtung 0.023 / 0.58 Weiß 0553223 0.023 / 0.58 Weiß 0553323 0.023 / 0.58 Weiß 0553423 0.023 / 0.58 Weiß 0553523 0.023 / 0.58 Weiß 0553623 0.023 / 0.58 Weiß...
- Page 22 Anhang Die Vorteile: Bestellnr. Beschreibung 2311659 2311852 und Trade Tip 2 Düse Fine Finish 410 TempSpray H 226 (optimal für Dispersionen/hochviskose Materialien) 2311660 2311853 und Trade Tip 2 Düse 419 TempSpray H 326 (optimal für Dispersionen/hochviskose Materialien) 2311661 2311854 und Trade Tip 2 Düse 421 TempSpray H 226 TempSpray H 326...
- Page 23 Anhang (Best. Nr. 2306987) Features: möglich Geeignet für folgende Modelle: Membranpumpen Kolbenpumpen SF 21 Finish 270/370 PS 24 PS 3.25 SF 23 PS 26 PS 3.29 SF 27 PS 30 PS 3.31 SF 31 PS 34 PS 3.34 SF 7000 Anwendungsbeispiel...
- Page 24 Original Operating Manual Warning! Attention: Danger of injury by injection! Airless units develop extremely high spraying pressures. Never put your ngers, hands or any other parts of the body into the spray jet! Never point the spray gun at yourself, other persons or animals. Never use the spray gun without safety guard.
- Page 25 Relief valve ....................36 11.2 Inlet and outlet valve ................36 Description of unit................26 11.3 Packings ....................37 Airless process ..................26 11.4 ProSpray 3.29 / 3.31 connection diagram ........38 Functioning of the unit ...............26 ....27 ....................39 ........27 12.1 Selection of tip ..................39 Technical data ..................28 12.2...
-
Page 26: Hazard: Injection Injury
Danger of explosion from solvent, paint fumes and incompatible materials Only use WAGNER original-high-pressure hoses in order to ensure functionality, safety and durability. Danger of injury from inhalation of harmful vapors... -
Page 27: Hazard: Hazardous Vapors
Safety regulations Electric models must be earthed. In the event of an electrical short sheet and technical information to ensure safe use. circuit, earthing reduces the risk of electric shock by providing an a cord having an earthing wire with an appropriate earthing plug. never be sprayed or pumped back into a container with a Connection to the mains only through a special feed point, e.g. -
Page 28: General View Of Application
General view of application Description of unit General view of application = Recommended Model Materials Object Size up to 200 m Release agents, oils, undercoats, primers, llers, synthetic resin-based paints, acrylic paints 200 m - 800 m recommended nozzle size: FineFinish 0.008“ - 0.014“ more than 800 m up to 200 m 200 m... - Page 29 Description of unit 1 Spray gun 9 Cart 2 High-pressure hose 10 Relief valve k circulation) increased wear of the packings) 11 Digital Electronic Spray Control (DESC) 5 Pail hook 12 Control panel indicators 13 Pressure control knob 7 Suction tube 8 Return hose...
-
Page 30: Technical Data
Description of unit Starting operation Technical data Starting operation ProSpray 3.29 220-240 Volt, 50/60 Hz Voltage: 7.5 A Max. current consumption: 1. Screw the high-pressure hose (2) to the coating material – 6 m Power cord: outlet (Fig. 3, Item 1). -
Page 31: Control Panel Indicators
Solid Yellow When the pressure indicator is solid yellow, the sprayer is operating Wagner‘s accessories program also includes a mobile operator protection device for the electronic supply, pressure indicator means: which can also be used with other electronical... -
Page 32: Cleaning Preserving Agent When Starting-Up Of Operation Initially
Starting operation Cleaning preserving agent when starting-up Digital Electronic Spray Control (DESC) of operation initially The Digital Electronic Spray Control (DESC) increases the functionality of the sprayer. It is installed directly below the pressure control 1. Immerse the suction tube (Fig. 7, Item 1) and return hose (2) knob on the control panel. - Page 33 The Timers screen shows the total time the MENU-1 SELECT-4 If you forget or misplace your security code, you can contact Wagner sprayer has been turned on as well as the customer service for assistance. total time the sprayer has been running (pumping).
-
Page 34: Spraying Technique
Do not drive over the high-pressure hose. Protect against sharp to 30 cm between the spray tip and the surface. objects and edges. avoided by using a Wagner spray gun with a swivel joint and a hose system. 25 - 30 cm... -
Page 35: Cleaning The Unit (Shutting Down)
Cleaning the unit (shutting down) Cleaning the unit (shutting down) A clean state is the best method of ensuring operation without First of all pull out mains plug from socket. circumstances may any remaining coating material dry and harden in the unit. -
Page 36: Cleaning Airless Spray Gun
Cleaning the unit (shutting down) Remedy in case of faults Assembly Cleaning Airless spray gun 1. Place intake lter (3) with the long cone into the gun housing. 1. Rinse Airless spray gun with an appropriate cleaning agent. 2. Screw in grip (2) into the gun housing and tight en. 2. - Page 37 TEMPERATURE appears when the temperature of the will shut down. motor has risen too high. Take the sprayer to a Wagner authorized service center for repair. Before proceeding, relieve any pressure remaining in the system (valve position PRIME k). Additionally,...
-
Page 38: Relief Valve
The risk of damage rises with the age of the high- 5. When it reaches the bottom, dead-center of its stroke, turn pressure hose. Wagner recommends replacing high- the pressure control knob back to minimum pressure. The pressure hoses after 6 years. -
Page 39: Packings
Repairs at the unit 8. Push piston (4) downward out of the upper housing (6). Check wrench while holding the upper housing (11) securely with a piston for wear and replace if necessary. second adjusting wrench. 9. Remove upper packing (8) and lower packing (9) from the upper housing (6). - Page 40 Repairs at the unit 18. Lubricate installation tool and piston (4) with machine grease. lip (2) downward into the upper housing (6). 19. Push piston (4) through the lower and upper packings until the upper end of the piston protrudes from the threaded joint (7).
- Page 41 To achieve faultless and rational working, the selection of the tip is of the greatest importance. In many cases the correct tip can only be determined by means of a spraying test. Some rules for this: The spray jet must be even. If streaks appear in the spray jet the spraying pressure is either too low or the viscosity of the coating material to high.
- Page 42 Wagner TradeTip 3 tip up to 270 bar for Wagner spray guns for Graco/Titan spray guns Order no. Order no. 0289390 All of the tips in the table below are supplied together with the appropriate gun lter.
- Page 43 Gun lter Order no. Application Tip marking Spray Bore Spraying angle inch / mm Roof coatings 0.023 / 0.58 white 0553223 0.023 / 0.58 white 0553323 0.023 / 0.58 white 0553423 0.023 / 0.58 white 0553523 0.023 / 0.58 white 0553623 0.023 / 0.58 white...
-
Page 44: Tempspray
Advantages: Order No. Description 2311659 2311852 Trade Tip 2 Fine Finish 410 TempSpray H 226 (ideal for dispersions/materials with high viscosity) 2311660 2311853 Trade Tip 2 nozzle 419 TempSpray H 326 (ideal for dispersions/materials with high viscosity) 2311661 2311854 Trade Tip 2 nozzle 421 TempSpray H 226 TempSpray H 326... - Page 45 (Order No. 2306987) Features: Suitable for the following models: Diaphragm Pumps Double-stroke piston pumps SF 21 Finish 270/370 PS 24 PS 3.25 SF 23 PS 26 PS 3.29 SF 27 PS 30 PS 3.31 SF 31 PS 34 PS 3.34 SF 7000 Example of use...
- Page 46 Traduction du mode d’emploi original Attention! Danger de blessure par injection de produit! Les groupes “Airless” produisent des pressions de projection extrêmement élevées. Ne jamais exposer les doigts, les mains ou d’autres parties du corps au jet! Ne jamais diriger le pistolet vers soi, vers d’autres personnes ou vers des animaux.
- Page 47 Description du matériel ..............48 .................48 .....................61 ............48 ..................61 ......49 12.2 Entretien et nettoyage de buses Airless en carbure ....61 Illustration ProSpray 3.29 / 3.31 ............49 12.3 Accessoires de pistolets ..............61 ..............50 12.4 Tableau des buses Airless ............62/63 Transport ....................50 12.5 TempSpray ....................64...
-
Page 48: Projection Airless
projection Airless Veuillez lire et être sûr de comprendre toutes les informations de nettoyer le système. Ce symbole indique un risque potentiel pouvant entraîner des blessures graves ou même mortelles. Vous trouverez ci-après d’importantes tuyau. consignes de sécurité. Ce symbole indique un risque potentiel pour vous RISQUE : Flexible à... -
Page 49: Risque : Vapeurs Dangereuses
tuyau au besoin). Les vapeurs in ammables sont souvent plus raccords du tuyau. pour les soulever. avec une pression de pompe faible, et une fois la buse de revêtement. DANGER — Les travaux ou réparations sur l‘équipement électrique doivent être con és uniquement à... -
Page 50: Généralités D'utilisation
Généralités d’utilisation Modèle Taille de Produits applicables chantiers 200 m - 800 m Peintures en dispersion / Impression, peintures vinyles 200 m - 800 m Peintures anticorrosion, ignifuges, colles toile de verre, 200 m - 800 m Enduits airless 200 m - 800 m Produits de revêtement Description du matériel... - Page 51 1 Pistolet de projection 9 Chariot k circulation) p projection) 11 Digital Electronic Spray Control (DESC) 5 Crochet de seau 12 Voyants du panneau de commandes 8 Tuyau de retour...
-
Page 52: Caractéristiques Techniques
Mise en service Caractéristiques techniques ProSpray 3.29 Tension : 220-240 Volt, 50/60 Hz projection et huile de balayage Courant maximal absorbé : 7,5 A Cordon d’alimentation : – 6 m 3, pos. 1). Puissance absorbée : 1725 Watt 1840 Watt... -
Page 53: Voyants Du Panneau De Commandes
être entretenu/réparé. Jaune xe Le raccordement doit être pourvu d‘un dispositif de protection contre Dans le programme d’accessoires WAGNER, vous trouverez des dispositifs électriques mobiles de protection des personnes que vous pouvez également utiliser avec d’autres appareils... -
Page 54: Première Mise En Service Nettoyage Du Produit De Conservation
Première mise en service - netto yage du Digital Electronic Spray Control (DESC) produit de conservation bouton de commande de pression du panneau de commandes. minimale. (k circulation). REG MPa 23.0 Écran MPa ACTUEL 22.5 retour. Touches de fonctions (p projection). 8. - Page 55 Security Code Screen (Fenêtre de code de sûreté ) CODE SECURITE L’activation de la touche n° 3 dans le Main Screen La fenêtre « Security Code » (Code de MENU-1 CHANGE-2 (Fenêtre principale) permet de changer la langue du texte a ché à l’écran. Neug langues sont disponibles au total.
-
Page 56: Technique De Projection
Technique de projection pression Risque d’injection. Ne pulvérisez pas sans avoir installé au préalable le protège-embout. N’appuyez JAMAIS sur la gâchette du pistolet si l’embout n’est pas sur la position de pulvérisation ou de débouchage. Bloquez toujours la gâchette du blessure! pistolet avant d’enlever, de remplacer ou de nettoyer l’embout. -
Page 57: Nettoyage Du Groupe (Mise Hors Service)
Nettoyage du groupe (mise hors service) Tirer d’abord la che de la prise de secteur. Danger de court-circuit par la pénétration d’eau! Ne jamais utiliser un jet ou de la vapeur sous pression pour le nettoyage. Attention solvant. Essuyer l‘extérieur uniquement avec un chi on imprégné. -
Page 58: Nettoyage Du Pistolet Airless
Nettoyage du pistolet Airless Montage 2. Visser la crosse (2) dans le corps et serrer. 3. Emboîter la garde de protection (1) Tamis de crosse dans le pistolet Airless x .3 rn in c le ti p Dépannage Défaut Cause possible Remède Absence de secteur. -
Page 59: Messages D'erreur Du Digital Electronic Spray Control (Desc)
Défaut Cause possible Remède Le produit sort du haut de la pompe de peinture Le rendement diminue. Pression trop basse. Forte pulsation au pistolet Remplacer la buse. plus bas. Buse trop grand pour le produit projection corrrecte. Diluer suivant les prescriptions du fournisseur. Messages d’erreur du Digital Electronic Spray Control (DESC) High Motor Temperature Screen (Fenêtre de température élevée... - Page 60 Danger de contusion – ne pas mettre les doigts ou un Wagner. outil entre les parties en mouvement. ». 3. Appuyez sur la touche 1 du panneau de commande DESC. La » apparaît alors. fenêtre « 4. Tournez lentement le bouton de commande de pression dans doivent tourner librement.
-
Page 61: Garnitures
Eviter d’endommager le boîtier supérieur. Attention (17), la bille (18), la rondelle (19) et le siège (20). Contrôler le corps du clapet de refoulement (14), le siège (20), 19. E ectuer le remontage en ordre inverse. Graisser le joint chapitre 11.2, page 58. pos. - Page 62 sorte du raccord (7). 20. Retirer le dispositif de montage du piston (4). 21. Faites glisser le haut du piston (4) dans la fente en T (2) lèvre (2) en saillie soit en haut. 27. Viser et serrer le tuyau de liaison. chapitre 11.2, point 13.
- Page 63 Quelques règles à ce sujet: Remède: Règle générale: grande buse = faible pression petite buse = haute pression Buses standard Tenir compte des points suivants a n de conserver la propreté et la disponibilité de la buse: k circulation). Buse réglable à jet plat Protection Largeur du jet à...
- Page 64 F (11/16 - 16 Wagner pour pistolets Graco/Titan TradeTip 3 buse Réf. No. Réf. No. 0289390 Toutes les buses indiquées dans le tableau ci- dessous sont fournies avec le ltre à pistolet adéquat. Utilisation Marquage Angle de...
- Page 65 Tamis de crosse Réf. No. Utilisation Marquage Angle de Ori ce Largeur du jet mm projection inch / mm Revêtements pour toitures 0.023 / 0.58 blanc 0553223 0.023 / 0.58 blanc 0553323 0.023 / 0.58 blanc 0553423 0.023 / 0.58 blanc 0553523 0.023 / 0.58...
- Page 66 Avantages : Réf. No Description 2311659 2311852 TradeTip 2 et buse TradeTip 2 FineFinish - 410 TempSpray H 226 (idéal pour les dispersions/matériaux haute viscosité) 2311660 mm - 1 m 2311853 TradeTip 2 et buse TradeTip 2 - 419 TempSpray H 326 (idéal pour les dispersions/matériaux haute viscosité) 2311661 - 1 m 2311854...
- Page 67 (Réf. No. 2306987) Accessoires universels pour le nettoyage, le transport propre et la conservation du bloc pompe Caractéristiques : Compatibles avec les modèles suivants : Pompes à membrane Pompes à double e et SF 21 Finish 270/370 PS 24 PS 3.25 SF 23 PS 26 PS 3.29...
- Page 68 Traduzione delle istruzioni per l’uso Avvertenza! Attenzione: Pericolo di lesioni causate da iniezione! Gli apparecchi per la spruzzatura ad alta pressione raggiungono pressioni di spruzzatura estremamente elevate! Non intercettare mai con le dita o con la mano il getto di spruzzatura! Non puntare mai l’aerografo su se stessi, su altre persone o su animali.
- Page 69 Schema elettrico ProSpray 3.29 / 3.31 ...........82 Descrizione dell’apparecchio ............70 ..................70 ....................83 ...........70 ...................83 Leggenda della gura illustrativa ProSpray 3.29 / 3.31 ...71 Figura illustrativa ProSpray 3.29 / 3.31 ..........71 di metallo duro ..................83 Dati tecnici ....................72 ..............83 Trasporto ....................72 12.4...
-
Page 70: Di Spruzzatura Airless
si spruzza. Il dispositivo di sicurezza della punta o re una certa spruzzatura Airless protezione, ma si tratta per la maggior parte di un dispositivo di avvertimento. Il presente manuale contiene informazioni che devono essere lette uno dei seguenti simboli si prega di prestare molta attenzione e di non funziona ed il dispositivo di sicurezza non è... -
Page 71: O Di Amme)
PERICOLO — I lavori e le riparazioni alle apparecchiature elettriche devono essere eseguiti solo da un elettricista specializzato. Wagner declina alta pressione. qualsiasi responsabilità in caso di installazione irregolare o errata. Spegnere l’apparecchio. Prima di... -
Page 72: Panoramica Sull'impiego
Panoramica sull’impiego = raccomandato = non raccomandato Modello Dimensioni super ci Materiali no a 200 m Agenti di distacco ed olii, impregnanti, fondi, stucchi, vernici a base di resina sintentica, vernici acriliche da 200 m a 800 m Dimensione ugello raccomandata: FineFinish 0.008“ - 0.014“ oltre 800 m no a 200 m da 200 m... - Page 73 1 Aerografo 9 Carello 2 Tubo essibile ad alta pressione 10 Valvola di s ato k circolazione) 3 Apertura di rifornimento EasyGlide p spruzzatura) 11 Digital Electronic Spray Control (DESC) 12 Indicatori del pannello di controllo 5 Gancio di secchio 6 Pulsante olio 7 Tubo essibile di aspirazione 8 Tubo essibile di ritorno...
-
Page 74: Dati Tecnici
Dati tecnici Messa in servizio ProSpray 3.29 220-240 Volt, 50/60 Hz Tensione: olio distaccante 7,5 A Corrente assorbita max.: Cavo di allacciamento materiale di copertura ( g. 3, pos. 1). – 6 m dell’apparecchio: 1725 Watt 1840 Watt Potenza assorbita: pressione. -
Page 75: Indicatori Del Pannello Di Controllo
è usurato oppure è necessario provvedere alla manutenzione/riparazione dello spruzzatore. Giallo sso Nel programma di accessori WAGNER si trovano dispositivi elettrici mobili di protezione delle persone utilizzabili anche con altri apparecchi elettrici. spruzzare mordente, lacca, vernice e colori vari... -
Page 76: Prima Messa In Servizio: Rimozione Della Sostanza Conservante
Prima messa in servizio: rimozione della Digital Electronic Spray Control (DESC) sostanza conservante dello spruzzatore. Il sistema è installato direttamente sotto la 1. Immergere il tubo essibile di aspirazione ( g. 7, pos. 1) ed manopola di regolazione della pressione sul pannello di controllo. Si il tubo essibile di ritorno (2) in un serbatoio contenente detergente adatto. - Page 77 (pompato). Se ci si dimentica o si perde il codice di sicurezza, è possibile T. ON XXXX contattare il servizio clienti Wagner per assistenza. Per selezionare la videata Timers, premere T. FUNZ XXXX...
-
Page 78: Tecnica Di Spruzzatura
Fare attenzione che il tubo essibile non si torca. Ciò può essere evitato utilizzando un aerografo Wagner con articolazione girevole e 25 - 30 cm un tamburo per tubo essibile. ad alta pressione su ponteggi è quello di condurlo sempre all’esterno del ponteggio o dell’impalcatura. -
Page 79: Pulizia Dell'apparecchio (Messa Fuori Servizio)
Pulizia dell’apparecchio (messa fuori servizio) Dapprima disinserire la spina di rete dalla presa di corrente.Vedi le norme di sicurezza. Pericolo di cortocircuito dovuto alla penetrazione di Il detergente usato per la pulizia (usare solo solventi con punto di acqua! Non pulire mai l’apparecchio con unità a getto materiale di copertura. -
Page 80: Pulizia Dell'aerografo Airless
Pulizia dell’aerografo Airless Montaggio pressione di esercizio. serrare. assicurandosi di eliminare tutti i residui di materiale di 3. Innestare in posizione la sta a di protezione (1). copertura. Filtro innestabile dell’aerografo Airless x .3 rn in c le ti p 1. - Page 81 Electronic Spray Control (DESC) è salita eccessivamente. Far riparare dello spruzzatore. lo spruzzatore presso un centro di assistenza autorizzato Wagner. Videata High Mechanical Load (sovraccarico da sovraccarico) Videata Check Transducer (controllare il trasduttore) SOVRACCARICO CONTR.
- Page 82 5. Quando raggiunge il fondo, al centro esatto della corsa, riportare la manopola di controllo della pressione sulla rischio di danneggiamento. Wagner raccomanda pressione minima. Il gruppo albero a gomito/cursore dovrebbe arrestarsi. anni.
- Page 83 14. Svitare il corpo inferiore ( g. 13, pos. 10) con una chiave ssa 9. Togliere la guarnizione superiore (8) e la guarnizione inferiore bloccando il corpo superiore (11) con una seconda chiave (9) dal corpo superiore (6). ssa. 16. Con un cacciavite esagonale da 3/8 pollici svitare il corpo della Non danneggiare l’interno del corpo superiore.
- Page 84 Ring (1) ed al labbro sporgente (2) verso il basso nel corpo pistone (4). superiore (6). 19. Spingere il pistone (4) attraverso le guarnizioni inferiore (2) del gruppo cursore (3). 22. Avvitare il dado di arresto (5) no al contatto con il corpo superiore (6).
- Page 85 Appendice Alcune regole da prendere in considerazione: Il getto di spruzzatura deve essere uniforme. eccessiva. Rimedio Si può a ermare che: ugello grande = pressione bassa ugello piccolo = pressione alta Ugelli standard Se è montato un altro tipo di ugello si deve operare come indicato dal costruttore. Per mantenere l’ugello pulito e pronto per l’uso osservare i seguenti punti: 1.
- Page 86 Appendice senza ugello senza ugello Wagner TradeTip 3 ugello bis 270 bar per aerogra Graco/Titan N°ord. N°ord. 0289390 Tutti gli ugelli nella tabella sottostante sono forniti insieme al ltro per aerografo adatto. Impiego Marcatura Angolo di Foro Larghezza mm Filtro per aero- N°ord.
- Page 87 Appendice Impiego Marcatura Angolo di Foro Larghezza mm Filtro per aero- N°ord. dell'ugello spruzzatura pollici/mm grafo 0.023 / 0.58 bianco 0553223 Copertura tetti 0.023 / 0.58 bianco 0553323 0.023 / 0.58 bianco 0553423 0.023 / 0.58 bianco 0553523 0.023 / 0.58 bianco 0553623 0.023 / 0.58...
- Page 88 Appendice Il materiale di verniciatura è riscaldato alla temperatura richiesta, in modo uniforme, da un elemento di riscaldamento elettrico, che si trova Vantaggi: Nº ord. Denominazione 2311659 2311852 F) e Trade Tip 2 Fine Finish 410 TempSpray H 226 (ideale per dispersioni/materiali con alta viscosità) 2311660 2311853 F) e ugello Trade Tip 2 419...
- Page 89 Appendice (Nº ord. 2306987) Caratteristiche: sgocciolare Adatti per i seguenti modelli: Pompe a membrana Pompe a doppia corsa SF 21 Finish 270/370 PS 24 PS 3.25 SF 23 PS 26 PS 3.29 SF 27 PS 30 PS 3.31 SF 31 PS 34 PS 3.34 SF 7000...
- Page 90 d Zubehörbild g Accessories illustration f Illustration des accessoires i Figura degli accessori...
-
Page 91: Désignation
Best. Nr. Item Part No. Désignation Denominazione Benennung Description Nº de pièce Pos. Pos. N° ord. 0296 388 Spritzpistole AG 08, F-Gewinde Spray gun AG 08, F-thread Pistolet AG 08, let F Aerografo AG 08, Filettatura F 0296 386 Spritzpistole AG 08, G-Gewinde Spray gun AG 08, G-thread Pistolet AG 08, let G Aerografo AG 08, Filettatura G... -
Page 92: Gruppo Principale
Liste des pièces de rechange Ersatzteilliste Spare parts list Elenco dei ricambi Hauptbaugruppe Main Assembly Ensemble principal Gruppo principale CEE 7/7 0558 482 220V~240V... - Page 93 PS3.29 Benennung Description Désignation Denominazione 0290 270 Couverture du moteur Copertura del motore 0508 559 Schraube (2) Screw (2) Vis (2) Vite (2) 0290 269 Verkleidungsunterteil Belly pan Cuvette Puntale 9802 266 Schraube (2) Screw (2) Vis (2) Vite (2) 0290 228 Klappe Door...
- Page 94 Liste des pièces de rechange Ersatzteilliste Spare parts list Elenco dei ricambi Farbstufe Fluid section Pompe à peinture Stadio della vernice...
- Page 95 Best. Nr. Item Part No. Désignation Denominazione Benennung Description Nº de pièce Pos. Pos. N° ord. 0290 263 Führungsmutter Retainer Dado di guida 0290 255 Arretiermutter Dado di arresto 0290 276 Abstandhalter Spacer Entretoise Distanziatore ------- Guarnizione superiore 0290 249 Corpo superiore 0508 343 Doppelstutzen...
- Page 96 Liste des pièces de rechange Ersatzteilliste Spare parts list Elenco dei ricambi Baugruppe Antrieb Drive Assembly Ensemble moteur Gruppo azionamento...
- Page 97 Best. Nr. Item Part No. Désignation Denominazione Nº de pièce Benennung Description Pos. Pos. N° ord. 0558 323A Baugruppe Gehäuse Housing assembly Logement Gruppo alloggiamento 0290 241 Schiebeeinheit Slider assembly Coulisseau Gruppo cursore 0290 254 Anlaufscheibe Thrust washer Ralla 0290 239 Kurbelwelle Gear/crankshaft assembly Albero a gomiti...
-
Page 98: Ersatzteilliste
Ersatzteilliste Spare parts list Liste des pièces de rechange Elenco dei ricambi Hochdruk lter Filter assembly Filter haute pression Filtro ad alta pressione... - Page 99 Best. Nr. Item Part No. Nº de pièce Désignation Denominazione Benennung Description Pos. Pos. N° ord. 0524 918 Filtergehäuse Filter housing Corps de ltre Scatola del ltro 14058 Konusfeder Conical spring Ressort 0508 748 Filter, 60 mesh (standard) Filtre, 60 mailles (standard) Filtro, 60 maglie (standard) (Standardausrüstung) 0508 451...
- Page 100 Liste des pièces de rechange Ersatzteilliste Spare parts list Elenco dei ricambi Hoher Wagen Upright cart assembly Chariot haut Carello alto...
- Page 101 Best. Nr. Item Part No. Désignation Denominazione Benennung Description Nº de pièce Pos. Pos. N° ord. 0290 207 Handgri (inklusive der Handle assembly (includes Impugnatura (comprende Elemente 8-9) items 8-9) articoli n 8-9) 9805 352 Schraube (2) Screw (2) Vis (2) Vite (2) 0290 257 Buchse...
-
Page 102: 3+2 Jahre Garantie Professional Finishing
(Stand 01.02.2009) Garantieansprüche können nicht berücksichtigt werden für Teile, die einem gebrauchsbedingten oder sonstigen, natürlichen Alle Wagner Pro -Farbauftragsgeräte (im folgenden Produkte genannt) gebrauchsbedingten oder sonstigen natürlichen Ver-schleiß werden sorgfältig geprüft, getestet und unterliegen den strengen Kontrollen zurückzuführen sind. Hierzu zählen insbesondere Kabel, Ventile, der Wagner Qualitätssicherung. - Page 103 4. Exclusion of guarantee Guarantee claims cannot be considered All Wagner professional colour application devices (hereafter referred to as for parts that are subject to wear and tear due to use or other natural products) are carefully inspected, tested and are subject to strict checks under wear and tear, as well as defects in the product that are a result of natural wear and tear, or wear and tear due to use.