Table des Matières
Publicité
Les langues disponibles
Les langues disponibles
Liens rapides
MIG / MAG
Schweißbrenner-System
ABIMIG
flüssiggekühlt
®
EN 60 974-7
Betriebsanleitung
Operating instructions
Mode d´emploi
Instructivo de servicio
MIG / MAG
Welding Torch System
ABIMIG
liquid cooled
®
EN 60 974-7
MIG / MAG
Système de torches ABIMIG
refroidies par liquide
EN 60 974-7
MIG / MAG
Sistema de Antorcha ABIMIG
refrigeración líquida
EN 60 974-7
®
®
Publicité
Chapitres
Table des Matières

Manuels Connexes pour Abicor Binzel ABIMIG 452W


Sommaire des Matières pour Abicor Binzel ABIMIG 452W
- Page 1 Betriebsanleitung Operating instructions Mode d´emploi Instructivo de servicio MIG / MAG MIG / MAG Welding Torch System Schweißbrenner-System ABIMIG liquid cooled ® ABIMIG flüssiggekühlt EN 60 974-7 ® MIG / MAG EN 60 974-7 Système de torches ABIMIG ® refroidies par liquide EN 60 974-7 MIG / MAG Sistema de Antorcha ABIMIG...
- Page 2 Inhalt Deutsch ....... Seite 3 Contents Der Hersteller behält sich das Recht vor, jederzeit und ohne vorherige Mitteilung Sommaire Änderungen an dieser Betriebsanleitung durchzuführen, die durch Druckfehler, Indice...
-
Page 3: Table Des Matières
1. Inhalt Inhalt Seite Bestimmungsgemäße Verwendung Seite Technische Daten Seite Lieferumfang Seite Sicherheitshinweise Seite 5.1 Erklärungen Seite 5.2 Kennzeichnung des Schweißbrenners Seite 5.3 Begriffserklärung Seite 5.4 Sicherheitsnorm Seite 5.5 Sicherheitsprüfungen Seite 5.6 Pflichten des Betreibers Seite Gefahrenhinweise Seite Transport und Verpackung Seite Systembeschreibung Seite... -
Page 4: Bestimmungsgemäße Verwendung
Für diese flüssiggekühlten Ausführungen ist ein Umlaufkühlaggregat erforderlich. Die Steuereinrichtung im Handgriff ist für maximal 42 V und 0,1 bis 1 A ausgelegt. Die Schweißbrenner dürfen nur mit Original ABICOR BINZEL ® -Ersatzteilen betrieben werden. Der Betreiber hat sicherzustellen, dass der Schweißbrenner in Verbindung mit dem Schweißgerät der EG-Richtlinie EMV... - Page 5 3. Technische Daten (Fortsetzung) Allgemeine Brennerdaten nach EN 60 974-7 Spannungsart: Gleichspannung DC Polung der Elektroden: in der Regel positiv Drahtarten: handelsübliche Runddrähte Führungsart: handgeführt maschinengeführt Spannungsbemessung: 113 V Scheitelwert 141 V Scheitelwert Schutzart der maschinenseitigen Anschlüsse (EN 60 529): IP3X IP2X Schutzgas:...
-
Page 6: Lieferumfang
4. Lieferumfang Die Schweißbrenner dieser Baureihe werden als vollständige Einheit schweiß- bereit ausgeliefert, d. h. mit Schlauchpaket und Zentralstecker. Prüfen Sie, ob Sie die korrekten Ausrüstteile zur Erstbestückung gewählt haben. Details zu Ausrüst- und Verschleißteilen, sowie die Bestelldaten und Identnummern entnehmen Sie bitte den aktuellen Bestellunterlagen. Betriebsanleitung ABIMIG ®... -
Page 7: Sicherheitsnorm
ABIMIG ® MT...W Flüssiggekühlter Maschinenbrenner 5. Sicherheits- ABIMIG ® MT...DW Flüssiggekühlter Maschinenbrenner mit auswechsel- hinweise barem Düsenstock (Fortsetzung) 5.4 Sicherheitsnorm Der ABIMIG Schweißbrenner wurde entsprechend der deutschen Fassung der ® Vorschrift EN 60 974-7 gebaut. 5.5 Sicherheitsprüfung Der ABIMIG ® Schweißbrenner unterliegt in allen Fertigungsstufen und Montageschritten einer ständigen Qualitätskontrolle in Anlehnung an die DIN EN ISO 9001. -
Page 8: Transport Und Verpackung
6. Gefahren- • Spülen Sie Werkstücke, die mit chlorierten Lösungsmitteln entfettet hinweise wurden, mit klarem Wasser ab, sonst besteht die Gefahr der (Fortsetzung) Phosgengasbildung. Stellen Sie keine chlorhaltigen Entfettungs- bäder in der Nähe des Schweißplatzes auf. • Benutzen Sie die Schweißbrenner nur in geeigneten Räumlichkeiten. Verwenden Sie beim Gebrauch im Freien einen geeigneten Schutz gegen alle Witterungseinflüsse. -
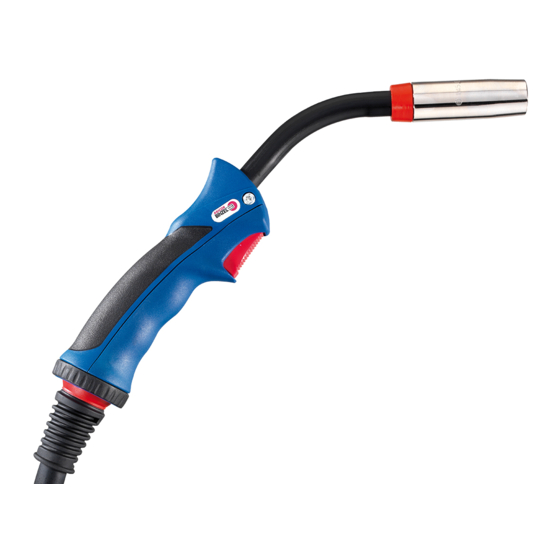
Page 9: Baugruppe
8. System- Der gebrauchsfähige Schweißbrenner ABIMIG ® besteht aus: beschreibung 1. Schlauchpaket mit Ausrüstung 2. Handgriff / Griffrohr bei ABIMIG MT Versionen ® 3. Brennerhals z. B. ABIMIG 535W mit Ausrüst- und Verschleißteilen. ® Alle Elemente bilden zusammen eine funktionsfähige Einheit, die mit entspre- chenden Betriebsmitteln versorgt, einen Lichtbogen zum Schweißen erzeugt. - Page 10 9. Inbetriebnahme – Schneiden Sie die Führungsspirale bündig am Brennerhals ab, (Fortsetzung) bei ABIMIG ® 452 DW am Düsenstock. – Achten Sie darauf, dass die Schnittkante gratfrei ist. Das Anpassen neuer Drahtführungen und deren richtige Montage entnehmen Sie dem Kapitel „11. Wartung“. Führungsspirale, isoliert –...
-
Page 11: Schlauchpaket Maschinenseitig Montieren
Rücklaufes am Umlaufkühlaggregat. Kühlmittelvorlauf – blau markierter Stecknippel Kühlmittelrücklauf – rot markierter Stecknippel Kühlmittelempfehlung: ABICOR BINZEL BTC-15 ® Entlüften Sie bei jeder Erstinbetriebnahme bzw. nach jedem Schlauchpaket- wechsel das gesamte Kühlsystem wie folgt: 1. Lösen Sie am laufenden Umlaufkühlaggregat den Schlauch vom Kühlmittel- rücklauf und halten diesen über einen Auffangbehälter. -
Page 12: Bedienung
9. Inbetriebnahme Überprüfen Sie, ob ausreichend Kühlmittelflüssigkeit im Tank des (Fortsetzung) Umlaufkühlaggregates ist. Schutzgasmenge einstellen Entnehmen Sie das Schutzgas aus Flaschen und stellen Sie die Gasmenge am Druckminderer ein. Art und Menge des zu verwendenden Schutzgases hän- gen von der Schweißaufgabe ab. 10. -
Page 13: Wartung / Reinigung
Schlauchpaket – Prüfen Sie alle Verschraubungen auf festen Sitz. – Wechseln Sie bei Verschleiß oder Verschmutzung die Drahtführung. – Tauschen Sie schadhafte, deformierte oder verschlissene Teile aus. – Im Reparaturfall bietet ABICOR BINZEL ® Werksreparaturen an. Drahtführung reinigen – Lösen Sie das Schlauchpaket maschinenseitig und bringen Sie es in eine gestreckte Position. -
Page 14: Störung, Ursache, Behebung
4. Führen Sie den Zentralstecker mit der überlangen Kunststoffseele durch die Zentralbuchse bis in das Drahtvorschubgerät. Markieren Sie die Kunststoff- seele unmittelbar vor den Rollen und lösen Sie den Zentralstecker nochmals. 5. Schneiden Sie die Kunststoffseele mit dem ABICOR BINZEL ® -Cutter an der Markierung ab. - Page 15 12. Störung, Störung Ursache Behebung Ursache, Behebung Brennerhals wird zu • Kontaktdüse / Spann- – Überprüfen und (Fortsetzung) heiß. zange nicht richtig fest. anziehen. • Stromanschlüsse. – Überprüfen und brennerseitig und zum anziehen. Werkstück lose. • zu geringer Kühlmittel- – Kühlsystem überprüfen. durchfluss.
-
Page 16: Demontage, Entsorgung
Im Notfall ist die Stromversorgung sofort zu unterbrechen. 14. Notfall Weitere Maßnahmen entnehmen Sie der Betriebsanleitung „Stromquelle“. 15. Gewährleistung Der ABIMIG ® -Schweißbrenner ist ein Original ABICOR BINZEL ® -Erzeugnis. Die Alexander BINZEL Schweisstechnik GmbH & Co. KG garantiert eine feh- ®... - Page 17 1. Contents Contents Page Proper use Page Technical data Page Components Page Safety instructions Page 5.1 Explanations Page 5.2 Identifications marking Page 5.3 Terminology Page 5.4 Safety standard Page 5.5 Safety tests Page 5.6 Responsibilities of the user Page Safety warnings Page Shipment and packaging Page...
-
Page 18: Proper Use
A coolant unit is required for liquid-cooled welding torches. The operating unit in the handle is suitable for max. 42 V and 0.1 Amps up to 1.0 Amps. The welding torch should only be operated using original ABICOR BINZEL ® spare parts. - Page 19 3. Technical data (continuation) General torch data with reference to EN 60 974-7 Type of voltage: D.C. voltage Electrode polarity: Positive as a rule Wire type: Standard round wire Type of guide: manual automatic Voltage limitation: Peak value of 113 V Peak value of 141 V Safety class of machine side connections (EN 60 529): IP3X...
-
Page 20: Components
4. Components The ABIMIG ® welding torch is supplied as a complete ready-to-use unit, i.e. with cable assembly and central plug. Check whether correct equipment parts have been selected for initial assembly. Please see current equipment data leaflets for consumables as well as ordering information and part numbers. -
Page 21: Safety Standard
ABIMIG ® MT...W Liquid-cooled machine-operted torch 5. Safety ABIMIG ® MT...DW Liquid-cooled machine-operted torch with changeable instructions contact tip holder (continuation) 5.4 Safety Standard The welding torch ABIMIG has been built in compliance with the German ® version of the EN 60 974-7 standard. 5.5 Safety tests At each stage of the production and assembly process, the welding torch ABIMIG... -
Page 22: Shipment And Packaging
6. Safety warnings • Observe fire hazards caused from spatter/drops created during wel- (continuation) ding. During welding work remove everything combustible from the working area. • During welding work in confined spaces, electrical hazards increase. Protect yourself accordingly through use of insulating mats, dry clothing and sufficient ventilation and exhaust. -
Page 23: System Description
8. System In the ready-to-use state, the welding torch ABIMIG ® consists of: description 1. Cable assembly with equipment 2. Handle / Handle tube for ABIMIG MT Version ® 3. Torch neck e. g. ABIMIG 535W with equipment parts and ®... - Page 24 9. Start-up – Cut the guide spiral liner off flush to the torch neck, with ABIMIG ® 452 DW procedure on the contact tip holder. (continuation) – Make sure there is no burr on the cutting edge. For information on how to install new wire guide liners and about correct procedure for assembly, consult chapter 11 entitled ”Servicing”.
- Page 25 Coolant supply circuit – connector nipple with the blue marking Coolant return circuit – connector nipple with the red marking Recommended coolant: ABICOR BINZEL ® BTC-15 Ventilate the entire cooling system as follows at every first use and after every cable assembly change: 1.
-
Page 26: Operation
9. Start-up Check the level of coolant in the circulating coolant unit. procedure (continuation) Setting the level of shielding gas Set the required gas volume at the pressure reducing valve. Type and quantity of shield gas to be used depend on the welding task to be performed. 10. -
Page 27: Servicing / Cleaning
– Check that all the nuts are tight. – Replace the wire guide liner if it is worn or dirty. – Replace damaged, deformed or worn parts. – If repair work is required, ABICOR BINZEL ® offers an in-house repairs service. -
Page 28: Troubleshooting
4. Guide the central plug with the extra long plastic core liner through the central adaptor into the wire feeding unit. Mark the plastic core liner directly before the rollers and loosen the central plug again. 5. Cut the plastic core liner off at the marking using the ABICOR BINZEL -cutter. ®... - Page 29 12. Troubleshooting Problem Cause Solution (continuation) Torch becomes too hot. • Contact tip/ collet chuck – Check and tighten. not tight enough. • Current connection on – Check and tighten. the torch side and to the workpiece are loose. • Too little coolant flow. –...
-
Page 30: Disassembly / Disposal
14. In the event of For further action in such circumstances, consult the ”Power Supply” operating an emergency instructions. 15. Warranty The welding torch ABIMIG is an original- ABICOR BINZEL product. ® ® The Alexander BINZEL ® Schweisstechnik GmbH &Co. KG warranties fault-free... - Page 31 1. Sommaire Sommaire Page Conseils d’utilisation Page Caractéristiques techniques Page Matériel fourni Page Mesures de sécurité Page 5.1 Explications Page 5.2 Identification Page 5.3 Abréviations Page 5.4 Norme de sécurité Page 5.5 Norme de qualité Page 5.6 Obligation du fournisseur Page Informations sur les dangers Page...
-
Page 32: Conseils D'utilisation
Le circuit de commande est conçu pour une tension maximale de 42 V et un ampérage de 0,1 à 1 A. Les torches de soudage ne doivent être exploitées qu'avec des pièces d'origine ABICOR BINZEL ® L'utilisateur doit s'assurer que le couple torche de soudage poste à... -
Page 33: Capacité Selon Type Col Suivant En 60 974
3. Caractéristiques techniques (suite) Caractéristiques générales suivant EN 60 974-7 Type de tension : Courant continu CC Pôle de l’électrode : positive en général Type de fil : standard pour soudage MIG/MAG Manipulation : manuelle automatique Mesures de tension : 113 V en crète 141 V en crète Classe de protection des raccords... -
Page 34: Matériel Fourni
4. Matériel fourni Les torches de soudage de cette gamme sont livrées "prête à l’emploi", faisceau et raccord européen compris. Vérifier la conformité de l’équipement avec votre besoin. Pour les pièces détachées et d’usure ainsi que les références, consulter nos documentations techniques. Mode d’emploi ABIMIG ®... -
Page 35: Norme De Sécurité
ABIMIG ® MT...W Torche automatique refroidie par liquide 5. Mesures de ABIMIG ® MT...DW Torche automatique refroidie par liquide avec sup- sécurité port tube-contact (suite) 5.4 Norme de sécurité La torche de soudage ABIMIG est réalisée en conformité avec les prescriptions ®... -
Page 36: Transport Et Emballage
6. Informations sur • N’utiliser les torches de soudage que dans des locaux destinés à la les dangers soudure. En cas d’utilisation à l’extérieur, munissez vous de toutes les (suite) protections contre les intempéries. • Dans de rares circonstances, un risque d’électrocution est possible. Protégez vous par un tapis isolant, des vêtements secs et une bonne aération. -
Page 37: Description
8. Description La gamme de torche de soudage ABIMIG ® est prête à l'emploi. Elle se compose de: 1. Faisceau complet équipé 2. Poignée / Poignée cylindrique pour les versions ABIMIG ® 3. Col de cygne, par ex. ABIMIG 535W équipé des pièces détachées et ®... - Page 38 9. Mise en service – Couper la gaine guide-fil à ras du col de cygne, en version (suite) ABIMIG ® 452 DW à ras du support tube-contact. – Retirer d’éventuelles bavures. La mise à longueur et le montage de la gaine sont décrits au paragraphe ”11.
-
Page 39: Raccordement Du Faisceau Au Poste
Arrivée d’eau – identification par la couleur bleue Retour d’eau – identification par la couleur rouge Nous préconisons le liquide ABICOR BINZEL ® BTC-15 pour le circuit de refroidissement. Lors d'une première installation ou d'un changement de faisceau, il est néces- saire de réaliser une purge du circuit de refroidissement comme suit :... -
Page 40: Utilisation
9. Mise en service Avant la mise en route, vérifier le niveau d’eau du refroidisseur. (suite) Réglage du débit de gaz Le réglage du débit de gaz s'effectue sur le débilitre de votre installation. Le type et la quantité de gaz dépendent de la nature de la soudure. 10. -
Page 41: Entretien / Nettoyage
– Contrôler le serrage de toutes les vis. – Remplacer les gaines lorsque celles-ci sont usées ou encrassées. – Changer toutes les pièces d'usure détériorées ou usées. – La réparation peut être effectuée par ABICOR BINZEL ® Nettoyage du transport de fil –... -
Page 42: Défaut / Origine / Solution
(Suite) Gaine guide-fil métallique Gaine guide-fil synthétique Gaine guide-fil synthétique 1. Chanfreiner le bout de la gaine à l'aide du taille gaine ABICOR BINZEL ® à un angle d'environ 40°. 2. Insérer la gaine jusqu'en butée sur le tube-contact. 3. Monter l'embout de gaine, le joint et l'écrou d'arrêt de gaine sur la gaine, les maintenir sous pression et visser l'écrou. - Page 43 12. Défaut / Défaut Origine Solution Origine / Solution La torche chauffe. • Tube-contact / support – Vérifier et resserrer. (Suite) tube-contact mal serré. • Raccordement du cou- – Vérifier et resserrer. rant insuffisant au niveau du raccord européen ou de la masse.
-
Page 44: Démontage / Gestion Des Déchets
14. Urgence Les informations complémentaires se trouvent dans le mode d'emploi du poste à souder. 15. Garantie La torche ABIMIG -est un authentique produit ABICOR BINZEL ® ® La société Alexander BINZEL ® Schweisstechnik GmbH & Co. KG garantit ce produit contre tout défaut de fabrication et de fonctionnement lors de sa... - Page 45 1. Índice Índice Página Uso adecuado Página Datos técnicos Página Componentes Página Instrucciones de seguridad Página 5.1 Explicaciones Página 5.2 Identificación Página 5.3 Terminología Página 5.4 Normas de seguridad Página 5.5 Prueba de seguridad Página 5.6 Responsabilidad del usuario Página Advertencias de seguridad Página Transporte y empaque...
-
Page 46: Uso Adecuado
La unidad de mando en la empuñadura es apropiada para el máx de 42 V y desde 0,1 amperio hasta 1,0 amperio. Las antorchas de soldadura sólo se deben utilizar con repuestos originales ABICOR BINZEL ® El operador ha de asegurarse de que la antorcha de soldadura y el dispositivo de soldadura se ajustan a la Directiva CE CEM (89/336/CEE). - Page 47 3. Datos técnicos (continuación) Datos generales de las antorchas según EN 60 974-7 Tipo de voltaje: Corriente continua CC Polaridad de los electrodos: en general positivo Tipo de hilo: hilo estándar redondo Tipo de guía: manual automática Medición de tensión: 113 V valor de cresta 141 V valor de cresta Grado de protección para las conexiones a la máquina (EN60529): IP3X...
-
Page 48: Componentes
4. Componentes Las antorchas de soldadura de esta gama se suministran como unidad com- pleta lista para soldar, es decir con conjunto de cables y adaptador central. Verificar si en la fase inicial se han seleccionado los accesorios adecuados. Información detallada de los accesorios y las piezas de desgaste, así como los datos de pedido y números de identificación se pueden consultar en el folleto comercial actual. -
Page 49: Normas De Seguridad
ABIMIG ® MT...W Antorcha de soldadura automático enfriada por 5. Instrucciones líquido de seguridad ABIMIG MT...DW Antorcha de soldadura automático enfriada por ® (continuación) líquido con portatubo cambiable 5.4 Normas de seguridad La antorcha de soldadura ABIMIG ® ha sido fabricada de acuerdo con las normas de seguridad alemanas EN 60 974-7. -
Page 50: Transporte Y Empaque
6. Advertencias de • Las piezas de trabajo que se han desengrasado usando disolventes seguridad clorurados deben rociarse con agua limpia, para evitar el riesgo de (continuación) formación de fosgeno. No debe ponerse cerca del lugar de soldadura ningún baño desengrasante que contenga cloro. •... -
Page 51: Descripción Del Sistema
8. Descripción del La antorcha de soldadura ABIMIG ® apta para el uso se compone de: sistema 1. Conjunto de cables con los accesorios 2. Empuñadura / Empuñadura tubular en las versiones ABIMIG ® 3. Cuello de antorcha p. ej. ABIMIG 535W con los accesorios y ®... - Page 52 9. Puesta en marcha – Corte la sirga a ras con el cuello de antorcha, en el ABIMIG ® 452 DW a (continuación) ras con el portatubo. – Preste atención en que el canto cortado esté libre de rebabas. Consulte el capitulo 11 "revisión” para el asesoramiento sobre cómo adaptar sirgas nuevas y su proceso de montaje correcto.
-
Page 53: Conexión Del Refrigerante
Suministro de refrigerant: – niple conector con marca azul Retorno de refrigerante: – niple conector con marca roja Refrigerante recomendado: ABICOR BINZEL ® BTC-15 Antes de la primera puesta en marcha, pugue el sistema de enfriamiento completo como sigue: 1. -
Page 54: Operación
9. Puesta en marcha Antes de la puesta en marcha, verifique el nivel del refrigerante en (continuación) el enfriador de líquido. Ajustar la cantidad de gas protector Abra la válvula de gas protector de las botellas y ajuste la cantidad de gas en el regulador de presión. -
Page 55: Revisión / Limpieza
– Verifique que todas las juntas atornilladas estén fijas. – Reemplace la sirga en caso de desgaste o suciedad. – Reemplace cualquier pieza dañada, deformada o desgastada. – Si se requiere alguna reparación, ABICOR BINZEL ofrece un servicio de ®... -
Page 56: Averías
Marque la sirga de teflón contiguamente ante los rodillos y suelte nuevamente el adaptador central. 5. Corte la sirga de teflón con el Cortador ABICOR BINZEL ® en la marca. - Page 57 12. Averías Problema Solución Causa (continuación) Antorcha demasiado – ¡Verificar y apretar! • Tubo de contacto/portatubos caliente. no están fijos correctamente. – ¡Verificar y apretar! • Conexiones de corriente, en el lado de la antorcha y para la pieza de trabajo, sueltas.
-
Page 58: Desmontaje / Eliminación De Residuos
Consulte la sección titulada ”suministro de corriente” en el instructivo de servicio concerniente a la adopción de medidas adicionales. 15. Garantía La antorcha de soldadura ABIMIG ® es un producto original ABICOR BINZEL ® Alexander BINZEL Schweisstechnik GmbH & Co. KG garantiza que este pro- ®... - Page 60 Head office: Alexander Binzel Schweisstechnik GmbH & Co. KG Postfach 10 01 53, D-35331 Gießen Tel.: ++49 (0) 64 08/59-0 Fax: ++49 (0) 64 08/5 91 91 Internet: http://www.binzel-abicor.com...