Table des Matières
Publicité
Les langues disponibles
Les langues disponibles
Liens rapides
Publicité
Chapitres
Table des Matières
Dépannage

Manuels Connexes pour Ego Power+ ST1510T


Sommaire des Matières pour Ego Power+ ST1510T
- Page 1 56-VOLT LITHIUM-ION CORDLESS STRING TRIMMER Français p. 33 MODEL NUMBER Español p. 71 ST1510T/ST1510T-FC WARNING: To reduce the risk of injury, the user must read and understand the Operator’s Manual before using this product. Save these instructions for future reference.
-
Page 2: Table Des Matières
TABLE OF CONTENTS Safety Symbols ......... . 3 Safety Instructions . -
Page 3: Safety Symbols
SAFETY SYMBOLS The purpose of safety symbols is to attract your attention to possible dangers. The safety symbols and the explanations with them deserve your careful attention and understanding. The symbol warnings do not, by themselves, eliminate any danger. The instructions and warnings they give are no substitutes for proper accident prevention measures. -
Page 4: Safety Instructions
SAFETY INSTRUCTIONS This page depicts and describes safety symbols that may appear on this product. Read, understand, and follow all instructions on the machine before attempting to assemble and operate it. Safety Alert Indicates a potential personal injury hazard. Read & To reduce the risk of injury, user must read and Understand understand the operator’s manual before using... -
Page 5: Work Area Safety
GENERAL BATTERY-OPERATED POWER TOOL SAFETY WARNINGS WARNING: Read all safety warnings, instructions, illustrations and specifications provided with this power tool. Failure to follow all instructions listed below may result in electric shock, fire and/or serious injury. Save all warnings and instructions for future reference. WORK AREA SAFETY ◾... - Page 6 ◾ Cautionary statements regarding the use of proper clothing and footwear during operation to reduce the risk of injury that may be caused by flying debris. ◾ If devices are provided for the connection of dust extraction and collection facilities, ensure these are connected and properly used. Use of dust collection can reduce dust-related hazards.
-
Page 7: Battery Pack
◾ Keep handles and grasping surfaces dry, clean and free from oil and grease. Slippery handles and grasping surfaces may lead to unsafe handling and/or loss of control of the tool. ◾ Keep cables away from the working area of the tool. During operation cables may be hidden from view and can be accidentally damaged by the tool. -
Page 8: Important Safety Instructions
◾ Follow all charging instructions and do not charge the battery pack or tool outside the temperature range specified in the instructions. Charging improperly or at temperatures outside the specified range may damage the battery and increase the risk of fire. SERVICE ◾... -
Page 9: Introduction
◾ Battery tools do not have to be plugged into an electrical outlet; therefore, they are always in operating condition. Be aware of possible hazards even when the tool is not operating. Take care when performing maintenance or service. ◾ Do not wash with a hose;... -
Page 10: Specifications
SPECIFICATIONS Voltage 56 V Low speed set: 3000-4800 RPM No-load speed High speed set: 4500-5800 RPM Cutting Mechanism Bump-feed trimmer head Cutting Line Type 0.095 in.(2.4mm) nylon twist line Cutting Width 15 in. (38 cm) Operating Temperature 32°F-104°F(0°C-40°C) Storage Temperature -4°F-158°F(-20°C-70°C) Weight (Without battery pack) 7.63 lbs (3.46 kg) -
Page 11: Description
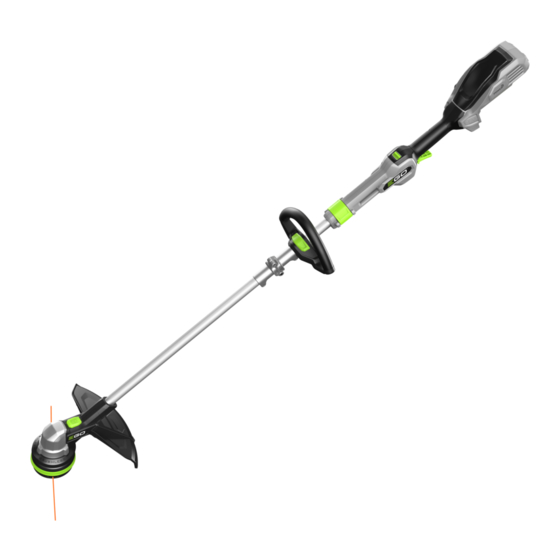
DESCRIPTION KNOW YOUR STRING TRIMMER (Fig. 1) The safe use of this product requires an understanding of the information on the tool and in this operator’s manual, as well as knowledge of the project you are attempting. Before using this product, familiarize yourself with all operating features and safety rules. High/low-speed Switch Loop Handle Rear Handle... - Page 12 WARNING: Never operate the tool without the guard firmly in place. The guard must always be on the tool to protect the user. LOOP HANDLE Quickly adjust the loop handle for easy control of the trimmer during cutting. REAR HANDLE Ergonomic handle with over mold improves comfort and grip.
- Page 13 TRIMMER HEAD (BUMP HEAD) Stores the cutting line and releases the cutting line when the head is lightly tapped on firm ground during operation. LINE-LOADING BUTTON Press this button to automatically wind the line into the trimmer head. HINGE Connects and locks the two foldable shafts. BATTERY-RELEASE BUTTON Releases the battery pack from the tool.
-
Page 14: Assembly
ASSEMBLY WARNING: If any parts are damaged or missing, do not operate this product until the parts are replaced. Use of this product with damaged or missing parts could result in serious personal injury. WARNING: Do not attempt to modify this product or create accessories not recommended for use with this product. -
Page 15: Mounting The Guard
UNFOLDING THE SHAFT WARNING: In order to avoid pinching your hands or fingers, do not hold the shaft at the joint. WARNING: Do not attempt to start the trimmer until the shaft has been locked. 1. Remove the battery pack from the trimmer. -
Page 16: Loop Handle
MOUNTING AND ADJUSTING THE Loop Handle LOOP HANDLE 1. Loosen and remove the lock-pole Lock-Pole lever and wing nut from the loop Lever handle (Fig.6). 2. Push the loop handle onto the shaft between the Height Locking Collar Clamping Block Wing Nut and hinge(Fig.7). - Page 17 ADJUSTING THE TRIMMER HEIGHT If the length of the shaft is not suitable for operation, you can adjust the length of the shaft with the height-locking clamp. 1. Remove the battery pack from the Height-Locking Clamp trimmer. 2. To adjust the trimmer height, open the height-locking clamp, and then slide the shaft up or down to desired length, securing it in place by depressing the height-locking clamp.
-
Page 18: Operation
OPERATION WARNING: Do not allow familiarity with this product to make you careless. Remember that a careless fraction of a second is sufficient to inflict serious injury. WARNING: Always wear eye protection that is marked to comply with ANSI Z87.1. Failure to do so could result in objects being thrown into your eyes and other possible serious injuries. - Page 19 NOTE: Make sure that the latch on the string trimmer snaps into place and the battery pack is secured to the tool before beginning operation. To remove battery pack (Fig. 13) Press to Release WARNING: Always be aware of the location of your feet and children or pets around you when pressing the battery release button.
- Page 20 STARTING/STOPPING THE STRING TRIMMER To Start 1. Move the lock-off trigger forward Switch Trigger and then press the switch trigger. The string trimmer will start. Lock-off Trigger 2. The rotational speed of the trimmer head is controlled with the switch trigger.
- Page 21 ADJUSTING THE CUTTING LINE LENGTH The trimmer head allows the operator to release more cutting line without stopping the motor. As line becomes frayed or worn, additional line can be released by lightly tapping the trimmer head on the ground while operating the trimmer (Fig.16).
- Page 22 1. Remove the battery pack from the Cutting Line trimmer. 2. Cut one piece of cutting line 13 ft. (4m) long. 3. Insert the line into the eyelet (Fig.17) Lower Cover and push the line until the end of Eyelet the line comes out of the opposite eyelet.
- Page 23 NOTICE: In case the line is pulled into the trimmer head by accident, open the head and pull the cutting line out from the spool. Follow the section “RELOAD THE CUTTING LINE” in this manual to reload the line. RELOAD THE CUTTING LINE NOTICE: When the cutting line breaks from the eyelet or the cutting line is not released when the trimmer head is tapped, you will need to remove the remaining cutting line from the trimmer head and follow the steps below to reload the line.
-
Page 24: Maintenance
MAINTENANCE WARNING: When servicing, use only identical replacement parts. Use of any other parts may create a hazard or cause product damage. To ensure safety and reliability, all repairs should be performed by a qualified service technician. WARNING: Battery tools do not have to plugged into an electrical outlet; therefore, they are always in operating condition. -
Page 25: Remove The Trimmer Head
REMOVE THE TRIMMER HEAD 1. Remove the battery pack from the trimmer. 2. Press the release tabs on the trimmer head and remove the lower cover assembly of the trimmer head by pulling it straight out (see Fig. 20a & 20b). 3. - Page 26 NOTICE: Bushing2# easily fall off the motor shaft, so take care to save them for reassembly. 7. Replace with a new trimmer head and mount it in following steps. INSTALL THE NEW TRIMMER HEAD Motor Shaft Bushing2# 1. Mount the bushing2# in motor shaft and mount the Upper cover base Bushing1# assembly into place (Fig.
-
Page 27: Transporting And Storing
SHARPEN THE LINE-CUTTING BLADE WARNING: Always protect your hands by wearing heavy gloves when performing any maintenance on the line-cutting blade. 1. Remove the battery. 2. Remove the line-cutting blade from the guard. 3. Secure the blade in a vise. 4. -
Page 28: Troubleshooting
TROUBLESHOOTING PROBLEM CAUSE SOLUTION ◾ ◾ The battery pack is not Attach the battery pack to the attached to the trimmer. trimmer. ◾ ◾ No electrical contact Remove battery, check contacts and between the trimmer and reinstall the battery pack. the battery pack. - Page 29 PROBLEM CAUSE SOLUTION ◾ ◾ The motor shaft or trimmer Stop the trimmer, remove the head is bound with grass. battery, and clean the motor shaft and trimmer head. ◾ ◾ There is not enough line on Remove the battery and replace the spool or the line breaks the cutting line follow “LINE REPLACEMENT”...
- Page 30 PROBLEM CAUSE SOLUTION ◾ ◾ The cutting line is too long. Cut the line so that about 5.5 in.(14cm) long is showing on each side. ◾ ◾ Improper cutting line is We suggest that you use EGO used. original nylon cutting line, see“Recommended Cutting Line”section in this manual.
-
Page 31: Warranty
WARRANTY EGO WARRANTY POLICY 5-year limited warranty on EGO POWER+ outdoor power equipment and portable power for personal, household use. 3-year limited warranty on EGO POWER+ System battery packs and chargers for personal, household use. An additional 2-year extended warranty applies for the 10.0Ah battery whether sold separately (Model# BA5600T) or included with any tool, if it is registered within 90 days of purchase. -
Page 32: How To Obtain Service
d) This warranty is void if the product has been used for rental purpose. e) This warranty does not cover the damage resulting from modification, alteration or unauthorized repair. f) This warranty only covers defects arising under normal usage and does not cover any malfunction, failure or defect resulting from misuse, abuse (including overloading of the product beyond capacity and immersion in water or other liquid), accidents, neglect or lack of proper installation, and improper maintenance... - Page 33 PILES AU LITHIUM-ION DE 56 VOLTS NUMÉRO DE MODÈLE ST1510T/ST1510T-FC AVERTISSEMENT : Afin de réduire les risques de blessure, l’utilisateur doit lire et comprendre le guide d’utilisation avant d’utiliser ce produit. Conservez le présent guide afin de pouvoir le consulter ultérieurement.
- Page 34 Garantie ..........69-70 TAILLE-BORDURE SANS FIL À PILES AU LITHIUM-ION DE 56 VOLTS — ST1510T/ST1510T-FC...
-
Page 35: Symboles De Sécurité
Nous recommandons le port d’un masque de sécurité panoramique par-dessus les lunettes ou de lunettes de sécurité standard avec écrans latéraux. Portez toujours des lunettes de sécurité conformes à la norme ANSI Z87.1. TAILLE-BORDURE SANS FIL À PILES AU LITHIUM-ION DE 56 VOLTS — ST1510T/ST1510T-FC... -
Page 36: Consignes De Sécurité
Vitesse de rotation à vide Tours par minute Longueur ou taille minute Vitesse de rotation Longueur ou taille Centimètre Longueur ou taille Millimètre Longueur ou taille Kilogramme Poids Livre Poids TAILLE-BORDURE SANS FIL À PILES AU LITHIUM-ION DE 56 VOLTS — ST1510T/ST1510T-FC... -
Page 37: Sécurité De L'aire De Travail
TAILLE-BORDURE SANS FIL À PILES AU LITHIUM-ION DE 56 VOLTS — ST1510T/ST1510T-FC... -
Page 38: Utilisation Et Entretien De L'outil Électrique
électrique qui ne peut être commandé au moyen de l’interrupteur est dangereux et doit être réparé. ◾ Utilisez le bon appareil - N'utilisez pas l'appareil pour un travail autre que celui pour lequel il est destiné TAILLE-BORDURE SANS FIL À PILES AU LITHIUM-ION DE 56 VOLTS — ST1510T/ST1510T-FC... -
Page 39: Utilisation Et Entretien Du Bloc-Pile
Un chargeur conçu pour un type de bloc-piles peut causer un incendie s’il est utilisé avec un autre bloc-piles. Utilisez l’article uniquement avec les blocs-piles et les chargeurs indiqués ci-dessous. TAILLE-BORDURE SANS FIL À PILES AU LITHIUM-ION DE 56 VOLTS — ST1510T/ST1510T-FC... - Page 40 Une recharge inadéquate ou effectuée à des températures en dehors de la plage précisée peut endommager le bloc-piles et augmenter le risque d’incendie. TAILLE-BORDURE SANS FIL À PILES AU LITHIUM-ION DE 56 VOLTS — ST1510T/ST1510T-FC...
-
Page 41: Entretien
◾ N’ouvrez pas et n’abîmez pas le bloc-piles. L’électrolyte qu’il contient est corrosif et peut causer des lésions oculaires ou cutanées. Il peut être toxique s’il est ingéré. TAILLE-BORDURE SANS FIL À PILES AU LITHIUM-ION DE 56 VOLTS — ST1510T/ST1510T-FC... -
Page 42: Introduction
DATE D’ACHAT _____________________ NOUS VOUS RECOMMANDONS DE NOTER LE NUMéRO DE SéRIE ET LA DATE D’ACHAT ET DE LES CONSERVER EN LIEU sûr AFIN DE POUVOIR LES CONSULTER ULTéRIEUREMENT. TAILLE-BORDURE SANS FIL À PILES AU LITHIUM-ION DE 56 VOLTS — ST1510T/ST1510T-FC... -
Page 43: Fil De Coupe Recommandé
Poids (sans le bloc-piles) 7.63 lbs (3.46 kg) Fil de coupe recommandé NOM DE PIÈCE TYPE NUMÉRO DE MODÈLE Fil de coupe Fil torsadé de 2,4 mm AL2415S/AL2450S/AL2420P/ AL2420PD (0.095 po) TAILLE-BORDURE SANS FIL À PILES AU LITHIUM-ION DE 56 VOLTS — ST1510T/ST1510T-FC... -
Page 44: Liste Des Pièces Contenues Dans L'emballage
Boulon pour l’arbre de verrouillage Dispositif de protection (avec deux vis préassemblées sur le dispositif de protection) Poignée en boucle à réglage rapide Clé hexagonale Fil de coupe Guide d’utilisation TAILLE-BORDURE SANS FIL À PILES AU LITHIUM-ION DE 56 VOLTS — ST1510T/ST1510T-FC... -
Page 45: Familiarisez-Vous Avec Le Taille-Bordure (Fig. 1)
Tête de taille-bordure (tête à ressort) Loquet de verrouillage Fil de coupe Contact électrique Clé hexagonale Mécanisme d’éjection Lame pour coupe de fil Languette de dégagement TAILLE-BORDURE SANS FIL À PILES AU LITHIUM-ION DE 56 VOLTS — ST1510T/ST1510T-FC... -
Page 46: Poignée Arrière
BRIDE DE FIXATION POUR VERROUILLER LA HAUTEUR La poignée peut être réglée facilement en fonction de la taille de la personne afin d’aider à assurer une hauteur de travail confortable idéale. TAILLE-BORDURE SANS FIL À PILES AU LITHIUM-ION DE 56 VOLTS — ST1510T/ST1510T-FC... -
Page 47: Mécanisme D'éjection
Connecte et verrouille les deux arbres repliables. BOUTON D’ÉJECTION DES PILES Détache le bloc-piles de l’outil. LOQUET DE VERROUILLAGE Assujettit le bloc-piles à l’outil. MÉCANISME D’ÉJECTION Aide à retirer les piles. TAILLE-BORDURE SANS FIL À PILES AU LITHIUM-ION DE 56 VOLTS — ST1510T/ST1510T-FC... -
Page 48: Assemblage
à chaîne et de l’avoir fait fonctionner de manière satisfaisante. ◾ Si une pièce quelconque est endommagée ou manquant, rapportez le produit dans le magasin où vous l’ave acheté. TAILLE-BORDURE SANS FIL À PILES AU LITHIUM-ION DE 56 VOLTS — ST1510T/ST1510T-FC... -
Page 49: Montaje De La Protección
1. Détachez le bloc-piles du taille-bordure. 2. Posez le taille-bordure sur le sol de telle façon que la tête du taille-bordure soit orientée vers le haut. TAILLE-BORDURE SANS FIL À PILES AU LITHIUM-ION DE 56 VOLTS — ST1510T/ST1510T-FC... - Page 50 à oreilles de la poignée à boucle Poignée en boucle (Fig. 6). Levier du poteau de verrouillage Bloc de serrage Écrou à oreilles TAILLE-BORDURE SANS FIL À PILES AU LITHIUM-ION DE 56 VOLTS — ST1510T/ST1510T-FC...
- Page 51 6. Engagez le levier du poteau de verrouillage afin de sécuriser la poignée à boucle en position. AVERTISSEMENT : L’outil ne peut pas être utilisé si la poignée à boucle n’est pas sécurisée solidement en place. TAILLE-BORDURE SANS FIL À PILES AU LITHIUM-ION DE 56 VOLTS — ST1510T/ST1510T-FC...
- Page 52 (Fig.11.) AVIS : La poignée à boucle devra peut-être être réajustée après avoir changé la hauteur du taille-bordure. TAILLE-BORDURE SANS FIL À PILES AU LITHIUM-ION DE 56 VOLTS — ST1510T/ST1510T-FC...
-
Page 53: Fonctionnement
Le retrait du bloc-piles empêchera une mise en marche accidentelle qui risquerait de causer des blessures graves. REMARQUE : Chargez le bloc-piles au maximum avant sa première utilisation. TAILLE-BORDURE SANS FIL À PILES AU LITHIUM-ION DE 56 VOLTS — ST1510T/ST1510T-FC... -
Page 54: Installation Du Bloc-Piles (Fig. 12)
2. Appuyez sur le bouton d’éjection des piles avec votre pouce ; le bloc-piles se détachera alors du loquet de verrouillage. 3. Saisissez le bloc-piles et retirez-le du taille-bordure. TAILLE-BORDURE SANS FIL À PILES AU LITHIUM-ION DE 56 VOLTS — ST1510T/ST1510T-FC... - Page 55 Évitez d’utiliser des solvants lorsque vous nettoyez des pièces en plastique. La plupart des plastiques sont susceptibles d’être endommagés par divers types de solvants commerciaux. Utilisez des chiffons propres pour retirer les saletés, la poussière, l’huile, la graisse, etc. TAILLE-BORDURE SANS FIL À PILES AU LITHIUM-ION DE 56 VOLTS — ST1510T/ST1510T-FC...
-
Page 56: Pour Démarrer
à la zone de coupe et relâchez la gâchette de l'interrupteur pour arrêter l'outil. AVERTISSEMENT : Retirez toujours le bloc-piles du taille-bordure pendant les pauses et après avoir fini votre travail. TAILLE-BORDURE SANS FIL À PILES AU LITHIUM-ION DE 56 VOLTS — ST1510T/ST1510T-FC... -
Page 57: Réglage De La Longueur Du Fil De Coupe
1. Détachez le bloc-piles du taille-bordure. 2. Coupez un morceau de fil de coupe de 4 m / 13 pi de long. TAILLE-BORDURE SANS FIL À PILES AU LITHIUM-ION DE 56 VOLTS — ST1510T/ST1510T-FC... - Page 58 Suivez les instructions de la rubrique « RECHARGEMENT DU FIL DE COUPE » dans ce mode d’emploi pour recharger le fil. TAILLE-BORDURE SANS FIL À PILES AU LITHIUM-ION DE 56 VOLTS — ST1510T/ST1510T-FC...
-
Page 59: Rechargement Du Fil De Coupe
6. Suivez les instructions figurant sous la rubrique « REMPLACEMENT DU FIL » pour recharger le fil de coupe. Ensemble de ② cache inférieur Languette de relâchement ① Ressort Languette de relâchement Fente TAILLE-BORDURE SANS FIL À PILES AU LITHIUM-ION DE 56 VOLTS — ST1510T/ST1510T-FC... -
Page 60: Entretien
Toutes les opérations d’entretien du taille-bordure, à l’exception de celles qui sont mentionnées dans ces instructions de maintenance, doivent être effectuées par des techniciens qualifiés pour la réparation d’un taille-bordure. TAILLE-BORDURE SANS FIL À PILES AU LITHIUM-ION DE 56 VOLTS — ST1510T/ST1510T-FC... -
Page 61: Retrait De La Tête Du Taillebordure
3. Retirez le fil de coupe de la tête du taille-bordure (Fig. 24). 4. Retirez le ressort de l’ensemble de bobine si nécessaire. Conservez-le en vue du remontage. TAILLE-BORDURE SANS FIL À PILES AU LITHIUM-ION DE 56 VOLTS — ST1510T/ST1510T-FC... - Page 62 ; faites donc attention de bien les conserver en vue du remontage. 7. Remplacement par une nouvelle tête de taille-bordure et montage en suivant les étapes ci-après. TAILLE-BORDURE SANS FIL À PILES AU LITHIUM-ION DE 56 VOLTS — ST1510T/ST1510T-FC...
-
Page 63: Installation De La Nouvelle Tête Du Taille-Bordure
L’humidité peut également causer un risque de choc. Essuyez toute humidité avec un chiffon doux et sec. TAILLE-BORDURE SANS FIL À PILES AU LITHIUM-ION DE 56 VOLTS — ST1510T/ST1510T-FC... -
Page 64: Affûtage De La Lame Coupe-Fil
à proximité de ceux-ci. ◾ Tenez-le à distance des agents corrosifs tels que des produits chimiques de jardins et des sels pour faire fondre la glace. TAILLE-BORDURE SANS FIL À PILES AU LITHIUM-ION DE 56 VOLTS — ST1510T/ST1510T-FC... -
Page 65: Dépannage
à couper et en sortir, et ne retirez pas plus de 20 cm / 8 po de long en une seule opération de coupe. TAILLE-BORDURE SANS FIL À PILES AU LITHIUM-ION DE 56 VOLTS — ST1510T/ST1510T-FC... - Page 66 Suivez les instructions afin d’affûter La lame ne bord du dispositif de protection la lame pour couper le fil ou coupe pas le fil. s’est émoussée. remplacez-la par une nouvelle lame. TAILLE-BORDURE SANS FIL À PILES AU LITHIUM-ION DE 56 VOLTS — ST1510T/ST1510T-FC...
- Page 67 ◾ ◾ La pile est partiellement Rechargez la pile. déchargée. TAILLE-BORDURE SANS FIL À PILES AU LITHIUM-ION DE 56 VOLTS — ST1510T/ST1510T-FC...
- Page 68 ; appuyez sur le bouton de head when la réinstallation. chargement du fil pour déclencher inserting the brièvement le chargement line. électrique afin de relâcher le cache inférieur. TAILLE-BORDURE SANS FIL À PILES AU LITHIUM-ION DE 56 VOLTS — ST1510T/ST1510T-FC...
-
Page 69: Garantie
La période de garantie pour les produits remis en état ou certifiés par l’usine utilisés à des fins résidentielles est de 1 an, et de 90 jours lorsqu’ils sont utilisés à des fins industrielles, professionnelles ou commerciales. TAILLE-BORDURE SANS FIL À PILES AU LITHIUM-ION DE 56 VOLTS — ST1510T/ST1510T-FC... -
Page 70: Réclamation Au Titre De La Garantie
Il se peut qu’un petit dépôt soit exigé lorsque vous laissez votre outil dans un centre de service autorisé. Ce dépôt est remboursable lorsque le service de réparation est considéré comme étant couvert par la garantie. TAILLE-BORDURE SANS FIL À PILES AU LITHIUM-ION DE 56 VOLTS — ST1510T/ST1510T-FC... - Page 71 LÁMBRICA DE ION LITIO DE 56 V MODELO NÚMERO ST1510T/ST1510T-FC ADVERTENCIA: Para reducir el riesgo de lesiones, el usuario debe leer y comprender el Manual del usuario antes de usar el producto. Guarde estas instrucciones para consultarlas en el futuro.
- Page 72 Garantía ......... . 108-110 ORILLADORA DE HILO INALÁMBRICA DE ION LITIO DE 56 V — ST1510T/ST1510T-FC...
-
Page 73: Símbolos De Seguridad
Le recomendamos usar una máscara de seguridad de visión amplia sobre anteojos o gafas de seguridad estándar con protección lateral. Use siempre lentes de protección con la marca de cumplimiento de la norma ANSI Z87.1. ORILLADORA DE HILO INALÁMBRICA DE ION LITIO DE 56 V — ST1510T/ST1510T-FC... -
Page 74: Instrucciones De Seguridad
Protección contra las salpicaduras de agua ingreso Voltio Voltaje Corriente Tipo o característica de corriente continua Velocidad sin Velocidad de rotación sin carga carga Revoluciones por Largo o tamaño minuto ORILLADORA DE HILO INALÁMBRICA DE ION LITIO DE 56 V — ST1510T/ST1510T-FC... - Page 75 Velocidad de minute Largo o tamaño rotación Centímetros Largo o tamaño Milímetro Largo o tamaño Kilogramo Peso Libra Peso ORILLADORA DE HILO INALÁMBRICA DE ION LITIO DE 56 V — ST1510T/ST1510T-FC...
-
Page 76: Seguridad En El Área De Trabajo
Transportar herramientas eléctricas con el dedo en el interruptor o enchufar herramientas eléctricas que tienen el interruptor encendido aumenta las posibilidades de accidentes. ORILLADORA DE HILO INALÁMBRICA DE ION LITIO DE 56 V — ST1510T/ST1510T-FC... -
Page 77: Uso Y Cuidado De Las Herramientas Eléctricas
Las herramientas eléctricas son peligrosas en manos de usuarios sin capacitación. ORILLADORA DE HILO INALÁMBRICA DE ION LITIO DE 56 V — ST1510T/ST1510T-FC... -
Page 78: Uso Y Cuidado De La Herramienta A Batería
Use las herramientas eléctricas solo con los paquetes de baterías específicamente designados para ellas. El uso de cualquier otro paquete de baterías puede crear un riesgo de lesión e incendio. ORILLADORA DE HILO INALÁMBRICA DE ION LITIO DE 56 V — ST1510T/ST1510T-FC... - Page 79 (2,4 mm); la utilización de hilos más gruesos que los recomendados por el fabricante aumenta la carga sobre el motor y reduce su velocidad de funcionamiento. Esto causa sobrecalentamiento y daños a la orilladora. ORILLADORA DE HILO INALÁMBRICA DE ION LITIO DE 56 V — ST1510T/ST1510T-FC...
-
Page 80: Instrucciones Importantes De Seguridad
Si presta la herramienta a alguien más, préstele también estas instrucciones para evitar el uso indebido del producto y posibles lesiones. GUARDE ESTAS INSTRUCCIONES. ORILLADORA DE HILO INALÁMBRICA DE ION LITIO DE 56 V — ST1510T/ST1510T-FC... -
Page 81: Introducción
NúMERO DE SERIE ____________________ FECHA DE COMPRA __________________ DEBE ANOTAR EL NúMERO DE SERIE Y LA FECHA DE COMPRA Y CONSERVARLOS EN UN LUGAR SEGURO PARA CONSULTARLOS EN EL FUTURO. ORILLADORA DE HILO INALÁMBRICA DE ION LITIO DE 56 V — ST1510T/ST1510T-FC... - Page 82 7.63 lbs (3.46 kg) Hilo de corte recomendado NOMBRE DE TIPO NÚMERO DEL MODELO LA PIEZA Línea de corte Hilo de nailon enrollado de AL2415S/AL2450S/AL2420P/ AL2420PD 2,41 mm (0,095 pulg.) ORILLADORA DE HILO INALÁMBRICA DE ION LITIO DE 56 V — ST1510T/ST1510T-FC...
-
Page 83: Lista De Empaque
CANTIDAD Orilladora Perno para el eje de fijación Protector (con dos tornillos preensamblados en el protector) Agarradera de ajuste rápido Llave hexagonal Hilo de corte Manual del operador ORILLADORA DE HILO INALÁMBRICA DE ION LITIO DE 56 V — ST1510T/ST1510T-FC... -
Page 84: Descripción
Cabezal de la orilladora (cabezal de avance por golpeo) Pestillo Hilo de corte Contacto eléctrico Llave hexagonal Mecanismo de eyección Hoja de corte del hilo Lengüeta de liberación ORILLADORA DE HILO INALÁMBRICA DE ION LITIO DE 56 V — ST1510T/ST1510T-FC... - Page 85 ABRAZADERA DE FIJACIÓN DE LA ALTURA El mango se puede ajustar rápidamente para acomodar cualquier tamaño de persona, lo cual ayudar a garantizar una altura de trabajo ideal y cómoda. ORILLADORA DE HILO INALÁMBRICA DE ION LITIO DE 56 V — ST1510T/ST1510T-FC...
- Page 86 BOTÓN DE LIBERACIÓN DE LA BATERÍA Libera el paquete de batería de la herramienta. PESTILLO Fija el paquete de batería a la herramienta. MECANISMO DE EYECCIÓN Ayuda a retirar la batería ORILLADORA DE HILO INALÁMBRICA DE ION LITIO DE 56 V — ST1510T/ST1510T-FC...
-
Page 87: Ensamblaje
No deseche el material de embalaje hasta que haya inspeccionado cuidadosamente y utilizado satisfactoriamente la herramienta. ◾ Si hay piezas faltantes o dañadas, devuelva este producto al lugar donde lo compró. ORILLADORA DE HILO INALÁMBRICA DE ION LITIO DE 56 V — ST1510T/ST1510T-FC... - Page 88 1. Retire el paquete de batería de la orilladora. 2. Acueste la orilladora en el terreno o el piso con el cabezal de la orilladora orientado hacia arriba. ORILLADORA DE HILO INALÁMBRICA DE ION LITIO DE 56 V — ST1510T/ST1510T-FC...
- Page 89 1. Afloje la palanca del poste de fijación y la tuerca de mariposa y Agarradera retírelas del mango en bucle (Fig. 6). Palanca del poste de fijación Bloque de sujeción Tuerca mariposa ORILLADORA DE HILO INALÁMBRICA DE ION LITIO DE 56 V — ST1510T/ST1510T-FC...
- Page 90 La herramienta no se puede utilizar sin el mango en bucle firmemente instalado. Bloque de sujeción Palanca del poste de fijación Abrazadera de fijación de la altura Bisagra Tuerca de mariposa ORILLADORA DE HILO INALÁMBRICA DE ION LITIO DE 56 V — ST1510T/ST1510T-FC...
- Page 91 (Fig. 11). AVISO: Puede que sea necesario reajustar el mango en bucle después de cambiar la altura de la orilladora. ORILLADORA DE HILO INALÁMBRICA DE ION LITIO DE 56 V — ST1510T/ST1510T-FC...
-
Page 92: Funcionamiento
NOTA: Cargue completamente el paquete de baterías antes de usar por primera vez. ORILLADORA DE HILO INALÁMBRICA DE ION LITIO DE 56 V — ST1510T/ST1510T-FC... - Page 93 La hoja de corte del hilo ubicada en el borde del protector se puede desafilar con el tiempo. Se recomienda afilarla periódicamente con una lima o reemplazarla por una nueva. ORILLADORA DE HILO INALÁMBRICA DE ION LITIO DE 56 V — ST1510T/ST1510T-FC...
- Page 94 (Fig. 14). AVISO: El motor funciona solo al mover hacia delante el gatillo de fijación en apagado y presionar el gatillo del interruptor al mismo tiempo. ORILLADORA DE HILO INALÁMBRICA DE ION LITIO DE 56 V — ST1510T/ST1510T-FC...
-
Page 95: Ajuste De La Longitud Del Hilo De Corte
La liberación del hilo se vuelve más difícil a medida que dicho hilo se vuelve más corto. Reemplace el hilo cuando sea necesario. Para obtener detalles, consulte la sección "REEMPLAZO DEL HILO ". ORILLADORA DE HILO INALÁMBRICA DE ION LITIO DE 56 V — ST1510T/ST1510T-FC... - Page 96 5. Jale el hilo desde el otro lado hasta que aparezcan longitudes iguales del mismo a ambos lados del cabezal de la orilladora (Fig. 18). 6. Instale el paquete de batería en la orilladora de hilo. ORILLADORA DE HILO INALÁMBRICA DE ION LITIO DE 56 V — ST1510T/ST1510T-FC...
- Page 97 Siga la sección “RECARGUE EL HILO DE CORTE” de este manual para recargar el hilo. ORILLADORA DE HILO INALÁMBRICA DE ION LITIO DE 56 V — ST1510T/ST1510T-FC...
- Page 98 6. Siga las instrucciones de la sección “REEMPLAZO DEL HILO” para recargar el hilo de corte. Ensamblaje de la ② cubierta inferior Lengüeta de liberación ① Resorte Lengüeta de liberación Ranura ORILLADORA DE HILO INALÁMBRICA DE ION LITIO DE 56 V — ST1510T/ST1510T-FC...
-
Page 99: Mantenimiento
Todo el servicio de ajustes y reparaciones de la orilladora de hilo, que no sea de los artículos indicados en estas instrucciones de mantenimiento, deberá ser realizado por personal competente de servicio de orilladoras de hilo. ORILLADORA DE HILO INALÁMBRICA DE ION LITIO DE 56 V — ST1510T/ST1510T-FC... - Page 100 (vea la Fig. 20a y 20b). 3. Retire el hilo de corte del cabezal de la orilladora (Fig. 24). ORILLADORA DE HILO INALÁMBRICA DE ION LITIO DE 56 V — ST1510T/ST1510T-FC...
- Page 101 7. Reemplace el cabezal de la orilladora por un cabezal nuevo y móntelo siguiendo los pasos que se indican a continuación. ORILLADORA DE HILO INALÁMBRICA DE ION LITIO DE 56 V — ST1510T/ST1510T-FC...
- Page 102 La humedad también puede causar un peligro de descargas eléctricas. Si hay humedad, elimínela con un paño suave y seco. ORILLADORA DE HILO INALÁMBRICA DE ION LITIO DE 56 V — ST1510T/ST1510T-FC...
-
Page 103: Transporte Y Almacenamiento
No almacene la unidad sobre ni adyacente a fertilizantes, gasolina u otras sustancias químicas. ◾ Mantenga la unidad alejada de los agentes corrosivos, tales como sustancias químicas de jardín y sales anticongelantes. ORILLADORA DE HILO INALÁMBRICA DE ION LITIO DE 56 V — ST1510T/ST1510T-FC... -
Page 104: Solución De Problemas
8 pulgadas de longitud en un solo corte. ORILLADORA DE HILO INALÁMBRICA DE ION LITIO DE 56 V — ST1510T/ST1510T-FC... - Page 105 ORILLADORA DE HILO INALÁMBRICA DE ION LITIO DE 56 V — ST1510T/ST1510T-FC...
- Page 106 ◾ ◾ Batería con carga baja. Cargue la batería. ORILLADORA DE HILO INALÁMBRICA DE ION LITIO DE 56 V — ST1510T/ST1510T-FC...
- Page 107 ORILLADORA DE HILO INALÁMBRICA DE ION LITIO DE 56 V — ST1510T/ST1510T-FC...
-
Page 108: Garantía
El período de garantía para productos reacondicionados o certificados de fábrica que se utilizan para fines residenciales es de 1 año, para fines industriales, profesionales o comerciales es de 90 días. ORILLADORA DE HILO INALÁMBRICA DE ION LITIO DE 56 V — ST1510T/ST1510T-FC... - Page 109 Este depósito se reembolsará cuando se considere que el servicio de reparación se haya cubierto con la garantía. ORILLADORA DE HILO INALÁMBRICA DE ION LITIO DE 56 V — ST1510T/ST1510T-FC...
-
Page 110: Limitaciones Adicionales
Para obtener el servicio al cliente, póngase en contacto con nosotros de manera gratuita al: 1-855-EGO-5656 o visite: EGOPOWERPLUS.COM EGO Customer Service, 769 SEWARD AVE NW / Suite 102 Grand Rapids, MI 49504 ORILLADORA DE HILO INALÁMBRICA DE ION LITIO DE 56 V — ST1510T/ST1510T-FC...