
Manuels Connexes pour Speck pumpen BADU 93


Sommaire des Matières pour Speck pumpen BADU 93
- Page 1 Pumpendatenblatt Pump data sheet Fiche technique pompe Pompgegevens Documentazione pompa Ficha técnica de la bomba 93-AK VD93.08.204-P 09|2021...
- Page 2 Telefon 09123 949-0 Telefax 09123 949-260 info@speck-pumps.com www.speck-pumps.com Alle Rechte vorbehalten. Inhalte dürfen ohne schriftliche Zustimmung von SPECK Pumpen Verkaufsgesellschaft GmbH weder verbreitet, vervielfältigt, bearbeitet noch an Dritte weitergegeben werden. Dieses Dokument sowie alle Dokumente im Anhang unterliegen keinem Änderungsdienst! Technische Änderungen vorbehalten!
- Page 3 BADU 93 max. L VD93.08.201-P BADU 93-AK max. L VD93.08.203-P 09|2021...
- Page 4 BADU 93 BADU 93-AK H [m] 93/55H 93/50H 93/45H 93/110 93/80 93/60 93/40H 93/70 93/30H Q [m³/h] VKL93.08.203-P 09|2021...
- Page 5 TD 50 Hz BADU 93/30 H /-AK 110 110 110 742 792 BADU 93/40 H /-AK 110 110 110 765 815 BADU 93/45 H /-AK 110 110 110 765 815 3~ 400/230 V TD 50 Hz BADU 93/30 H /-AK 1,77 1,50 3,30/5,72 63,8 70,3 72,8 ○/●...
- Page 6 TD 50 Hz BADU 93/50 H /-AK 110 110 110 765 815 BADU 93/55H /-AK 110 110 110 110 782 832 BADU 93/60 /-AK 110 110 140 110 765 815 3~ 400/230 V TD 50 Hz BADU 93/50 H /-AK 3,45 3,00 6,20/10,7 69 78,0 80,5 ○/●...
- Page 7 TD 50 Hz BADU 93/70 /-AK 110 110 140 125 766 816 BADU 93/80 /-AK 110 110 140 140 782 832 BADU 93/110 /-AK 110 110 160 140 872 872 3~ 400/230 V TD 50 Hz BADU 93/70 /-AK 3,45 3,00 6,20/10,7 68,8 78,0 80,5 ○/●...
- Page 8 Pumpendatenblatt Mitgeltende Dokumente Zu diesem Pumpendatenblatt gehört die Originalbetriebsanleitung "Normal- und selbstansaugende Pumpen mit/ohne Kunststofflaternen-Ausführung (-AK)". Sie muss für das Bedien- und Wartungspersonal frei zugänglich sein. 93-AK VD93.08.204-P DE 8 09|2021...
- Page 9 Glossar Technische Daten Sauganschluss Druckanschluss d-Saug Empfohlener Durchmesser der Saugleitung bis 5 m d-Druck Empfohlener Durchmesser der Druckleitung bis 5 m max. L Maximale Länge der Pumpe Dichte Aufgenommene Leistung Abgegebene Leistung Nennstrom Schalldruckpegel in 1 m Entfernung gemessen nach DIN 45635 (1 m) Schallleistung Gewicht...
- Page 10 Die folgenden Aufzählungen beziehen sich auf die mitgeltenden Dokumente! Installation VD93.08.202.1-P Varianten zum Einbau: Ausführung Flansch Ausführung Verschraubung mit Klebestutzen Artikel-Nr. Verschraubung 290.2072.153 Artikel-Nr. Öffnungshilfe 290.2099.800 Anschlussteile nicht im Lieferumfang enthalten. DE 10 09|2021...
- Page 11 Pump data sheet Related Documentation The additional information compiled in this data sheet must be kept together with the original operation manual for "Non-self- priming and self-priming pumps with/without plastic lanterns" and must be accessible to the relevant personnel at all times. 93-AK VD93.08.204-P 09|2021...
- Page 12 Glossary Technical data Inlet connection Outlet connection d-Saug Recommended diameter for the suction line from 5 m d-Druck Recommended diameter for the pressure line from 5 m max. L Maximum length of the pump Density Power input Power output Rated current Sound pressure level at 1 m measured in accordance with DIN 45635 (1 m) Acoustic capacity...
-
Page 13: Installation Options
The following points refer to the related documentation! Installation VD93.08.202.1-P Installation options: Flange version Screw fitting with glue adapter version Article No. Screw fitting 290.2072.153 Article No. Opening aid 290.2099.800 Connection parts not included in delivery. 09|2021 EN 13... - Page 14 Fiche technique pompe Documents applicables Le présent document technique comprend la notice d’utilisation originale pour pompes non auto-amorçantes ou auto-amorçantes, avec/sans lanterne plastique (version AK). Il est recommandé de le tenir accessible aux personnes chargées de l'utilisation et de la maintenance. 93-AK VD93.08.204-P FR 14...
-
Page 15: Glossaire
Glossaire Données techniques Raccordement aspiration Raccordement refoulement d-Saug Diamètre recommandé conduite d'aspiration à 1 m d-Druck Diamètre recommandé conduite de refoulement à 1 m max. L Longueur maximale de la pompe Densité Puissance électrique absorbée Puissance restituée Intensité nominale Niveau de pression acoustique à un mètre de distance. Mesures (1 m) effectuées conformément à... - Page 16 Les énumérations suivantes se rapportent aux documents d'accompagnement! Installation VD93.08.202.1-P Variantes de montage: Exécution avec bride Exécution avec raccord à visser et manchon à coller Référence raccord 290.2072.153 Référence clef d’ouverture 290.2099.800 Accessoires de raccordement non inclus dans la livraison. FR 16 09|2021...
- Page 17 Pompgegevens Relevante documenten Bij deze pompgegevens hoort de originele gebruiksaanwijzing "normal en zelfaanzuigende pompen met/zonder kunststof lantaarn (AK)". Deze moet voor het bedienings- en onderhoudspersoneel te allen tijde beschikbaar zijn. 93-AK VD93.08.204-P 09|2021 NL 17...
- Page 18 Woordenlijst Technische gegevens Zuigaansluiting Persaansluiting d-Saug Aanbevolen diameter van de zuigleiding vanaf 5 m d-Druck Aanbevolen diameter van de persleiding vanaf 5 m max. L Maximale lengte van de pomp Soortelijke massa Opgenomen vermogen Afgegeven vermogen Nominale stroom Geluidsniveau gemeten bij 1 m. afstand volgens DIN 45635 (1 m) Geluidsniveau Gewicht...
- Page 19 Onderstaande opsomming heeft betrekking op de overige relevante documenten! Installatie VD93.08.202.1-P Varianten voor de inbouw: Uitvoering met flensaansluiting Uitvoering met wartelmoer en lijmbus Artikelnr. aansluitset 290.2072.153 Artikelnr. openingssleutel 290.2099.800 Aansluitstukken zijn niet bij de levering inbegrepen. 09|2021 NL 19...
- Page 20 Documentazione pompe Altri documenti applicabili Le istruzioni di funzionamento originali "Pompe aspirazione normale e autodescanti, con e senza campana - esecuzione (AK)" fanno parte a questa documentazione pompa. Queste devono essere ben accessibili per il personale di servizio e per il personale di assistenza.
- Page 21 Glossario Dati tecnici Raccordo aspirazione Raccordo mandata d-Saug Diametro aspirazione consigliato da 5 m d-Druck Diametro mandata consigliato da 5 m max. L Lunghezza massima della pompa Densità Potenza assorbita Potenza resa Corrente nominale Livello di pressione acustica in 1 m di distanza. Misurato a norma (1 m) DIN 45635 Potenza acustica...
- Page 22 I seguenti elenchi riguardano i documenti di riferimento! Montaggio VD93.08.202.1-P Varianti di installazione: Esecuzione flangia Esecuzione raccordo con manicotto incollaggio Rif. Art. raccordo 290.2072.153 Rif. Art. chiave a corredo 290.2099.800 Raccordi non compresi nella fornitura. IT 22 09|2021...
-
Page 23: Ficha Técnica De La Bomba
Ficha técnica de la bomba Documentos incluidos Este documento forma parte de las instrucciones originales para bombas de "aspiración normal y bombas auto-aspirantes con/sin la versión (AK)". Se recomienda mantenerlo de fácil acceso para el personal de operación y mantenimiento. 93-AK VD93.08.204-P 09|2021... - Page 24 Glosario Datos técnicos Conexión por aspiración Conexión por presión d-Saug Diámetro recomendado de la conexión por aspiración a 5 m d-Druck Diámetro recomendado de la conexión por presión a 5 m max. L Maximo largo de la bomba Densidad Potencia absorbida Potencia disipada Corriente nominal Nivel de presión acústica a un metro de distancia.
- Page 25 Las siguientes enumeraciones se refieren a los documentos convalidados! Instalación VD93.08.202.1-P Variantes para la instalación: Versión con brida Versión enlace con válvulas Artículo Nº Enlace 290.2072.153 Artículo Nº Llave de apertura 290.2099.800 Piezas de conexión no incluidas en el envío. 09|2021 ES 25...
- Page 26 09|2021...
-
Page 27: Eg-Konformitätserklärung
| Por la presente declaramos que la unidad de bomba Baureihe Series | Série | Serie | Serie | Serie BADU 93 BADU 93-AK folgenden einschlägigen Bestimmungen entspricht: is in accordance with the following standards: | correspond aux dispositions pertinentes suivantes: | in de door ons geleverde uitvoering voldoet aan de eisen van de in het vervolg genoemde bepalingen: | è... - Page 28 | Technisch directeur en documentatie gemachtigde | Direttotore tecnico e autorizzato per la documentazione | Director técnico y documentación autorizada 91233 Neunkirchen am Sand, 28.09.2021 SPECK Pumpen Verkaufsgesellschaft GmbH Hauptstraße 3, 91233 Neunkirchen am Sand, Germany VG 766.1360.050 K' RE/SPN 09|2021...
- Page 29 DE Normal- und selbstansaugende Pumpen mit/ohne Kunststofflaternen-Ausführung (AK) EN Non self-priming and self-priming pumps with/without plastic lantern construction (AK) FR Pompes non auto-amorçantes ou auto-amorçantes avec/sans lanterne plastique (exécution AK) NL Normaal en zelfaanzuigende pompen met/zonder uitvoering met kunststof lantaarn Pompe aspirazione normale e autoadescanti con/senza campana in plastica (AK) ES Bombas normales y auto-aspirantescon/sin linternas...
- Page 30 Inhaltsverzeichnis DE Kurzbetriebsanleitung EN Translation of brief operating manual FR Transduction du résumé de la notice de montage NL Vertaling van de beknopte handleiding Traduzione della breve guida all’uso ES Traducción de las instrucciones de servicio abreviadas DE Originalbetriebsanleitung EN Original operation manual FR Instruction d'utilisation originale NL Oorspronkelijke gebruikershandleiding Manuale d'istruzioni originale...
- Page 31 Kurzbetriebsanleitung HINWEIS Nachstehend ein paar wichtige Punkte für den täglichen Betrieb Ihrer Schwimmbadpumpe. Bitte lesen Sie aber trotzdem die ausführliche Betriebsanleitung für Ihre Pumpe. ACHTUNG! Mögliche Wasserrückstände im Pumpengehäuse, sowie die Anschlusskabel im Klemmkasten (Prüflitzen), stammen von der Endprüfung der Pumpe. Vor Inbetriebnahme den Pumpenkörper mit Wasser auffüllen.
- Page 32 Translation of brief operating manual NOTICE Enclose you will find a few important points for the daily use of your swimming pool pump. However please also read the detailed operating manual for your pump. ATTENTION! Possible water residues may be found in the pump housing and connection cables (test leads) may be found in the terminal box.
- Page 33 Transduction du résumé de la notice de montage AVIS Vous trouverez ci-dessous un rappel des différents points importants pour l’utilisation quotidienne de votre pompe. Nous vous recommandons néanmoins de lire attentivement la notice d’utilisation détaillée. ATTENTION! Chaque pompe est testée individuellement après production, pour cette raison vous trouverez des traces d’eau dans le corps de pompe.
- Page 34 Vertaling van de beknopte handleiding LET OP Hieronder vindt u enkel belangrijke punten vvor het dagelijkse gebruik van uw zwembadpomp. Gelieve echter ook de uitvoerige handleiding van uw pomp te lezen. OPGELEGT! Mogelijke waterresten in pomphuis en de controlestrengen aan de aansluitkabels in de annsluitkast zijn afkomstig van de eindcontrole van de pomp.
- Page 35 Traduzione della breve guida all’uso AVVISO Di seguito sono elencati alcuni punti importanti per l’uso quotidiano della pompa per piscine. Leggere tuttavia attentamente le istruzioni d’uso dettagliate della pompa. ATTENZIONE! Possibili residui d‘acqua nell’alloggiamento della pompa, cosi come la presenza di cavetti di controllo sul cavo di collegamento nella cassetta terminale, sono dovuti all’ispezione finale della pompa.
- Page 36 Traducción de las instrucciones de servicio abreviadas AVISO A continuación, adjuntamos un par de puntos importantes para el funcionamiento de su bomba de piscina. Sin embargo, le recomendamos lea también las instrucciones de servicio detalladas de su bomba. ¡ATENCIÓN! Posibles restos de agua en la carcasa de la bomba, asi como el cable de conexión en la caja de bornes (cordones conductors), detectados en la comprobación final de la bomba.
- Page 37 Originalbetriebsanleitung Normal- und selbstansaugende Pumpen mit/ohne Kunststofflaternen-Ausführung (-AK)
- Page 38 Telefax 09123 949-260 info@speck-pumps.com www.speck-pumps.com Alle Rechte vorbehalten. Inhalte dürfen ohne schriftliche Zustimmung von SPECK Pumpen Verkaufsgesellschaft GmbH weder verbreitet, vervielfältigt, bearbeitet noch an Dritte weitergegeben werden. Dieses Dokument sowie alle Dokumente im Anhang unterliegen keinem Änderungsdienst! Technische Änderungen vorbehalten!
-
Page 39: Table Des Matières
Inhaltsverzeichnis Zu diesem Dokument ................ 6 Umgang mit dieser Anleitung............6 Mitgeltende Dokumente .............. 6 1.2.1 Symbole und Darstellungsmittel ..........6 Sicherheit ................... 8 Bestimmungsgemäße Verwendung ........... 8 2.1.1 Mögliche Fehlanwendungen ........... 8 Personalqualifikation ..............8 2.2.1 Herzschrittmacher ..............9 Sicherheitsvorschriften ............... - Page 40 Beschreibung ................... 15 Funktion ..................15 3.1.1 Magnetkupplung..............15 Transport und Zwischenlagerung ..........16 Transport ................... 16 Pumpe anheben ................ 16 Lagerung ................... 17 Rücksendung ................17 Installation ..................18 Einbauort ................... 18 5.1.1 Aufstellen im Servicebereich ..........18 5.1.2 Bodenablauf muss vorhanden sein ........
- Page 41 Deckel/Saugsieb demontieren beziehungsweise montieren ..28 Saugsieb reinigen ..............29 Salzkristalle bei Kunststofflaternen-Ausführung (-AK) entfernen ................... 29 Gewährleistung ................. 30 SiC-Keramikgleitlager ............... 30 Serviceadressen ............... 30 Entsorgung ..................31 Index ....................32 06|2021 DE 5...
-
Page 42: Zu Diesem Dokument
Zu diesem Dokument Zu diesem Dokument Umgang mit dieser Anleitung Diese Anleitung ist Teil der Pumpe/Anlage. Die Pumpe/Anlage wurde nach den anerkannten Regeln der Technik hergestellt und geprüft. Dennoch können bei unsachgemäßer Verwendung, bei unzureichender Wartung oder unzulässigen Eingriffen Gefahren für Leib und Leben sowie materielle Schäden entstehen. - Page 43 Zu diesem Dokument Um die korrekte Bedienung zu verdeutlichen, sind wichtige Informationen und technische Hinweise besonders hervorgehoben. Symbol Bedeutung Einschrittige Handlungsaufforderung. Mehrschrittige Handlungsaufforderung. Reihenfolge der Schritte beachten. 06|2021 DE 7...
-
Page 44: Sicherheit
Sicherheit Sicherheit Bestimmungsgemäße Verwendung Die Pumpe ist zur Umwälzung von Schwimmbadwasser in Verbindung mit einer Schwimmbad-Filteranlage vorgesehen. Für Magnetpumpen muss das Fördermedium frei von magnetisier- baren Partikeln sein. Ausnahmen siehe Pumpendatenblatt. Zur bestimmungsgemäßen Verwendung gehört die Beachtung folgender Informationen: • Diese Anleitung •... -
Page 45: Herzschrittmacher
Sicherheit Sicherstellen, dass folgende Voraussetzungen erfüllt sind: • Das Personal, das die entsprechende Qualifikation noch nicht aufweisen kann, erhält die erforderliche Schulung, bevor es mit anlagentypischen Aufgaben betraut wird. • Die Zuständigkeiten des Personals, zum Beispiel für Arbeiten am Produkt, an der elektrischen Ausrüstung oder den hydraulischen Einrichtungen, sind entsprechend seiner Qualifikation und Arbeitsplatzbeschreibung festgelegt. -
Page 46: Bauliche Veränderungen Und Ersatzteile
Sicherheit Bauliche Veränderungen und Ersatzteile Umbau oder bauliche Veränderungen können die Betriebssicherheit beeinträchtigen. Pumpe/Anlage nur in Absprache mit dem Hersteller umbauen oder verändern. Nur Originalersatzteile oder -zubehör verwenden, das vom Hersteller autorisiert ist. Schilder Alle Schilder auf der gesamten Pumpe/Anlage in lesbarem ... -
Page 47: Elektrische Energie
Sicherheit 2.7.3 Elektrische Energie Bei Arbeiten an der elektrischen Anlage besteht durch die feuchte Umgebung erhöhte Stromschlaggefahr. Ebenso kann eine nicht ordnungsgemäß durchgeführte Installation der elektrischen Schutzleiter zum Stromschlag führen, zum Beispiel durch Oxidation oder Kabelbruch. VDE- und EVU-Vorschriften des ... -
Page 48: Störungen
Sicherheit Störungen Bei Störungen Anlage sofort stilllegen und ausschalten. Alle Störungen umgehend beseitigen lassen. Festsitzende Pumpe Wird eine festsitzende Pumpe mehrmals hintereinander eingeschaltet, kann der Motor beschädigt werden. Folgende Punkte beachten: Pumpe/Anlage nicht mehrmals hintereinander einschalten. Motorwelle von Hand durchdrehen. Siehe Kapitel 6.1.2 auf ... -
Page 49: Überhitzen
Sicherheit 2.9.4 Überhitzen Folgende Faktoren können zu einer Überhitzung der Pumpe führen: • Zu hoher Druck auf der Druckseite. • Falsch eingestellter Motorschutzschalter. • Zu hohe Umgebungstemperatur. Pumpe nicht bei geschlossenen Armaturen betreiben, Mindestförderstrom 10 % von Q Bei Pumpen mit Drehstrommotor den Motorschutzschalter ... -
Page 50: Sichere Nutzung Des Produktes
Sicherheit 2.9.9 Sichere Nutzung des Produktes Eine sichere Nutzung des Produktes ist bei folgenden Punkten nicht mehr gewährleistet: • Bei nicht ordnungsgemäßem Zustand des Rohrleitungssystems. • Bei festsitzender Pumpe. Siehe Kapitel 2.8 auf Seite 12. • Bei schadhafter oder fehlender Schutzeinrichtungen, zum Beispiel Berührungsschutz. -
Page 51: Beschreibung
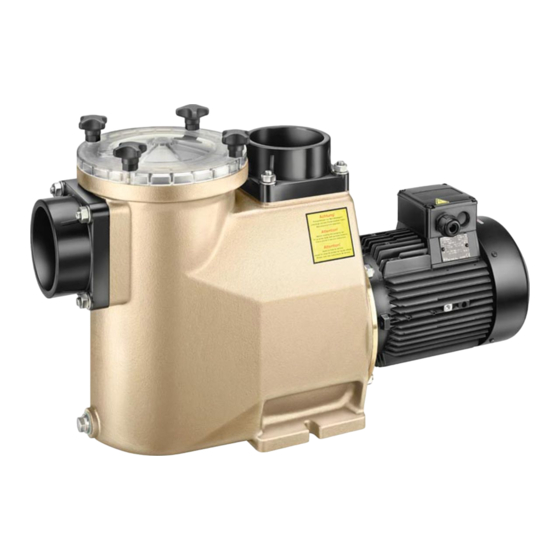
Beschreibung Beschreibung W90.04.086-1-P Abb. 1 Normalsaugende Pumpe Selbstansaugende Pumpe (1) Saugstutzen (3) Motor (2) Druckstutzen (4) Deckel mit Saugsieb Funktion Die Pumpe saugt das Wasser aus dem Schwimmbecken über eine Absperrarmatur und den Saugstutzen (1) an. Das Saugsieb (4), falls vorhanden, filtert grobe Verschmutzungen aus. Das Wasser wird über den Druckstutzen (2) und eine Absperrarmatur zur Filteranlage zurück gepumpt. -
Page 52: Transport Und Zwischenlagerung
Transport und Zwischenlagerung Transport und Zwischenlagerung Transport Lieferzustand kontrollieren: • Verpackung auf Transportschäden prüfen. • Schaden feststellen, mit Bildern dokumentieren und an den Händler wenden. Pumpe anheben GEFAHR Tod oder Quetschungen von Gliedmaßen durch herabfallendes Transportgut! Die Tragösen am Motor sind nur für das Gewicht des Motors ausgelegt. -
Page 53: Lagerung
Transport und Zwischenlagerung Lagerung HINWEIS Korrosion durch Lagerung in feuchter Luft bei wechselnden Temperaturen! Kondenswasser kann Wicklungen und Metallteile angreifen. Pumpe/Anlage in trockener Umgebung bei möglichst konstanter Temperatur zwischenlagern. HINWEIS Beschädigung des Gewindes und Eindringen von Fremdkörpern durch ungeschützte Stutzen! Stutzenabdeckungen erst vor Anschließen der Rohrleitungen ... -
Page 54: Installation
Installation Installation Einbauort 5.1.1 Aufstellen im Servicebereich Die Aufstellung der Pumpe hat im Servicebereich, z. B. Betriebsraum, Schacht oder Gartenhaus, zu erfolgen. 5.1.2 Bodenablauf muss vorhanden sein Größe des Bodenablaufs nach folgenden Kriterien bemessen: • Größe des Schwimmbeckens. •... -
Page 55: Rohrleitungen
Installation Rohrleitungen 5.2.1 Rohrleitungen dimensionieren Zu lange Saugleitungen haben erhebliche Nachteile: • Höherer Widerstand, dadurch schlechteres Ansaugverhalten und höhere Kavitationsgefahr. • Längere Ansaugzeit, bis zu zwölf Minuten. Die Rohrleitungsdimensionen, die im Pumpendatenblatt spezifiziert sind, gelten nur für eine Leitungslänge von maximal 5 m. -
Page 56: Aufstellung
Installation HINWEIS Bei einer undichten Saugleitung saugt die Pumpe schlecht oder überhaupt nicht. Dichtigkeit der Saugleitung sicherstellen und gewährleisten, dass der Deckel fest aufgeschraubt ist. Aufstellung Die Pumpe kann entweder unterhalb des Wasserniveaus im Zulaufbetrieb oder oberhalb des Wasserniveaus im Saugbetrieb aufgestellt werden. -
Page 57: Pumpe Aufstellen Und An Die Rohrleitung Anschließen
Installation 5.3.1 Pumpe aufstellen und an die Rohrleitung anschließen Pumpe horizontal und trocken aufstellen. Dabei die maximalen Abstände zum Wasserniveau, das heißt die geodätische Höhe, beachten. Siehe Pumpendatenblatt. HINWEIS Beschädigung des Motors durch unzureichenden Leckageabfluss! Leckageabfluss zwischen Pumpengehäuse und Motor nicht ... -
Page 58: Elektrischer Anschluss
Installation Elektrischer Anschluss WARNUNG Stromschlaggefahr durch unsachgemäßen Anschluss! Elektrische Anschlüsse und Verbindungen müssen immer von autorisiertem Fachpersonal vorgenommen werden. VDE- und EVU-Vorschriften des Energieversorgungsunternehmens beachten. Pumpen für Schwimmbecken und deren Schutzbereiche gemäß DIN VDE 0100-702 installieren. Trennvorrichtung zur Unterbrechung der ... -
Page 59: Inbetriebnahme/Außerbetriebnahme
Inbetriebnahme/Außerbetriebnahme Inbetriebnahme/Außerbetriebnahme Inbetriebnahme HINWEIS Beschädigung der Pumpe/Anlage durch Trockenlauf! Sicherstellen, dass die Pumpe/Anlage immer mit Wasser gefüllt ist. Dies gilt auch bei der Drehrichtungskontrolle. 6.1.1 Selbstansaugende Pumpe mit Wasser füllen Deckel abnehmen. Siehe Kapitel 8.1 auf Seite 28 HINWEIS Hochkonzentrierte Wasserpflegemittel können die Pumpe beschädigen! Keine Wasserpflegemittel, insbesondere in Tablettenform, in... -
Page 60: Pumpe Einschalten
Inbetriebnahme/Außerbetriebnahme 6.1.3 Pumpe einschalten Voraussetzungen: • Saugsieb ist eingebaut, falls vorhanden. • Deckel ist dicht montiert. • Pumpe ist bei Saugbetrieb mit Wasser gefüllt. Saugseitige Armatur vollständig öffnen. Druckseitige Armatur nur halb öffnen. HINWEIS Beschädigung der Pumpe durch Trockenlauf! Pumpe und Saugleitung entlüften. ... -
Page 61: Störungen
Störungen Störungen Gleitringdichtung HINWEIS Es ist normal, dass von Zeit zu Zeit einige Tropfen Wasser durch die Gleitringdichtung austreten. Das gilt insbesondere während der Einlaufzeit. Je nach Wasserbeschaffenheit und Betriebsstundenzahl kann die Gleitringdichtung undicht werden. Bei permanentem Wasseraustritt Gleitringdichtung von einem ... -
Page 62: Pumpe Nach Ansprechen Eines Schutzkontakts/-Schalters Prüfen
Störungen Störung: Leckage an der Pumpe. Mögliche Ursache Abhilfe Gleitringdichtung verschlissen Gleitringdichtung oder beschädigt. austauschen. Störung: Laute Motorgeräusche Mögliche Ursache Abhilfe Kugellager defekt. Kugellager von einem Fachmann auswechseln lassen. Falsche Drehrichtung (3~). Durch Elektrofachkraft prüfen lassen. Störung: Auskuppeln der Magnetkupplung Mögliche Ursache Abhilfe Schaden an Magneteinheit... -
Page 63: Ersatzteillisten
Störungen HINWEIS Wenn die Pumpe festsitzt, kann der Motor durch mehrmaliges Einschalten beschädigt werden. Sicherstellen, dass die Pumpe/Anlage nur einmal eingeschaltet wird. Warten, bis der Wicklungsschutzkontakt den Motor nach dessen Abkühlen automatisch einschaltet. – Oder – Den Motorschutzschalter zurücksetzen. Sobald die volle Drehzahl des Motors erreicht ist, die druckseitige Armatur voll öffnen. -
Page 64: Wartung/Instandhaltung
Wartung/Instandhaltung Wartung/Instandhaltung HINWEIS Vor Instandhaltungsarbeiten alle Absperrarmaturen schließen und Leitungen entleeren. Alle Pumpen Wann? Was? Regelmäßig Saugsieb reinigen. Bei Frostgefahr Pumpe und frostgefährdete Leitungen rechtzeitig entleeren. Zusätzlich bei Kunststofflaternen-Ausführung (-AK) Wann? Was? Salzkristalle, bedingt durch Regelmäßig Salzwasser, entfernen. -
Page 65: Saugsieb Reinigen
Wartung/Instandhaltung Saugsieb reinigen Pumpe ausschalten. Absperrarmaturen schließen. Deckel abnehmen. Saugsieb herausnehmen. Saugsieb mit Wasser abspritzen. Saugsieb einsetzen. HINWEIS Hochkonzentrierte Wasserpflegemittel können die Pumpe beschädigen! Keine Wasserpflegemittel, insbesondere in Tablettenform, in das Saugsieb legen. HINWEIS Ein zu starkes Anziehen des Deckels unter Verwendung der Öffnungshilfe erschwert ein erneutes Öffnen des Deckels. -
Page 66: Gewährleistung
Wartung/Instandhaltung Sicherstellen, dass die Motorwelle von den Salzkristallen vollständig befreit und sichtbar ist. Motorwelle an der Lüfterseite mit einem Schraubendreher durchdrehen. Die Motorwelle muss sich leicht durchdrehen lassen. Spannungsversorgung wieder herstellen. Gewährleistung Die Gewährleistung erstreckt sich auf die gelieferten Geräte mit allen Teilen. -
Page 67: Entsorgung
Entsorgung Entsorgung Schädliche Fördermedien auffangen und vorschriftsgemäß entsorgen. Die Pumpe/Anlage beziehungsweise die Einzelteile müssen nach Lebensdauerende fachgerecht entsorgt werden. Eine Entsorgung im Hausmüll ist nicht zulässig! Verpackungsmaterial, unter Beachtung der örtlichen Vorschriften, im Hausmüll entsorgen. 06|2021 DE 31... -
Page 68: Index
Index Index Installation 18 Aufstellung 20 Außerbetriebnahme 23, 24 Lagerung 17 Bestimmungsgemäße Mitgeltende Dokumente 6 Verwendung 8 Pumpe einschalten 24 Elektrischer Anschluss 22 Entsorgung 31 Ersatzteile 10 Rohrleitung 12, 19, 21 Fehlanwendungen 8 Frost 13 Störungen 12, 25 Gewährleistung 30 Gleitringdichtung 25 Transport 16 Inbetriebnahme 23... - Page 69 Translation of original operation manual Non self-priming and self-priming pumps with/without plastic lantern construction (AK)
- Page 70 All rights reserved. Contents may not be distributed, duplicated, edited or transferred to third parties without the written permission of SPECK Pumpen Verkaufsgesellschaft GmbH. This document and all attached documents are not subject to update service! Subject to technical modifications!
- Page 71 Table of contents About this document................. 6 Using this manual ............... 6 Other applicable documents ............6 1.2.1 Symbols and means of representation ........6 Safety ....................8 Intended use ................8 2.1.1 Possible misuse ..............8 Personnel qualification ..............8 2.2.1 Cardiac pacemakers ...............
- Page 72 Description ..................14 Function ..................14 3.1.1 Magnetic coupling ..............14 Transport and intermediate storage ..........15 Transport ................... 15 Lifting the pump ................ 15 Storage ..................16 Returns ..................16 Installation ..................17 Installation site ................17 5.1.1 Installation in the service area ..........17 5.1.2 There must be ground drainage ..........
- Page 73 Cleaning the strainer basket ............. 28 Removing salt crystals for pumps with plastic lanterns (AK version) ................28 Warranty ................... 29 SiC-Ceramic slide bearing ............29 Service addresses ..............29 Disposal .................... 30 Index ....................31 06|2021 EN 5...
-
Page 74: About This Document
About this document About this document Using this manual This manual is a component of the pump/unit. The pump/unit was manufactured and tested according to the generally accepted rules of technology. However, if the pump/unit is used incorrectly, not serviced enough or tampered with, danger to life and limb or material damage could result. - Page 75 About this document Important information and technical notes are specially marked to explain correct operation. Symbol Meaning Instructions for a one-step action. Directions for a multi-step action. Observe the order of the steps. 06|2021 EN 7...
-
Page 76: Safety
Safety Safety Intended use The pump is intended to circulate swimming pool water in connection with a swimming pool filter system. For pumps with magnetic coupling, the pumped medium must be free of magnetic particles. See the pump data sheet for exceptions. Observing the following information is vital for intended use: •... -
Page 77: Cardiac Pacemakers
Safety • The personnel have read this manual and understand the necessary working steps. 2.2.1 Cardiac pacemakers Magnets can interfere with and stop cardiac pacemakers and implanted defibrillators. – The magnetic field can cause cardiac pacemakers to switch to standard mode and therefore cause cardiovascular problems. -
Page 78: Residual Risk
Safety Residual risk 2.7.1 Falling parts The lifting hooks on the motor are designed for the weight of the motor. The lifting hooks can break if the complete pump unit is attached. The pump unit, consisting of the motor and the pump, should ... -
Page 79: Hot Surfaces
Safety • Ensure that the system is free of voltage. Check the electrical system regularly to ensure it is in proper working condition. 2.7.4 Hot surfaces The electric motor can reach temperatures of up to 70 °C. There is a risk of being burned. Do not touch the motor during operation. -
Page 80: Preventing Material Damage
Safety Preventing material damage 2.9.1 Leakage and pipe breakage Vibrations and thermal expansion can cause pipes to break. Install the pump/unit in a manner which reduces structure- borne and airborne noise transmission. When doing so, observe relevant regulations. If the pipe forces are exceeded, leaks can occur at the screwed connection or the pump itself. -
Page 81: Pressure Surges
Safety 2.9.5 Pressure surges Valves which close suddenly can cause pressure surges which far exceed the maximum permissible housing pressure of the pump. Install shock absorber or air vessel. Avoid valves which close suddenly or, if present, close them ... -
Page 82: Description
Description Description W90.04.086-1-P Fig. 1 Non-self-priming pump Self-priming pump (1) Suction discharge (3) Motor (2) Pressure discharge (4) Lid with strainer basket Function The pump draws the water from the swimming pool via a shut-off valve and the suction discharge (1). If there is a strainer basket (4), it filters out contamination. -
Page 83: Transport And Intermediate Storage
Transport and intermediate storage Transport and intermediate storage Transport Check the delivery conditions: • Check the packaging for transport damage. • Determine damages, document them with photographs and contact the distributor. Lifting the pump DANGER Goods being transported can fall and result in death or crushing of limbs! The lifting hooks on the motor are designed for the weight of the motor. -
Page 84: Storage
Transport and intermediate storage Storage NOTICE Corrosion is possible due to storage in humid conditions with fluctuating temperatures! Condensation can corrode windings and metal parts. Store the pump/unit in a dry environment at a temperature which is as constant as possible. NOTICE There is a risk of damage to the threads and entry of foreign matter due to open ports! -
Page 85: Installation
Installation Installation Installation site 5.1.1 Installation in the service area The pump must be installed in the service area, e.g. operating room, shaft or shed. 5.1.2 There must be ground drainage Calculate the size of the ground drain according to the ... -
Page 86: Pipes
Installation Pipes 5.2.1 Pipe sizing Suction lines which are too long have significant disadvantages: • Higher resistance which results in reduced suction performance and a higher risk of cavitation. • Longer priming time, up to 12 minutes. The dimensions which are specified in the pump data sheet only apply to a pipe length of maximum 5 m. -
Page 87: Installation
Installation Installation The pump can either be installed below the water level in intake mode or above the water level in suction operation mode. W90.80.020-P Fig. 3 A Installation above water level B Installation below water level = suction operation mode = intake mode (1) Foot valve is necessary for non-self-priming pumps In suction operation mode, the suction height is significantly... -
Page 88: Installing The Pump And Connecting It To The Pipework
Installation 5.3.1 Installing the pump and connecting it to the pipework Install the pump in a horizontal and dry position. When doing so, pay attention to the maximum distance to the water level, i.e. geodetic height. See pump data sheet. NOTICE The motor can be damaged due to insufficient drainage! Do not block or seal the drain gap between the pump housing... -
Page 89: Electrical Connection
Installation Electrical connection WARNING Risk of electric shock due to incorrect connections! Electrical connections must always be carried out by authorised specialists. Observe VDE and utility company regulations. Install pumps for swimming pools and their protection according to DIN VDE 0100-702. Install a disconnecting device with at least a 3 mm contact ... -
Page 90: Commissioning/Decommissioning
Commissioning/Decommissioning Commissioning/Decommissioning Commissioning NOTICE The pump/unit can be damaged if it runs dry! Ensure that the pump/unit is always full of water. This also applies to checking the rotation direction. 6.1.1 Filling self-priming pumps with water Remove the lid. See point 8.1 on page 27 NOTICE High concentrations of water treatment chemicals can damage the pump! -
Page 91: Switching The Pump On
Commissioning/Decommissioning 6.1.3 Switching the pump on Pre-requisites: • Strainer basket is installed, where applicable. • Lid is fitted securely. • The pump is filled with water for suction operation. Open the valve on the intake side completely. Only open the valve on the delivery side halfway. NOTICE The pump can be damaged if it runs dry! Purge air from the pump and suction line. -
Page 92: Faults
Faults Faults Mechanical seal NOTICE It is normal for a few drops of water to escape from the mechanical seal from time to time. This is especially true during the break-in period. Depending on the water quality and number of operating hours, the mechanical seal can begin to leak. -
Page 93: Check The Pump After The Overload Switch Has Tripped
Faults Problem: Pump leaks Possible cause Solution Mechanical seal is worn or Replace mechanical seal. damaged. Problem: Loud motor noise Possible cause Solution Faulty ball bearings. Have a mechanic replace the ball bearings. Incorrect direction of rotation Have a qualified ... -
Page 94: Spare Parts Lists
Faults Wait until the built-in overload switch automatically switches the motor on after it has cooled down. – or – Reset the motor overload switch. As soon as full motor speed is reached, open the valve on the delivery side completely. Have an electrician test the power supply, fuses and power consumption. -
Page 95: Maintenance
Maintenance Maintenance NOTICE Before maintenance work, close all shut-off valves and drain all pipes. All pumps When? What? Regularly Clean strainer basket. If there is a chance of Drain pump and pipes sensitive frost to frost in good time. Additionally for pumps with plastic lanterns (AK version) When? What? -
Page 96: Cleaning The Strainer Basket
Maintenance Cleaning the strainer basket Switch pump off. Close shut-off valves. Remove lid. Remove strainer basket. Hose strainer basket down with water. Return strainer basket. NOTICE High concentration water treatment products can damage the pump! Do not place water treatment products, particularly in tablet ... -
Page 97: Warranty
Maintenance Ensure that the motor shaft is completely free of salt crystals and is visible. Turn the motor shaft on the fan side using a screwdriver. The motor shaft must be easy to turn. Reconnect to the power supply. Warranty The warranty includes the devices delivered and all components. -
Page 98: Disposal
Disposal Disposal Collect harmful media and dispose of it according to the regulations. At the end of its service life, the pump/unit or individual components must be disposed of correctly. Disposal in the household waste is not permitted! Dispose of the packaging materials in the household waste in ... -
Page 99: Index
Index Index Mechanical seal 24 misuse 8 Commissioning 22 Other applicable documents 6 Decommissioning 22, 23 Disposal 30 pipe 12, 18, 20 Electrical connection 21 Spare parts 9 Storage 16 Switching the pump on 23 Faults 11, 24 Frost 13 Transport 15 Installation 17, 19 Intended use 8... - Page 101 Traduction des instructions d'utilisation originale Pompes non auto-amorçantes ou auto- amorçantes avec/sans lanterne plastique (exécution AK)
- Page 102 Le contenu ne doit pas être distribué, copié, modifié ou encore cédé à un tiers sans l'accord écrit de la société SPECK Pumpen Verkaufsgesellschaft GmbH. Ce document ainsi que tous les documents en annexe ne sont aucunement soumis à une obligation de mise à...
- Page 103 Sommaire A propos de ce document ..............6 Utilisation de ce manuel .............. 6 Documents annexes ..............6 1.2.1 Symboles et représentations graphiques ....... 6 Sécurité ....................8 Utilisation conforme aux dispositions ......... 8 2.1.1 Erreurs de manipulation possibles ......... 8 Qualification du personnel ............
- Page 104 Description ..................15 Fonctionnement ................ 15 3.1.1 Accouplement magnétique ........... 15 Transport et stockage intermédiaire ..........16 Transport ................... 16 Soulever la pompe ..............16 Stockage ................... 17 Retour ..................17 Installation ..................18 Lieu de montage ............... 18 5.1.1 Installation dans un local de service ........
- Page 105 Entretien/Maintenance ..............29 Démonter/remonter le couvercle/le panier filtrant ....29 Nettoyer le panier filtrant ............30 Retirer les cristaux de sel d'une pompe avec lanterne plastique (-AK) ................30 Garantie ..................31 SiC-Palier lisse en céramique........... 31 Adresses de service ..............31 Elimination ..................
-
Page 106: Propos De Ce Document
A propos de ce document A propos de ce document Utilisation de ce manuel Ce mode d'emploi est inclus dans le colis de la pompe/l'équipement. La pompe/l’équipement a été fabriquée et contrôlée selon les règles techniques reconnues. Malgré cela, en cas d'utilisation inappropriée, de maintenance insuffisante ou d'interventions non autorisées, des risques de blessure et de mort ainsi que de dommages matériels peuvent se présenter. - Page 107 A propos de ce document AVIS Recommandations pour éviter les dégâts matériels, améliorer la compréhension ou optimiser le déroulement des opérations. Pour une utilisation correcte du filtre, des informations importantes ainsi que des conseils techniques sont présentés de façon spécifique. Symbole Signification Intervention ne nécessitant qu'une seule étape.
-
Page 108: Sécurité
Sécurité Sécurité Utilisation conforme aux dispositions La pompe est destinée à la circulation de l'eau des piscines, en association avec un système de filtration de la piscine. Pour des pompes à entrainement magnétique, le liquide doit être libre de particules magnétisables. Pour les exceptions, vous référer à la fiche technique de la pompe. -
Page 109: Stimulateurs Cardiaques (Pacemakers)
Sécurité • Pour les travaux sur le système électrique : électricien qualifié. Assurez-vous que les conditions préalables suivantes sont remplies: • Le personnel qui n’a pas encore acquis la qualification requise reçoit la formation nécessaire avant d'effectuer des travaux sur ce type de système. •... -
Page 110: Équipements De Protection
Sécurité Équipements de protection Une intervention sur des pièces mobiles tels que l'accouplement et/ou la roue du ventilateur, peut provoquer des blessures graves. La pompe/l'installation doivent être utilisées uniquement avec un système de protection contre les contacts accidentels. Changements de la structure et pièces détachées Les transformations ou modifications peuvent compromettre la sécurité... -
Page 111: Énergie Électrique
Sécurité A proximité d'une pompe de type AK en fonctionnement respecter les règles suivantes : – Ne pas porter de vêtements amples. – Porter un filet de protection sur les cheveux. – Ne pas porter de bijoux. 2.7.3 Énergie électrique Un environnement humide entraîne un risque élevé... -
Page 112: Forces Magnétiques
Sécurité 2.7.7 Forces magnétiques Risque de blessures par force magnétique lors du montage/ démontage de la pompe. Prenez garde aux forces magnétiques lors de toute manipulation sur la pompe. 2.7.8 Champ magnétique Maintenez éloigné des aimants tout appareil ou objet ... -
Page 113: Fonctionnement Sans Eau
Sécurité 2.9.2 Fonctionnement sans eau En cas de fonctionnement de la pompe sans eau, la garniture mécanique et les pièces en matière plastique peuvent être détruites en l'espace de quelques secondes. Ne pas faire fonctionner la pompe sans eau. Cela vaut ... -
Page 114: Blocage De La Pompe
Sécurité 2.9.6 Blocage de la pompe Des impuretés dans la conduite d'aspiration peuvent boucher et bloquer la pompe. Ne pas démarrer la pompe sans la crépine d’aspiration ou sans sa poignée. Vérifier le bon fonctionnement de la pompe avant la mise en ... -
Page 115: Description
Description Description W90.04.086-1-P Fig. 1 A Pompe non-auto amorçante B Pompe auto-amorçante (1) Volute d'aspiration (3) Moteur (2) Volute de refoulement (4) Couvercle avec panier filtrant Fonctionnement La pompe aspire l'eau du bassin par le biais d'un clapet anti- retour et de l’orifice d'aspiration (1). Le cas échéant, le panier filtrant (4) collecte les grosses impuretés. -
Page 116: Transport Et Stockage Intermédiaire
Transport et stockage intermédiaire Transport et stockage intermédiaire Transport Contrôler la livraison: • Vérifier si l'emballage n’a pas subi de dommages liés au transport. • Localiser le dommage, le documenter avec des photos et contacter le revendeur. Soulever la pompe DANGER Risque de décès ou d'écrasement des membres suite à... -
Page 117: Stockage
Transport et stockage intermédiaire Stockage AVIS Corrosion due à un stockage dans un environnement humide et sujet aux variations de température ! La condensation peut endommager le bobinage et les pièces métalliques. Stockage intermédiaire de la pompe/l'installation dans un lieu ... -
Page 118: Installation
Installation Installation Lieu de montage 5.1.1 Installation dans un local de service Il faut installer la pompe dans un local de service, par exemple, dans un espace technique, un puits de pompage ou un abri de jardin. La mis 5.1.2 La mise en place d'une bonde d'évacuation de l'eau est obligatoire... -
Page 119: Tuyauteries
Installation Tuyauteries 5.2.1 Définir les dimensions des tuyauteries Des conduites d'aspiration trop longues présentent des inconvénients considérables: • Plus forte résistance, d'où une aspiration plus mauvaise et un risque de cavitation plus élevé. • Temps d'aspiration plus élevé, jusqu'à 12 minutes. Les dimensions des tuyauteries, qui sont précisées dans la fiche technique de la pompe, ne sont valables que pour des longueurs de tuyauteries de 5 m maximum. -
Page 120: Mise En Place
Installation AVIS En cas de défaut d'étanchéité de la conduite d'aspiration, la pompe a des difficultés pour aspirer ou n'aspire pas du tout. Vérifier et s'asurer de l'étanchéité de la conduite d'aspiration et que le couvercle est solidement vissé. Mise en place La pompe peut être installée soit en dessous du niveau d'eau en fonctionnement d'alimentation ou en dessous du niveau d'eau en... -
Page 121: Installer La Pompe Et La Raccorder Aux Tuyauteries
Installation 5.3.1 Installer la pompe et la raccorder aux tuyauteries Installer la pompe horizontalement et au sec. Respecter pour cela les distances maximales par rapport au niveau d’eau ainsi que la hauteur géodésique. Voir la fiche technique de la pompe. AVIS Endommagement du moteur suite à... -
Page 122: Branchement Électrique
à cette norme. Pos : 124 /Tec hnisc he D ok umentati on Speck Pumpen/Betriebs anleitung/Ins tall ati on/El ektrisc her Ansc hluss /Bauseitig er Ansc hluss @ 8\mod_1472042559745_371.docx @ 94549 @ @ 1 Raccordement au niveau du bâtiment: ... - Page 123 Installation Les pompes équipées de câbles et de connecteurs sont prêtes à être raccordées. Si le câble d’alimentation est endommagé, il faut le faire remplacer par le fabricant ou le service après-vente afin d’éviter les dangers. Pour débrancher la fiche de la prise, il est interdit de tirer sur ...
-
Page 124: Mise En Service/Mise Hors Service
Mise en service/Mise hors service Mise en service/Mise hors service Mise en service AVIS Endommagement de la pompe/l'installation suite à un fonctionnement sans eau! Assurez-vous que la pompe/l'installation soit remplie d'eau. Cette recommandation s’applique également au contrôle du sens de rotation. 6.1.1 Remplir d'eau la pompe auto-amorçante Enlever le couvercle. -
Page 125: Démarrer La Pompe
Mise en service/Mise hors service 6.1.3 Démarrer la pompe Conditions préalables: • Le panier filtrant est à sa place dans le préfiltre au cas où la pompe en est pourvue. • Le couvercle est en place et étanche. • En mode « aspiration », la pompe est remplie d’eau. Ouvrir complètement la robinetterie côté... -
Page 126: Pannes
Pannes Pannes Garniture mécanique AVIS Il est normal que, de temps en temps, des gouttelettes d'eau suintent de la garniture mécanique. Cela est particulièrement vrai lorsque la pompe est en fonctionnement. Selon la qualité de l'eau et le nombre d'heures de fonctionnement de la pompe, il se peut que la garniture mécanique ne soit plus étanche. -
Page 127: Contrôler La Pompe Après Le Déclenchement D'un Contacteur/ Disjoncteur De Protection
Pannes Pannes: La pompe est bloquée. Causes possibles Solutions Garniture mécanique collée. Faire tourner l'arbre moteur. Voir chapitre 6.1.2, page 24 Nettoyer la pompe. Pannes: Fuite à la pompe. Causes possibles Solutions Garniture mécanique usée ou Remplacer la garniture ... -
Page 128: Listes De Pièces De Rechange
Pannes Bon fonctionnement de l'arbre moteur: Enlever le tournevis. Ouvrir à moitié la vanne du côté du refoulement. Rétablir la tension d'alimentation. AVIS Si la pompe est bloquée, le moteur peut être endommagé par des redémarrages successifs. Assurez-vous que la pompe/l'installation n'a été démarrée ... -
Page 129: Entretien / Maintenance
Entretien/Maintenance Entretien/Maintenance AVIS Fermer tous les clapets anti-retour et vider les tuyauteries avant tous travaux de maintenance. Applicable à toutes les pompes Quand? Quoi? Régulièrement Nettoyer le panier filtrant. En cas de risque de gel Vidanger en temps voulu la ... -
Page 130: Nettoyer Le Panier Filtrant
Entretien/Maintenance Nettoyer le panier filtrant Éteindre la pompe. Fermer le clapet anti-retour. Enlever le couvercle. Sortir le panier filtrant. Nettoyer le panier filtrant avec de l'eau. Remettre le panier filtrant. AVIS Les produits d'entretien hautement concentrés peuvent endommager la pompe! N'introduire aucun produit d'entretien dans le panier filtrant, ... -
Page 131: Garantie
Entretien/Maintenance Enlever les croûtes de sel qui se sont formées au pied du moteur (2). Assurez-vous que l'arbre moteur est débarrassé des cristaux de sel et visible. Faire tourner l'arbre moteur avec un tournevis du côté du ventilateur. L'arbre moteur doit pouvoir trouner sans difficulté. Rétablir la tension d'alimentation. -
Page 132: Elimination
Elimination Elimination Recueillir et éliminer le liquide pompé nocif conformément aux prescriptions. La pompe/l'installation et les composants doivent être éliminés dans les règles de l'art à la fin de leur durée de vie. Une élimination avec les déchets ménagers normaux est interdite ! Jeter le matériel d'emballage avec les déchets ménagers ... -
Page 133: Index
Index Index Branchement électrique 22 Mise en place 20 Mise en service 24 Mise hors service 24, 25 Démarrer la pompe 25 Documents annexes 6 Pannes 12, 26 Pièces détachées 10 Elimination 32 Entretien 29 Erreurs de manipulation 8 Stockage 17 Garantie 31 Transport 16 Garniture mécanique 26... - Page 135 Vertaling van de oorspronkelijke gebruikershandleiding Normaal en zelfaanzuigende pompen met/zonder uitvoering met kunststof lantaarn...
- Page 136 Telefax +49 9123 949-260 info@speck-pumps.com www.speck-pumps.com Alle rechten voorbehouden. De inhoud mag, zonder schriftelijke toestemming, van SPECK Pumpen Verkaufsgesellschaft GmbH niet verspreid, vermenigvuldigd, bewerkt of aan derden gegeven worden. Dit document en ook alle documenten in de appendix kunnen veranderen!
- Page 137 Inhoudsopgave Over dit document ................6 Omgang met deze handleiding ........... 6 Overige relevante documenten........... 6 1.2.1 Symbolen en speciale opmaak ..........6 Veiligheid .................... 8 Gebruik volgens bestemming ............. 8 2.1.1 Mogelijk onjuist gebruik ............8 Kwalificaties van het personeel ..........8 2.2.1 Pacemaker ................
- Page 138 Beschrijving ..................15 Werking ..................15 3.1.1 Magneetkoppeling ..............15 Transport en tijdelijke opslag ............16 Transport ................... 16 Pomp optillen ................16 Opslag ..................17 Terugzending ................17 Installatie ..................18 Inbouwlocatie ................18 5.1.1 Installatie in het servicegebied ..........18 5.1.2 Bodemafvoer moet aanwezig zijn .........
- Page 139 Deksel/filtermandje demonteren respectievelijk monteren ..29 Filtermandje reinigen ..............30 Zoutkristallen bij uitvoering met kunststof lantaarn (-AK) verwijderen................30 Garantie ..................31 SiC-Keramisch glijlager ............31 Serviceadressen ............... 31 Verwijdering ..................32 Index ....................33 06|2021 NL 5...
-
Page 140: Over Dit Document
Over dit document Over dit document Omgang met deze handleiding Deze handleiding is onderdeel van de pomp/installatie. De pomp/installatie is volgens de erkende stand der techniek gebouwd en gecontroleerd. Desondanks kan er bij ondeskundig gebruik, bij onvoldoende onderhoud en bij ongeoorloofde ingrepen gevaar voor lijf en leden evenals materiële schade ontstaan. - Page 141 Over dit document Om de correcte bediening te verduidelijken zijn belangrijke informatie en technische aanwijzingen speciaal opgemaakt. Symbool Betekenis Uit te voeren handeling bestaande uit één stap. Handelingsinstructie bestaande uit meerdere stappen. Neem de volgorde van de stappen in acht. ...
-
Page 142: Veiligheid
Veiligheid Veiligheid Gebruik volgens bestemming De pomp dient voor circulatie van zwembadwater alleen in combinatie met een zwembadfilterinstallatie te worden gebruikt. Voor magneetpompen moet het medium vrij zijn van magnetiseerbare deeltjes. Uitzonderingen zie datablad met pompgegevens. Tot het bedoelde gebruik behoort ook het in acht nemen van onderstaande informatie: •... -
Page 143: Pacemaker
Veiligheid Zorg dat aan onderstaande voorwaarden is voldaan: • Personeel dat de betreffende kwalificaties nog niet kan aantonen, is passend geïnstrueerd voordat het werk- zaamheden aan de installatie uitvoert. • De verantwoordelijkheden van het personeel, bijvoorbeeld voor werkzaamheden aan het product, aan de elektrische uitrusting of de hydraulische voorzieningen, zijn in over- eenstemming met hun kwalificaties en functieomschrijving vastgelegd. -
Page 144: Constructieve Wijzigingen En Reserveonderdelen
Veiligheid Constructieve wijzigingen en reserveonderdelen Wijzigingen aan de installatie kunnen de bedrijfszekerheid nadelig beïnvloeden. Wijzig de pomp/installatie uitsluitend in overleg met de fabrikant. Gebruik uitsluitend originele reserveonderdelen en accessoires, die door de fabrikant zijn vrijgegeven. Afbeeldingen Houd alle afbeeldingen op de complete pomp/installatie in ... -
Page 145: Elektrische Energie
Veiligheid 2.7.3 Elektrische energie Bij werkzaamheden aan de elektrische installatie bestaat als gevolg van de vochtige omgeving verhoogd gevaar voor een elektrische schok. Ook een niet correct geïnstalleerde elektrische beschermings- geleider kan leiden tot een elektrische schok, bijvoorbeeld bij roest of een kabelbreuk. Neem de VDE- en EVU-voorschriften van het energiebedrijf ... -
Page 146: Magnetisch Veld
Veiligheid 2.7.8 Magnetisch veld Magneten van alle apparaten en voorwerpen uit de buurt houden, die door krachtige magneetvelden beschadigd of qua werking verminderd kunnen worden. Storingen Leg bij storingen de installatie direct stil en schakel deze uit. Laat alle storingen onmiddellijk verhelpen. ... -
Page 147: Cavitatie
Veiligheid 2.9.3 Cavitatie Te lange leidingen verhogen de weerstand. Daardoor bestaat het gevaar van cavitatie. Controleer of de zuigleiding dicht is. De maximale lengte van de leiding in acht nemen. Pomp alleen inschakelen bij half geopende afsluiters aan de ... -
Page 148: Bevriezingsgevaar
Veiligheid 2.9.8 Bevriezingsgevaar Maak de pomp/installatie en leidingen die kunnen bevriezen tijdig leeg. Pomp/installatie tijdens de vorstperiode uitbouwen en in een droge ruimte opslaan. 2.9.9 Veilig gebruik van het product Een veilig gebruik van het product is in onderstaande gevallen niet langer gewaarborgd: •... -
Page 149: Beschrijving
Beschrijving Beschrijving W90.04.086-1-P Afb. 1 Normaalzuigende pomp Zelfaanzuigende pomp (1) Zuigaansluiting (3) Motor (2) Persaansluiting (4) Deksel met filtermandje Werking De pomp zuigt het water uit het zwembad aan via een afsluiter en de zuigaansluiting (1). Het filtermandje (4), indien aanwezig, filtert grof vuil eruit. -
Page 150: Transport En Tijdelijke Opslag
Transport en tijdelijke opslag Transport en tijdelijke opslag Transport Controleer de levering: • Controleer de verpakking op transportschade. • Schade vaststellen, foto's maken en contact met de dealer opnemen. Pomp optillen GEVAAR Dood of letsel aan ledematen door vallende delen! De hijsogen aan de motor zijn alleen geschikt om het gewicht van de motor te dragen. -
Page 151: Opslag
Transport en tijdelijke opslag Opslag LET OP Corrosie door opslag in een vochtige omgeving bij wisselende temperaturen! Condens kan inwerken op de wikkelingen en metalen delen. Zorg bij tijdelijke opslag van de pomp/installatie voor een droge omgeving met een zo constant mogelijke temperatuur. LET OP Beschadiging van de schroefdraad en het indringen van vreemde voorwerpen door niet afgedekte aansluitingen! -
Page 152: Installatie
Installatie Installatie Inbouwlocatie 5.1.1 Installatie in het servicegebied De pomp moet worden geïnstalleerd in het onderhoudsgebied, bijv. de ruimte waar de pomp staat, de schacht of de schuur. 5.1.2 Bodemafvoer moet aanwezig zijn Bepaal de afmetingen van de bodemafvoer naar ... -
Page 153: Leidingen
Installatie Leidingen 5.2.1 Leidingen dimensioneren Te lange zuigleidingen hebben aanzienlijke nadelen: • Een hogere weerstand, waardoor slechter aanzuigen en een grotere kans op cavitatie. • Een langere aanzuigtijd, tot twaalf minuten. De afmetingen van de leidingen, gespecificeerd in het datablad met pompgegevens, gelden alleen voor een leidinglengte van maximaal 5 meter. -
Page 154: Plaatsing
Installatie Zorgen dat de zuigleiding dicht is en controleren of de deksel vastgeschroefd is. Plaatsing De pomp kan onder het waterniveau worden geplaatst in toeloopbedrijf of boven het waterniveau in aanzuigbedrijf. W90.80.020-P Afb. 3 A Opstelling boven het B Opstelling onder het waterniveau = aanzuigbedrijf waterniveau = toevoerbedrijf (1) Voetklep is bij normaalzuigende pompen noodzakelijk... -
Page 155: Pomp Plaatsen En Op De Leiding Aansluiten
Installatie 5.3.1 Pomp plaatsen en op de leiding aansluiten Pomp horizontaal en droog plaatsen. Daarbij de maximale afstanden tot het waterniveau, dat wil zeggen de geodetische hoogte, in acht nemen. Zie datablad met pompgegevens. LET OP Beschadiging van de motor door ontoereikende lekkage-afvoer! Lekkage-afvoer tussen pomphuis en motor niet belemmeren ... -
Page 156: Elektrische Aansluiting
Installatie Elektrische aansluiting WAARSCHUWING Gevaar voor een elektrische schok door ondeskundige aansluiting! Elektrische aansluitingen en verbindingen moeten altijd door geautoriseerd personeel worden uitgevoerd. Neem de VDE- en EVU-voorschriften van het energiebedrijf in acht. Installeer pompen voor zwembaden en beschermingszones ... - Page 157 Installatie Bij het verwijderen van de stekker uit het stopcontact niet aan het netsnoer trekken. 06|2021 NL 23...
-
Page 158: Inbedrijfstelling/Buitenbedrijfstelling
Inbedrijfstelling/Buitenbedrijfstelling Inbedrijfstelling/Buitenbedrijfstelling Inbedrijfstelling LET OP Beschadiging van de pomp/installatie door droogloop! Zorg dat de pomp/installatie altijd met water is gevuld. Dat geldt ook tijdens controle van de draairichting. 6.1.1 Zelfaanzuigende pomp met water vullen Deksel losschroeven. Zie hoofdstuk 8.1 op bladzijde 29 LET OP Hoog geconcentreerde waterbehandelingsproducten kunnen de pomp beschadigen! -
Page 159: Pomp Inschakelen
Inbedrijfstelling/Buitenbedrijfstelling 6.1.3 Pomp inschakelen Voorwaarden: • Filtermandje is ingebouwd, indien aanwezig. • Deksel is dicht gemonteerd. • De pomp is met water gevuld tijdens het aanzuigen. Afsluiter aan de zuigzijde volledig openen. Afsluiter aan de perszijde uitsluitend half openen. LET OP Beschadiging van de pomp door drooglopen! Ontlucht de pomp en de zuigleiding. - Page 160 Storingen Storingen Mechanical seal LET OP Het is normaal dat er van tijd tot tijd enkele druppels water door de mechanical seal gaat lekken. Dat geldt met name tijdens de inlooptijd. Afhankelijk van de waterkwaliteit en het aantal bedrijfsuren kan de mechanical seal gaan lekken.
-
Page 161: Storingen
Storingen Storing: Lekkage bij de pomp. Mogelijke oorzaak Oplossing Mechanical seal versleten of Mechanical seal beschadigd. vervangen. Storing: Harde motorgeluiden Mogelijke oorzaak Oplossing Kogellager defect. Laat het kogellager vervangen door een monteur. Verkeerde draairichting (3~). Door een vakman laten ... -
Page 162: Reserveonderdelenlijsten
Storingen LET OP Wanneer de pomp vastzit, kan de motor door meerdere keren inschakelen beschadigen. Zorg dat de pomp/installatie slechts een keer wordt ingeschakeld. Wachten tot de thermische zekering de motor na het afkoelen daarvan automatisch inschakelt. – of – De motorbeveiligingsschakelaar indrukken. -
Page 163: Onderhoud
Onderhoud Onderhoud LET OP Sluit voorafgaand aan onderhoudswerkzaamheden alle afsluiters en maak alle leidingen leeg. Alle pompen Wanneer? Wat? Regelmatig Filtermandje reinigen. Bji bevriezingsgevaar Maak de pomp en leidingen die kunnen bevriezen tijdig leeg. Extra bij uitvoering met kunststof lantaarn (-AK) Wanneer? Wat? Zoutkristallen, veroorzaakt door... -
Page 164: Filtermandje Reinigen
Onderhoud Filtermandje reinigen Pomp uitschakelen. Afsluiters sluiten. Deksel losschroeven. Filtermandje verwijderen. Filtermandje met water afspoelen. Filtermandje terugplaatsen. LET OP Hoog geconcentreerde waterbehandelingsproducten kunnen de pomp beschadigen! Waterbehandelingsproducten, met name in tabletvorm, mogen niet in het filtermandje gelegd worden. LET OP Wanneer het deksel met gereedschap te strak wordt vastgedraaid, kan het later moeilijker worden geopend. -
Page 165: Garantie
Onderhoud Controleren of de motoras volledig vrij van zoutkristallen is en dat deze zichtbaar is. Draai de motoras rond aan de ventilatorzijde met een schroevendraaier. De motoras moet makkelijk rond kunnen draaien. Sluit de pomp weer aan op de netspanning. Garantie De garantie omvat alle geleverde apparaten en onderdelen. -
Page 166: Verwijdering
Verwijdering Verwijdering Vang schadelijke vloeistoffen op en voer deze af conform de voorschriften. De pomp/installatie resp. losse onderdelen moeten aan het einde van hun levensduur correct worden afgevoerd. Afvoer met het normale huisvuil is niet toegestaan! Voer verpakkingsmateriaal af met het huisvuil, met ... -
Page 167: Index
Index Index Bevriezing 14 Onderhoud 29 Buitenbedrijfstelling 24, 25 onjuist gebruik 8 Opslag 17 Overige relevante documenten Elektrische aansluiting 22 Plaatsing 20 Garantie 31 Pomp inschakelen 25 Gebruik volgens bestemming 8 Reserveonderdelen 10 Inbedrijfstelling 24 Installatie 18 Storingen 12, 26 leiding 12, 19, 21 Leiding 19 Transport 16... - Page 169 Traduzione del manuale d'istruzioni originali Pompe aspirazione normale e autoadescanti con/senza campana in plastica (AK)
- Page 170 BADU e' un marchio ® SPECK Pumpen Verkaufsgesellschaft GmbH Hauptstraße 3 91233 Neunkirchen am Sand, Germany Telefono +49 9123 949-0 +49 9123 949-260 info@speck-pumps.com www.speck-pumps.com Tutti i diritti riservati. I contenuti non potranno essere diffusi, riprodotti, modificati né ceduti a terzi senza il consenso scritto di SPECK Pumpen Verkaufsgesellschaft GmbH.
- Page 171 Indice Informazioni sul presente documento ..........6 Utilizzo delle presenti istruzioni ..........6 Altra documentazione valida............6 1.2.1 Simboli e mezzi illustrativi ............6 Sicurezza .................... 8 Uso conforme ................8 2.1.1 Possibili usi errati ..............8 Qualifica del personale ............... 8 2.2.1 Pacemaker ................
- Page 172 Descrizione ..................15 Funzione ................... 15 3.1.1 Giunto magnetico ..............15 Trasporto ed immagazzinamento temporaneo ......16 Trasporto ................... 16 Sollevare la pompa ..............16 Immagazzinamento ..............17 Spedizione di ritorno ..............17 Installazione ..................18 Luogo di montaggio ..............18 5.1.1 Installazione in ambito di servizio .........
- Page 173 Manutenzione/controllo ..............28 Smontaggio e montaggio del coperchio/cestello ...... 28 Pulire il cestello ................. 29 Eliminare i cristalli di sale sulla pompa con campana in plastica (-AK) ................29 Garanzia ................... 30 SiC-Cuscinetti a strisciamento in ceramica ......30 Indirizzi assistenza ..............30 Smaltimento ..................
-
Page 174: Informazioni Sul Presente Documento
Informazioni sul presente documento Informazioni sul presente documento Utilizzo delle presenti istruzioni Queste istruzioni sono parte pompa/impianto. Pompa/impianto è stato prodotto e controllato secondo le regole tecniche riconosciute ed approvate. Il suo utilizzo non conforme, la sua manutenzione insufficiente o interventi non consentiti su di esso possono tuttavia comportare pericoli anche letali o danni materiali. - Page 175 Informazioni sul presente documento Per illustrare e chiarire l'uso corretto, informazioni importanti ed avvertenze tecniche sono evidenziate in modo particolare. Simbolo Significato Singola azione da compiere. Istruzioni per una serie di azioni da compiere. Rispettare l'ordine delle azioni. 06|2021 IT 7...
-
Page 176: Sicurezza
Sicurezza Sicurezza Uso conforme La pompa è stata realizzata per la circolazione dell'acqua delle piscine in collegamento con un gruppo di filtraggio (filtro). Per pompe a magnete il fluido deve essere privo di particelle magnetiche. Per le eccezioni si veda la scheda tecnica della pompa. -
Page 177: Pacemaker
Sicurezza Assicurarsi che i seguenti lavori siano effettuati solo da personale adeguatamente formato, con le seguenti qualifiche tecniche: • Lavori sul sistema meccanico, ad esempio cambio cuscinetti oppure cambio tenuta meccanica: meccanico qualificato. • Lavori sull'impianto elettrico: elettricista qualificato. Assicurare che siano soddisfatte le seguenti condizioni: ... -
Page 178: Dispositivi Di Protezione
Sicurezza Dispositivi di protezione L'intervento su componenti in movimento, come ad esempio giunto e/o ventola, può provocare lesioni gravi. Far funzionare la pompa/impianto solo con protezione contro i contatti accidentali. Modifiche strutturali e parti di ricambio Trasformazioni o modifiche possono influenzare negativamente la sicurezza operativa. -
Page 179: Energia Elettrica
Sicurezza Nelle vicinanze di una pompa con campana in plastica (-AK) durante il funzionamento prestare attenzione ai seguenti aspetti: – Indossare indumenti aderenti. – Raccogliere i capelli in una retina. – Non indossare gioielli. 2.7.3 Energia elettrica Durante i lavori sull'impianto elettrico, il pericolo di folgorazione aumenta a causa dell'ambiente umido. -
Page 180: Forze Magnetiche
Sicurezza 2.7.7 Forze magnetiche Pericolo di lesioni causate da forze magnetiche durante il montaggio/lo smontaggio della pompa. Durante i lavori sulla pompa prestare attenzione alle forze magnetiche. 2.7.8 Campo magnetico Tenere lontani i magneti da tutti gli apparecchi e gli oggetti ... -
Page 181: Funzionamento A Secco
Sicurezza 2.9.2 Funzionamento a secco Il funzionamento a secco può causare il danneggiamento irreparabile di tenute meccaniche e di parti di plastica entro pochi secondi. Non far funzionare a secco la pompa. Ciò vale anche per il controllo del verso di rotazione. Prima dell'avviamento sfiatare la pompa ed il tubo di ... -
Page 182: Bloccaggio Della Pompa
Sicurezza 2.9.6 Bloccaggio della pompa La presenza di particelle di sporco nel tubo di aspirazione può intasare e bloccare la pompa. Non azionare la pompa senza cestello rispettivamente senza la maniglia cestello. Prima della messa in servizio e dopo lunghi periodi di fermo ... -
Page 183: Descrizione
Descrizione Descrizione W90.04.086-1-P Fig. 1 Pompa aspirazione Pompa autoadescante normale (1) Raccordo di aspirazione (3) Motore (2) Raccordo di mandata (4) Coperchio con cestello Funzione La pompa aspira l'acqua dalla piscina passando da una valvola ed arrivando al raccordo di aspirazione (1). Il cestello (4), se presente, filtra lo sporco di dimensioni maggiori. -
Page 184: Trasporto Ed Immagazzinamento Temporaneo
Trasporto ed immagazzinamento temporaneo Trasporto ed immagazzinamento temporaneo Trasporto Controllare le condizione alla consegna: • Controllare se l'imballaggio presenta danni di trasporto. • Determinare il danno, documentarlo fotograficamente e inviare al rivenditore. Sollevare la pompa PERICOLO Morte o schiacciamento degli arti a seguito di caduta delle merci trasportate! Gli occhielli per il trasporto presenti sul motore sono progettati per il solo peso del motore. -
Page 185: Immagazzinamento
Trasporto ed immagazzinamento temporaneo Immagazzinamento AVVISO Corrosione a causa dell'immagazzinamento in aria umida e soggetta a sbalzi termici! L'acqua di condensa può attaccare gli avvolgimenti e le parti metalliche. Immagazzinare temporaneamente la pompa/impianto in un ambiente asciutto ed a temperatura possibilmente costante. AVVISO Danneggiamento della filettatura e penetrazione di corpi estranei attraverso bocchettoni - raccordi non protetti! -
Page 186: Installazione
Installazione Installazione Luogo di montaggio 5.1.1 Installazione in ambito di servizio L´installazione della pompa deve essere fatta in un ambito di servizio, per esempio nel locale tecnico, pozzetto o in un capannone in giardino. 5.1.2 Scarico di fondo deve essere presente Dimensionare lo scarico di fondo secondo i seguenti criteri: ... -
Page 187: Tubazioni
Installazione Tubazioni 5.2.1 Dimensionamento delle tubazioni Tubi di aspirazione di lunghezza eccessiva comportano notevoli svantaggi: • Resistenza maggiore, per cui comportamento di aspirazione peggiore e rischio di cavitazione maggiore. • Tempo di aspirazione più lungo, fino a dodici minuti. Le dimensioni dei tubi, indicate nella scheda tecnica della pompa, valgono solo per tubi di lunghezza massima 5 m. -
Page 188: Installazione
Installazione AVVISO In caso di tubazione non a tenuta, la pompa aspirerà in maniera non corretta o non aspirerà affatto. Verificare la tenuta dell’aspirazione e accertarsi che il coperchio sia avvitato in maniera fissa. Installazione La pompa potrà essere montata sotto il livello dell'acqua nel servizio di mandata o sopra il livello dell'acqua nel servizio di aspirazione. -
Page 189: Montaggio Della Pompa E Collegamento Alla Tubazione
Installazione 5.3.1 Montaggio della pompa e collegamento alla tubazione Montare la pompa orizzontalmente e all’asciutto. Durante tale operazione rispettare le distanze massime rispetto al livello dell'acqua, significa l'altezza geodetica. Vedi scheda tecnica della pompa. AVVISO Il motore può essere danneggiato dall'insufficiente deflusso - gocciolamento! Non ostruire né... -
Page 190: Collegamento Elettrico
Installazione Collegamento elettrico AVVERTENZA Pericolo di folgorazione a causa di un collegamento improprio! Gli allacciamenti e i collegamenti elettrici devono essere eseguiti da personale specializzato e autorizzato. Osservare le disposizioni VDE e dell'azienda elettrica locale. Installare le pompe per piscine e le loro aree di sicurezza ... -
Page 191: Messa In Servizio/Messa Fuori Servizio
Messa in servizio/Messa fuori servizio Messa in servizio/Messa fuori servizio Messa in servizio AVVISO Danneggiamento della pompa/impianto dovuto al funzionamento a secco! Assicurare che la pompa/impianto sia sempre piena d'acqua. Ciò vale anche per il controllo del verso di rotazione. 6.1.1 Riempire con acqua la pompa autoadescante Togliere il coperchio. -
Page 192: Accensione Della Pompa
Messa in servizio/Messa fuori servizio 6.1.3 Accensione della pompa Premesse: • Se disponibile, il cestello è montato. • Il coperchio è montato a tenuta. • In aspirazione la pompa è riempita d’acqua. Aprire completamente la valvola dal lato dell'aspirazione. Aprire solo a metà la valvola lato mandata. AVVISO Danneggiamento della pompa dovuto al funzionamento a secco! Sfiatare la pompa ed il tubo di aspirazione. -
Page 193: Guasti
Guasti Guasti Tenuta meccanica AVVISO Di tanto in tanto è normale che qualche goccia d'acqua fuoriesca dalla tenuta meccanica. Ciò si verifica specialmente durante il periodo di rodaggio. La tenuta meccanica può diventare non piu´ ermetica a seconda delle proprietà dell'acqua e del numero di ore di funzionamento. In caso di fuoriuscita permanente di acqua sostituire la tenuta ... -
Page 194: Controllare La Pompa Dopo L'intervento Di Un Interruttore/ Salvamotore
Guasti Guasto: Perdite della pompa. Possibile causa Rimedio Tenuta meccanica consumata Sostituire la tenuta o danneggiata. meccanica. Guasto: Il motore è molto rumoroso. Possibile causa Rimedio Cuscinetto a sfera difettoso. Chiedere a un meccanico di sostituire il cuscinetto. Far controllare da un Verso di rotazione errato (3~). -
Page 195: Liste Dei Pezzi Di Ricambio
Guasti AVVISO Se la pompa è bloccata, il motore può subire danni se viene acceso ripetutamente. Assicurare che la pompa/impianto venga accesa una sola volta. Attendere sino al momento in cui il contatto di protezione si attivi automaticamente, una volta terminato il raffreddamento. –... -
Page 196: Manutenzione/Controllo
Manutenzione/controllo Manutenzione/controllo AVVISO Prima di qualsiasi intervento di manutenzione, chiudere tutte le saracinesche e svuotare le tubazioni. Tutte le pompe Quando? Cosa? Regolarmente Pulire il cestello del filtro. In caso di pericolo di gelo Svuotare per tempo la pompa e i componenti esposti al gelo. -
Page 197: Pulire Il Cestello
Manutenzione/controllo Pulire il cestello Spegnere la pompa. Chiudere le saracinesche. Togliere il coperchio. Estrarre il cestello. Lavare il cestello con acqua. Inserire il cestello. AVVISO Prodotti di trattamento dell'acqua in concentrazione eccessivamente elevata possono danneggiare la pompa! Non inserire nel cestello prodotti di trattamento dell'acqua, in ... -
Page 198: Garanzia
Manutenzione/controllo Eliminare dal piedino - basamento del motore (2) la crosta salina caduta. Assicurarsi che l'albero del motore sia completamente privo di cristalli di sale e ben visibile. Ruotare l'albero motore sul lato della ventola, utilizzando un cacciavite. Deve essere possibile ruotare l'albero motore senza difficoltà. -
Page 199: Smaltimento
Smaltimento Smaltimento Raccogliere i fluidi nocivi e smaltirli nel rispetto delle disposizioni in materia. Al termine della loro durata utile, la pompa/l'impianto o i suoi singoli componenti devono essere smaltiti correttamente. Lo smaltimento insieme ai rifiuti domestici non è consentito! Smaltire il materiale di imballaggio insieme ai rifiuti domestici ... -
Page 200: Indice
Indice Indice Messa fuori servizio 23, 24 Messa in servizio 23 Accensione della pompa 24 Altra documentazione valida 6 Parti di ricambio 10 Collegamento elettrico 22 Smaltimento 31 Garanzia 30 Gelo 14 Tenuta meccanica 25 Guasti 12, 25 Trasporto 16 tubazioni 19 tubi 12, 21 Tubi 19... - Page 201 Traducción de las instrucciones originales para el manejo Bombas normales y auto-aspirantescon/sin linternas de plástico-diseño (AK)
- Page 202 BADU es una marca de ® SPECK Pumpen Verkaufsgesellschaft GmbH Hauptstraße 3 91233 Neunkirchen am Sand, Germany Teléfono +49 9123 949-0 +49 9123 949-260 info@speck-pumps.com www.speck-pumps.com Todos los derechos reservados. Los contenidos sin la autorización escrita de SPECK Pumpen Verkaufsgesellschaft GmbH ni difundirse, reproducirse, editarse ni pasarse a terceros.
- Page 203 Índice de contenidos Acerca de este documento ............... 6 Uso de estas instrucciones ............6 Documentos convalidados ............6 1.2.1 Símbolos y medios de representación ........6 Seguridad ................... 8 Utilización según prescripción ............ 8 2.1.1 Posible mal uso............... 8 Cualificación del personal ............
- Page 204 Descripción ..................15 Función ..................15 3.1.1 Acoplamiento magnético ............15 Transporte y almacenamiento intermedio ........16 Transporte ................. 16 Elevar la bomba ................ 16 Almacenamiento ............... 17 Devolución ................17 Instalación ..................18 Lugar de instalación ..............18 5.1.1 Installación en el área de servicio .........
- Page 205 Tapa/montaje o desmontaje de los prefiltros de aspiración ..29 Limpie el filtro ................30 Retirar los cristales de sal en la versión linternas de plástico (-AK) ................30 Garantía ..................31 Rodamiento deslizante cerámico ..........31 Direcciones del servicio de asistencia ........31 Eliminación de desechos ...............
-
Page 206: Acerca De Este Documento
Acerca de este documento Acerca de este documento Uso de estas instrucciones Estas instrucciones forman parte de la bomba/unidad. La bomba/unidad fue fabricada y comprobada de acuerdo con las normas tecnológicas aceptadas. Sin embargo, el uso indebido, el mantenimiento insuficiente o intervenciones inadecuadas pueden causar riesgos para la vida y la integridad física personal o daños a la propiedad. - Page 207 Acerca de este documento A fin de obtener un correcto manejo, las informaciones y las indicaciones técnicas importantes están especialmente realizadas. Símbolo Significado Petición de acción de un solo paso. Dirección de acción multi-paso. Tener en cuenta el orden de los pasos. ...
-
Page 208: Seguridad
Seguridad Seguridad Utilización según prescripción La bomba se ha previsto para la recirculación del agua del baño en conexión con una instalación de filtros en piscinas. En cuanto a bombas de arrastre magnético, es imprescindible que no haya partículas magnetizables en el líquido bombeado. Para excepciones ver ficha técnica de la bomba. -
Page 209: Marcapasos
Seguridad Asegurarse de que se cumplen los siguientes requisitos: • El personal que no esté todavía en condiciones de acreditar la cualificación necesaria, deberá recibir la capacitación necesaria antes de ser encargado de las tareas típicas del dispositivo. • Las responsabilidades del personal, p.ej. -
Page 210: Modificaciones Estructurales Y Piezas De Recambio
Seguridad Modificaciones estructurales y piezas de recambio Las reformas o modificaciones pueden afectar a la seguridad operacional. Reformar o modificar el bomba/unidad sólo de mútuo acuerdo con el fabricante. Utilizar sólo piezas de recambio originales y accesorios autorizados por el fabricante. Rótulos Mantener en estado legible todos los rótulos pertenecientes ... -
Page 211: Energía Eléctrica
Seguridad 2.7.3 Energía eléctrica Al trabajar en la instalación eléctrica existe gran peligro de descarga de corriente debido al entorno húmedo. Del mismo modo, una instalación mal realizada de los conductores protectores puede causar una descarga de corriente, p.ej. oxidación o rotura de cable. Tener en cuenta las prescripciones de la empresa de ... -
Page 212: Campo Magnético
Seguridad 2.7.8 Campo magnético Los imanes se deben mantener alejados de cualquier aparato u objeto que pueda resultar dañado o destruido por los campos magnéticos intensos. Averías En caso de averías cerrar y apagar inmediatamente el dispositivo. Disponer la reparación inmediata de todas las averías. ... -
Page 213: Cavitación
Seguridad 2.9.3 Cavitación Conductos demasiado largos elevan la resistencia. De tal manera que existe peligro de cavitación. Asegurarse de que la tubería de aspiración es hermética. Tener en cuenta la longitud máxima del conducto. Conectar la bomba sólo por el cuerpo de la bomba del lado ... -
Page 214: Peligro De Heladas
Seguridad 2.9.8 Peligro de heladas Drenar con antelación la bomba/unidad y las tuberías expuestas a las heladas. Durante el periodo de heladas, desmontar la bomba/unidad y guardarla en un lugar seco. 2.9.9 Utilización segura del producto La utilización segura del producto ya no está garantizada con los siguientes puntos: •... -
Page 215: Descripción
Descripción Descripción W90.04.086-1-P Fig. 1 Bombas con aspiración Bombas auto-aspirantes normal (1) Boquilla de aspiración (3) Motor (2) Boquilla de impulsión (4) Tapa con prefiltro Función La bomba aspira el agua de las piscinas a través de una cuerpo de la bomba y una boquilla de aspiración (1). Los prefiltros de aspiración (4) si existen filtran la suciedad más gruesa. -
Page 216: Transporte Y Almacenamiento Intermedio
Transporte y almacenamiento intermedio Transporte y almacenamiento intermedio Transporte Comprobar el estado de suministro: • Comprobar si el embalaje presenta daños de transporte. • Determinar el daño, documentar con imágenes y contactar al vendedor. Elevar la bomba PELIGRO ¡Muerte o lesiones de extremidades por caída de la mercancía! Las cargas en suspensión en el motor se computan para el peso del motor. -
Page 217: Almacenamiento
Transporte y almacenamiento intermedio Almacenamiento AVISO ¡Corrosión mediante almacenamiento en aire húmedo a diferentes temperaturas! El agua condensada puede corroer los bobinados y las partes de metal. Almacenar provisionalmente la bomba/unidad en un entorno seco a una temperatura constante. AVISO ¡Daños rápidos e infiltraciones de cuerpos extraños por boquillas desprotegidas! -
Page 218: Instalación
Instalación Instalación Lugar de instalación 5.1.1 Installación en el área de servicio La bomba debe estar instalada en un área de servicio, p. ej. en un espacio operativo, un pozo o una caseta de jardín. 5.1.2 Drenaje de fondo debe estar disponible Dimensionar el tamaño del drenaje de fondo según ... -
Page 219: Conductos
Instalación Conductos 5.2.1 Dimensionamiento de la tubería Las tuberías de aspiración demasiado largas tienen desventajas considerables: • Mayor resistencia, en consecuencia aspiración deficiente y mayor peligro de cavitación. • Mayor tiempo de aspiración, hasta 12 Mínuto. Las dimensiones de los conductos, las que se especifican en la hoja técnica de como máximo 5 m. -
Page 220: Instalación
Instalación AVISO En caso que el conducto no hermético la bomba no aspira bien o en absoluto. Asegurar la densidad de las tuberías de aspiración y garantizar que la cobertura se desatornille de forma consistente. Instalación La bomba se puede disponer por debajo del nivel del agua en el funcionamiento en carga o por encima del nivel del agua en el funcionamiento de aspiración. -
Page 221: Montar La Bomba Y Conectar Los Conductos
Instalación 5.3.1 Montar la bomba y conectar los conductos Montar y centrifugar la bomba de forma horizontal. Así se mantiene la máxima distancia al nivel del agua, nivel geodésico. Ver ficha técnica de la bomba. AVISO ¡Daños en el motor por salida del drenaje por mantenimiento deficiente! No parar ni taponar la salida de drenaje entre la carcasa de ... -
Page 222: Conexión Eléctrica
Instalación Conexión eléctrica ADVERTENCIA ¡Peligro de descarga de corriente por conexión inadecuada! Las conexiones eléctricas y las uniones siempre deben ser realizadas por personal técnico autorizado. Tener en cuenta los reglamentos VDE y EVU de las compañías eléctricas distribuidoras. Instalar bombas para piscinas y sus zonas restringidas ... - Page 223 Instalación Para extraer el conector de la toma de corriente, no debe tirarse del cable de red. 06|2021 ES 23...
-
Page 224: Puesta En Servicio/Puesta Fuera De Servicio
Puesta en servicio/Puesta fuera de servicio Puesta en servicio/Puesta fuera de servicio Puesta en servicio AVISO ¡Desperfecto de la bomba/unidad mediante funcionamiento en seco! Asegurarse de que la bomba/unidad está siempre llena de agua. Esto rige también para el control del sentido de giro. 6.1.1 Llenar con agua bombas auto-aspirantes Sacar la tapa. -
Page 225: Conexión De La Bomba
Puesta en servicio/Puesta fuera de servicio 6.1.3 Conexión de la bomba Requisitos: • Se ha instalado el cesto del prefiltro, si está disponible. • Se monta la tapa herméticamente. • En modo de aspiración, la bomba está llena de agua. Abrir de forma completa el cuerpo de la bomba de forma completamente abierta. - Page 226 Averías Averías Sello mecánico AVISO Es normal que de vez en cuando algunas gotas de agua salgan a través del retén frontal. Esto sucede especialmente durante el tiempo de marcha inicial. El retén frontal puede tener fugas dependiendo de la calidad del agua y las horas de funcionamiento.
-
Page 227: Averías
Averías Avería: Fugas de la bomba. Posibles causas Solución Cierre mecánico desgastado o Sustituir el sello dañado. mecánico. Avería: Ruido del motor alto. Posibles causas Solución Defecto del cojinete de bolas. Dejar efectuar el cambio de los rodamientos de bolas por un mecánico. -
Page 228: Listas De Piezas De Recambio
Averías AVISO Cuando la bomba está atascada, el motor puede ser dañado si se enciende varias veces. Asegúrese de que la bomba/unidad se enciende sólo una vez. Espere, hasta que el contacto de protección del motor después de haberse enfriado se reconecte de forma automática. -
Page 229: Mantenimiento
Mantenimiento Mantenimiento AVISO Antes de cualquier trabajo de mantenimiento cerrar cuerpo de la bomba y vaciar conductos. Todas las bombas ¿Cuándo? ¿Qué? Regularmente Limpie el filtro. Para evitar la Vaciar a tiempo la bomba y los congelación conductos dañados por el hielo. -
Page 230: Limpie El Filtro
Mantenimiento Limpie el filtro Apague la bomba. Cerrar cuerpo de la bomba. Retire la tapa. Retire el cesto del prefiltro. Rociar el cesto del prefiltro con agua. Colocar el cesto del prefiltro. AVISO ¡Productos químicos altamente concentrados de tratamiento de agua pueden dañar la bomba! No colocar productos químicos de alta concentración de ... -
Page 231: Garantía
Mantenimiento Alejar las incrustaciones de sal de la base del motor (2). Asegúrese de que se han liberado del eje del motor por completo los cristales de sal y es visible. Haga girar el eje del motor en el lado del ventilador con un destornillador. -
Page 232: Eliminación De Desechos
Eliminación de desechos Eliminación de desechos Recoger los fluidos de bombeo nocivos y disponer su eliminación de acuerdo con los reglamentos. La bomba/unidad o las piezas sueltas deben ser eliminadas conforme a las normas al final de la vida útil. ¡La evacuación con la basura doméstica no está... - Page 233 Índice Índice Almacenamiento 17 Instalación 18, 20 Averías 12, 26 mal uso 8 conductos 21 Mantenimiento 29 Conexión de la bomba 25 Conexión eléctrica 22 Piezas de recambio 10 Puesta en servicio 24 Documentos convalidados 6 Puesta fuera de servicio 24, 25 Eliminación de desechos 32 Retén frontal 26 Garantía 31...
- Page 236 BADU ist eine Marke der ® SPECK Pumpen Verkaufsgesellschaft GmbH Hauptstraße 3 91233 Neunkirchen am Sand, Germany Telefon 09123 949-0 Telefax 09123 949-260 info@speck-pumps.com www.speck-pumps.com 06/2021 VG 766.2000.055 140‘ RE/BA...