Table des Matières

Publicité

Les langues disponibles

Les langues disponibles

Liens rapides

www.delonghi.com
Printed in China
5711810711
/08.11

Publicité

Table des Matières
loading

Sommaire des Matières pour DeLonghi DO1289

  • Page 1 Printed in China 5711810711 /08.11...
  • Page 2 Register this product on-line and receive a free trial issue of ELECTRIC CHaRaCTERIsTICs Cook’s Illustrated. Visit www.delonghiregistration.com. CaRaCTÉRIsTIQUEs ÉLECTRIQUEs Visit www.delonghi.com for a list of service centers near you. CaRaCTERIsTICas ELECTRICas: 120 V~ 60 Hz 1 400 W Enregistrez ce produit en ligne et recevez un numéro gratuit de Cook’s Illustrated.
  • Page 3: Table Des Matières

    ELECTRICAL CONNECTION CONVERSION TABLE Only use a three-pin, 120 Volt, 60 Hz power outlet GROUNDING INSTRUCTIONS °C °F 95 ..................200 107 ..................225 120 ..................250 135 ..................275 150 ..................300 163 ..................325 177 ..................350 190 ..................375 205 ..................400 218 ..................425 233 ..................450 MaKE sURE THaT THE PLUG Is CORRECTLY GROUNDED This appliance must be grounded: in the event of short circuits, CONTENTS...
  • Page 4: Chap. 1 General

    chap. 1 general 1.1 CONTROL PANEL Display TOasT pilot light KEEP WaRM pilot light FaN & BaKE / DEFROsT pilot light BaKE pilot light BROIL pilot light PIzza pilot light DEHYD pilot light sMaRT COOKIEs pilot light 10 Mode knob 11 TEMP./sELECT/CLOCK button 12 TIME/TOasT COLOR knob 13 sTaRT/sTOP button...
  • Page 5: Important Safeguards

    IMPORTANT SAFEGUARDS throwing out the hot fat. 16. Do not use metal sponges to clean the appliance, When using electrical appliances, a number of funda- small particles may be detached that cause electric mental safety rules must be observed, including the shocks.
  • Page 6: Summary Table

    1.4 SUMMARY TABLE Temperature setting/ Wire rack and Program Modes Notes/Tips display indication accessory position DEFR FaN & BaKE/ Defrost DEFROsT Keep warm KEEP WaRM 180 °F Ideal for lasagna, meat, pizza, ca- kes in general, foods that should be crunchy on the surface (“au gratin”) and bread.
  • Page 7: Correct Wire Rack Position

    Temperature setting/ Wire rack and Program Modes Notes/Tips display indication accessory position Broil function is ideal for all types of traditional grilling: hamburgers, for broiling Broiling and top hot dogs, kebabs, etc. Use the top BROIL browning browning function to top brown open-face sandwiches, cheese toppings, and hors d’...
  • Page 8: Installation

    chap. 2 using the controls and setting the modes 1.6 INSTALLATION bake, keep warm, broil, toast, dehydrate, smart cookie and piz- za functions. 1) Check that the appliance has not suffered any damage due to transportation. 2.1 SETTING THE CLOCK 2) Place the appliance on a flat, stable surface out of the re- ach of children (the glass door becomes very hot while the When the appliance is connected to the power supply for the...
  • Page 9: Bake And Fan/Bake Modes

    display shows the time set) Press the sTaRT/sTOP button (13). The oven will start the countdown. at the end of the set time the control will emit 3 “beeps” and the display will return to stand-by (showing the time of the day, if previously set). •...
  • Page 10: General Guidelines

    To cook two dishes at the same time, simply observe these ge- Important : we recommend cooking chicken, roasts and small neral rules. fowl directly on the broiling rack resting on the bake pan (see 1. The cooking times for different recipes prepared simulta- fig.) to avoid fat spattering onto the sides of the oven and drip- neously are higher than when the items are cooked indivi- ping onto the bottom.
  • Page 11 TEMPERATURE AND TIME FOR TYPICAL FOODS (CONVECTION BAKING AND ROASTING) Temperature Food Modes setting/display Approx. time Notes and tips indicator Whole chicken 75 min. or until internal Roast in bake pan with broiling rack in- FaN & BaKE/ 350°F 3-3.5 lbs. Unstuf- temperature of 175°F in verted, with wire rack in position 1 (see DEFROsT...
  • Page 12: Smart Cookies Mode

    2.3 SMART COOKIES MODE Only when baking on two levels: at 3/4 of the baking time, an audible signal will sound to indicate that the bake pan (H) need This special function is designed to produce perfect results to be swapped and turned 180 degrees (see the figure on the when using one or two trays to bake delicate food items such right).
  • Page 13: Pizza Mode

    ton (11); place the pizza in the oven. slices of apples, pineapple, pears, peaches or bananas, placed directly on the dehydrator kit (L), will dry in 8 to 14 hours in the 3 Press the START/STOP button (13); the display will show gently circulating warm air. the countdown. at the end of the set time the control will Time will depend on the moisture in the fruit.
  • Page 14: Display Indication

    We suggest adding mozzarella or soft cheese just five mi- • Cooking result may vary; adjust these settings to your indi- nutes before the end of cooking process: the cheese will vidual preferences. melt perfectly without overburning. • In order to select the right program, refer to the following table. Display indication Notes/tips Ideal for small frozen pizzas (weight 6.5 - 9 ounce * P1 Ideal for medium frozen pizzas (weight 9 - 18 ounce) * P2...
  • Page 15: Defrost Mode

    2.6 DEFROST MODE stand-by. Turn the MODE knob (10) until the FaN BaKE/DEFROsT led Portions and pieces of raw meat, poultry and fish, frozen soups, lights on. pastry, fruit or leftovers will thaw more quickly on this setting than on a counter or in the refrigerator. Thaw only pieces or portions small enough to thaw in an hour or less and do not let food come to room temperature.
  • Page 16 stand-by. broiler heat. • Trim excess fat from meat. Dry meat, fish and poultry sur- faces with paper towel. When the function and the temperature controls are set to • Place the food on the broiling rack set in the bake pan as BROIL only the top element heats at full power. set the broiling shown in the figure. Position wire rack so that food will be rack in the bake pan on the wire rack in position 2 (see pag.
  • Page 17: Toast Mode

    2.8 TOAST MODE • When toasting, the toasting time will count down on the clock display. The timing will be different for each custom Turn the MODE knob (10) until the TOasT led lights on. setting you choose. Keep in mind that the timing is adju- sted by the oven thermostat. so if your oven is already warm, the toasting time will be less than if you start with a cold oven.
  • Page 18: Care And Cleaning

    chap. 3 cleaning and maintenance hand or in the dishwasher. select the keep warm time by turning the TIME/TOasT CO- LOR knob (12). Press the sTaRT/sTOP (13) button. The oven will start the countdown. at the end of the set time the control will emit 3 beeps and the display will return to stand-by (showing the time of the day, if previously set).
  • Page 19 If repairs become necessary, see contact information below: U.s. Residents: Please contact our toll free hotline at 01-800-322-3848 or log onto our website at www.delonghi.com. Residents of Canada: Please contact our toll free hotline at 01-888-335-6644 or log onto our website at www.delonghi.com.
  • Page 20: Branchement Electrique

    BRANCHEMENT ELECTRIQUE tension au niveau de la fiche ou sur le point de rattache- ment à l’appareil. Il peut être positionné soit sur le plan de travail soit sur un chariot mobile. Il nécessite seulement d’une prise de courant TABLEAU DE CONVERSION 120V (60 Hz) tripolaire connectée à...
  • Page 21: Chap. 1 Généralités

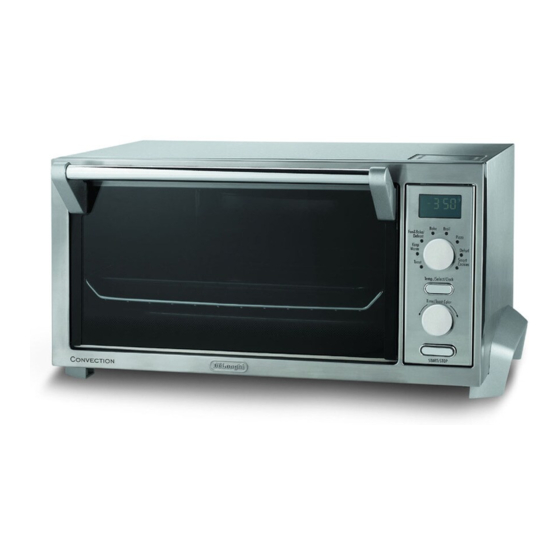
    chap. 1 généralités 1.1 TABLEAU DE COMMANDE Affichage Témoin TOAST Témoin kEEP wARM Témoin FAN & BAkE/ DEFROST Témoin BAkE Témoin BROIL Témoin PIzzA Témoin DEHyD Témoin SMART COOkIES 10 Bouton sélecteur fonctions 11 TOUCHE TEMP./SELECT/CLOCk 12 BOUTON SÉLECTEUR TIME/TOAST COLOR 13 TOUCHE START/STOP 1.2 DESCRIPTION DE L’APPAREIL Tableau de commande...
  • Page 22: Avertissements

    AVERTISSEMENTS 15. Redoublez de prudence pour retirer la lèchefrite ou vider la graisse chaude de cuisson. when using electrical appliances, a number of funda- 16. Pour nettoyer l’appareil, évitez les éponges métalli- mental safety rules must be observed, including the ques : des morceaux pourraient se détacher et pro- following: voquer des décharges électriques.
  • Page 23: Tableau Récapitulatif

    1.4 TABLEAU RÉCAPITULATIF Programmation de la Position de la grille Programme Fonctions Notes/Conseils température / Affichage et des accessoires FAN & DEFR Décongélation BAkE/ DEFROST Maintien au kEEP 180 °F chaud wARM Idéale pour lasagnes, viandes, piz- zas, gâteaux en général, aliments à surface croustillante (ou gratinés) et pour le pain.
  • Page 24: Position Correcte De La Grille

    Programmation de la Position de la grille Programme Fonctions Notes/Conseils température / Affichage et des accessoires La fonction de cuisson sur le gril est parfaite pour tous les aliments: ham- Pour cuire sur le gril Cuisson sur le BROIL burgers, hot dogs, brochettes, etc. gril et gratins Utilisez cette fonction pour dorer les sandwiches et pour gratiner.
  • Page 25: Chap. 2 Utilisation Des Commandes Et Programmation

    chap. 2 utilisation des commandes et programmation des fonctions 1.6 INSTALLATION DE’LONGHI est doté de 8 fonctions : cuisson chaleur tournante/ décongélation, traditionnelle, maintien au chaud, grillage, cu- 1) Assurez-vous que l’appareil n’a pas subi de dommages isson sur le gril, séchage, cuire les biscuits et cuisson pizza. pendant le transport.
  • Page 26: Fonction Bake Et Fan/Bake (Cuisson Traditionnelle Ou Chaleur Tournante)

    affiche l’heure programmée). Appuyez sur la touche START/STOP (13). Le four commen- ce le compte à rebours. Le temps programmé étant écoulé, l’appareil émet 3 “bips” et l’ é cran se remet en veille (affi- chant l’heure, si elle a été programmée précédemment). •...
  • Page 27 Pour cuire deux plats simultanément, il suffit de respecter que- lques règles générales. 1. Les temps pour la cuisson simultanée de recettes différen- tes sont plus longs que ceux d’une cuisson individuelle. 2. À mi-cuisson environ, intervertissez les 2 lèchefrites, en posant celle du haut sur la grille inférieure et celle du bas sur la grille supérieure.
  • Page 28 TEMPÉRATURES ET TEMPS DE CUISSON POUR PRÉPA- RATIONS TYPIQUES (CUISSON CHALEUR TOURNANTE) Programmation Temps de cuisson Ingrédients Fonctions de la tempera- Notes et conseils indicatif ture /affichage 75 min ou jusqu‘à atteindre Poulet entier de FAN & Utiliser la lèchefrite avec la grille pro- une température interne 350°F 3-3,5 livres (1 –...
  • Page 29: Fonction Smart Cookies (Cuisson De Biscuits)

    2.3 FONCTION SMART COOKIES Seulement pour la cuisson sur deux niveaux: aux 3/4 du temps de cuisson, un signal sonore vous avertira qu’il faut intervertir Cette fonction est conçue pour cuire de manière parfaite des les plaques à biscuits (L) et les tourner de 180 degrés (Voir fi- aliments délicats, comme les biscuits et les pâtisseries, en uti- gure à...
  • Page 30: Fonction Pizza

    Sélectionnez le programme désiré (voir tableau à la page suivante) en appuyant à plusieurs reprises sur la touche TEMP./SELECT/CLOCk (11). Enfournez la pizza. Disposez directement sur les grilles de séchage (L) les tranches de pomme, d’ananas, de pêche ou de banane. La circulation d’air modérément chaud les déshydratera en 8-14 heures.
  • Page 31: Pour Cuire Une Seule Pizza

    lèchefrite bien huilé (H) ou recouvert de papier sulfurisé • Pour choisir le programme le plus approprié, consultez le Nous suggérons d’ajouter la mozzarella ou le fromage cinq tableau suivant minutes avant la fin de la cuisson. Le fromage fondra de • Le résultat peut varier; réglez les programmations selon manière parfaite sans brûler. votre goût. Indication de l’écran Notes/conseils Idéal pour petites pizzas surgelées pesant 6,5 –...
  • Page 32: Fonction Defrost (Fonction Décongélation)

    2.6 FONCTION DEFROST processeur se remettra en veille. Tournez le sélecteur fonctions (10) jusqu’à ce que le té- Portions et pièces de viande crue, volaille et poisson, soupes, moin FAN BAkE/DEFROST s’allume. pâtisseries, fruits ou restes surgelés décongèlent plus vite de cette façon qu’ è température ambiante ou au réfrigérateur.
  • Page 33 les 3 minutes qui suivent la programmation précédente, le REMARQUE : les plats en verre ne doivent pas être exposés processeur se remettra en veille. directement à la chaleur du gril. • Éliminez de la viande l’ e xcédent de graisse. Essuyez la viande, le poisson et la volaille avec du papier-torchon.
  • Page 34: Fonction Toast (Grillage)

    2.8 FONCTION TOAST • Pendant que les tranches grillent, l’horloge affiche le com- pte à rebours du temps de cuisson. Le temps de grillage Tournez le sélecteur fonctions (10) jusqu’à ce que le té- varie selon les programmations sélectionnées. N’ o ubliez moin TOAST s’allume. pas que le temps est réglé par le thermostat du four. Par conséquent, si le four est déjà...
  • Page 35: Nettoyage Et Entretien

    chap. 3 nettoyage et entretien Programmez le temps en tournant le sélecteur TIME/TO- AST COLOR (12). Appuyez sur la touche START/STOP (13). Le four commence le compte à rebours. A la fin du temps programmé, l’appa- reil émet 4 “bips” et l’ é cran se remet en veille (en affichant l’heure si elle a été...
  • Page 36: Garantie Limitée

    Cette garantie s’applique à tous les appareils ménagers de mar- Veuillez appeler notre ligne d’assistance sans frais au 01-800- ques De’Longhi ou kenwood. 711-8805 ou connectez-vous à notre site web à www.delonghi. com. Qu’ e st-ce qui est couvert par la garantie?
  • Page 37: Conexión Eléctrica

    CONEXIÓN ELÉCTRICA TABLA DE CONVERsIÓN Solamente se requiere una toma de corriente de tres bocas para 120V-60 Hz, dotada de una apropiada descarga a tierra. °c °F 95 ..................200 INsTRuCCIONEs pARA LA puEsTA A TIERRA 107 ..................225 120 ..................250 135 ..................275 150 ..................300 163 ..................325 177 ..................350...
  • Page 38: Cap. 1 General

    cap. 1 general 1.1 pANEL DE MANDOs display Piloto toASt Piloto keeP wArm Piloto FAn & BAke / deFroSt Piloto BAke Piloto Broil Piloto PizzA Piloto deHyd Piloto SmArt cookieS 10 mando del selector de funciones 11 Botón temP./Select/clock 12 mando del selector time/toASt color 13 Botón StArt/StoP 1.2 DEsCRIpCIÓN DEL ApARATO Panel de mandos...
  • Page 39: Advertencias

    ADVERTENCIAs para los que ha sido proyectado. 15. extreme las precauciones al retirar la bandeja del cuando utiliza un electrodoméstico debe tomar algunas horno o cuando elimine la grasa caliente de la coc- simples precauciones de seguridad que facilitamos a con- ción.
  • Page 40: Tabla Resumen

    1.4 TABLA REsuMEN programación de la posición de la programa funciones temperatura/indica- parrilla y de los Notas/Consejos ción del display accesorios FAn & DEFR descongelación BAke/ deFroSt mantener los keeP alimentos 180 °F wArm calientes ideal para lasañas, carnes, pizzas, tartas en general, alimentos que de- ben estar crocantes en la superficie (gratinados) y pan.
  • Page 41: Posición Correcta De La Parrilla

    programación de la posición de la programa funciones temperatura/indica- parrilla y de los Notas/Consejos ción del display accesorios la función de cocción con grill es perfecta para todo tipo de alimen- Para asar a la parrilla cocción con grill tos: hamburguesas, würstel, pin- Broil y gratinado chos, etc.
  • Page 42: Instalación

    cap. 2 uso de los mandos y programación de las funciones 1.6 INsTALACIÓN correctamente en el alimento o en los bordes de la bandeja del horno o del plato. 1) Antes de usar el aparato, compruebe que no haya sufrido no tape la parrilla.
  • Page 43 cuenta atrás. Al final del tiempo programado se emiten 3 “beeps” y el display vuelve a estar en stand-by (muestra la hora, si ha sido previamente programada). • Si quiere cambiar la hora tras haber programado el reloj, pulse el botón temP./Select/clock (11) y siga las instruc- Notas: ciones facilitadas anteriormente. •...
  • Page 44: Advertencias Generales

    consideración algunas reglas generales simples: talles, lea los párrafos siguientes. 1. los tiempos para la cocción contemporánea de recetas dife- rentes son más largos que los tiempos para una única cocción. 2. en la mitad del ciclo de cocción, debe intercambiar las dos bandejas del horno, ponga la superior sobre la parrilla del nivel inferior y viceversa.
  • Page 45: Tiempo De Cocción

    TEMpERATuRAs Y TIEMpOs DE COCCIÓN pARA pREpARACIONEs TÍpICAs (COCCIÓN VENTILADA) pROgR.TEMp./ TIEMpO DE COCCIÓN INgREDIENTEs INDICACIÓN NOTAs Y CONsEJOs fuNCIONEs INDICATIVO DEL DIspLAY Pollo entero de 3-3.5 FAn & 75 min. o hasta alcanzar una utilice la bandeja del horno con la 350°F lbs.(1 –...
  • Page 46 2.3 COCCIÓN DE LAs gALLETAs de cocción, una señal acústica le avisará que debe invertir las bandejas de repostería (l) entre ellas y girarlas a 180 grados esta función ha sido concebida para cocer con resultados óptimos (consulte la figura de la derecha). tras haber invertido las dos alimentos delicados, tales como diferentes tipos de galletas y bandejas, pulse el botón StArt/StoP para acabar la cocción.
  • Page 47: Función Pizza

    guiente) pulsando repetidamente el botón temP./Select/ clock (11); meta la pizza en el horno. coloque directamente en las parrillas para deshidratación rodajas de manzana, piña, melocotón o plátano. la circulación de aire modera- damente caliente las deshidratará en 8-14 horas. el tiempo necesario para la completa deshidratación depende de la jugosidad de la fruta.
  • Page 48 • Pizza casera con masa fresca; extienda la pizza en la ban- perfectamente sin quemarse. deja para pizza untada con aceite (o) o revista la bandeja • Para elegir el programa más adecuado, consulte la tabla con papel de horno. siguiente; • Le aconsejamo añadir la mozzarella o el queso tierno cinco • El resultado puede variar; regule las programaciones en minutos antes del final de la cocción; el queso se derretirá base a su gusto.
  • Page 49 2.6 fuNCIÓN DEsCONgELACIÓN o en el frigorífico. descongele solamente porciones o trozos suficientemente gire el selector de funciones (10) hasta que el piloto FAn pequeños para poder descongelarlos en una hora al máxi- BAke/deFroSt se encienda. mo y no deje que los alimentos se pongan a la temperatu- ra ambiente.
  • Page 50 vuelve a estar en stand-by. notA: no exponga platos de horno de vidrio directamente • Elimine la grasa excesiva de la carne. Seque la carne, el al calor del grill. pescado y la carne de ave con papel absorbente. coloque los alimentos sobre la parrilla dietética situada en la cuando el mando del termostato y del selector de funciones bandeja del horno siguiendo las indicaciones de la figura.
  • Page 51 2.8 TOsTADO atrás del tiempo de cocción. • El tiempo de tostado varía en función de las programacio- gire el selector de funciones (10) hasta que el piloto toASt nes seleccionadas. se encienda. • Tenga en consideración que el termostato del horno regu- la el tiempo. • Por consiguiente, si el horno está ya caliente, el tostado durará menos tiempo. • Puede interrumpir la cocción en cualquier momento pul- sando el botón StArt/StoP (13). •...
  • Page 52: Limpieza Y Mantenimiento

    cap. 3 limpieza y mantenimiento gire el selector time/toASt color (12) para programar el a mano como en el lavavajillas. tiempo . Pulse el botón StArt/StoP (13). el horno empieza la cuen- ta atrás. Al final del tiempo programado se emiten 3 “beeps” y el display vuelve a estar en stand-by (muestra la hora, si ha sido previamente programada).
  • Page 53 Por favor contactar a nuestra línea telefónica gratuita, al 01- Esta garantía cubre todos los productos con las marcas De’Lon- 888-335-6644 o ingrese a nuestro sitio en el internet www. ghi o kenwood. delonghi.com. Alcance de la garantía residentes de méxico: cada artefacto tiene garantía por defectos de materiales y de Por favor contactar a nuestra línea telefónica gratuita, al 01-...

Table des Matières