Table des Matières

Publicité

Les langues disponibles

Les langues disponibles

Liens rapides

KD-R960BTS / KD-AR865BTS / KD-R860BT
CD RECEIVER
INSTRUCTION MANUAL
RÉCEPTEUR CD
MANUEL D'INSTRUCTIONS
RECEPTOR CON CD
MANUAL DE INSTRUCCIONES
Please read all instructions carefully before
operation to obtain the best possible performance
from the unit.
Veuillez lires les instructions attentivement avant
d'utiliser l'appareil afin d'obtenir les meilleures
performances possibles de l'appareil.
Por favor lea detenidamente este manual para
comprender a fondo todas las instrucciones y
obtener un máximo disfrute de esta unidad.
For customer Use:
Enter below the Model No. and Serial No. which are
located on the top or bottom of the cabinet. Retain this
information for future reference.
Model No.
Serial No.
ENGLISH
FRANÇAIS
ESPAÑOL
B5A-0110-10 [J]

Publicité

Table des Matières
loading

Sommaire des Matières pour JVC KD-R960BTS

  • Page 1 ENGLISH FRANÇAIS ESPAÑOL KD-R960BTS / KD-AR865BTS / KD-R860BT CD RECEIVER Please read all instructions carefully before INSTRUCTION MANUAL operation to obtain the best possible performance from the unit. RÉCEPTEUR CD Veuillez lires les instructions attentivement avant MANUEL D’INSTRUCTIONS d’utiliser l’appareil afin d’obtenir les meilleures RECEPTOR CON CD performances possibles de l’appareil.
  • Page 2: Fcc Warning

    FCC NOTE JVC KENWOOD Corporation This equipment has been tested and found to comply with the limits for a Class B digital 2967-3, ISHIKAWA-MACHI, device, pursuant to Part 15 of the FCC Rules.
  • Page 3 Para cumplimiento de la COFETEL: CAUTION “La operación de este equipo está sujeta a las siguientes dos condiciones: This equipment complies with FCC/IC radiation exposure limits set forth for an uncontrolled (1) es posible que este equipo o dispositivo no cause interferencia perjudicial y environment and meets the FCC radio frequency (RF) Exposure Guidelines in Supplement C (2) este equipo o dispositivo debe aceptar cualquier interferencia, incluyendo la que pueda to OET65 and RSS-102 of the IC radio frequency (RF) Exposure rules.
  • Page 4: Table Des Matières

    • Never put or leave any metallic objects (such as coins or metal tools) inside the unit, to prevent a short SiriusXM® Radio circuit. (for KD-R960BTS / KD-AR865BTS) • If a disc error occurs due to condensation on the laser lens, eject the disc and wait for the moisture to evaporate.
  • Page 5: Basics

    BASICS Faceplate Remote control (RM-RK52) Attach Remote sensor (Do not expose Display window to bright sunlight.) KD-R960BTS Detach Volume knob (turn/press) Loading slot Pull out the insulation sheet when using for the first time. How to reset How to replace the battery...
  • Page 6: Getting Started

    Press and hold For details on how to update the firmware, see: Turn the volume knob to select [CLOCK], then press the knob. <http://www.jvc.net/cs/car/>. Turn the volume knob to select [CLOCK SET], then press the knob. CLOCK Turn the volume knob to make the settings, then press the knob.
  • Page 7: Cd / Usb / Ipod / Android

    SONG RND/ ALL RND/ RND OFF Do not leave the cable inside the car when not using. When connecting an Android device, “Press [VIEW] to install JVC MUSIC PLAY APP” is shown. Follow the instructions to install the ANDROID application. You can also install the latest version of JVC MUSIC PLAY application on your Android device before connecting.
  • Page 8 Quick Search repeatedly. If you have many files, you can search through them quickly. AUTO MODE: Control from the unit (using JVC MUSIC For MP3/WMA /AAC/WAV or JPC / JMC file: PLAY application). Turn the volume knob quickly. AUDIO MODE: Control other media player applications...
  • Page 9: Radio

    • [OFF] is selected for [AM] in [SRC SELECT] after Radio Timer for AM is The preset number flashes and “MEMORY” appears. selected. (  4) For KD-R960BTS / KD-AR865BTS: Selectable only when SiriusXM Vehicle Tuner is connected. (  11) Selectable only when [ONCE] or [WEEKLY] is selected in step...
  • Page 10: Aux

    RADIO Default: XX Use a portable audio player SSM 01 – 06 / SSM 07 – 12 / SSM 13 – 18: Automatically presets up Connect a portable audio player (commercially available). to 18 stations for FM. “SSM” stops flashing when the first 6 stations are 3.5 mm (1/8") stereo mini plug with “L” shaped connector stored.
  • Page 11: Pandora

    Pandora® Preparation: Create and save a new station Install the latest version of the Pandora application on your device Press (iPhone/ iPod touch), then create an account and log in to Pandora. Turn the volume knob to select [NEW STATION], then press the knob. •...
  • Page 12: Iheartradio

    Preparation: Search for a station Install the latest version of iHeart Link for JVC application on your device (iPhone/ iPod Press touch), then create an account and log in to iHeartRadio. Turn the volume knob to select a category, then •...
  • Page 13: Siriusxm® Radio (For Kd-R960Bts / Kd-Ar865Bts)

    SiriusXM® Radio (for KD-R960BTS / KD-AR865BTS) Only SiriusXM® brings you more of what you love Start listening to listen to, all in one place. Get over 140 channels, Press repeatedly to select SIRIUS XM. including commercial-free music plus the best sports, Press news, talk, comedy and entertainment.
  • Page 14: Siriusxm Replay

    SiriusXM® Radio When you select a SmartFavorites channel, you can rewind and replay up SiriusXM Replay™ to 30 minutes of any of the missed news, talk, sports or music content. Press the volume knob. • Playback starts from the beginning of the song if [TUNE START] is set to “...
  • Page 15 SiriusXM® Radio SiriusXM settings TUNE START * ON: Selected SmartFavorite channel starts playback from the beginning of the song. ; OFF: Cancels. Press and hold Turn the volume knob to select [SIRIUS XM], then press the knob. SIGNAL LVL NO SIGNAL/ WEAK/ GOOD/ STRONG: Shows the strength Turn the volume knob to make a selection (see the following table), then of the current received signal.
  • Page 16: Bluetooth

    Automatic pairing request is activated only if: – Bluetooth function of the connected devcie is turned on. microphone input terminal. (  31) – [AUTO CNNT] is set to [ON]. ( 18) – JVC MUSIC PLAY application is installed on the Android device.
  • Page 17 BLUETOOTH® BLUETOOTH — Mobile phone Improve the voice quality While talking on the phone..Press and hold Turn the volume knob to make a selection (see the following table), then press the knob. Repeat step until the desired item is selected or activated.
  • Page 18: Make A Call

    BLUETOOTH® Make the settings for receiving a call Press to enter Bluetooth mode. Turn the volume knob to make a selection (see the following table), then press the knob. Repeat step until the desired item is selected or activated. To return to the previous setting item, press Make a call You can make a call from the call history, phonebook, or dialing the number.
  • Page 19 BLUETOOTH® Settings in memory DIAL NUMBER 1 Turn the volume knob to select a number (0 to 9) or character ( , #, Store a contact in memory 2 Press to move the entry position. You can store up to 6 contacts into the number buttons (1 to 6). Repeat steps until you finish entering the phone number.
  • Page 20 “ ” disappears when disconnected. been deleted, and the unit exits check mode. JVC Smart Music Control is designed to view JVC car receiver status and perform simple • To cancel, press and hold to turn off the power, then turn control operations on Android smart phones.
  • Page 21 BLUETOOTH® BLUETOOTH — Audio Internet radio via Bluetooth Listen to Pandora Preparation: Select [ON] for [PANDORA] in [SRC SELECT]. (  4) You can listen to Pandora on your smart phone (Android OS) through Bluetooth on this unit. Open the Pandora application on your device. Audio player via Bluetooth Connect your Bluetooth audio player via Bluetooth connection.
  • Page 22: Audio Settings

    On the faceplate EASY EQ 1 USER1/ USER2: Select a preset name. 2 Adjust your own sound settings. Press repeatedly. Select a preset (For KD-R960BTS / KD-R860BT) equalizer Press , then turn the volume knob within SUB.W SP * 00 to +06 (Default: 03 2 seconds.
  • Page 23 AUDIO SETTINGS SUB.W PHASE * PRO EQ (For KD-AR865BTS) REVERSE (180°)/ NORMAL (0°): Selects the phase of the subwoofer 1 USER1/ USER2: Select a preset name. output to be in line with the speaker output for optimum performance. 2 BASS / MID BASS / MID / MID HIGH / HIGH: Select a sound tone. (Selectable only if a setting other than [THROUGH] is selected for 3 Adjust the sound elements of the selected sound tone.
  • Page 24: Display Settings

    AUTO: Changes between the day and night adjustments when you turn off or on the car headlights. * REAR/SUB.W Rear speakers output Rear speakers output For KD-R960BTS, the display and button colors change according to the SUB.W/SUB.W Subwoofer output (Mute) settings made on [COLOR].
  • Page 25 ONCE: Scrolls the display information once. ; AUTO: Repeats scrolling at • If [00] is selected for all primary colors for [DISP ZONE], nothing 5-second intervals. ; OFF: Cancels. appears on the display. COLOR (for KD-R960BTS) COLOR GUIDE ON: Changes the button, display, USB input terminal and auxiliary input PRESET You can select a color for [ALL ZONE], [ZONE 1], [DISP ZONE], or [ZONE 2]...
  • Page 26: More Information

    (AOA) 2.0. - Windows long file name: 32 characters • If the Android device supports both mass storage class device and AOA 2.0, this unit always playback via AOA 2.0 as priority. • For more information and the latest compatible list, see: <http://www.jvc.net/cs/car/>.
  • Page 27 Track title Playing time Day/ • When you play audio file with song data added using the JVC Playlist Creator or JVC Music Clock (back to the beginning) Control, you can search for audio file by Genres, Artists, Albums, Playlists, and Songs.
  • Page 28: Troubleshooting

    (  24) listening to the radio. Cannot playback at [AUTO • Make sure JVC MUSIC PLAY APP is installed on the Disc cannot be ejected. Press and hold to forcibly eject the disc. Be careful not MODE].
  • Page 29 Make sure you have installed the latest version of the detected. • Reset the unit. (  3) iHeart Link for JVC application on your device. Pairing cannot be • Make sure you have entered the same PIN code to both the “PLS LOGIN”...
  • Page 30: Specifications

    If you have any troubles, try the following: MP3 Decode Compliant with MPEG-1/2 Audio Layer-3 1 Check TROUBLESHOOTING WMA Decode Compliant with Windows Media Audio 2 Reset the unit (  3) AAC Decode AAC-LC “.m4a” files 3 Contact (USA only) Call: 1-800-252-5722 ( or ) visit: http://www.jvc.com...
  • Page 31 (at less than 1 % THD) Maximum Supply Current DC 5 V   1 A Speaker Impedance 4 Ω — 8 Ω MP3 Decode Compliant with MPEG-1/2 Audio Layer-3 Preout Level/Load (CD/USB) KD-R960BTS / KD-R860BT: WMA Decode Compliant with Windows Media Audio 2 500 mV/10 kΩ KD-AR865BTS: AAC Decode AAC-LC “.m4a” files 4 800 mV/10 kΩ WAV Decode...
  • Page 32: Basic Procedure

    Warning Installing the unit (in-dash mounting) • The unit can only be used with a 12 V DC power supply, negative ground. • Disconnect the battery’s negative terminal before wiring and mounting. • Do not connect Battery wire (yellow) and Ignition wire (red) to the car chassis or Ground wire (black) to prevent a short circuit.
  • Page 33: Wiring Connection

    Wiring connection Firmly connect the ground wire of the amplifier (for KD-R960BTS / KD-AR865BTS) to the car’s chassis to avoid damaging the unit. KD-R960BTS KD-AR865BTS Rear output JVC Amplifier * Front output Front output Signal cord (not supplied) Rear/subwoofer output Subwoofer output Fuse (10 A)
  • Page 34 Wiring connection (for KD-R860BT) Firmly connect the ground wire of the amplifier to the car’s chassis to avoid JVC Amplifier * Front output damaging the unit. Signal cord (not supplied) Rear/subwoofer output Part list for Fuse (10 A) Remote wire installation...
  • Page 36 • Si une erreur de disque se produit à cause de la condensation sur l’objectif laser, éjectez le disque et attendez que l’humidité Radio SiriusXM® s’évapore. (pour KD-R960BTS / KD-AR865BTS) Télécommande (RM-RK52): • Ne laissez pas la télécommande dans des endroits exposés à la chaleur, comme sur le tableau de bord par exemple.
  • Page 37: Fonctionnement De Base

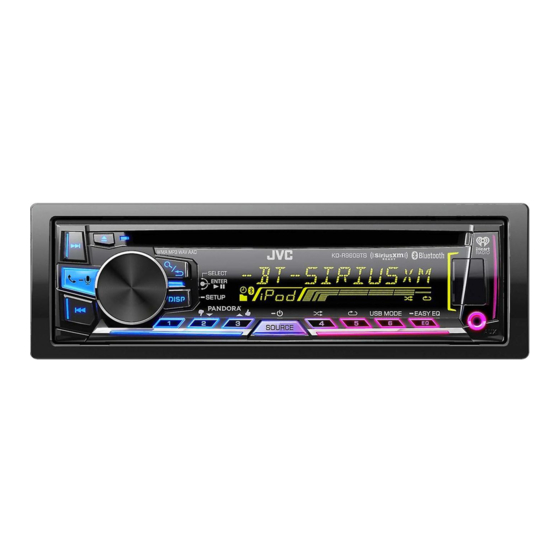
    FONCTIONNEMENT DE BASE Façade Télécommande (RM-RK52) Attachez Capteur de télécommande (NE l’exposez PAS à la lumière directe du soleil.) Fenêtre d’affichage KD-R960BTS Détachez Bouton de volume (tournez/appuyez) Fente d’insertion Retirez la feuille d’isolant lors de la première utilisation. Comment réinitialiser...
  • Page 38: Prise En Main

    Pour en savoir plus sur la mise à niveau du micrologiciel, référez-vous à: CLOCK Tournez le bouton de volume pour choisir [ ], puis appuyez sur le bouton. <http://www.jvc.net/cs/car/>. CLOCK SET Tournez le bouton de volume pour choisir [ ], puis appuyez sur CLOCK le bouton.
  • Page 39: Cd / Usb / Ipod / Android

    ANDROID Lors de la connexion d’un périphérique Android, “Press [VIEW] to install JVC MUSIC PLAY APP” apparaît. Suivez les instructions pour installer l’application. Vous pouvez aussi intaller la dernière version de l’application JVC MUSIC PLAY sur votre périphérique Android avant la connexion.
  • Page 40 Pour iPod: multimédia à partir du périphérique Android (sans Vous pouvez rechercher un fichier en fonction du premier caractère. utiliser l’application JVC MUSIC PLAY). Cependant, Appuyez sur ou tournez le bouton de volume rapidement pour vous pouvez encore utiliser la lecture/pause ou le sélectionner le caractère souhaité...
  • Page 41: Radio

    Tournez le bouton de volume pour choisir un numéro de préréglage, minuterie de radio pour AM. ( puis appuyez sur le bouton. Le numéro de préréglage clignote et “MEMORY” apparaît. KD-R960BTS KD-AR865BTS Pour : Sélectionnable quand le tuner SiriusXM Vehicle est connecté.
  • Page 42: Aux

    RADIO Défaut: Utilisation d’un lecteur audio portable SSM 01 – 06 SSM 07 – 12 SSM 13 – 18 : Prérègle automatiquement un Connectez un lecteur audio portable (en vente dans le commerce). maximum de 18 stations pour FM. “SSM” s’arrête de clignoter quand les 6 premières stations SSM 07 –...
  • Page 43: Pandora

    Pandora® Préparation: Création et sauvegarde d’une nouvelle station Installez la dernière version de l’application Pandora sur votre appareil (iPhone/ iPod touch), puis créez un compte et connectez-vous sur Pandora. Appuyez sur • Sélectionnez [ ] pour [ PANDORA ] dans [ SRC SELECT ( 4) Tournez le bouton de volume pour choisir [...
  • Page 44: Iheartradio

    Préparation: Recherchez une station Installez la dernière version de l’application iHeart Link for JVC sur votre appareil (iPhone/ iPod touch), puis créez un compte et connectez-vous sur iHeartRadio. Appuyez sur Tournez le bouton de volume pour choisir une • Sélectionnez [...
  • Page 45: Radio Siriusxm

    Radio SiriusXM® (pour KD-R960BTS / KD-AR865BTS) Seul SiriusXM® vous apporte plus de ce que vous aimez écouter, Démarrez l’écoute en un seul endroit. Obtenez plus de 140 canaux, y compris de la musique sans pauses publicitaires, le meilleur du sport, les Appuyez répétitivement sur...
  • Page 46: Smartfavorites Et Tunestart

    Radio SiriusXM® Quand vous syntonisez un canal préféré intelligent, vous pouvez revenir en arrière et Relecture SiriusXM™ relire 30 minutes maximum de n’importe quel contenu manqué: nouvelles, discussions, Appuyez sur le bouton de volume. sport ou musique. “ ” s’allume et l’appareil mémorise la position de pause. •...
  • Page 47 Radio SiriusXM® Réglages SiriusXM TUNE START * : La lecture du canal SmartFavorite sélectionné démarre à partir du début du morceau. ; : Annulation. Maintenez enfoncée Tournez le bouton de volume pour choisir [ SIRIUS XM ], puis appuyez sur le bouton. SIGNAL LVL NO SIGNAL WEAK GOOD...
  • Page 48: Bluetooth

    – [ AUTO CNNT ] est réglé sur [ ]. ( KD-R960BTS / KD-AR865BTS * Pour le , faites la – L’application JVC MUSIC PLAY est installée sur le périphérique Android. connexion à la prise d’entrée du microphone. ( 31)
  • Page 49: Réception D'un Appel

    BLUETOOTH® BLUETOOTH — Téléphone portable Amélioration de la qualité des voix Quand vous parlez au téléphone..Maintenez enfoncée Tournez le bouton de volume pour réaliser une sélection voir le tableau suivant , puis appuyez sur le bouton. Répétez l’étape jusqu’à ce que l’élément souhaité...
  • Page 50: Faire Un Appel

    BLUETOOTH® Réalise les réglages de réception d’un appel Appuyez sur pour entrer en mode Bluetooth. Tournez le bouton de volume pour réaliser une sélection (voir le tableau suivant), puis appuyez sur le bouton. Répétez l’étape jusqu’à ce que l’élément souhaité soit sélectionné ou activé. Faire un appel Pour retourner à...
  • Page 51: Dial Number

    BLUETOOTH® Réglages en mémoire DIAL NUMBER Tournez le bouton de volume pour sélectionner un numéro (0 à 9) ou un caractère ( , #, +). Appuyez sur pour déplacer la position d’ e ntrée. Stockage d’un contact en mémoire Répétez les étapes jusqu’à...
  • Page 52 Bluetooth actuellement connecté. “ ” disparaît quand la connexion est établie. puis mettez de nouveau l’appareil sous tension. JVC Smart Music Control est conçu pour voir l’état de l’autoradio JVC et réaliser des commandes simple à partir de smartphones Android.
  • Page 53 BLUETOOTH® BLUETOOTH — Audio Internet radio via Bluetooth Écoute de Pandora Préparation: Sélectionnez [ ] pour [ PANDORA ] dans [ SRC SELECT ( 4) Vous pouvez écouter Pandora sur votre smartphone (Android OS) via le Bluetooth de cet appareil. Ouvrez l’application Pandora sur votre appareil.
  • Page 54: Réglages Audio

    Sur la façade EASY EQ 1 USER1 USER2 : Sélectionnez un nom préréglé. Ajustez vos propres ajustements sonores. Appuyez répétitivement sur Choisissez un KD-R960BTS KD-R860BT (Pour égaliseur préréglé Appuyez sur , puis tournez le bouton de SUB.W SP *  à  (Défaut: volume avant 2 secondes.
  • Page 55 RÉGLAGES AUDIO SUB.W PHASE * PRO EQ KD-AR865BTS REVERSE NORMAL (Pour  (180°)/  (0°): Sélectionne la phase de la sortie du caisson de grave à synchroniser avec la sortie des enceintes afin d’ o btenir des performances optimales. 1 USER1 USER2 : Sélectionnez un nom préréglé. THROUGH 2 BASS (Peut être uniquement sélectionné...
  • Page 56: Réglages D'affichage

    RÉGLAGES D’AFFICHAGE RÉGLAGES AUDIO SPK/PRE OUT KD-AR865BTS / KD-R860BT KD-R960BTS Connexion via les prises de sortie de ligne (   31, 32 KD-R960BTS KD-R860BT (Pour Prise de sortie de ligne Réglage FRONT REAR/SW REAR/REAR Sortie des enceintes avant Sortie des enceintes arrière Maintenez enfoncée...
  • Page 57 ] est choisi pour toutes les couleurs primaires pour [ ], rien n’apparaît 5 secondes d’intervalle. ; : Annulation. sur l’affichage. COLOR KD-R960BTS (pour COLOR GUIDE : Change l’ é clairage des touches, de l’affichage, de la prise d’ e ntrée USB et de la PRESET ALL ZONE ZONE 1 Vous pouvez sélectionner une couleur séparément pour [...
  • Page 58: Plus D'informations

    • Si le périphérique Android prend en charge à la fois le protocole mass storage class et AOA 2.0, cet appareil utilise toujours en priorité la lecture via AOA 2.0. • Pour plus d’informations et la liste de compatibilité la plus récente, reportez-vous à: <http://www.jvc.net/cs/car/>.
  • Page 59 Jour/Horloge Titre d’album/Artiste* Titre de plage* • Quand vous reproduisez un fichier audio avec des données de chanson ajoutée en utilisant JVC Playlist Creator ou (retour au début) USB-ANDROID JVC Music Control, vous pouvez rechercher des fichiers audio par genre, artiste, album, liste de lecture et chansons.
  • Page 60: Guide De Dépannage

    ( de la radio. Lecture impossible en mode • Assurez-vous que JVC MUSIC PLAY APP est installé sur le périphérique Le disque ne peut pas être éjecté. Maintenez enfoncée pour éjecter le disque de force. Faites attention AUTO MODE Android.
  • Page 61 Assurez-vous que vous avez bien installé la dernière version de réalisé. périphérique Bluetooth. l’application iHeart Link for JVC sur votre appareil. • Supprimez les informations de pairage pour cet appareil et le périphérique “PLS LOGIN” Vous n’ ê tes pas connecté. Connectez-vous de nouveau.
  • Page 62: Spécifications

    Compatible avec le format MPEG-1/2 Audio Layer-3 1 Vérifiez la section GUIDE DE DÉPANNAGE Décodage MP3 2 Réinitialisez l’appareil (  3) Décodeur WMA Compatible Windows Media Audio 3 Contactez (USA uniquement) Décode AAC Fichiers AAC-LC “.m4a” Appelez: 1-800-252-5722 ( ou ) consultez: http://www.jvc.com...
  • Page 63: Kd-R860Bt

    Courant d’alimentation maximum CC 5 V   1 A Impédance d’ e nceinte 4 Ω — 8 Ω Décodage MP3 Compatible avec le format MPEG-1/2 Audio Layer-3 Niveau de préamplification/charge (CD/USB) KD-R960BTS KD-R860BT: 2 500 mV/10 kΩ Décodeur WMA Compatible Windows Media Audio KD-AR865BTS Décode AAC Fichiers AAC-LC “.m4a”...
  • Page 64 Avertissement Installation de l’appareil (montage encastré) • L’appareil peut uniquement être utilisé avec une alimentation de 12 V CC, à masse négative. • Déconnectez la borne négative de la batterie avant le câblage et le montage. • Ne connectez pas le fil de batterie (jaune) et le fil d’allumage (rouge) au châssis de la voiture ou au fil de masse (noir) pour éviter les courts-circuits.
  • Page 65: Connexion Recommandée

    Connexions (pour KD-R960BTS / KD-AR865BTS) Connectez solidement le câble de masse de l’amplificateur au châssis de la voiture pour éviter d’endommager l’appareil. KD-R960BTS KD-AR865BTS Sortie arrière Sortie avant Amplificateur * Sortie avant Cordon de signal (non fournie) Sortie arrière/caisson de grave...
  • Page 66: Connexions (Pour Kd-R860Bt)

    Connexions (pour KD-R860BT) Connectez solidement le câble de masse de l’amplificateur au châssis de la voiture pour éviter Sortie avant Amplificateur * d’endommager l’appareil. Cordon de signal (non fournie) Sortie arrière/caisson de grave Liste des pièces pour Fusible (10 A) Fil de télécommande l’installation Tableau de bord du véhicule...
  • Page 68: Antes Del Uso

    • Si ocurre un error de disco debido a la condensación en el lente láser, extraiga el disco y espere hasta que se evapore la Radio SiriusXM® humedad. (para KD-R960BTS / KD-AR865BTS) Mando a distancia (RM-RK52): • No deje el mando a distancia sobre superficies calientes, tales como el salpicadero.
  • Page 69: Puntos Básicos

    PUNTOS BÁSICOS Placa frontal Mando a distancia (RM-RK52) Fijar Sensor remoto (DO lo exponga a la luz solar brillante.) Ventanilla de visualización KD-R960BTS Desmontar Rueda de volumen (girar/pulsar) Ranura de carga Retire la hoja aislante cuando se utilice por primera vez.
  • Page 70: Procedimientos Iniciales

    Pulse y mantenga pulsado Para obtener información sobre cómo actualizar el firmware, consulte: Gire la rueda de volumen para seleccionar [ CLOCK ] y luego púlsela. <http://www.jvc.net/cs/car/>. Gire la rueda de volumen para seleccionar [ CLOCK SET ] y luego púlsela. CLOCK Gire la rueda de volumen para realizar los ajustes y, a continuación,...
  • Page 71: Cd / Usb / Ipod / Android

    Cuando conecte un dispositivo Android, se mostrará “Press [VIEW] to install JVC MUSIC PLAY APP”. Siga las instrucciones para instalar la aplicación. Antes de la conexión, también puede instalar la versión más reciente de la aplicación JVC MUSIC PLAY en su dispositivo Android.
  • Page 72 Archivo MP3/ WMA /AAC/ WAV o archivo JPC / JMC: fuente ANDROID. Gire rápidamente la rueda de volumen. AUTO MODE Control desde la unidad (utilizando la aplicación JVC Para iPod: MUSIC PLAY). Puede realizar la búsqueda de un archivo por el primer carácter.
  • Page 73: Radio

    “PRESET MODE” parpadee. AM para el temporizador de la radio. ( Gire la rueda de volumen para seleccionar un número de preajuste y luego púlsela. KD-R960BTS KD-AR865BTS Para : Solo es posible seleccionarlo si el sintonizador para El número de preajuste parpadea y aparece “MEMORY”.
  • Page 74: Aux

    RADIO Predeterminado: Uso de un reproductor de audio portátil SSM 01 – 06 SSM 07 – 12 SSM 13 – 18 : Configura automáticamente hasta Conecte un reproductor de audio portátil (disponible en el mercado). 18 emisoras para FM. “SSM” deja de destellar cuando se almacenan las primeras 6 emisoras. SSM 07 –...
  • Page 75: Pandora

    Pandora® Preparativos: Crear y guardar una emisora nueva Instale la última versión de la aplicación Pandora en su dispositivo (iPhone/ iPod touch) y, a continuación, cree una cuenta e inicie sesión en Pandora. Pulse • Seleccione [ ] para [ PANDORA ] en [ SRC SELECT...
  • Page 76: Iheartradio

    Preparativos: Búsqueda de una emisora Instale la última versión de la aplicación iHeart Link for JVC en su dispositivo (iPhone/ iPod touch) y, a continuación, cree una cuenta e inicie sesión en iHeartRadio. Pulse Gire la rueda de volumen para seleccionar una •...
  • Page 77: Radio Siriusxm

    Radio SiriusXM® (para KD-R960BTS / KD-AR865BTS) Solo SiriusXM® ofrece todo lo que quiere escuchar, en un solo Comience a escuchar lugar. Con más de 140 canales, incluida música sin publicidad además de lo mejor en deportes, noticias, entrevistas, Pulse repetidamente para seleccionar SIRIUS XM.
  • Page 78 Radio SiriusXM® Le permite rebobinar y reproducir hasta 30 minutos de cualquier programa de noticias, SiriusXM Replay™ charlas, deportes o música al seleccionar un canal SmartFavorites. Pulse la rueda de volumen. • La reproducción comienza desde el principio de la canción si [ TUNE START ] está...
  • Page 79 Radio SiriusXM® Ajustes de SiriusXM TUNE START * : El canal SmartFavorite seleccionado comienza la reproducción desde el comienzo de la canción. ; : Se cancela. Pulse y mantenga pulsado Gire la rueda de volumen para seleccionar [ SIRIUS XM ] y luego púlsela. SIGNAL LVL NO SIGNAL WEAK...
  • Page 80: Bluetooth

    ( 31) – Está activada la función Bluetooth del dispositivo conectado. AUTO CNNT – [ ] está ajustado a [ ]. ( – La aplicación JVC MUSIC PLAY está instalada en el dispositivo Android.
  • Page 81: Recibir Una Llamada

    BLUETOOTH® BLUETOOTH — Teléfono móvil Mejorar la calidad de voz Mientras habla por teléfono..Pulse y mantenga pulsado Gire la rueda de volumen para seleccionar consulte la siguiente tabla y luego púlsela. Repita el paso hasta que se seleccione o active el elemento deseado.
  • Page 82: Realizar Una Llamada

    BLUETOOTH® Realice los ajustes para recibir una llamada Pulse para ingresar al modo Bluetooth. Gire la rueda de volumen para seleccionar (consulte la siguiente tabla) y luego púlsela. Repita el paso hasta que se seleccione o active el elemento deseado. Para volver al elemento de ajuste anterior, pulse Realizar una llamada Predeterminado:...
  • Page 83 BLUETOOTH® Ajustes en la memoria DIAL NUMBER Gire la rueda de volumen para seleccionar un número (0 a 9) o un carácter ( , #, +). Pulse para mover la posición de ingreso. Almacenar un contacto en la memoria Repita los pasos hasta finalizar el ingreso del número telefónico.
  • Page 84 Cuando se desconecte, desaparecerá “ ”. vuélvala a encender. JVC Smart Music Control ha sido diseñada para ver el estado del receptor para automóvil JVC y realizar operaciones de control simples en los teléfonos inteligentes que ejecutan Android. Si desea conocer las operaciones de JVC Smart Music Control, visite el sitio web de JVC:...
  • Page 85 BLUETOOTH® BLUETOOTH — Audio Radio Internet a través de Bluetooth Escuchar Pandora Preparativos: Seleccione [ ] para [ PANDORA ] en [ SRC SELECT ( 4) Puede escuchar Pandora en su teléfono inteligente (Android OS) a través de la conexión Bluetooth de esta unidad. Abra la aplicación Pandora en su dispositivo.
  • Page 86: Ajustes De Audio

    En la placa frontal EASY EQ 1 USER1 USER2 : Seleccione un nombre preajustado. Ajuste su propia configuración de sonido. Pulse repetidamente. Seleccionar un KD-R960BTS KD-R860BT (Para ecualizador Pulse y, a continuación, gire la rueda de SUB.W SP *  a  (Predeterminado: preajustado volumen antes de que transcurran 2 segundos.
  • Page 87 AJUSTES DE AUDIO SUB.W PHASE * PRO EQ KD-AR865BTS REVERSE NORMAL (Para  (180°)/  (0°): Selecciona la fase de la salida del subwoofer de acuerdo con la salida de los altavoces, para lograr un desempeño óptimo. 1 USER1 USER2 : Seleccione un nombre preajustado. THROUGH 2 BASS (Puede seleccionarse solo si se seleccionó...
  • Page 88: Ajustes De Visualización

    AJUSTES DE VISUALIZACIÓN AJUSTES DE AUDIO SPK/PRE OUT KD-AR865BTS / KD-R860BT KD-R960BTS Conexión a través de los terminales de salida de línea (   31, 32 KD-R960BTS KD-R860BT (Para Terminal de salida de línea Configuración FRONT REAR/SW REAR/REAR Salida de los altavoces delanteros...
  • Page 89 ] para todos los colores primarios para [ ], no aparecerá intervalos de 5 segundos. ; : Se cancela. nada en la pantalla. COLOR KD-R960BTS (para COLOR GUIDE : Cambia la iluminación de los botones, la pantalla, el terminal de entrada USB y la toma PRESET ALL ZONE...
  • Page 90: Más Información

    • Si el dispositivo Android es compatible con dispositivos de clase de almacenamiento masivo y con AOA 2.0, esta unidad siempre reproducirá con prioridad a través de AOA 2.0. • Para obtener más información y la lista de compatibilidad más reciente, consulte: <http://www.jvc.net/cs/car/>.
  • Page 91 (vuelta al comienzo) USB-ANDROID • Cuando reproduce audio con datos de canciones añadidos mediante JVC Playlist Creator o JVC Music Control, puede Si no está registrado, aparece “NO NAME”. buscar archivos de audio por género, artista, álbum, lista de producción o canción.
  • Page 92: De Problemas

    Pulse y mantenga pulsado para forzar la expulsión del disco. Tenga No se puede reproducir en • Asegúrese de que JVC MUSIC PLAY APP esté instalado en el dispositivo cuidado de no dejar caer el disco cuando sea expulsado. AUTO MODE Android.
  • Page 93 “UPDATE APP” Asegúrese de haber instalado en su dispositivo, la última versión de la No se detecta ningún • Vuelva a buscar el dispositivo Bluetooth. aplicación iHeart Link for JVC. dispositivo Bluetooth. ( 3) • Reinicialice la unidad. “PLS LOGIN”...
  • Page 94: Especificaciones

    85 dB 2 Reinicialice la unidad (  3) MP3 decodificado Compatible con MPEG-1/2 Audio Layer-3 3 Llame al (solo EE.UU.) WMA decodificado Compatible con Windows Media Audio Llame al: 1-800-252-5722 ( o ) visite: http://www.jvc.com Decodificación AAC Archivos AAC-LC “.m4a”...
  • Page 95 Corriente máxima de alimentación 5 V CC   1 A Impedancia del altavoz 4 Ω — 8 Ω MP3 decodificado Compatible con MPEG-1/2 Audio Layer-3 Nivel de salida de preamplificador/carga (CD/USB) KD-R960BTS KD-R860BT: 2 500 mV/10 kΩ WMA decodificado Compatible con Windows Media Audio KD-AR865BTS Decodificación AAC Archivos AAC-LC “.m4a”...
  • Page 96: Procedimiento Básico

    Advertencia Instalación de la unidad (montaje en el tablero) • La unidad puede utilizarse solamente con una fuente de alimentación de 12 V CC con negativo a masa. • Desconecte el terminal negativo de la batería antes de realizar el cableado y el montaje. •...
  • Page 97: Conexión Recomendada

    Conexión del cableado (para KD-R960BTS / KD-AR865BTS) Para evitar daños a la unidad, conecte firmemente el cable de conexión a masa del amplificador al chasis del vehículo. KD-R960BTS KD-AR865BTS Amplificador de Salida trasera Salida delantera JVC * Salida delantera Cable de señal (no suministrado)
  • Page 98: Conexión Del Cableado

    Para evitar daños a la unidad, conecte firmemente el cable de Amplificador de conexión a masa del amplificador Salida delantera JVC * al chasis del vehículo. Cable de señal (no suministrado) Salida posterior/subwoofer Lista de piezas para la Fusible (10 A) Cable remoto instalación...
  • Page 100 • Android is trademark of Google Inc. • The Bluetooth® word mark and logos are registered trademarks owned by Bluetooth SIG, Inc. and any use of such marks by JVC KENWOOD Corporation is under license. Other trademarks and trade names are those of their respective owners.

Ce manuel est également adapté pour:

Kd-ar865btsRd-r860bt

Table des Matières