Table des Matières

Publicité

Les langues disponibles

Les langues disponibles

Liens rapides

Model
WM 18DBL
Modèle
Modelo
SAFETY INSTRUCTIONS AND INSTRUCTION MANUAL
IMPROPER OR UNSAFE use of this power tool can result in death or serious bodily
injury!
This manual contains important information about product safety. Please read and
understand this manual BEFORE operating the power tool. Please keep this manual
available for other users and owners before they use the power tool.
This manual should be stored in safe place.
INSTRUCTIONS DE SECURITE ET MODE D'EMPLOI
Une utilisation INCORRECTE OU DANGEREUSE de cet outil motorisé peut entraîner la
mort ou de sérieuses blessures corporelles!
Ce mode d'emploi contient d'importantes informations à propos de la sécurité de ce
produit. Prière de lire et de comprendre ce mode d'emploi AVANT d'utiliser l'outil
motorisé. Garder ce mode d'emploi à la disponibilité des autres utilisateurs et propriétaires
avant qu'ils utilisent l'outil motorisé. Ce mode d'emploi doit être conservé dans un
endroit sûr.
INSTRUCCIONES DE SEGURIDAD Y MANUAL DE INSTRUCCIONES
¡La utilización INAPROPIADA O PELIGROSA de esta herramienta eléctrica puede
resultar en lesiones de gravedad o la muerte!
Este manual contiene información importante sobre la seguridad del producto. Lea y
comprenda este manual ANTES de utilizar la herramienta eléctrica. Guarde este manual
para que puedan leerlo otras personas antes de utilizar la herramienta eléctrica. Este
manual debe ser guardado en un lugar seguro.
WARNING
AVERTISSEMENT
ADVERTENCIA
Electronic Pulse Driver
Visseuse a impulsion electronique
Atornillador eléctrico de impulsos

Publicité

Table des Matières
loading

Sommaire des Matières pour Hitachi WM 18DBL

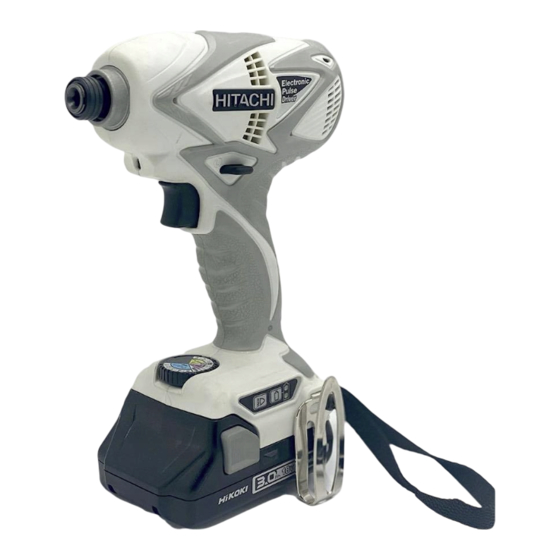
  • Page 1 Model Electronic Pulse Driver WM 18DBL Modèle Visseuse a impulsion electronique Modelo Atornillador eléctrico de impulsos SAFETY INSTRUCTIONS AND INSTRUCTION MANUAL WARNING IMPROPER OR UNSAFE use of this power tool can result in death or serious bodily injury! This manual contains important information about product safety. Please read and understand this manual BEFORE operating the power tool.
  • Page 2: Table Des Matières

    CONTENTS English Page Page IMPORTANT SAFETY INSTRUCTIONS ....3 ASSEMBLY AND OPERATION ....... 11 MEANINGS OF SIGNAL WORDS ......3 APPLICATIONS ........... 11 REMOVAL AND INSTALLATION METHOD OF SAFETY ..............3 BATTERY ............11 GENERAL POWER TOOL SAFETY WARNINGS ... 3 CHARGING METHOD .........
  • Page 3: Important Safety Instructions

    Hazards that must be avoided to prevent bodily injury or machine damage are identified by WARNINGS on the power tool and in this Instruction Manual. NEVER use this power tool in a manner that has not been specifically recommended by HITACHI. MEANINGS OF SIGNAL WORDS WARNING indicates a potentially hazardous situations which, if ignored, could result in death or serious injury.
  • Page 4 English A moment of inattention while operating Maintain power tools. Check for power tools may result in serious personal misalignment or binding of moving parts, injury. breakage of parts and any other condition Use personal protective equipment. Always that may affect the power tool’s operation. wear eye protection.
  • Page 5: Specific Safety Rules And Symbols

    Tightening a screw with the tool at an angle to that for repairs by a Hitachi authorized service center. screw can damage the head of the screw and the 19. NEVER leave tool running unattended. Turn power proper force will not be transmitted to the screw.
  • Page 6: Important Safety Instructions For Battery Charger

    2. Before using battery charger, read all instructions and cautionary markings on (1) battery charger, (2) battery, and (3) product using battery. 3. To reduce risk of injury, charge HITACHI rechargeable battery type BSL1830. Other type of 23. Definitions for symbols used on this tool batteries may burst causing personal injury and V ....
  • Page 7: Important Safety Instructions For Use Of The Battery And Battery Charger

    In such case, charge it up immediately. CAUTION: If the tool is overloaded, the motor may stop. In this USE ONLY HITACHI BATTERY TYPE BSL1830. case, release the switch of tool and eliminate causes OTHER TYPES OF BATTERIES MAY BURST AND of overloading.
  • Page 8 English 11. If there is battery leakage, foul odor, heat If you find rust, foul odor, overheating, discolor, generated, discolored or deformed, or in any way deformation, and/or other irregularities when using appears abnormal during use, recharging or the battery for the first time, do not use and return storage, immediately remove it from the it to your supplier or vendor.
  • Page 9: Functional Description

    English FUNCTIONAL DESCRIPTION NOTE: The information contained in this Instruction Manual is designed to assist you in the safe operation and maintenance of the power tool. NEVER operate, or attempt any maintenance on the tool unless you have first read and understood all safety instructions contained in this manual.
  • Page 10: Specifications

    English SPECIFICATIONS 1. Electronic Pulse Driver Model WM18DBL Electronic pulse mode Wood screw 5/32 × 3" (4.2 × 75 mm) Ordinary bolt 5/32" (M4) – 3/8" (M10) Bolt mode High tension bolt 5/32" (M4) – 1/4" (M6) Self drilling screw mode Self drilling screw 1/4"...
  • Page 11: Assembly And Operation

    English ASSEMBLY AND OPERATION WARNING: APPLICATIONS Do not charge at voltage higher than indicated on Driving and removing of small screws, small bolts, the nameplate. machine screws, wood screws, tapping screws, If charged at voltage higher than indicated on the etc.
  • Page 12 English 3. Charging When the battery is fully charged, the pilot lamp will blink in red slowly. (At 1-second intervals) (See When the battery is connected to the battery Table 2) charger, charging will commence and the pilot lamp will light in red. (See Table 2) (1) Pilot lamp indication The indications of the pilot lamp will be as shown NOTE:...
  • Page 13: Prior To Operation

    English substance will deteriorate, and the battery life will • To attach a drill without hexagonal shank, you need be shortened. Leave the battery and recharge it to have the drill chuck adapter set sold separately. after it has cooled for a while. (1) Insert the drill bit into the chuck.
  • Page 14 English Table 5 Example of mode selection Operation Maximum Marking Application Notes mode torque Diagonal tightening of 3" (75 mm) screw Wood Electronic screw Tightening of screw 2" (50 mm) – 3" (75 mm) pulse mode tightening Tightening screw shorter than 2" (50 mm) Use the bit 292 in-lbs Bolt mode...
  • Page 15 English Electronic pulse mode, self drilling screw mode (2) and drill mode Push button Self drilling screw mode (1) Bolt mode Push Push Electronic clutch mode (reverse rotation) Fig. 7 CAUTION The push button can not be switched while the Electronic clutch mode tool is turning.
  • Page 16 English (2) Replacing the hook and tightening the screws. As the remaining battery indicator shows Install securely the hook in the groove of power somewhat differently depending on ambient tool and tighten the screws to fix the hook firmly. temperature and battery characteristics, read it as (Fig.
  • Page 17: Operational Cautions

    English ● Use the bit that fits the cross recess on the screw 9. Work amount possible with one charging head. The following table shows the approximate Make sure to use an appropriate bit especially amount of work to be carried out by the tool with when tightening self drilling screws since using one charging.
  • Page 18: Maintenance And Inspection

    Repair, modification and inspection of Hitachi 2. Check the Screws Power Tools must be carried out by a Hitachi Authorized Service Center. Loose screws are dangerous. Regularly inspect This Parts List will be helpful if presented with the them and make sure they are tight.
  • Page 19: Accessories

    ALWAYS use Only authorized HITACHI replacement parts and accessories. NEVER use replacement parts or accessories which are not intended for use with this tool. Contact HITACHI if you are not sure whether it is safe to use a particular replacement part or accessory with your tool.
  • Page 20 4. Wood working drill bit: Code No. 959183 3-17/64” (83 mm) 5. Drill chuck adapter set: Code No. 321823 Use the drill available on the market. NOTE: Specifications are subject to change without any obligation on the part of the HITACHI.
  • Page 21: Consignes De Sécurité Importantes

    Les dangers qui doivent être évités pour prévenir des blessures corporelles ou un endommagement de la machine sont identifiés par AVERTISSEMENTS sur l’outil motorisé et dans ce mode d’emploi. NE JAMAIS utiliser cet outil motorisé d’une manière qui n’est pas spécifiquement recommandée par HITACHI. SIGNIFICATION DES MOTS D’AVERTISSEMENT AVERTISSEMENT indique des situations potentiellement dangereuses qui, si elles sont ignorées, pourraient...
  • Page 22 Français En cas d'utilisation d'un outil électrique à L'utilisation d'un dispositif de collecte de la l'extérieur, utiliser un cordon de rallonge poussière peut réduire les dangers associés adapté à un usage extérieur. à la poussière. L'utilisation d'un cordon adapté à l'usage Utilisation et entretien d'un outil électrique extérieur réduit les risques de choc électrique.
  • Page 23: Regles De Securite Specifiques Et Symboles

    Français Lorsque la batterie est inutilisée, la garder à Tenir l’outil électrique par les surfaces isolées l’écart d’objets métalliques comme des permettant de l’agripper pour effectuer une trombones, des pièces de monnaie, des clés, opération où coupel’attache peut entrer en contact des clous, des vis ou autres petits objets avec des fils électriques masqués.
  • Page 24: Consignes De Sécurité Importantes Pour Le Chargeur De Batterie Avertissement

    4. Ne pas exposer le chargeur à la pluie ni à la neige. défectueux, arrêter de l’utiliser immédiatement et 5. L’utilisation d’un accessoire non recommandé ou le faire réparer par un centre de service Hitachi non vendu par le fabricant du chargeur de batterie autorisé.
  • Page 25: Consignes De Sécurité Importantes Pour L'utilisation De La Batterie Et Du Chargeur De Batterie

    104°F (40°C). PRECAUTION: 12. TOUJOURS alimenter le chargeur sur une prise UTILISER EXCLUSIVEMENT LE BATTERIE HITACHI secteur domestique standard (120 volts). DE BSL1830. LES AUTRES TYPES DE BATTERIE L’utilisation du chargeur à une autre tension peut POURRAIENT EXPLOSER OU PROVOQUER DES entraîner une surchauffe et endommager le...
  • Page 26: Précautions Relatives A La Batterie Au Lithium Ion

    Français En cas d’échec du chargement d’une batterie, PRÉCAUTIONS RELATIVES A LA même après un certain délai, arrêtez BATTERIE AU LITHIUM ION immédiatement le rechargement. Pour prolonger sa durée de vie, la batterie lithium-ion N’exposez pas la batterie à des températures ou à est équipée d'une fonction de protection qui coupe une pression élevées (four à...
  • Page 27: Les Mettre A La Disposition Des Autres Utilisateurs

    Français CONSERVER CES INSTRUCTIONS LES METTRE A LA DISPOSITION DES AUTRES UTILISATEURS PROPRIETAIRES DE CET OUTIL!
  • Page 28: Description Fonctionnelle

    Français DESCRIPTION FONCTIONNELLE REMARQUE: Les informations contenues dans ce mode d’emploi sont conçues pour assister l’utilisateur dans une utilisation sans danger et un entretien de l’outil motorisé. NE JAMAIS utiliser ni entreprendre une révision de l’outil sans avoir d’abord lu et compris toutes les instructions de sécurité...
  • Page 29 Français SPECIFICATIONS 1. Visseuse a impulsion electronique Modèle WM18DBL Mode à impulsion Vis de bois 5/32 × 3" (4.2 × 75 mm) électronique Boulon ordinaire 5/32" (M4) – 3/8" (M10) Mode boulon Boulon hautement 5/32" (M4) – 1/4" (M6) extensible Capacité...
  • Page 30: Assemblage Et Fonctionnement

    Français ASSEMBLAGE ET FONCTIONNEMENT 1. Brancher le cordon d’alimentation du UTILISATIONS chargeur sur une prise secteur. Enfoncement et extraction de petites vis, petits Quand vous raccordez la fiche du chargeur à une écrous, vis mécaniques, vis de bois, vis de prise murale, la lampe témoin clignote en rouge.
  • Page 31 Français Quand la batterie est rechargée à fond, la lampe (1) Indication de la lampe témoin témoin clignote lentement en rouge. (A intervalles Les indications de la lampe témoin sont expliquées d’une seconde) (Voir le Tableau 2) dans le Tableau 2, selon la condition du chargeur ou de la batterie rechargeable.
  • Page 32: Avant L'utilisation

    Français Une batterie est toujours chaude immédiatement PRECAUTION : après son utilisation. Si la batterie est rechargée Si le manchon-guide n’est pas replacé à sa position immédiatement après utilisation, les substances originale, la mèche n’est pas installée chimiques internes risquent de se détériorer et la correctement.
  • Page 33 Français Lorsqu’on tourne le cadran de sélection de mode REMARQUE : alors que l'outil est en marche, le mode de Le couple de serrage obtenu par chacun des modes sélection ne change pas. Mettre l’outil sur arrêt varie selon la vis et le matériau à visser. Régler le avant de procéder au changement du mode de cadran de sélection de mode après avoir testé...
  • Page 34: Fonctionnement De L'interrupteur

    Français Le mode embrayage électronique (rotation 3. Vérifiez le sens de rotation régulière) fait tourner le moteur à une vitesse très La mèche tourne dans le sens horaire (vu de lente pendant un moment après le démarrage et l’arrière) quand on appuie sur le côté R du bouton- augmente ensuite la vitesse.
  • Page 35 Français (1) Dépose du crochet. Tableau 6 Enlevez les vis qui maintiennent le crochet, à l’aide Etat de la lampe Puissance résiduelle de la batterie d’un tournevis Philips. (Fig. 8) La puissance résiduelle de la batterie est suffisante. La puissance résiduelle de la batterie est à...
  • Page 36: Quantité De Travail Possible Après Un Rechargement

    Français REMARQUE : Toujours visser avec l’outil parfaitement aligné sur Pour éviter de consommer de la puissance batterie la vis. ● lorsque vous oubliez de couper la DEL, la lampe Utilisez l’embout adapté pour l’empreinte s’éteint automatiquement après environ 15 cruciforme sur la tête des vis.
  • Page 37: Entretien Et Inspection

    Les réparations, modifications et inspections des dès qu’une abrasion apparait. outils électriques Hitachi doivent être confiées à 2. Vérifier les vis un service après-vente Hitachi agréé. Il sera utile de présenter cette liste de pièces au Des vis mal serrées sont dangereuses.
  • Page 38: Accessoires

    être utilisé avec cet outil. En cas de doute, contacter HITACHI pour savoir si une pièce de rechange ou un accessoire particulier peuvent être utilisés en toute sécurité avec votre outil.
  • Page 39 4. Foret pour le forage du bois: N° de Code 959183 3-17/64” (83 mm) 5. Jeu d’adaptateur de mandrin de foreuse: N° de Code 321823 Utiliser la foreuse en vente. REMARQUE: Les spécifications sont sujettes à modification sans aucune obligation de la part de HITACHI.
  • Page 40 Manual de instrucciones. No utilice NUNCA esta herramienta eléctrica de ninguna forma que no esté específicamente recomendada por HITACHI. SIGNIFICADO DE LAS PALABRAS DE SEÑALIZACIÓN ADVERTENCIA indica situaciones potencialmente peligrosas que, si se ignoran, pueden resultar en la muerte o en lesiones de gravedad.
  • Page 41 Español Mantenga el cable alejado del calor, del La utilización de un sistema de recogida de aceite, de bordes afilados o piezas móviles. polvo puede reducir los riesgos relacionados Los cables dañados o enredados aumentan con el polvo. el riesgo de descarga eléctrica. Utilización y mantenimiento de las herramientas Cuando utilice una herramienta eléctrica al eléctricas...
  • Page 42: Normas Y Símbolos Específicos De Seguridad

    Español Utilice herramientas eléctricas sólo con NORMAS Y SÍMBOLOS ESPECÍFICOS DE paquetes de pilas específicamente diseñados. SEGURIDAD La utilización de otros paquetes de pilas podría crear riesgo de daños e incendio. Utilice los mangos auxiliares si es proporcionados Cuando no se utilice el paquete de pilas, con la herramienta.
  • Page 43: Instrucciones Importantes De Seguridad Para El Cargador De Baterías

    3. Para reducir el riesgo de lesiones, cargue la batería deje inmediatamente de utilizarla y solicite su HITACHI de tipo de BSL1830. Otros tipos de arreglo a un centro de reparaciones autorizado por baterías podrían explotar causando lesiones y Hitachi.
  • Page 44: Instrucciones Importantes De Seguridad Para La Batería Y El Cargador De Baterías

    Si la entrada nominal del cargador de baterías se PRECAUCIÓN: indica en vatios en vez de amperios, el amperaje ¡UTILICE SOLAMENTE BATERÍA HITACHI DEL nominal correspondiente se determinará TIPO DE LA BSL1830. LOS DEMÁS TIPOS DE dividiendo el vataje por la tensión, por ejemplo: BATERÍAS PODRÍAN EXPLOTAR Y CAUSAR...
  • Page 45: Advertencia De La Batería De Litio

    Español NUNCA inserte objetos extraños en el orificio para No agujeree la batería con un objeto afilado como la batería ni en el cargador de baterías. un clavo, no la golpee con un martillo, la pise, la NUNCA utilice un transformador elevador para tire o la exponga a fuertes impactos físicos.
  • Page 46 Español ¡GUARDE ESTAS INSTRUCCIONES PÓNGALAS A DISPOSICIÓN DE OTROS USUARIOS PROPIETARIOS DE ESTA HERRAMIENTA!
  • Page 47: Descripción Funcional

    Español DESCRIPCIÓN FUNCIONAL NOTA: La información contenida en este Manual de instrucciones ha sido diseñada para ayudarle a utilizar con seguridad y mantener esta herramienta eléctrica. NUNCA haga funcionar ni efectúe el mantenimiento de la herramienta antes de leer y comprender todas las instrucciones de seguridad contenidas en este manual.
  • Page 48 Español ESPECIFICACIONES 1. Atornillador eléctrico de impulsos Modelo WM18DBL Modo de impulso Tornillo para 5/32 × 3" (4.2 × 75 mm) eléctrico madera Perno ordinario 5/32" (M4) – 3/8" (M10) Modo para pernos Pernos de gran 5/32" (M4) – 1/4" (M6) resistencia a la tracción Modo para tornillos Tornillo autoperforante 1/4"...
  • Page 49: Montaje Y Operación

    Español MONTAJE Y OPERACIÓN 1. Enchufe el cable de alimentación del cargador APLICACIONES a un tomacorriente de CA. Atornillamiento y desatornillamiento de tornillos Cuando haya conectado el enchufe del cargador a pequeños, tornillos para metales, tornillos para una toma de la red, la lámpara piloto se encendrá madera, tornillos que no necesitan abrir antes su en rojo.
  • Page 50 Español Cuando la batería se haya cargado completamente, (1) Indicaciones de la lámpara piloto la lámpara parpadeará lentamente en rojo. (A Las indicaciones de la lámpara piloto mostradas en intervalos de 1 segundo) (Consulte la Tabla 2) la Tabla 2, se producirán de acuerdo con la condición del cargador o de la batería.
  • Page 51: Antes De La Operación

    Español substancia química interna se deterioraría, y la Broca duración útil de la batería se acortaría. Deje la batería • Es posible instalar una broca con vástago y recárguela después de que se haya enfriado hexagonal directamente en la herramienta. durante cierto tiempo.
  • Page 52 Español NOTA: Use el modo para pernos para apretar pernos. El par de apriete que alcanzará cada modo variará Girar la rueda de selección de modo con la en función del tornillo y el material en el que éste herramienta encendida no producirá ningún se atornille.
  • Page 53 Español Un destornillador de impulso eléctrico controla la hasta que la batería se agote definitivamente. Es rotación del motor con objeto de optimizar su difícil determinar el nivel de carga restante en la funcionamiento en función del modo seleccionado. batería a partir de la velocidad de rotación, por lo Como resultado, podrían producirse las siguientes que es posible que la herramienta se detenga situaciones durante el uso.
  • Page 54 Español 5. Uso del gancho Al retirar el dedo de dicho interruptor, el indicador luminoso de batería restante se apaga. La Tabla 6 El gancho se usa para colgarse la herramienta con muestra el estado del indicador luminoso de alimentación eléctrica del cinturón mientras se batería restante y la potencia de batería restante.
  • Page 55: Precauciones Operacionales

    Español Empuje la herramienta lo suficientemente como para que la punta de destornillador encaje en la cabeza del tornillo. PRECAUCIÓN: ● Si aplica demasiado tiempo la herramienta sobre el tornillo, éste se apretará demasiado y se romperá. Apriete los tornillos con el ángulo que no dañe sus cabezas y de forma que se pueda aplicar la fuerza apropiada.
  • Page 56 Español El indicador LED parpadeará mientras la herramienta se encuentre encendida. Espere a que la herramienta se haya enfriado lo suficiente. No toque la punta de la herramienta durante operaciones que impliquen su funcionamiento continuo; dicho punto alcanza temperaturas muy elevadas.
  • Page 57: Mantenimiento E Inspección

    Esta lista de repuestos será de utilidad si es presentada junto con la herramienta al Centro de Los tornillos son peligrosos. Inspecciónelos Servicio Autorizado de Hitachi, para solicitar la regularmente y cerciórese de que estén bien reparación o cualquier otro tipo de apretados.
  • Page 58: Accesorios

    ACCESORIOS ADVERTENCIA: SIEMPRE utilice únicamente repuestos y accesorios autorizados por HITACHI. NO utilice nunca repuestos o accesorios no previstos para usar con esta herramienta. Si tiene dudas en cuanto a la seguridad de usar determinado repuesto o accesorio junto con su herramienta, póngase en contacto con HITACHI.
  • Page 59 4. Broca para taladrar madera: No. de código 959183 3-17/64" (83 mm) 5. Juego adaptador de portabrocas: No. de código 321823 Monte las brocas que se venden en el mercado para perforar orificios. NOTA: Las especificaciones están sujetas a cambio sin ninguna obligación por parte de HITACHI.
  • Page 64 Please contact HITACHI KOKI U.S.A. LTD. at 1-800-59-TOOLS (toll free), or HITACHI AUTHORIZED POWER TOOL SERVICE CENTER regarding COLLECTION. Pour le RAMASSAGE, contacter HITACHI KOKI U.S.A. LTD. au 1-800-59-TOOLS (appel gratuit), ou UN SERVICE APRÈS-VENTE D’OUTILS ÉLECTRIQUE AGRÉÉ PAR HITACHI.

Table des Matières