Table des Matières

Publicité

Les langues disponibles
  • FR

Les langues disponibles

Liens rapides

METROBREEZE
MIAMI
Klimaanlage
Air Conditioner
Aire acondicionado
Climatiseur
Condizionatore
10034678 10034679
www.klarstein.com

Publicité

Table des Matières
loading

Sommaire des Matières pour Klarstein METROBREEZE MIAMI

  • Page 1 METROBREEZE MIAMI Klimaanlage Air Conditioner Aire acondicionado Climatiseur Condizionatore 10034678 10034679 www.klarstein.com...
  • Page 3: Table Des Matières

    Sehr geehrter Kunde, wir gratulieren Ihnen zum Erwerb Ihres Gerätes. Lesen Sie die folgenden Hinweise sorgfältig durch und befolgen Sie diese, um möglichen Schäden vorzubeugen. Für Schäden, die durch Missachtung der Hinweise und unsachgemäßen Gebrauch entstehen, übernehmen wir keine Haftung. Scannen Sie den folgenden QR-Code, um Zugriff auf die aktuellste Bedienungsanleitung und weitere Informationen rund um das Produkt zu erhalten.
  • Page 4: Hinweise Zum Kältemittel R290

    HINWEISE ZUM KÄLTEMITTEL R290 Warnhinweise • Die Klimaanlage muss aufrecht aufbewahrt und transportiert werden. Andernfalls können irreparable Kompressorschäden entstehen. Lassen Sie das Gerät im mindestens 24 Stunden stehen, bevor Sie es in Betrieb nehmen. • Schalten Sie den das Gerät vor der Reinigung aus und trennen Sie es von der Stromversorgung.
  • Page 5: Sicherheitshinweise

    SICHERHEITSHINWEISE Spezielle Hinweise • Verwenden Sie zum Entfrosten oder zum Reinigen ausschließlich vom Hersteller empfohlene Mittel. • Lagern Sie das Gerät keinesfalls in einem Raum, in welchem sich permanent Zündquellen befinden (beispielsweise: offene Flammen, ein eingeschaltetes Gasgerät oder ein eingeschaltetes elektrisches Heizgerät). •...
  • Page 6 • Decken Sie das Gerät, zur Vermeidung von Brandgefahr, nicht ab. • Alle Anschlüsse des Lüfters müssen den lokalen Vorschriften für elektrische Sicherheit entsprechen. Falls notwendig, informieren Sie sich über diese Vorschriften. • Beaufsichtigen Sie Kinder, damit diese nicht mit dem Gerät spielen. •...
  • Page 7: Geräteübersicht Und Funktionstasten

    GERÄTEÜBERSICHT UND FUNKTIONSTASTEN Bedienfeld Lüftungsgitter Luftauslass Wasserauslass Rollen Griff Lüftungsgitter Abluftöffnung Abdeckung Lieferumfang Bezeichnung Menge Hauptgerät Abluftschlauch Schlauchanschluss (Fensterseite) Schlauchanschluss (Geräteseite) Fensterdichtung Fernbedienung Verbindungsstück Ablaufschlauch...
  • Page 8: Bedienfeld Und Fernbedienung

    BEDIENFELD UND FERNBEDIENUNG Anpassung Timer ein/aus Ventilator- geschwindigkeit Schlummer- Ein/Aus funktion ein/aus Schwingen Temperatur/Zeit Temperatur/ Modus- aktivieren/deaktivieren verringern Zeit erhöhen auswahl POWER – Ein-/Ausschalten MODE – Modusauswahl TIMER – Einstellen der Zeit SPEED – Ventilatorgeschwindigkeit einstellen TEMP – Temperatur erhöhen TEMP –...
  • Page 9: So Bringen Sie Die Dichtung An

    SO BRINGEN SIE DIE DICHTUNG AN Die Montage der Fensterdichtung ist einfach. Sie können die Dichtung an ein gekipptes Fenster, ein seitlich geöffnetes Fenster oder ein Dachfenster anbringen. Wir haben hier zur Demonstration ein seitlich geöffnetes Fenster gewählt. Es eignet sich besonders gut, weil sich der Abluftschlauch seitlich weit nach unten anbringen lässt.
  • Page 10: Installation

    INSTALLATION Installation des Abluftschlauchs 1. Stecken Sie die Enden des Abluftschlauchs an einer Seite in die quadratische Fixierung und an der anderen Seite ich die Flache Fixierung. 2. Befestigen Sie die quadratische Fixierung in der Öffnung an der Rückseite des Geräts (siehe Abbildung oben).
  • Page 11 Installation des Schlauchs zur kontinuierlichen Entwässerung Hinweis: Das Gerät kann anfallendes Kondenswasser automatisch über das Abluftrohr abgeben. Im Kühl- und Luftentfeuchtungsmodus kann ein Ablassschlauch angeschlossen werden. Wenn Sie keinen Ablassschlauch anschließen, müssen Sie darauf achten, dass der Gummistopfen im Gerät installiert ist. 1.
  • Page 12: Inbetriebnahme Und Bedienung

    INBETRIEBNAHME UND BEDIENUNG Inbetriebnahme 1. Wählen Sie einen Ort aus, an welchem sich eine Stromverbindung in der Nähe befindet. 2. Installieren Sie den Abluftschlauch. 4. Stecken Sie den Netzstecker die Steckdose. 5. Drücken Sie zum Einschalten des Geräts die Taste EIN/AUS. Gerät einschalten/ausschalten Drücken Sie zum Einschalten des Geräts die Taste EIN/AUS.
  • Page 13 TIMER einstellen Sie können mit dem Timer die Zeit bis zum automatischen ein- oder ausschalten einstellen. Zeit bis zum automatischen Einschalten einstellen Wenn Sie den entsprechenden Timer aktiviert haben, schaltet sich das Gerät nach der von Ihnen eingestellten Zeit ein. Wenn Sie im Standbymodus die Taste TIMER drücken, blinkt die Timeranzeige auf.
  • Page 14 Taste TEMP- Die Temperatur kann in der Kühl- und Heizfunktion im Temperaturbereich von 16 ~ 31 °C eingestellt werden. Durch jedes Drücken der Taste wird die Temperatur um 1 °C reduziert. Taste TEMP+ Die Temperatur kann in der Kühl- und Heizfunktion im Temperaturbereich von 16 ~ 31 °C eingestellt werden.
  • Page 15: Reinigung Und Pflege

    Temperaturanzeige Durch gleichzeitiges Drücken der Tasten (+) und (-) können Sie zwischen Fahrenheit und Celsius wechseln. Vorsichtsmaßnahmen für Kühlung und Luftentfeuchtung • Achten Sie darauf, dass Sie bei der Verwendung des Kühl- und Luftentfeuchtungsmodus darauf, dass Sie nach dem Ausschalten mindestens 3 Minuten warten, bevor Sie das Gerät wieder einschalten.
  • Page 16: Fehlerbehebung

    FEHLERBEHEBUNG Problem Mögliche Ursache Lösungsansatz Das Gerät startet nicht beim Die Wasserstandsanzeige- Entleeren Sie das Wasser aus Drücken der Taste Ein/Aus. leuchte blinkt auf, weil der dem Wassertank. Wassertank voll ist. Die Raumtemperatur ist höher Setzen Sie die als die eingestellte Temperatur Temperatureinstellung zurück.
  • Page 17: Hinweise Zur Entsorgung

    HINWEISE ZUR ENTSORGUNG Wenn es in Ihrem Land eine gesetzliche Regelung zur Entsorgung von elektrischen und elektronischen Geräten gibt, weist dieses Symbol auf dem Produkt oder auf der Verpackung darauf hin, dass dieses Produkt nicht im Hausmüll entsorgt werden darf. Stattdessen muss es zu einer Sammelstelle für das Recycling von elektrischen und elektronischen Geräten gebracht werden.
  • Page 18: Produktdatenblatt

    PRODUKTDATENBLATT Angaben nach Verordnung (EU) Nr. 626/2011 Warenzeichen des Lieferanten: Klarstein Modellkennung des Lieferanten: 10034678, 10034679 Schallleistungspegel in lnnenräumen bei Norm- Nennbedingungen im Kühlbetrieb in dB: 65 dB Der Austritt von Kältemittel (R290) trägt zum Klimawandel bei. Kältemittel mit geringerem Treibhauspotenzial tragen im Fall eines Austretens weniger zur Erderwärmung bei als solche mit höherem Treibhauspotenzial.
  • Page 19 Angaben nach Verordnung (EU) Nr. 206/2012 Modellkennung(en) 10034678, 10034679 Bezeichnung Symbol Wert Einheit Nenn-Leistung im Kühlbetrieb im Kühlbetrieb rated Nenn-Leistung im Heizbetrieb im Heizbetrieb - rated Nenn-Leistungsaufnahme im Kühlbetrieb Nenn-Leistungsaufnahme im Heizbetrieb Nenn-Leistungszahl im Kühlbetrieb EERd Nenn-Leistungszahl im Heizbetrieb COPd Leistungsaufnahme im Betriebszustand „Temperaturregler aus“...
  • Page 21 Dear Customer, Congratulations on purchasing this device. Please read the following instructions carefully and follow them to prevent possible damages. We assume no liability for damage caused by disregard of the instructions and improper use. Scan the QR code to get access to the latest user manual and more product information.
  • Page 22: Notes On Refrigerant R290

    NOTES ON REFRIGERANT R290 Warnings • The air conditioning system must be kept and transported upright. Otherwise, irreparable compressor damage may occur. Leave the unit for at least 24 hours before putting it into operation. • Switch off the device and disconnect it from the power supply before cleaning. •...
  • Page 23: Safety Instructions

    SAFETY INSTRUCTIONS Special notes • Only use agents recommended by the manufacturer for defrosting or cleaning. • Never store the appliance in a room in which there are permanent sources of ignition (e.g. open flames, a switched on gas appliance or a switched on electric heater).
  • Page 24 • To avoid the risk of fi re, do not cover the unit. • All fan connections must comply with local electrical safety regulations. If necessary, refer to these regulations. • Supervise children so that they do not play with the unit. •...
  • Page 25: Device Overview And Function Keys

    DEVICE OVERVIEW AND FUNCTION KEYS Control panel Ventilation grilles Air outlet Water outlet Rolls Grip Ventilation grilles Exhaust opening Cover Accessories Designation Quantity Main unit Exhaust hose Hose connection (window side) Hose connection (device side) Window slide set Remote control Connector Drain hose...
  • Page 26: Control Panel And Remote Control

    CONTROL PANEL AND REMOTE CONTROL Fan speed Timer on/off adjustment Sleep on/off On/Off Swing function on/off Reduce tempe- Increase Mode selec- rature/time temperature/ tion time POWER - On/Off switch MODE - Mode selection TIMER - Set the time SPEED - Set fan speed TEMP - Increase temperature TEMP - Reduce temperature SLEEP - Sleep function...
  • Page 27: How To Install The Window Seal

    HOW TO INSTALL THE WINDOW SEAL Installing the window sealing is easy. You can attach it to a tilted window or to a laterally opened window. Our demonstration is performed on a laterally opened window. It is especially suitable for low positions of the exhaust pipe. The velcro tape must be attached on three sides.
  • Page 28: Installation

    INSTALLATION Installing the exhaust hose 1. Insert the ends of the exhaust hose into the square fixation on one side and the flat fixation on the other side. 2. Fasten the square fixation in the opening at the back of the unit (see illustration above).
  • Page 29 Installation of the hose for continuous dewatering Note: The unit can automatically discharge condensation water via the exhaust pipe. A drain hose can be connected in cooling and dehumidifying mode. If you do not connect a drain hose, make sure that the rubber plug is installed in the unit. 1.
  • Page 30: Commissioning And Operation

    COMMISSIONING AND OPERATION Commissioning 1. Select a location where there is a power connection nearby. 2. Install the exhaust hose. 4. Plug the mains plug into the socket. 5. Press the ON/OFF button to turn on the unit. Switching the unit on/off Press the ON/OFF button to turn on the unit.
  • Page 31 Setting the TIMER You can use the timer to set the time to automatically switch on or off. Setting the auto power on time If you have activated the corresponding timer, the unit switches on after the time you have set. When you press the TIMER button in standby mode, the timer indicator blinks.
  • Page 32 TEMP- button The temperature can be adjusted in the cooling and heating function within the temperature range of 16 ~ 31 °C can be set. Each time the button is pressed, the temperature is increased by 1 °C. TEMP+ button The temperature can be adjusted in the cooling and heating function within the temperature range of 16 ~ 31 °C can be set.
  • Page 33: Cleaning And Care

    Temperature display Press the (+) and (-) buttons simultaneously to switch between Fahrenheit and Celsius. Cooling and dehumidifying precautions • When using the cooling and dehumidifying mode, be sure to wait at least 3 minutes after turning off the unit before turning it on again. •...
  • Page 34: Troubleshooting

    TROUBLESHOOTING Problem Possible cause Suggested solution The unit does not start when The water level indicator light Empty the water from the the On/Off button is pressed. flashes because the water water tank. tank is full. The room temperature is higher Reset the temperature setting.
  • Page 35: Disposal Considerations

    DISPOSAL CONSIDERATIONS If there is a legal regulation for the disposal of electrical and electronic devices in your country, this symbol on the product or on the packaging indicates that this product must not be disposed of with household waste. Instead, it must be taken to a collection point for the recycling of electrical and electronic equipment.
  • Page 36: Product Data Sheet

    PRODUCT DATA SHEET Information according to regulation (EU) No. 626/2011 Supplier‘s trademark: Klarstein Supplier‘s model identifier: 10034678, 10034679 Inside sound power levels at standard rating conditions on cooling mode in dB: 65 dB Refrigerant (R290) leakage contributes to climate change. Refrigerant...
  • Page 37 Information according to regulation (EU) No. 206/2012 Model identifier(s) 10034678, 10034679 Description Symbol Value Unit Rated capacity for cooling for cooling 2,6 rated Rated capacity for heating for heating - rated Rated power input for cooling Rated power input for heating Rated Energy efficiency ratio EERd Rated Coefficient of performance...
  • Page 39 Estimado cliente, Le felicitamos por la adquisición de este producto. Lea atentamente las siguientes instrucciones y sígalas para evitar posibles daños. No asumimos ninguna responsabilidad por los daños causados por el incumplimiento de las instrucciones y el uso inadecuado. Escanee el siguiente código QR para obtener acceso a la última guía del usuario y más información sobre el producto.
  • Page 40: Indicaciones Sobre El Refrigerante R290

    INDICACIONES SOBRE EL REFRIGERANTE R290 Advertencias • Transporte y guarde el aparato en posición vertical. De lo contrario, podría dañar de forma irreparable el compresor. Deje el aparato en posición vertical durante al menos 24 horas antes de ponerlo en marcha. •...
  • Page 41: Indicaciones De Seguridad

    INDICACIONES DE SEGURIDAD Indicaciones especiales • Para descongelar o limpiar, utilice solamente los productos recomendados por el fabricante. • En ningún caso almacene el aparato en una estancia donde se encuentren fuentes de ignición de manera permanente (por ejemplo: llamas abiertas, un aparato a gas conectado o un radiador eléctrico encendido).
  • Page 42 • No tape el aparato para evitar peligro de incendio. • Todas las conexiones del ventilador deben cumplir con la normativa local de seguridad eléctrica. Si fuera necesario, infórmese sobre dicha normativa. • Los niños no deben jugar con el aparato. •...
  • Page 43: Visión General Del Aparato Y Funciones De Los Botones

    VISIÓN GENERAL DEL APARATO Y FUNCIONES DE LOS BOTONES Panel de control Rejilla de ventilación Salida de aire Salida de agua Ruedas Rejilla de ventilación Orificio de extracción de aire Cubierta Contenido del paquete Denominación Cantidad Aparato principal Tubo de extracción de aire Conexión de la manguera (lado de la ventana) Conexión de la manguera (lado del aparato) Junta de la ventana...
  • Page 44: Panel De Control Y Mando A Distancia

    PANEL DE CONTROL Y MANDO A DISTANCIA Ajuste de la Temporizador velocidad del on/off ventilador Función noche On/off on/off Activar / desactivar Reducir tempe- Aumentar Selección de oscilación ratura/tiempo temperatura/ modo tiempo POWER - Encender / apagar MODE - Selección de modo TIMER - Ajuste del tiempo SPEED - Regular velocidad del ventilador TEMP - Aumentar temperatura...
  • Page 45: Cómo Montar La Junta

    CÓMO MONTAR LA JUNTA El montaje de la junta para ventana es sencillo. Puede montarla en una ventana de corredera o en una ventana abatible o una ventana de techo. Para la demostración, hemos seleccionado una ventana de corredera. Es especialmente apropiada para instalar el conducto de evacuación en una posición inferior.
  • Page 46: Instalación

    INSTALACIÓN Instalación del conducto de extracción 1. Conecte los extremos del conducto de extracción a un lado en la fijación cuadrada y al otro en la fijación plana. 2. Encaje la fijación cuadrada en el orificio situado en la parte trasera del aparato (véase ilustración superior).
  • Page 47 Instalación del conducto para un desagüe permanente Nota: El aparato puede desechar el agua condensada automáticamente mediante el conducto de desagüe. En modo refrigeración y deshumidificación puede conectar un conducto de desagüe. Si no conecta ningún conducto, debe recordar colocar el tapón de goma.
  • Page 48: Puesta En Marcha Y Uso

    PUESTA EN MARCHA Y USO Puesta en marcha 1. Seleccione una ubicación situada cerca de una toma eléctrica. 2. Instale el conducto de extracción. 4. Conecte el enchufe a la toma de corriente. 5. Pulse el botón ON/OFF para encender el aparato. Apagar/encender aparato Pulse el botón ON/OFF para encender el aparato.
  • Page 49 Ajustar el temporizador Puede configurar el temporizador para un apagado o encendido automáticos. Configurar tiempo hasta el apagado automático Si ha activado el temporizador correspondiente, el aparato se enciende cuando transcurra el tiempo indicado. Si pulsa el botón TIMER en modo standby, el indicador del temporizador parpadea.
  • Page 50 Botón TEMP- La temperatura puede regularse en la función de refrigeración y calefacción en un rango de 16 a 31 °C. Cada vez que pulse el botón, la temperatura se reduce en 1 °C. Botón TEMP+ La temperatura puede regularse en la función de refrigeración y calefacción en un rango de 16 a 31 °C.
  • Page 51: Limpieza Y Cuidado

    Indicador de temperatura Pulsando simultáneamente los botones (+) y (-) puede cambiar entre grados Fahrenheit y Celsius. Medidas de seguridad para la refrigeración y la deshumidificación • Tenga en cuenta que al utilizar el modo de refrigeración y deshumidificación, debe esperar al menos 3 minutos tras apagar el aparato antes de volver a encenderlo.
  • Page 52: Resolución De Problemas

    RESOLUCIÓN DE PROBLEMAS Problema Posible causa Solución propuesta El aparato no se pone en El indicador del nivel del agua Vacíe el agua del depósito. marcha al pulsar el botón parpadea porque el depósito ON/OFF. de agua está lleno. La temperatura ambiente es Reajuste la temperatura.
  • Page 53: Indicaciones Sobre La Retirada Del Aparato

    INDICACIONES SOBRE LA RETIRADA DEL APARATO Si en su país existe una disposición legal relativa a la eliminación de aparatos eléctricos y electrónicos, este símbolo estampado en el producto o en el embalaje advierte que no debe eliminarse como residuo doméstico. En lugar de ello, debe depositarse en un punto de recogida de reciclaje de aparatos eléctricos y electrónicos.
  • Page 54: Hoja De Datos Del Producto

    HOJA DE DATOS DEL PRODUCTO Informaciones de conformidad con el reglamento (UE) No 626/2011 Marca comercial del proveedor: Klarstein Identificador del modelo del proveedor: 10034678, 10034679 Nivel de potencia acústica interior en condiciones estándar, en los modos de refrigeración en dB: 65 dB Las fugas de refrigerante (R290) contribuyen al cambio climático.
  • Page 55 Informaciones de conformidad con el reglamento (UE) No 206/2012 Denominación del modelo 10034678, 10034679 Descripción Símbolo Valor Unidad Potencia nominal de refrigeración para refrigeración 2,6 rated Potencia nominal de calefacción para calefacción rated Potencia nominal utilizada para refrigeración Potencia nominal utilizada para calefacción Factor de eficiencia energética EERd...
  • Page 57 Chère cliente, cher client, Toutes nos félicitations pour l’acquisition de ce nouvel appareil. Veuillez lire attentivement et respecter les instructions de ce mode d’emploi afin d’éviter d’éventuels dommages. Nous ne saurions être tenus pour responsables des dommages dus au non-respect des consignes et à...
  • Page 58: Remarques Concernant Le Réfrigérant R290

    REMARQUES CONCERNANT LE RÉFRIGÉRANT R290 Mises en garde • Le climatiseur doit être entreposé et transporté à la verticale. Faute de quoi, le compresseur pourrait être endommagé de façon irréparable. En cas de doute, laissez l‘appareil reposer pendant au moins 24 heures avant de le mettre en service.
  • Page 59: Consignes De Sécurité

    CONSIGNES DE SÉCURITÉ Consignes particulières • Pour le dégivrage ou le nettoyage, utilisez uniquement les produits recommandés par le fabricant. • Ne rangez jamais l‘appareil dans une pièce avec des sources d‘inflammation présentes en permanence (par exemple : flammes nues, appareil à gaz allumé ou chauffage électrique allumé).
  • Page 60 • Ne couvrez pas l‘appareil pour éviter tout risque d‘incendie. • Tous les raccordements du ventilateur doivent être conformes à la réglementation de sécurité électrique locale. Si nécessaire, informez-vous sur ces réglementations. • Surveillez les enfants pour qu‘ils ne jouent pas avec l‘appareil. •...
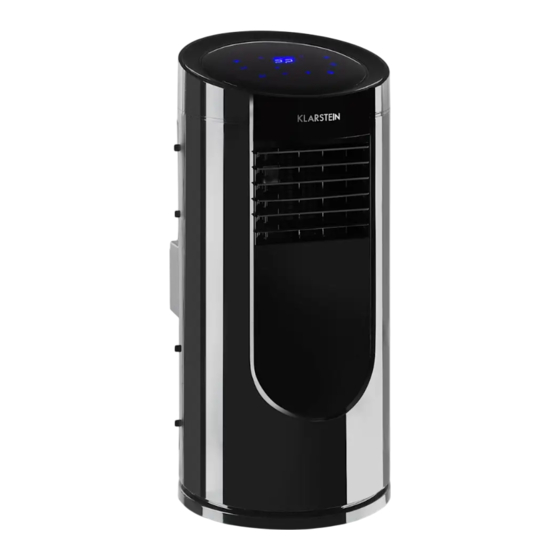
  • Page 61: Aperçu De L'appareil Et Fonction Des Touches

    APERÇU DE L‘APPAREIL ET FONCTION DES TOUCHES Panneau de commande Grille d'aération Sortie d'air Evacuation d'eau Roulettes Poignée Grille d'aération Ouverture d'extraction d'air Cache Contenu de l‘emballage Description Quantité Unité principale Conduit d'évacuation Raccordement de conduit (côté fenêtre) Raccordement de conduit (côté appareil) Joint de fenêtre Télécommande Raccord...
  • Page 62: Panneau De Comande Et Télécommande

    PANNEAU DE COMANDE ET TÉLÉCOMMANDE Réglage de Minuterie la vitesse du marche / arrêt ventilateur Mode nuit mar- Marche / arrêt che / arrêt Activer / désactiver Réduire la Augmenter la Sélection du l‘oscillation température / la température / mode durée la durée POWER –...
  • Page 63: Installation Du Joint

    INSTALLATION DU JOINT L‘installation du joint de fenêtre est simple. Vous pouvez fixer le joint à une fenêtre inclinée, à une fenêtre coulissante ou à une lucarne. Nous avons choisi une fenêtre coulissante à des fins de démonstration. Ce type de fenêtre convient spécialement car le tuyau d‘échappement peut être fixé...
  • Page 64: Installation

    INSTALLATION Installation du conduit d‘évacuation 1. Insérez les extrémités du conduit d‘évacuation dans la fixation carrée d’un côté et plate de l’autre côté. 2. Fixez le côté carré à l’ouverture au dos de l’appareil (voir illustration ci-dessus). 3. Fixez l’autre extrémité du conduit d‘évacuation à un rebord de fenêtre proche. Installation de l‘appareil •...
  • Page 65 Installation du tuyau pour une vidange permanente Remarque : L‘appareil peut évacuer automatiquement la condensation accumulée par le tuyau de vidange. En mode de refroidissement et de déshumidification, vous pouvez brancher un tuyau de vidange. Si vous ne connectez pas de tuyau de vidange, assurez-vous que le bouchon en caoutchouc est installé...
  • Page 66: Mise En Marche Et Utilisation

    MISE EN MARCHE ET UTILISATION Mise en marche 1. Sélectionnez un emplacement avec une prise électrique à proximité. 2. Installez le conduit d‘évacuation. 3. Branchez la fiche d‘alimentation dans la prise. 4. Appuyez sur la touche MARCHE / ARRÊT pour allumer l‘appareil. Pour allumer / éteindre l‘appareil Appuyez sur la touche MARCHE / ARRÊT pour allumer l’appareil.
  • Page 67 Réglage de la minuterie (TIMER) Vous pouvez utiliser la minuterie pour régler l‘heure d‘activation ou de désactivation automatique. Réglage de l‘heure d‘activation automatique Lorsque vous avez activé la minuterie correspondante, l‘appareil s‘allume une fois le délai défini écoulé. Lorsque vous appuyez sur la touche TIMER en mode veille, le témoin de la minuterie clignote.
  • Page 68 Touche TEMP- La température peut être ajustée dans les fonctions de climatisation et de chauffage dans la plage de température de 16 à 31 °C. Chaque pression sur la touche réduit la température de 1 °C. Touche TEMP+ La température peut être ajustée dans les fonctions de climatisation et de chauffage dans la plage de température de 16 à...
  • Page 69: Nettoyage Et Entretien

    Affichage de la température Appuyez simultanément sur les touches (+) et (-) pour basculer entre les degrés Fahrenheit et Celsius. Précautions pour le refroidissement et la déshumidification • Soyez prudent lorsque vous utilisez le mode climatiseur et déshumidification et attendez au moins 3 minutes après avoir éteint l‘appareil avant de le rallumer. •...
  • Page 70: Résolution Des Problèmes

    RÉSOLUTION DES PROBLÈMES Problème Cause possible Solution L'appareil ne démarre pas Le voyant de niveau d'eau Videz l'eau du réservoir. lorsqu'ion appuie sur la clignote car le réservoir d'eau touche de marche/arrêt. est plein. La température ambiante est Réinitialisez le réglage de la supérieure à...
  • Page 71: Informations Sur Le Recyclage

    INFORMATIONS SUR LE RECYCLAGE S‘il existe une réglementation pour l‘élimination ou le recyclage des appareils électriques et électroniques dans votre pays, ce symbole sur le produit ou sur l‘emballage indique que cet appareil ne doit pas être jeté avec les ordures ménagères.
  • Page 72: Fiche De Données Produit

    FICHE DE DONNÉES PRODUIT Informations conformément au règlement (UE) n° 626/2011 Marque du fournisseur : Klarstein Référence du modèle donnée par le fournisseur : 10034678, 10034679 Niveaux de puissance acoustique intérieur dans les conditions nominales, pour les fonctions de refroidissement en dB : 65 dB Les fuites de réfrigérants (R290) accentuent le changement climatique.
  • Page 73 Informations conformément au règlement (UE) n° 206/2012 Référence (s) du produit 10034678, 10034679 Description Symbole Valeur Unité Puissance frigorifique nominale frigorifique rated Puissance calorifique nominale calorifique rated Puissance frigorifique absorbée nominale Puissance calorifique absorbée nominale Coefficient d‘efficacité énergétique EERd nominal Coefficient de performance nominal COPd Consommation d‘électricité...
  • Page 75 Gentile cliente, La ringraziamo per aver acquistato il dispositivo. La preghiamo di leggere attentamente le seguenti istruzioni per l’uso e di seguirle per evitare possibili danni. Non ci assumiamo alcuna responsabilità per danni scaturiti da una mancata osservazione delle avvertenze di sicurezza e da un uso improprio del dispositivo.
  • Page 76: Avvertenze Sul Refrigerante R290

    AVVERTENZE SUL REFRIGERANTE R290 Avvertenze • Il climatizzatore deve essere conservato e trasportato in verticale, altrimenti possono risultare danni irreparabili al compressore. Lasciare il dispositivo in posizione verticale per almeno 24 ore prima di metterlo in funzione. • Spegnere il dispositivo e staccare la spina prima di pulirlo. •...
  • Page 77: Avvertenze Di Sicurezza

    AVVERTENZE DI SICUREZZA Avvertenze speciali • Utilizzare solo il prodotto consigliato dal produttore per pulire o sbrinare. • Non riporre assolutamente il dispositivo in un locale in cui ci sono fonti di ignizione (ad es. fiamme libere, un dispositivo a gas acceso o un dispositivo elettrico di riscaldamento acceso).
  • Page 78 • Per evitare incendi, non coprire il dispositivo. • Tutti i collegamenti del dispositivo devono essere conformi alle normative locali per la sicurezza elettrica. Se necessario, informarsi su queste normative. • Tenere sotto controllo i bambini, in modo che non giochino con il dispositivo. •...
  • Page 79: Descrizione Del Dispositivo E Tasti Funzione

    DESCRIZIONE DEL DISPOSITIVO E TASTI FUNZIONE Pannello di controllo Griglia di ventilazione Uscita dell’aria Uscita dell’acqua Rotelle Impugnatura Griglia di ventilazione Apertura di scarico dell’aria copertura Volume di consegna Nome Quantità Dispositivo Tubo di scarico Collegamento tubo (lato finestra) Collegamento tubo (lato dispositivo) Guarnizione finestra Telecomando Connettore...
  • Page 80: Pannello Di Controllo E Telecomando

    PANNELLO DI CONTROLLO E TELECOMANDO Regolazione Timer on/off velocità ventola Funzione nottur- On/off na on/off Attivare/disattivare oscil- Diminuire Aumentare Selezione lazione temperatura/ temperatura/ modalità Tempo Tempo POWER: accendere/spegnere MODE: selezionare la modalità TIMER: impostare il tempo SPEED: impostare la velocità della ventola TEMP+: aumentare la temperatura TEMP-: diminuire la temperatura SLEEP: funzione notturna...
  • Page 81: Installare La Guarnizione

    INSTALLARE LA GUARNIZIONE Installare la guarnizione per la finestra è semplice. E´ possibile installare la guarnizione ad una finestra, ad apertura inclinata, ad una finestra ad apertura laterale oppure ad un lucernario. La dimostrazione in basso è eseguita con una finestra ad apertura laterale.
  • Page 82: Installazione

    INSTALLAZIONE Installazione del tubo di scarico dell’aria 1. Inserire l’estremità del tubo di scarico dell’aria nel fissaggio quadrato da un lato e nel fissaggio piatto dall’altro. 2. Bloccare il fissaggio quadrato nell’apertura sul retro del dispositivo (v. immagine in alto). 3.
  • Page 83 Installazione del tubo per lo scarico dell’acqua continuo Nota: il dispositivo può scaricare automaticamente la condensa che si forma attraverso il tubo di scarico. In modalità di raffreddamento e deumidificazione è possibile collegare un tubo di scarico. Se non si collega alcun tubo di scarico, è necessario installare un tappo di gomma.
  • Page 84: Messa In Funzione E Utilizzo

    MESSA IN FUNZIONE E UTILIZZO 1. Scegliere un luogo in cui la connessione alla rete elettrica si trova nelle vicinanze. 2. Installare il tubo di scarico dell’aria. 3. Collegare la spina a una presa elettrica. 4. Premere On/Off per accendere il dispositivo. Accendere/spegnere il dispositivo Premere ON/OFF per accendere il dispositivo e premerlo di nuovo per spegnerlo.
  • Page 85 Impostazione TIMER Il timer può essere impostato per automatizzare l’accensione o lo spegnimento. Impostare il tempo fino all’accensione automatica Se il relativo timer è stato attivato, il dispositivo si accende allo scadere del tempo impostato. Se si preme TIMER in standby, lampeggia l’indicazione del timer. Impostare il tempo con + e –...
  • Page 86 TEMP- La temperatura può essere impostata tra 16 e 31 °C in modalità di raffreddamento e riscaldamento. Ogni volta che si preme il tasto, la temperatura si abbassa di 1 °C. TEMP+ La temperatura può essere impostata tra 16 e 31 °C in modalità di raffreddamento e riscaldamento.
  • Page 87: Pulizia E Manutenzione

    Indicazione della temperatura Premendo + e – contemporaneamente, è possibile cambiare tra Fahrenheit e Celsius. Misure di sicurezza per raffreddamento e deumidificazione • Quando si utilizzano le modalità di raffreddamento e deumidificazione, assicurarsi di attendere almeno 3 minuti dopo lo spegnimento prima di riaccendere il dispositivo.
  • Page 88: Correzione Degli Errori

    CORREZIONE DEGLI ERRORI Problema Causa Soluzione Quando si preme On/Off, il La spia del livello dell’acqua Svuotare il serbatoio. dispositivo non si attiva. lampeggia perché il serbatoio è pieno. La temperatura della stanza Reimpostare la temperatura. è più alta di quella impostata (modalità...
  • Page 89: Avviso Di Smaltimento

    AVVISO DI SMALTIMENTO Se nel proprio paese si applicano le regolamentazioni inerenti lo smaltimento di dispositivi elettrici ed elettronici, questo simbolo sul prodotto o sulla confezione segnala che questi prodotti non possono essere smaltiti con i rifiuti normali e devono essere portati a un punto di raccolta di dispositivi elettrici ed elettronici.
  • Page 90: Scheda Informativa Del Prodotto

    SCHEDA INFORMATIVA DEL PRODOTTO Indicazioni conformi al regolamento (UE) n. 626/2011 Marchio del fornitore: Klarstein Identificazione del modello del fornitore: 10034678, 10034679 Livelli di potenza sonora interna alle condizioni nominali standard per le funzioni di raffreddamento in dB: 65 dB La perdita di refrigerante contribuisce al cambiamento climatico.
  • Page 91 Indicazioni conformi al regolamento (UE) n. 206/2012 Identificazione del modello (i) 10034678, 10034679 Descrizione Simbolo Valore Unità Capacità nominale di per il nominale raffreddamento raffreddamento Capacità nominale di per il nominale riscaldamento riscaldamento Potenza nominale assorbita per il raffreddamento Potenza nominale assorbita per il riscaldamento Indice di efficienza energetica EERd...

Ce manuel est également adapté pour:

1003467810034679

Table des Matières