Optelec Compact 7 HD Manuel D'utilisation
Masquer les pouces
Voir aussi pour Compact 7 HD:
- Manuel d'utilisation (109 pages) ,
- Manuel d'utilisation (232 pages)
Table des Matières
Publicité
Les langues disponibles
Les langues disponibles
Liens rapides
Publicité
Table des Matières

Manuels Connexes pour Optelec Compact 7 HD


Sommaire des Matières pour Optelec Compact 7 HD
-
Page 3: Table Des Matières
3. CHARGING THE BATTERY ..................... 24 7 HD ..................... 24 HARGING THE OMPACT ..................25 TANDBY AND OWER ....................... 25 ATTERY WARNING 4. THE COMPACT 7 HD MENU .................... 26 ......................27 CTIVATING THE MENU ......................27 AVIGATING THE MENU ........................ 27 XITING THE MENU... - Page 4 Optelec Compact 7 HD ......................28 NFORMATION ........................28 MAGES ......................30 RIGHTNESS ........................31 OWER ........................34 OUND ........................35 IGHT ........................35 OLOR ........................36 ESET APPENDIX A: SAFETY ......................37 APPENDIX B: TECHNICAL INFORMATION ................ 38 APPENDIX C: WARRANTY CONDITIONS ................40 INHOUDSOPGAVE 1.
- Page 5 OPLADEN ................57 TAND BY EN UTOMATISCH ITSCHAKELEN ....................57 ATTERIJ WAARSCHUWING 4. HET COMPACT 7 HD MENU .................... 58 ......................59 ET MENU ACTIVEREN ....................59 AVIGEREN DOOR HET MENU ......................59 ET MENU VERLATEN ) ..................60 NFORMATIE NFORMATION ) ....................
- Page 6 TILISER LE BOUTON PHOTO INSTANTANEE 3. CHARGEMENT DE LA PILE ..................... 85 7 HD ....................85 HARGER LE OMPACT ............. 86 ISE EN VEILLE ET MISE HORS TENSION AUTOMATIQUE 4. LE MENU DU COMPACT 7 HD ..................87 ........................88 UVRIR LE MENU...
- Page 7 Optelec Compact 7 HD ...................... 88 AVIGUER DANS LE MENU ......................... 88 ERMER LE MENU ......................89 NFORMATION ........................89 MAGES ....................... 91 UMINOSITE ......................92 LIMENTATION .......................... 96 ........................96 UMIERE ........................97 OULEUR ..................98 ONFIGURATION PAR DEFAUT ANNEXE A: MESURES DE SECURITE ................
- Page 8 7 HD ..................117 OME RICARICARE OMPACT ................... 117 TANDBY E AUTOSPEGNIMENTO ....................118 VVISO BATTERIA SCARICA 4. IL MENU DI COMPACT 7 HD ..................119 ......................120 TTIVARE IL ......................120 AVIGARE NEL ......................120 SCIRE DAL ......................121 NFORMAZIONI .........................
- Page 9 1. INTRODUCCIÓN ......................139 ....................140 CERCA DE ESTE MANUAL ¿Q ? ....................140 UÉ CONTIENE LA CAJA 2. CONOCER SU COMPACT 7 HD ..................141 7 HD .......... 142 TILIZAR EL OMPACT EN LA POSICIÓN CERRADA O ABIERTA ............... 143 IMPIAR EL LENTE DE LA CÁMARA Y EL ESPEJO...
- Page 10 Optelec Compact 7 HD ..................... 150 VISO DE BATERÍA VACÍA 4. EL MENÚ DEL COMPACT 7 HD ..................151 ....................... 152 CTIVAR EL MENÚ ......................152 AVEGAR EN EL MENÚ ......................... 152 ALIR DEL MENÚ ......................153 ENÚ NFORMACIÓN ....................... 153 ENÚ...
- Page 11 3. AUFLADEN DES AKKUS ....................183 7 HD ................... 183 UFLADEN DES OMPACT ..............184 TANDBY UND AUTOMATISCHES USSCHALTEN ........................184 KKUWARNUNG 4. DAS COMPACT 7 HD MENÜ..................185 ....................... 186 ENÜ AKTIVIEREN ......................186 AVIGIEREN IM ENÜ ..................... 186 ERLASSEN DES ENÜS ......................
- Page 12 ANHANG A: SICHERHEITSHINWEISE ................197 ANHANG B: TECHNISCHE INFORMATIONEN ..............198 ANHANG C: GARANTIEBEDINGUNGEN ................200 OPTELEC OFFICES WORLDWIDE | OPTELEC KANTOREN WERELDWIJD | OPTELEC DANS LE MONDE | SEDI OPTELEC NEL MONDO | OPTELEC EN EL MUNDO | OPTELEC ZWEIGNIEDERLASSUNGEN WELTWEIT…………………………………..204...
- Page 13 Optelec Compact 7 HD Compact 7 HD User Manual Version 1.5 © 2017 Optelec, the Netherlands All rights reserved Optelec P.O. Box 399 2990 AJ Barendrecht The Netherlands Phone: +31 (0)88 678 34 44 E-mail: info@optelec.nl Internet: www.optelec.com English...
- Page 14 Optelec Compact 7 HD WEEE Notice The directive on Waste Electrical and Electronic Equipment (WEEE), which entered into force as European law on February 13, 2003, resulted in a major change in the treatment of electrical equipment at end-of-life. The purpose of this Directive is, as a first priority, the prevention of WEEE, and in addition, to promote the reuse, recycling and other forms of recovery of such wastes so as to reduce disposal.
-
Page 15: Introduction
With its multifunctional design, unique lighting concept, autofocus, and integrated reading stand, the Compact 7 HD can be used for reading, viewing images, price tags, displays and much more while at home or on the go. If you have questions or suggestions concerning the use of this product, please contact your distributor or Optelec’s headquarters, using the contact information on the last page of this... -
Page 16: About This Manual
Support section. This manual will familiarize you with the features and basic operation of the Compact 7 HD. Please read this manual carefully before using your device. What’s in the box? The Compact 7 HD packaging contains the following: ... -
Page 17: Getting Started
Compact 7 HD 2. Getting started The Compact 7 HD is placed correctly in front of you when the screen is facing up, and the large white button and orange on / off switch are at the bottom of the screen. -
Page 18: Hd In The Closed Or Open Position
Using the Compact 7 HD in the closed or open position The Compact 7 HD can be used in two ways: in the closed or open position.In the closed position, hold the unit in your hand and point the camera (located at the back of the unit) to the object or text you wish to view or read. -
Page 19: Cleaning The Camera Lens And Mirror
To open the unit, follow these steps: Place the Compact 7 HD in front of you so that the screen is facing up, and the large white button and orange on / off switch are at the bottom of the screen. -
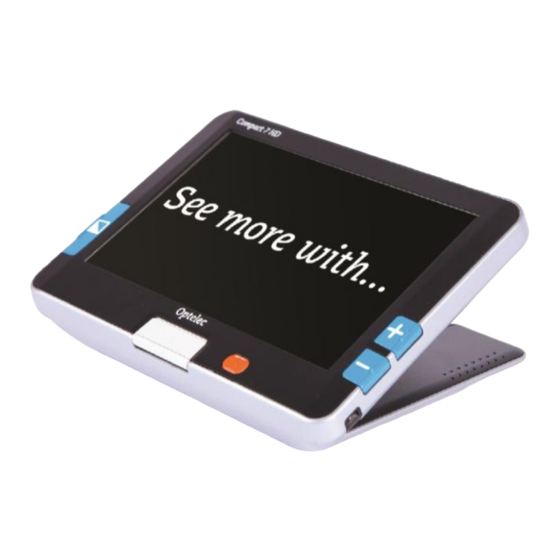
Page 20: Buttons
The Compact 7 HD has the following buttons: Open Pressing the white button in the centre at the bottom of the screen will open the Compact 7 HD and switch the unit on. Mode Pressing the Mode button to the left of the screen allows you to select one of the viewing modes. -
Page 21: Switching The Power On And Off
Switching the power on and off To switch on the Compact 7 HD for the first time, the unit needs to be charged. Once charged, press the orange oval on / off switch located on the right of the white Open button in the centre at the bottom of the screen for one second. -
Page 22: Adjusting The Magnification
In the open position, when placed on a document, the magnification level starts at 2.5 times and can be increased to 30 times. The Compact 7 HD is equipped with an auto-focus camera. This allows you to use the unit while holding it in your hands in the closed position. -
Page 23: Selecting A Viewing Mode
Hold or place the Compact 7 HD over the text or image you wish to capture. Press the snapshot button located on the top right side of the unit to take the snapshot. Bringing the Compact 7 HD closer to your eyes will enable you to view the object or text closely. - Page 24 A maximum of 75 images can be stored inside the Compact 7 HD memory. A new image will replace the oldest image in memory. Press the snapshot button again to and return to the live video mode. It is now possible to take a new snapshot.
-
Page 25: Charging The Battery
To charge the Compact 7 HD, connect the power supply to the 12V DC IN jack located on the left side of the unit. Plug the other end of the power supply into a power outlet. The orange LED indicator next to the 12V DC IN jack will glow continuously while the Compact 7 HD is charging. -
Page 26: Standby And Auto Power Off
Compact 7 HD Standby and Auto Power Off The Compact 7 HD will automatically go into standby mode after two minutes if no button is pressed or no image change is detected. Pressing any button will wake up the unit. Four minutes after the Compact 7 HD goes into standby mode, the unit will automatically switch off. -
Page 27: The Compact 7 Hd Menu
Optelec Compact 7 HD 4. The Compact 7 HD Menu Shows the battery status and firmware version. Allows you to view or delete the saved images Allows you to adjust the screen brightness. Allows you to configure the power settings. -
Page 28: Activating The Menu
Optelec Compact 7 HD Activating the menu To enter the menu, press the + and – buttons simultaneously for two seconds. Navigating the menu Use the + and – buttons to navigate between the menu items. The Mode button located to the left of the screen will activate the chosen menu item or confirm the selection. -
Page 29: Menu : Information
Optelec Compact 7 HD Menu: Information This menu item displays the unit’s battery status and current firmware version. No changes can be made in this menu. Activate the menu by pressing the + and – buttons simultaneously for two seconds. - Page 30 Optelec Compact 7 HD Submenu View: To view the taken images: Activate the menu by pressing the + and - buttons for two seconds. Select the menu option Images and activate this menu by pressing the Mode button. Select the View option. Press the Mode button to confirm your choice.
-
Page 31: Menu : Brightness
Optelec Compact 7 HD Submenu Delete all To delete all images: Activate the menu by pressing the + and - buttons for two seconds. Use the + button to move up and the - button to move down within the menu. -
Page 32: Menu : Power
This menu item contains four submenus: Standby Sets the time after which the Compact 7 HD goes into standby mode to conserve power. Pressing any button will take the unit out of standby mode. By default, the standby time is set to 2 minutes. - Page 33 Compact 7 HD Close Enables or disables the automatic power-off function upon closing the Compact 7 HD. By default, the Compact 7 HD will power off upon closing the unit. Submenu Standby By default, the standby time is set to 2 minutes. To adjust the standby time of the Compact 7 Activate the menu by pressing the + and –...
- Page 34 Press the Mode button to confirm your choice and return to live video mode. Submenu Open To enable or disable the power-on function upon opening the Compact 7 HD: Activate the menu by pressing the + and – buttons simultaneously for two seconds.
-
Page 35: Menu : Sound
Optelec Compact 7 HD Activate the menu by pressing the + and – buttons simultaneously for two seconds. Use the + button to move up or the – button to move down within the menu. Select the menu option Power and activate this menu option by pressing the Mode button. -
Page 36: Menu : Light
Press the Mode button to confirm your choice and return to live video mode. Menu: Color The Compact 7 HD supports four high contrast modes. For each of these four modes, the foreground and background colors can be selected. Three of the high contrast modes can be disabled if just one high contrast mode is required. -
Page 37: Menu : Reset
Press the Mode button to confirm your choice and return to live video mode. Menu: Reset The Compact 7 HD can be reset to the factory default settings. Any settings that have been adjusted will be restored to factory defaults. -
Page 38: Appendix A: Safety
Appendix A: Safety Intended Use: The Compact 7 HD is designed that it can be used in a hospital environment for general purpose such as reviewing medical records. The Compact 7 HD can not be used for surgical procedures in combination with life supporting systems. -
Page 39: Appendix B: Technical Information
Optelec Compact 7 HD Appendix B: Technical information 2.5 – 30 times Magnification Viewing modes Full color photo mode High contrast, white on black High contrast, black on white High contrast color combination 1 High contrast color combination 2 Focus... - Page 40 Optelec Compact 7 HD Operating conditions Temperature +10°C to 35°C / 50°F to 95°F Humidity < 70%, no condensation Altitudes up to 3000 m (9842 feet) 700 – 1060 hPa Pressure Storage & transportation conditions Temperature +10°C to 40°C / 50°F to 104°F Humidity <...
-
Page 41: Appendix C: Warranty Conditions
The warranty is not transferable and does not apply to groups, multi-users and agencies. The Compact 7 HD was designed for the individual purchaser to be used at home or on the go. Optelec reserves the right to repair or replace any purchased Compact 7 HD with a similar or improved product. - Page 42 Warning – To avoid risk of electric shock, this equipment must only be connected to a grounded power outlet. Caution: The supplied adapter PW-M024A-1Y120K is part of the Compact 7 HD product. Caution, consult ACCOMPANYING DOCUMENTS. Follow the operating instructions or consult instructions for use.
- Page 43 Optelec Compact 7 HD RoHS Compliance This product is in compliance with Directive 2011/65/EU of the European Parliament and of the Council of 03 January 2013, on the restriction of the use of certain hazardous substances in electrical and electronic equipment (RoHS) and its amendments.
- Page 44 Compact 7 HD as cause harmful interference radio replacement parts for components, may communications.
- Page 45 Optelec Compact 7 HD WARNING: cautioned that WARNING: Risk of explosion if the battery changes or modifications not expressly is replaced by an incorrect type. Pleas e approved by the party responsible for dispose of used batteries according to the...
- Page 46 Optelec Compact 7 HD Compact 7 HD Gebruikershandleiding Version 1.5 © 2017 Optelec, the Netherlands All rights reserved Optelec P.O. Box 399 2990 AJ Barendrecht The Netherlands Phone: +31 (0)88 678 34 44 E-mail: info@optelec.nl Internet: www.optelec.com Nederlands...
-
Page 47: Inleiding
HD kwaliteit, volledig in kleur of in één van de hoog contrast standen. Het 7” scherm van de Compact 7 HD, gecombineerd met de lage vergroting van 2.5 keer, geeft u maximaal overzicht en biedt tegelijkertijd tot 30 keer vergroting voor gebruikers die een hogere vergroting wensen. -
Page 48: Over Deze Handleiding
Support om te zien of er een recentere versie beschikbaar Deze handleiding geeft u een overzicht van de mogelijkheden en het gebruik van de Compact 7 HD. Wij raden u aan deze handleiding aandachtig te lezen alvorens u het product gaat gebruiken. -
Page 49: Aan De Slag
Optelec Compact 7 HD 2. Aan de slag De Compact 7 HD is op de juiste wijze voor u geplaatst wanneer het beeldscherm naar boven wijst en de grote witte knop en oranje aan/uit knop onderaan het scherm zitten. Nederlands... -
Page 50: Het Gebruik Van De Compact 7 Hd In De Open Gesloten Positie
Het gebruik van de Compact 7 HD in de open/gesloten positie De Compact 7 HD kan op twee manieren worden gebruikt: open of in de gesloten positie. In de gesloten positie houdt u het apparaat in uw hand en wijst u met de camera (die zich aan de achterzijde van het apparaat bevindt) richting het object of de tekst die u wenst te bekijken. -
Page 51: Het Schoonhouden Van De Camera Lens En De Spiegel
Om het apparaat te openen, volgt u de volgende stappen: 1. Leg de Compact 7 HD voor u, met de grote witte knop en oranje aan/uit knop naar u toe. 2. Druk op de grote witte knop, in het midden onderaan. Het scherm gaat nu omhoog en de Compact 7 HD gaat aan. -
Page 52: Knoppen
Optelec Compact 7 HD Knoppen De Compact 7 HD heeft de volgende knoppen: Open Door op witte knop in het midden onderaan. Het scherm gaat omhoog en de Compact 7 HD gaat aan. Modus Door op de modus knop links op het scherm te drukken kunt u één van de verschillende leesstanden selecteren. -
Page 53: Het Apparaat Aan- En Uitzetten
Het apparaat aan- en uitzetten Om de Compact 7 HD aan te kunnen zetten, dient het apparaat opgeladen te zijn. Als het apparaat is opgeladen, drukt u één seconde op de ovale oranje aan/uit knop rechts van de grote witte knop. -
Page 54: Aanpassen Van De Vergroting
2.5 keer vergroting en kan deze worden verhoogd tot 30 keer vergroting. De Compact 7 HD is voorzien van een autofocus camera. Deze maakt het mogelijk om het apparaat te gebruiken in uw handen in de gesloten positie. -
Page 55: Het Gebruik Van De Snapshot Functie
De snapshot functie maakt het mogelijk om een tijdelijke foto te maken van een afbeelding of tekst. Plaats of houd de Compact 7 HD op of voor de afbeelding of tekst die u wenst te zien. Druk op de snapshot knop (rechts op de unit) Door de Compact 7 HD dicht bij uw ogen te brengen, kunt u de afbeelding of tekst van dichtbij bekijken. - Page 56 Optelec Compact 7 HD Druk nogmaals op de snapshot knop om terug te keren naar het normale camera beeld. Het is nu mogelijk om een nieuwe snapshot te maken. Let op: als de snapshot knop wordt losgelaten voordat deze twee piepjes heeft gegeven, is de foto niet opgeslagen.
-
Page 57: Netstroom En Batterijgebruik
Om de Compact 7 HD op te laden dient u de adapter aan te sluiten op de adapter ingang aan de linkerzijde van het apparaat. Steek de andere kant van de adapter in het stopcontact. -
Page 58: Stand-By En Automatisch Uitschakelen
De stand-by tijd en de automatisch tijd voor uitschakelen kunnen beiden worden aan- of uitgezet in het menu van de Compact 7 HD. In het volgende hoofdstuk kunt u meer informatie vinden over het wijzigen van deze instellingen. -
Page 59: Het Compact 7 Hd Menu
Optelec Compact 7 HD 4. Het Compact 7 HD Menu Toont de batterij status en de firmware versie Bekijk of verwijderen de opgeslagen shapshot beelden. Aanpassen van de helderheid van het beeldscherm Aanpassen van de stroominstellingen In- of uitschakelen van het geluid... -
Page 60: Het Menu Activeren
Optelec Compact 7 HD Let op: het menu van de Compact 7 HD is in het Engels. Voor uw gemak zullen wij in deze handleiding alle menu opties vertalen naar het Nederlands Het menu activeren Om het menu te activeren, drukt u tegelijkertijd op de + en – knop gedurende twee seconden. -
Page 61: Menu: Informatie (Information)
Optelec Compact 7 HD Menu: Informatie (Information) Deze menukeuze toont de status van de batterij en de huidige firmware versie van uw apparaat. In deze menu optie kunt u geen wijzigingen aanbrengen. Activeer het menu door tegelijkertijd op de + en – knop te drukken gedurende twee seconden. - Page 62 Optelec Compact 7 HD seconden. - Gebruik de + knop om omhoog en de – knop om naar beneden te gaan in het menu. Kies het menu Images en activeer deze met de modus knop. - Selecteer het View submenu (met de + en – knop kan door de opties worden gelopen).
-
Page 63: Menu: Helderheid (Brightness)
Optelec Compact 7 HD Submenu Delete all (Alles verwijderen) Om alle beelden te verwijderen: - Activeer het menu: druk tegelijkertijd op de + en – knop gedurende twee seconden. - Gebruik de + knop om omhoog en de – knop om naar beneden te gaan in het menu. -
Page 64: Menu: Stroominstellingen (Power)
Druk op de modus knop om uw keuze te bevestigen en terug te keren naar het normale camera beeld. Menu: Stroominstellingen (Power) Deze menukeuze bevat vier submenu’s: Stelt de tijd in waarop de Compact 7 HD in stand-by modus Stand-by gaat om stroom te besparen. Door op een willekeurige knop te (Standby) drukken wordt het apparaat uit stand-by gehaald. - Page 65 Compact 7 HD Openen Stelt het automatisch aanzetten van het apparaat in bij het (Open) openen van de Compact 7 HD. Standaard is het apparaat ingesteld om aangezet te worden wanneer het apparaat wordt geopend. Sluiten Stelt het automatisch uitschakelen van het apparaat in bij het (Close) sluiten van de Compact 7 HD.
- Page 66 Submenu Uitschakelen (Power Off) Om de tijd waarop de Compact 7 HD automatisch wordt uitgeschakeld in te stellen (staat standaard op 4 minuten): Activeer het menu door tegelijkertijd op de + en – knop te drukken gedurende twee seconden.
- Page 67 Optelec Compact 7 HD Submenu Openen (Open) Om automatische inschakeling van het apparaat bij het openen hiervan in te stellen: Activeer het menu door tegelijkertijd op de + en – knop te drukken gedurende twee seconden. Gebruik de + of – knop om respectievelijk omhoog of omlaag te navigeren binnen het menu.
-
Page 68: Menu : Geluid (Sound )
Optelec Compact 7 HD nogmaals op de modus knop te drukken. Om het apparaat automatisch te laten uitschakelen bij het sluiten hiervan, selecteert u de keuze ‘POWER OFF’ met de + en – knop. Door voor ‘NO ACTION’ te kiezen zal het apparaat niet automatisch worden uitgeschakeld als deze wordt gesloten. -
Page 69: Menu: Licht (Light)
Menu: Kleuren (Color) De Compact 7 HD ondersteunt vier hoogcontrast standen. Voor elk van deze vier standen standen de voorgrond en de achtergrond kleuren worden ingesteld. Drie van de vier hoogcontrast standen kunnen worden uitgeschakeld indien er slecht één stand nodig is. -
Page 70: Menu: Fabrieksinstellingen (Reset)
Optelec Compact 7 HD menu. Kies voor de optie Color en bevestig uw keuze door op de modus knop te drukken. Selecteer de hoog contrast stand die u in wenst te stellen door met de + en – knop in het menu te navigeren. -
Page 71: Bijlage A: Veiligheid
Compact 7 HD Bijlage A: Veiligheid Stel de Compact 7 HD niet bloot aan hitte of direct zonlicht om het risico op brand te verminderen. Verwijder geen onderdelen van de Compact 7 HD. Laat reparatie en service over aan door Optelec geautoriseerd personeel of uw leverancier. -
Page 72: Bijlage B: Technische Informatie
Optelec Compact 7 HD Bijlage B: Technische informatie 2,5 x – 30x Vergroting Leesstanden Foto Hoog contrast wit op zwart Hoog contrast zwart op wit Hoogcontrast kleurencombinatie 1 Hoogcontrast kleurencombinatie 2 Focus Autofocus Hoogcontrast ratio 500:1 Helderheid beeldscherm 500 cd/m2 7”... - Page 73 Optelec Compact 7 HD Gebruiksomstandigheden Temperatuur +10°C tot 35°C Vochtigheid < 70%, geen condensatie Opslag- en transportomstandigheden Temperatuur +10°C tot 40°C Vochtigheid < 95%, geen condensatie Dit apparaat voldoet aan de richtlijnen en standaarden van CE en FCC. Nederlands...
- Page 74 Optelec Compact 7 HD Compact 7 HD Manuel d’utilisation Version 1.5 © 2017 Optelec, Pays-Bas Tous droits réservés Optelec P.O. Box 399 2990 AJ Barendrecht Pays-Bas Tel.: +31 (0)88 678 34 44 Courriel: info@optelec.nl Internet: www.optelec.com Français...
- Page 75 Optelec Compact 7 HD Avis DEEE La directive relative aux déchets d'équipements électriques et électroniques (DEEE), qui a pris effet en tant que loi européenne le 13 février 2003, a apporté des changements importants en matière d'élimination des équipements électriques et électroniques (EEE) arrivés en fin de vie.
-
Page 76: Introduction
Son design unique et polyvalent, sa conception d'éclairage unique, sa mise au point automatique, ainsi que son support de lecture intégré, font du Compact 7 HD un outil essentiel pour lire, regarder des photos, voir les prix en magasin et bien plus encore. Il peut être employé... -
Page 77: Àpropos Du Manuel
Assistance. Ce manuel vous permettra de vous familiariser avec les caractéristiques et le fonctionnement du Compact 7 HD. Veuillez lire attentivement ce manuel avant d’utiliser votre appareil. Ce que contient la boîte Le matériel du Compact 7 HD comprend les éléments suivants : ... -
Page 78: Connaitre Votre Compact 7 Hd
Compact 7 HD 2. Connaître votre Compact 7 HD Vous êtes certain que le Compact 7 HD est dans la bonne position devant vous lorsque l’écran est orienté vers le haut et que le bouton de couleur blanc ainsi que l’interrupteur orange marche / arrêt se trouvent au bas de l’écran. -
Page 79: Hd En Position Ouverte Ou Fermee
Utiliser le Compact 7 HD en position ouverte ou fermée Vous pouvez utiliser le Compact 7 HD de deux façons, soit dans la position ouverte ou dans la position fermée. Pour l’utiliser dans la position fermée, tenez l’unité dans votre main et pointez la camera située à... -
Page 80: Nettoyer La Lentille De La Camera Et Le Miroir
Pour ouvrir l’unité, suivez les étapes suivantes : 1. Placez le Compact 7 HD devant vous de façon à ce que l’écran soit orienté vers le haut et que le bouton blanc et l’interrupteur orange marche/arrêt se trouvent au bas de l’écran. -
Page 81: Les Boutons
Optelec Compact 7 HD Les boutons Le Compact 7 HD comprend les boutons suivants: Appuyer sur le bouton blanc situé en bas de l’écran au centre pour Ouvrir ouvrir votre Compact 7 HD. Le bouton Mode situé sur le côté gauche de l’écran vous permet de Mode sélectionner l’un des modes de visualisation. -
Page 82: Allumer Et Eteindre Le Compact 7 Hd
Allumer et éteindre le Compact 7 HD Lorsque vous allumerez le Compact 7 HD pour la première fois, assurez-vous que la pile est chargée à pleine capacité. Une fois chargée, appuyez pendant une seconde sur le bouton orange de l’interrupteur qui est situé... -
Page 83: Regler Le Niveau De Grossissement
à 2.5 fois et peut être augmenté jusqu’à un maximum de 30 fois. Le Compact 7 HD est muni d’une caméra à mise au point automatique, ce qui vous permet d’utiliser l’unité en la tenant en position fermée dans votre main. Cette caractéristique vous... -
Page 84: Selectionner Le Mode De Visualisation
Les lumières d’objet se rallumeront automatiquement lorsque vous changerez de mode. Utiliser le bouton photo instantanée Le bouton capture instantanée permet de prendre une capture temporaire d’un texte ou d’une image. Tenez ou placez le Compact 7 HD au-dessus du texte ou de l’image que vous souhaitez capturer. Français... - Page 85 Appuyez sur le bouton capture instantanée, situé sur le côté droit de l’appareil et vers le haut. Vous pouvez ensuite approcher le Compact 7 HD vers vous pour mieux voir l’image ou le texte capturé. Appuyez sur le bouton Mode pour changer le mode de visualisation.
-
Page 86: Chargement De La Pile
La recharge de la pile du Compact 7 HD peut durer environ 3,5 heures. La durée d’utilisation du Compact 7 HD lorsque pleinement chargée est d’environ 5 heures, selon les paramètres d’alimentation. -
Page 87: Mise En Veille Et Mise Hors Tension Automatique
En passant par le menu du Compact 7 HD, vous pourrez régler le temps des fonctions de la mise en veille et de la mise hors tension automatique, ou désactiver ces fonctions. Veuillez consulter le chapitre suivant pour connaître la procédure à... -
Page 88: Le Menu Du Compact 7 Hd
Optelec Compact 7 HD 4. Le menu du Compact 7 HD Indique l’état de la pile et la version courante du logiciel. Pour visualiser ou supprimer les images capturées. Vous permet de régler la luminosité de l’écran. Vous permet de définir les paramètres d’alimentation. -
Page 89: Ouvrir Le Menu
Optelec Compact 7 HD Ouvrir le menu Pour ouvrir le menu, appuyez sur les boutons + et – simultanément pendant deux secondes. Naviguer dans le menu Utilisez les boutons + ou – pour naviguer parmi les options du menu. Le bouton Mode à... - Page 90 Optelec Compact 7 HD Menu: Information (Information) Cette option du menu indique l’état de la pile et la version courante du logiciel du Compact 7 HD. Il n’est pas possible d’effectuer des changements dans ce menu. Ouvrez le menu en appuyant sur les boutons + et – simultanément pendant deux secondes.
- Page 91 Optelec Compact 7 HD - Utilisez le bouton + pour vous déplacer vers le haut et le bouton – pour vous déplacer vers le bas à l’intérieur du menu. Sélectionnez l’option de menu et activez cette option en appuyant sur le bouton Mode.
-
Page 92: Menu: Luminosité (Brightness)
Optelec Compact 7 HD Appuyez sur le bouton + pour annuler. Appuyez sur le bouton Mode pour revenir en mode vidéo. Sous-menu Tout supprimer (Delete all): Pour supprimer toutes les images capturées: Activez le menu en appuyant sur les boutons + et – simultanément pendant deux secondes. -
Page 93: Menu: Alimentation (Power)
Éteindre Pour régler le temps de la mise hors tension automatique du (Power Compact 7 HD. Par défaut, il est réglé à quatre minutes. Ces off) quatre minutes prennent effet après que les deux minutes (valeur par défaut) de la mise en veille automatique soient expirées. - Page 94 Fermer Pour activer ou désactiver la mise hors tension automatique (Close) lors de la fermeture du Compact 7 HD. Par défaut, le Compact 7 HD s’éteint lorsqu’il est fermé. Sous-menu Mise en veille (Standby) Par défaut, le temps d'inactivité requis pour activer la mise en veille automatique est réglé à...
- Page 95 - Appuyez sur le bouton Mode pour confirmer votre choix et pour revenir en mode vidéo. Sous-menu Éteindre (Power off) Pour régler le temps avant la mise hors tension automatique du Compact 7 HD: - Ouvrez le menu en appuyant sur les boutons + et – simultanément pendant deux secondes.
- Page 96 Optelec Compact 7 HD - Ouvrez le menu en appuyant sur les boutons + et – simultanément pendant deux secondes. - Utilisez le bouton + pour naviguer vers le haut et le bouton – pour naviguer vers le bas dans le menu. Sélectionnez l’option Alimentation dans le menu, puis activez-la en appuyant sur le bouton Mode.
-
Page 97: Menu: Lumière (Light)
Optelec Compact 7 HD - Pour activer la fonction de mise hors tension automatique à la fermeture de l’unité, choisissez l’option Power off en vous aidant des boutons + ou -. Pour désactiver cette fonction, sélectionnez l’option No action. - Appuyez sur le bouton Mode pour confirmer votre choix et pour revenir en mode vidéo. -
Page 98: Menu: Couleur (Color)
- Appuyez sur le bouton Mode pour confirmer votre choix et pour revenir en mode vidéo. Menu: Couleur (Color) Le Compact 7 HD offre quatre combinaisons de couleurs à contraste élevé. Pour chacune de ces quatre combinaisons, vous pouvez sélectionner les couleurs de l’avant et de l'arrière- plan. -
Page 99: Menu: Configuration Par Défaut (Reset)
- Appuyez sur le bouton Mode pour confirmer votre choix et pour revenir en mode vidéo. Menu: Configuration par défaut (Reset) Vous pouvez restaurer la configuration par défaut du Compact 7 HD. Tous les paramètres ayant subi une modification reviendront alors à la configuration d’origine du fabricant. -
Page 100: Annexe A: Mesures De Sécurité
Compact 7 HD Annexe A: Mesures de sécurité Évitez d’exposer le Compact 7 HD à la chaleur excessive ou au soleil afin de prévenir le risque de sinistre. Ne retirez aucune pièce du Compact 7 HD. Communiquez avec un centre de service autorisé... -
Page 101: Annexe B: Renseignements Techniques
Optelec Compact 7 HD Annexe B: Renseignements techniques 2.5x – 30x Grossissement Modes de visualisation Mode photo couleur Contraste élevé, blanc sur noir Contraste élevé, noir sur blanc Contraste élevé, combinaison de couleurs 1 Contraste élevé, combinaison de couleurs 2... - Page 102 Optelec Compact 7 HD Conditions d’utilisation Température +10 °C à 35 °C / 50 °F à 95 °F Humidité < 70%, sans condensation Conditions d’entreposage et de transport Température +10 °C à 40 °C / 50 °F à 104 °F Humidité...
-
Page 103: Annexe C: Conditions De Garantie
La garantie ne peut être cédée et ne s’applique pas aux groupes, utilisateurs multiples ou agences. Le Compact 7 HD est conçu pour être employé par l’acheteur individuel chez lui ou au bureau. Optelec se réserve le droit de réparer le Compact 7 HD ou de le remplacer par un produit similaire ou supérieur. - Page 104 Optelec Compact 7 HD Conformité RoHS Ce produit est conforme aux normes de la Directive 2011/65/EU adoptée par le Parlement Européen et par le Conseil du 3 janvier 2013, sur les restrictions en matière de l’utilisation de substances dangereuses dans les dispositifs électriques et électroniques (RoHS) et ses modifications, le cas échéant.
- Page 105 Compact 7 HD comme pièces de rechange radiocommunications. Néanmoins, il n'est pas garanti que des interférences ne des composantes, peuvent entraîner une surviennent pas dans une installation augmentation émissions...
- Page 106 Optelec Compact 7 HD circuit autre que celui sur lequel est AVERTISSEMENT: Le remplacement de branché le récepteur. la batterie par un modèle inapproprié entraîne un risque d’explosion. Lorsque · Faire appel à l'aide du distributeur ou d'un technicien radio/TV expérimenté.
- Page 107 Optelec Compact 7 HD Compact 7 HD Manuale Utente Versione 1.5 © 2017 Optelec, the Netherlands Tutti i diritti riservati Optelec P.O. Box 399 2990 AJ Barendrecht The Netherlands Phone: +31 (0)88 678 34 44 E-mail: info@optelec.nl Internet: www.optelec.com Italiano...
- Page 108 Optelec Compact 7 HD Direttiva RAEE La direttiva sui rifiuti di apparecchiature elettriche ed elettroniche (RAEE), entrata in vigore come legge europea il 13 Febbraio 2003, ha determinato un cambiamento importante nel trattamento delle apparecchiature elettriche quando devono essere smaltite.
- Page 109 HD a colori o in una delle modalità ad alto contrasto. Compact 7 HD è dotato di un display da 7 pollici, con ingrandimento minimo da 2.5 volte, per consentire una visione d’insieme, raggiungendo un ingrandimento fino a 30 volte, per chi necessita di un ingrandimento più...
- Page 110 “Support” sul sito www.optelec.com. Questo manuale vi aiuta a familiarizzare con le caratteristiche e il funzionamento di base di Compact 7 HD. Si prega di leggerlo attentamente prima di utilizzare il dispositivo. Contenuto della confezione La confezione di Compact 7 HD contiene: ...
-
Page 111: Per Iniziare
2. Per iniziare Per permettervi di seguire correttamente le indicazioni contenute in questo manuale, posizionate il Compact 7 HD di fronte a voi, con lo schermo rivolto verso l’alto e il pulsante bianco e l’interruttore arancione on/off nella parte inferiore dello schermo. - Page 112 Compact 7 HD Utilizzare Compact 7 HD in posizione chiusa o aperta Compact 7 HD può essere utilizzato in 2 modi: in posizione chiusa o aperta. In posizione chiusa, tenete l'apparecchio in mano e orientate la telecamera (si trova sul retro dell'apparecchio) sull'oggetto o sul testo che desiderate vedere o leggere.
- Page 113 Compact 7 HD Per aprire l’unità, seguire questi passaggi: Posizionare il Compact 7 HD di fronte a voi con lo schermo verso l’alto e l’interruttore arancione on/off nella parte inferiore dello schermo. Premere il pulsante bianco centrale, posizionato nella parte inferiore dello schermo.
- Page 114 Compact 7 HD Pulsanti Il Compact 7 HD ha i seguenti pulsanti: Apri Premendo il pulsante bianco centrale, Compact 7 HD si apre e si accende. Modalità Premendo il pulsante Modalità alla sinistra dello schermo, è possibile selezionare una delle modalità di visualizzazione.
-
Page 115: Accensione E Spegnimento
è nella posizione chiusa. Accensione e spegnimento Prima di accendere il Compact 7 HD per la prima volta, occorre caricare le batterie. Quando è carico, premere per un secondo il pulsante arancione on/off, posizionato alla destra del pulsante bianco centrale utilizzato per l’apertura. -
Page 116: Regolare L'ingrandimento
In posizione aperta, quando è posizionato su un documento, l’ingrandimento minimo è di 2.5 volte e può essere aumentato fino a 30 volte. Compact 7 HD è dotato di una telecamera autofocus. Questa consente di utilizzare l'apparecchio tenendolo in mano in posizione chiusa. - Page 117 Posizionare Compact 7 HD sul testo o sull’immagine che si desidera visualizzare. Premere il pulsante di scatto sul lato superiore destro del dispositivo per fare una foto. Tenere Compact 7 HD vicino agli occhi per vedere oggetti o immagini più da vicino. Premere il pulsante modalità per cambiare modalità di visualizzazione.
-
Page 118: Ricarica Della Batteria
In questo caso, scollegare l'alimentazione e riprovare. La ricarica di Compact 7HD richiede circa 3,5 ore. A piena carica, Compact 7 HD è in grado di operare per un tempo medio di 5 ore, a seconda delle impostazioni per l’alimentazione. - Page 119 Compact 7 HD automaticamente. Premendo il pulsante arancione On / Off potrà essere riacceso. Il tempo di standby e di spegnimento può essere modificato e disattivato nel menu di Compact 7 HD. Consultate il capitolo successivo per modificare queste impostazioni.
- Page 120 Optelec Compact 7 HD 4. Il Menu di Compact 7 HD Stato di carica della batteria e versione del firmware. Consente di visualizzare o eliminare le immagini scattate Consente di regolare la luminosità dello schermo. Consente di configurare le impostazioni di alimentazione.
-
Page 121: Navigare Nel Menu
Optelec Compact 7 HD Attivare il Menu Per accedere al menu, premere i tasti + e - contemporaneamente per due secondi. Navigare nel Menu Utilizzare i tasti + e - per spostarsi tra le voci del menu. Il pulsante Modalità, situato a sinistra dello schermo, attiva la voce di menu selezionata o conferma la selezione. -
Page 122: Menu: Informazioni (Information)
Optelec Compact 7 HD Menu: Informazioni (Information) Questo menu mostra lo stato della batteria e la versione del firmware del dispositivo. In questo menu, non è possibile fare alcuna modifica. Attivare il menu premendo i tasti + e - contemporaneamente per due secondi. - Page 123 Optelec Compact 7 HD all’interno del menu. Selezionare l'opzione di menu Immagini e attivare questo menu premendo il pulsante Modalità. - Selezionare l’opzione Visualizza usando i tasti + e – per scorrere le opzioni. Premere il pulsante Modalità per confermare la scelta.
-
Page 124: Menu: Luminosità
Optelec Compact 7 HD Sottomenu Cancella Tutto (Delete all) Per cancellare tutte le immagini: - Attivare il menu premendo i tasti + e – simultaneamente per due secondi. - Utilizzare il tasto + per spostarsi in alto e il tasto – per spostarsi in basso all’interno del menu. -
Page 125: Menu: Alimentazione (Power)
HD entra in modalità standby per risparmiare energia. Premendo un qualsiasi pulsante si riattiverà l’unità. Per impostazione predefinita, il tempo di standby è impostato a 2 minuti. Spegnimento Consente di impostare il tempo prima che Compact 7 HD (Power off) spenga automaticamente. Come impostazione predefinita, il tempo di spegnimento è... - Page 126 Optelec Compact 7 HD Attiva o disattiva l’accensione automatica all'apertura di Apri (Open) Compact 7 HD. Per impostazione predefinita, Compact 7 HD si accende al momento dell’apertura. Chiudi Attiva o disattiva lo spegnimento automatico alla chiusura (Close) di Compact 7 HD. Per impostazione predefinita, Compact 7 HD si spegne al momento della chiusura.
- Page 127 - Premere il pulsante Modalità per confermare la scelta e tornare alla modalità Video. Sottomenu Apri (Open) Per attivare o disattivare l'alimentazione dopo l'apertura di Compact 7 HD: - Attivare il menu premendo i tasti + e - contemporaneamente per due secondi.
- Page 128 - Premere il pulsante Modalità per confermare la scelta e tornare alla modalità Video. Sottomenu Chiudi (Close) Per attivare o disattivare l'alimentazione alla chiusura di Compact 7 HD: - Attivare il menu premendo i tasti + e - contemporaneamente per due secondi.
-
Page 129: Menu: Luce (Light)
- Premere il pulsante Modalità per confermare la scelta e tornare alla modalità Video. Menu: Colore (Color) Compact 7 HD supporta quattro modalità ad alto contrasto. Per ognuna di esse, i colori in primo piano e i colori di sfondo possono essere selezionati. Tre delle modalità ad alto contrasto possono essere disabilitate se solo una modalità... - Page 130 - Premere il pulsante Modalità per confermare la scelta e tornare alla modalità Video. Menu: Reset In Compact 7 HD possono essere ripristinate le impostazioni predefinite in fabbrica. Con il Reset, tutte le impostazioni che sono state modificate, saranno ripristinate alle impostazioni di fabbrica.
- Page 131 Compact 7 HD Appendice A: Sicurezza Non esporre Compact 7 HD a calore eccessivo o alla luce diretta del sole per evitare il rischio di incendio Non smontare le parti di Compact 7 HD. Contattare un distributore Optelec autorizzato nella vostra zona.
- Page 132 Optelec Compact 7 HD Appendice B: Informazioni tecniche Ingrandimento 2.5x - 30x Modalità visualizzazione A colori modalità fotografica Alto contrasto bianco su nero Alto contrasto nero su bianco Alto contrasto a colori combinazione 1 Alto contrasto a colori combinazione 2...
- Page 133 Optelec Compact 7 HD Condizioni di utilizzo Temperatura da +10°C a 35°C Umidità < 70%, no condensa Condizioni per stoccaggio e trasporto Temperatura da 10°C a 40°C Umidità < 95%, no condensa Italiano...
- Page 134 La garanzia non è trasferibile e non si applica a gruppi, utenti multipli e agenzie. Compact 7 HD è stato progettato per l'utente singolo, per essere utilizzato in ambienti chiusi o all’aperto. Optelec si riserva il diritto di riparare o sostituire qualsiasi Compact 7 HD acquistato con un prodotto simile o migliore.
- Page 135 Optelec Compact 7 HD Direttiva RoHS Questo prodotto è conforme alla Direttiva 2011/65/EU del Parlamento Europeo e del Consiglio Europeo del 3 gennaio 2013, sulla restrizione dell'uso di determinate sostanze pericolose nelle apparecchiature elettriche ed elettroniche (RoHS) e loro modifiche.
- Page 136 Compact 7 HD come parti di ricambio per i Tuttavia, non vi è alcuna garanzia che tali componenti, possono causare aumento o interferenze non si verifichino in una riduzione dell'immunità di Compact 7 HD.
- Page 137 Optelec Compact 7 HD ATTENZIONE: Si avvisa che cambiamenti o modifiche non espressamente approvati dalla parte responsabile della conformità potrebbero annullare il permesso di usare l'apparecchiatura. Questo dispositivo è conforme alla Parte 15 delle norme FCC. Il funzionamento è soggetto alle seguenti due condizioni: (1) Questo dispositivo non può...
- Page 138 Optelec Compact 7 HD Compact 7 HD Manual del usuario Versión 1.5 © 2017 Optelec, los Países Bajos Reservados todos los derechos Optelec C.P. 399 2990 AJ Barendrecht Países Bajos Teléfono: +31 (0)88 678 34 44 Correo-E: info@optelec.nl Internet: www.optelec.com...
- Page 139 Optelec Compact 7 HD Aviso RAEE La directiva relativa a los Residuos de Aparatos Eléctricos y Electrónicos (RAEE), una ley n aplicación desde el 13 de febrero del 2003 en todo el ámbito de la Unión Europea, ha resultado en cambios importantes con respecto al tratamiento des estos equipos una vez llegados al final de su vida útil.
- Page 140 HD de alta calidad y resolución. La pantalla de 7” del Compact 7 HD proporciona una amplificación mínima de 2.5 veces para una vvisualización más completa de la pantalla hasta un máximo de 30 veces para un nivel de zoom más poderoso.
-
Page 141: Qué Contiene La Caja
última versión de este manual en la página de www.optelec.com. El siguiente manual le permite familiarizarse con las características y el funcionamiento sencillo del Compact 7 HD. Por favor, lea atentamente este manual antes de usar su sistema. -
Page 142: Conocer Su Compact 7 Hd
Compact 7 HD 2. Conocer su Compact 7 HD El Compact 7 HD está puesto correctamente delante de usted cuando la pantalla mira hacia arriba, y el botón naranjado del interruptor y el gran botón blanco están ubicados en la parte inferior de la pantalla. - Page 143 Utilizar el Compact 7 HD en la posición cerrada o abierta Se puede usar el Compact 7 HD de dos maneras: en la posición cerrada o en la posición abierta. En la posición cerrada, sujete la unidad en la mano y dirija el foco de la cámara (ubicada atrás de la unidad) al objeto o texto que desea visualizar o leer en la pantalla.
-
Page 144: Limpiar El Lente De La Cámara Y El Espejo
Compact 7 HD Para abrir la unidad, siga estos pasos: Coloque el Compact 7 HD delante de usted para que la pantalla mire hacia arriba y el botón naranjado del interruptor y el gran botón blanco estén ubicados en la parte inferior de la pantalla. -
Page 145: Los Botones
El Compact 7 HD tiene los botones siguientes: Abrir Al presionar el botón blanco ubicado en el centro de la parte inferior de la pantalla, abrirá el Compact 7 HD y encenderá la unidad. Modo Al presionar el botón Modo ubicado a la izquierda de la pantalla, podrá... -
Page 146: Encender Y Apagar La Unidad
Encender y apagar la unidad Es necesario cargar el Compact 7 HD al usarlo por primera vez. Una vez cargado, presione durante un segundo el botón oval naranjado localizado a la derecha del gran botón blanco en el centro de la parte inferior de la pantalla. La unidad se encenderá en el modo de la... -
Page 147: Ajustar La Amplificación
2.5 veces y puede ser aumentado hasta 30 veces. El Compact 7 HD incluye una cámara con auto-foco que le permite de tener la unidad en la mano mientras la usa en la posición cerrada. Esta posición le ofrece una visualización más completa de la pantalla, pero reduce el nivel mínimo y máximo de la amplificación. -
Page 148: Seleccionar Un Modo De Visualización
Presione y mantenga presionado el botón de foto instantánea ubicado en la parte superior derecha de la unidad. Al acercar el Compact 7 HD a sus ojos le permitirá mirar el objeto o texto de cerca. Presione el botón Modo para seleccionar otro modo de visualización. - Page 149 Presione de nuevo el botón de foto instantánea para volver al modo video. Ahora está listo para tomar otra captura. Nota: Si suelta el botón de foto instantánea antes de oír los dos bips, el Compact 7 HD no guardará ninguna foto.
-
Page 150: Cargar El Compact 7 Hd
(Europa, Estados Unidos, Reino Unido y Australia). Seleccione el adaptador apropiado a su país y conéctelo al cable de alimentación. Para recargar el Compact 7 HD, conecte el cable de alimentación al conector DC 5V ubicado al lado izquierdo de la unidad. Enchufe el otro extremo del cable de alimentación en una toma de corriente. - Page 151 Compact 7 HD Modo de reposo y función de apago automático El Compact 7 HD se pondrá en modo de reposo automáticamente si no detecta ninguna presión de botón o ningún cambio de imagen durante dos minutos. Para anular el modo de reposo, toque cualquier botón.
-
Page 152: El Menú Del Compact 7 Hd
Optelec Compact 7 HD 4. El menú del Compact 7 HD Muestra el estado de la batería y la versión del firmware Le permite visualizar o borrar las capturas de imagenes Le permite de ajustar el brillo de la pantalla Le permite de regular los parámetros de alimentación... - Page 153 Optelec Compact 7 HD Activar el menú Para entrar en el menú, presione los botones + y – simultáneamente durante dos segundos. Navegar en el menú Utilice los botones + o – para navegar entre las opciones del menú. El botón Modo ubicado a la izquierda de la pantalla le permite de activar la opción del...
-
Page 154: Menú: Información (Information)
Optelec Compact 7 HD Menú: Información (Information) Esta opción de menú indica el estado de la batería y la versión del firmware actual de la unidad. Ningún cambio es posible en este menú. Presione los botones + y – simultáneamente durante dos segundos para activar el menú. - Page 155 Optelec Compact 7 HD abajo en el menú. Seleccione la opción de menú Imágenes y presione el botón Modo para activar esta opción. - Utilice el botón + o el botón – para seleccionar el submenú Ver y para recorrer las opciones en el submenú.
-
Page 156: Menú: Brillo (Brightness)
Optelec Compact 7 HD Utilice el botón Modo para volver al modo video. Submenú: Borrar todas (Delete all) Para borrar todas las imágenes guardadas: - Presione los botones + y – simultáneamente durante dos segundos para activar el menú. - Utilice el botón + para navegar hacia arriba o el botón – para navegar hacia abajo en el menú. -
Page 157: Menú: Alimentación (Power)
Apagar Le permite de regular el tiempo de la función del apago (Power off) automático del Compact 7 HD. Por defecto, el tiempo del apago automático está regulado a 4 minutos. Después de estos minutos, Compact apagará... - Page 158 Compact 7 HD Abrir Le permite de activar o desactivar el encendido automático al (Open) abrir el Compact 7 HD. Por defecto, el Compact 7 HD se encenderá al abrirlo. Cerrar Le permite de activar y desactivar el apago automático al (Close) cerrar el Compact 7 HD.
- Page 159 - Presione el botón Modo para confirmar la selección y volver al modo video. Submenú Abrir (Open) Para activar o desactivar el encendido automático al abrir el Compact 7 HD: Presione los botones + y – simultáneamente durante dos segundos para activar el menú.
- Page 160 - Presione el botón Modo para confirmar la selección y volver al modo video. Submenú Cerrar (Close) Para activar o desactivar el apago automático al cerrar el Compact 7 HD: - Presione los botones + y – simultáneamente durante dos segundos para activar el menú.
-
Page 161: Menú: Iluminación (Light)
Optelec Compact 7 HD Menú: Sonido (Beep) Esta opción de menú le permite de activar o desactivar los sonidos (sonidos de respuestas). Por defecto, los sonidos están activados. - Presione los botones + y – simultáneamente durante dos segundos para activar el menú. -
Page 162: Menú: Color (Color)
- Presione el botón Modo para confirmar la selección y volver al modo video. Menú: Color (Color) El Compact 7 HD suporta cuatro modos de visualización en alto contraste. Para cada uno de los modos, se puede seleccionar los colores del primer plano y del fondo. Se puede desactivar tres de los modos de visualización en alto contraste, si solo un modo es... -
Page 163: Menú: Restablecer (Reset)
Menú: Restablecer (Reset) Es posible de restablecer la configuración de defecto del Compact 7 HD. Cualquier cambio que ha hecho a los parámetros del Compact 7 HD se restablecerá a el valor de defecto del fabricante. Presione los botones + y – simultáneamente durante dos segundos para activar el menú. - Page 164 Compact 7 HD Apéndice A: Seguridad No exponga el Compact 7 HD a cambios extremos de temperatura o a la luz solar directa para evitar riesgos de incendios. No intente retirar ningún compuesto del Compact 7 HD. Póngase en contacto con su proveedor Optelec local.
-
Page 165: Características Técnicas
Optelec Compact 7 HD Apéndice B: Características técnicas 2.5 – 30 veces Amplificación ó Modos de visualizaci Modo de foto a todo color Alto contraste, blanco sobre negro Alto contraste, negro sobre blanco Alto contraste, combinación de colores 1 Alto contraste, combinación de colores 2... - Page 166 Optelec Compact 7 HD Condiciones de funcionamiento Temperatura +10°C a 35°C / 50°F a 95°F Humedad < 70%, no condensación Condiciones de almacenamiento y de transporte Temperatura +10°C a 40°C / 50°F a 104°F Humedad < 95%, no condensación Español...
- Page 167 Apéndice C: Condiciones de garant í Optelec garantiza que el Compact 7 HD, a partir de su fecha de entrega, está libre de defectos de materiales y de fallos por mano de obra. La garantía no es transferible, ni es aplicable a grupos, multiusuarios o agencias. El Compact 7 HD ha sido diseñado para el comprador individual para su uso dentro y fuera de...
- Page 168 Optelec Compact 7 HD Conformidad RoHS Este producto se cumple con la Directiva 2011/65/EU del Parlamento Europeo y del consejo del 3 de enero del 2013, con respecto a las restricciones acerca del uso de substancias peligrosas en los equipos eléctricos y electrónicos (RoHS) y a sus modificaciones.
- Page 169 Compact 7 HD pueden Este equipo genera, utiliza y puede emitir ocasionar un aumento en las emisiones o energía de radiofrecuencia y, si no se ha una disminución de la inmunidad del...
- Page 170 Optelec Compact 7 HD - Conecte el equipo a una toma de (2) Este dispositivo debe aceptar cualquier corriente de un circuito distinto al que se interferencia recibida, incluidas encuentre conectado el receptor. interferencias que puedan causar un - Consulte con el fabricante o con un funcionamiento no deseado.
- Page 171 Optelec Compact 7 HD Compact 7 HD Bedienungsanleitung Version 1.5 © 2017 Optelec, the Netherlands Alle Rechte vorbehalten Optelec P.O. Box 399 2990 AJ Barendrecht The Netherlands Phone: +31 (0)88 678 34 44 E-mail: info@optelec.nl Internet: www.optelec.com Deutsch...
- Page 172 Optelec Compact 7 HD WEEE Richtlinie Die WEEE-Richtlinie (Waste Electrical and Electronic Equipment; deutsch: (Elektro- und Elektronikgeräte-Abfall) ist die EG-Richtlinie 2002/96/EG zur Reduktion der zunehmenden Menge an Elektronikschrott aus nicht mehr benutzten Elektro- und Elektronikgeräten. Die EU-Richtlinie ist im Jahr 2003 in Kraft getreten.
- Page 173 Wenn Sie Fragen oder Anregungen zur Verwendung des Compact 7 HD haben, kontaktieren Sie bitte Ihren Händler oder die Optelec GmbH. Die Kontaktdaten finden Sie auf der letzten Seite dieses Handbuches. Ihre Fragen und Anregungen nehmen wir gerne entgegen! Wir wünschen Ihnen viel Freude mit Ihrem Compact 7 HD!
- Page 174 Supportbereich herunter. Dieses Handbuch wird Sie mit den Eigenschaften und den grundlegenden Funktionen des Compact 7 HD vertraut machen. Bitte lesen Sie diese Anleitung sorgfältig durch, bevor Sie Ihr Gerät benutzen. Lieferumfang Das finden Sie in der Verpackung des Compact 7 HD: ...
-
Page 175: Erste Schritte
Compact 7 HD 2. Erste Schritte Der Compact 7 HD ist korrekt vor Ihnen platziert, wenn der Bildschirm nach oben zeigt und die große weiße Taste sowie die orange farbene Taste zum Ein- und Ausschalten sich unterhalb des Bildschirms befindet. - Page 176 Gerät auf den gewünschten Text oder das Bild (die Kamera befindet sich auf der Rückseite des Compact 7 HD). Der Compact 7 HD mit geschlossenem Bildschirm zum Lesen aus der Distanz oder zum schnellen Aufnehmen von Objekten oder Dokumenten. Compact 7 HD geschlossen Compact 7 HD geöffnet...
- Page 177 Ihnen dank des integrierten Leseständers auch das Lesen von längeren Texten. Zum Öffnen des Gerätes gehen Sie wie folgt vor: Platzieren Sie den Compact 7 HD vor sich, so dass der Bildschirm nach oben zeigt und die große weiße Taste sowie der orange farbene Ein-/Ausschalter unter dem Bildschirm zu sehen sind.
-
Page 178: Reinigung Der Kameralinse Und Des Spiegels
Optelec Compact 7 HD Reinigung der Kameralinse und des Spiegels Für ein einwandfreies Bild empfehlen wir, die Kameralinse und den Spiegel der indirekten Beleuchtung regelmäßig zu reinigen. Durch eine verschmutzte Kameralinse können unscharfe Bilder entstehen. Außerdem kann Verschmutzung dazu führen, dass der Autofokus die Entfernungseinstellung nicht richtig ausführt. - Page 179 Optelec Compact 7 HD Tastenbelegung Der Compact 7 HD verfügt über folgende Tasten: Der Compact 7 HD öffnet sich durch Drücken der weißen Taste in Öffnen der Mitte unter dem Bildschirm. Modus-Taste Drücken Sie die Modus-Taste an der linken Seite des Bildschirms um den Darstellungsmodus zu wählen.
-
Page 180: Ein/Aus Taste
Compact 7 HD ein- und ausschalten Bevor Sie den Compact 7 HD das erste Mal einschalten, muss das Gerät geladen werden. Nach dem Aufladen drücken Sie die orangefarbene, ovale Ein/Aus-Taste rechts neben der silbernen Öffnen-Taste für eine Sekunde. Das Gerät startet in dem zuletzt gewählten Modus. -
Page 181: Einstellen Der Vergrößerung
Durch nochmaliges Drücken der orangefarbenen Taste für eine Sekunde schalten Sie den Compact 7 HD wieder aus. Wenn Sie den Compact 7 HD einschalten, dauert es ca. 3 Sekunden, bis ein Bild auf dem Bildschrim erscheint. Sie können das Gerät auch wie bereits beschrieben durch Aufstellen des Bildschirmes einschalten (Standardeinstellung). -
Page 182: Auswahl Des Darstellungsmodus
Die Schnappschuss-Funktion ermöglicht Ihnen, einen Text oder ein Bild vorübergehend zu speichern. - Halten oder legen Sie den Compact 7 HD auf den gewünschten Text oder das Bild welches Sie erfassen möchten. - Drücken Sie die Schnappschusstaste auf der oberen rechten Seite des Gerätes für die Aufnahme. - Page 183 Optelec Compact 7 HD - Halten Sie den Compact 7 HD nun näher an Ihre Augen um den Text oder die Vorlage direkt anzuschauen. - Drücken Sie die Modus-Taste um den Darstellungsmodus zu ändern. - Verwenden Sie die Vergrößerungstasten auf der rechten Seite des Bildschirms um die Vergrößerung auf Ihrem Bildschirm zu ändern.
-
Page 184: Aufladen Des Akkus
Netzteilkabel aus dem Compact 7 HD heraus und versuchen Sie das Aufladen durch erneutes Einstecken des Kabels noch einmal. Das Aufladen des Compact 7 HD Akku dauert ca. 3,5 Stunden. Ein vollgeladener Compact 7 HD kann durchschnittlich 5 Stunden in Betrieb genommen werden, abhängig von den Energie-Einstellungen. -
Page 185: Akkuwarnung
Compact 7 HD Standby und automatisches Ausschalten Der Compact 7 HD geht automatisch in den Standby-Modus, wenn innerhalb von zwei Minuten keine Taste gedrückt oder eine Bildveränderung erkannt wurde. Durch Drücken einer beliebigen Taste verlässt das Gerät wieder den Standby-Modus. Nach vier Minuten im Standby-Modus schaltet sich der Compact 7 HD automatisch aus. - Page 186 Optelec Compact 7 HD 4. Das Compact 7 HD Menü Anzeige Akku-Status und Firmwareversion Anzeigen oder löschen von gespeicherten Bildern. Einstellen der Helligkeit Einstellen der Energieoptionen Signaltöne Ein- oder Ausschalten Aktivieren oder Deaktivieren der Objektbeleuchtung Ändern der 4 Lesefarben Darstellungsmodi Auf Werkseinstellung zurücksetzen...
- Page 187 Optelec Compact 7 HD Das Menü aktivieren Um das Menü aufzurufen, drücken Sie die + und – Taste gleichzeitig für zwei Sekunden. Navigieren im Menü Drücken Sie die + oder – Taste zum Navigieren zwischen den Menüpunkten. Mit der Modus-Taste auf der linken Seite des Bildschirms aktivieren oder bestätigen Sie den Menüpunkt.
-
Page 188: Menü: Images Bilder
Optelec Compact 7 HD Menü: Information Dieser Menüpunkt zeigt Ihnen den Akkustatus und die aktuelle Firmwareversion Ihres Gerätes an. In diesem Menüpunkt sind Änderungen nicht möglich. Um das Menü aufzurufen, drücken Sie die + und – Taste gleichzeitig für zwei Sekunden. - Page 189 Optelec Compact 7 HD Sie diesen mit dem Betätigen der Modus-Taste. - Wählen Sie das Menü View mit der + oder – Taste. Durch Drücken der Modus-Taste bestätigen Sie Ihre Auswahl. - Wählen Sie das gewünschte Bild mit der + Taste zum nächsten oder mit der – Taste zum vorherigen Bild.
-
Page 190: Menü: Brightness Helligkeit
Optelec Compact 7 HD Untermenü Delete all Alles löschen Um alle Bilder zu löschen: - Um das Menü aufzurufen, drücken Sie die + und –Taste gleichzeitig für zwei Sekunden. - Mit der + Taste bewegen Sie sich innerhalb des Menüs nach oben und mit der –... -
Page 191: Menü: Power Ein-Und Ausschalten
Menü: Power Ein-und Ausschalten Dieser Menüpunkt hat vier Untermenüs: Standby Einstellen der Zeit, bis der Compact 7 HD in den Standby- Modus schaltet um Energie zu sparen. Drücken Sie eine beliebige Taste, und das Gerät verlässt den Standby- Modus. Die Standardein-stellung der Standby-Zeit beträgt 2 Minuten. - Page 192 Aktivieren oder deaktivieren automatischen Ausschaltung des Compact 7 HD mittels Schließen des Bildschirms. In der Standardeinstellung wird der Compact 7 HD mit dem Schließen des Bildschirms ausgeschaltet. Untermenü STANDBY Die Standardeinstellung der Standby-Zeit beträgt 2 Minuten. So stellen Sie die Standby-Zeit des Compact 7 HD ein: Aktivieren Sie das Menü...
- Page 193 - Drücken Sie die Modus-Taste um zu bestätigen und in den bewegten Darstellungsmodus zurückzukehren. Untermenü ÖFFNEN Automatisches Einschalten des Compact 7 HD durch Öffnen: - Aktivieren Sie das Menü durch gleichzeitiges Drücken der + und – Taste für zwei Sekunden.
- Page 194 - Drücken Sie die Modus-Taste um zu bestätigen und in den bewegten Darstellungsmodus zurückzukehren. Untermenü SCHLIESSEN So aktivieren oder deaktivieren Sie das automatische Ausschalten des Compact 7 HD mit Schließen des Gerätes bzw. des Bildschirms: - Aktivieren Sie das Menü durch gleichzeitiges Drücken der + und – Taste für zwei Sekunden.
-
Page 195: Menü: Light Objektbeleuchtung
Optelec Compact 7 HD Menü: Beep Signalton In diesem Menüpunkt können Sie den Signalton aktivieren oder deaktivieren. In der Standardeinstellung ist der Signalton aktiviert. - Aktivieren Sie das Menü durch gleichzeitiges Drücken der + und – Taste für zwei Sekunden. -
Page 196: Menü: Color Farbe
- Drücken Sie die Modus-Taste um zu bestätigen und in den bewegten Darstellungsmodus zurückzukehren. Menü: Color Farbe Der Compact 7 HD verfügt über vier kontrastverstärkte Lesefarbenmodi. Für jeden sind verschiedene Vorder- und Hintergrundfarben wählbar. Drei dieser Modi können deaktiviert werden, wenn nur eine Lesefarbe benötigt wird. -
Page 197: Menü: Reset Zurücksetzen
- Drücken Sie die Modus-Taste um zu bestätigen und in den bewegten Darstellungsmodus zurückzukehren. Menü: Reset Zurücksetzen Der Compact 7 HD kann auf die Werkseinstellungen zurückgesetzt werden. Alle Einstellungen, die Sie vorgenommen haben, werden auf die Werkseinstellungen zurückgesetzt. - Aktivieren Sie das Menü durch gleichzeitiges Drücken der + und – Taste für zwei Sekunden. - Page 198 Compact 7 HD Anhang A: Sicherheitshinweise Um die Brandgefahr des Compact 7 HD gering zu halten, setzen Sie das Gerät keiner übermässiger Hitze oder direktem Sonnenlicht aus. Entfernen Sie nicht irgendwelche Teile des Compact 7 HD. Kontaktieren Sie den autorisierten Optelec Service in Ihrer Umgebung.
- Page 199 Optelec Compact 7 HD Anhang B: Technische Informationen Vergrößerung 2.5- bis 30fach Darstellungsmodi Darstellungsmodi Echtfarbe Foto Modus Hoher Kontrast Weiß auf Schwarz Hoher Kontrast Schwarz auf Weiß Hoher Kontrast Lesefarbe Kombination 1 Hoher Kontrast Lesefarbe Kombination 2 Fokus Auto-Fokus Kontrastverhältnis...
- Page 200 Optelec Compact 7 HD Betriebsbedingungen Temperatur +10°C bis +35°C Relative Luftfeuchtigkeit < 70%, Keine Kondensation Lager und Transportbedingungen Temperatur +10°C bis +40°C Relative Luftfeuchtigkeit < 95%, Keine Kondensation Deutsch...
- Page 201 Die Garantie ist nicht übertragbar und gilt nicht für Gruppen, Mehrfach-Anwender oder Agenturen. Der Compact 7 HD wurde für Endkunden bzw. Einzelpersonen zur Verwendung zu Hause oder unterwegs konzipiert. Optelec behält sich das Recht vor, den Compact 7 HD zu reparieren oder durch ein ähnliches oder besseres Produkt zu ersetzen.
- Page 202 Optelec Compact 7 HD RoHS Übereinstimmung Dieses Produkt stimmt mit der Direktive 2011/65/EU des Europäischen Parlaments und dem Europäischen Rat vom 3. Januar 2013 über die Reduzierung gefährlicher Substanzen in elektrischen und elektronischen Geräten (RoHS) überein. Anmerkung Europäische Union Produkte mit der CE-Kennzeichnung stimmen mit der EMV-Richtlinie (2014/30/EU) und der...
- Page 203 Zubehörteile bestimmt sind, können lung und kann bei unsachgemäßer Be- eine erhöhte Emission oder verringerte handlung oder beim Einsatz nicht vom Immunität des Compact 7 HD zur Folge Hersteller zugelassener Zubehör- und haben. Ersatzteile einen Einfluss auf Umfeld oder...
- Page 204 Optelec Compact 7 HD Benutzen Sie eine andere derer, die einen unerwünschten Stromversorgungssteckdose als die, Effekt im Betrieb erzeugen. die Ihr Empfangsgerät benutzt. Ziehen Sie Ihren Händler oder einen WARNUNG! Es besteht ein Explosions- elektronischen Fachmann zu Rate. risiko, falls der Akku gegen einen falschen Typ ersetzt wird.
- Page 205 Optelec Offices Worldwide Optelec kantoren wereldwijd | Optelec dans le monde | Sedi Optelec nel mondo Optelec en el mundo | Optelec Zweigniederlassungen Weltweit Optelec Europe Optelec U.S. Breslau 4 11800 31st Court North 2993 LT Barendrecht St. Petersburg, FL 33716 The Netherlands U.S.A.