Télécharger Imprimer la page

Optelec Compact 7 HD Manuel D'utilisation

Masquer les pouces Voir aussi pour Compact 7 HD:

Publicité

Les langues disponibles
  • FR

Les langues disponibles

  • FRANÇAIS, page 85

Liens rapides

All manuals and user guides at all-guides.com

Publicité

loading

Sommaire des Matières pour Optelec Compact 7 HD

  • Page 1 All manuals and user guides at all-guides.com...
  • Page 2 All manuals and user guides at all-guides.com...
  • Page 3 ELECTING A VIEWING MODE ....................23 SING THE SNAPSHOT BUTTON 3. CHARGING THE BATTERY ....................25 7 HD....................25 HARGING THE OMPACT ...................26 TANDBY AND OWER ........................26 ATTERY WARNING 4. THE COMPACT 7 HD MENU .....................27 Page / Pagina/ Página / Seite 1...
  • Page 4 All manuals and user guides at all-guides.com ......................28 CTIVATING THE MENU ......................28 AVIGATING THE MENU .........................28 XITING THE MENU ......................29 NFORMATION .......................30 RIGHTNESS ........................31 OWER ........................36 OUND .........................37 IGHT ........................38 OLOR ........................39 ESET APPENDIX A: SAFETY......................40 APPENDIX B: TECHNICAL INFORMATION .................42 APPENDIX C: WARRANTY CONDITIONS ................44 NEDERLANDS 1.
  • Page 5 3. NETSTROOM EN BATTERIJGEBRUIK ................62 7 HD ....................62 OMPACT OPLADEN ................63 TAND BY EN UTOMATISCH ITSCHAKELEN .....................63 ATTERIJ WAARSCHUWING 4. HET COMPACT 7 HD MENU .....................64 ......................65 CTIVATING THE MENU ......................65 AVIGATING THE MENU .........................65 XITING THE MENU )..................66 NFORMATIE NFORMATION )..................67 ELDERHEID RIGHTNESS )..................68...
  • Page 6 FRANÇAIS 1. INTRODUCTION ........................85 À ......................86 PROPOS DU MANUEL ....................86 E QUE CONTIENT LA BOITE 2. CONNAITRE VOTRE COMPACT 7 HD ................87 7 HD ..........88 TILISER LE OMPACT EN POSITION OUVERTE OU FERMEE ..............90 ETTOYER LA LENTILLE DE LA CAMERA ET LE MIROIR ........................91...
  • Page 7 All manuals and user guides at all-guides.com 4. LE MENU DU COMPACT 7 HD ..................100 .........................101 UVRIR LE MENU .....................101 AVIGUER DANS LE MENU ........................101 ERMER LE MENU ......................102 NFORMATION ......................103 UMINOSITE ......................104 LIMENTATION ......................107 MENU UVRIR ......................108 MENU ERMER .........................109...
  • Page 8 SARE IL PULSANTE 3. RICARICA DELLA BATTERIA ..................135 7 HD..................135 OME RICARICARE OMPACT ....................135 TANDBY E AUTOSPEGNIMENTO ....................136 VVISO BATTERIA SCARICA 4. IL MENU DI COMPACT 7 HD ..................137 .......................138 TTIVARE IL ......................138 AVIGARE NEL .......................138 SCIRE DAL ......................139 NFORMAZIONI ......................140...
  • Page 9 ESPAÑOL 1. INTRODUCCIÓN ......................159 ....................160 CERCA DE ESTE MANUAL ¿Q ?....................160 UÉ CONTIENE LA CAJA 2. CONOCER SU COMPACT 7 HD ..................161 7 HD ...........162 TILIZAR EL OMPACT EN LA POSICIÓN CERRADA O ABIERTA ................164 IMPIAR EL LENTE DE LA CÁMARA Y EL ESPEJO ........................165...
  • Page 10 7 HD ....................171 ARGAR EL OMPACT ............172 ODO DE REPOSO Y FUNCIÓN DE APAGO AUTOMÁTICO ......................172 VISO DE BATERÍA VACÍA 4. EL MENÚ DEL COMPACT 7 HD ..................173 ........................174 CTIVAR EL MENÚ ......................174 AVEGAR EN EL MENÚ ........................174 ALIR DEL MENÚ...
  • Page 11 3. AUFLADEN DES AKKUS ....................207 7 HD....................207 UFLADEN DES OMPACT ..............208 TANDBY UND AUTOMATISCHES USSCHALTEN ........................208 KKUWARNUNG 4. DAS COMPACT 7 HD MENÜ...................209 ......................210 ENÜ AKTIVIEREN ......................210 AVIGIEREN IM ENÜ ......................210 ERLASSEN DES ENÜS Page / Pagina/ Página / Seite 9...
  • Page 12 All manuals and user guides at all-guides.com ......................211 ENÜ NFORMATION ..................212 ENÜ RIGHTNESS ELLIGKEIT ................213 ENÜ OWER USSCHALTEN ....................218 ENÜ OUND IGNALTON ..................219 ENÜ IGHT BJEKTBELEUCHTUNG .......................220 ENÜ OLOR ARBE ..................221 ENÜ ESET URÜCKSETZEN ANHANG A: SICHERHEITSHINWEISE................222 ANHANG B: TECHNISCHE INFORMATIONEN ..............223 ANHANG C: GARANTIEBEDINGUNGEN................225 Page / Pagina/ Página / Seite 10...
  • Page 13 All manuals and user guides at all-guides.com Optelec Compact 7 HD Compact 7 HD User Manual Version 1.1 © 2012 Optelec, the Netherlands All rights reserved Optelec P.O. Box 399 2990 AJ Barendrecht The Netherlands Phone: +31 (0)88 678 34 44 E-mail: info@optelec.nl...
  • Page 14 All manuals and user guides at all-guides.com Optelec Compact 7 HD WEEE Notice The directive on Waste Electrical and Electronic Equipment (WEEE), which entered into force as European law on February 13, 2003, resulted in a major change in the treatment of electrical equipment at end-of-life.
  • Page 15 With its multifunctional design, unique lighting concept, autofocus, and integrated reading stand, the Compact 7 HD can be used for reading, viewing images, price tags, displays and much more while at home or on the go. If you have questions or suggestions concerning the use of this product, please contact your distributor or Optelec’s headquarters, using the contact information on the last page of this...
  • Page 16 Optelec Compact 7 HD About this manual This manual will familiarize you with the features and basic operation of the Compact 7 HD. Please read this manual carefully before using your device. What’s in the box? The Compact 7 HD packaging contains the following:...
  • Page 17 Compact 7 HD 2. Getting started The Compact 7 HD is placed correctly in front of you when the screen is facing up, and the large white button and orange on / off switch are at the bottom of the screen.
  • Page 18 Using the Compact 7 HD in the closed or open position The Compact 7 HD can be used in two ways: in the closed and open positions. In the closed position, hold the unit in your hand and point the camera (located at the back of the unit) to the object or text you wish to view or read.
  • Page 19 To open the unit, follow these steps: Place the Compact 7 HD in front of you so that the screen is facing up, and the large white button and orange on / off switch are at the bottom of the screen.
  • Page 20 All manuals and user guides at all-guides.com Optelec Compact 7 HD Cleaning the camera lens and mirror For an optimal quality image, it is recommended to ensure that the camera lens and object light mirror are kept clean. A dirty lens will result in a fuzzy image and may cause the auto- focus camera to incorrectly focus.
  • Page 21 The Compact 7 HD has the following buttons: Open Pressing the white button in the centre at the bottom of the screen will open the Compact 7 HD and switch the unit on. Mode Pressing the Mode button to the left of the screen allows you to select one of the viewing modes.
  • Page 22 Compact 7 HD to power and charge the unit. The camera of the Compact 7 HD is located at the back of the unit. To the left and right of the camera are two object lights that are used when the unit is in the closed position.
  • Page 23 In the open position, when placed on a document, the magnification level starts at 2 times and can be increased to 24 times. The Compact 7 HD is equipped with an auto-focus camera. This allows you to use the unit while holding it in your hands in the...
  • Page 24 All manuals and user guides at all-guides.com Optelec Compact 7 HD closed position. This will provide more overview, but this will decrease the minimum and maximum magnification levels. Note: In the lowest magnification of 2 times, text lines may display with a slight curve. This will be most visible when reading small texts.
  • Page 25 The snapshot button allows you to take a temporary picture of a text or image. Hold or place the Compact 7 HD over the text or image you wish to have displayed. Press and hold the snapshot button located on the top right side of the unit.
  • Page 26 The image will be temporarily stored in the Compact 7 HD memory. Bringing the Compact 7 HD closer to your eyes will enable you to view the object or text closely. Use the magnification buttons located to the right side of the screen to change the magnification of the displayed image.
  • Page 27 To charge the Compact 7 HD, connect the power supply to the 12V DC IN jack located on the left side of the unit. Plug the other end of the power supply into a power outlet. The orange LED indicator next to the 12V DC IN jack will glow continuously while the Compact 7 HD is charging.
  • Page 28 Compact 7 HD Standby and Auto Power Off The Compact 7 HD will automatically go into standby mode after two minutes if no button is pressed or no image change is detected. Pressing any button will wake up the unit. Four minutes after the Compact 7 HD goes into standby mode, the unit will automatically switch off.
  • Page 29 All manuals and user guides at all-guides.com Optelec Compact 7 HD 4. The Compact 7 HD Menu Shows the battery status and firmware version. Allows you to adjust the screen brightness. Allows you to configure the power settings. Allows you to switch the sound on or off.
  • Page 30 All manuals and user guides at all-guides.com Optelec Compact 7 HD Activating the menu To enter the menu, press the + and – buttons simultaneously for one second. Navigating the menu Use the + and – buttons to navigate between the menu items. The Mode button located to the left of the screen will activate the chosen menu item or confirm the selection.
  • Page 31 All manuals and user guides at all-guides.com Optelec Compact 7 HD Menu: Information This menu item displays the unit’s battery status and current firmware version. No changes can be made in this menu. Activate the menu by pressing the + and – buttons simultaneously for one second.
  • Page 32 All manuals and user guides at all-guides.com Optelec Compact 7 HD Menu: Brightness This menu item allows you to adjust the brightness of the display. Activate the menu by pressing the + and – buttons simultaneously for one second. Use the + button to move up or the – button to move down within the menu. Select the menu option Brightness and activate this menu by pressing the Mode button.
  • Page 33 Menu: Power This menu item contains four submenus: Standby Sets the time after which the Compact 7 HD goes into standby mode to conserve power. Pressing any button will take the unit out of standby mode. By default, the standby time is set to 2 minutes.
  • Page 34 Compact 7 HD Open Enables or disables the automatic power-on function upon opening the Compact 7 HD. By default, the Compact 7 HD will power on upon opening the unit. open Close Enables or disables the automatic power-off function upon closing the Compact 7 HD. By default, the Compact 7 HD will power off upon closing the unit.
  • Page 35 Press the Mode button to confirm your choice and exit the menu. Submenu Power off To activate the Compact 7 HD power-off time: Activate the menu by pressing the + and – buttons simultaneously for one second. Use the + button to move up or the – button to move down within the menu. Select the menu option Power and activate this menu option by pressing the Mode button.
  • Page 36 Press the Mode button to confirm your choice and exit the menu. Submenu Open To enable or disable the power-on function upon opening the Compact 7 HD: Activate the menu by pressing the + and – buttons simultaneously for one second.
  • Page 37 Compact 7 HD Submenu Close To enable or disable the power-off function upon closing the Compact 7 HD: Activate the menu by pressing the + and – buttons simultaneously for one second. Use the + button to move up or the – button to move down within the menu. Select the menu option Power and activate this menu option by pressing the Mode button.
  • Page 38 All manuals and user guides at all-guides.com Optelec Compact 7 HD Menu: Sound This menu item allows you to enable or disable the sounds (feedback tones). By default, the tones are enabled. Activate the menu by pressing the + and – buttons simultaneously for one second.
  • Page 39 All manuals and user guides at all-guides.com Optelec Compact 7 HD Menu: Light This menu item allows you to enable or disable the object lights - located to the left and right of the camera - for distant viewing. By default, the object lights are enabled.
  • Page 40 Compact 7 HD Menu: Color The Compact 7 HD supports four high contrast modes. For each of these four modes, the foreground and background colors can be selected. Three of the high contrast modes can be disabled if just one high contrast mode is required.
  • Page 41 Compact 7 HD Menu: Reset The Compact 7 HD can be reset to the factory default settings. Any settings that have been adjusted will be restored to factory defaults. Activate the menu by pressing the + and – buttons simultaneously for one second.
  • Page 42 Appendix A: Safety Intended Use: The Compact 7 HD is designed that it can be used in a hospital environment for general purpose such as reviewing medical records. The Compact 7 HD can not be used for surgical procedures in combination with life supporting systems.
  • Page 43 Always unplug and switch off the unit before cleaning. Use a dry soft cloth to clean the exterior. Do not use cleaning agents or abrasive materials as they will damage your unit. Use of the Compact 7 HD other than described in this manual will exclude it from warranty conditions. English...
  • Page 44 All manuals and user guides at all-guides.com Optelec Compact 7 HD Appendix B: Technical information Magnification 2 – 24 times Viewing modes Full color photo mode High contrast, white on black High contrast, black on white High contrast color combination 1...
  • Page 45 All manuals and user guides at all-guides.com Optelec Compact 7 HD Operating conditions Temperature +10° C to 35° C / 50° F to 95° F Humidity < 70%, no condensation Altitudes up to 3000 m (9842 feet) Pressure 700 – 1060 hPa Storage &...
  • Page 46 The warranty is not transferable and does not apply to groups, multi-users and agencies. The Compact 7 HD was designed for the individual purchaser to be used at home or on the go. Optelec reserves the right to repair or replace any purchased Compact 7 HD with a similar or improved product.
  • Page 47 Warning – To avoid risk of electric shock, this equipment must only be connected to a grounded power outlet. Caution: The supplied adapter PW-M024A-1Y120K is part of the Compact 7 HD product. Caution, consult ACCOMPANYING DOCUMENTS. Follow the operating instructions or consult instructions for use.
  • Page 48 All manuals and user guides at all-guides.com Optelec Compact 7 HD RoHS Compliance This product is in compliance with Directive 2002/95/EC of the European Parliament and of the Council of 27 January 2003, on the restriction of the use of certain hazardous substances in electrical and electronic equipment (RoHS) and its amendments.
  • Page 49 Compact 7 HD as cause harmful interference radio replacement parts for components, may communications.
  • Page 50 All manuals and user guides at all-guides.com Optelec Compact 7 HD WARNING: cautioned that WARNING: Risk of explosion if the battery changes or modifications not expressly is replaced by an incorrect type. Pleas e approved by the party responsible for...
  • Page 51 All manuals and user guides at all-guides.com Optelec Compact 7 HD Compact 7 HD Gebruikershandleiding Version 1.1 © 2012 Optelec, the Netherlands All rights reserved Optelec P.O. Box 399 2990 AJ Barendrecht The Netherlands Phone: +31 (0)88 678 34 44 E-mail: info@optelec.nl...
  • Page 52 HD kwaliteit, volledig in kleur of in één van de hoog contrast standen. Het 7” scherm van de Compact 7 HD, gecombineerd met de lage vergroting van 2 keer, geeft u maximaal overzicht en biedt tegelijkertijd tot 24 keer vergroting voor gebruikers die een hogere vergroting wensen.
  • Page 53 Compact 7 HD Over deze handleiding Deze handleiding geeft u een overzicht van de mogelijkheden en het gebruik van de Compact 7 HD. Wij raden u aan deze handleiding aandachtig te lezen alvorens u het product gaat gebruiken. Inhoud van de verpakking...
  • Page 54 Optelec Compact 7 HD 2. Aan de slag De Compact 7 HD is op de juiste wijze voor u geplaatst wanneer het beeldscherm naar boven wijst en de grote witte knop en oranje aan/uit knop onderaan het scherm zitten. Nederlands...
  • Page 55 Het gebruik van de Compact 7 HD in de open/gesloten positie De Compact 7 HD kan op twee manieren worden gebruikt: open of in de gesloten positie. In de gesloten positie houdt u het apparaat in uw hand en wijst u met de camera (die zich aan de achterzijde van het apparaat bevindt) richting het object of de tekst die u wenst te bekijken.
  • Page 56 Om het apparaat te openen, volgt u de volgende stappen: Leg de Compact 7 HD voor u, met de grote witte knop en oranje aan/uit knop naar u toe. Druk op de grote witte knop, in het midden onderaan. Het scherm gaat nu omhoog en de Compact 7 HD gaat aan.
  • Page 57 All manuals and user guides at all-guides.com Optelec Compact 7 HD Het schoonhouden van de camera lens en de spiegel Voor een optimaal beeld, is het aanbevolen om ervoor te zorgen dat de camera lens en de spiegel van het apparaat schoongehouden worden. Een vieze lens resulteert in een troebel beeld en kan ervoor zorgen dat de autofocus camera niet goed kan scherpstellen.
  • Page 58 Door deze knoppen 1 seconde tegelijkertijd ingedrukt te houden opent of sluit u het menu van de Compact 7 HD. Met de snapshotknop rechts boven op het apparaat kunt u Snapshot knop een tijdelijke foto maken van een tekst of object, waarna u deze dichter bij u ogen kunt brengen en kunt inzoomen.
  • Page 59 Gebruik alleen de meegeleverde adapter om uw Compact 7 HD op te laden. De camera van de Compact 7 HD bevindt zich aan de achterkant van het apparaat. Links en rechts van de camera bevinden zich twee lampjes, die gebruikt worden wanneer het apparaat in de gesloten positie wordt gebruikt.
  • Page 60 Compact 7 HD Het apparaat aan- en uitzetten Om de Compact 7 HD aan te kunnen zetten, dient het apparaat opgeladen te zijn. Als het apparaat is opgeladen, drukt u één seconde op de ovale oranje aan/uit knop rechts van de grote witte knop.
  • Page 61 Optelec Compact 7 HD verhoogd tot 24 keer vergroting. De Compact 7 HD is voorzien van een autofocus camera. Deze maakt het mogelijk om het apparaat te gebruiken in uw handen in de gesloten positie. Dit geeft u meer overzicht, maar zal de minimale en maximale vergroting verlagen.
  • Page 62 De snapshot functie maakt het mogelijk om een tijdelijke foto te maken van een afbeelding of tekst. Plaats of houd de Compact 7 HD op de afbeelding of tekst die u wenst te zien. Druk op de snapshot knop (rechts bovenop het apparaat) en houd deze ingedrukt.
  • Page 63 De Compact 7 HD zal de genomen snapshot tonen. De afbeelding wordt tijdelijk opgeslagen in het geheugen van de Compact 7 HD. Door de Compact 7 HD dichter bij uw ogen te brengen, kunt u de afbeelding of tekst van dichtbij bekijken.
  • Page 64 Om de Compact 7 HD op te laden dient u de adapter aan te sluiten op de adapter ingang aan de linkerzijde van het apparaat. Steek de andere kant van de adapter in het stopcontact.
  • Page 65 De stand-by tijd en de automatisch tijd voor uitschakelen kunnen beiden worden aan- of uitgezet in het menu van de Compact 7 HD. In het volgende hoofdstuk kunt u meer informatie vinden over het wijzigen van deze instellingen.
  • Page 66 All manuals and user guides at all-guides.com Optelec Compact 7 HD 4. Het Compact 7 HD Menu Toont de batterij status en de firmware versie Aanpassen van de helderheid van het beeldscherm Aanpassen van de stroominstellingen In- of uitschakelen van het geluid...
  • Page 67 All manuals and user guides at all-guides.com Optelec Compact 7 HD Let op: het menu van de Compact 7 HD is in het Engels. Voor uw gemak zullen wij in deze handleiding alle menu opties vertalen naar het Nederlands Activating the menu Om het menu te activeren, drukt u tegelijkertijd op de + en –...
  • Page 68 All manuals and user guides at all-guides.com Optelec Compact 7 HD Menu: Informatie (Information) Deze menukeuze toont de status van de batterij en de huidige firmware versie van uw apparaat. In deze menu optie kunt u geen wijzigingen aanbrengen. Activeer het menu door tegelijkertijd op de + en – knop te drukken gedurende één seconde.
  • Page 69 All manuals and user guides at all-guides.com Optelec Compact 7 HD Menu: Helderheid (Brightness) Deze menukeuze geeft u de mogelijkheid om de helderheid van het beeldscherm in te stellen. Activeer het menu door tegelijkertijd op de + en – knop te drukken gedurende één seconde.
  • Page 70 Optelec Compact 7 HD Menu: Stroominstellingen (Power) Deze menukeuze bevat vier submenu’s: Stelt de tijd in waarop de Compact 7 HD in stand- Stand-by by modus gaat om stroom te besparen. Door op (Standby) een willekeurige knop te drukken wordt het apparaat uit stand-by gehaald.
  • Page 71 Stelt het automatisch uitschakelen van het apparaat Sluiten in bij het sluiten van de Compact 7 HD. Standaard is (Close) het apparaat ingesteld om uitgeschakeld te worden wanneer deze wordt gesloten. close...
  • Page 72 All manuals and user guides at all-guides.com Optelec Compact 7 HD Submenu Stand-by (Standby) Standaard is de stand-by tijd ingesteld op 2 minuten. Om deze stand-by tijd aan te passen: Activeer het menu door tegelijkertijd op de + en – knop te drukken gedurende één seconde.
  • Page 73 Compact 7 HD Submenu Uitschakelen (Power Off) Om de tijd waarop de Compact 7 HD automatisch wordt uitgeschakeld in te stellen (staat standaard op 4 minuten): Activeer het menu door tegelijkertijd op de + en – knop te drukken gedurende één seconde.
  • Page 74 All manuals and user guides at all-guides.com Optelec Compact 7 HD Submenu Openen (Open) Om automatische inschakeling van het apparaat bij het openen hiervan in te stellen: Activeer het menu door tegelijkertijd op de + en – knop te drukken gedurende één seconde.
  • Page 75 All manuals and user guides at all-guides.com Optelec Compact 7 HD Submenu Sluiten (Close) Om het automatisch uitschakelen van het apparaat bij het sluiten hiervan in te stellen: Activeer het menu door tegelijkertijd op de + en – knop te drukken gedurende één seconde.
  • Page 76 All manuals and user guides at all-guides.com Optelec Compact 7 HD Menu: Geluid (Sound) Deze menukeuze geeft u de mogelijkheid om de geluiden (feedback geluiden) in- of uit te schakelen. Standaard zijn de geluiden ingeschakeld. Activeer het menu door tegelijkertijd op de + en – knop te drukken gedurende één seconde.
  • Page 77 All manuals and user guides at all-guides.com Optelec Compact 7 HD Menu: Licht (Light) Deze menukeuze geeft u de mogelijkheid om de objectverlichting (die te vinden zijn links en rechts van de camera) in- of uit te schakelen. Standaard is de objectverlichting ingeschakeld.
  • Page 78 Compact 7 HD Menu: Kleuren (Color) De Compact 7 HD ondersteunt vier hoogcontrast standen. Voor elk van deze vier standen standen de voorgrond en de achtergrond kleuren worden ingesteld. Drie van de vier hoogcontrast standen kunnen worden uitgeschakeld indien er slecht één stand nodig is.
  • Page 79 All manuals and user guides at all-guides.com Optelec Compact 7 HD Menu: Fabrieksinstellingen (Reset) De Compact 7HD kan worden teruggezet naar de standaard fabrieksinstellingen. Alle opties die zijn aangepast worden hiermee teruggezet naar de fabrieksinstellingen. Activeer het menu door tegelijkertijd op de + en – knop te drukken gedurende één seconde.
  • Page 80 Optelec Compact 7 HD Bijlage A: Veiligheid Stel de Compact 7 HD niet bloot aan hitte of direct zonlicht om het risico op brand te verminderen. Verwijder geen onderdelen van de Compact 7 HD. Laat reparatie en service over aan door Optelec geautoriseerd personeel of uw leverancier.
  • Page 81 All manuals and user guides at all-guides.com Optelec Compact 7 HD Bijlage B: Technische informatie Vergroting 2x - 24x Leesstanden Foto Hoog contrast wit op zwart Hoog contrast zwart op wit Hoogcontrast kleurencombinatie 1 Hoogcontrast kleurencombinatie 2 Focus Autofocus Hoogcontrast ratio...
  • Page 82 All manuals and user guides at all-guides.com Optelec Compact 7 HD Gebruiksomstandigheden Temperatuur +10° C tot 35° C Vochtigheid < 70%, geen condensatie Opslag- en transportomstandigheden Temperatuur +10°C tot 40°C Vochtigheid < 95%, geen condensatie Nederlands Pagina 80...
  • Page 83 All manuals and user guides at all-guides.com Optelec Compact 7 HD Dit product voldoet aan de volgende bepalingen en richtlijnen: C-Tick EN 60601-1-2 CISPR 22 FCC part 15 Class B EN 55022 EN 55024 Safety UL 60950 EN 60601-1-1 apparaat...
  • Page 84 All manuals and user guides at all-guides.com...
  • Page 85 All manuals and user guides at all-guides.com Optelec Compact 7 HD Compact 7 HD Manuel d’utilisation Version 1.1 © 2012 Optelec, Pays-Bas Tous droits réservés Optelec P.O. Box 399 2990 AJ Barendrecht Pays-Bas Tel.: +31 (0)88 678 34 44 Courriel: info@optelec.nl...
  • Page 86 All manuals and user guides at all-guides.com Optelec Compact 7 HD Avis DEEE La directive relative aux déchets d'équipements électriques et électroniques (DEEE), qui a pris effet en tant que loi européenne le 13 février 2003, a apporté des changements importants en matière d'élimination des équipements électriques et électroniques (EEE)
  • Page 87 Son design unique et polyvalent, sa conception d'éclairage unique, sa mise au point automatique, ainsi que son support de lecture intégré, font du Compact 7 HD un outil essentiel pour lire, regarder des photos, voir les prix en magasin et bien plus encore. Il peut être employé...
  • Page 88 Compact 7 HD À propos du manuel Ce manuel vous permettra de vous familiariser avec les caractéristiques et le fonctionnement du Compact 7 HD. Veuillez lire attentivement ce manuel avant d’utiliser votre appareil. Ce que contient la boîte Le matériel du Compact 7 HD comprend les éléments suivants : Le téléagrandisseur Compact 7 HD...
  • Page 89 
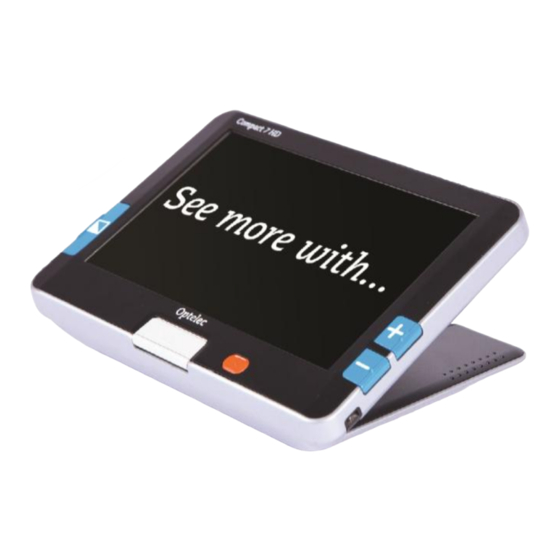
Compact 7 HD 2. Connaître votre Compact 7 HD Vous êtes certain que le Compact 7 HD est dans la bonne position devant vous lorsque l’écran est orienté vers le haut et que le bouton de couleur blanc ainsi que l’interrupteur orange marche / arrêt se trouvent au bas de l’écran.
  • Page 90 Compact 7 HD Utiliser le Compact 7 HD en position ouverte ou fermée Vous pouvez utiliser le Compact 7 HD de deux façons, soit dans la position ouverte ou dans la position fermée. Pour l’utiliser dans la position fermée, tenez l’unité dans votre main et pointez la camera située à...
  • Page 91 Pour ouvrir l’unité, suivez les étapes suivantes : 1. Placez le Compact 7 HD devant vous de façon à ce que l’écran soit orienté vers le haut et que le bouton blanc et l’interrupteur orange marche/arrêt se trouvent au bas de l’écran.
  • Page 92 All manuals and user guides at all-guides.com Optelec Compact 7 HD Nettoyer la lentille de la caméra et le miroir Pour une meilleure qualité d’image, nous vous suggérons de maintenir la lentille de la caméra et le miroir de l’objectif propres. Une lentille sale pourrait produire des images floues et affecter le bon fonctionnement de la mise au point automatique.
  • Page 93 All manuals and user guides at all-guides.com Optelec Compact 7 HD Les boutons Le Compact 7 HD comprend les boutons suivants: Ouvrir Appuyer sur le bouton blanc situé en bas de l’écran au centre pour ouvrir votre Compact 7 HD.
  • Page 94 Compact 7 HD pour alimenter l’unité et recharger sa pile. La caméra du Compact 7 HD se trouve à l’arrière de l’unité. À la gauche et à la droite de la caméra, il y a deux lumières d’objet qui s'allument lorsque l’unité...
  • Page 95 Compact 7 HD Allumer et éteindre le Compact 7 HD Lorsque vous allumerez le Compact 7 HD pour la première fois, assurez-vous que la pile est chargée à pleine capacité. Une fois chargée, appuyez pendant une seconde sur le bouton orange de l’interrupteur qui est situé...
  • Page 96 à 2 fois et peut être augmenté jusqu’à un maximum de 24 fois. Le Compact 7 HD est muni d’une caméra à mise au point automatique, ce qui vous permet d’utiliser l’unité en la tenant en position fermée dans votre main. Cette caractéristique vous permet d’obtenir une meilleure vue d’ensemble, mais les niveaux de grossissement minimum...
  • Page 97 All manuals and user guides at all-guides.com Optelec Compact 7 HD L’effet “Fish-eye” au niveau de grossissement 2x Sélectionner le mode de visualisation Appuyez sur le bouton Mode qui se trouve sur le côté gauche de l’unité pour choisir l’un des modes de visualisation suivants : Mode photo: visualisation de textes et d’images en couleur...
  • Page 98 Le bouton photo instantanée vous permet de prendre une photo temporaire d’un texte ou d’une image. Placez le Compact 7 HD sur le texte ou l’image que vous désirez voir à l’écran. Appuyez sur le bouton photo instantanée situé sur le côté droit au-dessus de l’unité.
  • Page 99 Nota: Si vous relâchez le bouton photo instantanée avant l'émission des deux bips sonores, la photo sera annulée et le Compact 7 HD reviendra à son niveau de grossissement et son mode de visualisation d’origine (c’est-a-dire ceux définis avant que vous ayez appuyé sur le bouton photo instantanée)
  • Page 100 La recharge de la pile du Compact 7 HD peut durer environ 3,5 heures. La durée d’utilisation du Compact 7 HD lorsque pleinement chargée est d’environ 4 à 5 heures, selon les paramètres d’alimentation.
  • Page 101 En passant par le menu du Compact 7 HD, vous pourrez régler le temps des fonctions de la mise en veille et de la mise hors tension automatique, ou désactiver ces fonctions. Veuillez consulter le chapitre suivant pour connaître la procédure à...
  • Page 102 All manuals and user guides at all-guides.com Optelec Compact 7 HD 4. Le menu du Compact 7 HD Indique l’état de la pile et la version courante du logiciel. Vous permet de régler la luminosité de l’écran. Vous permet de définir les paramètres d’alimentation.
  • Page 103 All manuals and user guides at all-guides.com Optelec Compact 7 HD Ouvrir le menu Pour ouvrir le menu, appuyez sur les boutons + et – simultanément pendant une seconde. Naviguer dans le menu Utilisez les boutons + ou – pour naviguer parmi les options du menu. Le bouton Mode à...
  • Page 104 All manuals and user guides at all-guides.com Optelec Compact 7 HD Menu: Information Cette option du menu indique l’état de la pile et la version courante du logiciel du Compact 7 HD. Il n’est pas possible d’effectuer des changements dans ce menu.
  • Page 105 All manuals and user guides at all-guides.com Optelec Compact 7 HD Menu: Luminosité Cette option de menu vous permet de régler la luminosité de l’écran. Ouvrez le menu en appuyant sur les boutons + et – simultanément pendant une seconde.
  • Page 106 à deux minutes. Mise Pour régler le temps de la mise hors tension hors automatique du Compact 7 HD. Par défaut, il est tension réglé à quatre minutes. Ces quatre minutes prennent effet après que les deux minutes (valeur power off par défaut) de la mise en veille automatique soient...
  • Page 107 Compact 7 HD Ouvrir Pour activer ou désactiver la mise en marche automatique lors de l’ouverture du Compact 7 HD. Par défaut, le Compact 7 HD s’allume lorsqu’il est ouvert. open Fermer Pour activer ou désactiver la mise hors tension automatique lors de la fermeture du Compact 7 HD.
  • Page 108 -Appuyez sur le bouton Mode pour confirmer votre choix et pour fermer le menu. Sous-menu Éteindre Pour régler le temps avant la mise hors tension automatique du Compact 7 HD: -Ouvrez le menu en appuyant sur les boutons + et – simultanément pendant une seconde.
  • Page 109 All manuals and user guides at all-guides.com Optelec Compact 7 HD - Réglez le temps de la mise hors tension automatique en utilisant le bouton + pour l’augmenter et le bouton – pour le réduire. Appuyez sur le bouton Mode pour confirmer votre choix.
  • Page 110 All manuals and user guides at all-guides.com Optelec Compact 7 HD Sous-menu Fermer Pour activer ou désactiver la mise hors tension automatique lors de la fermeture du Compact 7 HD : -Ouvrez le menu en appuyant sur les boutons + et – simultanément pendant une seconde.
  • Page 111 All manuals and user guides at all-guides.com Optelec Compact 7 HD Menu: Son Cette option de menu vous permet d’activer ou de désactiver les sons (signaux sonores). Par défaut, les sons sont activés. Ouvrez le menu en appuyant sur les boutons + et – simultanément pendant une seconde.
  • Page 112 All manuals and user guides at all-guides.com Optelec Compact 7 HD Menu: Lumière Cette option de menu vous permet d’activer ou de désactiver les lumières d’objet situées à la gauche et à la droite de la camera. L’éclairage fourni par les lumières d’objet favorise la visualisation à...
  • Page 113 Compact 7 HD Menu: Couleur Le Compact 7 HD offre quatre combinaisons de couleurs à contraste élevé. Pour chacune de ces quatre combinaisons, vous pouvez sélectionner les couleurs de l’avant et de l'arrière- plan. Il est possible de désactiver trois des quatre combinaisons si une seule combinaison de couleurs est requise.
  • Page 114 Compact 7 HD Menu: Configuration par défaut Vous pouvez restaurer la configuration par défaut du Compact 7 HD. Tous les paramètres ayant subi une modification reviendront alors à la configuration d’origine du fabricant. Ouvrez le menu en appuyant sur les boutons + et – simultanément pendant une seconde.
  • Page 115 Compact 7 HD Annexe A: Mesures de sécurité Évitez d’exposer le Compact 7 HD à la chaleur excessive ou au soleil afin de prévenir le risque de sinistre. Ne retirez aucune pièce du Compact 7 HD. Communiquez avec un centre de service autorisé...
  • Page 116 All manuals and user guides at all-guides.com Optelec Compact 7 HD Annexe B: Renseignements techniques Grossissement 2x – 24x Modes de visualisation Mode photo couleur Contraste élevé, blanc sur noir Contraste élevé, noir sur blanc Contraste élevé, combinaison de couleurs 1 Contraste élevé, combinaison de couleurs 2...
  • Page 117 All manuals and user guides at all-guides.com Optelec Compact 7 HD Conditions d’utilisation Température +10 ° C à 35 ° C / 50 ° F à 95 ° F Humidité < 70%, sans condensation Conditions d’entreposage et de transport Température +10 °...
  • Page 118 La garantie ne peut être cédée et ne s’applique pas aux groupes, utilisateurs multiples ou agences. Le Compact 7 HD est conçu pour être employé par l’acheteur individuel chez lui ou au bureau. Optelec se réserve le droit de réparer le Compact 7 HD ou de le remplacer par un produit similaire ou supérieur.
  • Page 119 All manuals and user guides at all-guides.com Optelec Compact 7 HD Conformité RoHS Ce produit est conforme aux normes de la Directive 2002/95/EC adoptée par le Parlement Européen et par le Conseil du 27 janvier 2003, sur les restrictions en matière de l’utilisation de substances dangereuses dans les dispositifs électriques et électroniques (RoHS) et ses...
  • Page 120 à l’exception des transducteurs et des câbles vendus par le fabricant du interférences nuisibles pour Compact 7 HD comme pièces de rechange radiocommunications. Néanmoins, il n'est des composantes, peuvent entraîner une pas garanti que des interférences ne augmentation émissions surviennent pas dans une installation réduction de l’immunité...
  • Page 121 All manuals and user guides at all-guides.com Optelec Compact 7 HD circuit autre que celui sur lequel est AVERTISSEMENT: Le remplacement de branché le récepteur. la batterie par un modèle inapproprié · Faire appel à l'aide du distributeur ou d'un entraîne un risque d’explosion.
  • Page 122 All manuals and user guides at all-guides.com...
  • Page 123 All manuals and user guides at all-guides.com Optelec Compact 7 HD Compact 7 HD Manuale Utente Versione 1.0 © 2012 Optelec, the Netherlands Tutti i diritti riservati Optelec P.O. Box 399 2990 AJ Barendrecht The Netherlands Phone: +31 (0)88 678 34 44 E-mail: info@optelec.nl...
  • Page 124 All manuals and user guides at all-guides.com Optelec Compact 7 HD Direttiva RAEE La direttiva sui rifiuti di apparecchiature elettriche ed elettroniche (RAEE), entrata in vigore come legge europea il 13 Febbraio 2003, ha determinato un cambiamento importante nel trattamento delle apparecchiature elettriche quando devono essere smaltite.
  • Page 125 HD a colori o in una delle modalità ad alto contrasto. Compact 7 HD è dotato di un display da 7 pollici, con ingrandimento minimo da 2 volte, per consentire una visione d’insieme, raggiungendo un ingrandimento fino a 24 volte, per chi necessita di un ingrandimento più...
  • Page 126 A proposito di questo manuale Questo manuale vi aiuta a familiarizzare con le caratteristiche e il funzionamento di base di Compact 7 HD. Si prega di leggerlo attentamente prima di utilizzare il dispositivo. Contenuto della confezione La confezione di Compact 7 HD contiene:...
  • Page 127 2. Per iniziare Per permettervi di seguire correttamente le indicazioni contenute in questo manuale, posizionate il Compact 7 HD di fronte a voi, con lo schermo rivolto verso l’alto e il pulsante bianco e l’interruttore arancione on/off nella parte inferiore dello schermo.
  • Page 128 Compact 7 HD Utilizzare Compact 7 HD in posizione chiusa o aperta Compact 7 HD può essere utilizzato in 2 modi: in posizione chiusa o aperta. In posizione chiusa, tenete l'apparecchio in mano e orientate la telecamera (si trova sul retro dell'apparecchio) sull'oggetto o sul testo che desiderate vedere o leggere.
  • Page 129 Per aprire l’unità, seguire questi passaggi: Posizionare il Compact 7 HD di fronte a voi con lo schermo verso l’alto e l’interruttore arancione on/off nella parte inferiore dello schermo. Premere il pulsante bianco centrale, posizionato nella parte inferiore dello schermo.
  • Page 130 All manuals and user guides at all-guides.com Optelec Compact 7 HD Come pulire la lente della telecamera e lo specchio Per un'immagine di qualità ottimale, si raccomanda di mantenere puliti l'obiettivo della telecamera e lo specchio della luce. Una lente non pulita può visualizzare un’immagine non a fuoco e potrebbe causare problemi al sistema autofocus.
  • Page 131 All manuals and user guides at all-guides.com Optelec Compact 7 HD Pulsanti Il Compact 7 HD ha i seguenti pulsanti: Apri Premendo il pulsante bianco centrale, Compact 7 HD si apre e si accende. Modalità Premendo il pulsante Modalità alla sinistra dello schermo, è possibile...
  • Page 132 La telecamera di Compact 7 HD è posizionata sul retro dell’unità. Alla destra e alla sinistra della telecamera ci sono due luci che vengono utilizzate quando l’unità è nella posizione chiusa. Italiano Pagina 130...
  • Page 133 In posizione aperta, quando è posizionato su un documento, l’ingrandimento minimo è di 2 volte e può essere aumentato fino a 24 volte. Compact 7 HD è dotato di una telecamera autofocus. Questa consente di utilizzare l'apparecchio tenendolo in mano in...
  • Page 134 All manuals and user guides at all-guides.com Optelec Compact 7 HD posizione chiusa. Avrete così una visione panoramica, ma diminuirà l'ingrandimento minimo e massimo. Nota: con il fattore d’ingrandimento minimo di 2 volte, le linee del testo possono essere visualizzate leggermente arcuate. Questa distorsione sarà più evidente durante la lettura di testi di piccole dimensioni.
  • Page 135 Il pulsante Foto permette di scattare una fotografia temporanea di un testo o di un'immagine. Posizionare Compact 7 HD sul testo o sull’immagine che si desidera visualizzare. Premere e tenere premuto il pulsante Foto sul lato superiore destro del dispositivo.
  • Page 136 Compact 7 HD visualizzerà l’immagine. L'immagine verrà temporaneamente memorizzata all'interno della memoria Compact 7 HD. Portare Compact 7 HD vicino agli occhi per visualizzare l'oggetto o il testo da vicino. Utilizzare i pulsanti di ingrandimento situati sul lato destro dello schermo per modificare l'ingrandimento dell'immagine visualizzata.
  • Page 137 In questo caso, scollegare l'alimentazione e riprovare. La ricarica di Compact 7HD richiede circa 3,5 ore. A piena carica, Compact 7 HD è in grado di operare per un tempo medio di 4,5 ore, a seconda delle impostazioni per l’alimentazione.
  • Page 138 Pressing the orange on / off button will switch it back on again. The standby time and power off time can be changed or disabled in the Compact 7 HD menu. Please refer to the next chapter on how to change these settings.
  • Page 139 All manuals and user guides at all-guides.com Optelec Compact 7 HD 4. Il Menu di Compact 7 HD Stato di carica della batteria e versione del firmware. Consente di regolare la luminosità dello schermo. Consente di configurare le impostazioni di alimentazione.
  • Page 140 All manuals and user guides at all-guides.com Optelec Compact 7 HD Attivare il Menu Per accedere al menu, premere i tasti + e - contemporaneamente per un secondo. Navigare nel Menu Utilizzare i tasti + e - per spostarsi tra le voci del menu. Il pulsante Modalità, situato a sinistra dello schermo, attiva la voce di menu selezionata o conferma la selezione.
  • Page 141 All manuals and user guides at all-guides.com Optelec Compact 7 HD Menu: Informazioni Questo menu mostra lo stato della batteria e la versione del firmware del dispositivo. In questo menu, non è possibile fare alcuna modifica. Attivare il menu premendo i tasti + e - contemporaneamente per un secondo.
  • Page 142 All manuals and user guides at all-guides.com Optelec Compact 7 HD Menu: Luminosità Questa voce di menu consente di regolare la luminosità del display. Attivare il menu premendo i tasti + e - contemporaneamente per un secondo. Utilizzare il pulsante + per spostarsi in alto e il pulsante - per spostarsi in basso all'interno del menu.
  • Page 143 Menu: Alimentazione Questo menu contiene 4 sottomenu: Standby Consente di impostare il tempo dopo il quale Compact 7 HD entra in modalità standby per risparmiare energia. Premendo un qualsiasi pulsante si riattiverà l’unità. Per impostazione standby predefinita, il tempo di standby è impostato a 2 minuti.
  • Page 144 Apri Attiva disattiva l’accensione automatica all'apertura di Compact 7 HD. Per impostazione predefinita, Compact 7 HD si accende al momento dell’apertura. open Chiudi Attiva o disattiva lo spegnimento automatico alla chiusura di Compact 7 HD. Per impostazione predefinita, Compact 7 HD si spegne al momento della chiusura.
  • Page 145 Premere il pulsante Modalità per confermare la scelta e uscire dal menu. Sottomenu Spegnimento Per attivare il menu Spegnimento di Compact 7 HD: Attivare il menu premendo i tasti + e - contemporaneamente per un secondo. Utilizzare il pulsante + per spostarsi in alto e il pulsante - per spostarsi in basso all'interno del menu.
  • Page 146 Premere il pulsante Modalità per confermare la scelta e uscire dal menu. Sottomenu Apri Per attivare o disattivare l'alimentazione dopo l'apertura di Compact 7 HD: Attivare il menu premendo i tasti + e - contemporaneamente per un secondo. Utilizzare il pulsante + per spostarsi in alto e il pulsante - per spostarsi in basso all'interno del menu.
  • Page 147 Compact 7 HD Sottomenu Chiudi Per attivare o disattivare l'alimentazione alla chiusura di Compact 7 HD: Attivare il menu premendo i tasti + e - contemporaneamente per un secondo. Utilizzare il pulsante + per spostarsi in alto e il pulsante - per spostarsi in basso all'interno del menu.
  • Page 148 All manuals and user guides at all-guides.com Optelec Compact 7 HD Menu: Audio Questo menu consente di attivare o disattivare i segnali acustici (segnali di feedback). Per impostazione predefinita, i segnali acustici sono abilitati. Attivare il menu premendo i tasti + e - contemporaneamente per un secondo.
  • Page 149 All manuals and user guides at all-guides.com Optelec Compact 7 HD Menu: Luce Questo menu consente di attivare o disattivare le luci sull’oggetto, che si trovano a sinistra e a destra della telecamera. Per impostazione predefinita, le luci sono abilitate.
  • Page 150 Compact 7 HD Menu: Colore Compact 7 HD supporta quattro modalità ad alto contrasto. Per ognuna di esse, i colori in primo piano e i colori di sfondo possono essere selezionati. Tre delle modalità ad alto contrasto possono essere disabilitate se solo una modalità ad alto contrasto è richiesta.
  • Page 151 Optelec Compact 7 HD Menu: Reset In Compact 7 HD possono essere ripristinate le impostazioni predefinite in fabbrica. Con il Reset, tutte le impostazioni che sono state modificate, saranno ripristinate alle impostazioni di fabbrica. Attivare il menu premendo i tasti + e - contemporaneamente per un secondo.
  • Page 152 Optelec Compact 7 HD Appendice A: Sicurezza Non esporre Compact 7 HD a calore eccessivo o alla luce diretta del sole per evitare il rischio di incendio Non smontare le parti di Compact 7 HD. Contattare un distributore Optelec autorizzato nella vostra zona.
  • Page 153 All manuals and user guides at all-guides.com Optelec Compact 7 HD Appendice B: Informazioni tecniche Ingrandimento 2x - 24x Modalità visualizzazione A colori modalità fotografica Alto contrasto bianco su nero Alto contrasto nero su bianco Alto contrasto a colori combinazione 1...
  • Page 154 All manuals and user guides at all-guides.com Optelec Compact 7 HD Condizioni di utilizzo Temperatura da +10° C a 35° C Umidità < 70%, no condensa Condizioni per stoccaggio e trasporto Temperatura da 10°C a 40°C Umidità < 95%, no condensa...
  • Page 155 La garanzia non è trasferibile e non si applica a gruppi, utenti multipli e agenzie. Compact 7 HD è stato progettato per l'utente singolo, per essere utilizzato in ambienti chiusi o all’aperto. Optelec si riserva il diritto di riparare o sostituire qualsiasi Compact 7 HD acquistato con un prodotto simile o migliore.
  • Page 156 All manuals and user guides at all-guides.com Optelec Compact 7 HD Direttiva RoHS Questo prodotto è conforme alla Direttiva 2002/95/CE del Parlamento Europeo e del Consiglio Europeo del 27 gennaio 2003, sulla restrizione dell'uso di determinate sostanze pericolose nelle apparecchiature elettriche ed elettroniche (RoHS) e loro modifiche.
  • Page 157 Compact 7 HD come parti di ricambio per i Tuttavia, non vi è alcuna garanzia che tali componenti, possono causare aumento o interferenze non si verifichino in una riduzione dell'immunità di Compact 7 HD.
  • Page 158 All manuals and user guides at all-guides.com Optelec Compact 7 HD ATTENZIONE: Si avvisa che cambiamenti o modifiche non espressamente approvati dalla parte responsabile della conformità potrebbero annullare il permesso di usare l'apparecchiatura. Questo dispositivo è conforme alla Parte 15 delle norme FCC. Il funzionamento è...
  • Page 159 All manuals and user guides at all-guides.com Optelec Compact 7 HD Compact 7 HD Manual del usuario Versión 1.1 © 2012 Optelec, los Países Bajos Reservados todos los derechos Optelec C.P. 399 2990 AJ Barendrecht Países Bajos Teléfono: +31 (0)88 678 34 44 Correo-E: info@optelec.nl...
  • Page 160 All manuals and user guides at all-guides.com Optelec Compact 7 HD Aviso RAEE La directiva relativa a los Residuos de Aparatos Eléctricos y Electrónicos (RAEE), una ley n aplicación desde el 13 de febrero del 2003 en todo el ámbito de la Unión Europea, ha resultado en cambios importantes con respecto al tratamiento des estos equipos una vez llegados al final de su vida útil.
  • Page 161 HD de alta calidad y resolución. La pantalla de 7” del Compact 7 HD proporciona una amplificación mínima de 2 veces para una vvisualización más completa de la pantalla hasta un máximo de 24 veces para un nivel de zoom más poderoso.
  • Page 162 Compact 7 HD Acerca de este manual El siguiente manual le permite familiarizarse con las características y el funcionamiento sencillo del Compact 7 HD. Por favor, lea atentamente este manual antes de usar su sistema. ¿Qué contiene la caja? El empaque del Compact 7 HD contiene los elementos siguientes: El sistema de amplificación Compact 7 HD...
  • Page 163 Compact 7 HD 2. Conocer su Compact 7 HD El Compact 7 HD está puesto correctamente delante de usted cuando la pantalla mira hacia arriba, y el botón naranjado del interruptor y el gran botón blanco están ubicados en la parte inferior de la pantalla.
  • Page 164 Compact 7 HD Utilizar el Compact 7 HD en la posición cerrada o abierta Se puede usar el Compact 7 HD de dos maneras: en la posición cerrada o en la posición abierta. En la posición cerrada, sujete la unidad en la mano y dirija el foco de la cámara (ubicada atrás de la unidad) al objeto o texto que desea visualizar o leer en la pantalla.
  • Page 165 Para abrir la unidad, siga estos pasos: Coloque el Compact 7 HD delante de usted para que la pantalla mire hacia arriba y el botón naranjado del interruptor y el gran botón blanco estén ubicados en la parte inferior de la pantalla.
  • Page 166 All manuals and user guides at all-guides.com Optelec Compact 7 HD Limpiar el lente de la cámara y el espejo Para una mayor calidad de imagen, le recomienda de mantener el lente de la cámara y el espejo de las luces del objeto limpios. Un lente sucio sacará fotos nubladas y podrá causar el uso incorrecto del auto-foco.
  • Page 167 El Compact 7 HD tiene los botones siguientes: Open (Abrir) Al presionar el botón blanco ubicado en el centro de la parte inferior de la pantalla, abrirá el Compact 7 HD y encenderá la unidad. Mode (Modo) Al presionar el botón Modo ubicado a la izquierda de la pantalla, podrá...
  • Page 168 Optelec se debe usar para alimentar la unidad y cargar su batería. La cámara del Compact 7 HD está puesta atrás de la unidad. A la izquierda y a la derecha de la cámara están dos luces del objeto. Se usan estas luces cuando la unidad está en la posición cerrada.
  • Page 169 Compact 7 HD Encender y apagar la unidad Es necesario cargar el Compact 7 HD al usarlo por primera vez. Una vez cargado, presione durante un segundo el botón oval naranjado localizado a la derecha del gran botón blanco en el centro de la parte inferior de la pantalla. La unidad se encenderá en el modo de la última inicialización.
  • Page 170 Optelec Compact 7 HD Compact 7 HD incluye una cámara con auto-foco que le permite de tener la unidad en la mano mientras la usa en la posición cerrada. Esta posición le ofrece una visualización más completa de la pantalla, pero reduce el nivel mínimo y máximo de la amplificación.
  • Page 171 El botón de foto instantánea le permitirá de sacar una foto temporaria de un texto o una imagen. Coloque o sujete el Compact 7 HD sobre el texto o la imagen que desea visualizar en la pantalla. Presione y mantenga presionado el botón de foto instantánea ubicado en la parte superior derecha de la unidad.
  • Page 172 Presione de nuevo el botón de foto instantánea para anular la imagen. Ahora se puede sacar otra foto. Nota: Si suelta el botón de foto instantánea antes de oír los dos bips, el Compact 7 HD no sacará ninguna foto y volverá a su nivel de amplificación y modo de visualización de origen (antes de presionar el botón de foto instantánea).
  • Page 173 (Europa, Estados Unidos, Reino Unido y Australia). Seleccione el adaptador apropiado a su país y conéctelo al cable de alimentación. Para recargar el Compact 7 HD, conecte el cable de alimentación al conector DC 5V ubicado al lado izquierdo de la unidad. Enchufe el otro extremo del cable de alimentación en una toma de corriente.
  • Page 174 Compact 7 HD Modo de reposo y función de apago automático El Compact 7 HD se pondrá en modo de reposo automáticamente si no detecta ninguna presión de botón o ningún cambio de imagen durante dos minutos. Para anular el modo de reposo, toque cualquier botón.
  • Page 175 All manuals and user guides at all-guides.com Optelec Compact 7 HD 4. El menú del Compact 7 HD Muestra el estado de la batería y la versión del firmware. Le permite de ajustar el brillo de la pantalla. Le permite de regular los parámetros de alimentación.
  • Page 176 All manuals and user guides at all-guides.com Optelec Compact 7 HD Activar el menú Para entrar en el menú, presione los botones + y – simultáneamente durante un segundo. Navegar en el menú Utilice los botones + o – para navegar entre las opciones del menú. El botón Mode (Modo) ubicado a la izquierda de la pantalla le permite de activar la opción...
  • Page 177 All manuals and user guides at all-guides.com Optelec Compact 7 HD Menú Información Esta opción de menú indica el estado de la batería y la versión del firmware actual de la unidad. Ningún cambio es posible en este menú. Presione los botones + y – simultáneamente durante un segundo para activar el menú.
  • Page 178 All manuals and user guides at all-guides.com Optelec Compact 7 HD Menú Brillo Esta opción de menú le permite de regular el brillo de la pantalla. Presione los botones + y – simultáneamente durante un segundo para activar el menú.
  • Page 179 Power Le permite de regular el tiempo de la función del apago automático del Compact 7 HD. Por defecto, (Apagar) el tiempo del apago automático está regulado a 4 minutos. Después de estos 4 minutos, el Compact power off 7 HD se apagará...
  • Page 180 Compact 7 HD Open Le permite de activar o desactivar el encendido (Abrir) automático al abrir el Compact 7 HD. Por defecto, el Compact 7 HD se encenderá al abrirlo. open Close Le permite de activar y desactivar el apago (Cerrar) automático al cerrar el Compact 7 HD.
  • Page 181 Presione el botón Mode (Modo) para confirmar la selección y salir del menú. Submenú Apagar Para activar el tiempo del apago automático del Compact 7 HD: Presione los botones + y – simultáneamente durante un segundo para activar el menú.
  • Page 182 Presione el botón Mode (Modo) para confirmar la selección y salir del menú. Submenú Abrir Para activar o desactivar el encendido automático al abrir el Compact 7 HD: Presione los botones + y – simultáneamente durante un segundo para activar el menú.
  • Page 183 Optelec Compact 7 HD Submenú Cerrar Para activar o desactivar el apago automático al cerrar el Compact 7 HD: Presione los botones + y – simultáneamente durante un segundo para activar el menú. Utilice el botón + para navegar hacia arriba o el botón – para navegar hacia abajo en el menú.
  • Page 184 All manuals and user guides at all-guides.com Optelec Compact 7 HD Menú Sonido Esta opción de menú le permite de activar o desactivar los sonidos (sonidos de respuestas). Por defecto, los sonidos están activados. Presione los botones + y – simultáneamente durante un segundo para activar el menú.
  • Page 185 All manuals and user guides at all-guides.com Optelec Compact 7 HD Menú Iluminación Esta opción de menú le permite de activar o desactivar las luces del objeto ubicadas a la izquierda y a la derecha de la cámara. Por defecto, las luces del objeto están activadas.
  • Page 186 Compact 7 HD Menú Color El Compact 7 HD suporta cuatro modos de visualización en alto contraste. Para cada uno de los modos, se puede seleccionar los colores del primer plano y del fondo. Se puede desactivar tres de los modos de visualización en alto contraste, si solo un modo es necesario.
  • Page 187 Menú Restablecer Es posible de restablecer la configuración de defecto del Compact 7 HD. Cualquier cambio que ha hecho a los parámetros del Compact 7 HD se restablecerá a el valor de defecto del fabricante. Presione los botones + y – simultáneamente durante un segundo para activar el menú.
  • Page 188 Compact 7 HD Apéndice A: Seguridad No exponga el Compact 7 HD a cambios extremos de temperatura o a la luz solar directa para evitar riesgos de incendios. No intente retirar ningún compuesto del Compact 7 HD. Póngase en contacto con su proveedor Optelec local.
  • Page 189 All manuals and user guides at all-guides.com Optelec Compact 7 HD Apéndice B: Características técnicas Amplificación 2 – 24 veces ó Modos de visualizaci Modo de foto a todo color Alto contraste, blanco sobre negro Alto contraste, negro sobre blanco Alto contraste, combinación de colores 1...
  • Page 190 All manuals and user guides at all-guides.com Optelec Compact 7 HD Condiciones de funcionamiento Temperatura +10° C a 35° C / 50° F a 95° F Humedad < 70%, no condensación Condiciones de almacenamiento y de transporte Temperatura +10°C a 40°C / 50° F a 104° F Humedad <...
  • Page 191 Apéndice C: Condiciones de garant í Optelec garantiza que el Compact 7 HD, a partir de su fecha de entrega, está libre de defectos de materiales y de fallos por mano de obra. La garantía no es transferible, ni es aplicable a grupos, multiusuarios o agencias. El Compact 7 HD ha sido diseñado para el comprador individual para su uso dentro y fuera de...
  • Page 192 All manuals and user guides at all-guides.com Optelec Compact 7 HD Conformidad RoHS Este producto se cumple con la Directiva 2002/95/CE del Parlamento Europeo y del consejo del 27 de enero del 2003, con respecto a las restricciones acerca del uso de substancias peligrosas en los equipos eléctricos y electrónicos (RoHS) y a sus modificaciones.
  • Page 193 Compact 7 HD pueden Este equipo genera, utiliza y puede emitir ocasionar un aumento en las emisiones o energía de radiofrecuencia y, si no se ha una disminución de la inmunidad del...
  • Page 194 All manuals and user guides at all-guides.com Optelec Compact 7 HD - Conecte el equipo a una toma de (2) Este dispositivo debe aceptar cualquier corriente de un circuito distinto al que se interferencia recibida, incluidas encuentre conectado el receptor.
  • Page 195 All manuals and user guides at all-guides.com Optelec Compact 7 HD Compact 7 HD Bedienungsanleitung Version 1.1 © 2012 Optelec, the Netherlands Alle Rechte vorbehalten Optelec P.O. Box 399 2990 AJ Barendrecht The Netherlands Phone: +31 (0)88 678 34 44 E-mail: info@optelec.nl...
  • Page 196 All manuals and user guides at all-guides.com Optelec Compact 7 HD WEEE Richtlinie Die WEEE-Richtlinie (Waste Electrical and Electronic Equipment; deutsch: (Elektro- und Elektronikgeräte-Abfall) ist die EG-Richtlinie 2002/96/EG zur Reduktion der zunehmenden Menge an Elektronikschrott aus nicht mehr benutzten Elektro- und Elektronikgeräten. Die EU-Richtlinie ist im Jahr 2003 in Kraft getreten.
  • Page 197 Wenn Sie Fragen oder Anregungen zur Verwendung des Compact 7 HD haben, kontaktieren Sie bitte Ihren Händler oder die Optelec GmbH. Die Kontaktdaten finden Sie auf der letzten Seite dieses Handbuches. Ihre Fragen und Anregungen nehmen wir gerne entgegen! Wir wünschen Ihnen viel Freude mit Ihrem Compact 7 HD!
  • Page 198 Compact 7 HD Über dieses Handbuch Dieses Handbuch wird Sie mit den Eigenschaften und den grundlegenden Funktionen des Compact 7 HD vertraut machen. Bitte lesen Sie diese Anleitung sorgfältig durch, bevor Sie Ihr Gerät benutzen. Lieferumfang Das finden Sie in der Verpackung des Compact 7 HD:...
  • Page 199 Compact 7 HD 2. Erste Schritte Der Compact 7 HD ist korrekt vor Ihnen platziert, wenn der Bildschirm nach oben zeigt und die große weiße Taste sowie die orange farbene Taste zum Ein- und Ausschalten sich unterhalb des Bildschirms befindet.
  • Page 200 Gerät auf den gewünschten Text oder das Bild (die Kamera befindet sich auf der Rückseite des Compact 7 HD). Der Compact 7 HD mit geschlossenem Bildschirm zum Lesen aus der Distanz oder zum schnellen Aufnehmen von Objekten oder Dokumenten. Compact 7 HD closed...
  • Page 201 Ihnen dank des integrierten Leseständers auch das Lesen von längeren Texten. Zum Öffnen des Gerätes gehen Sie wie folgt vor: Platzieren Sie den Compact 7 HD vor sich, so dass der Bildschirm nach oben zeigt und die große weiße Taste sowie der orange farbene Ein-/Ausschalter unter dem Bildschirm zu sehen sind.
  • Page 202 All manuals and user guides at all-guides.com Optelec Compact 7 HD Reinigung der Kameralinse und des Spiegels Für ein einwandfreies Bild empfehlen wir, die Kameralinse und den Spiegel der indirekten Beleuchtung regelmäßig zu reinigen. Durch eine verschmutzte Kameralinse können unscharfe Bilder entstehen. Außerdem kann Verschmutzung dazu führen, dass der Autofokus die Entfernungseinstellung nicht richtig ausführt.
  • Page 203 Compact 7 HD Tastenbelegung Der Compact 7 HD verfügt über folgende Tasten: Öffnen Der Compact 7 HD öffnet sich durch Drücken der weißen Taste in der Mitte unter dem Bildschirm. Modus-Taste Drücken Sie die Modus-Taste an der linken Seite des Bildschirms um den Darstellungsmodus zu wählen.
  • Page 204 Compact 7 HD ein- und ausschalten Bevor Sie den Compact 7 HD das erste Mal einschalten, muss das Gerät geladen werden. Nach dem Aufladen drücken Sie die orangefarbene, ovale Ein/Aus-Taste rechts neben der silbernen Öffnen-Taste für eine Sekunde. Das Gerät startet in dem zuletzt gewählten Modus.
  • Page 205 Durch nochmaliges Drücken der orangefarbenen Taste für eine Sekunde schalten Sie den Compact 7 HD wieder aus. Wenn Sie den Compact 7 HD einschalten, dauert es ca. 3 Sekunden, bis ein Bild auf dem Bildschrim erscheint. Sie können das Gerät auch wie bereits beschrieben durch Aufstellen des Bildschirmes einschalten (Standardeinstellung).
  • Page 206 All manuals and user guides at all-guides.com Optelec Compact 7 HD Hinweis! In der kleinsten, 2fachen Vergrößerung erscheinen die Textlinien in einer Rundung. Dies wird meist bei sehr kleinen Texten sichtbar. Dieser “Fischaugen” Effekt entsteht durch das Ultra-Weitwinkel Objektiv. “Fischaugen” Effekt in 2facher Vergrößerung Auswahl des Darstellungsmodus Drücken Sie die Modus-Taste auf der linken Seite des Bildschrims.
  • Page 207 Die Schnappschuss-Funktion ermöglicht Ihnen, einen Text oder ein Bild vorübergehend zu speichern. Halten oder legen Sie den Compact 7 HD auf den gewünschten Text oder das Bild. Drücken und halten Sie die Schnappschuss-Taste, die sich oberhalb auf der rechten Seite des Bildschirms befindet.
  • Page 208 Nun können Sie ein neues Bild vorübergehend speichern. Hinweis! Wenn Sie die Schnappschuss-Taste vor Ertönen der zwei Signaltöne loslassen, speichert der Compact 7 HD kein Bild. Das Gerät geht zurück in die zuletzt verwendete Vergrößerungsstufe und den zuletzt verwendeten Darstellungsmodus.
  • Page 209 Netzteilkabel aus dem Compact 7 HD heraus und versuchen Sie das Aufladen durch erneutes Einstecken des Kabels noch einmal. Das Aufladen des Compact 7 HD Akku dauert ca. 3,5 Stunden. Ein vollgeladener Compact 7 HD kann durchschnittlich 4,5 Stunden in Betrieb genommen werden, abhängig von den Energie-Einstellungen.
  • Page 210 Compact 7 HD Standby und automatisches Ausschalten Der Compact 7 HD geht automatisch in den Standby-Modus, wenn innerhalb von zwei Minuten keine Taste gedrückt oder eine Bildveränderung erkannt wurde. Durch Drücken einer beliebigen Taste verlässt das Gerät wieder den Standby-Modus. Nach vier Minuten im Standby-Modus schaltet sich der Compact 7 HD automatisch aus.
  • Page 211 All manuals and user guides at all-guides.com Optelec Compact 7 HD 4. Das Compact 7 HD Menü Anzeige Akku-Status und Firmwareversion Einstellen der Helligkeit Einstellen der Energieoptionen Signaltöne Ein- oder Ausschalten Aktivieren oder Deaktivieren der Objektbeleuchtung Ändern der 4 Lesefarben Darstellungsmodi Auf Werkseinstellung zurücksetzen...
  • Page 212 All manuals and user guides at all-guides.com Optelec Compact 7 HD Ds Menü aktivieren Um das Menü aufzurufen, drücken Sie die + und – Taste gleichzeitig für eine Sekunde. Navigieren im Menü Drücken Sie die + oder – Taste zum Navigieren zwischen den Menüpunkten. Mit der Modus-Taste auf der linken Seite des Bildschirms aktivieren oder bestätigen...
  • Page 213 All manuals and user guides at all-guides.com Optelec Compact 7 HD Menü: Information Dieser Menüpunkt zeigt Ihnen den Akkustatus und die aktuelle Firmwareversion Ihres Gerätes an. In diesem Menüpunkt sind Änderungen nicht möglich. Um das Menü aufzurufen, drücken Sie die + und – Taste gleichzeitig für eine Sekunde.
  • Page 214 All manuals and user guides at all-guides.com Optelec Compact 7 HD Menü: Brightness Helligkeit Mit diesem Menüpunkt können Sie die Helligkeit auf Ihrem Bildschirm einstellen. Um das Menü aufzurufen, drücken Sie die + und – Taste gleichzeitig für eine Sekunde.
  • Page 215 Menü: Power Ein-und Ausschalten Dieser Menüpunkt hat vier Untermenüs: Standby Einstellen der Zeit, bis der Compact 7 HD in den Standby-Modus schaltet um Energie zu sparen. Drücken Sie eine beliebige Taste, und das Gerät verlässt den Standby-Modus. Die Standardein- standby stellung der Standby-Zeit beträgt 2 Minuten.
  • Page 216 Compact 7 HD mit Aufstellen des Bildschirms open eingeschaltet. Schließen Aktivieren oder deaktivieren der automatischen Ausschaltung des Compact 7 HD mittels Schließen des Bildschirms. In der Standardeinstellung wird der Compact 7 HD mit dem Schließen des Bildschirms close ausgeschaltet. Deutsch Seite 214...
  • Page 217 Compact 7 HD Untermenü STANDBY Die Standardeinstellung der Standby-Zeit beträgt 2 Minuten. So stellen Sie die Standby-Zeit des Compact 7 HD ein: Aktivieren Sie das Menü durch gleichzeitiges Drücken der + und –Taste für eine Sekunde. Wählen Sie den Menüpunkt “Power“. Mit der + oder – Taste bewegen Sie sich durch die Optionen.
  • Page 218 Mit der Modus-Taste bestätigen Sie und verlassen damit das Menü. Untermenü ÖFFNEN Automatisches Einschalten des Compact 7 HD durch Öffnen: Aktivieren Sie das Menü durch gleichzeitiges Drücken der + und – Taste für eine Sekunde. Mit der + Taste bewegen Sie sich innerhalb des Menüs nach oben und mit der –...
  • Page 219 Optelec Compact 7 HD Untermenü SCHLIESSEN So aktivieren oder deaktivieren Sie das automatische Ausschalten des Compact 7 HD mit Schließen des Gerätes bzw. des Bildschirms: Aktivieren Sie das Menü durch gleichzeitiges Drücken der + und – Taste für eine Sekunde.
  • Page 220 All manuals and user guides at all-guides.com Optelec Compact 7 HD Menü: Sound Signalton In diesem Menüpunkt können Sie den Signalton aktivieren oder deaktivieren. In der Standardeinstellung ist der Signalton aktiviert. Aktivieren Sie das Menü durch gleichzeitiges Drücken der + und – Taste für eine Sekunde.
  • Page 221 All manuals and user guides at all-guides.com Optelec Compact 7 HD Menü: Light Objektbeleuchtung In diesem Menüpunkt können Sie die Objektbeleuchtung für das Lesen aus der Distanz aktivieren oder deaktivieren. Die Objektbeleuchtung befindet sich rechts und links neben der Kamera. In der Standardeinstellung ist die Objektbeleuchtung aktiviert.
  • Page 222 Compact 7 HD Menü: Color Farbe Der Compact 7 HD verfügt über vier kontrastverstärkte Lesefarbenmodi. Für jeden sind verschiedene Vorder- und Hintergrundfarben wählbar. Drei dieser Modi können deaktiviert werden, wenn nur eine Lesefarbe benötigt wird. Aktivieren Sie das Menü durch gleichzeitiges Drücken der + und – Taste für eine Sekunde.
  • Page 223 Compact 7 HD Menü: Reset Zurücksetzen Der Compact 7 HD kann auf die Werkseinstellungen zurückgesetzt werden. Alle Einstellungen, die Sie vorgenommen haben, werden auf die Werkseinstellungen zurückgesetzt. Aktivieren Sie das Menü durch gleichzeitiges Drücken der + und – Taste für eine Sekunde.
  • Page 224 Optelec Compact 7 HD Anhang A: Sicherheitshinweise Um die Brandgefahr des Compact 7 HD gering zu halten, setzen Sie das Gerät keiner übermässiger Hitze oder direktem Sonnenlicht aus. Entfernen Sie nicht irgendwelche Teile des Compact 7 HD. Kontaktieren Sie den autorisierten Optelec Service in Ihrer Umgebung.
  • Page 225 All manuals and user guides at all-guides.com Optelec Compact 7 HD Anhang B: Technische Informationen Vergrößerung 2- bis 24fach Darstellungsmodi Darstellungsmodi Echtfarbe Foto Modus Hoher Kontrast Weiß auf Schwarz Hoher Kontrast Schwarz auf Weiß Hoher Kontrast Lesefarbe Kombination 1 Hoher Kontrast Lesefarbe Kombination 2...
  • Page 226 All manuals and user guides at all-guides.com Optelec Compact 7 HD Betriebsbedingungen Temperatur +10° C bis +35° C Relative Luftfeuchtigkeit < 70%, Keine Kondensation Lager und Transportbedingungen Temperatur +10° C bis +40° C Relative Luftfeuchtigkeit < 95%, Keine Kondensation Deutsch...
  • Page 227 Die Garantie ist nicht übertragbar und gilt nicht für Gruppen, Mehrfach-Anwender oder Agenturen. Der Compact 7 HD wurde für Endkunden bzw. Einzelpersonen zur Verwendung zu Hause oder unterwegs konzipiert. Optelec behält sich das Recht vor, den Compact 7 HD zu reparieren oder durch ein ähnliches oder besseres Produkt zu ersetzen.
  • Page 228 All manuals and user guides at all-guides.com Optelec Compact 7 HD RoHS Übereinstimmung Dieses Produkt stimmt mit der Direktive 2002/95/EC des Europäischen Parlaments und dem Europäischen Rat vom 27. Januar 2003 über die Reduzierung gefährlicher Substanzen in elektrischen und elektronischen Geräten (RoHS) überein.
  • Page 229 Zubehörteile bestimmt sind, können lung und kann bei unsachgemäßer Be- eine erhöhte Emission oder verringerte handlung oder beim Einsatz nicht vom Immunität des Compact 7 HD zur Folge Hersteller zugelassener Zubehör- und haben. Ersatzteile einen Einfluss auf Umfeld oder...
  • Page 230 All manuals and user guides at all-guides.com Optelec Compact 7 HD Benutzen Sie eine andere derer, die einen unerwünschten Stromversorgungssteckdose als Effekt im Betrieb erzeugen. die, die Ihr Empfangsgerät benutzt. Ziehen Sie Ihren Händler oder WARNUNG! Es besteht ein Explosions-...
  • Page 231 All manuals and user guides at all-guides.com Optelec Offices Worldwide / Optelec kantoren wereldwijd / Optelec dans le monde / Optelec oficinas por todo el mundo / Optelec Zweigniederlassungen Weltweit Optelec U.S. Ltd Optelec Canada Optelec Nederland BV 3030 Enterprise Court, Ste C 1832 Marie-Victorin...
  • Page 232 All manuals and user guides at all-guides.com UDC-02113 – Rev. A...