Table des Matières
Publicité
Liens rapides
Nice
SWN
SDN
SDNI
Industrial doors
EN - Instructions and warnings for installation and use
IT - Istruzioni ed avvertenze per l'installazione e l'uso
FR - Instructions et avertissements pour l'installation et l'utilisation
ES - Instrucciones y advertencias para la instalación y el uso
DE - Installierungs-und Gebrauchsanleitungen und Hinweise
PL -
NL - Aanwijzingen en aanbevelingen voor installatie en gebruik
TR - Türkçeye tercüme edilen metin
Publicité
Chapitres
Table des Matières

Manuels Connexes pour Nice SWN 70-24


Sommaire des Matières pour Nice SWN 70-24
- Page 1 Nice SDNI Industrial doors EN - Instructions and warnings for installation and use IT - Istruzioni ed avvertenze per l’installazione e l’uso FR - Instructions et avertissements pour l’installation et l’utilisation ES - Instrucciones y advertencias para la instalación y el uso...
-
Page 3: Installation Warnings
GENERAL WARNINGS: SAFETY - INSTALLATION - USE (original instructions in Italian) ATTENTION Important safety instructions. Follow all instructions as improper installation may cause serious damage ATTENTION Important safety instructions. It is important for you to comply with these instructions for your own and other people’s safety. -
Page 4: Table Des Matières
CONTENTS 4 - TESTING AND COMMISSIONING GENERAL WARNINGS: 4.1 - Testing 4.2 - Commissioning 1 - PRODUCT DESCRIPTION AND INTENDED USE 5 - FURTHER DETAILS 2 - PRODUCT APPLICATION LIMITS 5.1 - Static braking torque 3 - INSTALLATION AND ELECTRICAL CONNECTIONS 7 - PRODUCT DISPOSAL 3.1 - Gear motor installation 7 - BASIC TROUBLESHOOTING... - Page 5 STANDARD ASSEMBLY There are two types of shaft English – 3...
-
Page 6: Installation And Electrical Connections
Tightening torque must be 20 Nm. Note: if needing to position the gear motor differently, contact the Nice technical service. Note: if the gear motor needs to be painted, the seal rings should be protected and must not come into contact with the paint. - Page 7 VERSION WITH RELEASE FOR MANUAL OPERATION wall the cable shaft axis. There are two types of shaft English – 5...
- Page 8 6 – English...
-
Page 9: Electrical Connections
3.2 - Electrical connections age to the equipment or personal injuries. Only connect the power cable to the control unit: when using Nice D-PRO (Action - Comfort - Automatic) control units, refer to the instruction manuals for these products. 3.3 - Crank-operated emergency manual device (KU) The emergency manual device must only be used to open and close the door in the event of power outages. - Page 10 (KE - KEL) 3.4 - Light chain-operated emergency manual device The emergency manual device must only be used to open and close the door in the event of power outages. WARNINGS: - The emergency manual device must only be used when the motor is off. in the vertical position only.
- Page 11 Only use if the chain slides; if necessary, turn the knob clockwise until the door moves correctly. 3.5 - Chain-operated emergency manual device (KE 2) The emergency manual device must only be used to open and close the door in the event of power outages. WARNINGS: - The emergency manual device must only be used when the motor is off.
- Page 12 chain. Grasp the ‘MOTOR’ grip and pull gently until stopping, thus restor- ing control voltage and allowing the door to be operated electri- cally. 10 – English...
-
Page 13: Emergency Manual Device Chain Length Adjustment
3.6 - Emergency manual device chain length adjustment The chain-operated emergency manual device has an attachment where it can be opened, and thus lengthened or shortened by adding or removing links. - The links must be secured carefully. - When adjusting chain length, make sure the chain does not get tangled. -
Page 14: Mechanical Limit Stop Adjustment
3.7 - Mechanical limit stop adjustment To adjust the limit stop, proceed as follows: - Close the door the centre of the switch (B); then tighten the grub screw (C) using the adjustment tool provided. This operation makes an initial adjustment -Open the door to the desired position - Adjust the OPENING limit stop in the same way and then the other cam wheels (5) and (6) (if used) -
Page 15: Mechanical Limit Stop Connections
3.8 - Mechanical limit stop connections English – 13... - Page 16 3.9 - Electronic limit switch connections The ENAS002 electronic limit switch is an encoder that provides an absolute value. The positions are set by the control unit. Encode connection Safety chain 14 – English...
-
Page 17: Testing And Commissioning
TESTING AND COMMISSIONING These are the most important steps in the development of an automa- 4.2 - Commissioning tion system, to ensure maximum system safety. Commissioning can only be performed after obtaining positive results in all the tests run on the control unit and the other devices (paragraph 4.1). -
Page 18: Product Disposal
BASIC TROUBLESHOOTING... TECHNICAL SPECIFICATIONS tions to its products at any time when deemed necessary, maintaining the same intended use and functions. Control unit SWN 70-24 SDN 70-24 SDN 100-24 SDN 140-20 SDNI 140-20 Torque [Nm] Output RPM [min-¹]... -
Page 19: Product Data Sheets
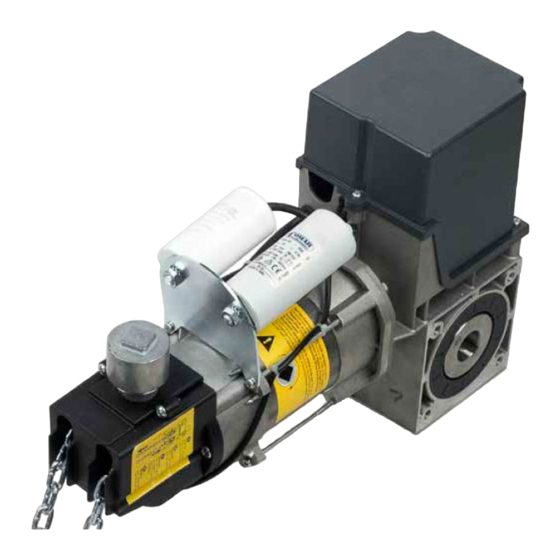
Product data sheet SWN 70 - 24 - KU Table 1 Table 2 Description Ø A Description 25.4 6.35 28.4 Gear motor 31.75 6.35 34.7 Electric motor Emergency manual device Capacitors Asse Cable shaft axis albero cavo Ø A English – 17 English –... - Page 20 Product data sheet SWN 70 - 24 - KE Table 1 Table 2 Description Ø A Description 25.4 6.35 28.4 Gear motor 31.75 6.35 34.7 Electric motor Emergency manual device Capacitors 122,5 dim max 55,0 18 – English English – 18...
- Page 21 Product data sheet SWN 70 - 24 - E Table 1 Table 2 Description Ø A Description SWN 70 - 24 - E 25.4 6.35 28.4 Gear motor Electric motor Release device Capacitors 122,5 English – 19 English – 19...
- Page 22 Product data sheet SDN 70 - 24 - KE Table 1 Table 2 Description Ø A Description 25.4 6.35 28.4 Gear motor Electric motor Emergency manual device 122,5 dim max Asse albero cavo Cable shaft axis Ø A 20 – English 20 –...
- Page 23 Product data sheets SDN 100 - 24 - KU, SDN 140 - 20 - KU Table 1 Table 2 Description Ø A Description 25,4 6,35 28,4 Gear motor 31,75 6,35 34,7 Electric motor 25,4 6,35 28,4 31,75 6,35 34,7 Emergency manual device 122,5 Dim Max) Ø...
- Page 24 Product data sheets SDN 100 - 24 - KE / KEL, SDN 140 - 20 - KE / KEL Table 1 Table 2 Description Ø A Description 25,4 6,35 28,4 Gear motor 31,75 6,35 34,7 Electric motor 25,4 6,35 28,4 31,75 6,35 34,7...
- Page 25 Product data sheet SDN 100 - 24 - E, SDN 140 - 20 - E Table 1 Table 2 Description Ø A Description SDN 100 - 24 - E 25,4 6,35 28,4 Gear motor Electric motor SDN 140 - 20 - E 25,4 6,35 28,4...
- Page 26 Product data sheet SDN 140 - 20 - KE 2 Table 1 Table 2 Description Ø A Description 25.4 6.35 28.4 Gear motor 31.75 6.35 34.7 Electric motor Release device 24 – English 24 – English...
- Page 27 Product data sheet SDNI 120 - 20 - KU Table 1 Table 2 Description Ø A Description 31.75 6.35 34.7 Gear motor Electric motor Emergency manual device Inverter 55 55 English – 25 English – 25...
- Page 28 Product data sheet SDN 140 - 20 - KE 2 Table 1 Table 2 Description Ø A Description 25.4 6.35 28.4 Gear motor 31.75 6.35 34.7 Electric motor Emergency manual device 26 – English 26 – English...
- Page 29 Product data sheet SDNI 140 - 20 - KU Table 1 Table 2 Description Ø A Description 31,75 6,35 34,7 Gear motor Electric motor Emergency manual device Inverter 55 55 English – 27 English – 27...
-
Page 31: User Manual (To Be Consigned To The End User)
User manual (to be consigned to the end user) • • Maintenance: The automation must undergo mainte- tant to be informed by the installer of any residual hazards nance work on an annual basis in order to guarantee long and to take a few minutes to read this instruction manual: life. -
Page 33: Avvertenze Installazione
AVVERTENZE GENERALI: SICUREZZA - INSTALLAZIONE - USO (istruzioni originali in italiano) ATTENZIONE Istruzioni importanti per la sicurezza. Seguire tutte le istruzioni poiché l’installazione non corretta può causare gravi danni ATTENZIONE Istruzioni importanti per la sicurezza. Per la sicurezza delle persone è importante seguire queste istruzioni. Conservare queste istruzioni •... -
Page 34: Descrizione Prodotto E Destinazione D'uso
SOMMARIO 4 - COLLAUDO E MESSA IN SERVIZIO AVVERTENZE GENERALI: 1 - DESCRIZIONE PRODOTTO E DESTINAZIONE D’USO 5 - APPROFONDIMENTI 2 - LIMITI D’IMPIEGO 3 - INSTALLAZIONE E COLLEGAMENTI ELETTRICI 6 - SMALTIMENTO DEL PRODOTTO 3.1 - Installazione motoriduttore 7 - COSA FARE SE... 8 - CARATTERISTICHE TECNICHE Schede prodotto Manuale per l’uso... -
Page 35: Montaggio Standard
MONTAGGIO STANDARD L’albero può essere di due tipologie Italiano – 3... -
Page 36: Installazione E Collegamenti Elettrici
INSTALLAZIONE E COLLEGAMENTI ELETTRICI 3.1 - Installazione motoriduttore riale e l’ingombro del motoriduttore (vedere schede prodotto pagg. 17-28). squilibri che potrebbero causare danni oppure un’usura eccessiva degli elementi di trasmissione. Assicurarsi che la porta non presenti punti d’attrito sia in chiusura che in apertura; la movimentazione manuale della porta non necessiti di una forza superiore a 300N (30 kg). - Page 37 VERSIONE CON SBLOCCO MANUALE e asse albero cavo. L’albero può essere di due tipologie Italiano – 5...
- Page 38 6 – Italiano...
-
Page 39: Collegamenti Elettrici
3.2 - Collegamenti elettrici possono causare danni all’apparecchiature o alle persone. 3.3 - Dispositivo manuale di emergenza a manovella (KU) Il dispositivo manuale di emergenza deve essere usato esclusivamente per aprire e chiudere la porta in caso di mancanza di energia elettrica. AVVERTENZE: - Il dispositivo manuale d’emergenza va usato solo ed esclusivamente a motore fermo. - Page 40 (KE - KEL) 3.4 - Dispositivo manuale di emergenza a catena leggera Il dispositivo manuale di emergenza deve essere usato esclusivamente per aprire e chiudere la porta in caso di mancanza di energia elettrica. AVVERTENZE: - Il dispositivo manuale d’emergenza va usato solo ed esclusivamente a motore fermo. solo in posizione verticale .
- Page 41 mente la porta. 3.5 - Dispositivo manuale di emergenza a catena (KE 2) Il dispositivo manuale di emergenza deve essere usato esclusivamente per aprire e chiudere la porta in caso di mancanza di energia elettrica. AVVERTENZE: - Il dispositivo manuale d’emergenza va usato solo ed esclusivamente a motore fermo. - La manovra manuale d’emergenza va effettuata da un posto sicuro.
- Page 42 genza. 10 – Italiano...
- Page 43 La catena del dispositivo manuale d’emergenza si può aprire nel aggiungendo o togliendo delle maglie. - Le maglie vanno chiuse accuratamente. non attorcigliare la catena su se stessa. Sblocco manovra manuale Afferrare l’impugnatura ‘HAND’ e tirare delicatamente verso il bas- trica.
- Page 44 diante l’apposita chiave di regolazione. Questa operazione consente una prima regolazione regolazione Finecorsa sicurezza 12 – Italiano...
- Page 45 Italiano – 13...
- Page 46 sicurezza 14 – Italiano...
-
Page 47: Collaudo E Messa In Servizio
COLLAUDO E MESSA IN SERVIZIO Queste sono le fasi più importanti nella realizzazione dell’automazione 4.2 - Messa in servizio per garantire la massima sicurezza dell’impianto. La messa in servizio può avvenire solo dopo aver eseguito con esito sorie’. rimento ai manuali istruzioni dei singoli dispositivi. manuale di istruzioni per l’uso e del piano di manutenzione dell’automazione. -
Page 48: Smaltimento Del Prodotto
COSA FARE SE... CARATTERISTICHE TECNICHE Centrale SWN 70-24 SDN 70-24 SDN 100-24 SDN 140-20 SDNI 140-20 Momendo d’arresto statico [Nm] Peso max sollevabile [N]... - Page 49 Scheda prodotto SWN 70 - 24 - KU Tabella 1 Tabella 2 Descrizione Ø A Descrizione Motore elettrico Dispositivo manuale di emergenza Asse Asse albero cavo albero cavo Ø A Italiano – 17 Italiano – 17...
- Page 50 Scheda prodotto SWN 70 - 24 - KE Tabella 1 Tabella 2 Descrizione Ø A Descrizione Motore elettrico Dispositivo manuale di emergenza 122,5 dim max 55,0 18 – Italiano Italiano – 18...
- Page 51 Scheda prodotto SWN 70 - 24 - E Tabella 1 Tabella 2 Descrizione Ø A Descrizione Motore elettrico Dispositivo di sblocco 122,5 Italiano – 19...
- Page 52 Scheda prodotto SDN 70 - 24 - KE Tabella 1 Tabella 2 Descrizione Ø A Descrizione Motore elettrico Dispositivo manuale di emergenza 122,5 dim max Asse albero cavo Asse albero cavo Ø A 20 – Italiano...
- Page 53 Scheda prodotti SDN 100 - 24 - KU, SDN 140 - 20 - KU Tabella 1 Tabella 2 Descrizione Ø A Descrizione Motore elettrico Dispositivo manuale di emergenza 122,5 Dim Max) Ø A Italiano – 21...
- Page 54 Scheda prodotti SDN 100 - 24 - KE / KEL, SDN 140 - 20 - KE / KEL Tabella 1 Tabella 2 Descrizione Ø A Descrizione Motore elettrico Dispositivo manuale di emergenza 122,5 (dim max) Ø A 22 – Italiano...
- Page 55 Scheda prodotto SDN 100 - 24 - E, SDN 140 - 20 - E Tabella 1 Tabella 2 Descrizione Ø A Descrizione Motore elettrico Dispositivo di sblocco 122,5 Ø A Italiano – 23...
- Page 56 Scheda prodotto SDN 140 - 20 - KE 2 Tabella 1 Tabella 2 Descrizione Ø A Descrizione Motore elettrico Dispositivo manuale di emergenza 24 – Italiano...
- Page 57 Scheda prodotto SDNI 140 - 20 - KU Tabella 1 Tabella 2 Descrizione Ø A Descrizione Motore elettrico Dispositivo manuale di emergenza Inverter 55 55 Italiano – 25...
-
Page 59: Manuale Per L'uso
Manuale per l’uso • • Avvertenza: informati dall’installatore riguardo l’origine dei rischi residui aperta e ferma. e dedicare alcuni minuti alla lettura del manuale istruzio- • Manutenzione: Per mantenere costante il livello di sicu- rezza e per garantire la massima durata dell’intera auto- •... - Page 61 (instructions originales en italien) ATTENTION Instructions importantes pour la sécurité. Il est important de suivre toutes les instructions fournies étant donné qu’une installation incorrecte est susceptible de provoquer des dommages graves ATTENTION Instructions importantes pour la sécurité. Pour la sécurité des personnes, il est important de suivre ces instructions.
-
Page 62: Déclaration De Conformité
SOMMAIRE 5 - INFORMATIONS COMPLÉMENTAIRES Fiches produit Manuel d’utilisation DÉCLARATION DE CONFORMITÉ dans des conditions ambiantes différentes de celles indiquées industriel. dans ce manuel doit être considérée comme impropre et inter- – encodeur absolu (le réglage des positions est effectué par le biais de ou bien glage manuel des cames). -
Page 63: Montage Standard
MONTAGE STANDARD L’arbre peut être de deux types Français – 3... -
Page 64: Installation Du Motoréducteur
3.1 - Installation du motoréducteur qui pourraient causer des dommages ou une usure excessive des éléments de transmission. S’assurer que la porte ne présente pas de points de friction en fermeture et en ouverture. La manipulation manuelle de la porte ne nécessite pas une force supérieure à... - Page 65 la peinture. entre la paroi (mur) et l’axe de l’arbre creux. L’arbre peut être de deux types Français – 5...
- Page 66 6 – Français...
- Page 67 peuvent provoquer des dommages matériels et corporels. Le dispositif manuel d’urgence doit être exclusivement utilisé pour ouvrir et fermer la porte en cas de panne de courant. Insérer la manivelle dans le trou en exerçant une pression légère. commande est coupée, la porte ne peut plus être actionnée en En extrayant la manivelle, la tension de commande est rétablie, la Français –...
- Page 68 (KE - KEL) Le dispositif manuel d’urgence doit être exclusivement utilisé pour ouvrir et fermer la porte en cas de panne de courant. mouvement vers la droite ou la gauche. 8 – Français...
- Page 69 soit plus possible de manipuler correctement la porte. 3.5 - Dispositif manuel d’urgence à chaîne (KE 2) Le dispositif manuel d’urgence doit être exclusivement utilisé pour ouvrir et fermer la porte en cas de panne de courant. interrompre la tension de commande et empêcher l’actionnement Français –...
- Page 70 d’urgence. pour interrompre la tension de commande et permettre de nou- 10 – Français...
- Page 71 le point de connexion et donc peut être allongée ou raccourcie en ajoutant ou en supprimant des maillons. - Les maillons doivent être soigneusement fermés. Déverrouillage du fonctionnement manuel manipuler manuellement la porte. Français – 11...
- Page 72 - Refermer la porte - Des erreurs de position mineures peuvent être corrigées par un réglage précis (D). TURE TURE Raccordement Fin de course sécurité 12 – Français...
- Page 73 Français – 13...
- Page 74 sécurité 14 – Français...
-
Page 75: Mise En Service
Il s’agit des phases les plus importantes dans la réalisation de l’auto- 4.2 - Mise en service pas autorisée. du respect des prescriptions des lois, des normes et des réglemen- matismes de portes et portails. adoptées, déclaration de conformité du fabricant de tous les Les dispositifs supplémentaires doivent faire l’objet d’essais spéci- nance de l’automatisme. - Page 76 éliminés. et la même utilisation prévue. en sortie. chute. Logique SWN 70-24 SDN 70-24 SDN 100-24 SDN 140-20 SDNI 140-20 Poids maxi soulevable [N]...
- Page 77 Tableau 1 Tableau 2 Description Ø A N° Description Réducteur Dispositif manuel d’urgence Asse Axe arbre creux albero cavo Ø A Français – 17...
- Page 78 Fiche produit SWN 70 - 24 - KE Tableau 1 Tableau 2 Description Ø A N° Description Réducteur Dispositif manuel d’urgence 122,5 dim max 55,0 18 – Français...
- Page 79 Fiche produit SWN 70 - 24 - E Tableau 1 Tableau 2 Description Ø A N° Description Réducteur Dispositif de déverrouillage 122,5 Français – 19...
- Page 80 Fiche produit SDN 70 - 24 - KE Tableau 1 Tableau 2 Description Ø A N° Description Réducteur Dispositif manuel d’urgence 122,5 dim max Asse albero cavo Axe arbre creux Ø A 20 – Français...
- Page 81 Tableau 1 Tableau 2 Description Ø A N° Description Réducteur Dispositif manuel d’urgence 122,5 Dim Max) Ø A Français – 21...
- Page 82 Fiche produits SDN 100 - 24 - KE / KEL, SDN 140 - 20 - KE / KEL Tableau 1 Tableau 2 Description Ø A N° Description Réducteur Dispositif manuel d’urgence 122,5 (dim max) Ø A 22 – Français...
- Page 83 Fiche produit SDN 100 - 24 - E, SDN 140 - 20 - E Tableau 1 Tableau 2 Description Ø A N° Description Réducteur Dispositif de déverrouillage 122,5 Ø A Français – 23...
- Page 84 Fiche produit SDN 140 - 20 - KE 2 Tableau 1 Tableau 2 Description Ø A N° Description Réducteur Dispositif manuel d’urgence 24 – Français...
- Page 85 Tableau 1 Tableau 2 Description Ø A N° Description Réducteur Dispositif manuel d’urgence Inverseur 55 55 Français – 25...
- Page 87 Guide de l’utilisateur • Il est important, lors de la première utilisation de l’auto- réparer l’automatisme au plus vite. matisme, d’être informé par l’installateur sur l’origine des • générales (manuel instructions produit). • Il faut effectuer une maintenance régu- • Il est en outre important de conserver le manuel d’ins- lière pour maintenir un niveau de sécurité...
-
Page 89: Advertencias De Instalación
ADVERTENCIAS GENERALES: SEGURIDAD - INSTALACIÓN - USO (instrucciones originales en italiano) ATENCIÓN Instrucciones importantes para la seguridad. Seguir todas las instrucciones: una instalación incorrecta puede provocar daños graves ATENCIÓN Instrucciones importantes para la seguridad. Para la seguridad de las personas es importante seguir estas instrucciones. -
Page 90: Descripción Del Producto Y Uso Previsto
ÍNDICE 4 - PRUEBA Y PUESTA EN SERVICIO ADVERTENCIAS GENERALES: 1 - DESCRIPCIÓN DEL PRODUCTO Y USO PREVISTO 5 - AHONDAMIENTOS 2 - LÍMITES DE UTILIZACIÓN 3 - INSTALACIÓN Y CONEXIONES ELÉCTRICAS 6 - ELIMINACIÓN DEL PRODUCTO 3.1 - Instalación del motorreductor 7 - QUÉ... -
Page 91: Montaje Estándar
MONTAJE ESTÁNDAR El eje puede ser de dos tipos Español – 3... -
Page 92: Instalación Y Conexiones Eléctricas
INSTALACIÓN Y CONEXIONES ELÉCTRICAS 3.1 - Instalación del motorreductor ¡IMPORTANTE! - El eje de bobinado debe resultar concéntrico y alineado al eje motorizado; en caso contrario, se crearán des- equilibrios que podrían causar daños o un desgaste excesivo de los elementos de transmisión. Asegurarse de que la puerta no presente puntos de fricción al cierre o a la apertura;... - Page 93 VERSIÓN CON DESBLOQUEO MANUAL mm entre la pared y el eje hueco. El eje puede ser de dos tipos Español – 5...
- Page 94 6 – Español...
-
Page 95: Conexiones Eléctricas
3.2 - Conexiones eléctricas ¡ATENCIÓN! – Todas las conexiones eléctricas deben efectuarse sin tensión en la instalación. Las conexiones incorrectas pue- den causar daños al aparato y a las personas. - Automatic) consultar los respectivos manuales de instrucciones. 3.3 - Dispositivo manual de emergencia con manivela (KU) ¡ATENCIÓN! –... -
Page 96: Dispositivo Manual De Emergencia Con Cadena Ligera (Ke - Kel)
(KE - KEL) 3.4 - Dispositivo manual de emergencia con cadena ligera ¡ATENCIÓN! – ! NO utilizarlo en situaciones diferentes de la situación descrita! – ! El uso incorrecto del dispositivo puede causar lesiones! ADVERTENCIAS: - El dispositivo manual de emergencia debe utilizarse sólo y exclusivamente con el motor parado. - Los motorreductores dotados de dispositivo manual de emergencia de tipo KE - KEL se deben instalar sólo en posición vertical . - Page 97 Utilizar sólo si la cadena patina; en tal caso girar el pomo en sen- 3.5 - Dispositivo manual de emergencia con cadena (KE 2) ¡ATENCIÓN! – ¡NO utilizarlo en situaciones diferentes de la situación descrita! – ¡El uso incorrecto del dispositivo puede causar lesiones! ADVERTENCIAS: - El dispositivo manual de emergencia debe utilizarse sólo y exclusivamente con el motor parado.
- Page 98 emergencia. tope para restablecer la tensión de mando y permitir el acciona- 10 – Español...
- Page 99 La cadena del dispositivo manual de emergencia se puede abrir en el punto de conexión, para alargarla o acortarla añadiendo o - Los eslabones se deben cerrar bien. luego mover la puerta manualmente. Restablecimiento maniobra automática Español – 11...
-
Page 100: Regulación Del Tope Mecánico
3.7 - Regulación del tope mecánico regulación. Esta operación permite una primera regulación - Abrir la puerta hasta la posición deseada Llave de regulación tope seguridad 12 – Español... - Page 101 3.8 - Conexiones del tope mecánico Español – 13...
- Page 102 3.9 - Conexiones del tope electrónico El tope electrónico ENAS002 es un encoder de valor absoluto. seguridad 14 – Español...
-
Page 103: Prueba Y Puesta En Servicio
PRUEBA Y PUESTA EN SERVICIO Éstas son las fases más importantes en la realización de la automati- 4.2 - Puesta en servicio zación para garantizar la seguridad máxima de la instalación. efectuado correctamente todas las fases de ensayo (apartado 4.1). de las automatizaciones para portones y puertas. -
Page 104: Eliminación Del Producto
QUÉ HACER SI... CARACTERÍSTICAS TÉCNICAS Central SWN 70-24 SDN 70-24 SDN 100-24 SDN 140-20 SDNI 140-20 3000... - Page 105 Ficha producto SWN 70 - 24 - KU Tabla 1 Tabla 2 Descripción Ø A Descripción SWN 70 - 24 - KU 28,4 Reductor 34,7 Alojamiento del tope Dispositivo manual de emergencia Asse Eje árbol cable albero cavo Ø A Español –...
- Page 106 Ficha producto SWN 70 - 24 - KE Tabla 1 Tabla 2 Descripción Ø A Descripción SWN 70 - 24 - KE 28,4 Reductor 34,7 Alojamiento del tope Dispositivo manual de emergencia 122,5 dim max 55,0 18 – Español...
- Page 107 Ficha producto SWN 70 - 24 - E Tabla 1 Tabla 2 Descripción Ø A Descripción SWN 70 - 24 - E 28,4 Reductor Alojamiento del tope 122,5 Español – 19...
- Page 108 Ficha producto SDN 70 - 24 - KE Tabla 1 Tabla 2 Descripción Ø A Descripción SWN 70 - 24 - KE 28,4 Reductor Alojamiento del tope Dispositivo manual de emergencia 122,5 dim max Asse albero cavo Eje árbol cable Ø...
- Page 109 Ficha productos SDN 100 - 24 - KU, SDN 140 - 20 - KU Tabla 1 Tabla 2 Descripción Ø A Descripción SDN 100 - 24 - KU 28,4 Reductor 34,7 SDN 140 - 20 - KU 28,4 Alojamiento del tope 34,7 Dispositivo manual de emergencia 122,5...
- Page 110 Ficha productos SDN 100 - 24 - KE / KEL, SDN 140 - 20 - KE / KEL Tabla 1 Tabla 2 Descripción Ø A Descripción SDN 100 - 24 - KE / KEL 28,4 Reductor 34,7 SDN 140 - 20 - KE / KEL 28,4 Alojamiento del tope 34,7...
- Page 111 Ficha producto SDN 100 - 24 - E, SDN 140 - 20 - E Tabla 1 Tabla 2 Descripción Ø A Descripción SDN 100 - 24 - E 28,4 Reductor SDN 140 - 20 - E 28,4 Alojamiento del tope 34,7 122,5 Ø...
- Page 112 Ficha producto SDN 140 - 20 - KE 2 Tabla 1 Tabla 2 Descripción Ø A Descripción SDN 140 - 20 - KE 2 28,4 Reductor 34,7 Alojamiento del tope Dispositivo manual de emergencia 24 – Español...
- Page 113 Ficha producto SDNI 140 - 20 - KU Tabla 1 Tabla 2 Descripción Ø A Descripción SDNI 140 - 20 - KU 34,7 Reductor Alojamiento del tope Dispositivo manual de emergencia Inverter 55 55 Español – 25...
- Page 115 Manual de uso • • Advertencia: informados por el instalador sobre el origen de los riesgos tamente abierta y parada. residuales y dedicar unos minutos a la lectura del manual • Mantenimiento: de instrucciones, sobre todo de las advertencias genera- guridad y para garantizar la duración máxima de toda la les (manual de instrucciones del producto).
- Page 117 ALLGEMEINE HINWEISE: SICHERHEIT - INSTALLATION - GEBRAUCH (Originalanleitung in Italienisch) ACHTUNG Wichtige Sicherheitshinweise. Halten Sie alle Anweisungen strikt ein. Eine unkorrekte Installation kann schwerwiegende Schäden verursachen ACHTUNG Wichtige Sicherheitshinweise. Die Sicherheit von Personen ist nur gewährleistet, wenn die folgenden Anweisungen eingehalten werden. Bewahren Sie diese Anleitung gut auf •...
- Page 118 INHALT 4 - ABNAHME UND INBETRIEBNAHME ALLGEMEINE HINWEISE: 4.1 - Abnahmeprüfung SICHERHEIT - INSTALLATION - GEBRAUCH 4.2 - Inbetriebnahme 1 - PRODUKTBESCHREIBUNG UND BESTIMMUNGSZWECK 5 - WEITERE INFORMATIONEN 5.1 - Statisches Haltemoment 2 - EINSATZBESCHRÄNKUNGEN 6 - ENTSORGUNG DES GERÄTS 3 - INSTALLATION UND ELEKTRISCHE ANSCHLÜSSE 3.1 - Installation des Antriebs 7 - WAS TUN, WENN...
- Page 119 STANDARDMONTAGE Es sind zwei Wellenausführungen möglich Deutsch – 3...
-
Page 120: Installation Und Elektrische Anschlüsse
Das Anzugsmoment muss 20 Nm betragen. Hinweis: Wenn der Antrieb anders positioniert werden soll, den technischen Kundendienst von Nice kontaktieren. Hinweis: Wenn der Antrieb lackiert werden soll, die Dichtungsringe schützen, da sie nicht in Berührung mit dem Lack kommen dürfen. - Page 121 VERSION MIT MANUELLER ENTRIEGELUNG Die Seilführung wie in den nachfolgenden Abbildungen gezeigt zum Bügel positionieren und dabei den Mindestabstand von 90 mm zwischen Wand (Mauer) und Hohlwellenachse einhalten. Es sind zwei Wellenausführungen möglich Deutsch – 5...
- Page 122 6 – Deutsch...
-
Page 123: Elektrische Anschlüsse
ACHTUNG! – Alle elektrischen Anschlüsse müssen ohne Spannung an der Anlage ausgeführt werden. Fehlerhafte Anschlüsse können Schäden an Geräten und/oder Personen verursachen. Stellen Sie nur den elektrischen Anschluss zwischen dem Netzkabel und der Steuerung her: Bei Verwendung der Steuerungen Nice D-PRO (Action - Comfort - Automatic) die Bedienungsanleitungen der einzelnen Produkte beachten. -
Page 124: Manuelle Notbedienung Mit Leichter Kette (Ke - Kel)
(KE - KEL) 3.4 - Manuelle Notbedienung mit leichter Kette Die manuelle Notbedienung darf ausschließlich zum Öffnen und Schließen des Tors im Falle des Stromausfalls verwendet werden. ACHTUNG! – NICHT in anderen Situationen als der beschriebenen verwenden! – Der fehlerhafte Gebrauch der Vorrichtung kann Verletzungen verursachen! HINWEISE: - Die manuelle Notbedienung darf nur und ausschließlich bei stillstehendem Motor verwendet werden. -
Page 125: Manuelle Notbedienung Mit Kette (Ke 2)
Nur bei durchrutschender Kette verwenden; in diesem Fall den Drehknopf im Uhrzeigersinn drehen, bis die korrekte Torbewegung möglich ist. 3.5 - Manuelle Notbedienung mit Kette (KE 2) Die manuelle Notbedienung darf ausschließlich zum Öffnen und Schließen des Tors im Falle des Stromausfalls verwendet werden. ACHTUNG! –... - Page 126 Das Tor durch Ziehen der Kette zur Notentriegelung öffnen und/ oder schließen. Den Griff ‘MOTOR’ behutsam bis zum Anschlag ziehen, um die Steuerspannung wieder einzuschalten und den elektrischen Tor- betrieb wieder zu ermöglichen. 10 – Deutsch...
-
Page 127: Änderung Der Kettenlänge Der Manuellen Notbedienung
3.6 - Änderung der Kettenlänge der manuellen Notbedienung Die Kette der manuellen Notbedienung kann an der Verbindungs- stelle geöffnet und durch Verbindungsglieder verlängert oder ge- kürzt werden. - Die Kettenglieder müssen sorgfältig geschlossen werden. - Bei einer Änderung der Kettenlänge ist darauf zu achten, dass die Kette nicht in sich verdreht montiert wird. -
Page 128: Einstellung Mechanischer Endschalter
3.7 - Einstellung mechanischer Endschalter Zur Einstellung der mechanischen Endschalter wie folgt verfahren: - Das Tor schließen - Den Steuernocken (A) des Endschalters SCHLIESSUNG (3) bis in die Mitte des Schalters (B) drehen; danach die Stiftschraube (C) mit dem vorgesehenen Einstellschüssel einschrauben. Dieser Vorgang ermöglicht eine erste Einstellung - Das Tor bis zur gewünschten Position öffnen - Auf dieselbe Weise die Einstellung des Endschalters ÖFFNUNG... -
Page 129: Anschlüsse Mechanischer Endschalter
3.8 - Anschlüsse mechanischer Endschalter Deutsch – 13... -
Page 130: Anschlüsse Elektronischer Endschalter
3.9 - Anschlüsse elektronischer Endschalter Der elektronische Endschalter ENAS002 ist ein Absolutwertgeber. Die Einstellung der Positionen erfolgt über die Steuerung. Encoder-Anschluss Sicherheitskette 14 – Deutsch... -
Page 131: Abnahme Und Inbetriebnahme
ABNAHME UND INBETRIEBNAHME Um die höchste Sicherheit der Anlage zu gewährleisten, sind dies die Nach Abschluss der Prüfungen die Steuerung mit Strom ver- wichtigsten Phasen bei der Realisierung der Automation. sorgen und nach Entfernung der manuellen Notbedienung den Antrieb starten. Sie müssen von erfahrenem Fachpersonal ausgeführt werden, das die erforderlichen Tests zur Überprüfung der je nach vorhandenem Risiko 4.2 - Inbetriebnahme... -
Page 132: Entsorgung Des Geräts
Bezug. TECHNISCHE DATEN Alle technischen Daten beziehen sich auf eine Umgebungstemperatur von 20 °C (± 5 °C). • Nice S.p.a. behält sich das Recht auf jederzeitige Änderungen des Geräts vor, insofern diese die vorgesehene Funktionalität und den Einsatzzweck nicht ändern. - Page 133 Produktdatenblatt SWN 70 - 24 - KU Tabelle 1 Tabelle 2 Beschreibung Ø A Beschreibung SWN 70 - 24 - KU 25,4 6,35 28,4 Antrieb 31,75 6,35 34,7 Elektromotor Endschaltergehäuse Manuelle Notbedienung Kondensatoren Asse Achse Hohlwelle albero cavo Ø A Deutsch –...
- Page 134 Produktdatenblatt SWN 70 - 24 - KE Tabelle 1 Tabelle 2 Beschreibung Ø A Beschreibung SWN 70 - 24 - KE 25,4 6,35 28,4 Antrieb 31,75 6,35 34,7 Elektromotor Endschaltergehäuse Manuelle Notbedienung Kondensatoren 122,5 dim max 55,0 18 – Deutsch...
- Page 135 Produktdatenblatt SWN 70 - 24 - E Tabelle 1 Tabelle 2 Beschreibung Ø A Beschreibung SWN 70 - 24 - E 25,4 6,35 28,4 Antrieb Elektromotor Endschaltergehäuse Entriegelungsvorrichtung Kondensatoren 122,5 Deutsch – 19...
- Page 136 Produktdatenblatt SDN 70 - 24 - KE Tabelle 1 Tabelle 2 Beschreibung Ø A Beschreibung SWN 70 - 24 - KE 25,4 6,35 28,4 Antrieb Elektromotor Endschaltergehäuse Manuelle Notbedienung 122,5 dim max Asse albero cavo Achse Hohlwelle Ø A 20 – Deutsch...
- Page 137 Produktdatenblatt SDN 100 - 24 - KU, SDN 140 - 20 - KU Tabelle 1 Tabelle 2 Beschreibung Ø A Beschreibung SDN 100 - 24 - KU 25,4 6,35 28,4 Antrieb 31,75 6,35 34,7 Elektromotor SDN 140 - 20 - KU 25,4 6,35 28,4...
- Page 138 Produktdatenblatt SDN 100 - 24 - KE / KEL, SDN 140 - 20 - KE / KEL Tabelle 1 Tabelle 2 Beschreibung Ø A Beschreibung SDN 100 - 24 - KE / KEL 25,4 6,35 28,4 Antrieb 31,75 6,35 34,7 Elektromotor SDN 140 - 20 - KE / KEL 25,4...
- Page 139 Produktdatenblatt SDN 100 - 24 - E, SDN 140 - 20 - E Tabelle 1 Tabelle 2 Beschreibung Ø A Beschreibung SDN 100 - 24 - E 25,4 6,35 28,4 Antrieb Elektromotor SDN 140 - 20 - E 25,4 6,35 28,4 Endschaltergehäuse 31,75...
- Page 140 Produktdatenblatt SDN 140 - 20 - KE 2 Tabelle 1 Tabelle 2 Beschreibung Ø A Beschreibung SDN 140 - 20 - KE 2 25,4 6,35 28,4 Antrieb 31,75 6,35 34,7 Elektromotor Endschaltergehäuse Manuelle Notbedienung 24 – Deutsch...
- Page 141 Produktdatenblatt SDNI 140 - 20 - KU Tabelle 1 Tabelle 2 Beschreibung Ø A Beschreibung SDNI 140 - 20 - KU 31,75 6,35 34,7 Antrieb Elektromotor Endschaltergehäuse Manuelle Notbedienung Inverter 55 55 Deutsch – 25...
-
Page 143: Bedienungsanleitung (Dem Endbenutzer Zu Übergeben)
Bedienungsanleitung (dem Endbenutzer zu übergeben) • Vor der Inbetriebnahme des Torantriebs erläutert der Elek- • troinstallateur Ihnen die Restrisiken. Nehmen Sie sich eini- heitsvorrichtungen: Wenn die vorhandenen Sicher- ge Minuten Zeit, um die Betriebsanleitung, und darin vor heitsvorrichtungen nicht korrekt funktionieren, kann die allem die allgemeinen Hinweise (Bedienungsanleitung des Automatisierung dennoch gesteuert werden. - Page 145 • • • • • • • • • • • • • • • • • • • • • • • • • • • • Polski – 1...
- Page 146 2 – Polski...
- Page 147 Polski – 3...
- Page 148 4 – Polski...
- Page 149 Polski – 5...
- Page 150 6 – Polski...
- Page 151 Polski – 7...
- Page 152 8 – Polski...
- Page 153 Polski – 9...
- Page 154 – Polski...
- Page 155 Przywracanie manewru automatycznego Polski – 11...
- Page 156 regulacyjne ogranicznika 12 – Polski...
- Page 157 Polski – 13...
- Page 158 14 – Polski...
- Page 159 LOCK Polski – 15...
- Page 160 Umieszczony obok symbol zabrania wyrzucania niniej- Moment [Nm] Statyczny moment zatrzymania [Nm] Max podnoszona masa [N] Moc silnika [kW] Cykl roboczy Masa [kg] 16 – Polski...
- Page 161 Silnik elektryczny Asse albero cavo Ø A Polski – 17...
- Page 162 Silnik elektryczny 122,5 dim max 55,0 18 – Polski...
- Page 163 Silnik elektryczny 122,5 Polski – 19...
- Page 164 Silnik elektryczny 122,5 dim max Asse albero cavo Ø A – Polski...
- Page 165 Silnik elektryczny 122,5 Dim Max) Ø A Polski – 21...
- Page 166 Silnik elektryczny 122,5 (dim max) Ø A 22 – Polski...
- Page 167 Silnik elektryczny 122,5 Ø A Polski – 23...
- Page 168 Silnik elektryczny 24 – Polski...
- Page 169 Silnik elektryczny 55 55 Polski – 25...
- Page 171 • • • • • - Mechanizm nie wymaga konserwacji i jest smarowany • Podczas corocznej kon- • • • • • • • • • Polski – 27 Polski – 27...
- Page 173 ALGEMENE WAARSCHUWINGEN: VEILIGHEID - INSTALLATIE - GEBRUIK (originele instructies in het Italiaans) LET OP LET OP • is voor uw geleide onderdeel. Als het product niet geschikt is, mag u NIET overgaan tot de installatie • LET OP • Voordat u met de installatie van het product begint, dient u te controleren of al het te gebruiken materiaal in optimale staat is en geschikt voor gebruik •...
- Page 174 INHOUDSOPGAVE ALGEMENE WAARSCHUWINGEN: VEILIGHEID - INSTALLATIE - GEBRUIK GEBRUIKSBESTEMMING 5 - VERDERE DETAILS 2 - GEBRUIKSLIMIETEN 6 - AFDANKING VAN HET PRODUCT 3 - INSTALLATIE EN ELEKTRISCHE AANSLUITINGEN 3.1 - Installatie reductiemotor 7 - WAT TE DOEN ALS 3.2 - Elektrische aansluitingen 8 - TECHNISCHE KENMERKEN 3.3 - Handmatige noodbediening met slinger (KU) 3.4 - Handmatige noodbediening met lichte ketting (KE-KEL)
-
Page 175: Standaard Montage
STANDAARD MONTAGE Nederlands – 3... -
Page 176: Installatie En Elektrische Aansluitingen
Opmerking: als u de reductiemotor op een andere manier wilt positioneren, neem dan contact op met de Technische ondersteuningsdienst van Nice. als de reductiemotor geverfd moet worden, moeten de afdichtingsringen afgeschermd worden, omdat deze niet in aanraking mogen komen met verf. - Page 177 VERSIE MET HANDMATIGE ONTGRENDELING Nederlands – 5...
- Page 178 6 – Nederlands...
- Page 179 Breng de elektrische aansluiting van de voedingskabel uitsluitend tot stand op de besturingseenheid: met behulp van Nice D-PRO besturings- WAARSCHUWINGEN: - De handmatige noodbediening mag uitsluitend worden gebruikt met stilstaande motor. - De handmatige noodbeweging moet vanaf een veilige plaats worden uitgevoerd.
- Page 180 (KE - KEL) WAARSCHUWINGEN: - De handmatige noodbediening mag uitsluitend worden gebruikt met stilstaande motor. - De reductiemotoren met handmatige noodbediening van het type KE - KEL mogen enkel in de verticale positie - De handmatige noodbeweging moet vanaf een veilige plaats worden uitgevoerd. in werking zou treden.
- Page 181 WAARSCHUWINGEN: - De handmatige noodbediening mag uitsluitend worden gebruikt met stilstaande motor. - De handmatige noodbeweging moet vanaf een veilige plaats worden uitgevoerd. in werking zou treden. De werking van de automatisering in de elektrische modus kan niet worden geactiveerd. Haal de elektrische voeding van de automatisering af Neem de handgreep ‘HAND’...
- Page 182 Openen en/of sluiten van de poort door aan de ketting voor nood- ontgrendeling te trekken. Neem de handgreep ‘MOTOR’ beet en trek deze voorzichtig tot tegen de aanslag, om de stuurspanning te herstellen en de wer- king van de poort in de elektrische modus terug aan te schakelen. –...
- Page 183 De ketting van de handmatige noodbediening kan worden ge- opend ter hoogte van het verbindingspunt en kan dus verlengd - De schakels moeten zorgvuldig worden gesloten. zigt. Ontgrendelen van de handbediening Neem de handgreep ‘HAND’ beet en trek deze voorzichtig naar onder, laat vervolgens de poort handmatig bewegen.
- Page 184 Ga als volgt te werk om de eindaanslagen af te stellen: - Sluit de poort - Verdraai de stuurnok (A) van de eindaanslag SLUITING (3) tot aan - Open de poort tot op de gewenste stand stelsleutel WIT EXTRA EINDAANSLAG SLUITING GROEN EXTRA EINDAANSLAG OPENING ROOD VEILIGHEIDSEINDAANSLAG SLUITING WIT EINDAANSLAG SLUITING...
- Page 185 Nederlands – 13...
- Page 186 De elektronische eindaanslag ENAS002 is een encoder met absolute waarde. Het instellen van de posities gebeurt via de besturingseenheid. Aansluiting encoder Veiligheidsketen 14 – Nederlands...
-
Page 187: Verdere Details
om de maximale veiligheid van de installatie te garanderen. soneel, dat de benodigde testen moet uitvoeren om de veiligheids- omstandigheden te laten werken. maatregelen te controleren en dat tevens moet controleren of de wet- ten, normen en regels op dit gebied in acht worden genomen, in het Het technisch dossier van de automatisering moet samenge- steld en minimaal 10 jaar bewaard worden en moet bestaan testmethoden voor de controle van automatiseringen voor hekken en... -
Page 188: Wat Te Doen Als
VERWERKING VAN HET PRODUCT Zoals door het symbool hiernaast wordt aangegeven, Zoals ook voor de installatiehandelingen geldt, moeten de handelingen weg te gooien. Pas gescheiden afvalinzameling voor voor afdanking aan het einde van de levensduur van dit product door Dit product bestaat uit verschillende soorten materialen: sommige kunnen gerecycled worden, andere moeten als afval verwerkt worden. - Page 189 Ø A SWN 70 - 24 - KU 28,4 Reductor 34,7 Elektromotor Zitting eindaanslag Handmatige noodbediening Condensatoren Asse Holle as albero cavo Ø A Nederlands – 17...
- Page 190 Ø A SWN 70 - 24 - KE 28,4 Reductor 34,7 Elektromotor Zitting eindaanslag Handmatige noodbediening Condensatoren 122,5 dim max 55,0 18 – Nederlands...
- Page 191 Ø A SWN 70 - 24 - E 28,4 Reductor Elektromotor Zitting eindaanslag Ontgrendeling Condensatoren 122,5 Nederlands – 19...
- Page 192 Ø A SWN 70 - 24 - KE 28,4 Reductor Elektromotor Zitting eindaanslag Handmatige noodbediening 122,5 dim max Asse albero cavo Holle as Ø A – Nederlands...
- Page 193 Ø A SDN 100 - 24 - KU 28,4 Reductor 34,7 Elektromotor SDN 140 - 20 - KU 28,4 Zitting eindaanslag 34,7 Handmatige noodbediening 122,5 Dim Max) Ø A Nederlands – 21...
- Page 194 Ø A SDN 100 - 24 - KE / KEL 28,4 Reductor 34,7 Elektromotor SDN 140 - 20 - KE / KEL 28,4 Zitting eindaanslag 34,7 Handmatige noodbediening 122,5 (dim max) Ø A 22 – Nederlands...
- Page 195 Ø A SDN 100 - 24 - E 28,4 Reductor Elektromotor SDN 140 - 20 - E 28,4 Zitting eindaanslag 34,7 Ontgrendeling 122,5 Ø A Nederlands – 23...
- Page 196 Ø A SDN 140 - 20 - KE 2 28,4 Reductor 34,7 Elektromotor Zitting eindaanslag Handmatige noodbediening 24 – Nederlands...
- Page 197 Ø A SDNI 140 - 20 - KU 34,7 Reductor Elektromotor Zitting eindaanslag Handmatige noodbediening Inverter 55 55 Nederlands – 25...
- Page 199 • Voor het eerste gebruik van de automatisering is het van • als de veiligheidsinrichtingen niet cor- de resterende risico’s en enkele minuten te besteden aan rect werken, dan kan de poort toch bediend worden. het lezen van de instructiehandleiding: vooral de algeme- •...
- Page 201 • • • • • • • • • yükümlülük kabul etmez • • • • • • • • dikkatli olun • • • • • • • • • • • emin olun Türkçe – 1...
-
Page 202: Genel Uyarilar
GENEL UYARILAR: veya - Teknik 2 – Türkçe 2 – Türkçe... - Page 203 Türkçe – 3...
- Page 204 Not: 4 – Türkçe...
- Page 205 Türkçe – 5...
- Page 206 6 – Türkçe...
- Page 207 UYARILAR: Türkçe – 7...
- Page 208 UYARILAR: 8 – Türkçe...
- Page 209 UYARILAR: Türkçe – 9...
- Page 210 – Türkçe...
- Page 211 Türkçe – 11...
- Page 212 Ayarlama aleti 12 – Türkçe...
- Page 213 Türkçe – 13...
- Page 214 14 – Türkçe...
- Page 215 tertibatta ya da ayarlamada herhangi bir kusur ya da sürtün- LOCK Türkçe – 15...
- Page 216 Tork [Nm] Statik frenleme momenti [Nm] Koruma derecesi Sayfa 16 – Türkçe...
- Page 217 Ø A Asse Kablo mil ekseni albero cavo Ø A Türkçe – 17...
- Page 218 Ø A 122,5 dim max 55,0 18 - Türkçe...
- Page 219 Ø A 122,5 Türkçe – 19...
- Page 220 Ø A 122,5 dim max Asse albero cavo Kablo mil ekseni Ø A – Türkçe...
- Page 221 Ø A 122,5 Dim Max) Ø A Türkçe – 21...
- Page 222 Ø A 122,5 (dim max) Ø A 22 – Türkçe...
- Page 223 Ø A 122,5 Ø A Türkçe – 23...
- Page 224 Ø A 24 – Türkçe...
- Page 225 Ø A 55 55 Türkçe – 25...
- Page 226 Ø A 26 – Türkçe 26 – Türkçe...
- Page 227 Ø A 55 55 Türkçe – 27 Türkçe – 27...
- Page 229 • • • • • • otomasyon sistemleri yüksek seviyede gü- • • • • • • • • • Türkçe – 29 Türkçe – 29...
-
Page 231: Ec Declaration Of Conformity
Declaration in accordance with the following Directives: 2004/108/EC (EMC); 2006/42/EC (MD) Annex II, Part B Note Number: Revision: 0 Language: EN Manufacturer: Nice s.p.a. Address: Via Pezza Alta 13, Z.I. Rustignè, 31046 Oderzo (TV) Italy Person authorised to compile the technical documentation: Nice s.p.a. -
Page 232: Dichiarazione Ce Di Conformità
Dichiarazione in accordo alle Direttive: 2004/108/CE (EMC); 2006/42/CE (MD) allegato II, parte B Nota Numero: Revisione: 0 Lingua: IT Nome produttore: Nice s.p.a. Indirizzo: Via Pezza Alta 13, Z.I. Rustignè, 31046 Oderzo (TV) Italia Persona autorizzata a costituire la documentazione tecnica: Nice s.p.a. -
Page 233: Déclaration Ce De Conformité
Déclaration CE de conformité et déclaration d’incorporation de « quasi-machine » Remarque Nice s.p.a. Via Pezza Alta 13, Z.I. Rustignè, 31046 Oderzo (TV) Italie Personne autorisée à constituer Nice s.p.a. NDCMB001, NDCMB002, NDCMB003, NDCMB004, NDCMB006, NDCMH011, NDCMB012, NDCMB013, NDCMB014, NDCMB016, NDCMB031, NDCMB033, NDCMB034, NDCMH038,... -
Page 234: Declaración De Conformidad Ce
Declaración de conformidad con las Directivas: 2004/108/CE (CEM); 2006/42/CE (DM), anexo II, parte B Nota Número: Revisión: 0 Idioma: ES Nombre del fabricante: Nice s.p.a. Dirección: Via Pezza Alta 13, Z.I. Rustignè, 31046 Oderzo (TV) Italia Persona autorizada para elaborar la documentación técnica: Nice s.p.a. -
Page 235: Eg-Konformitätserklärung
Erklärung in Übereinstimmung der Richtlinien: 2004/108/EG (EMC); 2006/42/EG (MD) Anlage II, Teil B Hinweis Nummer: Revision: 0 Sprache: DE Hersteller: Nice s.p.a. Adresse: Via Pezza Alta 13, Z.I. Rustignè, 31046 Oderzo (TV) Italien Für die Zusammenstellung der technischen Dokumentation autorisierte Person: Nice s.p.a. - Page 236 Uwaga Numer: Wydanie: 0 Nazwa producenta: Nice s.p.a. Adres: dokumentacji technicznej: Nice s.p.a. Typ produktu: Elektromechaniczny motoreduktor per porte sezionali industrial Model / Typ: Motoriduttore elettromeccanico per porte sezionali industriali Modello / Tipo: NDCMB001, NDCMB002, NDCMB003, NDCMB004, NDCMB006, NDCMH011, NDCMB012,...
-
Page 237: Eg-Verklaring Van Overeenstemming
EG-verklaring van overeenstemming en inbouwverklaring betreffende niet voltooide machines N.B. Nummer: Revisie: 0 Taal: Naam fabrikant: Nice S.p.A. Adres: Via Pezza Alta 13, Z.I. Rustignè, 31046 Oderzo (TV) Italië Gemachtigde voor de samenstelling van de technische documentatie: Nice S.p.A. Producttype:... - Page 238 CE uyumluluk bildirimi Numara: Revizyon: 0 Dil: TR Üretici: Nice s.p.a. Adres: Teknik belgeyi derlemeye Nice s.p.a. Ürün tipi: Model / Tip: NDCMB001, NDCMB002, NDCMB003, NDCMB004, NDCMB006, NDCMH011, NDCMB012, NDCMB013, NDCMB014, NDCMB016, NDCMB031, NDCMB033, NDCMB034, NDCMH038, NDCMB043, NDCMB044, NDCMB053, NDCMB054, NDCMB063, NDCMB064, NDCMB082 Aksesuarlar: Oderzo, 2.03.16...
- Page 240 Nice SpA Oderzo TV Italia www.niceforyou.com info@niceforyou.com...