Table des Matières

Publicité

Les langues disponibles

Les langues disponibles

Liens rapides

WTF712
Bedienungsanleitung
Mode d'emploi
Istruzioni per l'uso
Operating Instructions

Publicité

Table des Matières
loading

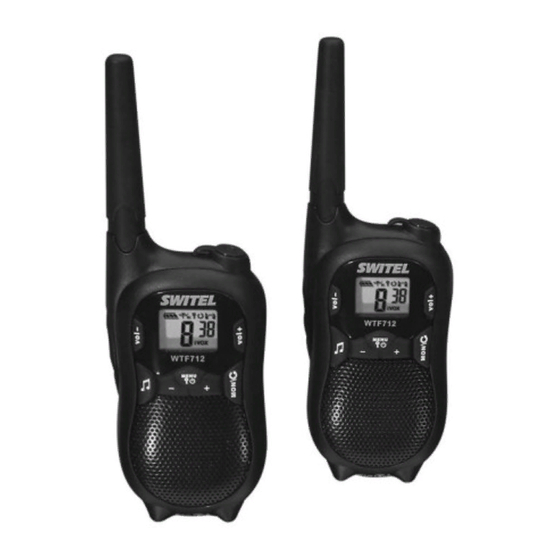
Sommaire des Matières pour switel WTF712

  • Page 1 WTF712 Bedienungsanleitung Mode d’emploi Istruzioni per l’uso Operating Instructions...
  • Page 2 Bedienungsanleitung ... Mode d’emploi ....Istruzioni per l’uso ... . Operating Instructions .
  • Page 3: Table Des Matières

    Inhaltsverzeichnis Sicherheitshinweise ... . . Funkgeräte in Betrieb nehmen ..Bedienelemente ....Wie bediene ich meine Funkgeräte? Falls es Probleme gibt .
  • Page 4: Sicherheitshinweise

    Sicherheitshinweise 1 Sicherheitshinweise Lesen Sie diese Bedienungsanleitung sorgfältig durch. Bestimmungsgemäße Verwendung Diese Sprechfunkgeräte sind geeignet für die Kommunikation mit anderen Sprechfunkgeräten gleichen Standards. Jede andere Ver- wendung gilt als nicht bestimmungsgemäß. Eigenmächtige Verän- derungen oder Umbauten sind nicht zulässig. Öffnen Sie die Geräte in keinem Fall selbst und führen Sie keine eigenen Reparaturversu- che durch.
  • Page 5: Entsorgung

    Sicherheitshinweise Entsorgung Sie sind gesetzlich zur sachgerechten Entsorgung von Ge- brauchsgütern verpflichtet. Das nebenstehende Symbol bedeutet, dass elektrische und elektronische Altgeräte und Akkus getrennt vom Hausmüll zu entsorgen sind. Elektrische oder elektronische Geräte entsorgen Sie bei einer Sammelstelle eines geeigneten Entsorgungsträgers. Akkus entsorgen Sie beim batterievertreibenden Handel sowie bei zuständigen Sammelstellen, die entsprechende Behälter bereitstellen.
  • Page 6: Funkgeräte In Betrieb Nehmen

    Funkgeräte in Betrieb nehmen 2 Funkgeräte in Betrieb nehmen Sicherheitshinweise Achtung: Lesen Sie vor der Inbetriebnahme unbedingt die Sicherheitshinweise in Kapitel 1. Verpackungsinhalt prüfen Zum Lieferumfang gehören: − zwei Funkgeräte mit Gürtelclip − zwei Akkupacks − zwei Headsets − ein Netzteil −...
  • Page 7: Gürtelclip Anbringen

    Funkgeräte in Betrieb nehmen Akkupacks aufladen Schließen Sie die Funkgeräte wie auf der Skizze abgebildet an. Verwenden Sie aus Sicherheitsgründen nur das mitgelieferte Netz- teil. Netzsteckdose Laden Sie die Funkgeräte vor der ersten Inbetriebnahme für minde- stens 14 Stunden. Wenn Sie die Funkgeräte korrekt angeschlossen haben, leuchten die roten LEDs.
  • Page 8: Bedienelemente

    Bedienelemente 3 Bedienelemente Die Tasten Ihres Telefons werden in dieser Bedienungsanleitung nachfolgend mit vereinheitlichten Symbolen dargestellt. Leichte Ab- weichungen der Tastensymbole Ihres Telefons gegenüber den hier verwendeten Tastensymbolen sind daher möglich. Mobilteil Anschlussbuchse Headset Display Lautstärke + Menü / Tastensperre / Ein / Aus Kanalsuche / Monitor Einstellung aufwärts...
  • Page 9: Wie Bediene Ich Meine Funkgeräte

    Wie bediene ich meine Funkgeräte? 4 Wie bediene ich meine Funkgeräte? Darstellungen und Schreibweisen Abgebildete Taste drücken a, P Abgebildete Taste lange drücken b, P Abgebildete Taste loslassen [ y ] Displayanzeige ð In das Mikrofon sprechen Ein− / Ausschalten der Funkgeräte Funkgerät einschalten Es erklingt ein Signal.
  • Page 10 Wie bediene ich meine Funkgeräte? Kanalwahl ; oder : Kanal auswählen Kanal Frequenz (MHz) Kanal Frequenz (MHz) 446.00625 446.05625 446.01875 446.06875 446.03125 446.08125 446.04375 446.09375 CTCSS−Code wählen Es werden alle Gespräche an Funkgeräten signalisiert, die sich im Empfangsbereich befinden. Voraussetzung dafür ist, dass alle Funkgeräte auf den gleichen Kanal eingestellt sind.
  • Page 11 Wie bediene ich meine Funkgeräte? Kanalsuche In einer Endlosschleife wird auf den acht Kanälen nach Signalen gesucht. Im Display erscheint das −Symbol. Wird ein aktiver Kanal gefunden, stoppt die Kanalsuche. Die Betriebs−LED blinkt einmal pro Sekunde. Drücken Sie die Taste P, um am Funkver- kehr teilzunehmen.
  • Page 12 Wie bediene ich meine Funkgeräte? Rufton senden Der Rufton macht andere Teilnehmer darauf aufmerksam, dass Sie ein Gespräch beginnen möchten. Voraussetzung dafür ist, dass die anderen Teilnehmer den gleichen Kanal und CTCSS−Code verwen- den. Rufton senden Rufton wählen / ausschalten Sie haben 10 Ruftöne zur Auswahl.
  • Page 13 Wie bediene ich meine Funkgeräte? Bestätigungston Der Bestätigungston erklingt, wenn Sie die Taste P loslassen. Dadurch wird Ihrem Gesprächspartner signalisiert, dass Ihre Über- tragung beendet ist. Bestätigungston ein−/ausschalten Schalten Sie das Funkgerät aus. Halten Sie die Taste : ge- drückt und schalten Sie gleichzeitig das Funkgerät wieder ein. Bei eingeschaltetem Bestätigungston erscheint das −Symbol im Display.
  • Page 14 Wie bediene ich meine Funkgeräte? VOX / iVOX (Freisprechen) Bei diesen Funktionen beginnt das Funkgerät automatisch zu sen- den, wenn Ihre Stimme oder ein Geräusch erkannt wird. Wenn Sie anfangen zu sprechen, tritt eine kurze Verzöge- rung auf bevor das Funkgerät sendet. VOX−Modus aktivieren Beim Freisprechen im VOX −Modus wird über ein Headset gespro-...
  • Page 15 Wie bediene ich meine Funkgeräte? iVOX−Modus aktivieren Beim Freisprechen im iVOX −Modus wird über das Funkgerät ge- sprochen. Die P Taste muss nicht gedrückt werden um zu sen- den. 1. Schalten Sie das Funkgerät aus. 2. Halten Sie die Taste P gedrückt und schalten Sie gleichzeitig das Funkgerät wieder ein.
  • Page 16: Falls Es Probleme Gibt

    Falls es Probleme gibt 5 Falls es Probleme gibt Haben Sie Probleme mit Ihren Funkgeräten, kontrollieren Sie zuerst die folgenden Hinweise. Bei Garantieansprüchen wenden Sie sich an Ihren Fachhändler. Die Garantiezeit beträgt 2 Jahre. Fragen und Antworten Fragen Antworten Keine Funktion −...
  • Page 17: Technische Eigenschaften

    Technische Eigenschaften 6 Technische Eigenschaften Technische Daten Merkmal Wert Ausgangsleistung 0.5 W Reichweite ca. 8 km − bei freier Sichtlinie Akkupack NiMh 3.6V, 600mAh Konformitätserklärung Dieses Gerät erfüllt die Anforderungen der EU−Richtlinie: 1999/5/EG Richtlinie über Funkanlagen und Telekommu- nikationsendeinrichtungen und die gegenseitige Aner- kennung ihrer Konformität.
  • Page 18: Pflegehinweise / Garantie

    Sollte Ihr Gerät dennoch einen Defekt innerhalb der Garantiezeit aufweisen, wenden Sie sich bitte unter Vorlage Ihrer Kaufquittung ausschließlich an das Geschäft, in dem Sie Ihr SWITEL − Gerät ge- kauft haben. Alle Gewährleistungsansprüche nach diesen Bestim- mungen sind ausschließlich gegenüber Ihrem Fachhändler geltend zu machen.
  • Page 19: Stichwortverzeichnis

    Stichwortverzeichnis 8 Stichwortverzeichnis Aufladen, 7 Laden, 7 Ausschalten, 9 Lautstärkeregelung, 9 Automatische Abschaltung, 15 Monitor, 13 Bedienelemente, 8 Bedienung, 9 Pflegehinweise, 18 Bestätigungston, 13 Rufton, 12 CTCSS−Code, 10 Schreibweisen, 9 Display, 8 Senden, 9 Sicherheitshinweise, 4 Einlegen, 6 Steckerbelegung, 14 Einschalten, 9 Stoppuhr, 15 Empfangen, 9...
  • Page 20 Table des matières Consignes de sécurité ... . Mise en service des émetteurs−récepteurs ... Eléments de manipulation ..Comment vous servir de vos émetteurs−récepteurs ? .
  • Page 21: Consignes De Sécurité

    Consignes de sécurité 1 Consignes de sécurité Lisez très attentivement ce mode d’emploi. Utilisation conforme aux prescriptions Ces émetteurs−récepteurs conviennent pour la communication avec d’autres émetteurs−récepteurs de même standard. Toute autre utili- sation est considérée comme non conforme à l’usage. Des modifi- cations ou changements effectués d’un propre gré...
  • Page 22: Elimination

    Consignes de sécurité Elimination La loi vous oblige à éliminer de manière appropriée les biens de consommation. Le symbole placé ci−contre signi- fie que les anciens appareils électriques et électroniques ainsi que les piles rechargeables ne doivent pas être élimi- nés avec les ordures ménagères normales.
  • Page 23: Mise En Service Des Émetteurs−Récepteurs

    Mise en service des émetteurs−récepteurs 2 Mise en service des émetteurs−récepteurs Remarques concernant la sécurité Attention : Avant de mettre votre appareil en service, li- sez impérativement les consignes de sécurité men- tionnées au chapitre 1. Vérifier le contenu de l’emballage Les éléments suivants font partie de la livraison : −...
  • Page 24 Mise en service des émetteurs−récepteurs Charger les packs de piles Raccordez les émetteurs−récepteurs tel que représenté sur le cro- quis. Pour des raisons de sécurité, n’utilisez que le bloc d’alimenta- tion fourni avec l’appareil. Prise réseau Avant la première mise en service, chargez les émetteurs−récep- teurs pendant un minimum de 14 heures.
  • Page 25: Eléments De Manipulation

    Eléments de manipulation 3 Eléments de manipulation Dans ce mode d’emploi, les touches de votre téléphone seront re- présentées par la suite par des icônes standardisées. Des différen- ces entre les icônes de votre téléphone et celles utilisées ici sont ainsi possibles.
  • Page 26: Comment Vous Servir De Vos

    Comment vous servir de vos émetteurs−récepteurs ? 4 Comment vous servir de vos émetteurs−récepteurs ? Représentations et notations Appuyer sur la touche représentée a, P Appuyer longuement sur la touché représentée b, P Relâcher la touche représentée [ y ] Affichage ð...
  • Page 27: Sélectionner Le Code Ctcss

    Comment vous servir de vos émetteurs−récepteurs ? Réception b, P Réception Vous ne pouvez pas recevoir de signaux radio si vous maintenez appuyée la touche P. Choix du canal ; ou : Sélection un canal Canal Fréquence (MHz) Canal Fréquence (MHz) 446.00625 446.05625 446.01875...
  • Page 28: Comment Vous Servir De Vos Émetteurs−Récepteurs

    Comment vous servir de vos émetteurs−récepteurs ? Recherche de canal Dans une boucle infinie, l’appareil cherche des signaux sur les huit canaux. Le symbole apparaît à l’écran. Si un canal actif est trouvé, la recherche de canal s’arrête. La diode électrolumines- cente de fonctionnement clignote une fois par seconde.
  • Page 29: Émettre Une Mélodie

    Comment vous servir de vos émetteurs−récepteurs ? Émettre une mélodie La sonnerie fait remarquer à d’autres correspondants que vous désirez entamer une conversation. A condition que les autres cor- respondants utilisent le même canal et le même code CTCSS. Emission d’une sonnerie Sélectionner /Débrancher la sonnerie Vous avez 10 sonneries à...
  • Page 30: Signal De Confirmation

    Comment vous servir de vos émetteurs−récepteurs ? Signal de confirmation Le signal de confirmation retentit si vous relâchez la touche P. Ceci signalise à votre correspondant que votre transmission est ter- minée. Brancher / Débrancher le signal de confirmation Débranchez l’émetteur−récepteur. Maintenez la touche : ap- puyée et rebranchez simultanément l’émetteur−récepteur.
  • Page 31 Comment vous servir de vos émetteurs−récepteurs ? VOX / iVOX (mode mains−libres) Avec ces fonctions, l’émetteur−récepteur commence automatique- ment à émettre s’il entend votre voix ou un bruit. Quand vous commencez à parler, un léger retardement a lieu avant que l’émetteur−récepteur émette. Activer le mode VOX (mains libres) En parlant dans le mode VOX mains−libres, vous parlez via un kit...
  • Page 32 Comment vous servir de vos émetteurs−récepteurs ? Activer le mode iVOX En parlant en mode mains−libres dans le mode iVOX , vous parlez via l’émetteur−récepteur. Vous n’avez pas besoin d’appuyer sur la touche P pour émettre. 1. Débranchez l’émetteur−récepteur. 2. Maintenez la touche P appuyée et rebranchez simultanément l’émetteur−récepteur.
  • Page 33: En Cas De Problèmes

    En cas de problèmes 5 En cas de problèmes Si vous avez des problèmes avec vos émetteurs−récepteurs, contrôlez d’abord les remarques suivantes. Si vous avez des droits de garantie, adressez−vous à votre revendeur. La durée de la ga- rantie est de 2 ans. Questions et réponses Questions Réponses...
  • Page 34: Caractéristiques Techniques

    Caractéristiques techniques 6 Caractéristiques techniques Données techniques Caractéristique Valeur Puissance de sor- 0.5 W Portée env. 8 km − si ligne visuelle libre Pack de piles re- NiMh 3.6V, 600mAh chargeables Déclaration de conformité Cet appareil répond aux exigences des directives de l’union européenne (UE) : 1999/5/CE Directive sur les installations de radio et de télécommunication et la reconnaissance réciproque de...
  • Page 35: Remarques D'entretien / Garantie

    SWITEL. Vous ne pouvez faire valoir vos droits à la garantie selon ces dispositions qu’auprès de votre revendeur exclu- sivement.
  • Page 36: Index

    Index 8 Index Brancher, 26 Plots de connexion, 31 Bruits ambiants, 32 Poser le clip de ceinture, 24 Charger, 24 Questions, 33 Choix du canal, 27 Chronomètre, 30 Réception, 27 Consignes de sécurité, 21 Recherche de canal, 28 Contenu de l’emballage, 23 Réglage du volume sonore, 26 CTCSS−Code, 27 Remarques d’entretien, 35...
  • Page 37 Contenuto Indicazioni di sicurezza ... Mettere in funzione i radiotrasmettitori Elementi di comando ... . . Come funzionano i miei radiotrasmettitori? .
  • Page 38: Indicazioni Di Sicurezza

    Indicazioni di sicurezza 1 Indicazioni di sicurezza Leggere attentamente le presenti istruzioni per l’uso. Impiego conforme agli usi previsti Questi ricetrasmettitori si prestano alla comunicazione con altri ap- parecchi ricetrasmittenti con lo stesso standard. Qualsiasi altro im- piego è considerato come non conforme agli usi previsti. Non sono consentite modifiche o trasformazioni non autorizzate.
  • Page 39: Smaltimento

    Indicazioni di sicurezza Smaltimento Sussiste l’obbligo legislativo al corretto smaltimento di beni di consumo. Il simbolo raffigurato qui a lato indica che ap- parecchi elettrici ed elettronici usati e batterie esauste non sono da smaltire assieme ai normali rifiuti domestici. Procedere allo smaltimento di apparecchi elettrici o elet- tronici presso un centro di raccolta incaricato con lo smal- timento conforme.
  • Page 40: Mettere In Funzione I Radiotrasmettitori

    Mettere in funzione i radiotrasmettitori 2 Mettere in funzione i radiotrasmettitori Indicazioni di sicurezza Attenzione: Prima della messa in funzione, leggere at- tentamente le indicazioni di sicurezza riportate al capitolo Verificare il contenuto della confezione La confezione contiene: − due radiotrasmettitori con −...
  • Page 41 Mettere in funzione i radiotrasmettitori Caricare gli accumulatori ricaricabili Procedere al collegamento dei radiotrasmettitori seguendo quanto raffigurato sul disegno. Si consiglia di utilizzare per motivi di sicu- rezza soltanto l’alimentatore fornito in dotazione. Presa elettrica Caricare i radiotrasmettitori prima della messa in funzione per mi- nimo 14 ore.
  • Page 42: Elementi Di Comando

    Elementi di comando 3 Elementi di comando I tasti del telefono riportati nel presente manuale d’istruzioni per l’uso sono raffigurati sotto forma di simboli uniformi. Sono pertanto possibili lievi scostamenti dei simboli dei tasti sul telefono rispetto ai simboli qui raffigurati. Unità...
  • Page 43: Come Funzionano I Miei Radiotrasmettitori

    Come funzionano i miei radiotrasmettitori? 4 Come funzionano i miei radiotrasmettitori? Rappresentazioni e modi di scrittura Premere il tasto raffigurato a, P Premere a lungo il tasto raffigurato b, P Rilasciare il tasto raffigurato [ y ] Visualizzazione di display ð...
  • Page 44: Selezione Del Canale

    Come funzionano i miei radiotrasmettitori? Selezione del canale ; o : Scegliere il canale Frequenza (MHz) Frequenza (MHz) nale nale 446.00625 446.05625 446.01875 446.06875 446.03125 446.08125 446.04375 446.09375 Scegliere il codice CTCSS I radiotrasmettitori segnalano tutte le chiamate compiute all’interno del campo di ricezione.
  • Page 45 Come funzionano i miei radiotrasmettitori? Ricerca del canale In un ciclo continuo l’apparecchio scorre gli otto canali alla pre- senza di segnali. Sul display è visualizzato il simbolo . Non ap- pena è stato individuato un canale attivo, la ricerca del canale è in- terrotta.
  • Page 46: Blocco Tastiera

    Come funzionano i miei radiotrasmettitori? Trasmettere il segnale di chiamata Il segnale di chiamata richiama l’attenzione degli altri interlocutori indicando che il chiamante desidera avviare una conversazione. A tale fine è necessario che gli altri interlocutori utilizzino lo stesso ca- nale e lo stesso codice CTCSS.
  • Page 47: Disattivazione Automatica

    Come funzionano i miei radiotrasmettitori? Tono di conferma Il segnale acustico di conferma risuona rilasciando il tasto P. In tal modo al proprio partner di chiamata si segnala la conclusione della trasmissione. Attivare / Disattivare il segnale acustico di conferma Disattivare il radiotrasmettitore.
  • Page 48 Come funzionano i miei radiotrasmettitori? VOX / iVOX (funzione vivavoce) Queste funzioni consentono al radiotrasmettitore di trasmettere au- tomaticamente, riconoscendo la propria voce come rumore. Appena si inizia la conversazione subentra un breve ri- tardo prima che il radiotrasmettitore proceda alla trasmis- sione.
  • Page 49 Come funzionano i miei radiotrasmettitori? Attivare la modalità iVOX Servendosi della funzione vivavoce in modalità iVOX , la conversa- zione è trasmessa attraverso il radiotrasmettitore. Il tasto P non deve essere premuto a scopo di trasmissione. 1. Disattivare il radiotrasmettitore. 2.
  • Page 50: In Presenza Di Problemi

    In presenza di problemi 5 In presenza di problemi In presenza di problemi con i radiotrasmettitori, seguire le indica- zioni riportate qui di seguito. In caso di reclami entro il periodo di garanzia, rivolgersi al rivenditore autorizzato. Il periodo di garanzia ricopre 2 anni.
  • Page 51: Specifiche Tecniche

    Specifiche tecniche 6 Specifiche tecniche Specifiche tecniche Caratteristica Valore Potenza di uscita 0.5 W Portata ca. 8 km − con linea di mira libera Accumulatore rica- NiMh 3.6V, 600mAh ricabile Dichiarazione di conformità Questo apparecchio risponde a quanto disposto dalla Di- rettiva UE: 1999/5/CE Direttiva concernente le apparecchiature ra- dio, le apparecchiature terminali di telecomunicazioni e il...
  • Page 52: Consigli Per La Cura / Garanzia

    SWITEL assieme al relativo scontrino di acquisto. In base a quanto riportato nelle presenti disposizioni, tutti i diritti di garanzia dovranno essere rivendicati nei confronti del rivenditore autorizzato.
  • Page 53: Indice Alfabetico

    Indice alfabetico 8 Indice alfabetico Attivare, 43 Regolazione del volume, 43 Auricolare, 47 Ricerca del canale, 45 Ricevere, 43 Rumori dell’ambiente circostante, 49 Blocco tastiera, 46 Schermo, 46 Caricare, 41 Segnale di chiamata, 46 Codice CTCSS, 44 Selezione del canale, 44 Consigli per la cura, 52 Specifiche tecniche, 51 Contenuto della confezione, 40...
  • Page 54 Contents Safety Information ....Preparing the Walkie−Talkies for Use Operating Elements ....Operating the Walkie−Talkies .
  • Page 55: Safety Information

    Safety Information 1 Safety Information Please read this operating instruction manual thoroughly. Intended use These walkie−talkies have been conceived for communication with other walkie−talkies complying to the same standards. Any other use is considered unintended use. Unauthorised modification or reconstruction is not permitted. Under no circumstances open the devices or complete any repair work yourself.
  • Page 56 Safety Information Disposal You are obliged to dispose of consumable goods accord- ing to legal requirements. The adjacent symbol indicates that electrical and electronic apparatus and batteries no longer required must be disposed of separate from domes- tic waste. Electrical and electronic devices must be disposed of at suitable collection points provided by the public waste authorities.
  • Page 57: Preparing The Walkie−Talkies For Use

    Preparing the Walkie−Talkies for Use 2 Preparing the Walkie−Talkies for Use Safety information Caution: It is essential to read the Safety Information in Chapter 1 before starting up. Checking the package contents The package contains: − two walkie−talkies with belt clip −...
  • Page 58: Charging The Battery Pack

    Preparing the Walkie−Talkies for Use Charging the battery pack Connect the walkie−talkies as illustrated in the diagram. For safety reasons, only use the power adapter plug supplied. Mains power outlet Before using the walkie−talkies for the first time, charge them for at least 14 hours.
  • Page 59: Operating Elements

    Operating Elements 3 Operating Elements The buttons in this operating manual are subsequently depicted with a uniform contour. Therefore, slight deviations in the appear- ance of the symbols on the telephone buttons compared to those depicted here are possible. Handset Connection socket, headset Display Volume +...
  • Page 60: Operating The Walkie−Talkies

    Operating the Walkie−Talkies 4 Operating the Walkie−Talkies Display and notation of operating sequences Press the button displayed a, P Press and hold the button displayed b, P Release the button displayed [ y ] Display indicator ð Speak into the microphone Switching the walkie−talkie on/off Switch the walkie−talkie on An acoustic signal is issued.
  • Page 61: Selecting A Channel

    Operating the Walkie−Talkies Selecting a channel ; or : Select a channel Channel Frequency (MHz) Channel Frequency (MHz) 446.00625 446.05625 446.01875 446.06875 446.03125 446.08125 446.04375 446.09375 Selecting the CTCSS code All the calls on walkie−talkies which occur within the range of recep- tion are signalled.
  • Page 62 Operating the Walkie−Talkies Searching for a channel Signals are searched for in the eight channels in a continuous cy- cle. The icon appears in the display. If an active channel is de- tected, the channel search stops. The Ready LED flashes once per second.
  • Page 63 Operating the Walkie−Talkies Transmit ringing tone The ringing tones indicate to other subscribers that you want to talk to them. A condition for this is that the other subscribers are using the same channel and CTCSS code. Send ringing tones Selecting/Deactivating the ringing tone There are 10 ringing tones available for selection.
  • Page 64: Automatic Deactivation

    Operating the Walkie−Talkies Confirmation signal The confirmation signal is issued on releasing the P button. This signals to the caller that you have ended transmission. Activating/Deactivating the confirmation signal Switch the walkie−talkie off. Press and hold the : button and, while doing so, switch the walkie−talkie on again.
  • Page 65 Operating the Walkie−Talkies VOX / iVOX (handsfree) When this function is active, the walkie−talkie automatically starts to transmit when the unit detects your voice or a sound. When you start to speak, there is a slight delay before the walkie−talkie starts to transmit. Activate VOX mode When using VOX mode, conversation is carried out via a headset.
  • Page 66 Operating the Walkie−Talkies Activating iVOX mode When using iVOX mode, conversation is carried out via the walkie− talkie. The P button on the walkie−talkie need not be pressed to transmit. 1. Switch the walkie−talkie off. 2. Press and hold the P button and, while doing so, switch the walkie−talkie on again.
  • Page 67: In Case Of Problems

    In Case of Problems 5 In Case of Problems Should problems arise with the walkie−talkies, please refer to the following information first. In the case of claims under the terms of guarantee, contact your sales outlet. There is a 2 year period of guarantee.
  • Page 68: Technical Properties

    Technical Properties 6 Technical Properties Technical data Feature Value Output power 0.5 W Range Approx. 8 km in open space Battery pack NiMh 3.6V, 600mAh Declaration of Conformity This device fulfils the requirements stipulated in the EU directive: 1999/5/EU directive on radio equipment and telecom- munications terminal equipment and the mutual recogni- tion of their conformity.
  • Page 69: Maintenance / Guarantee

    Clean the housing surfaces with a soft, fluff−free cloth. Never use cleaning agents or solvents. Guarantee SWITEL equipment is produced and tested according to the latest production methods. Carefully selected materials and highly develo- ped technology ensure perfect functioning and a long service life.
  • Page 70: Index

    Index 8 Index Ambient noise, 66 Package contents, 57 Automatic deactivation, 64 Pin assignment, 65 Belt clip, 58 Questions, 67 Charge, 58 Receiving, 60 Charging, 58 Ringing tone, 63 Confirmation signal, 64 CTCSS code, 61 Safety information, 55 Searching for a channel, 62 Declaration of Conformity, 68 Selecting a channel, 61 Display, 59...
  • Page 71 Index...
  • Page 72: Declaration Of Conformity

    Copies of this document will be held on file for a period of 10 years after the last production. Supplier: TELGO AG, Route d’Englisberg 17 0979 CH−1763 Granges−Paccot Product: WTF712 This product transmits in a non−EU−harmonised frequency band (446MHz) and may thus only be used within those countries that permit usage of such equipment.

Table des Matières