Sharp K-60D22IM1 Guide D'utilisation

Sharp K-60D22IM1 Guide D'utilisation

Masquer les pouces Voir aussi pour K-60D22IM1:
Table des Matières

Publicité

Les langues disponibles

Les langues disponibles

Liens rapides

K-60D22IM1-FR
Cooking
User Manual
EN
Guide d'utilisation
FR
ES
Manual de uso
NL
Handleiding
Home Appliances

Publicité

Table des Matières
loading

Sommaire des Matières pour Sharp K-60D22IM1

  • Page 1 Home Appliances K-60D22IM1-FR Cooking User Manual Guide d'utilisation Manual de uso Handleiding...
  • Page 2 Merci d’avoir choisi ce produit. Cette notice d’utilisation contient des informations et des consignes de sécurité importantes concernant l’utilisation et l’entretien de votre appareil. Lisez attentivement cette notice d’utilisation avant d’utiliser votre appareil et conservez-la pour consultation ultérieure. Icône Type Signification AVERTISSEMENT Risque de blessures graves ou danger de mort...
  • Page 3: Table Des Matières

    TABLE DES MATIÈRES 1.CONSIGNES DE SÉCURITÉ ....................4 1.1. Avertissements de sécurité généraux ................4 1.2. Avertissements relatifs à l’installation ................6 1.3. Au cours de l’utilisation ....................7 1.4. Nettoyage et entretien ....................9 2.INSTALLATION ET PRÉPARATION À L’UTILISATION ...........10 2.1. Instructions destinées à l’installateur ................10 2.2.
  • Page 4: Consignes De Sécurité

    1. CONSIGNES DE SÉCURITÉ • Lisez attentivement cette notice d’utilisation dans son intégralité avant d’utiliser votre appareil et conservez-la dans un endroit accessible pour consultation ultérieure. • Ce manuel a été préparé pour plusieurs modèles, votre appareil peut donc ne pas disposer de certaines fonctions décrites dans ce manuel.
  • Page 5 avec de l'eau, mais arrêter l'appareil puis couvrir les flammes par exemple avec un couvercle ou une couverture anti-feu. AVERTISSEMENT: Risque d'incendie: ne pas entreposer d'objets sur les surfaces de cuisson. • L’appareil n’est pas destiné à être mis en fonctionnement au moyen d’une minuterie externe ou d’un système de commande à...
  • Page 6: Avertissements Relatifs À L'installation

    dispositifs de protections non adaptés à l'appareil de cuisson peuvent provoquer des accidents. • Avant l'installation s'assurer que les conditions de distribution locale (tension et fréquence électriques) et le réglage de l'appareil sont compatibles. Les conditions de réglage de cet appareil sont inscrites sur la plaque signalétique de l’appareil.
  • Page 7: Au Cours De L'utilisation

    Le fabricant ne peut être tenu responsable de tout dommage causé en cas d’installation incorrecte par un techncien non qualifié. • L'installation électrique doit être équipée d'un dispositif d'isolement avec coupure de tous les pôles, ayant une distance d'ouverture des contacts d'aumoins 3 mm.
  • Page 8 • Rester prudent lors de l’ouverture de la porte du four pendant ou après la cuisson. La vapeur s’échappant du four peut provoquer des brûlures. • Ne pas placer de matériaux combustibles ou inflammables dans l’appareil ou près de l’appareil lorsqu’il est en fonctionnement.
  • Page 9: Nettoyage Et Entretien

    • La lèchefrite s’incline lorsqu’on la sort du four. Attention à ne pas renverser ni à ne pas faire tomber de nourriture en la sortant du four. • Ne rien placer sur la porte du four lorsqu’elle est ouverte. Ceci pourrait déséquilibrer le four ou endommager la porte.
  • Page 10: Installation Et Préparation À L'utilisation

    2. INSTALLATION ET est endommagé, ne pas l’utiliser et contacter immédiatement un PRÉPARATION À L’UTILISATION professionnel agréé ou un technicien AVERTISSEMENT : Cet appareil doit qualifié. être installé par un professionnel • Vérifier qu’aucun élément ou matériau agréé ou par un technicien qualifié, combustible ou inflammable, par conformément aux instructions de cette exemple un rideau, de l’huile, un...
  • Page 11: Branchement Électrique Et Sécurité

    Installation murale Une fois les branchements électriques lui aussi être capable de supporter effectués, insérer le four dans son la puissance nominale de l’appareil emplacement en la poussant vers l’avant. (également mentionnée sur la plaque Ouvrir la porte du four et insérer 2 vis dans signalétique de l’appareil).
  • Page 12 • Le câble d’alimentation (H05VV-F) doit être assez long pour pouvoir être branché sur l’appareil, même si l’appareil se trouve devant le meuble. • Vérifier que tous les branchements sont bien serrés. • Fixer le câble d’alimentation sur le bornier, puis refermer le couvercle. •...
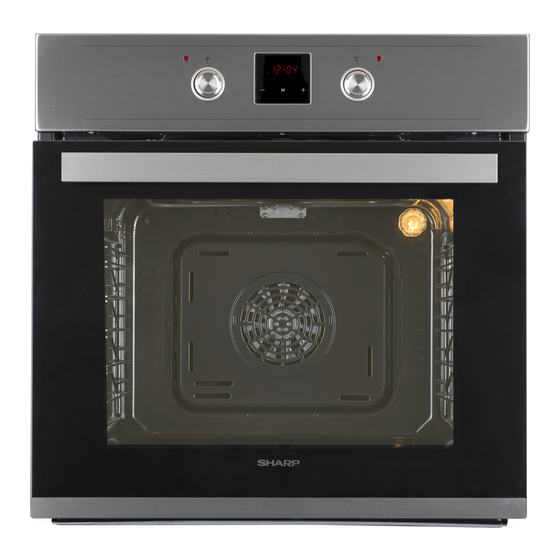
  • Page 13: Caractéristiques Du Produit

    3. CARACTÉRISTIQUES DU PRODUIT Important : Les caractéristiques du produit varient et l’apparence de votre appareil peut être différente de celle présentée sur les figures ci-dessous. Liste des composants 1. Bandeau de commande 2. Poignée de la porte du four 3.
  • Page 14: Utilisation De L'appareil

    4. UTILISATION DE L’APPAREIL Fonction Chaleur brassée: Le voyant du thermostat et les 4.1. commAndes du four voyants du four Manette de fonction s’allument, les Faire tourner le bouton sur le symbole résistances supérieure correspondant à la fonction souhaitée. Pour les détails des différentes fonctions, se et inférieure commencent à...
  • Page 15: Table De Cuisson

    4.2. tABle de cuisson Fonction Gril express : Le voyant du thermostat et les voyants du four Plats s’allument, et la résistance du gril ainsi Pâte feuilletée 2-3-4 170-190 35-45 que la résistance supérieure commencent à Gâteau 2-3-4 170-190 30-40 chauffer.
  • Page 16 surbrillance. Pour déverrouiller le minuteur, appuyez sur le bouton « MODE » pendant Description des fonctions 2 secondes. L'opération souhaitée peut être effectuée. Cuisson automatique Réglage du mode "Chronomètre" La durée de réglage est comprise entre « Cuisson manuelle 00:00 » et « 23 h 59 » minutes. Ce mode n'arrête pas le four.
  • Page 17 3. Sélectionnez 2. Appuyez l'heure de fin de sur le bouton « MODE »jusqu’à cuisson souhaitée à l'aide des touches « + ce que vous voyiez » et « - ». s’afficher à l’écran « dur ». L'icône « A » clignote.
  • Page 18: Accessoires - Grille Métallique Easy Fix

    4. Appuyez 4.3. Accessoires **** - Grille sur le bouton métallique Easy Fix « MODE »jusqu’à Nettoyez soigneusement les accessoires ce que vous voyiez avec de l’eau tiède, du détergent et un s’afficher à l’écran « chiffon doux et propre lors de la End ».
  • Page 19: Nettoyage Et Entretien

    et poussez-la au fond. Collecteur d'eau De la condensation peut apparaître sur la vitre intérieure dans certains cas, selon le type d'aliment. Il ne s'agit pas d'un dysfonctionnement de l'appareil. Ouvrez la porte du four jusqu'au niveau du gril et laissez-la dans cette position pendant 20 secondes.
  • Page 20 • En cas de déversement de liquide, • Ne laissez pas de vinaigre, café, nettoyez immédiatement pour éviter lait, sel, eau, jus de citron ou de d’endommager les pièces. tomate sur les pièces en acier inoxydable pendant de longs moments. •...
  • Page 21: Entretien

    1. Ouvrez la porte du four. Retrait des gradins métalliques Pour retirer les gradins : Dégagez les attaches inférieures en tirant sur les gradins. Un fois libérés soulevez les gradins pour les dégager des attaches supérieures. 2. Déverrouillez les loquets des 2 charnières (a)(à...
  • Page 22: Dépannage Et Transport

    6. DÉPANNAGE ET TRANSPORT 6.1. dépAnnAge Si le problème persiste sur votre appareil après avoir suivi ces étapes de dépannage de base, contacter un professionnel agréé ou un technicien qualifié. Problème Cause possible Solution Vérifier que l’alimentation électrique est branchée. Le four ne s’allume pas.
  • Page 23: Spécifications Techniques

    7. SPÉCIFICATIONS TECHNIQUES 7.1. fiche énergie Marque Modèle K-60D22IM1-FR Type de four ÉLECTRIQUE Masse de I’appareil 30,3 Indice d’efficacité énergétique - conventionnel 103,6 Indice d’efficacité énergétique - ventilation forcée 94,0 Classe énergétique Consommation énergétique (électricité) - conventionnelle kWh/cycle 0,87 Consommation énergétique (électricité) - ventilation forcée...
  • Page 24 Thank you for choosing this product. This User Manual contains important safety information and instructions on the operation and maintenance of your appliance. Please take the time to read this User Manual before using your appliance and keep this book for future reference. Icon Type Meaning...
  • Page 25 CONTENTS 1.SAFETY INSTRUCTIONS ....................4 1.1 General Safety Warnings ....................4 1.2 Installation Warnings ......................6 1.3 During Use ........................7 1.4 During Cleaning and Maintenance .................8 2.INSTALLATION AND PREPARATION FOR USE ..............9 2.1 Instructions for the Installer ....................9 2.2 Installation of the Oven ....................9 2.3 Electrical Connection and Safety..................10 3.PRODUCT FEATURES ....................12 4.USE OF PRODUCT ......................13...
  • Page 26: Safety Instructions

    1. SAFETY INSTRUCTIONS • Carefully read all instructions before using your appliance and keep them in a convenient place for reference when necessary. • This manual has been prepared for more than one model therefore your appliance may not have some of the features described within.
  • Page 27 the oven. • Handles may get hot after a short period during use. • Do not use harsh abrasive cleaners or scourers to clean the oven door glass and other surface. They can scratch the surfaces which may result in shattering of the door glass or damage to surfaces.
  • Page 28: Installation Warnings

    heating a room. • Do not use the oven door handles to lift or move the appliance. • All possible measures have been taken to ensure your safety. Since the glass may break, care should be taken while cleaning to avoid scratching. Avoid hitting or knocking the glass with accessories.
  • Page 29: During Use

    • Any materials (i.e. cabinets) around the appliance must be able to withstand a minimum temperature of 100°C. • The appliance must not be installed behind a decorative door, in order to avoid overheating. 1.3 DurinG uSe • When you first use your oven you may notice a slight smell.
  • Page 30: During Cleaning And Maintenance

    • Make sure the appliance control knobs are always in the “0” (stop) position when it is not in use. • The trays incline when pulled out. Take care not to spill or drop hot food while removing it from the ovens.
  • Page 31: Installation And Preparation For Use

    2. INSTALLATION AND do not use it and contact an authorised service person or qualified technician PREPARATION FOR USE immediately. WARNING : This appliance must be • Make sure that there are no flammable installed by an authorised service or combustible materials in the close person or qualified technician, according to vicinity, such as curtains, oil, cloth etc.
  • Page 32: Electrical Connection And Safety

    Installation in a wall unit After making the electrical connections, WARNING: THE APPLIANCE MUST insert the oven into the cabinet by pushing BE EARTHED. it forward. Open the oven door and insert • Before connecting the appliance to the 2 screws in the holes located on the oven power supply, the voltage rating of the frame.
  • Page 33 • The appliance is designed for a power supply of 220-240V If your supply is different, contact the authorised service person or a qualified electrician. • The power cable (H05VV-F) must be long enough to be connected to the appliance, even if the appliance stands on the front of its cabinet.
  • Page 34: Product Features

    3. PRODUCT FEATURES Important: Specifications for the product vary and the appearance of your appliance may differ from that shown in the figures below. List of Components 1. Control Panel 2. Oven Door Handle 3. Oven Door Control Panel 4. Timer 5.
  • Page 35: Use Of Product

    4. USE OF PRODUCT Fan Function: The oven’s thermostat and warning lights will 4.1 oven ControlS switch on, and the Oven function control knob upper and lower Turn the knob to the corresponding symbol heating elements and of the desired cooking function. For the fan will start operating.
  • Page 36: Cooking Table

    food in the centre of the grid. Always place Grilled 10-15 a tray beneath the food to catch any drips meatballs of oil or fat. It is recommended that you Chicken 50-60 preheat the oven for about 10 minutes. Chop 4-5- 15-25 Warning: When grilling, the oven door...
  • Page 37 3. The symbol “ ” will 1. Press the “MODE” remain illuminated, the for 2 sec to deactive time will be saved and keylock and the dot the warning will be set. in the middle of the screen will start to flash.
  • Page 38 Semi-automatic time adjustment 2. Press “MODE” until (finishing time) you see “dur” symbol on the screen. The This function automatically starts the oven symbol “A” will flash. so that cooking will finish at a set time. You can set an end time of up to 10 hours after the current time of day.
  • Page 39: Accessories

    Sound Adjustment ****Accessories may vary depending on the model purchased. To adjust the volume of the audible warning sound, while the current time of day is The Deep Tray displayed, press “+” and “-” keys and the The deep tray is best used for cooking dot in the middle of the screen will start stews.
  • Page 40: Cleaning And Maintenance

    of your appliance. • Should any liquids overflow, clean them immediately to avoid parts becoming damaged. Do not use steam cleaners for cleaning any part of the appliance. Cleaning the Inside of the Oven • The inside of enamelled ovens are best cleaned while the oven is warm.
  • Page 41 Cleaning Painted Surfaces (if available) • Spots of tomato, tomato paste, ketchup, lemon, oil derivatives, milk, sugary foods, sugary drinks and coffee should be cleaned with a cloth dipped in warm water immediately. If these stains are not cleaned and allowed to dry on the surfaces they are on, they should NOT be rubbed with hard objects (pointed objects, steel and plastic scouring wires,...
  • Page 42: Maintenance

    Removal of the Wire Shelf To remove the wire rack, pull the wire rack as shown in the figure. After releasing it from the clips (a), lift it up. 5.2 MaintenanCe WARNING: The maintenance of this appliance should be carried out by an authorised service person or qualified technician only.
  • Page 43: Troubleshooting&Transport

    6. TROUBLESHOOTING&TRANSPORT 6.1 troubleShootinG If you still have a problem with your appliance after checking these basic troubleshooting steps, please contact an authorised service person or qualified technician. Problem Possible Cause Solution Check whether there is power supplied. Oven does not switch Power is switched off.
  • Page 44: Technical Specifications

    7. TECHNICAL SPECIFICATIONS 7.1 enerGy fiChe Brand Model K-60D22IM1-FR Type of Oven ELECTRIC Mass 30,3 Energy Efficiency Index - conventional 103,6 Energy Efficiency Index - fan forced 94,0 Energy Class Energy consumption (electricity) - conventional kWh/cycle 0,87 Energy consumption (electricity) - fan forced...
  • Page 45 Gracias por elegir este producto. Este Manual de usuario contiene información de seguridad e instrucciones importantes relacionadas con el uso y mantenimiento del aparato. Tómese el tiempo que necesite para leer este Manual de usuario antes de usar el aparato y guárdelo por si tuviese que consultarlo más adelante.
  • Page 46 ÍNDICE 1.INSTRUCCIONES DE SEGURIDAD ................4 1.1. Advertencias generales de seguridad ................4 1.2. Advertencias para la instalación ..................6 1.3. Durante el uso .......................7 1.4. Durante la limpieza y el mantenimiento.................8 2.INSTALACIÓN Y PREPARACIÓN PARA SU USO ............10 2.1. Instrucciones para el instalador ...................10 2.2.
  • Page 47: Instrucciones De Seguridad

    1. INSTRUCCIONES DE SEGURIDAD • Lea detenidamente todas las instrucciones antes de usar el aparato y guarde este manual en un lugar de fácil acceso para poder consultarlo cuando sea necesario. • Este manual ha sido redactado para más de un modelo.
  • Page 48 • Durante el uso, el aparato se calentará. Se debe tener cuidado a fin de evitar tocar los elementos de calentamiento que hay dentro del horno. • Durante el uso, los tiradores se pueden calentar en un corto período de tiempo. •...
  • Page 49: Advertencias Para La Instalación

    compatibles. Las especificaciones de este aparato se indican en la etiqueta. PRECAUCIÓN: Este aparato solo ha sido diseñado para cocinar alimentos en el interior de una vivienda. No se debe usar para ningún otro fin o aplicación, como para uso no doméstico, en un entorno comercial o para calentar una habitación.
  • Page 50: Durante El Uso

    detecta algún tipo de defecto, no use el aparato y póngase en contacto inmediatamente con un agente de servicio cualificado. Los materiales empleados para el embalaje (nailon, grapas, espuma de estireno, etc.) pueden resultar dañinos para los niños y se deben recoger y retirar inmediatamente. •...
  • Page 51: Durante La Limpieza Y El Mantenimiento

    • En ningún caso se debe cubrir el horno con papel de aluminio, ya que existe la posibilidad de que se produzca un sobrecalentamiento. • No coloque platos o bandejas de horno directamente sobre la base del horno mientras se esté...
  • Page 52: Declaración De Conformidad De La Ce

    • Para preservar la eficacia y seguridad del aparato, le recomendamos que use siempre piezas de repuesto originales y que llame a un agente de servicio autorizado cuando sea necesario. Declaración de conformidad de la CE Declaramos que nuestros productos cumplen con las directivas, decisiones y normativas europeas pertinentes y con los requisitos enumerados en los estándares mencionados.
  • Page 53: Instalación Ypreparación Para Su Uso

    2. INSTALACIÓN Y tipo de daño en el aparato, no lo utilice. Póngase en contacto inmediatamente PREPARACIÓN PARA SU USO con una persona de servicio autorizada ADVERTENCIA: Este aparato debe o un técnico cualificado. instalarlo una persona de servicio • Asegúrese de que no haya materiales autorizada o un técnico cualificado siguiendo inflamables o combustibles cerca del las instrucciones proporcionadas en esta...
  • Page 54: Conexión Eléctrica Y Seguridad

    Instalación en una unidad de pared ADVERTENCIA: ESTE APARATO Una vez que se hayan realizado las conexiones eléctricas, inserte el horno en DEBE ESTAR CONECTADO A el armario empujándolo hacia delante. Abra TIERRA. la puerta del horno e inserte 2 tornillos • Antes de conectar el aparato al en los orificios que se encuentran en suministro eléctrico, debe comprobarse...
  • Page 55 • El aparato está diseñado para un suministro eléctrico de 220-240V. Si el suministro eléctrico de su vivienda es distinto, póngase en contacto con un técnico de servicio autorizado o un electricista cualificado. • El cable de alimentación (H05VV-F) debe ser lo suficientemente largo como para conectarlo al aparato aunque este se encuentre en la parte delantera del armario.
  • Page 56: Características Del Producto

    3. CARACTERÍSTICAS DEL PRODUCTO Importante: Las especificaciones para el producto varían y el aspecto del aparato podría variar con respecto al mostrado en las figuras que se muestran debajo. Lista de componentes 1. Panel de mando 2. Tirador de puerta de horno 3.
  • Page 57: Uso Del Producto

    4. USO DEL PRODUCTO un estante a la vez con esta función. Función de ventilador: Las luces 4.1. controles del horno de advertencia y del Mando de control de funciones del horno termostato del horno Gire el mando hasta el símbolo se encenderán y correspondiente de la función de cocción comenzarán a operar...
  • Page 58: Mesa De Cocción

    4.2. mesA de cocción Función de grill rápido: Las luces de advertencia y del termostato del horno Platos se encenderán y comenzarán a operar los elementos de Hojaldre 2-3-4 170 - 190 35 - 45 calentamiento superiores y del grill. Esta Tarta 2-3-4 170 - 190...
  • Page 59 desbloquear los botones del temporizador, mantenga pulsado el botón “MODE” Descripción de la función durante 2 segundos. De esta forma se podrá llevar a cabo la operación deseada. Cocción automática Ajuste del tiempo de la señal acústica El tiempo de la señal acústica se puede Cocción manual ajustar en cualquier momento entre las “00:00”...
  • Page 60 3. Utilice los botones 2. Pulse “MODE” hasta “+” y “-” para ajusta el que vea el símbolo tiempo de finalización “dur” en la pantalla. El símbolo “A” deseado. parpadeará. 4. En la pantalla 3. Seleccione el aparecerá de nuevo la periodo de tiempo hora actual, los de cocción deseado...
  • Page 61: Accesorios

    4. Pulse “MODE” hasta 4.3. Accesorios que vea el símbolo La rejilla EasyFix “End” en la pantalla. Limpie bien los accesorios con agua La hora y los símbolos caliente, detergente y un paño limpio suave “A” parpadearán. cuando vaya a utilizarlos por primera vez. 5. Seleccione el tiempo de finalización deseado mediante las teclas “+” y “-”. El símbolo “...
  • Page 62: Limpieza Y Mantenimiento

    Colector de agua A veces al cocinar, se produce condensación en el cristal interior de la puerta del horno. Esto no significa que el producto esté averiado. Abra la puerta del horno en la posición de grill y déjela en esta posición 20 segundos. El agua caerá...
  • Page 63 Limpieza del interior del horno superficies donde se encuentran, NO se deben frotar con objetos duros (objetos • El interior de los hornos esmaltados se puntiagudos, estropajos de alambre de limpia mejor con el horno caliente. acero y plástico, esponjas para platos • Después de usar el horno, siempre que dañan la superficie) o con agentes debe limpiarse con un trapo suave...
  • Page 64: Mantenimiento

    Si la puerta del cristal es una puerta de horno de triple cristal, la tercera capa de cristal se puede quitar de la misma manera que la segunda capa. Extracción de la puerta del horno Antes de limpiar el cristal de la puerta del horno, debe quitar la puerta del horno, tal como se muestra debajo.
  • Page 65: Solución De Problemas Y Transporte

    6. SOLUCIÓN DE PROBLEMAS Y TRANSPORTE 6.1. solución de problemAs Si sigue teniendo algún problema con su aparato tras comprobar estos pasos básicos de resolución de problemas, póngase en contacto con un técnico de servicio autorizado o con un técnico cualificado. Problema Posible causa Solución...
  • Page 66: Especificaciones Técnicas

    7. ESPECIFICACIONES TÉCNICAS 7.1. FichA energéticA Marca Modelo K-60D22IM1-FR Tipo de horno ELÉCTRICO Masa 30,3 Índice de eficiencia energética – convencional 103,6 Índice de eficiencia energética – ventilación forzada 94,0 Clase energética Consumo de energía (electricidad) - convencional kWh/ciclo 0,87 Consumo de energía (electricidad) –...
  • Page 67 Wij danken u dat u voor dit product hebt gekozen. Deze gebruikershandleiding bevat belangrijke informatie over veiligheid en instructies die zijn bedoeld u te helpen in de bediening en het onderhoud van uw apparaat. Neem de tijd om deze gebruikershandleiding door te lezen voordat u uw apparaat in gebruik neemt en bewaar hem als naslagwerk voor de toekomst.
  • Page 68 INHOUD 1.VEILIGHEIDSINSTRUCTIES ....................4 1.1. Algemene veiligheidswaarschuwingen ................4 1.2. Waarschuwingen bij de installatie .................6 1.3. Tijdens het gebruik ......................7 1.4. Tijdens reiniging en onderhoud ..................9 2.INSTALLATIE EN VOORBEREIDING VOOR GEBRUIK ..........10 2.1. Instructies voor de installateur ..................10 2.2. Installatie van de oven ....................10 2.3.
  • Page 69: Veiligheidsinstructies

    1. VEILIGHEIDSINSTRUCTIES • Lees deze instructies zorgvuldig en volledig voor u uw apparaat in gebruik neemt en bewaar deze op een handige locatie voor eventuele raadpleging in de toekomst. • Deze handleiding is gemaakt voor meer dan één model. Het is mogelijk dat een aantal functies, die in deze handleiding worden besproken, niet aanwezig zijn op uw apparaat.
  • Page 70 • Gebruik het apparaat niet met een externe timer of afzonderlijk afstandsbedieningsysteem. • Het apparaat wordt tijdens gebruik heet. Zorg ervoor geen verwarmingselementen in de oven aan te raken. • Tijdens het gebruik kunnen handvaten die men tijdens het normale gebruik kort vast neemt warm worden.
  • Page 71: Waarschuwingen Bij De Installatie

    • Voor de aansluiting van uw apparaat moet u ervoor zorgen dat de lokale distributievoorwaarden (soort gas en gasdruk of elektrische spanning en frequentie) en de vereisten van het apparaat compatibel zijn. De specificaties voor dit apparaat staan vermeld op het label. •...
  • Page 72: Tijdens Het Gebruik

    • Het apparaat moet worden gemonteerd door een geautoriseerde monteur. De fabrikant is niet verantwoordelijk voor eventuele schade die kan worden veroorzaakt door de defecte plaatsing en installatie door niet-geautoriseerde personen. • Controleer bij het uitpakken van het apparaat of er tijdens het transport geen schade is opgelopen.
  • Page 73 • Wees voorzichtig bij het openen van de deur terwijl u aan het koken bent en meteen daarna. De hete stoom uit de oven kan brandwonden veroorzaken. • Plaats geen ontvlambaar of brandbaar materiaal in of in de buurt van het apparaat als het in werking is. • Gebruik altijd ovenhandschoenen om gerechten in de oven te verplaatsen of uit de oven te nemen.
  • Page 74: Tijdens Reiniging En Onderhoud

    1.4. tijdens reiniging en onderhoud • Schakel het apparaat altijd uit voordat u het schoonmaakt of onderhoudt. U kunt deze activiteiten starten na het verwijderen van de stekker uit het stopcontact of nadat de hoofdschakelaars zijn uitgeschakeld. • Verwijder de bedieningsknoppen niet tijdens het reinigen van het bedieningspaneel.
  • Page 75: Installatie En Voorbereiding Voor Gebruik

    2. INSTALLATIE EN 2.2. instAllAtie vAn de oven VOORBEREIDING De apparaten worden geleverd met installatiekits. Ze kunnen worden VOOR GEBRUIK gemonteerd in een werkblad voorzien van WAARSCHUWING: Dit apparaat mag de correcte afmetingen. De afmetingen voor uitsluitend worden geïnstalleerd door de kookplaat en de oven vindt u hieronder.
  • Page 76 Installatie onder een werkblad Installatie in een wandeenheid • Nadat u de elektrische verbindingen hebt gemarkeerd, plaatst u de oven in het kastje door deze vooruit te duwen. Open de ovendeur en bevestig twee schroeven in de gaten voorzien in het ovenframe.
  • Page 77: Elektrische Aansluiting En Veiligheid

    2.3. elektrische AAnsluiting • Zorg ervoor dat alle aansluitingen goed en veiligheid vastzitten. WAARSCHUWING: De elektrische • Bevestig de stroomkabel in de aansluiting van dit apparaat mag kabelklem en sluit de deksel. uitsluitend worden uitgevoerd door • De aansluiting op het klemmenblok erkend onderhoudspersoneel of een wordt gedaan op de aansluitkast.
  • Page 78: Productkenmerken

    3. PRODUCTKENMERKEN Belangrijk: De specificaties van het product verschillen en het uiterlijk van uw apparaat kan afwijken van de afbeeldingen die hieronder zijn weergegeven. Onderdelenlijst 1. Bedieningspaneel 2. Deurgreep van de oven 3. Ovendeur Bedieningspaneel 4. Timer 5. Bedieningsknop ovenfunctie 6.
  • Page 79: Gebruik Van Het Product

    4. GEBRUIK VAN HET PRODUCT Heteluchtfunctie: Het thermostaatlampje en waarschuwingslampje 4.1. ovenbediening van de oven gaan aan Bedieningsknop ovenfunctie en het bovenste en Draai de knop naar het overeenstemmende onderste symbool van de gewenste kookfunctie. verwarmingselement en Zie voor details van andere functies de ventilator treden in werking.
  • Page 80: Bereidingstabel

    grillen en het bestrijken van een groter 170 - Bladerdeeg 2-3-4 25 - 35 oppervlak, voor bijvoorbeeld vlees. Gebruik de bovenste rekstanden in de oven. Bestrijk het 150 - rooster licht met olie om het voedsel niet vast Taart 2-3-4 25 - 35 te laten plakken en plaats het voedsel in het midden van het rooster.
  • Page 81 Tijdsinstelling 2. Kies de gewenste tijdsperiode met Voordat u de oven gaat gebruiken dient de gebruik van de tijd te worden ingesteld. Na de aansluiting knoppen '+' en '-' terwijl op de stroom gaan het symbool 'A' en ' knippert. '00:00' of '12:00' op het scherm knipperen.
  • Page 82 Als de timer de nul bereikt, schakelt de Volautomatische programmering oven uit en hoort u een geluidssignaal. Het symbool 'A' gaat knipperen. Draai beide Deze functie wordt gebruikt om te beginnen regelknoppen naar stand '0' en druk op met koken na een bepaalde tijdsperiode een willekeurige toets op de tijdklok om het en voor een bepaalde tijdsduur.
  • Page 83: Geluidinstelling

    De oven berekent de tijd en start de oven • De accessoires kunnen vervormen automatisch (symbool ' ' verschijnt weer door hitte. Zodra deze afgekoeld zijn, op het scherm) zodat de bereiding op de nemen deze hun oorspronkelijke vorm ingestelde eindtijd beëindigt. Als de timer weer aan en presteren deze weer als nul heeft bereikt, wordt de oven voorheen.
  • Page 84: Reiniging En Onderhoud

    Draadrooster 5. REINIGING EN ONDERHOUD Het draadrooster wordt gebruikt bij grillen of het bereiden van voedsel in ander kookgerei. 5.1. reiniging WAARSCHUWING: Schakel het apparaat uit en laat het volledig afkoelen voordat u schoonmaakwerkzaamheden op uw apparaat uitvoert. Algemene instructies •...
  • Page 85 • U kunt af en toe een vloeibaar ontvetters, schuurmiddelen die het schoonmaakmiddel nodig hebben om oppervlak beschadigen. Anders de oven volledig te reinigen. kunnen corrosie of vlekken ontstaan op het poedergelakte oppervlak. De fabrikant kan niet aansprakelijk worden gesteld voor schade veroorzaakt door het oneigenlijke gebruik van reinigingsmiddelen of -methodes.
  • Page 86: Onderhoud

    1. Open de ovendeur. 5.2. onderhoud WAARSCHUWING: Het onderhoud aan dit apparaat dient uitsluitend te worden uitgevoerd door erkend onderhoudspersoneel of een gekwalificeerd elektricien. Vervangen van de ovenlamp WAARSCHUWING: Schakel het apparaat uit en laat het volledig afkoelen voordat u schoonmaakwerkzaamheden op uw 2.
  • Page 87: Probleemoplossing En Transport

    6. PROBLEEMOPLOSSING EN TRANSPORT 6.1. ProbleemoPlossing Als u na deze basisprobleemoplossing nog problemen met uw apparaat ondervindt, neem dan contact op met een erkend servicebedrijf of een erkende technicus. Probleem Mogelijke oorzaak Oplossing Controleer de stroomtoevoer. De oven gaat niet aan. De stroom is uitgeschakeld.
  • Page 88: Technische Specificaties

    7. TECHNISCHE SPECIFICATIES 7.1. energiefiche Merk Model K-60D22IM1-FR Oventype ELEKTRISCH Massa 30,3 Index energie-efficiëntie - conventioneel 103,6 Index energie-efficiëntie – hete lucht 94,0 Energieklasse Energieverbruik (stroom) - conventioneel kWh/cyclus 0,87 Energieverbruik (stroom) – hete lucht kWh/cyclus 0,79 Aantal ruimtes Warmtebron...
  • Page 89 Service & Support Visit Our Website sharphomeappliances.com...

Table des Matières