
Manuels Connexes pour Sharp Home Appliances K-60V19IQM-FR


Sommaire des Matières pour Sharp Home Appliances K-60V19IQM-FR
- Page 1 Home Appliances K-60V19IQM-FR Cooking User Manual Guide d'utilisation Manual de uso Handleiding...
- Page 2 Thank you for choosing this product. This User Manual contains important safety information and instructions on the operation and maintenance of your appliance. Please take the time to read this User Manual before using your appliance and keep this book for future reference. Icon Type Meaning...
-
Page 3: Table Des Matières
CONTENTS 1.SAFETY INSTRUCTIONS ....................4 1.1 General Safety Warnings ....................4 1.2 Installation Warnings ......................6 1.3 During Use ........................7 1.4 During Cleaning and Maintenance .................8 2.INSTALLATION AND PREPARATION FOR USE ..............9 2.1 Instructions for the Installer ....................9 2.2 Installation of the Oven ....................9 2.3 Electrical Connection and Safety.................. -
Page 4: Safety Instructions
1. SAFETY INSTRUCTIONS • Carefully read all instructions before using your appliance and keep them in a convenient place for reference when necessary. • This manual has been prepared for more than one model therefore your appliance may not have some of the features described within. - Page 5 the oven. • Handles may get hot after a short period during use. • Do not use harsh abrasive cleaners or scourers to clean the oven door glass and other surface. They can scratch the surfaces which may result in shattering of the door glass or damage to surfaces.
-
Page 6: Installation Warnings
heating a room. • Do not use the oven door handles to lift or move the appliance. • All possible measures have been taken to ensure your safety. Since the glass may break, care should be taken while cleaning to avoid scratching. Avoid hitting or knocking the glass with accessories. -
Page 7: During Use
• Any materials (i.e. cabinets) around the appliance must be able to withstand a minimum temperature of 100°C. • The appliance must not be installed behind a decorative door, in order to avoid overheating. 1.3 DurinG uSe • When you first use your oven you may notice a slight smell. -
Page 8: During Cleaning And Maintenance
• Make sure the appliance control knobs are always in the “0” (stop) position when it is not in use. • The trays incline when pulled out. Take care not to spill or drop hot food while removing it from the ovens. -
Page 9: Installation And Preparation For Use
2. INSTALLATION AND 2.2 inStallation of the oven PREPARATION FOR USE The appliances are supplied with installation kits and can be installed in a WARNING : This appliance must be worktop with the appropriate dimensions. installed by an authorised service The dimensions for hob and oven person or qualified technician, according to installation are given below. - Page 10 Installation under a worktop Installation in a wall unit After making the electrical connections, insert the oven into the cabinet by pushing it forward. Open the oven door and insert 2 screws in the holes located on the oven frame. While the product frame touches the wooden surface of the cabinet, tighten the screws.
-
Page 11: Electrical Connection And Safety
2.3 eleCtriCal ConneCtion anD Safety WARNING: The electrical connection Blue of this appliance should be carried out by an authorised service person or qualified electrician, according to the instructions in this guide and in compliance with the current local regulations. WARNING: THE APPLIANCE MUST BE EARTHED. -
Page 12: Product Features
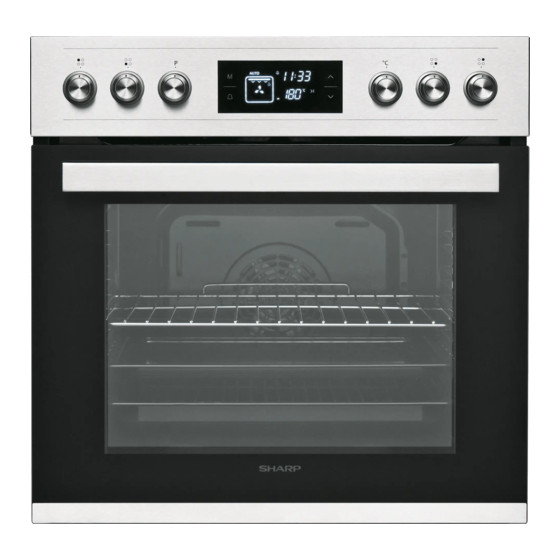
3. PRODUCT FEATURES Important: Specifications for the product vary and the appearance of your appliance may differ from that shown in the figures below. List of Components 1. Control Panel 2. Oven Door Handle 3. Oven Door Control Panel 4. Timer 5. -
Page 13: Use Of Product
4. USE OF PRODUCT heating elements will start operating. The static cooking function emits heat, ensuring even cooking of food. This is ideal for 4.1 oven ControlS making pastries, cakes, baked pasta, Oven function control knob lasagne and pizza. Preheating the oven for 10 minutes is recommended and it is best Turn the knob to the corresponding symbol to use only one shelf at a time in this... -
Page 14: Cooking Table
elements will start operating. This function 4.2 CookinG table is used for faster grilling and for grilling food with a larger surface area, such as meat. Use the upper shelves of the oven. Lightly Dishes brush the wire grid with oil to stop food sticking and place food in the centre of the grid. - Page 15 required cooking period using the “+” and “-” sensor buttons while the timer is in this Function Description position. After set the required cooking period, “AUTO” appear on the timer display Mode key screen. When you have completed the adjustment, wait until the current time of day is displayed on the screen and until the Alarm key Duration Time...
-
Page 16: Accessories
the key lock symbol on the display screen. The Deep Tray To deactivate the key lock, press and hold The deep tray is best used for cooking the “+” button until the key lock symbol stews. disappears from the display. Put the tray into any rack and push it to the While the key lock is active, only the power end to make sure it is placed correctly. -
Page 17: Cleaning And Maintenance
• Should any liquids overflow, clean them immediately to avoid parts becoming damaged. Child lock Do not use steam cleaners for cleaning any part of the appliance. Cleaning the Inside of the Oven • The inside of enamelled ovens are best cleaned while the oven is warm. - Page 18 Removal of the Catalytic Liner Removal of the Inner Glass To remove the catalytic liner, remove the You must remove the oven door glass screws holding each catalytic panel to the before cleaning, as shown below. oven. 1. Push the glass in the direction of B and release from the location bracket (x).
-
Page 19: Maintenance
5.2 MaintenanCe WARNING: The maintenance of this appliance should be carried out by an authorised service person or qualified technician only. Changing the Oven Lamp WARNING: Switch off the appliance and allow it to cool before cleaning your appliance. • Remove the glass lens, then remove the 2. -
Page 20: Troubleshooting&Transport
6. TROUBLESHOOTING&TRANSPORT 6.1 troubleShootinG If you still have a problem with your appliance after checking these basic troubleshooting steps, please contact an authorised service person or qualified technician. Problem Possible Cause Solution Check whether there is power supplied. Oven does not switch Power is switched off. -
Page 21: Technical Specifications
7. TECHNICAL SPECIFICATIONS 7.1 enerGy fiChe Brand Model K-60V19IQM-FR Type of Oven ELECTRIC Mass 33,0 Energy Efficiency Index - conventional 103,6 Energy Efficiency Index - fan forced Energy Class Energy consumption (electricity) - conventional kWh/cycle 0,87 Energy consumption (electricity) - fan forced kWh/cycle 0,79 Number of cavities... - Page 22 Merci d’avoir choisi ce produit. Cette notice d’utilisation contient des informations et des consignes de sécurité importantes concernant l’utilisation et l’entretien de votre appareil. Lire attentivement cette notice d’utilisation avant d’utiliser votre appareil et la conserver pour consultation ultérieure. Icône Type Signification AVERTISSEMENT...
- Page 23 TABLE DES MATIÈRES 1.CONSIGNES DE SÉCURITÉ ....................4 1.1. Avertissements de sécurité généraux ................4 1.2. Avertissements relatifs à l’installation ................6 1.3. Au cours de l’utilisation ....................7 1.4. Nettoyage et entretien ....................9 2.INSTALLATION ET PRÉPARATION À L’UTILISATION ...........10 2.1. Instructions destinées à l’installateur ................10 2.2.
-
Page 24: Consignes De Sécurité
1. CONSIGNES DE SÉCURITÉ • Lire attentivement cette notice d’utilisation dans son intégralité avant d’utiliser votre appareil et la conserver dans un endroit accessible pour consultation ultérieure. • Ce manuel a été préparé pour plusieurs modèles, votre appareil peut donc ne pas disposer de certaines fonctions décrites dans ce manuel. - Page 25 avec de l'eau, mais arrêter l'appareil puis couvrir les flammes par exemple avec un couvercle ou une couverture anti-feu. MISE EN GARDE : Risque d'incendie: ne pas entreposer d'objets sur les surfaces de cuisson. • L’appareil n’est pas destiné à être mis en fonctionnement au moyen d’une minuterie externe ou d’un système de commande à...
-
Page 26: Avertissements Relatifs À L'installation
dispositifs de protections non adaptés à l'appareil de cuisson peuvent provoquer des accidents. • Avant l'installation s'assurer que les conditions de distribution locale (tension et fréquence électrique) et le réglage de l'appareil sont compatibles. Les conditions de réglage de cet appareil sont inscrites sur la plaque signalétique de l’appareil. -
Page 27: Au Cours De L'utilisation
• L’appareil doit être installé par un technicien qualifié. Le fabricant ne peut être tenu responsable de tout dommage causé en cas d’installation incorrecte par un techncien non qualifié. • Un moyen de déconnexion du réseau d’alimentation ayant une distance d’ouverture des contacts de tous les pôles doit être prévu dans la canalisation fixe conformément aux règles d’installation. - Page 28 ventilé. • Rester prudent lors de l’ouverture de la porte du four pendant ou après la cuisson. La vapeur s’échappant du four peut provoquer des brûlures. • Ne pas placer de matériaux combustibles ou inflammables dans l’appareil ou près de l’appareil lorsqu’il est en fonctionnement.
-
Page 29: Nettoyage Et Entretien
• La lèchefrite s’incline lorsqu’on la sort du four. Attention à ne pas renverser ni à faire tomber de nourriture en la sortant du four. • Ne rien placer sur la porte du four lorsqu’elle est ouverte. Ceci pourrait déséquilibrer le four ou endommager la porte. -
Page 30: Installation Et Préparation À L'utilisation
2. INSTALLATION ET une température supérieure à 100 °C. PRÉPARATION À L’UTILISATION • Cet appareil ne doit pas être installé directement au-dessus d’un lave- AVERTISSEMENT : Cet appareil doit vaisselle, d’un réfrigérateur, d’un être installé par un professionnel congélateur, d’un lave-linge ou d’un agréé... - Page 31 Installation sous un plan de travail Installation murale Une fois les branchements électriques effectués, insérer le four dans son emplacement en la poussant vers l’avant. Ouvrir la porte du four et insérer 2 vis dans les trous du châssis du four. Lorsque le châssis du produit touche la surface du bois du meuble, serrer les vis.
-
Page 32: Branchement Électrique Et Sécurité
2.3. BrAnchement électrique • Fixer le câble d’alimentation sur le et sécurité bornier, puis refermer le couvercle. AVERTISSEMENT : Le branchement • Le branchement du boîtier de jonction électrique de cet appareil doit être est placé sur le boîtier de jonction. effectué... -
Page 33: Caractéristiques Du Produit
3. CARACTÉRISTIQUES DU PRODUIT Important : Les caractéristiques du produit varient et l’apparence de votre appareil peut être différente de celle présentée sur les figures ci-dessous. Liste des composants 1. Bandeau de commande 2. Poignée de la porte du four 3. -
Page 34: Utilisation De L'appareil
4. UTILISATION DE L’APPAREIL Fonction Convection naturelle : Le voyant du thermostat et les 4.1. commAndes du four voyants Manette de fonction d’avertissement du Faire tourner le bouton sur le symbole four s’allument, et les correspondant à la fonction souhaitée. Pour résistances inférieure les détails des différentes fonctions, se et supérieure... -
Page 35: Table De Cuisson
pinceau pour empêcher les aliments environ 10 minutes. d’accrocher, puis placez les aliments au centre de la grille. Placez toujours une Avertissement : Pendant la cuisson lèchefrite sous la grille pour recueillir l’huile au gril, la porte du four doit être fermée et la température du four doit ou les graisses. -
Page 36: Utilisation Du Programmateur Tactile Visio
4.3. utilisAtion du progrAmmAteur tActile visio le symbole « » arrête de clignoter et reste fixe. L’heure de l’alarme sonore est Description de la fonction désormais réglée. Touche de mode Une fois le temps écoulé, une alarme sonore retentit et le symbole « »... -
Page 37: Accessoires La Grille Métallique Easyfix
Toucher le bouton « M » jusqu’à ce que 4.4. Accessoires lA grille le symbole de temps de cuisson « I>I » et métAllique eAsyfix « AUTO » apparaissent sur l’affichage du Nettoyez soigneusement les accessoires minuteur. Régler le temps de cuisson requis avec de l’eau tiède, du détergent et un à... -
Page 38: Nettoyage Et Entretien
Plaque creuse La plaques creuse sert à cuisiner des ragoûts. Sécurité enfants Pour placer correctement la plaque dans la cavité, placez-la sur n'importe quel râtelier et poussez jusqu'au bout. Collecteur d'eau Une condensation peut se produire sur la vitre intérieure dans certains cas, selon le type d'aliment. - Page 39 ils risquent d’endommager les surfaces Si une grande quantité de graisse de l'appareil. s’accumule sur la protection, elle peut perdre de son efficacité. Pour résoudre ce Ne pas utiliser de produits nettoyants problème, régler le four sur la température contenant des particules, car ils maximum pendant 10 à...
-
Page 40: Entretien
Retrait des vitres internes Avant de nettoyer la vitre de la porte du four, vous devez retirer la vitre interne de la façon suivante : 1. Poussez la vitre vers la direction B et relâchez à partir de la console de positionnement (x). - Page 41 Remplacement de la lampe du four AVERTISSEMENT : Éteignez l’appareil et laissez-le refroidir avant de le nettoyer. • Retirez la lentille en verre, puis démontez l’ampoule. • Insérez la nouvelle ampoule (résistant à 300 °C) pour remplacer celle que vous avez retirée (230 V, 15 - 25 Watt, Type E14).
-
Page 42: Dépannage Et Transport
6. DÉPANNAGE ET TRANSPORT 6.1. dépAnnAge Si le problème persiste sur votre appareil après avoir suivi ces étapes de dépannage de base, contacter un professionnel agréé ou un technicien qualifié. Problème Cause possible Solution Vérifier que l’alimentation électrique est branchée. Le four ne s’allume pas. -
Page 43: Spécifications Techniques
7. SPÉCIFICATIONS TECHNIQUES 7.1. fiche énergie Marque Modèle K-60V19IQM-FR Type de four ÉLECTRIQUE Masse de I’appareil 33,0 Indice d’efficacité énergétique - conventionnel 103,6 Indice d’efficacité énergétique - ventilation forcée Classe énergétique Consommation énergétique (électricité) - conventionnelle kWh/cycle 0,87 Consommation énergétique (électricité) - ventilation forcée kWh/cycle 0,79 Nombre de cavités... - Page 44 Gracias por elegir este producto. Este Manual de usuario contiene información de seguridad e instrucciones importantes relacionadas con el uso y mantenimiento del aparato. Tómese el tiempo que necesite para leer este Manual de usuario antes de usar el aparato y guárdelo por si tuviese que consultarlo más adelante.
- Page 45 ÍNDICE 1.INSTRUCCIONES DE SEGURIDAD ................4 1.1. Advertencias generales de seguridad ................4 1.2. Advertencias para la instalación ..................6 1.3. Durante el uso .......................7 1.4. Durante la limpieza y el mantenimiento.................8 2.INSTALACIÓN Y PREPARACIÓN PARA SU USO ............10 2.1. Instrucciones para el instalador ...................10 2.2.
-
Page 46: Instrucciones De Seguridad
1. INSTRUCCIONES DE SEGURIDAD • Lea detenidamente todas las instrucciones antes de usar el aparato y guarde este manual en un lugar de fácil acceso para poder consultarlo cuando sea necesario. • Este manual ha sido redactado para más de un modelo. - Page 47 • Durante el uso, el aparato se calentará. Se debe tener cuidado a fin de evitar tocar los elementos de calentamiento que hay dentro del horno. • Durante el uso, los tiradores se pueden calentar en un corto período de tiempo. •...
-
Page 48: Advertencias Para La Instalación
compatibles. Las especificaciones de este aparato se indican en la etiqueta. PRECAUCIÓN: Este aparato solo ha sido diseñado para cocinar alimentos en el interior de una vivienda. No se debe usar para ningún otro fin o aplicación, como para uso no doméstico, en un entorno comercial o para calentar una habitación. -
Page 49: Durante El Uso
detecta algún tipo de defecto, no use el aparato y póngase en contacto inmediatamente con un agente de servicio cualificado. Los materiales empleados para el embalaje (nailon, grapas, espuma de estireno, etc.) pueden resultar dañinos para los niños y se deben recoger y retirar inmediatamente. •... -
Page 50: Durante La Limpieza Y El Mantenimiento
• En ningún caso se debe cubrir el horno con papel de aluminio, ya que existe la posibilidad de que se produzca un sobrecalentamiento. • No coloque platos o bandejas de horno directamente sobre la base del horno mientras se esté... - Page 51 • Para preservar la eficacia y seguridad del aparato, le recomendamos que use siempre piezas de repuesto originales y que llame a un agente de servicio autorizado cuando sea necesario. Declaración de conformidad de la CE Declaramos que nuestros productos cumplen con las directivas, decisiones y normativas europeas pertinentes y con los requisitos enumerados en los estándares mencionados.
-
Page 52: Instalación Ypreparación Para Su Uso
2. INSTALACIÓN Y directamente sobre un lavavajillas, frigorífico, congelador, lavadora o PREPARACIÓN PARA SU USO secadora. ADVERTENCIA: Este aparato debe instalarlo una persona de servicio 2.2. instAlAción del horno autorizada o un técnico cualificado siguiendo Los aparatos se suministran con kits de las instrucciones proporcionadas en esta instalación y se pueden instalar en una guía y cumpliendo las normativas locales... - Page 53 Instalación bajo una encimera Instalación en una unidad de pared Una vez que se hayan realizado las conexiones eléctricas, inserte el horno en el armario empujándolo hacia delante. Abra la puerta del horno e inserte 2 tornillos en los orificios que se encuentran en el bastidor del horno.
-
Page 54: Conexión Eléctrica Y Seguridad
2.3. conexión eléctricA y seguridAd • Fije el cable de alimentación a la abrazadera de cable y a continuación ADVERTENCIA: La conexión eléctrica cierre la tapa. de este aparato debe realizarla una persona de servicio autorizada o un • La conexión de la caja de terminales se electricista cualificado conforme a las encuentra en la caja de terminales. -
Page 55: Características Del Producto
3. CARACTERÍSTICAS DEL PRODUCTO Importante: Las especificaciones para el producto varían y el aspecto del aparato podría variar con respecto al mostrado en las figuras que se muestran debajo. Lista de componentes 1. Panel de mando 2. Tirador de puerta de horno 3. -
Page 56: Uso Del Producto
4. USO DEL PRODUCTO Función de cocción estática: Las luces de advertencia y del 4.1. controles del horno termostato del horno Mando de control de funciones del horno se encenderán y Gire el mando hasta el símbolo comenzarán a operar correspondiente de la función de cocción los elementos de deseada. -
Page 57: Mesa De Cocción
en el centro de la parrilla. Debajo de la minutos. comida debe colocar siempre una bandeja Advertencia: Al cocinar al grill, la que recoja las gotas de aceite o grasa. Se puerta del horno debe estar cerrada y recomienda precalentar el horno durante la temperatura del horno debe unos 10 minutos. -
Page 58: Uso Del Programador Visio Touch
4.3. uso del progrAmAdor visio touch que deje de parpadear el símbolo “ ” y permanezca iluminado. Se establecerá el Descripción de función tiempo de advertencia sonora. Cuando el temporizador llegue a cero, se Botón de modo emitirá una advertencia sonora y el símbolo “... -
Page 59: Accesorios
desee. 4.4. Accesorios Pulse el botón táctil “M” hasta que vea La rejilla EasyFix el símbolo de Tiempo de duración “I>I” y Limpie bien los accesorios con agua “AUTO” (AUTOMÁTICO) en el indicador caliente, detergente y un paño limpio suave del temporizador. -
Page 60: Limpieza Y Mantenimiento
Colector de agua A veces al cocinar, se produce condensación en el cristal interior de la puerta del horno. Esto no significa que el producto esté averiado. Abra la puerta del horno en la posición de grill y déjela en esta posición 20 segundos. El agua caerá... - Page 61 Extracción del revestimiento catalítico • Después de usar el horno, siempre debe limpiarse con un trapo suave Para extraer el revestimiento catalítico, empapado en agua con jabón. A quite los tornillos que fijan al horno cada continuación, vuelva a limpiar el horno uno de los paneles catalíticos.
- Page 62 1. Abra la puerta del horno. abrasivos para la superficie. De lo contrario, se puede producir corrosión en las superficies pintadas a base de polvo y provocar manchas. El fabricante no se hace responsable de ningún daño causado por el uso de productos o métodos de limpieza inadecuados.
-
Page 63: Mantenimiento
5.2. mAntenimiento ADVERTENCIA: El mantenimiento de este aparato solo debe llevarlo a cabo una persona de servicio autorizada o un técnico cualificado. Cambio de la lámpara del horno ADVERTENCIA: Apague el aparato y deje que se enfríe antes de limpiarlo. •... -
Page 64: Solución De Problemas Y Transporte
6. SOLUCIÓN DE PROBLEMAS Y TRANSPORTE 6.1. solución de problemAs Si sigue teniendo algún problema con su aparato tras comprobar estos pasos básicos de resolución de problemas, póngase en contacto con un técnico de servicio autorizado o con un técnico cualificado. Problema Posible causa Solución... -
Page 65: Especificaciones Técnicas
7. ESPECIFICACIONES TÉCNICAS 7.1. FichA energéticA Marca Modelo K-60V19IQM-FR Tipo de horno ELÉCTRICO Masa 33,0 Índice de eficiencia energética – convencional 103,6 Índice de eficiencia energética – ventilación forzada Clase energética Consumo de energía (electricidad) - convencional kWh/ciclo 0,87 Consumo de energía (electricidad) – ventilación forzada kWh/ciclo 0,79 Número de cavidades... - Page 66 Wij danken u dat u voor dit product hebt gekozen. Deze gebruikershandleiding bevat belangrijke informatie over veiligheid en instructies die zijn bedoeld u te helpen in de bediening en het onderhoud van uw apparaat. Neem de tijd om deze gebruikershandleiding door te lezen voordat u uw apparaat in gebruik neemt en bewaar hem als naslagwerk voor de toekomst.
- Page 67 INHOUD 1.VEILIGHEIDSINSTRUCTIES ....................4 1.1. Algemene veiligheidswaarschuwingen ................4 1.2. Waarschuwingen bij de installatie .................6 1.3. Tijdens het gebruik ......................7 1.4. Tijdens reiniging en onderhoud ..................9 2.INSTALLATIE EN VOORBEREIDING VOOR GEBRUIK ..........10 2.1. Installatie van de oven ....................10 2.2. Elektrische aansluiting en veiligheid ................12 3.PRODUCTKENMERKEN ....................13 4.GEBRUIK VAN HET PRODUCT ..................14 4.1.
-
Page 68: Veiligheidsinstructies
1. VEILIGHEIDSINSTRUCTIES • Lees deze instructies zorgvuldig en volledig voor u uw apparaat in gebruik neemt en bewaar deze op een handige locatie voor eventuele raadpleging in de toekomst. • Deze handleiding is gemaakt voor meer dan één model. Het is mogelijk dat een aantal functies, die in deze handleiding worden besproken, niet aanwezig zijn op uw apparaat. - Page 69 • Gebruik het apparaat niet met een externe timer of afzonderlijk afstandsbedieningsysteem. • Het apparaat wordt tijdens gebruik heet. Zorg ervoor geen verwarmingselementen in de oven aan te raken. • Tijdens het gebruik kunnen handvaten die men tijdens het normale gebruik kort vast neemt warm worden.
-
Page 70: Waarschuwingen Bij De Installatie
• Voor de aansluiting van uw apparaat moet u ervoor zorgen dat de lokale distributievoorwaarden (soort gas en gasdruk of elektrische spanning en frequentie) en de vereisten van het apparaat compatibel zijn. De specificaties voor dit apparaat staan vermeld op het label. •... -
Page 71: Tijdens Het Gebruik
• Het apparaat moet worden gemonteerd door een geautoriseerde monteur. De fabrikant is niet verantwoordelijk voor eventuele schade die kan worden veroorzaakt door de defecte plaatsing en installatie door niet-geautoriseerde personen. • Controleer bij het uitpakken van het apparaat of er tijdens het transport geen schade is opgelopen. - Page 72 • Wees voorzichtig bij het openen van de deur terwijl u aan het koken bent en meteen daarna. De hete stoom uit de oven kan brandwonden veroorzaken. • Plaats geen ontvlambaar of brandbaar materiaal in of in de buurt van het apparaat als het in werking is. •...
-
Page 73: Tijdens Reiniging En Onderhoud
1.4. tijdens reiniging en onderhoud • Schakel het apparaat altijd uit voordat u het schoonmaakt of onderhoudt. U kunt deze activiteiten starten na het verwijderen van de stekker uit het stopcontact of nadat de hoofdschakelaars zijn uitgeschakeld. • Verwijder de bedieningsknoppen niet tijdens het reinigen van het bedieningspaneel. -
Page 74: Installatie En Voorbereiding Voor Gebruik
2. INSTALLATIE EN • Apparaten om het apparaat heen moeten zijn gemaakt van materialen die VOORBEREIDING bestand zijn tegen temperaturen van VOOR GEBRUIK boven 100 °C. WAARSCHUWING: Dit apparaat mag • Het apparaat mag niet worden uitsluitend worden geïnstalleerd door geïnstalleerd direct boven een erkend onderhoudspersoneel of een vaatwasmachine, koelkast, diepvriezer,... - Page 75 Installatie onder een werkblad Installatie in een wandeenheid • Nadat u de elektrische verbindingen hebt gemarkeerd, plaatst u de oven in het kastje door deze vooruit te duwen. Open de ovendeur en bevestig twee schroeven in de gaten voorzien in het ovenframe.
-
Page 76: Elektrische Aansluiting En Veiligheid
2.2. elektrische AAnsluiting vastzitten. en veiligheid • Bevestig de stroomkabel in de WAARSCHUWING: De elektrische kabelklem en sluit de deksel. aansluiting van dit apparaat mag • De aansluiting op het klemmenblok uitsluitend worden uitgevoerd door wordt gedaan op de aansluitkast. erkend onderhoudspersoneel of een gekwalificeerd elektricien en overeenkomstig de instructies van deze... -
Page 77: Productkenmerken
3. PRODUCTKENMERKEN Belangrijk: De specificaties van het product verschillen en het uiterlijk van uw apparaat kan afwijken van de afbeeldingen die hieronder zijn weergegeven. Onderdelenlijst 1. Bedieningspaneel 2. Deurgreep van de oven 3. Ovendeur Bedieningspaneel 4. Timer 5. Bedieningsknop ovenfunctie 6. -
Page 78: Gebruik Van Het Product
4. GEBRUIK VAN HET PRODUCT Functie statisch koken: Het thermostaatlampje en 4.1. ovenbediening waarschuwingslampje Bedieningsknop ovenfunctie van de oven gaan aan Draai de knop naar het overeenstemmende en de onderste en symbool van de gewenste kookfunctie. bovenste Zie voor details van andere functies verwarmingselementen 'Ovenfuncties'. -
Page 79: Bereidingstabel
voedsel in het midden van het rooster. Waarschuwing: De ovendeur moet Plaats altijd een ovenschaal onder het tijdens het grillen zijn gesloten, en de voedsel om druppels olie of vet op te temperatuur moet zijn ingesteld op vangen. Het is raadzaam om de oven 190 °C. -
Page 80: Gebruik Van De Visio Touch Programmer
4.3. gebruik vAn de visio touch ProgrAmmer gewenste tijd hebt ingesteld, wacht u tot het symbool “ ” stopt met knipperen. De Functiebeschrijving tijd waarna een hoorbaar signaal wordt geactiveerd zal worden ingesteld. Modustoets Wanneer de timer nul bereikt, weerklinkt een hoorbaar signaal en knippert het Alarmtoets symbool “... -
Page 81: Accessoires
Druk op de sensorknop “M” tot u het symbool Tijdsduur “I>I” ziet en “AUTO” verschijnt op het beeldscherm. Stel de gewenste bereidingstijd in met de sensorknoppen “+” en “-” terwijl de timer in deze positie staat. Druk dan op de sensorknop “M”... -
Page 82: Reiniging En Onderhoud
Watercollector Mogelijk ontstaat er condensatie op het binnenglas. Dit hangt af van het type voedsel in de oven. Dit wijst niet op een storing van het product. Open de ovendeur tot op de grillstand en laat de deur 20 seconden lang open staan. Het water druppelt in de collector. - Page 83 De binnenkant van de oven reinigen de reinigingscyclus kan worden uitgevoerd zoals hierboven omschreven. • De binnenkant van de geëmailleerde oven wordt het best gereinigd als de Verwijderen van de katalytische plaat oven warm is. Om de katalytische plaat te verwijderen, verwijdert u de schroeven die elke •...
- Page 84 alcoholgehalte, vlekkenverwijderaars, 1. Open de ovendeur. ontvetters, schuurmiddelen die het oppervlak beschadigen. Anders kunnen corrosie of vlekken ontstaan op het poedergelakte oppervlak. De fabrikant kan niet aansprakelijk worden gesteld voor schade veroorzaakt door het oneigenlijke gebruik van reinigingsmiddelen of -methodes. Verwijdering van binnenglas Voordat u de glazen ovendeur reinigt, dient 2.
-
Page 85: Onderhoud
5.2. onderhoud WAARSCHUWING: Het onderhoud aan dit apparaat dient uitsluitend te worden uitgevoerd door erkend onderhoudspersoneel of een gekwalificeerd elektricien. Vervangen van de ovenlamp WAARSCHUWING: Schakel het apparaat uit en laat het volledig afkoelen voordat u schoonmaakwerkzaamheden op uw apparaat uitvoert. •... -
Page 86: Probleemoplossing En Transport
6. PROBLEEMOPLOSSING EN TRANSPORT 6.1. ProbleemoPlossing Als u na deze basisprobleemoplossing nog problemen met uw apparaat ondervindt, neem dan contact op met een erkend servicebedrijf of een erkende technicus. Probleem Mogelijke oorzaak Oplossing Controleer de stroomtoevoer. De oven gaat niet aan. De stroom is uitgeschakeld. -
Page 87: Technische Specificaties
7. TECHNISCHE SPECIFICATIES 7.1. energiefiche Merk Model K-60V19IQM-FR Oventype ELEKTRISCH Massa 33,0 Index energie-efficiëntie - conventioneel 103,6 Index energie-efficiëntie – hete lucht Energieklasse Energieverbruik (stroom) - conventioneel kWh/cyclus 0,87 Energieverbruik (stroom) – hete lucht kWh/cyclus 0,79 Aantal ruimtes Warmtebron ELEKTRISCH Volume Deze oven voldoet aan EN 60350-1 Tips voor energiebesparing... - Page 88 Service & Support Visit Our Website sharphomeappliances.com...