Télécharger Imprimer la page
LENCO SCD-685BK Mode D'emploi
Masquer les pouces Voir aussi pour SCD-685BK:

Publicité

Les langues disponibles
  • FR

Les langues disponibles

Liens rapides

Model SCD-685BK
User manual – Portable DAB+/FM radio with CD MP3, Bluetooth, USB and SD player
Gebruikshandleiding – Draagbare DAB+/FM-radio met CD MP3, Bluetooth, USB- en SD-speler
Bedienungsanleitung – Tragbares DAB+/FM-Radio mit CD/MP3-, Bluetooth-, USB- und SD-Player
Mode d'emploi – Radio DAB+/FM portative avec CD MP3, Bluetooth, USB et lecteur de carte SD
Manual de usuario – Radio DAB+/FM portátil con CD MP3, Bluetooth, USB y reproductor SD

Publicité

loading

Sommaire des Matières pour LENCO SCD-685BK

  • Page 1 Model SCD-685BK User manual – Portable DAB+/FM radio with CD MP3, Bluetooth, USB and SD player Gebruikshandleiding – Draagbare DAB+/FM-radio met CD MP3, Bluetooth, USB- en SD-speler Bedienungsanleitung – Tragbares DAB+/FM-Radio mit CD/MP3-, Bluetooth-, USB- und SD-Player Mode d’emploi – Radio DAB+/FM portative avec CD MP3, Bluetooth, USB et lecteur de carte SD...
  • Page 2: Table Des Matières

    Index English ....................................3 Nederlands ................................... 16 Deutsch....................................29 Français ....................................43 Español ....................................56...
  • Page 3: English

    English SCD-685BK CAUTION: Usage of controls or adjustments or performance of procedures other than those specified herein may result in hazardous radiation exposure. This unit should not be adjusted or repaired by anyone except qualified service personnel. PRECAUTIONS BEFORE USE KEEP THESE INSTRUCTIONS IN MIND: Do not use this device near water.
  • Page 4 33. This product is intended for non professional use only and not for commercial or industrial use. 34. Make sure the unit is adjusted to a stable position. Damage caused by using this product in an unstable position or by failure to follow any other warning or precaution contained within this user manual will not be covered by warranty.
  • Page 5 FRONT & TOP IR RECEPTION WINDOW 2. DISPLAY Display the unit operation status and information 3. CD DISC COMPARTMENT DOOR 4. VOL +/VOL - Adjust the main volume 5. FOLDER+/10+ CD/USB/SD: During playback, press to search to the current track number increase by 10 Press and hold will search to the next folder (folder up) 6.
  • Page 6 9. PROGRAM/REPEAT CD/USB/SD: During playback, press to start the repeat playback operation In stop mode, press to enter the program playback setup 10. INFO DAB/FM: Press to display station information CD/USB/SD: During MP3 playback, press to display the folder/track number or track/playing time 11.
  • Page 7 REAR & BOTTOM 1. AUX Connect to external audio player 2. HEADPHONE OUT JACK Connect to the external headphone 3. AC IN ~ Connect the power cable to this jack 4. BATTERY COMPARTMENT DOOR...
  • Page 8 REMOTE CONTROL STANDBY NUMERIC BUTTONS PRESET TUNE- SCAN RANDOM FM ST/MO BACKWARD FORWARD FOLDER + PAIR REPEAT PROGRAM PREVIOUS NEXT STOP PLAY/PAUSE TUNE+ ENTER/SELECT INFO MENU MUTE VOL - VOL + SOURCE Remote Control Operation A CR2025 battery is already installed in the remote control unit. Before using, pull out the battery insulation sheet as shown below.
  • Page 9 To replace a new battery, please refer to the figure shown below. When inserting a battery, be sure to do so in the proper direction.  If the remote control con icts with other devices, the operation will be affected. ...
  • Page 10 CONNECTING TO THE POWER SUPPLY 1. Connect the end of the detachable power cord to the unit rear panel AC IN ~ jack and the other end to the AC outlet. 2. Press the STANDBY button to turn on the unit. DC CONNECTION For DC operation, firstly remove the AC plug from the AC outlet and disconnect the AC cord from the AC IN ~ jack.
  • Page 11 Tuning Press the TUNE- or TUNE+ button to display the information of the next station. Then press the ENTER button to tune to this station in few seconds. Storing DAB Presets You can save up to 20 DAB stations. 1. Tune to the station you wish to store. 2.
  • Page 12 FM RADIO OPERATION Auto Scan 1. Turn on the unit in FM mode. 2. Press the SCAN button to scan for the next available FM station. Manual Scan 1. Press the TUNE- or TUNE+ button repeatedly to tune to a different frequency. 2.
  • Page 13 CD/USB/SD OPERATION Loading and Playing CD Disc Open the CD door. Install a disc with the CD graphic side facing up. Close the CD door. Press the SOURCE button to CD mode. After reading the total number of tracks will be shown on the display. Press the PLAY/PAUSE button to play.
  • Page 14 Bluetooth status indicator will keep on flashing. Turn on the Bluetooth function of your device and enable the search until “Lenco SCD-685” is found. Select “Lenco SCD-685” on the Bluetooth device to make connection. Enter the pass code “0000” if required.
  • Page 15 Our product is improved ceaselessly and the specification and function may be changed without prior notice. GUARANTEE Lenco offers service and warranty in accordance to European law, which means that in case of repairs (both during and after the warranty period) you should contact your local dealer.
  • Page 16: Nederlands

    Nederlands SCD-685BK LET OP: Gebruik van bedieningen of afstellingen of uitvoer van procedures anders dan gespecificeerd in deze documentatie kan leiden tot blootstelling aan schadelijke straling. Dit apparaat dient uitsluitend te worden aangepast of gerepareerd door gekwalificeerd onderhoudspersoneel. VOORZORGSMAATREGELEN VOOR GEBRUIK ONTHOUD DE VOLGENDE INSTRUCTIES: Gebruik dit apparaat niet in de buurt van water.
  • Page 17 29. Aandacht voor het milieu is nodig bij het verwijderen van de batterijen. 30. Het apparaat kan alleen worden gebruikt in gematigde klimaten. Extreem koude of warme omgevingen moeten worden vermeden. 31. Het nominale specificatielabel is te vinden op het paneel aan de onder- of achterkant van het apparaat. 32.
  • Page 18 VOOR- EN BOVENZIJDE IR ONTVANGSTVENSTER 2. SCHERM Toont de gebruiksmodus van en informatie over het apparaat 3. KLEPJE VAN DISKHOUDER 4. VOL +/VOL - Het hoofdvolume aanpassen 5. FOLDER+/10+ CD/USB/SD: Tijdens het afspelen indrukken om het huidige tracknummer met 10 te verhogen Ingedrukt houden om de volgende folder te selecteren (folder omhoog) 6.
  • Page 19 9. PROGRAMMEER/HERHAAL CD/USB/SD: Tijdens het afspelen indrukken om de herhalende afspeelmodus te starten In stopmodus indrukken om de instellingen te openen voor de geprogrammeerde afspeelmodus 10. INFO DAB/FM: Indrukken om stationsinformatie weer te geven CD/USB/SD: Tijdens MP3-weergave indrukken om de folder/het tracknummer of de track/afspeeltijd weer te geven 11.
  • Page 20 ACHTER- EN ONDERZIJDE 1. AUX Sluit hier een externe audiospeler aan 2. HOOFDTELEFOONUITGANG Sluit hier een externe hoofdtelefoon aan 3. AC IN ~ Sluit op deze ingang de voedingskabel aan 4. KLEPJE VAN BATTERIJVAK...
  • Page 21 AFSTANDSBEDIENING STAND-BY NUMERIEKE TOETSEN VOORKEUZE AFSTEMMEN- SCAN WILLEKEURIG FM ST/MO VORIGE VOLGENDE FOLDER + PAIR HERHAAL PROGRAMMA VORIGE VOLGENDE STOP AFSPELEN/PAUZE AFSTEMMEN+ ENTER/SELECTEREN INFO MENU DEMP VOL - VOL + BRON De afstandsbediening gebruiken Er is al een CR2025 batterij geïnstalleerd in de afstandsbediening. Trek vóór gebruik de isolatiestrip van de batterij af, zoals hieronder staat afgebeeld.
  • Page 22 Raadpleeg a.u.b. de afbeelding hieronder als u de batterij door een nieuwe wilt vervangen. Let a.u.b. op de juiste polariteitrichting wanneer u een batterij installeert.  Als deze afstandsbediening interferentie ontvangt van andere apparatuur, dan zal de werking ervan worden aangetast.
  • Page 23 AANSLUITING OP DE VOEDING 1. Sluit het ene uiteinde van de afneembare voedingskabel aan op de ingang AC IN op het achterpaneel van het apparaat en het andere uiteinde op het AC stopcontact. 2. Druk op de toets STANDBY om het apparaat in te schakelen. DC-AANSLUITING Om het apparaat op DC-voeding te gebruiken, dient u eerst de AC stekker uit het AC stopcontact te trekken en de AC voedingskabel los te koppelen van de ingang AC IN~.
  • Page 24 Handmatige scan 1. Schakel het apparaat in op DAB-modus. 2. Druk op de toets MENU om de menubediening te openen. 3. Druk op de knop TUNE- of TUNE+ totdat “Manual tune” (Handmatig afstemmen) wordt weergegeven en druk vervolgens op de toets ENTER om te openen. 4.
  • Page 25 Stations opruimen Deze functie verwijdert inactieve stations. 1. Druk op de toets MENU om de menubediening te openen. 2. Druk op de knop TUNE- of TUNE+ totdat “Prune” (Opruimen) wordt weergegeven en druk vervolgens op de toets ENTER om het apparaat op te ruimen. 3.
  • Page 26 Audio-instelling 1. Druk op de toets MENU om de menubediening te openen. 2. Druk op de knop TUNE- of TUNE+ totdat “Audio Mode” (Audiomodus) wordt weergegeven en druk vervolgens op de toets ENTER. 3. Druk op de knop TUNE- of TUNE+ om te wisselen tussen “Stereo”...
  • Page 27 Bluetooth-statusindicator blijven knipperen. Schakel de Bluetooth-functie van uw apparaat in en laat deze zoeken totdat “Lenco SCD-685” is gevonden. Selecteer “Lenco SCD-685” op het Bluetooth- apparaat om de verbinding tot stand te brengen. Voer eventueel het wachtwoord “0000” in.
  • Page 28 GARANTIE Lenco biedt service en garantie aan overeenkomstig met de Europese wetgeving. Dit houdt in dat u, in het geval van reparaties (zowel tijdens als na de garantieperiode), uw lokale handelaar moet contacteren. Belangrijke opmerking: Het is niet mogelijk om producten die moeten worden gerepareerd rechtstreeks naar Lenco te sturen.
  • Page 29: Deutsch

    Deutsch SCD-685BK ACHTUNG: Die zweckentfremdete Bedienung, Benutzung oder Einstellung der Prozeduren kann zu gefährlichen Unfällen durch Strahlen führen. Dieses Gerät darf außer von qualifizierten Fachleuten von niemand anderem repariert oder eingestellt werden. VORSICHTSMASSNAHMEN VOR DER BENUTZUNG BEFOLGEN SIE IMMER FOLGENDE ANWEISUNGEN: Benutzen Sie das Gerät nicht in der Nähe von Wasser.
  • Page 30 29. Bei der Batterieentsorgung sind die Entsorgungsvorschriften einzuhalten. 30. Das Gerät kann nur bei moderaten Temperaturen verwendet werden. Eine Nutzung in extrem kalten oder heißen Umgebungen sollte vermieden werden. 31. Das Typenschild befindet sich an der Unter- oder Rückseite des Gerätes. 32.
  • Page 31 OBER- UND FRONTSEITE IR-EMPFANGSFELD 2. ANZEIGE Anzeige des Betriebsmodus und von Informationen 3. CD-Fach-Tür 4. VOL +/VOL – Einstellung der Gesamtlautstärke 5. VERZEICHNIS+/10+ CD/USB/SD: Während der Wiedergabe drücken, um einen Titel mit der aktuellen Titelnummer + 10 zu suchen. Gedrückt halten, um zum nächsten Verzeichnis zu wechseln (eine Verzeichnisebene hoch) 6.
  • Page 32 9. PROGRAMMIEREN/WIEDERHOLEN CD/USB/SD: Während der Wiedergabe drücken, um die wiederholte Wiedergabe zu starten Bei beendeter Wiedergabe drücken, um zur Einstellung für die programmierte Wiedergabe zu gelangen 10. INFO DAB/FM: Drücken Sie diese Taste zur Anzeige von Radiosenderinformationen. CD/USB/SD: Drücken Sie die Taste während der MP3-Wiedergabe, um Ordner-/Titelnummer oder Titel-/Wiedergabezeit anzuzeigen 11.
  • Page 33 RÜCKTEIL UND UNTERSEITE 1. AUX Anschluss eines externen Audio-Players 2. KOPFHÖRERAUSGANGSBUCHSE Anschluss eines externen Kopfhörers 3. AC-NETZANSCHLUSSBUCHSE An diese Buchse das Netzkabel anschließen 4. BATTERIEFACHDECKEL...
  • Page 34 FERNBEDIENUNG STANDBY ZIFFERNTASTEN SPEICHERPLATZ ABSTIMMEN- SENDERSUCHLAUF RANDOM (ZUFALL) FM-STEREO/MONO ZURÜCK VERZEICHNIS + KOPPELN WIEDERHOLEN PROGRAM VORHERIG NACHFOLGEND STOPP WIEDERGABE/PAUSE ABSTIMMEN+ EINGABE/AUSWÄHLEN INFO MENÜ STUMM LAUTSTÄRKE – LAUTSTÄRKE + QUELLE Bedienung der Fernbedienung In der Fernbedienung befindet sich bereits eine CR2025-Knopfzelle. Entfernen Sie wie nachstehend gezeigt vor der Inbetriebnahme die Isolationsfolie von der Batterie.
  • Page 35 Folgen Sie bitte für das Ersetzen der Batterie nachfolgender Abbildung. Achten Sie beim Einlegen der Batterie auf die richtige Ausrichtung der Batterie.  Wenn die Fernbedienung und andere Geräte sich gegenseitig stören, kann dies ihren Betrieb beeinflussen.  Drücken Sie nicht gleichzeitig Tasten am Gerät und auf der Fernbedienung. ...
  • Page 36 ANSCHLUSS AN DAS STROMNETZ 1. Verbinden Sie das eine Ende des abziehbaren Netzkabels mit der AC-Netzanschlussbuchse AC IN ~ und das andere mit einer Netzsteckdose. 2. Drücken Sie die Taste STANDBY, um das Gerät einzuschalten. BATTERIEBETRIEB Ziehen Sie für den Batteriebetrieb zuerst den Netzstecker aus der Netzsteckdose und danach das Netzkabel aus der Netzanschlussbuchse AC IN ~.
  • Page 37 TUNE+, bis „Manual tune“ (Manuelle Abstimmung) angezeigt wird und 3. Drücken Sie die Taste TUNE- oder drücken Sie anschließend die Taste ENTER. 4. Wählen Sie mit der Taste TUNE- oder TUNE+ den gewünschten Kanal (5A-13F) aus. 5. Drücken Sie die Taste TUNE- oder TUNE+ zum Auswählen eines anderen Kanals (5A-13F).
  • Page 38 Bereinigen Diese Funktion entfernt inaktive Sender. 1. Rufen Sie mit der Taste MENU die Menüsteuerung auf. 2. Drücken Sie die Taste TUNE- oder TUNE+, bis „Prune“ (Bereinigen) angezeigt wird und drücken Sie anschließend die Taste ENTER, um das Gerät zu bereinigen. 3.
  • Page 39 Audioeinstellung 1. Rufen Sie mit der Taste MENU die Menüsteuerung auf. 2. Drücken Sie die Taste TUNE- oder TUNE+, bis „Audio Mode“ (Audiomodus) angezeigt wird und drücken Sie anschließend die Taste ENTER. 3. Wechseln Sie mit der Taste TUNE- oder TUNE+ zwischen der Auswahl „Stereo“...
  • Page 40 Anzeige als auch Bluetooth-Statusanzeige weiter. Schalten Sie in diesem Fall die Bluetoth- Funktion Ihres Geräts ein und aktivieren Sie die Suche bis „Lenco SCD-685“ gefunden wurde. Wählen Sie auf dem Bluetooth-Gerät „Lenco SCD-685“ aus, um eine Verbindung herzustellen. Geben Sie, falls erforderlich, den Zugangscode „0000“...
  • Page 41 Änderungen ohne vorherige Ankündigung vorgenommen werden. GARANTIE Lenco bietet Leistungen und Garantien im Einklang mit Europäischem Recht. Im Falle von Reparaturen (sowohl während als auch nach Ablauf der Garantiezeit) sollten Sie deshalb Ihren Einzelhändler kontaktieren. Wichtiger Hinweis: Es ist nicht möglich, Geräte für Reparaturen direkt an Lenco zu schicken.
  • Page 42 Sie, natürliche Ressourcen zu schonen und Umweltschutzstandards zur Verwertung und Entsorgung von Altgeräten aufrecht zu halten (Waste Electrical and Electronic Equipment Directive). SERVICE Besuchen Sie bitte für weitere Informationen und unseren Kundendienst unsere Homepage www.lenco.com Lenco Benelux BV, Thermiekstraat 1a, 6361 HB Nuth, The Netherlands.
  • Page 43: Français

    Français SCD-685BK ATTENTION : L’utilisation de commandes ou de réglages ou l’exécution de procédures autres que ceux spécifiés dans ce manuel peut entraîner une exposition à des rayonnements dangereux. Cet appareil ne doit pas être réglé ou réparé par quiconque d’autre que du personnel qualifié.
  • Page 44 28. Si l'appareil a lapossibilité de fonctionne r sur batterie, n’exposez pas la batterie à une chaleur extrême telle que les rayons du soleil, le feu ou toute autre chaleur. 29. Veuillez considérer les questions environnementales lors de la mise au rebut des piles. 30.
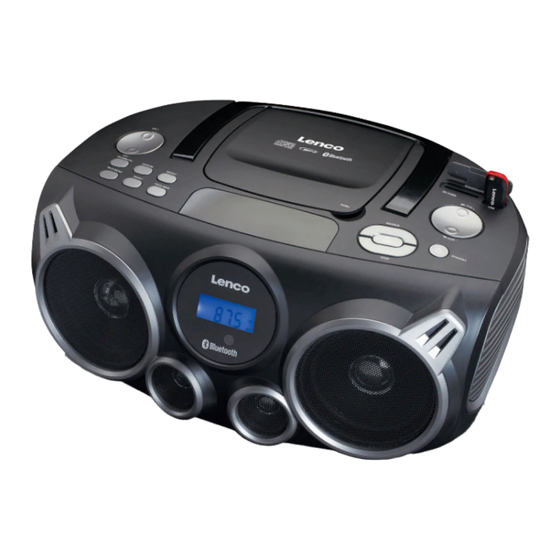
  • Page 45 AVANT ET DESSUS FENÊTRE DE RÉCEPTION IR 2. AFFICHAGE Pour afficher l'état de fonctionnement de l'appareil et des informations 3. PORTE DU COMPARTIMENT DE CD 4. VOL +/VOL - Pour régler le volume principal 5. DOSSIER+/10+ CD/USB/SD : En cours de lecture, appuyez dessus pour avancer de 10 pistes. Maintenez ce bouton enfoncé...
  • Page 46 9. PROGRAMME/RÉPÉTITION CD/USB/SD : En cours de lecture, appuyez dessus pour débuter la lecture en boucle. En mode arrêt, appuyez dessus pour passer en mode de lecture programmée. 10. INFO DAB/FM : Appuyez dessus pour afficher les informations de la station. CD/USB/SD : Pendant la lecture MP3, appuyez pour afficher le dossier/numéro de morceau ou morceau/temps de lecture 11.
  • Page 47 ARRIÈRE ET DESSOUS 1. AUX Pour brancher un lecteur audio externe 2. PRISE DE SORTIE CASQUE Pour brancher des écouteurs externes 3. ENTRÉE CA ~ Branchez le câble d’alimentation dans cette prise. 4. CACHE DES PILES...
  • Page 48 TÉLÉCOMMANDE MISE EN VEILLE PAVÉ NUMÉRIQUE PRÉSELECTION RÉGLAGE- RECHERCHE ALÉATOIRE FM ST/MO PRÉCÉDENT SUIVANT DOSSIER + COUPLAGE RÉPÉTITION PROGRA. PRÉCÉDENT SUIVANT ARRÊT LECTURE/PAUSE RÉGLAGE+ ENTRÉE/SÉLECTION INFO MENU MUET VOL - VOL + SOURCE Utilisation de la télécommande Une pile CR2025 est déjà installée dans la télécommande. Avant utilisation, sortez la bande isolante du compartiment à pile comme indiqué...
  • Page 49 Pour installer une pile neuve, consultez la figure ci-dessous. En installant une pile, veillez à suivre les instructions.  Si la télécommande entre en conflit avec d’autres appareil, le fonctionnement sera affecté.  N'appuyez pas simultanément sur des boutons sur l’appareil et la télécommande. ...
  • Page 50 BRANCHEMENT À L'ALIMENTATION ÉLECTRIQUE 1. Branchez l’extrémité du cordon d'alimentation amovible à la prise d’entrée CA sur le panneau arrière de l’appareil et l’autre extrémité à la prise secteur. 2. Appuyez sur le bouton STANDBY pour mettre l'appareil en marche. BRANCHEMENT CC Pour un fonctionnement CC, débranchez d'abord la fiche CA de la prise secteur et débranchez le cordon d'alimentation CA de la prise d’entrée CA.
  • Page 51 4. Utilisez les touches TUNE- /TUNE+ pour sélectionner un canal (de 5A à 13F). 5. Pour sélectionner un autre canal (de 5A à 13F), utilisez les touches TUNE- /TUNE+ . 6. Appuyez sur ENTER pour confirmer. Syntonisation Utilisez les touches TUNE- /TUNE+ pour afficher des informations sur la station suivante. Ensuite, appuyez sur le bouton ENTER pour que la radio se syntonise à...
  • Page 52 Éliminer toutes les stations non valables Cette fonction supprime les stations inactives. 1. Appuyez sur la touche MENU pour accéder au menu. 2. Utilisez les touches TUNE- /TUNE+ jusqu’à ce que « Prune » (Purge) apparaisse, puis appuyez sur ENTER pour purger les stations inutiles.
  • Page 53 Réglages audio 1. Appuyez sur la touche MENU pour accéder au menu. 2. Utilisez les touches TUNE- /TUNE+ jusqu’à ce que « Audio Mode » (Mode audio) apparaisse, puis appuyez sur ENTER. 3. Utilisez les touches TUNE- /TUNE+ pour basculer entre « Stereo » (Stéréo) ou « Mono », puis appuyez sur ENTER pour confirmer.
  • Page 54 Bluetooth continueront de clignoter. Activez la fonction Bluetooth de votre appareil et activez la recherche jusqu’à ce qu'il ait trouvé « Lenco SCD-685 ». Sélectionnez « Lenco SCD-685 » sur votre l’appareil Bluetooth pour effectuer la connexion. Saisissez le mot de passe « 0000 », si nécessaire.
  • Page 55 GARANTIE Lenco propose un service et une garantie conformément à la législation européenne, ce qui signifie qu’en cas de besoin de réparation (aussi bien pendant et après la période de garantie), vous pouvez contacter votre revendeur le plus proche.
  • Page 56: Español

    Español SCD-685BK PRECAUCIÓN: El uso de los controles o ajustes o el funcionamiento de los procedimientos excepto a aquellos especificados aquí pueden provocar una exposición peligrosa a la radiación. Esta unidad no debe ajustarse o repararse por ninguna persona salvo personal de servicio cualificado.
  • Page 57 30. El aparato solo debe usarse en climas moderados o extremadamente fríos y deben evitarse los entornos calurosos. 31. La etiqueta identificativa aparece marcada en la parte inferior o en el trasero del aparato. 32. Este aparato no está diseñado para su uso por personas (incluyendo niños) con discapacidades físicas, sensoriales o mentales o con falta de experiencia o conocimientos, salvo que estén bajo la supervisión o hayan recibido formación sobre el uso correcto del dispositivo por parte de una persona responsable de su seguridad.
  • Page 58 PARTE DELANTERA Y SUPERIOR VENTANA DE RECEPCIÓN DE INFRARROJOS 2. DISPLAY Muestra el estado de funcionamiento de la unidad e información 3. PUERTA DEL COMPARTIMENTO DE DISCOS CD 4. VOLUMEN +/VOLUMEN - Ajusta el volumen principal 5. CARPETA+/10+ CD/USB/SD: Durante la reproducción, púlselo para buscar el número de la pista actual aumentando por 10 Mantenerlo pulsado buscará...
  • Page 59 9. PROGRAMA/REPETIR CD/USB/SD: Durante la reproducción, púlselo para iniciar la operación de repetir reproducción. En modo parada, púlselo para entrar en la configuración de reproducción del programa 10. INFORMCIÓN DAB/FM: Púlselo para mostrar la información de la emisora. CD/USB/SD: Durante la reproducción de MP3, púlselo para mostrar la carpeta / número de pista o el tiempo de la pista / reproducción 11.
  • Page 60 PARTE POSTERIOR E INFERIOR 1. AUX Conéctelo al reproductor de audio externo 2. CONECTOR DE SALIDA DE AURICULARES Conéctelo al auricular externo 3. ENTRADA CA ~ Conecte el cable de alimentación a esta toma. 4. PUERTA DEL COMPARTIMENTO DE LAS PILAS...
  • Page 61 MANDO A DISTANCIA ESPERA BOTONES NUMÉRICOS PREDEFINIDA SINTONIZAR- BÚSQUEDA ALEATORIO FM ESTÉREO/MONO ATRÁS ADELANTE CARPETA + EMPAREJAR REPETIR PROGRAMA ANTERIOR SIGUIENTE DETENER REPRODUCIR/PAUSA SINTONIZAR+ ENTRAR/SELECCIONAR INFORMCIÓN MENÚ SILENCIO VOL - VOL + FUENTE Funcionamiento del mando a distancia En la unidad del mando a distancia ya se encuentra instalada una pila CR2025. Antes de usarlo, extraiga la hoja aislante de la pila tal y como se muestra debajo.
  • Page 62 Para sustituir una pila nueva, por favor, remítase a la figura que se muestra debajo. Cuando inserte una pila, asegúrese de hacerlo en la dirección correcta.  Si el mando a distancia entra en conflicto con otros dispositivos, se verá afectado el funcionamiento. ...
  • Page 63 CONEXIÓN A LA CORRIENTE ELÉCTRICA 1. Conecte el extremo del cable eléctrico extraíble a la entrada de corriente del panel trasero de la unidad y el otro extremo a la toma eléctrica. 2. Pulse el botón STANDBY para encender la unidad. CONEXIÓN CC Para utilizarlo con CC, retire primero el conector de CA de la toma de CA y desconecte el cable de CA del conector de entrada de corriente.
  • Page 64 5. Para seleccionar otro canal, (5A-13F), pulse el botón TUNE- o TUNE+. 6. Pulse ENTER para confirmarlo. Sintonización Pulse el botón TUNE- o TUNE+ para mostrar la información de la siguiente emisora. Posteriormente, pulse el botón ENTER para sintonizar esta emisora durante unos segundos. Guardar presintonías DAB Puede guardar hasta 20 emisoras DAB.
  • Page 65 FUNCIONAMIENTO DE LA RADIO FM Búsqueda automática 1. Encienda la unidad en modo FM. 2. Pulse el botón SCAN para buscar la siguiente emisora FM disponible. Búsqueda manual 1. Pulse el botón TUNE- o TUNE+ de forma reiterada para sintonizar una frecuencia diferente. 2.
  • Page 66 FUNCIONAMIENTO DE CD/USB/SD Carga y reproducción de discos CD Abra la tapa del CD. Introduzca un disco con el lado impreso del CD hacia arriba. Cierre la puerta del CD. Pulse el botón SOURCE para entrar en modo CD. Tras su lectura en pantalla se mostrará el número total de pistas. Pulse el botón REPRODUCIR/PAUSAR para reproducirlo.
  • Page 67 Bluetooth seguirán parpadeando. Encienda la función Bluetooth de su dispositivo y active la búsqueda hasta que se encuentre “Lenco SCD-685”. Seleccione “Lenco SCD-685” en el dispositivo Bluetooth para hacer la conexión. Introduzca la contraseña “0000” si la solicita.
  • Page 68 Nuestros productos se mejoran sin cesar y la especificación y función pueden cambiarse sin previo aviso. GARANTÍA Lenco ofrece servicio y garantía en cumplimiento con las leyes de la Unión Europea, lo cual implica que, en caso de que su producto precise ser reparado (tanto durante como después del periodo de garantía), deberá contactar directamente con su distribuidor.