Table des Matières

Publicité

Les langues disponibles

Les langues disponibles

THERMOMÈTRE FRONTAL ET AURICULAIRE
SSOT 6 B2
THERMOMÈTRE FRONTAL
ET AURICULAIRE
Mode d'emploi
FOREHEAD & EAR
THERMOMETER
Operating instructions
IAN 96247
STIRN- UND OHR-
THERMOMETER
Bedienungsanleitung
2

Publicité

Table des Matières
loading

Sommaire des Matières pour SilverCrest SSOT 6 B2

  • Page 1 THERMOMÈTRE FRONTAL ET AURICULAIRE SSOT 6 B2 THERMOMÈTRE FRONTAL STIRN- UND OHR- ET AURICULAIRE THERMOMETER Mode d’emploi Bedienungsanleitung FOREHEAD & EAR THERMOMETER Operating instructions IAN 96247...
  • Page 2 Avant de lire le mode d‘emploi, ouvrez les deux pages conte- nant les illustrations et familiarisez-vous ensuite avec toutes les fonctions de l‘appareil. Klappen Sie vor dem Lesen die beiden Seiten mit den Abbildun- gen aus und machen Sie sich anschließend mit allen Funktionen des Gerätes vertraut.
  • Page 4 SET 12hr SET 24hr (12/24) (12/24) SET hour SET minute SET sleep SET Year SET month SET day disable...
  • Page 5: Table Des Matières

    Table des matières Introduction Utilisation conforme à l’usage prévu ....Page 7 Fourniture ............Page 8 Description des pièces et éléments ....Page 8 Données techniques ........... Page 9 Sécurité Instructions générales de sécurité ..... Page 11 Instructions de sécurité ........Page 13 Consignes de sécurité...
  • Page 6 Sont utilisés dans le présent mode d‘emploi / sur l‘appareil les pictogrammes suivants : Lire le mode d‘emploi ! Tenir compte des avertissements et instructions de sécurité ! Risque d‘explosion ! Courant continu (type de courant et de tension) Milliampère Danger de mort et d‘accidents pour les en- fants et les enfants en bas-âge ! Produit médical de type BF Année et mois de fabrication...
  • Page 7: Utilisation Conforme À L'usage Prévu

    Introduction Thermomètre frontal et auriculaire Introduction Toutes nos félicitations pour l’achat de votre nouvel appareil. Vous avez choisi un produit de grande qualité. Le mode d’emploi fait partie de ce produit. Il contient des remarques importantes concernant la sécurité, l’utilisation et la mise au rebut.
  • Page 8: Fourniture

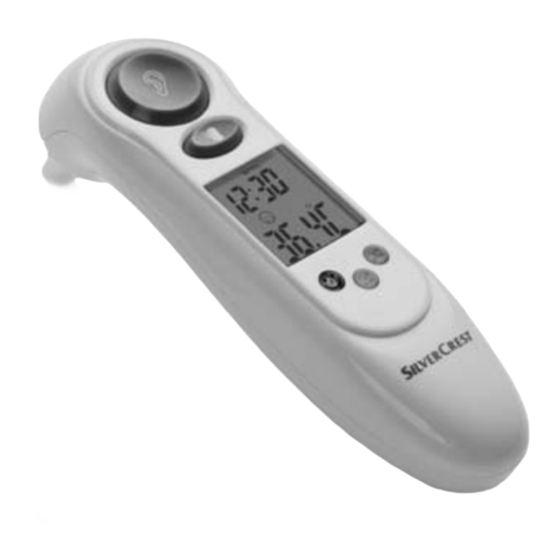
    Introduction Fourniture 1 x thermomètre frontal et auriculaire (avec pile et capuchon 1 x mode d’emploi Description des pièces et éléments Tête de mesure Touche «EAR» (Mesure de la température dans l’oreille/mode scan) Touche «FOREHEAD» (Mesure de la température sur le front/les tempes) Écran LCD DEL rouge : Fièvre 38,0 °C - 42,9 °C (100,4 °F - 109,2 °F)
  • Page 9: Données Techniques

    Introduction Ecran à cristaux liquides Symbole changement de pile Symbole affi chage année Symbole affi chage date Symbole mode auriculaire Symbole mode standard Symbole mode scan Affi chage de la température Symbole mode frontal Symbole nettoyage Date et heure en mode standard Symbole mode Sleep Affi...
  • Page 10 Introduction Coupure automatique : coupure automatique au bout d’une minute Plage de mesure mode auriculaire et frontal : 32 °C - 42,9 °C (89,6 °F - 109,2 °F) Exactitude de mesure : ± 0,2 °C (± 0,4 °F) pour la plage 35,5 °C - 42,0 °C (95,9 °F - 107,8 °F) ±...
  • Page 11: Instructions Générales De Sécurité

    Introduction / Sécurité Pression atmosphérique : 700 ~ 1060 hPa Dimensions : env. 135 x 35 x 58 mm (long. x larg. x haut.) Poids : env. 54 g *Relative humidity = humidité relative de l’air Sécurité CONSERVEZ POUR L’AVENIR L’ENSEMBLE DES INSTRUCTIONS DE SECURITE ET INSTRUCTIONS ! Instructions générales de sécurité...
  • Page 12 Sécurité physique ou psychomoteur ou encore des personnes souff rant de défi ciences mentales ou ayant un manque de connaissances et d'expérience s'ils sont sous la surveillance d'un adulte ou si l'usage de l'ap- pareil leur a été expliqué et ils sont conscients des dangers en résultant.
  • Page 13: Instructions De Sécurité

    Sécurité (100,4 °F). La diode rouge allumée est un avertis- sement. Procédez plusieurs fois à la mesure à un intervalle respectif de 0,5 à 1 heure pour suivre l’évolution de la température. Vos mesures faciliteront le diagnostic pour votre médecin. N’utilisez pas le thermomètre dans des conditions de température extrêmes et / où...
  • Page 14: Consignes De Sécurité Pour La Pile

    Sécurité Consignes de sécurité pour la pile Enlever la pile de l’appareil si celui-ci est resté longtemps inutilisé. PRUDENCE ! RISQUE D’EXPLOSION ! Ne jamais tenter de recharger la pile ! Veiller à insérer la pile en respectant la polarité correcte ! La polarité...
  • Page 15: Avant La Mise En Service

    Avant la mise en service / Utilisation Avant la mise en service Retrait de la protection pile Poussez vers le bas le couvercle du compartiment à pile Tirez le fi lm de protection au niveau de la languette du compartiment à pile. Repoussez le couvercle du compartiment à...
  • Page 16: Mesures De Températures

    Utilisation 2. Appuyez sur la touche « MEM / SET » pour sélectionner le mode 12h ou 24h. 3. Appuyez sur la touche « FOREHEAD » . Les heures clignotent et peuvent être corrigées à l’aide de la touche « MEM / SET » 4. Appuyez à nouveau sur la touche « FOREHEAD » Les minutes clignotent et peuvent être corrigées à...
  • Page 17 Utilisation Prise de température (mode auriculaire) Important ! Il est recommandé de procéder à 3 prises de température consécutives dans la même oreille et de partir du principe que le température la plus élevée est la température exacte. La prise de tempé- rature suivante peut être commencée lorsque l’affi...
  • Page 18 Utilisation 3. Vérifi ez que la tête de mesure et le capteur de mesure soient propres. 4. Nettoyez avec précaution le conduit auditif à l’aide d’un coton tige. 5. Tirez le pavillon de l’oreille légèrement vers l’arrière de la tête en biais vers le haut/vers l’arrière, afi n de li- bérer l’accès du conduit auditif et qu’il ne se trouve aucun obstacle entre le capteur et le tympan.
  • Page 19 Utilisation Avis : L’appareil se coupe automatiquement s’il n’est pas actionné pendant plus d’une minute. Si le mode de veille est activé, l’écran à cristaux liquides s’éteint. Si le mode de veille est désactivé, l’appareil se met en mode standard. Si le thermomètre a été utilisé dans des conditions normales, le résultat de la dernière prise de température est toujours mémorisé...
  • Page 20 Utilisation Notez de quelle manière vous avez pris votre température et dites-le à votre médecin. 1. Si le mode de veille est actif, activez le thermomètre avant la prise de température en appuyant sur une touche quelconque. 2. Appuyez avec précaution sur le capuchon de protec- tion et retirez celui-ci sans forcer avec un léger mouvement tournant.
  • Page 21 Utilisation 9. Répétez les étapes 3. à 6. pour procéder à d’autres prises de températures. Avis : L’appareil se coupe automatiquement s’il n’est pas actionné pendant plus d’une minute. Si le mode de veille est activé, l’écran à cristaux liquides s’éteint. Si le mode de veille est désactivé, l’appareil se met en mode standard.
  • Page 22 Utilisation Le thermomètre est de type tel qu’il procède à une mesure exacte si son boîtier est à température ambiante. Aussi, ne le tenez pas trop longtemps dans la main et tenez-le éloignez des rayons directs du soleil ! N’utilisez pas l’appareil immédiatement après nettoyage de la tête de mesure .
  • Page 23: Fonctions / Analyse Des Problèmes

    Utilisation/Fonctions / analyse des problèmes 7. Vous pouvez alors lire sur l’écran à cristaux liquides le résultat de la mesure (ill. E). 8. L’affi chage peut avoir lieu aussi bien en °C qu’en °F (voir « Fonctions / analyse des problèmes – Sélection de l’unité...
  • Page 24: La Fonction De Mémoire (Mode Mémoire)

    Fonctions / analyse des problèmes La fonction de mémoire (mode mémoire) IMPORTANT ! La mesure actuelle est toujours consignée sur le dernier emplacement de mémoire. Si tous les emplacements de mémoire sont occupés, la mesure la plus ancienne est eff acée de la mémoire. Les prises de température en mode auriculaire et frontal sont mémorisées automatiquement dans l’appareil.
  • Page 25: Remplacement De La Pile

    Fonctions / analyse des problèmes Remplacement de la pile L’appareil est équipé d’une pile au lithium (CR2032, 3 V permettant de très nombreuses mesures. Si la pile est usée, un message de défaut correspondant vous en avertit (voir « Fonctions / analyse des problèmes – solutions aux problèmes »).
  • Page 26: Solutions Aux Problèmes

    Fonctions / analyse des problèmes Solutions aux problèmes Si l’appareil ne peut pas procéder à une mesure dans la plage prévue, il émet un message de défaut. Ce message doit contribuer à résoudre le problème. Problème Cause possible Solution L‘appareil ne Pile vide ? Remplacer la pile réagit pas / se...
  • Page 27 Fonctions / analyse des problèmes Problème Cause possible Solution Affi chage « Hi » Contrôlez le mode Suivez le mode sur l‘écran à de mesure. d‘emploi en ce cristaux liquides qui concerne la (valeur me- manière de pro- surée supérieu- céder correcte- re à...
  • Page 28: Nettoyage Et Entretien

    Nettoyage et entretien Nettoyage et entretien Suite à plusieurs mesures de température, l’appareil vous rappelle de nettoyer le capteur de mesure. Le symbole nettoyage apparait pour cela à l’écran LCD et des signaux acoustiques se font entendre. Pour éviter une contamination avec des germes de maladie, la lentille doit être essuyée après chaque utilisation avec un chiff...
  • Page 29: Garantie Et S.a.v

    Nettoyage et entretien / Garantie et S.A.V. émis (voir « Fonctions / analyse des problèmes – solution aux problèmes »). Si vous n’utilisez pas l’appareil pendant une durée prolongée, retirez la pile. Garantie et S.A.V. Cet appareil bénéfi cie d‘une garantie de 3 ans à...
  • Page 30 Garantie et S.A.V. La garantie ne s‘applique pas en cas d‘utilisation non conforme ou inappropriée, d‘utilisation violente ou de toute intervention qui ne serait pas eff ectuée notre service aprèsvente autorisé. Vos droits légaux vous restent acquis, sans restriction du fait de cette garantie. La mise en jeu de la garantie ne prolonge pas la durée de garantie.
  • Page 31: Recyclage

    Garantie et S.A.V. / Recyclage Service Belgique Tel.: 070 270 171 (0,15 EUR/Min.) E-Mail: kompernass@lidl.be IAN 96247 Heures de service de notre hotline : du lundi au vendredi de 8 h à 20 h (HEC) Recyclage L’emballage se compose de matières recyclables qui peuvent être mises au rebut dans les déchetteries locales.
  • Page 32: Conformité

    Recyclage / Conformité Les piles défectueuses ou usées doivent être recyclées conf. à la Directive 2006 / 66 / EC. Rendez les piles et / ou l’appareil aux organismes de collectes proposés. Les piles ne font pas partie des ordures ménagères ! Rendez les piles et / ou le produit aux organismes de collectes proposés.
  • Page 33 Conformité Fabricant : Shenzhen Dongdixin Technology Co., Ltd. No. 3 Building XiliBaimang Xusheng Industrial Estate Nanshan, Shenzhen, China 518108 Tél. : +86 755 27 652 316 E-Mail : service@e-caretalk.com Mandataire CE : Shanghai International Holding Corp. GmbH (Europe) Eiff estraße 80 20537 Hamburg, Germany Tél. : +49 (0) 40 2513175 Téléc. :...
  • Page 34 34 FR/BE...
  • Page 35 Inhaltsverzeichnis Einleitung Bestimmungsgemäße Verwendung ....Seite 37 Lieferumfang ............Seite 38 Teilebeschreibung ..........Seite 38 Technische Daten ..........Seite 39 Sicherheit Allgemeine Sicherheitshinweise ......Seite 41 Sicherheitshinweise ..........Seite 43 Sicherheitshinweise zu Batterien ....... Seite 43 Vor der Inbetriebnahme Batteriesicherung entfernen ....... Seite 45 Betrieb Datum / Uhrzeit einstellen (Abb.
  • Page 36 In dieser Bedienungsanleitung / am Gerät werden folgende Piktogramme verwendet: Bedienungsanleitung lesen! Warn- und Sicherheitshinweise beachten! Explosionsgefahr! Gleichstrom (Strom- und Spannungsart) Milliampere Lebens- und Unfallgefahr für Kleinkinder und Kinder! Medizinprodukt Typ BF Fabrikationsjahr und -monat 2014-01 Entsorgen Sie Verpackung und Gerät umweltgerecht! 36 DE/AT/CH...
  • Page 37: Bestimmungsgemäße Verwendung

    Einleitung Stirn-und-Ohr-Thermometer Einleitung Herzlichen Glückwunsch zum Kauf Ihres neuen Gerätes. Sie haben sich damit für ein hochwer- tiges Produkt entschieden. Die Bedienungsanleitung ist Bestandteil dieses Produkts. Sie enthält wichtige Hinweise für Sicherheit, Gebrauch und Entsorgung. Machen Sie sich vor der ersten Inbetrieb- nahme mit den Funktionen des Gerätes vertraut.
  • Page 38: Lieferumfang

    Einleitung Lieferumfang 1 x Stirn-und-Ohr-Thermometer (inkl. Batterie und Schutzkappe 1 x Bedienungsanleitung Teilebeschreibung Messkopf „EAR”-Taste (Temperaturmessung im Ohr / Scan-Modus) „FOREHEAD”-Taste (Temperaturmessung an der Stirn / Schläfe) LC-Display LED rot: Fieber 38,0 °C - 42,9 °C (100,4 °F - 109,2 °F) LED orange: leichte Temperaturerhöhung 37,5 °C - 37,9 °C (99,5 °F - 100,3 °F) LED grün: kein Fieber 34,0 °C - 37,4 °C...
  • Page 39: Technische Daten

    Einleitung LC-Display Symbol Batteriewechsel Symbol Anzeige Jahr Symbol Anzeige Datum Symbol Ohren-Modus Symbol Standard-Modus Symbol Scan-Modus Temperaturanzeige Symbol Stirn-Modus Symbol Reinigung Datum und Zeit im Standard-Modus Symbol Sleep-Modus Anzeige PM Symbol Setup-Modus Symbol Memory-Modus Technische Daten Messverfahren: Infrarot (berührungsfrei) Stromversorgung: Lithium-Batterie 3 V CR2032 Stromverbrauch:...
  • Page 40 Einleitung Automatische Abschaltung: Automatische Abschaltung nach 1 Minute Messbereich Stirn- und Ohren-Modus: 32 °C - 42,9 °C (89,6 °F - 109,2 °F) Messgenauigkeiten: ± 0,2 °C (± 0,4 °F) im Bereich von 35,5 °C - 42,0 °C (95,9 °F - 107,8 °F) ±...
  • Page 41: Allgemeine Sicherheitshinweise

    Einleitung / Sicherheit Maße: ca. 135 x 35 x 58 mm (L x B x H) Gewicht: ca. 54 g *Relative humidity = relative Luftfeuchte Sicherheit BEWAHREN SIE ALLE SICHERHEITSHINWEISE UND ANWEISUNGEN FÜR DIE ZUKUNFT AUF! Allgemeine Sicherheitshinweise LEBENS- UND WARNUNG! UNFALLGEFAHR FÜR KLEINKINDER UND KINDER! Lassen Sie Kinder niemals...
  • Page 42 Sicherheit des Gerätes unterwiesen wurden und die daraus re- sultierenden Gefahren verstehen. Kinder dürfen nicht mit dem Gerät spielen. Reinigung und Benutzer-War- tung dürfen nicht von Kindern ohne Beaufsichtigung durchgeführt werden. Setzen Sie das Gerät - keinen extremen Temperaturen, - keinen starken Vibrationen, - keinen starken mechanischen Beanspruchungen, - keiner direkten Sonneneinstrahlung aus.
  • Page 43: Sicherheitshinweise

    Sicherheit Arzt die Diagnose. Verwenden Sie das Thermometer nicht unter extremen Temperaturbedingungen und / oder im Außenbereich. Ungenaue Messergebnisse sind die Folge. Beachten Sie die Vorgaben zu Umgebungs- und Lagertempera- turen (siehe „Technische Daten“). Der Messfühler sollte weder direkt berührt, noch an- gepustet werden.
  • Page 44 Sicherheit VORSICHT! EXPLOSIONSGEFAHR! Laden Sie Batterien niemals wieder auf! Achten Sie beim Einlegen auf die richtige Polarität! Diese wird im Batteriefach angezeigt. Reinigen Sie Batterie- und Gerätekontakt vor dem Einlegen falls erforderlich. Batterien gehören nicht in den Hausmüll! Jeder Verbraucher ist gesetzlich verpfl ichtet, Batterien ordnungsgemäß...
  • Page 45: Vor Der Inbetriebnahme

    Vor der Inbetriebnahme / Betrieb Vor der Inbetriebnahme Batteriesicherung entfernen Schieben Sie den Batteriefachdeckel nach unten. Ziehen Sie die Schutzfolie an der Lasche aus dem Batteriefach. Schieben Sie den Batteriefachdeckel wieder auf das Batteriefach, bis er hörbar einrastet (Abb. A). –...
  • Page 46: Temperaturmessungen

    Betrieb 3. Drücken Sie die „FOREHEAD“-Taste . Die Stunden blinken und können mit der „MEM / SET“-Taste korrigiert werden. 4. Drücken Sie die „FOREHEAD“-Taste erneut. Die Minuten blinken und können mit der „MEM / SET“- Taste korrigiert werden. Wiederholen Sie die Schritte 3. und 4., um die Werte für Jahr, Monat und Tag einzustellen bzw.
  • Page 47 Betrieb Körpertemperatur messen (Ohren-Modus) WICHTIG! Es wird empfohlen, 3 Messungen hinter- einander am selben Ohr durchzuführen und dabei die höchste Temperatur als Messwert anzunehmen. Die neue Messung kann jeweils gestartet werden, wenn die Anzeige „ “ erlischt. Verwenden Sie das Thermometer nicht, wenn bei der Messung Schmerzen auftreten.
  • Page 48 Betrieb 4. Reinigen Sie vorsichtig den Gehörgang des Ohres mit einem Wattestäbchen. 5. Ziehen Sie die Ohrmuschel leicht in Richtung Hinter- kopf schräg nach oben / nach hinten, damit der Gehörgang frei zugänglich wird und sich keine Hin- dernisse zwischen Messfühler und Trommelfell befi...
  • Page 49 Betrieb Hinweis: Das Ausschalten des Gerätes erfolgt automatisch, wenn es länger als 1 Minute nicht betätigt wird. Bei akti- viertem Sleep-Modus schaltet sich das LC-Display aus. Bei deaktiviertem Sleep-Modus schaltet das Gerät in den Standard-Modus. Wenn das Thermometer unter normalen Bedingungen betrieben wurde, wird immer das Ergebnis der jeweils letzten Messung vor dem Ausschalten automatisch gespeichert.
  • Page 50 Betrieb Merken Sie sich, mit welchem Messverfahren Sie die Temperatur gemessen haben und teilen Sie dies auch Ihrem Arzt mit. 1. Falls der Sleep-Modus aktiv ist, aktivieren Sie das Thermometer vor der Messung durch Drücken einer beliebigen Taste. 2. Drücken Sie vorsichtig auf die Schutzkappe entfernen Sie sie ohne Kraftaufwendung mit einer leichten Drehbewegung.
  • Page 51 Betrieb 8. Die Anzeige kann sowohl in „°C“ als auch in „°F“ erfolgen (siehe “Funktionen / Fehleranalyse - Temperatureinheit wählen“). 9. Wiederholen Sie Schritt 3. bis 6., um weitere Messungen durchzuführen. Hinweis: Das Ausschalten des Gerätes erfolgt automa- tisch, wenn es länger als 1 Minute nicht betätigt wird. Bei aktiviertem Sleep-Modus schaltet sich das LC-Display aus.
  • Page 52 Betrieb von seiner Innentemperatur unterscheiden, besonders, wenn die Oberfl äche der Sonneneinstrahlung oder ei- nem Luftzug ausgesetzt ist! Das Thermometer misst bauartbedingt den exakten Wert, wenn sein Gehäuse Raumtemperatur angenommen hat. Behalten Sie es zur Messung deshalb nicht zu lange in der Hand und halten Sie es von direkter Sonnen- strahlung fern! Benutzen Sie das Gerät nicht sofort nach der Reinigung...
  • Page 53 Betrieb 5. Halten Sie den Messkopf in einer Entfernung von 1 cm an die Flüssigkeit und / oder Oberfl äche, deren Temperatur Sie messen wollen. 6. Drücken Sie die „EAR“-Taste , um die Messung zu starten. 7. Nun können Sie das Messergebnis auf dem LC-Display ablesen (Abb.
  • Page 54: Funktionen / Fehleranalyse

    Funktionen / Fehleranalyse Funktionen / Fehleranalyse Temperatureinheit wählen Drücken und halten Sie gleichzeitig die „EAR“-Taste und die „FOREHEAD“-Taste , bis hinter der Temperaturanzeige „°F“ erscheint. Ein Umschalten von „°F“ in „°C“ ist mit der gleichen Prozedur möglich. Die Memory-Funktion (Memory-Modus) WICHTIG! Die aktuelle Messung wird stets auf dem letzten Speicher- platz abgelegt.
  • Page 55: Batteriewechsel

    Funktionen / Fehleranalyse Um in den Standard-Modus zurückzukehren, gehen Sie wie folgt vor: 1. Drücken Sie gleichzeitig die „FOREHEAD“-Taste und die „EAR“-Taste so oft, bis im LC-Display wieder Raumtemperatur, Datum und Uhrzeit, sowie das Symbol angezeigt werden (Abb. D). 2. Sie befi nden sich jetzt wieder im Standard-Modus. Batteriewechsel Das Gerät ist mit einer Lithium-Batterie (CR2032, 3 V ausgestattet, die sehr viele Messungen ermöglicht.
  • Page 56: Behebung Von Problemen

    Funktionen / Fehleranalyse Schieben Sie den Batteriefachdeckel wieder auf das Batteriefach, bis er hörbar einrastet (Abb. A). Behebung von Problemen Falls das Gerät eine Messung nicht im vorgesehenen Bereich durchführen kann, gibt es eine Fehlermeldung aus. Diese Meldung soll zur Problembehebung beitragen. Fehler Problem Beseitigung...
  • Page 57 Funktionen / Fehleranalyse Fehler Problem Beseitigung Anzeige „Hi“ Überprüfen Sie Befolgen Sie die auf LC-Display den Messmodus. Bedienungsanlei- (Messwert tung hinsichtlich über 42,9°C korrekter oder 109,2°F) Messungen. Anzeige „ErrE“ Umgebungstem- Sorgen Sie für LC-Display peratur außerhalb eine Umge- des Bereiches bungstemperatur 15,0 °C - 40,0 °C / im Bereich...
  • Page 58: Reinigung Und Pflege

    Reinigung und Pflege Reinigung und Pfl ege Nach einigen Temperaturmessungen erinnert Sie das Gerät daran, den Messfühler zu reinigen. Hierzu erscheint das Symbol Reinigung im LC-Display Signaltöne erklingen. Die Linse in der Öff nung des Messfühlers ist das empfi ndlichste Teil des Gerätes. Seien Sie sehr vorsichtig, wenn eine Reinigung erforderlich wird.
  • Page 59: Garantie Und Service

    Reinigung ... / Garantie und Service wird, anderenfalls wird eine Fehlermeldung ausgegeben (siehe „Funktionen / Fehleranalyse - Behebung von Problemen“). Ebenso ist zum Messen eine Raumtemperatur von 5,0 °C 59,9 °C (41,0 °F 139,8 °F) einzuhalten. Liegt sie außerhalb dieses Bereiches, erfolgt eine Fehler- meldung (siehe „Funktionen / Fehleranalyse - Behebung von Problemen“).
  • Page 60 Garantie und Service Bei missbräuchlicher und unsachgemäßer Behandlung, Gewaltanwendung und bei Eingriff en, die nicht von unserer autorisierten Service-Niederlassung vorgenommen wurden, erlischt die Garantie. Ihre gesetzlichen Rechte werden durch diese Garantie nicht eingeschränkt. Die Garantiezeit wird durch die Gewährleistung nicht verlängert.
  • Page 61: Entsorgung

    Garantie und Service / Entsorgung Service Schweiz Tel.: 0842 665566 (0,08 CHF/Min., Mobilfunk max. 0,40 CHF/Min.) E-Mail: kompernass@lidl.ch IAN 96247 Erreichbarkeit Hotline: Montag bis Freitag von 8:00 Uhr – 20:00 Uhr (MEZ) Entsorgung Die Verpackung besteht aus umweltfreundlichen Materialien, die Sie über die örtlichen Recycling- stellen entsorgen können.
  • Page 62: Konformität

    Entsorgung / Konformität Defekte oder verbrauchte Batterien müssen gemäß Richtlinie 2006/66/EC recycelt werden. Geben Sie Batterien und / oder das Gerät über die angebotenen Sammeleinrichtungen zurück. Batterien gehören nicht in den Hausmüll! Geben Sie die Batterien und / oder das Produkt über die angebotenen Sammeleinrichtungen zurück.
  • Page 63 Konformität Hersteller: Shenzhen Dongdixin Technology Co., Ltd. No. 3 Building XiliBaimang Xusheng Industrial Estate Nanshan, Shenzhen, China 518108 Tel.: +86 755 27 652 316 E-Mail: service@e-caretalk.com EU-Bevollmächtigter: Shanghai International Holding Corp. GmbH (Europe) Eiff estraße 80 20537 Hamburg, Germany Tel.: +49 (0) 40 2513175 Fax: +49 (0) 40 255726...
  • Page 64 64 DE/AT/CH...
  • Page 65 Table of Contents Introduction Intended use ............Page 67 Scope of delivery ..........Page 68 Description of parts ........... Page 68 Technical data ........... Page 69 Safety General safety instructions ....... Page 71 Safety instructions ..........Page 73 Safety Instructions for the Battery ..... Page 74 Before getting started Removing the battery fuse ........
  • Page 66 The following pictograms are used in these directions for use or on the device itself: Read the directions for use! Please observe the warning and safety instructions! Risk of explosion! Direct current (type of current and voltage) Milliampere Danger to life and danger of accidents for infants and children! Medical device type BF Year and month of manufacture...
  • Page 67: Intended Use

    Introduction Forehead & Ear Thermometer Introduction Congratulations on the purchase of your new appliance. You have clearly decided in favour of a quality product. These operating instructions are a part of this product. They contain important information in regard to safety, use and disposal.
  • Page 68: Scope Of Delivery

    Introduction Scope of delivery 1 x Forehead and ear thermometer (incl. battery and protective head guard 1 x Directions for use Description of parts Measuring head “EAR” button (Temperature measurement in the ear / scan mode) “FOREHEAD” button (Temperature measurement at forehead / temple) LC display Red LED: Fever 38.0 °C - 42.9 °C (100.4 °F - 109.2 °F)
  • Page 69: Technical Data

    Introduction LC display Battery change symbol Year display symbol Date display symbol Ear mode symbol Standard mode symbol Scan mode symbol Temperature display Forehead mode symbol Cleaning symbol Date and time in standard mode Sleep mode symbol PM display Setup mode symbol Memory mode symbol Technical data Measurement...
  • Page 70 Introduction Temperature scale: °C (°Celsius) °F (°Fahrenheit) Time display: 12 / 24-hour format Automatic switch-off : Automatic switch-off after 1 minute Measurement range forehead & ear mode: 32°C - 42.9°C (89.6°F - 109.2°F) Measurement accuracies: ± 0.2°C (± 0.4°F) in the range from 35.5°C - 42.0°C (95.9°F - 107.8°F) ±...
  • Page 71: Safety

    Introduction / Safety (59.0 °F - 104.0 °F) Storage temperature: –10.0 °C - +55.0 °C (14.0°F - 131.0°F) at 20 % RH* - 85 % RH* Atmospheric pressure: 700 ~ 1060 hPa Dimensions: approx. 135 x 35 x 58 mm (L x B x H) Weight: approx.
  • Page 72 Safety This device may be used by children aged 8 over and by persons with reduced physical, sensory or mental capabilities or lack of experience and knowledge, provided that they are under supervision or have been told how to use the device safely and are aware of the potential risks.
  • Page 73: Safety Instructions

    Safety Please consult a doctor if the thermometer indicates that the body temperature measured is high. With this measuring method, a fever is indicated if the tempera- ture is above 38.0 °C (100.4 °F). The red LED is a warning. Please take several measurements at intervals of 0.5 to 1 hour in order to follow the progression of the temperature.
  • Page 74: Safety Instructions For The Battery

    Safety Safety Instructions for the Battery Remove the battery from the device if it is not going to be used for a prolonged period. CAUTION! DANGER OF EXPLOSION! The battery must never be recharged! Ensure correct polarity when inserting the battery! This is indicated in the battery compartment.
  • Page 75: Before Getting Started

    Before getting started / Operation Before getting started Removing the battery fuse Push the battery compartment lid downwards. Pull the tab of the protective fi lm out of the battery compartment. Push the battery compartment lid onto the battery compartment until it clicks into place (Fig. A). –...
  • Page 76: Temperature Measurements

    Operation 3. Press the “FOREHEAD” button . The hours will fl ash and can be corrected with the “MEM / SET” button 4. Press the “FOREHEAD” button again. The minutes will fl ash and can be corrected with the “MEM / SET” button Repeat steps 3 and 4 to set the values for the year, month and day or to switch the sleep mode on or off...
  • Page 77 Operation Do not use the thermometer if pain occurs when the meas- urement is being taken. This could damage the ear canal. Do not use the thermometer with external ear disorders (e.g. infl ammation of the ear canal, injuries to the outer ear).
  • Page 78 Operation 7. Briefl y press the “EAR” button . The symbol will appear in the LC display and the measurement will start after an acoustic signal. 8. The end of the measurement is indicated by means of 2 acoustic signals. 9.
  • Page 79 Operation when the “MEM / SET” button is pressed again. The device has 9 storage spaces (see section on “Functions / error analysis - the memory function”). Measuring the body temperature (forehead mode) IMPORTANT! It is advisable to carry out 3 meas- urements in a row at the same place and to take the highest temperature as the measured value.
  • Page 80 Operation 3. Check that the measuring head and the measuring sensors are clean. 4. Hold the measuring sensor 1 cm away from the forehead or temple. 5. To start the measurement, press on the “FOREHEAD” button . The symbol will appear in the LC display and the measurement will start after an acoustic signal.
  • Page 81 Operation Note: The appliance automatically switches off if it is not operated for longer than 1 minute. When the sleep mode has been activated, the LC display switches itself off . When the sleep mode has been deactivated, the appliance switches to standard mode.
  • Page 82 Operation Do not use the appliance immediately after cleaning the measuring head . The evaporative cooling eff ect of the detergent may falsify the measuring result. Sample applications: The temperature of milk in baby bottles The temperature of bathwater 1. If the sleep mode has been activated, activate the thermometer again by pressing any button before taking a measurement.
  • Page 83: Functions / Error Analysis

    Operation / Functions / error analysis 9. Press the “EAR” button again to carry out further measurements. 10. The appliance automatically switches off if it is not operated for longer than 1 minute. This application is not stored in the device. In order to return to standard mode, proceed as follows: 1.
  • Page 84: Changing The Battery

    Functions / error analysis Measurements taken in ear and forehead mode are automatically stored in the appliance. The measured values are available again along with information on the date, time and measurement mode when the “MEM / SET” button is operated in standard mode. Press the “MEM / SET”...
  • Page 85: Problem-Solving

    Functions / error analysis Push the battery compartment lid downwards. Lever the battery out with a small screwdriver. Avoid short-circuiting the battery at all cost. A short- circuit can occur if the screwdriver comes into contact with the battery and the live parts in the battery compartment at the same time.
  • Page 86 Functions / error analysis Error Problem Solution Weak battery Insert a new Battery sym- battery bol on the LC display Thermometer Pay heed to the “Lo” on the correctly posi- operating in- LC display tioned in the ear structions in re- (measured or on the fore- gard to position-...
  • Page 87: Cleaning And Care

    Functions / error analysis / Cleaning and care Error Problem Solution No measure- Please observe “ErrU” on the ment result after the directions LC display measurement. for use with re- gard to taking correct measure- ments. Error detected Contact the “ErrH”...
  • Page 88: Guarantee And Service

    Cleaning and care / Guarantee and Service added to the water. Keep the appliance in a dry environ- ment and protect from direct sunlight. The appliance can be stored at temperatures of –10.0 °C - 55.0 °C (14.0 °F - 131.0 °F). Temperatures over 80.0 °C are to be avoided! In order to measure with it, however, it is nec- essary to let the appliance adjust to room temperature for a suffi...
  • Page 89 Guarantee and Service The warranty covers only material or manufacturing faults, not normal wear or damage to fragile parts such as switches or rechargeable batteries. The appliance is intended solely for private, not commercial, use. If this product has been subjected to improper or inappro- priate handling, abuse, or interventions not carried out by one of our authorised sales and service outlets, the warranty will be considered void.
  • Page 90: Disposal

    Disposal Disposal The packaging is made entirely of recyclable materials, which you may dispose of at local recycling facilities. Contact your local refuse disposal authority for more details of how to dispose of your worn-out product. The product is subject to Directive 2012 / 19 / EU (WEEE).
  • Page 91: Conformity

    Conformity Conformity The CE Mark 0197 has been attached to this product in accordance with the following European Directive: Directive for Medical Products 93/42/EEC, as amended by Directive 2007/47/EC. The associated declaration of conformity has been deposited with the importer: KOMPERNASS HANDELS GMBH BURGSTRASSE 21 44867 BOCHUM, GERMANY...
  • Page 92 Conformity Manufacturer: Shenzhen Dongdixin Technology Co., Ltd. No. 3 Building XiliBaimang Xusheng Industrial Estate Nanshan, Shenzhen, China 518108 Tel.: +86 755 27 652 316 E-Mail: service@e-caretalk.com EU Representative: Shanghai International Holding Corp. GmbH (Europe) Eiff estrasse 80 20537 Hamburg, Germany Tel.: +49 (0) 40 2513175 Fax:...
  • Page 93 KOMPERNASS HANDELS GMBH BURGSTRASSE 21 44867 BOCHUM DEUTSCHLAND / GERMANY www.kompernass.com Version des informations · Stand der Informationen Last Information Update: 11 / 2013 Ident.-No.: SSOT6B2-112013-3 IAN 96247...

Table des Matières