Table des Matières
Publicité
Les langues disponibles
Les langues disponibles
Liens rapides
壁掛け型プラズマディスプレイ金具
HUNG ON WALL UNIT
ECRAN MURAL
WANDBEFESTIGUNGSEINHEIT
UNITA' DA PARETE
UNIDAD PARA COLGAR DE LA PARED
PDK-WM03
「据付工事」について
● 本機は十分な技術・技能を有する専門業者が据え付けを
行うことを前提に販売されているものです。 据え付け ・ 取
り付けは必ず工事専門業者または販売店にご依頼くださ
い。
● なお、据え付け、取り付けの不備、誤使用、改造、天災な
どによる事故損傷については、弊社は一切責任を負いま
せん。
取扱説明書
Operating instructions
Mode d'emploi
Bedienungsanleitung
Istruzioni per l'uso
Manual de instrucciones
Publicité
Chapitres
Table des Matières

Manuels Connexes pour Pioneer PDK-WM03


Sommaire des Matières pour Pioneer PDK-WM03
- Page 1 壁掛け型プラズマディスプレイ金具 HUNG ON WALL UNIT ECRAN MURAL WANDBEFESTIGUNGSEINHEIT UNITA' DA PARETE UNIDAD PARA COLGAR DE LA PARED PDK-WM03 「据付工事」について ● 本機は十分な技術・技能を有する専門業者が据え付けを 行うことを前提に販売されているものです。 据え付け ・ 取 り付けは必ず工事専門業者または販売店にご依頼くださ い。 ● なお、据え付け、取り付けの不備、誤使用、改造、天災な どによる事故損傷については、弊社は一切責任を負いま せん。 取扱説明書 Operating instructions Mode d’emploi Bedienungsanleitung Istruzioni per l’uso...
-
Page 2: Table Des Matières
取扱説明書 このたびはパイオニアプラズマディスプレイ取付けユニットPDK-WM03をお買いあげいただき、 まことにありがとう ございました。 正しく安全に施行していいただくために、この取扱説明書をよくお読みください。 ★この壁掛けユニットはパイオニア製 61V 型プラズマディスプレイ専用です。 取け付けできるプラズマディスプレイ本体をご確認のうえ、使用してください。 [据付工事]について ● 本機は十分な技術・技能を有する専門業者が据え付けを行うことを前提に販売されているものです。 据え付け・取り付けは必ず、工事専門業者または販売店にご依頼ください。 ● なお、据え付け・取り付けの不備、誤使用、改造、天災などによる事故損傷については、弊社は一切 責任を負いません。 販売店様・工事店様へ 目 次 お客様の安全を確保するために取付け 同梱の部品一覧 ................. 表紙 場所の強度を確認し、プラズマディス 必ず守ってください ..............2 プレイおよびユニット等の荷重に耐 ■横置き設置 えるよう十分注意のうえ、設計施工 1. ディスプレイ金具を取り付ける .......... 4 をお願いいたします。 2. 壁掛けユニットを壁に取り付ける ........4 プラズマディスプレイは重量物のため... -
Page 3: 必ず守ってください
必ず守ってください ご使用の前に 絵表示について この「取扱説明書」では、製品を安全に正しくお使いいただき、あなたや他の人々への危害や財産への損 害を未然に防止するために、 設置者が正しく安全に施行するうえで必要な事項をいろいろな絵表示で示し ています。 その表示と意味は次のような警告や注意事項となっています。 内容をよく理解してから本文を お読みください。 この表示を無視して、誤った取り扱いをすると、人が死亡や大けがをするなど 警告 人身事故の原因となります。 この表示を無視して、誤った取り扱いをすると、人がけがをしたり周囲の家財に 注意 損害をあたえたりすることがあります。 絵表示の例 記号は注意(警告を含む)をうながす内容があることを告げるものです。 図の中に具体的な注意内容が描かれています。 記号はしてはいけないことを表しています。 図の中に具体的な禁止内容が描かれています。 記号はしなければならないことを表しています。 図の中に具体的な指示内容が描かれています。 警告 ● プラズマディスプレイを設置する際は、必ず販売店へ依頼し、 本書に基づいて行なってください。誤った 設置はプラズマディスプレイが落下してけがの原因となります。 ● 落下防止のため取付け場所の強度および固定方法は、 プラズマディスプレイおよびユニットなどの総合荷 重に長期間十分耐え、また地震にも十分耐える施工を行なってください。誤った取付けを行なった場合、 プラズマディスプレイが落下してけがの原因となります。以下の事項を必ずお守りください。 ・ プラズマディスプレイの電源はコンセントを使用してください。 直接電灯線に接続することは危険です ので行わないでください。 また、 電源プラグを抜き差しできるように手のとどくコンセントをご使用く ださい。... - Page 4 必ず守ってください 警告 ● 部品を改造しないでください。 プラズマディスプレイが落下してけがの原因となります。 ● こわれた部品を使用しないでください。プラズマディスプレイが落下してけがの原因となります。 万一、部品がこわれた場合は販売店にご相談ください。 ● 本ユニットはパイオニア製 61V 型プラズマディスプレイ専用です。 それ以外の機器を取り付けないでください。落下してけがの原因となります。 注意 ● プラズマディスプレイの通風孔をふさがないでください。 通風孔をふさぐと内部に熱がこもり、 火災の原 因となることがありますので、次のような使い方はしないでください。 たとえば、プラズマディスプレイを狭い風通しの悪いところに設置する・カバーなどでおおい隠すなど。 ● プラズマディスプレイを冷暖房の吐き出し口や振動の多い場所には設置しないでください。 火災・感電の原因となることがあります。 ● 湿気やほこり、油煙や湯気の当たるようなところ(調理台や加湿器のそばなど)に設置しないでください。 火災の原因となることがあります。屋外で使用しないでください。火災・感電の原因となることがあります。 ● プラズマディスプレイを設置するときは周囲から十分な間隔をあけてください。 十分な間隔をあけないと内部に熱がこもり火災の原因となることがあります。 ● プラズマディスプレイをユニットに取り付けるときは、 プラズマディスプレイをおさえながら行ってくだ さい。落下してけがの原因となることがあります。 ● プラズマディスプレイのガラス面に負担をかけないでください。 割れてけがの原因となることがあります。 ● 金具を付けない状態で、プラズマディスプレイにネジを取り付けないでください。 故障の原因になります。 ● 添付されている以外のネジは絶対に使用しないでください。 使用すると故障の原因になります。...
-
Page 5: ディスプレイ金具を取り付ける
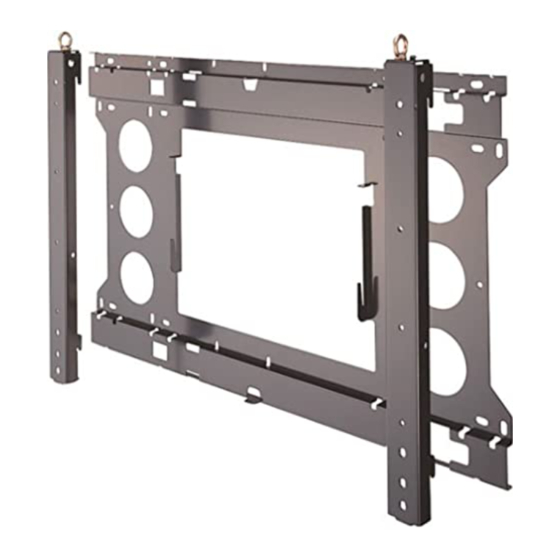
横置き設置 1. ディスプレイ金具を取り付ける ディスプレイ金具には右用と左用があります。 取り付けの際には、 2つのアイボルトが互いに内側にくるように取り付けて ください。 ① プラズマディスプレイ背面のネジ穴(M8)にディス プレイ金具(左右各1本)の上部と下部にある図の位 置のネジ穴(φ 9)を合わせ、添付の M8 ネジ各 2 本 アイボルト で固定する。 【参考】(PDP-614MXのみ) オプションスタンドの PDK-TS06 をご利用の 場合、スタンドに取り付けた状態でディスプレ イ金具を取り付けることができます。この時、 ディスプレイをスタンドに固定している M6 ネ ジ 4 本は、金具を取り付ける前にあらかじめ外 しておいてください。 なお、 プラズマディスプレ 右用 イを持ち上げる際、スタンドがいっしょに持ち 上がらないようにしてください。スタンドが外 れた際、ケガや破損などの原因となることがあ ります。 左用 2. 壁掛けユニットを壁に取り付ける 市販のアンカー類または... - Page 6 横置き設置 3. プラズマディスプレイを取り付ける 壁掛けユニットに、ディスプレイ金具を取り付けてあるプラズマディスプレイを取り付けます。 ① 左右のディスプレイ金具の上部フックを 壁掛けユニットの溝に引っ掛ける。 61型 上部 フック 50型 ② 上部フックが引っ掛かった状態で、 プラ ズマディスプレイを 1cm 程真上に持ち 上げ、 ぶつかったところでプラズマディ スプレイ下側を壁側に押し込み下部フッ クを掛ける。 【参考】 下部フック プラズマディスプレイ下側を手前に引いて動かないようで あれば正常に取り付けられています。 固定ネジ ③ 左右のディスプレイ金具上部にある固定ネジを ドライバーで締め付ける。 【参考】 手で持ち上げられない高い位置などに設置する場合、 ディスプレイ金具上部のアイボルトを、 重機等で吊り下 げて設置することもできます。 この際、 アイボルトが緩 んでいないことを確認してください。...
-
Page 7: 縦置き設置(Pdp-614Mx のみ
縦置き設置 (PDP-614MXのみ) 注意 PDP-615PRO/PRO-1410HD/PDP-615EXは縦置設置には対応していません。 1. ブラケット、ディスプレイ金具を取り付ける ディスプレイ金具には右用と左用があります。取り付けの際には、2 つのアイボルトが互いに内側にくるように取り付け てください。 プラズマディスプレイ背面から見てアイボルトが右側にくるように取り付けてください。 逆に取り付けると、 プラズマディスプレイの故障の原因となります。 ① 2 本のブラケットのうち 1 本を、添付の M8 ネジ 2 本で図の向きに固定する。 左用 φ9 φ9 ② プラズマディスプレイ背面のネジ穴(M8)に ディスプレイ金具(左右各 1 本)の図の位置の ブラケット ネジ穴(φ 9)を合わせ、添付の M8 ネジ各 2 アイボルト 本で固定する。 右用 【参考】(PDP-614MXのみ) オプションスタンドの PDK-TS06 をご利用 の場合、スタンドに取り付けた状態でディス... -
Page 8: プラズマディスプレイを取り付ける
縦置き設置 3. プラズマディスプレイを取り付ける 壁掛けユニットに、ディスプレイ金具を取り付けてあるプラズマディスプレイを取り付けます。 ① いったんクッション等を敷いた平らな床の上にプラズマディスプレイを置き、 図のように向きを変えてください。 アイボルト 天 スタンド用穴 正面 ハンドル部 ブラケット スタンド用穴 ※ ブラケットはハンドルとして使用してください。 この際けがをする恐れがありますので、必ず手袋を使用して作業を 行ってください。 ※ 手で持ち上げられない高い位置に設置する場合には、ディスプレイ 金具上部のアイボルトを、重機等で吊り下げて設置することもでき ます。 この際、アイボルトが緩んでいないことを確認してください。... - Page 9 縦置き設置 ② 左右のディスプレイ金具の上部フックを壁掛けユニットの溝に引っ掛ける。 上部フックが完全に引っ掛かると窓に白ペイントが見えます。 上部引掛け穴 上部フック 白ペイント 上部フックが引っ掛かった状態で、 プラズマディスプレイを 1cm程真上に持ち上げ、 ぶつかったところでプラズマディス プレイの下側を壁側に押し込み下部フックを掛ける。 【参考】 下部フック プラズマディスプレイの下側を手前に引いて動かないよう であれば正常に取り付けられています。...
- Page 10 縦置き設置 ③ 左右のディスプレイ金具を添付の M5 ネジで固定する。 縦置き設置用 固定ネジ穴 M5 ネジ...
-
Page 11: 壁掛けユニットとディスプレイの位置関係
壁掛けユニットとディスプレイの位置関係 ●横置き設置 PDP-614MX 1,470 453.5 426.5 61V 型 PDP-615PRO 1,502 PRO-1410HD 469.5 442.5 PDP-615EX (単位:mm) ●縦置き設置(PDP-614MXのみ) 1470 61V 型 PDP-614MX (単位:mm) J-10... -
Page 12: Package Parts List
This product is marketed assuming that it is installed by qualified personnel with enough skill and competence. Always have an installation specialist or your dealer install and set up the product. PIONEER cannot assume liabilities for damage caused by mistake in installation or mounting, misuse, modification or a natural disaster. -
Page 13: Heed The Following
Heed the Following Before Use... Symbols This Operating Installations uses pictograms to indicate matters required for the installer to install the plasma display properly and safety in order to ensure proper, safe use of the product and prevent injury to yourself and others or damage to property. -
Page 14: Installation Location
In the event that any parts are damaged, please contact the dealer. * This unit is made especially for use with Pioneer 61 inch and 50 inch plasma displays. Do not use with any other equipment since the equipment could fall and cause injury. -
Page 15: Horizontal Installation
Horizontal Installation 1. Attaching the Display Fittings to the Plasma Display There are two display fittings, one for the right side, the other for the left. Mount the fittings so that their eye bolts are at the inner side. 1 Line up the screw holes (ø9, indicated on the diagram) at the tops and bottoms of the display fittings (one each for Eye bolt アイボルト... -
Page 16: Attaching The Plasma Display
Horizontal Installation 3. Attaching the Plasma Display After attaching the display fittings to the plasma display, attach the plasma display to the wall mounting unit. 1 Catch the upper hooks on the left and right display fittings into the grooves in the wall mounting unit. -
Page 17: Vertical Installation (Pdp-614Mx Only)
Vertical Installation (PDP-614MX only) CAUTION Models PDP-615PRO, PRO-1410HD, and PDP-615EX do not support vertical installation. 1. Attaching the Bracket(s) and Display Fittings to the Plasma Display There are two display fittings, one for the right side, the other for the left. Mount the fittings so that their eye bolts are at the inner side. -
Page 18: Attaching The Plasma Display
Vertical Installation 3. Attaching the Plasma Display After attaching the display fittings to the plasma display, attach the plasma display to the wall mounting unit. 1 Place the plasma display on a cushion or other cushioning material that has been placed on a level floor, then change the orientation as illustrated in the diagram. - Page 19 Vertical Installation 2 Catch the hooks on the left and right display fittings into the grooves in the wall mounting unit. When the upper hook is completely engaged, a white painted area will be visible in the window. Upper hook hole Upper hook White paint With the upper hooks engaged in the wall mounting unit...
- Page 20 Vertical Installation 3 Fasten the left and right display fittings using the included M5 screws. Locking screw hole for vertical installation M5 screw...
-
Page 21: Positional Relationship Between The Wall Mounting Unit And The Display
Positional Relationship Between the Wall Mounting Unit and the Display * Horizontal installation PDP-614MX 1,470 453.5 426.5 61inch PDP-615PRO 1,502 PRO-1410HD 469.5 442.5 PDP-615EX (Unit : mm) * Vertical installation (PDP-614MX only) 1470 61inch PDP-614MX (Unit : mm) E-10... -
Page 22: Remarques Sur I'installation
Ce produit est vendu en assumant qu´il sera installé par un personnel suffisamment expérimenté et qualifié. Faites toujours réaliser le montage et I´installation par un spécialiste ou par votre revendeur. PIONEER ne peut être tenu responsable pour tout dommage causé par une erreur d´installation ou de montage, une mauvaise utilisation ou un désastre naturel. -
Page 23: Suivre Les Instructions Suivantes
Suivre les instructions suivantes Avant l'utilisation... Symboles Ces installations utilisent des pictogrammes pour indiquer les éléments nécessaires pour l'installateur pour installer correctement l'écran plasma en toute sécurité et afin d'assurer une utilisation correcte et sûre du produit et d'éviter des blessures corporelles et d'autres dommages du matériel. Les pictogrammes et leurs significations sont indiqués ci-dessous. -
Page 24: Emplacement D'installation
Si les pièces sont endommagées, prendre contact avec le revendeur. * Cette unité est conçue spécialement pour être utilisée avec les écrans plasma Pioneer de 61 et 50 pouces. Ne pas utiliser un autre équipement car ce dernier risque de tomber et de provoquer des blessures. -
Page 25: Installation Horizontale
Installation horizontale 1. Fixation des pièces de montage d'écran à l'écran plasma Il y a deux pièces de montage d'écran, une pour le côté droit, l'autre pour le côté gauche. Monter les pièces de montage de sorte que leurs boulons à oeillet soient à l'intérieur. 1 Aligner les trous de vis (ø9, indiqués sur le schéma ) sur les dessus et dessous des pièces de montage (une vis pour chaque côté... -
Page 26: Fixation De L'écran Plasma
Installation horizontale 3. Fixation de l'écran plasma Après la fixation des pièces de montage à l'écran plasma, fixer l'écran plasma à l'unité de montage mural. 1 Accrocher les crochets supérieurs sur les pièces de montage gauche et droit dans les rainures dans l'unité... -
Page 27: Installation Verticale(Pdp-614Mx Uniquement)
Installation verticale (PDP-614MX uniquement) Les modèles PDP-615PRO, PRO-1410HD et PDP-615EX ne supportent pas l’installation verticale. ATTENTION 1. Fixation du (des) support(s) et des pièces de montage d'écran à l'écran plasma Il y a deux pièces de montage, une pour le côte droit, l'autre pour le côté gauche. Monter les pièces de montage de sorte que leurs boulons à... -
Page 28: Fixation De L'écran Plasma
Installation verticale 3. Fixation de l'écran plasma Après la fixation des pièces de montage d'écran à l'écran plasma, fixer l'écran plasma à l'unité de montage mural. 1 Placer l'écran plasma sur un coussin ou un autre matériau amortisseur qui a été placé sur un sol à niveau, puis modifier l'orientation comme illustré... - Page 29 Installation verticale 2 Accrocher les crochets sur les pièces de montage gauche et droit dans les rainures dans l'unité de montage mural. Lorsque le crochet supérieur est complètement coincé, une zone peinte en blanc sera visible dans la fenêtre. Crochet supérieur Trou du crochet supérieur Peinture blanche Avec les crochets supérieurs coincés dans les rainures de l'unité...
- Page 30 Installation verticale 3 Fixer les lpièces de montage gauche et droit à l'aide des vis M5 fournies. Trou de vis de blocage pour une i n s t a l l a t i o n verticale Vis M5...
-
Page 31: Position De L'unité De Montage Mural Par Rapport À L'écran Plasma
Position de l'unité de montage mural par rapport à l'écran * Installation horizontale PDP-614MX 1,470 453.5 426.5 61 pouces PDP-615PRO 1,502 PRO-1410HD 469.5 442.5 PDP-615EX (Unité : mm) * Installation verticale (PDP-614MX uniquement) 1470 61 pouces PDP-614MX (Unité : mm) F-10... -
Page 32: Verpackungsteileliste
Bedienungsanleitung Wir danken Ihnen herzlich für den Kauf dieser Befestigungseinheit (PDK-WM03) für ein Plasma-Display von Pioneer. Bitte lesen Sie sich diese Bedienungsanleitung sorgfältig durch, damit eine ordnungsgemäße, sicher Verwendung gewährleistet werden kann. * Diese Befestigungseinheit wurde speziell für die Verwendung zusammen mit dem 61-Zoll-Plasma-Display von Pioneer hergestellt. -
Page 33: Beachten Sie Folgendes
Beachten Sie Folgendes Vor der Inbetriebnahme... Symbole In dieser Installations-Bedienungsanleitung sind Abbildungen aufgeführt, die für den Installationstechniker relevante Umstände darstellen, damit das Plasma-Display ordnungsgemäß und sicher installiert werden kann, um eine ordnungsgemäße und sichere Verwendung des Produktes zu gewährleisten und Verletzungen Ihrer eigenen sowie andere Personen oder die Beschädigung von Eigentum zu verhindern. Die Abbildungen und ihre jeweilige Bedeutung werden unten dargestellt. - Page 34 Für den Fall, dass eines der Teile beschädigt ist, konsultieren Sie bitte Ihren Händler. * Diese Einheit wurde speziell für die Verwendung mit den 61-Zoll- und 50-Zoll-Plasma-Displays von Pioneer hergestellt. Verwenden Sie sie mit keinen anderen Geräten, da dies zu einem Herunterfallen des Gerätes und zu daraus resultierenden Verletzungen führen könnte.
-
Page 35: Horizontale Installation
Horizontale Installation 1. Befestigung der Display-Passen am Plasma-Display Es gibt zwei Display-Passen: eine für die rechte Seite und eine für die linke. Befestigen Sie die Display-Passen so, dass sich ihre Augenschrauben an der Innenseite befinden. 1 Richten Sie die Schraubenlöcher (ø 9, in der Abbildung dargestellt) an der Ober- und Unterseite der Display-Passen (jeweils eine für die linke und rechte Seite) an den Augenschraube... -
Page 36: Befestigung Des Plasma-Displays
Horizontale Installation 3. Befestigung des Plasma-Displays Befestigen Sie nach der Montage der Display-Passen am Plasma-Display das Plasma-Display an der Wandmontage-Einheit. 1 Lassen Sie die oberen Haken an der linken und an der rechten Display-Passe in die Aussparungen an der Wandmontage-Einheit einrasten. Oberer Haken 2 Heben Sie das Plasma-Display bei in die... -
Page 37: Vertikale Installation (Nur Pdp-614Mx)
Vertikale Installation (nur PDP-614MX) Die Modelle PDP-615PRO, PRO-1410HD und PDP-615EX unterstützen keine senkrechte Installation. ACHTUNG 1. Befestigung der Halterung(en) und Display-Passen am Plasma-Display Es gibt zwei Display-Passen: eine für die rechte Seite und eine für die linke. Befestigen Sie die Display-Passen so, dass sich ihre Augenschrauben an der Innenseite befinden. -
Page 38: Befestigung Des Plasma-Displays
Vertikale Installation 3. Befestigung des Plasma-Displays Befestigen Sie nach der Montage der Display-Passen am Plasma-Display das Plasma-Display an der Wandmontage-Einheit. 1 Legen Sie das Plasma-Display auf ein Kissen oder ein anderes polsterndes Material, das Sie zuvor auf einen ebenen Boden gelegt haben, und ändern Sie die Ausrichtung wie in der Abbildung dargestellt. Augenschraube Eye bolt NACH OBEN... - Page 39 Vertikale Installation 2 Lassen Sie die Haken an der linken und an der rechten Display-Passe in die Aussparungen an der Wandmontage-Einheit einrasten. Wenn der obere Haken vollständig eingerastet ist, wird ein weiß markierter Bereich im Fenster sichtbar. Oberer Haken Oberes Hakenloch Weiße Markierung Heben Sie das Plasma-Display bei in die Aussparungen der Wandmontage-Einheit eingerasteten oberen Haken etwa 1 cm...
- Page 40 Vertikale Installation 3 Befestigen Sie die linke und rechte Display-Passe unter Verwendung der im Lieferumfang enthaltenen M5-Schrauben. Spannschraubenloch für die vertikale Installation M5-Schraube...
-
Page 41: Positionsverhältnis Zwischen Der Wandmontage-Einheit Und Dem Plasma-Display
Positionsverhältnis zwischen der Wandmontage-Einheit und dem Plasma-Display * Horizontale Installation PDP-614MX 1,470 453.5 426.5 61 pouces PDP-615PRO 1,502 PRO-1410HD 469.5 442.5 PDP-615EX (Einheit: mm) * Vertikale Installation (nur PDP-614MX) 1470 61 pouces PDP-614MX (Einheit: mm) G-10... - Page 42 Leggete le istruzioni per l'uso attentamente per assicurarvi un uso sicuro e corretto. * Quest'unità di montaggio è stata disegnata specificatamente per l'uso con i display plasma da 61 pollici della Pioneer. Controllate che il display plasma possa contenere l'unità prima dell'uso.
-
Page 43: Osservate Le Seguenti Norme
Osservate le seguenti norme Prima dell'uso... Simbolo Questo Manuale d'installazione contiene dei pittogrammi per indicare alcuni punti importanti per il tecnico d'installazione per poter installare correttamente il display plasma in maniera esatta per poter garantire l'uso appropriato e sicuro del prodotto e prevenire eventuali lesioni alle persone o danni materiali. -
Page 44: Luogo D'installazione
Rivolgetevi al vostro rivenditore se scoprite eventuali parti danneggiate. * Quest'unità è stata fatta specialmente per i display plasma Pioneer da 61 pollici e da 50 pollici. Non usate l'unità per altri componenti, altrimenti quest'ultimi possono cadere e causare lesioni alle persone. -
Page 45: Installazione Orizzontale
Installazione orizzontale 1. Fissaggio delle unità di fissaggio del display sul display plasma Ci sono due kit di installazione per il display, uno per il lato destro e l'altro per il lato sinistro. Montate le unità di fissaggio del display in modo tale che i bulloni ad occhiello siano sul lato interno. - Page 46 Installazione orizzontale 3. Fissaggio del display plasma Dopo aver fissato le unità di fissaggio sul display plasma, fissate il display plasma sulle incastellature di montaggio a parete. 1 Attaccate i ganci superiori delle unità di fissaggio sinistra e destra del display nelle fessure dell'unitòà...
-
Page 47: Installazione Verticale
Installazione verticale (soltanto PDP-614MX) I modelli PDP-615PRO, PRO-1410HD e PDP-615EX non supportano l’installazione verticale. PRECAUZIONE 1. Fissaggio della staffa e delle unità di fissaggio del display sul display stesso Ci sono due kit di montaggio del display, uno per il lato destro e l'altro per il lato sinistro. Installate le unità di montaggio in modo tale che i bulloni ad occhiello si trovano sul lato interno. - Page 48 Installazione verticale 3. Fissaggio del display plasma Dopo aver fissato le unità di fissaggio sul display plasma, fissate il display plasma sull'unità di montaggio a parete. 1 Posizionate il display plasma su un cuscino o altro materiale simile posizionato su un pavimento piano, poi cambiate l'orientamento come nell'illustrazione.
- Page 49 Installazione verticale 2 Fate passare i ganci delle unità di fissaggio sinistra e destra nelle fessure dell'unità d'installazione a parete. Quando il gancio superiore è completamente azionato, un'area bianca sarà visibile nella finestra. Gancio superiore Foro del gancio superiore Vernice bianca Con i ganci superiori inseriti nelle fessure dell'unità...
- Page 50 Installazione verticale 3 Fissate le unità di fissaggio del display sinistro e destro usando le viti M5 in dotazione. Foro della vite di bloccaggio per l'installazione verticale Vite M5...
- Page 51 Rapporto di posizionamento tra l'unità di montaggio a parete ed il display * Installazione orizzontale PDP-614MX 1,470 453.5 426.5 61 pouces PDP-615PRO 1,502 POR-1410HD 469.5 442.5 PDP-615EX (Unità : mm) * Installazione verticale (soltanto PDP-614MX) 1470 61 pouces PDP-614MX (Unità : mm) I-10...
-
Page 52: Listado De Piezas
Por favor, lea atentamente el manual de instrucciones para asegurarse un uso adecuado y seguro. * Esta unidad de montaje ha sido diseñada específicamente para su uso con monitores de plasma Pioneer de 61 pulgadas. Por favor, verifique que el monitor de plasma pueda albergar la unidad antes de utilizarla. -
Page 53: Tenga En Cuenta Lo Siguiente
Tenga en cuenta lo siguiente Antes de usar el producto... Símbolos Este Manual de instrucciones emplea pictogramas para indicar cuestiones requeridas por el instalador para instalar el monitor de plasma debidamente y seguramente para garantizar el uso adecuado y seguro del producto y evitar lesiones personales y a terceros o daños a la propiedad. -
Page 54: Ubicación De La Instalación
En caso de que las piezas se encuentren dañadas, póngase en contacto con el distribuidor. * Esta unidad ha sido especialmente fabricada para ser utilizada con monitores de plasma Pioneer de 61 y 50 pulgadas. No la utilice con ningún otro equipo, pues este podría caer y causar lesiones. -
Page 55: Instalación Horizontal
Instalación Horizontal 1. Montaje de los ajustes del monitor al monitor de plasma Existen dos ajustes del monitor, uno a la derecha y otro a la izquierda. Monte los ajustes de manera que los pernos de ojo se encuentre en la cara interna. -
Page 56: Montaje Del Monitor De Plasma
Instalación Horizontal 3. Montaje del monitor de plasma Después de ajustar los ajustes del monitor a la pantalla de plasma, coloque esta en la unidad de montaje de pared. 1 Introduzca los ganchos superiores de los ajustes izquierdo y derecho del monitor en las guías de la unidad de montaje de pared. -
Page 57: Instalación Vertical (Sólo El Pdp-614Mx)
Instalación Vertical (Sólo el PDP-614MX) Los modelos PDP-615PRO, PRO-1410HD y PDP-615EX no pueden instalarse en posición vertical. PRECAUCIÓN 1. Montaje de los enganches y de los ajustes del monitor al monitor de plasma Existen dos ajustes del monitor, uno a la derecha y otro a la izquierda. Monte los ajustes de manera que los pernos de ojo se encuentre en la cara interna. -
Page 58: Montaje Del Monitor De Plasma
Instalación Vertical 3. Montaje del monitor de plasma Después de ajustar los ajustes del monitor a la pantalla de plasma, coloque esta en la unidad de montaje de pared. 1 Coloque el monitor de plasma sobre un cojín u otro material acolchado colocado en el suelo. Posteriormente, cambie la orientación, tal y como se muestra en el diagrama. - Page 59 Instalación Vertical 2 Introduzca los ganchos de los ajustes izquierdo y derecho del monitor en las guías de la unidad de montaje de pared. Cuando el gancho superior se encuentre completamente sujeto, una zona pintada en blanco será visible en la ventana. Gancho superior Orificio de enganche superior...
- Page 60 Instalación Vertical 3 Apriete los ajustes del monitor de derecha e izquierda utilizando los tornillos M5 incluidos. Orificio de bloqueo de tornillo para instalación vertical Tornillo M5...
-
Page 61: Relación Posicional Entre La Unidad De Montaje En Pared Y El Monitor
Relación posicional entre la unidad de montaje en pared y el monitor * Instalación Horizontal PDP-614MX 1,470 453.5 426.5 61 pouces PDP-615PRO 1,502 PRO-1410HD 469.5 442.5 PDP-615EX (Unidad : mm) * Instalación Vertical 1470 61 pouces PDP-614MX (Unidad : mm) S-10... - Page 62 この取扱説明書は再生紙を使用しています。 2004パイオニア株式会社 禁無断転載 〒153-8654 東京都目黒区目黒1丁目4番1号...