
Manuels Connexes pour AYA ATV3F


Sommaire des Matières pour AYA ATV3F
- Page 1 ATV3F Table vitrocéramique Ceramic Hob INSTRUCTIONS D’UTILISATION INSTRUCTIONS FOR USE...
-
Page 3: Table Des Matières
TABLE DES MATIERES CONSIGNES DE SECURITE IMPORTANTES -13- DESCRIPTION DE L’APPAREIL UTILISATION DE L’APPAREIL -14- CONSEILS DE CUISSON -20- REGLAGE DU NIVEAU DE PUISSANCE -21- -22- ENTRETIEN ET NETTOY AGE -23- GUIDE DE DEPANNAGE INSTRUCTIONS D’INSTALLATION -24-... -
Page 4: Consignes De Securite Importantes
FAITES UN GESTE ECOCITOYEN EN TRIANT VOS EMBALLAGES CARTON À LA FIN DE VIE DE VOTRE PRODUIT, PENSEZ À LE RAPPORTER DANS UN POINT DE COLLECTE OU DÉPOSER LE À LA DÉCHETERIE PROCHE DE VOTRE DOMICILE CET APPAREIL EST DESTINE A UN USAGE DOMESTIQUE UNIQUEMENT! Veuillez lire attentivement toutes les instructions avant la première utilisation et... - Page 5 effectués par un électricien qualifié. Un non-respect de ces instructions peut conduire à un choc électrique ou la mort. 1.1.2 Risque de coupure Soyez prudent! Les rebords du panneau sont tranchants. Une utilisation sans soin peut conduire à des ...
- Page 6 1.2 UTILISATION ET MAINTENANCE 1.2.1 Risque de choc électrique N’utilisez pas une table de cuisson cassée ou fissurée. Si la surface de la table de cuisson est fissurée ou endommagée, éteignez-la immédiatement de la source de courant (un commutateur mural) et contactez un technicien qualifié.
- Page 7 1.2.3 Risque de surface chaude Pendant l'utilisation, les parties accessibles de l'appareil pourront devenir assez chaudes pour causer des brûlures. Ne laissez pas votre corps, des vêtements ou tout autre élément autre qu’un ustensile approprié entrer en contact avec la plaque à induction jusqu'à...
- Page 8 1.2.5 Précautions de sécurité Ne laissez jamais l'appareil sans surveillance lors de l’utilisation. Une cuisson excessive peut causer des fumées et des résidus graisseux qui pourraient s'enflammer. N’utilisez pas votre appareil comme un espace de stockage ou une surface de travail. Ne placez jamais d’objets ou d’ustensiles ...
- Page 9 Ne laissez pas les enfants seuls ou sans surveillance dans la zone où l'appareil est utilisé. N'autorisez pas les personnes à utiliser l'appareil sans surveillance sauf si des instructions appropriées leur ont été données, leur permettant d'utiliser l'appareil de faç on sûre et de comprendre les dangers d'une utilisation incorrecte.
- Page 10 Il est recommandé d’examiner régulièrement le câble d’alimentation pour déceler tout signe de détérioration éventuelle, et l’appareil ne doit pas être utilisé si le câble est endommagé. Ne faites pas fonctionner votre table de cuisson au moyen d’une minuterie extérieure ou par un système de commande à...
- Page 11 Cet appareil peut être utilisé par des enfants à partir de 8 ans et par des personnes ayant des capacités physiques, sensorielles ou mentales réduites ou un manque d’expérience et de connaissances à condition qu’elles aient été placées sous surveillance ou qu'elles aient reç u des instructions concernant l’utilisation de l’appareil en toute sécurité...
- Page 12 Il est recommandé de connecter cet appareil sur un circuit électrique dédié. Après l'installation de l'appareil, n'installez pas d'autres appareils électriques sur le même circuit pour éviter un surcourant (l'ampérage). Lorsque le disjoncteur se déclenche ou le fusible tombe en panne d'une manière répétée, un circuit dédié...
- Page 13 MISE EN GARDE: Lorsque la table de cuisson est en fonctionnement, ne jamais toucher son fond pour éviter tout choc électrique intattendu. Afin d'éviter tout contact accidentel ou que les enfants puissent jouer avec cet appareil, assurez-vous qu'un insert en bois soit fixé sous la table de cuisson.
-
Page 14: Description De L'appareil
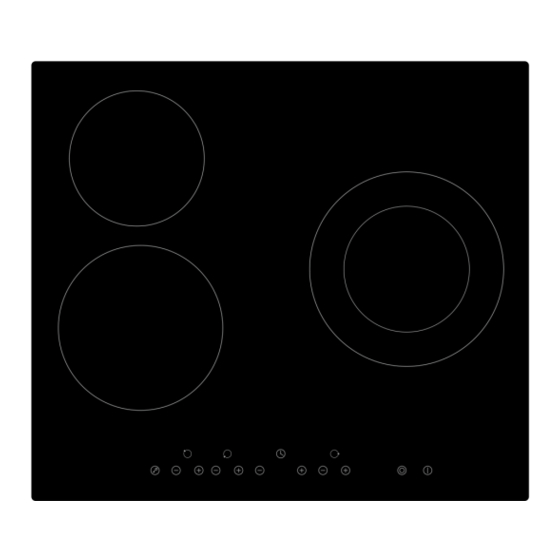
2. DESCRIPTION DE L’APPAREIL 2.1 VUE DE DESSUS 1. Zone de cuisson 1800W max. 2. Zone de cuisson 1200W max. 3. Double zone de cuisson 1000W ou 2200W max. 4. Surface vitrée 5. Touche « MARCHE/ARRÊT» 6. Bandeau de commande 2.2 BANDEAU DE COMMANDE 1. -
Page 15: Utilisation De L'appareil
Lisez ce manuel et faites une particulière attention à la section « CONSIGNES DE SECURITE ». Retirez le film de protection qui peut être encore sur votre table de cuisson vitrocéramique. 2.6 SPECIFICATIONS TECHNIQUES Modèle : ATV3F Nombre de zone de cuisson: 3 zones Alimentation électrique : 220-240V~ 50/60Hz Puissance: 4700-5700W Dimensions du produit (L×L×H) :... - Page 16 3.2 SELECTION DE LA BONNE BATTERIE DE CUISINE N’utilisez pas de récipients avec un fond abîmé ou arrondi ou des rebords dentelés. Assurez-vous que le fond de votre récipient est adapté au diamètre de la zone de cuisson et qu’il soit bien positionné...
- Page 17 3.3.2 Lorsque vous avez terminé la cuisson Décrémentez la puissance de la zone de cuisson en appuyant touche « -- » ou appuyez simultanément sur les touches « » et « » de la zone concernée. Assurez-vous qu’il affiche « 0 ». Appuyez sur la touche «...
- Page 18 Désactivication de la fonction double zone de cuisson « » Appuyez sur la touche encore une fois, la fonction de la double zone ◎ de cuisson sera désactivée. « 6 » Le voyant lumineux va afficher 3.3.4 Verrouillage des touches a) Cette table de cuisson permet de bloquer l’utilisation des touches sensitives pour éviter des modifications involontaires.
- Page 19 a) Utilisation de la minuterie comme minuteur de rappel Si vous ne choisissez pas une zone de cuisson : Assurez-vous que la table de cuisson soit en fonctionnement. Remarque : vous pouvez utiliser la minuterie même si aucune zone de cuisson n'est sélectionnée. Ajustez la valeur de la minuterie en appuyant sur les touches «...
- Page 20 b) Réglage de la minuterie pour éteindre une zone de cuisson Sélectionner une zone de cuisson Sélectionnez la zone de cuisson à programmer en appuyant ses touches « » et « » correspondantes. Ajustez la valeur de la minuterie en appuyant sur les touches «...
-
Page 21: Conseils De Cuisson
3.3.8Coupure automatique La table de cuisson est programmée pour s’éteindre automatiquement si aucune action n’est effectuée pendant un temps défini (par exemple, lors d’un oubli d’arrêt). Ce temps est programmé en fonction de la puissance définie et est noté dans le tableau ci-dessous : Niveau de puissance Temps de fonctionnement par défaut (heure) -
Page 22: Reglage Du Niveau De Puissance
4.1.3 Pour faire sauter 1. Choisissez un wok à fond plat adapté au plaques vitrocéramique ou une grande poêle à frire. 2. Préparez tous les ingrédients et l'équipement nécessaires. La cuisson doit être rapide. Si vous préparez une grande quantité d'aliments, faites de petites portions. 3. -
Page 23: Entretien Et Nettoyage
6. ENTRETIEN ET NETTOYAGE Quoi Comment Important ! Les saletés 1. Débranchez la table de cuisson de 1. Lorsque la table de cuisson est quotidiennes sur le l'alimentation électrique. éteinte, il n'y aura pas d'indication verre (les «surface chaude», mais la zone de 2. -
Page 24: Guide De Depannage
7. GUIDE DE DEPANNAGE PROBLEME CAUSES POSSIBLES SOLUTIONS La table de cuisson ne Pas d’alimentation. Assurez-vous que la table de s’allume pas. cuisson soit bien branchée et alimentée. Vérifiez que l’alimentation électrique de votre logement est bien en fonctionnement. -
Page 25: Instructions D'installation
8. INSTRUCTIONS D’INSTALLATION 8.1 Sélection de l'équipement d’installation Découpez la surface de travail selon les dimensions indiquées dans le schéma. Un espace minimum de 5 cm doit être laissé autour du trou pour l'installation et l'utilisation. Le plan de travail doit être d’une épaisseur d’au moins 30 mm et composé de matériau résistant aux hautes températures pour éviter les déformations importantes causées par la chaleur dégagée par la table, comme illustré... - Page 26 MISE EN GARDE: Assurez-vous d'avoir une ventilation adéquate Assurez-vous que la table de cuisson soit bien ventilée; et que l'entrée d'air et la sortie d'air ne soient pas obstruées. Afin d'éviter tout contact accidentel avec le fond de la table de cuisson ou tout risque de choc électrique inattendu pendant le travail, il est nécessaire de mettre insert en bois fixés avec des vis, à...
- Page 27 Ajustez le positionnement des supports pour l'adapter à l'épaisseur de la surface de fixation. Table de cuisson Table de cuisson Plan de travail Plan de travail Support Support Les supports ne doivent en aucun cas toucher les surfaces intérieures du plan de travail après l'installation (voir l'image).
- Page 28 8.4 Branchement de la table de cuisson à l'alimentation électrique L'alimentation électrique doit être branchée en respectant les standards en vigueur, ou avec un dispositif à coupure unipolaire. La méthode de branchement est montrée ci-dessous: 400V~ 220-240 V~ 220-240 V~ 220-240 V~ 220-240 V~ 220-240 V~...
- Page 29 ENLEVEMENT DES APPAREILS MENAGERS USAGES La directive Européenne 2012/19/EU sur les Déchets des Equipements Electriques et Electroniques (DEEE), exige que les appareils ménagers usagés ne soient pas jetés dans le flux normal des déchets municipaux. Les appareils usagés doivent être collectés séparément afin d'optimiser le taux de récupération et le recyclage des matériaux qui les composent et Elimination : Ne pas réduire l'impact sur la santé...
- Page 30 TABLE OF CONTENTS FORWARD RODUCT INTRODUCTION PERATION OF PRODUCT -10- -16- COOK ING GUIDELINESS -17- EAT SETTINGS -17- CARE AND CLEANING -18- HINTS AND TIPS -19- INSTALLATION...
- Page 52 BUT INTERNATIONAL 1, AVENUE S P INO Z A 77184 EMERAINVILLE, FRANCE...