Télécharger Imprimer la page
Dräger Panorama Nova RP Notice D'utilisation
Masquer les pouces Voir aussi pour Panorama Nova RP:

Publicité

Les langues disponibles
  • FR

Les langues disponibles

  • FRANÇAIS, page 14

Liens rapides

Dräger Panorama Nova RP
Gebrauchsanweisung
de
2
Instructions for Use
en
8
Notice d'utilisation
fr
14
Instrucciones de uso
es
21
Istruzioni per I'uso
it
29
You must read, understand, and follow these instructions for use
before you use the product in order to ensure proper operation and
functioning of the product.
Brugsanvisning
da
36
Instrukcja obsługi
pl
42
Руководство по эксплуатации
ru
50
Návod k použití
cs
57
Ръководство за работа
bg
63
WARNING
Instrucţiuni de utilizare
ro
71
Kullanım talimatları
tr
78
Instructions for Use
enUS
85

Publicité

loading

Sommaire des Matières pour Dräger Panorama Nova RP

  • Page 1 Dräger Panorama Nova RP Gebrauchsanweisung Brugsanvisning Instrucţiuni de utilizare    Instructions for Use Instrukcja obsługi Kullanım talimatları    Notice d‘utilisation Руководство по эксплуатации   Instrucciones de uso Návod k použití   Istruzioni per I'uso Ръководство...
  • Page 2 Zu Ihrer Sicherheit Beschreibung ● Vor Gebrauch des Produkts diese Gebrauchsanweisung und die Produktübersicht der zugehörigen Produkte aufmerksam lesen. ● Gebrauchsanweisung genau beachten. Der Anwender muss die Anweisungen vollständig verstehen und den Anweisungen genau Folge leisten. Das Produkt darf nur entsprechend dem Verwendungszweck verwendet werden.
  • Page 3 Funktionsbeschreibung Typidentische Kennzeichnungen Die Vollmasken sind Atemanschlüsse mit Steckanschluss Die Vollmasken sind folgendermaßen gekennzeichnet: (Schnellkupplungsanschluss) für Regenerationsgeräte. Anschlussstück Die Vollmasken können bei Temperaturen von –30 °C bis +60 °C ein- T (Telefon) gesetzt werden. Maskenkörper EPDM oder SI Für Brillenträger lässt sich eine Maskenbrille einsetzen. EN 136 CL.
  • Page 4 Extreme Einsatzbedingungen ● Bänderung über den Kopf führen und nach hinten streifen, bis das Stirnband Bei tiefen Temperaturen: Sichtscheibe innen mit Klarsichtmittel glatt anliegt. Vollmaske "klar-pilot" Gel gegen Beschlagen schützen. zurechtrücken. Bei hohen Temperaturen: Bei Beschädigung der Sichtscheibe Nackenbänder gleichmäßig straffzie- sofort Gefahrenbereich verlassen.
  • Page 5 Wartung Reinigung und Desinfektion Vollmaske nach jedem Einsatz reinigen und desinfizieren. Empfohlene Prüf- und Instandhaltungsintervalle WARNUNG Die folgenden Angaben sind Empfehlungen der in Deutschland Der Maskenkörper muss so gründlich gereinigt werden, dass keine gültigen DGUV-R 112-190. Nationale Richtlinien beachten. Rückstände von Hautpflege-Produkten am Maskenkörper bleiben. Andernfalls kann die Elastizität im Dichtbereich verloren gehen und die Maske sitzt nicht mehr richtig.
  • Page 6 Besondere Wartungsarbeiten ● Alle Teile, die desinfiziert werden müssen, in das Desinfektionsbad einlegen. Hör- und Sprechgarnitur montieren ● Alle Teile unter fließendem Wasser gründlich spülen. Ohrmuschel aufknöpfen. ● Alle Teile an der Luft oder im Trockenschrank trocknen lassen Hörer an der Bänderung befestigen. (Temperatur: max.
  • Page 7 Transport Maskenanschluss austauschen: Innen- maske aus der Nut des Schraubrings her- Vollmaske in einer Tragedose oder Maskentasche transportieren. ausziehen. Schelle mit Hilfe eines Schraubendrehers aufhebeln. Schelle Lagerung sowie Gleitring und Stützblech abneh- Bänderung bis zum Anschlag (Griff-Lasche) öffnen. Sichtscheibe mit men.
  • Page 8 For your safety Description ● Before using this product, carefully read these instructions for use Product overview and those of the associated products. ● Strictly follow the instructions for use. The user must fully understand and strictly observe the instructions. Use the product only for the purposes specified in the intended use section of this document.
  • Page 9 Feature description Approvals The full face masks are facepieces with plug-in connectors (quick The full face masks are approved according to: connect couplings) for closed-circuit breathing apparatuses. — EN 136:1998 CL.3+ The full face masks can be used at temperatures from –30 °C to —...
  • Page 10 ● Checking for leaks: Press both breathing hoses together tightly and inhale until a negative pressure is created. Hold your breath ● Soak the wiper in "klar-pilot" anti-mist fluid . Do not use the wiper for a moment. The negative pressure should remain. Otherwise, in its dry state.
  • Page 11 Maintenance Cleaning and disinfecting Clean and disinfect the full face mask after every use. Recommended test and maintenance intervals WARNING The following are recommendations from the DGUV-R 112-190, The mask body must be thoroughly cleaned, so that no residue of which applies in Germany.
  • Page 12 Special maintenance work ● Mount the accessories, if necessary. NOTICE Attaching the voice transmission/receiver set The full face mask can also be cleaned and disinfected in a washing Attach the ear cup. machine. Further information can be obtained from Dräger. Fasten the receiver to the harness.
  • Page 13 Transport Replacing the mask connector: Pull the inner mask out of the groove of the Transport the full face mask in a carrying box or mask bag. threaded ring. Force open the clamping ring with a screwdriver. Remove the Storage clamping ring and slip ring and the Loosen the harness as far as possible (until it is stopped by the tab).
  • Page 14 
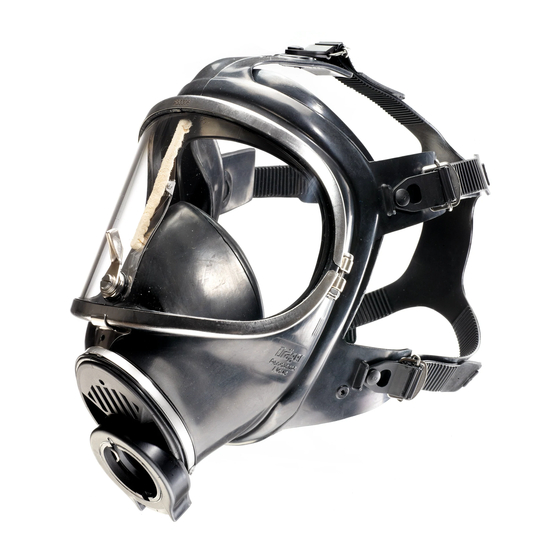
Pour votre sécurité Description ● Avant d'utiliser le produit, veuillez lire attentivement la notice Aperçu du produit d'utilisation et celle des produits associés. ● Veuillez respecter scrupuleusement la notice d'utilisation. L'utilisateur devra comprendre la totalité des instructions et les respecter scrupuleusement. Veuillez utiliser le produit en respectant rigoureusement le domaine d'application.
  • Page 15 Description du fonctionnement Homologations Les masques complets sont des pièces faciales équipées de Les masques complets sont homologués selon : raccords à encliqueter (raccord rapide) pour appareils de protection — EN 136:1998 CL.3+ respiratoire isolants à circuit fermé. — TR CU 019/2011 Les masques complets peuvent être utilisés à...
  • Page 16 Utilisation ● Contrôle de l’étanchéité : Comprimer fermement les deux tuyaux de ventilation et inspirer jusqu'à obtenir une dépression. ● Imprégner l'essuie-glace avec du gel antibuée « klar-pilot » Retenir brièvement la respiration. La dépression doit être Fluid . Ne pas actionner à l’état sec. maintenue ;...
  • Page 17 Conditions d'utilisation extrêmes Maintenance Dans le cas de températures basses : Protéger l'intérieur de Périodicité de contrôle et de maintenance l’oculaire contre la formation de buée en appliquant le gel antibuée « klar-pilot ». recommandée Dans le cas de températures élevées : En cas d'endommagement Les informations suivantes sont des préconisations de la norme de l'oculaire, il faut immédiatement quitter la zone de danger.
  • Page 18 Nettoyage et désinfection ● Placer toutes les pièces qui doivent être désinfectées dans le bain désinfectant. Nettoyer et désinfecter le masque complet après chaque utilisation. ● Rincer abondamment les pièces sous le robinet. AVERTISSEMENT ● Faire sécher toutes les pièces à l'air ou dans l'étuve La jupe de masque doit être minutieusement nettoyée afin d’éliminer (température : max.
  • Page 19 Contrôles d’étanchéité Travaux de maintenance spéciaux Contrôler le masque complet après chaque utilisation ou Installer le dispositif d’intercommunication maintenance et réparation. Détacher l’oreillette. Effectuer le contrôle d'étanchéité avec un appareil de test adapté (par Fixer l’écouteur sur la bride. ex. celui de la série Testor ou Quaestor). Fixer l’écouteur sur le cadre Contrôle de l’étanchéité...
  • Page 20 Remplacement du raccord de masque : Uniquement utiliser des composants d’origine de Dräger. Après la Retirer le masque intérieur de la rainure réalisation des travaux de maintenance et/ou le remplacement de de la bague filetée. Soulever le collier à composants, il faut de nouveau vérifier l’étanchéité. l’aide d’un tournevis.
  • Page 21 Para su seguridad Descripción ● Antes de utilizar el producto, leer atentamente estas instrucciones Vista general del producto de uso, así como las de los productos correspondientes. ● Observar exactamente las instrucciones de uso. El usuario tiene que comprender las instrucciones íntegramente y cumplirlas estrictamente.
  • Page 22 Descripción del funcionamiento Marcas identificativas típicas Las máscaras son conexiones respiratorias con conexión acoplable Las máscaras están identificadas de la siguiente manera: (conexión acoplable rápida) para equipos de regeneración. Conector del equipo Las máscaras pueden utilizarse a temperaturas de –30 °C a +60 °C. T (teléfono) Para los portadores de gafas existen gafas para máscara.
  • Page 23 Condiciones extremas de uso ● Colocar el atalaje sobre la cabeza y tirar hacia atrás hasta que la cinta de En caso de temperaturas bajas: Proteger el interior del visor contra la frente quede lisa. Colocar la empañamiento aplicando el gel antiempañante "klar-pilot". máscara completa en la posición En caso de altas temperaturas: En caso de que se dañe el visor, correcta.
  • Page 24 Mantenimiento Intervalos de comprobación y mantenimiento recomendados Las siguientes indicaciones son recomendaciones de la directriz DGUV-R 112-190 válida en Alemania. Observar las directrices nacionales. Trabajos necesarios en la máscara Limpieza y desinfección Inspección visual, prueba de funcionamiento y de estanqueidad Sustitución de la membrana fónica Sustitución del anillo obturador del...
  • Page 25 Limpieza y desinfección ● Enjuagar todas las piezas minuciosamente bajo agua corriente. ● Dejar que todas las piezas se sequen al aire o en el armario de Limpiar y desinfectar la máscara después de cada uso. desecación (temperatura: máx. 60 °C). Proteger contra la ADVERTENCIA radiación solar directa.
  • Page 26 Pruebas de estanqueidad Trabajos especiales de mantenimiento Comprobar la máscara después de cada uso y después de cada Montar el set de auricular y micrófono mantenimiento o reparación. Abrochar el auricular. Realizar la prueba de estanqueidad con un equipo de comprobación Fijar el audífono al atalaje.
  • Page 27 salientes de sujeción sea de 3 a 0,5 mm. Sustitución de la membrana fónica y la junta tórica: Sustitución de la conexión de la Extraer la mascarilla interior de la ranura máscara: Extraer la mascarilla interior de del anillo roscado. Desenroscar el anillo la ranura del anillo roscado.
  • Page 28 Transporte Transportar la máscara en una bolsa o caja de transporte. Almacenamiento Abra completamente el atalaje hasta el tope (lengüeta de sujeción). Limpiar el visor con un paño antiestático. Embalar la máscara en la bolsa o caja de transporte correspondiente. Almacenar la máscara en un lugar seco y sin polvo, comprobando que no se deforme.
  • Page 29 Per la vostra sicurezza Descrizione ● Prima dell'utilizzo del prodotto leggere attentamente le presenti Panoramica del prodotto istruzioni per l'uso nonché quelle relative ai prodotti acclusi. ● Osservare scrupolosamente le istruzioni per l'uso. L'utilizzatore deve comprendere le istruzioni nella loro completezza e osservarle scrupolosamente.
  • Page 30 Descrizione del funzionamento Omologazioni Le maschere a pieno facciale sono facciali dotati di raccordo ad Le maschere a pieno facciale sono omologate a norma: innesto (raccordo a chiusura rapida) per autorespiratori a circuito — EN 136:1998 CL.3+ chiuso. — TR CU 019/2011 Le maschere a pieno facciale possono essere utilizzate a temperature —...
  • Page 31 Utilizzo ● Controllare la tenuta: tenere chiusi entrambi i tubi di respirazione e inspirare, finché non si crea una depressione. Trattenere ● Bagnare il tergicristallo con fluido antiappannamento "klar-pilot" brevemente il respiro. Se la tenuta è perfetta, la pressione rimane .
  • Page 32 Condizioni d’impiego estreme Manutenzione A basse temperature: trattare la parte interna del visore col gel Intervalli di verifica e di manutenzione consigliati antiappannante "klar-pilot". Ad alte temperature: in caso di danni al visore si deve abbandonare Le seguenti indicazioni sono conformi a quanto raccomandato dalla immediatamente la zona di pericolo.
  • Page 33 Pulizia e disinfezione ● Far asciugare tutti i componenti all'aria o in un armadio essiccatore (temperatura: max. 60 °C). Proteggere Dopo ogni utilizzo, pulire e disinfettare la maschera. dall'esposizione diretta al sole. AVVERTENZA ● Montare gli eventuali accessori. Il corpo della maschera va pulito accuratamente in modo che non NOTA rimangano su di esso eventuali residui di prodotti per il trattamento della pelle.
  • Page 34 Sistema di comunicazione (microfono/ricevitore): montare il Pressare prima il telaio di fissaggio superiore e poi quello inferiore. Se microfono, il ricevitore e l’auricolare, vedere “Manutenzione necessario, montare la piastra di supporto. Inserire le viti nei dadi speciale”. esagonali e stringere finché la distanza fra le camme di serraggio non sia di 3 –...
  • Page 35 Smaltimento Sostituzione della membrana fonica o dell’anello toroidale: estrarre la maschera interna dalla Smaltire il prodotto conformemente alle norme vigenti. scanalatura dell'anello filettato. Svitare l'anello filettato con la chiave a forchetta. Ruotare la chiave e inserirla con cautela nei fori della griglia protettiva, facendo attenzione a non danneggiare la membrana.
  • Page 36 For din sikkerhed Beskrivelse ● Før produktet benyttes, skal denne brugsanvisning og Produktoversigt brugsanvisningerne til de tilhørende produkter læses grundigt igennem. ● Følg brugsanvisningen nøje. Brugeren skal forstå anvisningerne helt og følge dem nøje. Produktet må kun bruges i overensstemmelse med den tilsigtede anvendelse. ●...
  • Page 37 Funktionsbeskrivelse Typeidentitetsmærkninger Helmaskerne er åndedrætstilslutninger med stiktilslutning Helmaskerne er mærket forskelligt: (hurtigkoblingstilslutning) til kredsløbsapparater. Tilslutningsstykke Helmaskerne kan anvendes ved temperaturer fra –30 °C til +60 °C. T (Telefon) Brillebrugere skal benytte en maskebrille. Maskelegeme EPDM eller SI Maskerne med mærkningen "T" har en adapter for tilslutning til lytte- EN 136 CL.
  • Page 38 Ekstreme anvendelsesforhold ● Tag helmasken på: Skæg og kindskæg i helmaskens tætningsområde medfører lækager! De pågældende personer Ved lave temperaturer: Beskyt maskeruden indvendigt mod egner sig ikke til at bære helmasken. Brillestel fører ligeledes til dugdannelse med "klar-pilot"-gel. utætheder i tætningsområdet. Brug maskebriller. Knap Ved høje temperaturer: Ved beskadigelse af maskeruden skal bærestroppen af.
  • Page 39 Vedligeholdelse Rengøring og desinfektion Rengør og desinficer helmasken efter hver indsats. Anbefalede kontrol- og vedligeholdelsesintervaller ADVARSEL Følgende angivelser er anbefalinger i overensstemmelse med den i Maskelegemet skal rengøres så grundigt, at der ikke findes rester af Tyskland gældende DGUV-R 112-190. Overhold de nationale hudplejeprodukter på...
  • Page 40 Særligt vedligeholdelsesarbejde ● Monter evt. tilbehøret. BEMÆRK Montering af lytte- og taleudstyr Helmasken kan også rengøres og desinficeres i vaskemaskinen. Knap øresneglen op. Nærmere informationer fås hos Dräger. Fastgør telefonrøret på stropperne. Fastgør telefonrøret med Tæthedsafprøvinger spændebåndet på tætningsrammen. Kontrollér helmasken hhv. efter hver brug og efter hver service og Skru mikrofonen fast.
  • Page 41 Transport Udskiftning af masketilslutning: Træk indermasken ud af skrueringens not. Løsn Transportér helmasken i en bæredåse eller maskepose. spændebåndet op ved hjælp af en skruetrækker. Tag spændebåndet samt Opbevaring glideringen og beskyttelsespladen af. Åbn stropperne helt (laske). Tør maskeruden af med en antistatisk Træk masketilslutningen ud af klud.
  • Page 42 Dla Państwa bezpieczeństwa Opis ● Przed użyciem produktu należy uważnie przeczytać niniejszą Przegląd produktów instrukcję obsługi oraz instrukcje powiązanych produktów. ● Dokładnie przestrzegać instrukcji użytkowania. Użytkownik musi w całości zrozumieć instrukcje i zgodnie z nimi postępować. Produkt może być używany wyłącznie zgodnie z jego celem zastosowania.
  • Page 43 Opis działania Dopuszczenia Maski pełnotwarzowe to części twarzowe z przyłączem wtykowym Maski pełnotwarzowe są dopuszczone zgodnie z: (przyłączem szybkozłącznym) do aparatów oddechowych z — EN 136:1998 CL.3+ zamkniętym obiegiem powietrza. — TR CU 019/2011 Maski pełnotwarzowe mogą być stosowane w temperaturach od —...
  • Page 44 Użytkowanie ● Kontrola szczelności: Obydwa węże oddechowe ścisnąć mocno i wykonać wdech, aż powstanie podciśnienie. Na chwilę ● Wycieraczkę nasączyć środkiem poprawiającym widoczność wstrzymać powietrze. Podciśnienie powinno się utrzymywać, w „klar-pilot” Fluid . Nie uruchamiać w stanie suchym. przeciwnym razie naciągnąć taśmy. Dwukrotnie powtórzyć ●...
  • Page 45 Skrajne warunki stosowania Konserwacja Przy niskich temperaturach: Wizjer zabezpieczyć wewnątrz przed Zalecane okresy kontroli i konserwacji zaparowaniem żelem poprawiającym widoczność „klar-pilot”. Przy wysokich temperaturach: W przypadku uszkodzenia wizjera Poniższe dane to zalecenia obowiązujących w Niemczech przepisów natychmiast opuścić obszar zagrożenia. DGUV-R 112-190.
  • Page 46 Czyszczenie i dezynfekcja ● Wszystkie dezynfekowane części włożyć do kąpieli dezynfekcyjnej. Maskę pełnotwarzową należy po każdym użyciu wyczyścić i ● Wszystkie części dokładnie spłukać pod bieżącą wodą. zdezynfekować. ● Wszystkie części wysuszyć na powietrzu lub w suszarce OSTRZEŻENIE szafkowej (temperatura: maks. 60 °C). Nie wystawiać na Korpus maski należy wyczyścić...
  • Page 47 Kontrola szczelności Szczególne prace konserwacyjne Maskę pełnotwarzową sprawdzać po każdym użyciu lub po każdej Montaż armatury słuchowej i głosowej konserwacji i naprawie. Wpiąć nauszniki. Kontrola szczelności odbywa się przy użyciu odpowiedniego testera Zamocować słuchawki na uprzęży. (np.serii Testor lub Quaestor). Zamocować...
  • Page 48 Wymiana przyłącza maski: Maskę Wymiana membrany głosowej bądź pierścienia typu o-ring: wewnętrzną wyjąć z rowka pierścienia Wyjąć maskę wewnętrzną z rowka śrubowego. Podważyć obejmę przy pierścienia śrubowego. Pierścień śrubowy użyciu śrubokręta. Zdjąć obejmę oraz wykręcić kluczem kołkowym. Obrócić pierścień ślizgowy i blachę podporową. klucz kołkowy i włożyć...
  • Page 49 Transport Maskę pełnotwarzową transportować w puszce do noszenia lub torbie na maskę. Przechowywanie Rozsunąć uprząż do oporu (uchwytu). Wytrzeć wizjer ściereczką antystatyczną. Maskę pełnotwarzową zapakować w torebkę od kompletu lub puszkę do noszenia. Wysuszyć, unikając odkształceń i przechowywać w miejscu niezakurzonym. Temperatura przechowywania: Od –15 °C do +25 °C.
  • Page 50 В целях безопасности Описание ● Перед применением данного устройства внимательно Обзор устройства прочтите это Руководство по эксплуатации, а также руководства по эксплуатации изделий, используемых вместе с данным устройством. ● Строго следуйте указаниям данного Руководства по эксплуатации. Пользователь должен полностью понимать и строго...
  • Page 51 Описание функций Аттестации Полнолицевые маски представляют со штекерным Полнолицевые маски аттестованы согласно: соединителем (быстроразъемным соединением) предназначены — EN 136:1998 CL.3+ для дыхательных аппаратов с замкнутым циклом дыхания. — ТР ТС 019/2011 Полнолицевые маски могут использоваться при температурах от — (EС) 2016/425 –30 °C до...
  • Page 52 Использование ● Проверьте герметичность: Плотно сожмите оба дыхательных шланга и вдохните, создав разрежение. ● Смочите дворник средством против запотевания смотрового Ненадолго задержите дыхание. Разрежение должно стекла "klar-pilot" . Не используйте его сухим. сохраниться. Если оно не сохраняется, подтяните ремни ● Подготовьте...
  • Page 53 После использования Техническое обслуживание ● Отсоедините дыхательный аппарат с замкнутым циклом: Рекомендуемая периодичность технического Нажмите кнопку и одновременно извлеките штекерное соединение из соединителя маски. обслуживания ● Снимите маску: Подведите Приведенные сведения являются рекомендацией в соответствии указательные пальцы под застежки с действующими в Германии нормативами DGUV-R 112-190. на...
  • Page 54 Очистка и дезинфекция ● Погрузите все детали, требующие дезинфекции, в ванну с дезинфицирующим раствором. Очищайте и дезинфицируйте полнолицевую маску после ● Тщательно промойте все элементы проточной водой. каждого использования. ● Высушите все элементы на воздухе или в сушильном шкафу ПРЕДУПРЕЖДЕНИЕ (температура: макс.
  • Page 55 герметизируйте места утечки. Повторите проверку на Используйте только смотровые стекла с маркировкой »F« герметичность. (противопожарные). Маркировка »F« находится в верхней части смотрового стекла. Вставьте новое смотровое стекло в верхнюю, а После проверки: Нажмите кнопку и отсоедините адаптер. затем в нижнюю часть резиновой оправы. Центральные метки на Снимите...
  • Page 56 Транспортировка Замена переговорной мембраны или уплотнительного кольца: Транспортируйте полнолицевую маску в футляре для хранения и Извлеките внутреннюю маску из паза транспортировки или сумке для маски. резьбового кольца. Вывинтите Хранение резьбовое кольцо штифтовым ключом. Повернув ключ, осторожно вставьте его Максимально ослабьте ремни маски (до пряжки). Протрите в...
  • Page 57 Pro vaši bezpečnost Popis ● Před použitím výrobku si pozorně přečtěte tento návod k použití a Přehled produktu návody k příslušejícím výrobkům. ● Dodržujte přesně návod k použití. Uživatel musí pokynům úplně rozumět a musí je přesně dodržovat. Výrobek se smí používat jen v souladu s účelem použití.
  • Page 58 Popis funkce Typová označení Celoobličejové masky jsou dýchací přístroje s přípojkou (přípojka Celoobličejové masky jsou označeny takto: s rychlospojkou) pro regenerační zařízení. Přípojka Celoobličejové masky lze používat při teplotách od –30 °C do +60 °C. T (telefon) Osoby s brýlemi mohou do masky vložit adaptér pro dioptrická skla. Tělo masky EPDM nebo SI Masky s označením "T"...
  • Page 59 Extrémní podmínky použití ● Náhlavní pásky přetáhněte přes hlavu a napněte je směrem dozadu, až čelní V případě velice nízkých teplot: Zorník z vnitřní strany ošetřete pásek správně přiléhá. přípravkem „klar-pilot“, aby byl chráněn proti zamlžení. Celoobličejovou masku upravte. V případě velice vysokých teplot: Dojde-li k poškození zorníku, Týlní...
  • Page 60 Údržba Čištění a dezinfekce Po každém zásahu celoobličejovou masku vyčistěte a dezinfikujte ji. Doporučené intervaly zkoušek a údržby VAROVÁNÍ Následující údaje jsou doporučení a odpovídají požadavkům Tělo masky musí být důkladně vyčištěno, aby na něm nezůstaly v Německu platné normy DGUV-R 112-190. Dodržujte předpisy naprosto žádné...
  • Page 61 Speciální údržbové práce ● Příp. namontujte příslušenství. POZNÁMKA Montáž komunikační soupravy Celoobličejové masky se mohou čistit a desinfikovat také v pračce. Namontujte polštářek na ušní boltec. Potřebné informace vám poskytne firma Dräger. Sluchátko upevněte na náhlavní pásky. Zkoušky těsnosti Sluchátko s mušlí upevněte na těsnící Celoobličejovou masku po každém zásahu resp.
  • Page 62 Přeprava Výměna přípojky masky: Vnitřní masku vytáhněte z drážky závitového kroužku. Celoobličejovou masku přepravujte v transportním obalu nebo v tašce Pomocí šroubováku pozvedněte sponu. na masku. Sponu, kluzný kroužek a opěrnou Skladování podložku sejměte. Přípojku masky vytáhněte z těla masky. Novou přípojku Náhlavní...
  • Page 63 За Вашата безопасност Описание ● Преди употреба на продукта прочетете внимателно това Преглед на продукта ръководство за работа и ръководствата за работа на свързаните продукти. ● Спазвайте точно ръководството за работа. Потребителят трябва да разбира напълно инструкциите и да ги следва точно.
  • Page 64 Описание на функциите Сертификати Целите лицеви маска представляват дихателни връзки с щекер Целите лицеви маски са сертифицирани по: (връзка с бърз куплунг) за циркулационни дихателни апарати. — EN 136:1998 CL.3+ Целите лицеви маски могат да се използват при температура от —...
  • Page 65 Употреба ● Проверете уплътнението: Стиснете здраво двата дихателни шлауха и вдишайте, така че да се създаде вакуум. ● Намокрете чистачката с течност против изпотяване "klar- Задръжте въздуха за кратко. Вакуумът трябва да се запази, в pilot" . Не я пускайте да работи в сухо състояние. противен...
  • Page 66 Екстремни условия при употреба Поддръжка При ниска температура: Защитете визьора отвътре със Препоръчителни интервали за проверка и защитен гел „klar-pilot“ против изпотяване. поддържане в изправност При висока температура: При повреда на визьора незабавно напуснете опасната зона. Следващите данни са препоръки на валидните в Германия При...
  • Page 67 Почистване и дезинфекция ● Поставете в дезинфекционна баня всички части, които трябва да се дезинфекцират. Почиствайте и дезинфекцирайте цялата лицева маска след ● Изплакнете основно всички части под течаща вода. всяко ползване. ● Подсушете всички части на въздух или в сушилен шкаф ПРЕДУПРЕЖДЕНИЕ...
  • Page 68 Проверки на уплътнението Специални работи по поддръжка Проверявайте цялата лицева маска след всяка употреба, респ. Монтирайте гарнитурата за слушане и говорене след всяка поддръжка и поправка. Закачете мембраната за ухо. Извършете проверка на уплътнението с подходящ изпитвателен Закрепете слушалката към уред...
  • Page 69 шестостранните гайки и ги затегнете дотолкова, че разстоянието Смяна на говорната мембрана или на О-пръстена: между обтягащите щифтове да бъде от 3 до 0,5 mm. Извадете вътрешната маска от жлеба Смяна на присъединителния на пръстена с резба. Развинтете елемент на маската: Извадете пръстена...
  • Page 70 Транспортиране Транспортирайте цялата лицева маска в кутия за носене или в торба за маска. Съхранение Отворете ремъците докрай (до планката за хващане). Избършете визьора с антистатична кърпа. Опаковайте цялата лицева маска в съответната торба или в кутия за носене. Съхранявайте цялата лицева...
  • Page 71 Pentru siguranţa dumneavoastră Descriere ● Înaintea utilizării produsului, citiţi cu atenţie prezentele instrucţiuni Privire de ansamblu asupra produsului de utilizare şi instrucţiunile de utilizare ale produselor aparţinătoare. ● Respectaţi întocmai instrucţiunile de utilizare. Utilizatorul trebuie să înţeleagă integral instrucţiunile şi să le urmeze întocmai. Produsul poate fi utilizat numai în conformitate cu scopul de utilizare.
  • Page 72 Descrierea funcţiilor Omologări Măştile complete sunt racorduri de respiraţie cu racord cu fişă (racord Măştile complete sunt omologate conform: cu cuplă rapidă) pentru aparatele de respirație autonom. — EN 136:1998 CL.3+ Măştile complete se pot utiliza la temperaturi între –30 °C şi +60 °C. —...
  • Page 73 Utilizare ● Verificarea etanşeităţii: Asamblaţi prin presare ambele furtunuri de respiraţie şi inspiraţi până se creează subpresiune. Reţineţi ● Îmbibaţi ştergătorul cu fluidul pentru vedere clară "klar-pilot" . Nu aerul pentru o perioadă scurtă. Subpresiunea trebuie să persiste, acţionaţi în stare uscată. în caz contrar strângeţi harnaşamentul.
  • Page 74 Condiţii extreme de utilizare Întreţinerea curentă La temperaturi scăzute: Vizorul se protejează din interior cu agent Intervale recomandate de verificare şi revizie de vizibilitate gel „klar-pilot” împotriva aburirii. La temperaturi ridicate: La deteriorarea vizorului se părăseşte Datele de mai jos sunt recomandări conform DGUV-R 112-190, imediat zona periculoasă.
  • Page 75 Curăţarea şi dezinfectarea ● Lăsaţi toate piesele să se usuce în aer sau în dulapul de uscare (temperatura: max. 60 °C). Protejaţi de acţiunea directă a razelor Masca completă se curăţă şi se dezinfectează după fiecare aplicaţie. soarelui. AVERTISMENT ● După...
  • Page 76 Lucrări speciale de întreţinere Înlocuirea racordului măştii: Scoateţi masca interioară din canelura inelului filetat. Ridicaţi brida de fixare cu o Montarea garniturii de ascultare şi vorbire şurubelniţă. Scoateţi brida de fixare, inel Cuplaţi cochiliile pentru urechi. glisant şi tabla suport. Extrageţi racordul Aşezaţi căştile audio la harnaşament.
  • Page 77 Transportul Transportaţi masca completă într-o cutie de transport sau o geantă de mască. Depozitarea Deschideţi harnaşamentul până la opritor (eclisa mânerului). Vizorul se şterge cu o cârpă antistatizată. Masca completă se împachetează în punga sau cutia de transport aferentă. Uscaţi fără deformare şi depozitaţi ferită...
  • Page 78 Kendi güvenliğiniz için Açıklama ● Ürünü kullanmadan önce bu kullanma kılavuzunu ve ilgili Ürüne genel bakış ürünlerin kullanma kılavuzlarını dikkatlice okuyun. ● Kullanım kılavuzuna tam olarak uyun. Kullanıcı, talimatları eksiksiz şekilde anlamı ve tam olarak uygulamalıdır. Ürün, sadece kullanım amacına uygun olarak kullanılmalıdır. ●...
  • Page 79 Fonksiyon açıklaması Türe özgü işaretlemeler Tam yüz maskeleri, kapalı devre solunum cihazları için geçme Tam yüz maskeleri aşağıdaki şekilde işaretlenmiştir: bağlantılı (hızlı kaplin bağlantısı) solunum bağlantılarıdır. Bağlantı parçası Tam yüz maskeleri, –30 °C ile +60 °C arasındaki sıcaklıklarda T (Telefon) kullanılabilir.
  • Page 80 Kullanım ● Sızdırmazlık kontrolü: Her iki solunum hortumunu sıkıştırın ve düşük basınç oluşana kadar nefes alın. Nefesinizi kısa bir süre ● Cam sileceğini "klar-pilot" Fluid buğulanma önleyiciye batırın. tutun. Vakum olduğu gibi kalmalıdır, aksi takdirde baş bantlarını Kuru durumda çalıştırmayın. biraz daha sıkın.
  • Page 81 Özel ve aşırı durumlarda kullanımı Bakım Düşük sıcaklıklarda: Görüş camını, buğulama önleyici "klar-pilot" Tavsiye edilen kontrol ve bakım aralıkları Gel ile buğulanmaya karşı koruyun. Yüksek sıcaklıklarda: Görüş camının zarar görmesi durumunda Aşağıdaki bilgiler, Almanya'da geçerli DGUV-R 112-190 uyarınca tehlikeli bölgeden hemen çıkın. tavsiyelerdir.
  • Page 82 Temizleme ve dezenfeksiyon ● Tüm parçaları akar su altında iyice durulayın. ● Tüm parçaları açık havada veya kurutma dolabında kurumaya Tam yüz maskesi, her kullanımdan sonra temizlenmeli ve dezenfekte bırakın (sıcaklık: maks 60 °C). Doğrudan güneş ışığına karşı edilmelidir. koruyun. UYARI ●...
  • Page 83 Özel bakım işleri Maske bağlantısının değiştirilmesi: İç maskeyi vidalı halkanın yivinden çekip çıkarın. Kelepçeyi bir tornavidanın Dinleme ve konuşma ekipmanının montajı yardımıyla açın. Kelepçeyi ve kayar Kulak kepçesini düğmeleyin. halkayı ve destek plakasını çıkartın. Kulaklığı baş bantlarına sabitleyin. Maske bağlantısını maske gövdesinden Kulaklığı...
  • Page 84 Taşıma Tam yüz maskesini bir taşıma kutusunda veya maske çantasında taşıyın. Depolama Baş bantlarını sonuna (tutamaç) kadar açın. Görüş camını bir antistatik bezle silin. Tam yüz maskesini ait olduğu torbaya veya taşıma kutusuna koyun. Deformasyon olmayacak şekilde, kuru ve tozsuz bir yerde depolayın. Depolama sıcaklığı: –15 °C ila +25 °C. Doğrudan ışık ve sıcaklığa maruz bırakmayın.
  • Page 85 For your safety Safety symbols used in this manual While reading this manual, you will come across a number of General safety statements warnings concerning some of the risks and dangers you may face ● Before using this product, carefully read these Instructions for Use while using the facepiece.
  • Page 86 Description Feature description The Panorama Nova RP is a facepiece with plug-in connector (quick- release connector) for closed-circuit breathing apparatus. It consists Product overview of a facepiece body with head harness or hairnet. A wiper ensures good visibility. Special facepiece spectacles are available for users who wear spectacles.
  • Page 87 Type-identical identification marking ● Fit straps round head and pull them back until the harness connecting piece rests smoothly on the face. The Panorama Nova RP has the following markings: ● Position the facepiece: Equipment Tighten the neck straps uniformly connector (1).
  • Page 88 Dräger. Potentially explosive areas WARNING If the Panorama Nova RP is used in potentially explosive areas, apply antistatic spray or water mist to the facepiece. Otherwise there is danger of explosion due to electrostatic charge. Use instructions for NIOSH-approved full facepieces...
  • Page 89 Maintenance Cleaning and disinfecting The facepiece must be cleaned after every use so that it is clean ● After maintenance work and/or replacement of components before it is used by a different individual or, if individually assigned, as confirm the leak tightness. often as necessary to keep in a sanitary condition.
  • Page 90 Leak tests Cleaning and disinfecting procedure ● Remove any accessories from the facepiece and clean them Perform the leak test with suitable test equipment, e.g. from the separately. Testor or Quaestor series. ● Position the wiper in the middle of the visor. (1) Checking leak tightness ●...
  • Page 91 Special maintenance work ● Fit sliding ring and new clamping ring. Engage the hooks so that the clamping ring is as tight as possible. Replacing the visor ● Slide the support plate between ● Undo the two visor frame screws. clamping ring and sliding ring;...
  • Page 92 Replacing the O-ring of the wiper Attach the head harness to the facepiece as follows: ● Loosen screw at the outside of the facepiece using screw driver R 18 830 and remove operating lever. ● Put the clip on the connecting stud of the rubber flap, then lock it into ●...
  • Page 93 NIOSH Approval Label Draeger Safety AG & Co KGaA D - 23560 Luebeck Phone : 011 49 451 882-0 US Phone: 1-800-922-1737 PSS BG 4 Series Closed-Circuit, Demand, Entry and Escape Self-Contained Breathing Apparatus Closed-Circuit, Pressure Demand, Entry and Escape Self-Contained Breathing Apparatus These respirators are approved only in the following configurations: Respirator Components Alternate...
  • Page 96 Dräger Safety AG & Co. KGaA Revalstraße 1 D-23560 Lübeck 0158 Germany Phone +49 451 882-0 +49 451 882-2080 www.draeger.com Notified body: Involved in type approval and in quality control: DEKRA EXAM GmbH Dinnendahlstraße 9 D-44809 Bochum Germany Reference number: CE 0158 TP TC 019/2011 90 21 282 - GA 1412.533 ©...