Table des Matières

Publicité

Les langues disponibles
  • FR

Les langues disponibles

  • FRANÇAIS, page 46

Liens rapides

Original
Bedienungsanleitung
Vakuumiersystem
VRH 490 advanced
Artikelnummer. 1525
1

Publicité

Table des Matières
loading

Sommaire des Matières pour CASO DESIGN VRH 490 advanced

  • Page 1 Original Bedienungsanleitung Vakuumiersystem VRH 490 advanced Artikelnummer. 1525...
  • Page 2 Braukmann GmbH Raiffeisenstraße 9 D-59757 Arnsberg Service-Hotline International: Tel.: +49 (0) 29 32 / 80 55 4 – 99 Fax: +49 (0) 29 32 / 80 55 4 – 77 eMail: kundenservice@caso-germany.de Sie finden die aktuellste Version der Bedienungsanleitung auch auf unserer Homepage: www.caso-germany.de Dokument-Nr.: 1525 31-08-2020...
  • Page 3: Table Des Matières

    1 Bedienungsanleitung ................11 2 Allgemeines ................... 11 2.1 Informationen zu dieser Anleitung ................ 11 2.2 Warnhinweise ......................11 2.3 Haftungsbeschränkung ..................12 2.4 Urheberschutz ......................12 3 Sicherheit ....................12 3.1 Bestimmungsgemäße Verwendung ............... 12 3.2 Allgemeine Sicherheitshinweise ................13 3.3 Gefahrenquellen ......................
  • Page 4 8.1 Reinigung ......................... 24 9 Störungsbehebung ................25 9.1 Sicherheitshinweise ....................25 9.2 Störungsursachen und –behebung ............... 25 10 Entsorgung des Altgerätes ..............26 11 Garantie ....................26 12 Technische Daten .................. 27 13 Instruction Manual ................29 13.1 General ........................29 13.2 Information on this manual ..................
  • Page 5 17.1 Basics of sealing ..................... 38 17.2 Bags and rolls ......................39 17.3 Vacuum with a bag of the bag roll ................. 39 17.4 Vacuum packaging with a bag ................39 17.5 Use of the function "pulse vacuum" (Manuelles Vakuum) ........40 17.6 Vacuum package in a Canister ................
  • Page 6 25.5 Elimination des emballages ................... 52 25.6 Mise en place ......................52 25.6.1 Exigences pour l'emplacement d'utilisation ............52 25.7 Raccordement électrique ..................53 26 Structure et fonctionnement ..............53 26.1 Vue d'ensemble ....................... 54 26.2 Panneau de commande ..................55 26.3 Plaque signalétique ....................
  • Page 7 Pericolo d’incendio ....................68 34.3.2 34.3.3 Pericolo dovuto a corrente elettrica ..............68 34.3.4 Informazioni di sicurezza per la conservazione del cibo........69 35 Messa in funzione ................. 70 35.1 Indicazioni di sicurezza................... 70 35.2 Insieme della fornitura ed ispezione trasporto ............. 70 35.3 Funzioni ........................
  • Page 8 43.3 Advertencias ......................82 43.4 Limitación de responsabilidad ................83 43.5 Derechos de autor (copyright) ................83 44 Seguridad....................83 44.1 Uso previsto ......................84 44.2 Instrucciones generales de seguridad ..............84 44.3 Fuentes de peligro ....................86 44.3.1 Peligro de quemaduras ..................86 44.3.2 Peligro de fuego ....................
  • Page 9 50.1 Instrucciones de seguridad ..................96 50.2 Problemas, causas y remedios ................97 51 Eliminación del aparato usado ............. 97 52 Garantía ....................98 53 Datos técnicos ..................98 54 Руководство по эксплуатации ............100 55 Общие сведения ................100 55.1 Информация...
  • Page 10 60.3 Вакуумная упаковка в пакете, сделанном из рулона ........111 60.4 Вакуумная упаковка в пакете ................112 60.5 Использование функции "Ручное вакуумирование" ........113 60.6 Вакуумная упаковка в вакуумную емкость............. 113 60.7 Хранение вакуумного упаковщика ..............114 61 Очистка и уход ................... 114 61.1 Очистка...
  • Page 11: Bedienungsanleitung

    1 Bedienungsanleitung 2 Allgemeines Lesen Sie die hier enthaltenen Informationen, damit Sie mit Ihrem Gerät schnell vertraut werden und seine Funktionen in vollem Umfang nutzen können. Sachgerechte Behandlung und Pflege wirken sich positv auf seine Lebensdauer aus. Wir wünschen Ihnen viel Freude beim Gebrauch. 2.1 Informationen zu dieser Anleitung Diese Bedienungsanleitung ist Bestandteil des Vakuumierers (nachfolgend als Gerät bezeichnet) und gibt Ihnen wichtige Hinweise für die Inbetriebnahme, die Sicherheit, den...
  • Page 12: Haftungsbeschränkung

    2.3 Haftungsbeschränkung Alle in dieser Anleitung enthaltenen technischen Informationen, Daten und Hinweise für die Installation, Betrieb und Pflege entsprechen dem letzten Stand bei Drucklegung und erfolgen unter Berücksichtigung unserer bisherigen Erfahrungen und Erkenntnisse nach bestem Wissen. Aus den Angaben, Abbildungen und Beschreibungen in dieser Anleitung können keine Ansprüche hergeleitet werden.
  • Page 13: Allgemeine Sicherheitshinweise

    3.2 Allgemeine Sicherheitshinweise Beachten Sie für einen sicheren Umgang mit dem Gerät die folgenden allgemeinen Sicherheitshinweise: ► Kontrollieren Sie das Gerät vor der Verwendung auf äußere sichtbare Schäden. Nehmen Sie ein beschädigtes Gerät nicht in Betrieb. ► Bei Beschädigung der Anschlussleitung oder des Steckers, müssen diese durch den Hersteller oder dessen Servicebeauftragten ersetzt werden, um Gefahren vorzubeugen.
  • Page 14: Gefahrenquellen

    ► Defekte Bauteile dürfen nur gegen Original-Ersatzteile ausgetauscht werden. Nur bei diesen Teilen ist gewährleistet, dass sie die Sicherheitsanforderungen erfüllen werden. ► Das Gerät während des Betriebes nicht unbeaufsichtigt lassen. ► Ziehen Sie nicht an der Anschlussleitung und tragen Sie das Gerät nicht an der Anschlussleitung.
  • Page 15: Gefahr Durch Elektrischen Strom

    ► Halten Sie das Gerät fern von jeglichen Wärmequellen (Gas, Strom, Brenner, beheizter Ofen). 3.3.3 Gefahr durch elektrischen Strom Lebensgefahr durch elektrischen Strom! Beim Kontakt mit unter Spannung stehenden Leitungen oder Bauteilen besteht Lebensgefahr! Beachten Sie die folgenden Sicherheitshinweise um eine Gefährdung durch elektrischen Strom zu vermeiden: ►...
  • Page 16: Sicherheitshinweise Zur Aufbewahrung Von Lebensmitteln

    ► Verpackungsmaterialien dürfen nicht zum Spielen verwendet werden. Es besteht Erstickungsgefahr. 5.2 Lieferumfang und Transportinspektion Das Gerät wird standardmäßig mit folgenden Komponenten geliefert: • VRH 490 advanced  10 Profi-Vakuumierbeutel (20 x 30 cm) • Bedienungsanleitung  Vakuumierschlauch • Herausnehmbare Auffangschale für die Vakuumkammer ►...
  • Page 17: Einsatzbereich

    5.3 Einsatzbereich Die mit diesem Gerät vakuum-verpackten Lebensmittel bleiben bis zu achtmal länger frisch: Erhalten Sie Geschmack und Frische und reduzieren Sie Kosten durch weniger verdorbene Lebensmittel. • Verpacken Sie Lebensmittel, wie z.B. Fleisch, Fisch, Geflügel, Fisch und Meeresfrüchte und Gemüse zum Einfrieren oder für die Aufbewahrung im Kühlschrank. •...
  • Page 18: Elektrischer Anschluss

    • Die Steckdose muss leicht zugänglich sein, so dass das Stromkabel notfalls leicht abgezogen werden kann. • Der Aufstellung des Gerätes an nichtstationären Aufstellungsorten (z. B. Schiffen) darf nur von Fachbetrieben/Fachleuten durchgeführt werden, wenn sie die Voraussetzungen für den sicherheitsgerechten Gebrauch dieses Gerätes sicherstellen. 5.7 Elektrischer Anschluss Für einen sicheren und fehlerfreien Betrieb des Gerätes sind beim elektrischen Anschluss folgende Hinweise zu beachten:...
  • Page 19: Gesamtübersicht

    6.1 Gesamtübersicht 1 Vakuumierschlauch zum Vakuumieren von Behältern 2 obere Dichtung + 6 untere Dichtung 3 Griff 4 Gummidichtung (die den Beutel gegen den Schweißbalken drückt) 5 Verriegelungshaken 7 Vakuumkammer mit herausnehmbarer Auffangschale für Flüssigkeiten 8 Schweißbalken & Teflonband: Enthält einen teflonbeschichteten Heizdraht; dieser ermöglicht es, den Beutel zu versiegeln, ohne dass er festklebt.
  • Page 20: Bedienelemente

    ► Entfernen Sie nicht das Teflonband (T)! 6.2 Bedienelemente Tasten (die ausgewählte Funktion wird durch die jeweilige Kontrolleuchte angezeigt) Taste Vakuum & Schweißen / Abbrechen Zum automatischen Vakuumieren und Verschweißen eines Beutels. Taste erneut drücken um den Vorgang abzubrechen. Taste Schweißen Zum Verschweißen eines Beutels ohne zusätzlichen Vakuumiervorgang.
  • Page 21: Inbetriebnahme

    7.1 Inbetriebnahme Vor jedem Gebrauch und nach jedem Versiegeln müssen sowohl das Gerät als auch sämtliche mit Lebensmitteln in Berührung kommende Zubehörteile sorgfältig gereinigt werden; befolgen Sie dazu bitte die in dem Abschnitt „Reinigung und Pflege“ aufgeführten Anweisungen. 7.2 Beutel und Rollen Bitte verwenden Sie nur ausdrücklich für das Vakuumieren vorgesehene Beutel und Rollen.
  • Page 22: Gebrauch Der Funktion „Manuelles Vakuum

    Geben Sie die Lebensmittel in den Beutel. Platzieren Sie das offene Ende des Beutels in der Vakuumkammer. Schließen Sie den Deckel und drücken Sie den Griff herab. Stellen Sie die gewünschte Versiegelungszeit ein. Drücken Sie nun Vakuum & Schweißen / Abbrechen und der Beutel wird automatisch vakuumiert und versiegelt.
  • Page 23: Vakuum-Verpacken In Einem Behälter

    1. Geben Sie die Lebensmittel, die Sie aufbewahren möchten, in den Beutel. 2. Vergewissern Sie sich, dass sich das offene Ende des Beutels innerhalb der Vakuumkammerdichtung befindet. Dies garantiert, dass kein Vakuum entweicht. 3. Schließen Sie den Deckel und drücken Sie den Griff herab. 4.
  • Page 24: Reinigung Und Pflege

    8 Reinigung und Pflege In diesem Kapitel erhalten Sie wichtige Hinweise zur Reinigung und Pflege des Gerätes. Sicherheitshinweise Beachten Sie die folgenden Sicherheitshinweise, bevor Sie mit der Reinigung des Gerätes beginnen: ► Ziehen Sie den Stecker vor dem Reinigen des Gerätes aus der Steckdose. ►...
  • Page 25: Störungsbehebung

    ► Die Gummidichtung sollte sorgfältig getrocknet werden, bevor Sie sie wieder einbauen. ► Achten Sie auf eine korrekte Platzierung der Dichtung, das Gerät ordnungsgemäß funktionieren kann. 9 Störungsbehebung In diesem Kapitel erhalten Sie wichtige Hinweise zur Störungslokalisierung und Störungs- -behebung. Beachten Sie die Hinweise, um Gefahren und Beschädigungen zu vermeiden. 9.1 Sicherheitshinweise ►...
  • Page 26: Entsorgung Des Altgerätes

    Der Beutel wird nicht Der Schweißbalken ist Öffnen Sie den Deckel des Gerätes korrekt verschweißt überhitzt, so dass der und lassen Sie es einige Minuten Beutel schmilzt abkühlen Der Beutel hält das Wählen sie einen anderen Beutel, Vakuum nicht, nachdem Der Beutel ist defekt umwickeln Sie scharfe Kanten des er verschweißt wurde...
  • Page 27: Technische Daten

    Zur Geltendmachung eines Garantieanspruches setzen Sie sich bitte vor einer Rücksendung des Gerätes (immer mit Kaufbeleg!) mit uns in Verbindung. 12 Technische Daten Gerät Vakuumierer Name VRH 490 advanced Artikel-Nr. 1525 220 V – 240 V; 50 Hz Anschlussdaten Leistungsaufnahme 110 W Außenabmessungen (B/H/T)
  • Page 28 Instruction Manual Vacuum Sealer System VRH 490 advanced Item No. 1525...
  • Page 29: Instruction Manual

    13 Instruction Manual 13.1 General Please read the information contained herein so that you can become familiar with your device quickly and take advantage of the full scope of its functions. Your vacuum sealer system will serve you for many years if you handle it and care for it properly.
  • Page 30: Limitation Of Liability

    ATTENTION A warning notice of this level of danger indicates a possible dangerous situation. If the dangerous situation is not avoided, this can lead to slight or moderate injuries. ► Observe the instructions in this warning notice in order to avoid the personal injuries. PLEASE NOTE A notice of this kind indicates additional information, which will simplify the handling of the machine.
  • Page 31: Safety

    14 Safety This chapter provides you with important safety notices when handling the device. The device corresponds with the required safety regulations. Improper use can result in personal or property damages. 14.1 Intended use This device is only intended for use in households in enclosed spaces for vacuuming bags and canister, as well as sealing vacuum foils.
  • Page 32 Please note ► Children are not allowed to play with the device. ► The device and its connecting cable must be kept away from children who are less than 8 years old. ► The device may be used by individuals with reduced physical, sensory or mental capabilities or a lack of experience and / or knowledge of their use if they are supervised or have been instructed at to the safe use of the...
  • Page 33: Sources Of Danger

    14.3 Sources of danger 14.3.1 Danger of burns Warning The sealing bar gets very hot. Please observe the following safety notice in order not to burn yourself or others. ► To avoid getting burned, never touch the sealing bar directly after sealing process.
  • Page 34: Food Storage Safety Information

    ► Do not allow children to play with packaging materials due to risk of suffocation. 15.2 Delivery scope and transport inspection The vacuum sealer system VRH 490 advanced includes the following components: • VRH 490 advanced  10 top-quality bags(20 x 30 cm) ...
  • Page 35: Functions

    15.3 Functions Vacuum-packaged foods stay fresh for up to eight times longer: maintain taste and freshness, and reduce costs with less spoiled food. • Package foods, such as meat, fish, poultry, seafood and vegetables for refrigerated storage. • Maintain the freshness of dry foods, such as beans, nuts, and cereals. •...
  • Page 36: Electrical Connection

    15.7 Electrical connection In order to ensure the safe and trouble-free operation of the device, the following instructions must be observed for the electrical connection: • Before connecting the device, compare the connection data (voltage and frequency) on the rating plate with those of your electrical network. This data must agree in order that no damages occur in the device.
  • Page 37: Appliance Diagram

    16.1 Appliance diagram 1 vacuum hose for vacuuming of canisters 2 upper gasket + 6 lower gasket 3 handle 4 sealing profile (presses the bag against the sealing bar) 5 Hook for latching of cover 7 vacuum chamber with removable drip tray for liquids 8 Sealing bar: Contains a heating wire covered with teflon which allows the bag to seal but not to stick to the wire.
  • Page 38: Control Panel

    16.2 Control Panel Buttons (indicator light shows selected function) Button Vacuum & Seal / Cancel (Vakuum & Schweißen/Abbrechen) For automatic vacuuming and sealing of bags or containers Press the button again to cancel the operation. Button Sealing function (Schweißen) For sealing of a bag without additional vacuum operation. Pulse Vacuum (Manuelles Vakuum) As long as you press the button air is with drawn from the bag.
  • Page 39: Bags And Rolls

    17.2 Bags and rolls Please only use specified bags and rolls designed for vacuum sealing. Do not use other materials such as plastic wrap. All vacuum rolls and bags delivered by CASO are appropriate for cooking under vacuum (sous vide). Please make sure when vacuum rolls and bags of other producers are used, whether they are also microwaveable and suitable for cooking under vacuum.
  • Page 40: Use Of The Function "Pulse Vacuum" (Manuelles Vakuum)

    PLEASE NOTE ► Clean and straighten the open end of the bag before sealing. Foreign matter or creases on the bag may result in a faulty seal. ► Press the bag to expel excess air before vacuuming it. Too much air inside the bag may result in a poor vacuum.
  • Page 41: Storage

    Connect one end of vacuum hose at the connector at device and other end at connector at canister cover or with the adapter at canister cover. Press button for canisters (Vakuum Behälter). To ensure there is no air leaking between the cover and the canister, use your hand to push down the cover at the beginning of the vacuum operation.
  • Page 42: Cleaning

    18.2 Cleaning ◆ Outside of the unit Wipe with a damp cloth or sponge and mild dish soap. ◆ Inside of the unit Wipe away any food or liquids with a paper towel. Remove the drip tray and wash it with warm water and a mild dishwashing soap. Dry it carefully and replace it.
  • Page 43: Disposal Of The Old Device

    The open end of the bag is not completely inside the Position the bag correctly vacuum chamber A complete vacuum is not being created in The bag is defective Select another bag the bag. There is dirt on the welding Clean the seals and retry and the normal seals correctly once they are dry...
  • Page 44: Technical Data

    All further claims are excluded. To enforce a guarantee claim, please contact us prior to returning the device (always provide us with proof of purchase). 22 Technical Data Device Vacuum sealer system Name VRH 490 advanced Item No.: 1525 220 V – 240 V; 50 Hz Mains data 110 W...
  • Page 45 Mode d'emploi original Appareil d’emballage sous vide VRH 490 advanced N°. d'art. 1525...
  • Page 46: Mode D´emploi

    23 Mode d´emploi 23.1 Généralités Veuillez lire les indications de ce manuel afin de vous familiariser rapidement avec l'appareil et afin de pouvoir utiliser l'ensemble de ses fonctions. Votre l´apparail d´emballage sous vide vous sera fidèle de nombreuses années si vous l'utilisez et l'entretenez conformément.Nous vous souhaitons beaucoup de plaisir lors de son utilisation.
  • Page 47: Limite De Responsabilités

    Remarque Cette indication est accompagnée d'informations complémentaires pour faciliter l'utilisation de l'appareil. 23.4 Limite de responsabilités Tous les renseignements techniques, données et instructions d'installation, de fonctionnement et d'entretien contenus dans ce manuel sont parfaitement actuels au moment de la publication et tiennent compte de notre expérience réalisée jusqu'ici et de nos connaissances actuelles en toute bonne foi.
  • Page 48: Utilisation Conforme

    24.1 Utilisation conforme Cet appareil est conçu uniquement pour une utilisation ménagère à l'intérieur de locaux, afin de scellager uniquement ou de vider des sacs et des récipients pour conserver d´aliments sous vide. Cet appareil peut par ailleurs être utilisé dans le secteur semi- professionnel (chasseurs, pêcheurs, cuisiniers amateurs, etc.).
  • Page 49: Sources De Danger

    Remarque ► Les réparations doivent être effectuées uniquement par un service après-vente agréé par le constructeur, sinon en cas de dommages le recours en garantie est supprimé. Des réparations incorrectes peuvent entraîner de graves dangers pour l'utilisateur. ► Les pièces défectueuses doivent être remplacées uniquement par des rechanges d'origine.
  • Page 50: Danger D'incendie

    24.3.2 Danger d'incendie Attention En cas d'utilisation non conforme de l'appareil cela peut provoquer un incendie par inflammation du contenu. Pour éviter tout risque d'incendie veuillez observer les consignes de sécurité suivantes : ► Ne disposez pas l'appareil à proximité de matériaux inflammables.
  • Page 51: Informations Relatives À La Sécurité De Stockage Des Aliments

    ► Ne pas utiliser les matériaux d'emballage pour jouer. Danger d'étouffement. 25.2 Inventaire et contrôle de transport L´appareil d´emballage sous vide est livré de façon standard avec les composants  VRH 490 advanced suivants : • 10 sacs de haute valeur ...
  • Page 52: Fonctions

    25.3 Fonctions La principale fonction de cet appareil est de prolonger le stockage d’une grande variété d’aliments sans en altérer ni la fraîcheur ni le goût et de vous faire bénéficier d’une plus grande commodité. En général, les emballages sous vide permettent de conserver la fraîcheur des aliments huit fois plus longtemps que les méthodes de stockage traditionnelles.
  • Page 53: Raccordement Électrique

    • Ne disposez pas l'appareil dans un environnement chaud, mouillé ou très humide ou à proximité de matériaux inflammables. • Ne déplacez pas l’appareil d’emballage sous vide en cours d’utilisation. • Pour un fonctionnement correct l'appareil nécessite un flux d'air suffisant. Laissez un espace de 10 cm au-dessus, de 10 cm à...
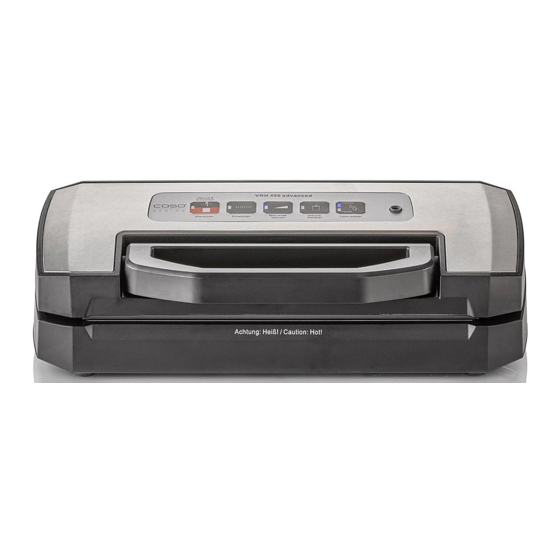
  • Page 54: Vue D'ensemble

    26.1 Vue d'ensemble 1 tuyau par exemple pour la mise sous vide de récipients 2 Sceau supérieure + 6 Sceau inférieure 3 Poignée. 4 Joint en caoutchouc (comprimant le sachet contre la barre de scellage) 5 Crochets de verrouillage pour le couvercle 7 Chambre à...
  • Page 55: Panneau De Commande

    26.2 Panneau de commande Boutons (la fonction sélectionnée est indiquée par le témoin de contrôle correspondant) Bouton Mettre sous vide & sceller / Arrêter (Vakuum & Schweißen/Abbrechen) Pour la mise sous vide et le scellage automatiques d'un sachet ou d'un récipient. Appuyer de nouveau sur la touche pour annuler l'opération.
  • Page 56: Conservation Dans Des Sachets Du Rouleau

    27.2 Conservation dans des sachets du rouleau Placez l’appareil sur une surface sèche. 1. Déroulez le sac sur la longueur désirée et coupez-le précisément et proprement. 2. Mettez une extrémité du sachet la bande de scellage. 3. Fermez le couvercle et appuyez fermement sur la poignée. 4.
  • Page 57: Utilisation De La Fonction " Vide En Mode Manuel

    Remarque ► Si les aliments que vous souhaitez emballer sont coupants ou pointus, par exemple des os, des spaghettis ou des fruits de mer, rembourrez le sac avec de l’essuie-tout afin d’éviter tout risque de déchirement. ► Pour emballer sous vide des aliments plus liquides, tels que des soupes, des ragoûts ou des compotes, congelez-les d’abord dans un plat trempé...
  • Page 58: Conservation Dans Un Récipient À Vide

    27.5 Conservation dans un récipient à vide Nettoyez le couvercle du récipient à vide et le récipient pour assurer qu'ils soient secs et propres. Remplissez les produits dans le récipient. Veillez à ce que vous ne remplissiez pas trop de produits. Fixez une extrémité...
  • Page 59: Nettoyage

    Prudence ► Après son utilisation la bande de scellage est chaude. Attention, risques de brulures ! Attendre que l'appareil soit froid. ► Nettoyer l´appareil après utilisation quand le four est refroidi. Ne pas attendre trop longtemps car cela rend le nettoyage plus difficile, et éventuellement impossible. Un encrassement trop important peut le cas échéant dégrader l'appareil.
  • Page 60: Réparation Des Pannes

    29 Réparation des pannes Ce chapitre est consacré à des indications importantes sur la localisation des pannes et leur réparation. Pour éviter les dangers et les dégradations il faut observer les indications. 29.1 Consignes de sécurité Prudence ► Les réparations sur les appareils électriques doivent être effectuées uniquement par des spécialistes agréés par le constructeur.
  • Page 61: Elimination Des Appareils Usés

    Ouvrez à nouveau le sac, nettoyez la partie interne supérieure du sac et Il y a des fuites à cause de éliminez corps étrangers miettes, graisse ou liquides éventuellement existants de la barre le long de la soudure de soudage avant de souder de nouveau le sac.
  • Page 62: Caractéristiques Techniques

    Pour tout recours en garantie nous vous prions d'entrer en contact avec nos services avant de nous retourner l'appareil (toujours avec le bon d'achat!). 32 Caractéristiques techniques Appareil Appareil d´emballage sans vide VRH 490 advanced N°. d'article 1525 220 V – 240 V; 50 Hz Données de raccordement Puissance consommée...
  • Page 63 Istruzioni d’uso originali Sistema di sigillatura sottovuoto VRH 490 advanced Articolo-N. 1525...
  • Page 64: Istruzione D´uso

    Legga le informazioni qui contenute, affinché acquisti rapidamente familiarità con il suo apparecchio e affinché possa utilizzare appieno le sue funzioni. Il Suo VRH 490 advanced le renderà un buon servizio per molti anni, se lo tratterà e lo curerà in modo adeguato.
  • Page 65: Limitazione Della Responsabilità

    Attenzione Un’indicazione d'avvertimento di questo livello di pericolo contrassegna una situazione di pericolo potenziale. Se tale situazione pericolosa non viene evitata, le conseguenze potranno essere lesioni leggere o di media entità. ► Osservare le indicazioni in queste avvertenze, per evitare il lesioni di persone. Indicazione Un indicazione contrassegna inoltre delle informazioni, che facilitano l’utilizzo della macchina.
  • Page 66: Sicurezza

    34 Sicurezza In questo capitolo riceverà importanti indicazioni sulla sicurezza nell’utilizzo dell’apparecchio. Questo apparecchio corrisponde alle disposizioni di sicurezza prescritte. Un utilizzo inadeguato può però provocare danni a persone e cose. 34.1 Utilizzo conforme alle disposizioni Questo apparecchio è previsto solo per l’utilizzo in un ambiente domestico, al aspira l’aria dal sacchetto e sigilla il sacchetto.
  • Page 67 Indicazione ► La pulizia e la manutenzione utente non devono essere eseguite da bambini, eccetto questi hanno l'età di 8 anni o maggiore e che vengano sorvegliati. ► L’apparecchio può essere utilizzato da persone con ridotte capacità fisiche, sensoriali o mentali o mancanza di esperienza e/o conoscenza se sono sorvegliate o istruite sull'uso sicuro dell'apparecchiatura e hanno compreso i rischi che ne derivano.
  • Page 68: Fonti Di Pericolo

    34.3 Fonti di pericolo 34.3.1 Pericolo di ustioni Avviso La barra saldatura dell'apparecchio diventa molto caldo. Osservare la seguente avvertenza di sicurezza, per non scottarsi se stessi o altri: ► Per prevenire eventuali ustioni, mai toccare la barra di saldatura direttamente dopo la saldatura. 34.3.2 Pericolo d’incendio Avviso In caso di utilizzo inadeguato dell’apparecchio, sussiste...
  • Page 69: Informazioni Di Sicurezza Per La Conservazione Del Cibo

    Pericolo ► Non aprire in nessun caso la scatola dell’apparecchio. Se si toccano connessioni sotto tensione e se viene modificata la struttura elettrica e meccanica, sussiste il pericolo di scossa elettrica. Inoltre possono verificarsi malfunzionamenti dell’apparecchio. ► Prima di connettere l’apparecchio o di utilizzarlo, assicurarsi che le mani siano asciutte e in posizione sicura.
  • Page 70: Messa In Funzione

    ► Materiali d’imballaggio non dovranno essere utilizzati come giocattoli. Sussiste il pericolo di soffocamento. 35.2 Insieme della fornitura ed ispezione trasporto Il VRH 490 advanced viene fornito standard con le seguenti componenti: • VRH 490 advanced  Istruzioni d’uso • 10 buste professionali in dotazione (20 x 30 cm) ...
  • Page 71: Posizionamento

    Ricondurre l’imballaggio nel circuito materiali permette di risparmiare sulle materie prime e riduce la produzione di rifiuti. Smaltisca i materiali per l'imballaggio, che non sono più necessari, nei punti di raccolta presso le “aree ecologiche” per il sistema di riciclo. Indicazione ►...
  • Page 72: Costruzione E Funzione

    36 Costruzione e funzione In questo capitolo riceverà indicazioni importanti sulla costruzione e sulla funzione dell’apparecchio. 36.1 Panoramica complessiva 1 Tubo di aspirazione ad esempio per la messa sotto vuoto di contenitori per vuoto 2 Guarnizione superior + 6 Guarnizione inferiore 3 Manico 4 Guarnizione di gomma (la quale preme il sacchetto contro la barra di saldatura) 5 Gancio di bloccaggio...
  • Page 73: Elementi Di Comando

    Indicazione ► Non rimuovere il nastro di teflon (T)! 36.2 Elementi di comando Tasti (la funzione selezionata viene visualizzata dalla rispettiva spia di controllo) Messa sotto vuoto e Sigillatura (Vakuum & Schweißen) Per la messa sottovuoto e la saldatura di un sacchetto o di un contenitore Premere di nuovo il tasto, per interrompere l’operazione.
  • Page 74: Sacchetti In Rotoli

    37.1 Sacchetti in rotoli Utilizzare solo ed esclusivamente i sacchetti in rotoli previsti per il confezionamento sottovuoto. Il materiale di questi speciali sacchetti per il confezionamento sottovuoto è diverso rispetto ai normali sacchetti utilizzati per mantenere la freschezza degli alimenti. Tutti i rotoli e sacchetti forniti da CASO sono adatti per la cottura dentro il sacchetto (Sous Vide).
  • Page 75: Uso Della Funzione „Vuoto Manuale

    Indicazione ► Non mettere una quantità di cibo eccessiva nel sacchetto; lasciare una lunghezza sufficiente all’estremità aperta del sacchetto in modo che possa essere ben posizionato sull’area di sigillatura. ► Non inumidire l’estremità aperta. Questo può rendere più difficile la chiusura ermetica del sacchetto.
  • Page 76: Confezionamento Sotto Vuoto In Un Contenitore Del Vuoto

    1. Inserire nel sacchetto i generi alimentari che volete conservare. 2. Assicurarsi che l'estremità aperta del sacchetto si trovi dentro la guarnizione della camera del vuoto. Ciò garantisce che il vuoto non fuoriesce. 3. Chiudere il coperchio e premere il manico verso il basso. 4.
  • Page 77: Indicazioni Di Sicurezza

    38.1 Indicazioni di sicurezza Attenzione Osservi le seguenti indicazioni di sicurezza, prima di procedere con la pulizia dell’apparecchio: ► Estragga la spina dalla presa a muro prima della pulizia. ► L’apparecchio dovrà essere pulito regolarmente e residui del composto da cuocere dovranno essere rimossi.
  • Page 78: Eliminazione Malfunzionamenti

    ◆ Guarnizione di gomma (la quale preme il sacchetto contro la barra di saldatura) Estrarre la guarnizione di gomma e pulirla in acqua saponata calda. Indicazione ► Prima di rimontare la guarnizione di gomma, asciugarla accuratamente. ► Durante l'assemblaggio fare attenzione di non danneggiare niente e di collocare la guarnizione di gomma in modo che l'apparecchio possa regolarmente funzionare.
  • Page 79: Smaltimento Dell'apparecchio Obsoleto

    Il sacchetto non resta Selezioni un altro sacchetto, sottovuoto, dopo essere avvolga eventualmente i bordi Il sacchetto è difettoso stato saldato taglienti del contenuto con dei tovaglioli di carta Apra nuovamente il sacchetto e pulisca la parte superiore del A causa di pieghe, briciole, sacchetto all’interno e rimuova del grasso o di liquidi lungo la eventualmente corpi estranei...
  • Page 80: Dati Tecnici

    Per far valere una pretesa di garanzia, La preghiamo di mettersi in contatto con noi, prima di reinviarci l’apparecchio (sempre con scontrino d’acquisto!). 42 Dati tecnici Apparecchio Sistema di sigillatura sottovuoto Nome VRH 490 advanced N. articolo 1525 220 V – 240 V; 50 Hz Dati connessione Potenza assorbita...
  • Page 81 Manual del usuario Envasadora al vacío VRH 490 advanced Ref. 1525...
  • Page 82: Manual Del Usuario

    Lea atentamente la información contenida en este manual para familiarizarse rápidamente con el aparato y poder utilizar sus funciones en toda su capacidad. Su VRH 490 advanced le servirá durante muchos años si lo trata y conserva adecuadamente. Le deseamos una gran satisfacción durante el uso.
  • Page 83: Limitación De Responsabilidad

    Nota Esta indicación proporciona información adicional que facilitará el manejo de la máquina. 43.4 Limitación de responsabilidad La información técnica contenida, datos e indicaciones contenidos en el presente manual para la instalación, operación y conservación se corresponden con los últimos avances técnicos en el momento de la impresión y se publican teniendo en cuenta nuestra experiencia y conocimientos hasta ese momento.
  • Page 84: Uso Previsto

    44.1 Uso previsto Este aparato se ha concebido para hacer vacío en bolsas y recipientes así como el sellado de láminas de manera doméstica en salas cerradas. Este aparato puede utilizartse también en el ámbito semiprofesional (caza, pesca, cocina aficionada, etc.). Cualquier otro uso distinto al aquí previsto se considera un uso indebido del aparato.
  • Page 85 Nota ► El aparato puede utilizarse poe personas con merma en sus capacidades físicas, sensoriales o mentales o falta de experiencia o conocimientos si lo hacen bajo supervisión o se les instruye previamente del uso seguro del aparato y comprenden los peligros resultantes. ►...
  • Page 86: Fuentes De Peligro

    44.3 Fuentes de peligro 44.3.1 Peligro de quemaduras Advertencia La barra selladora puede estar muy caliente. Tenga presente la siguiente indicación de seguridad para no quemarse a sí mismo ni quemar a otras personas: ► Para evitar posibles quemaduras, nunca toque la barra selladora justo después de sellar.
  • Page 87: Indicaciones De Seguridad Para La Conservación De Alimentos

    Peligro ► Nunca abra la carcasa del aparato. Si toca cualquier conexión energizada y cambia la disposición del cableado eléctrico o el diseño mecánico existe peligro de electrocución. Además, pueden producirse fallos de funcionamiento en el aparato. ► No toque el aparato ni el enchufe de alimentación con las manos mojadas.
  • Page 88: Instrucciones De Seguridad

    46.2 Ámbito de suministro e inspección de transporte El aparato se entrega con los siguientes componentes: • VRH 490 advanced  Manual del usuario  Tubo flexible de vacío • 10 bolsas profesionales en vacío (20 x 30 cm) •...
  • Page 89: Colocación

    Por tanto, deposite los materiales de embalaje que no necesite en los puntos de recogida "punto verde”. Nota ► Si fuera posible, conserve el embalaje original durante el período de garantía para poder embalar el aparato adecuadamente en caso de que requiera hacer uso de la garantía.
  • Page 90: Estructura Y Funciones

    • Asegúrese de que el cable de alimentación no resulte dañado y que no se tienda bajo el horno ni sobre superficies calientes o de bordes afilados. La seguridad eléctrica del aparato sólo se asegurará si se conecta un sistema de protección frente a sobrecargas.
  • Page 91: Elementos De Operación

    8 barras selladoras / cinta de teflón, con los filamentos calentadores recubiertos de teflón. esto permite sellar las bolsas sin que se peguen a las barras. Advertencia La barra selladora puede estar muy caliente. Tenga presente la siguiente indicación de seguridad para no quemarse a sí mismo ni quemar a otras personas: ►...
  • Page 92: Placa De Especificaciones

    47.3 Placa de especificaciones La placa de especificaciones con los datos de conexión y de potencia se encuentra en la parte trasera del aparato. 48 Operación y funcionamiento Este capítulo incluye algunos consejos importantes acerca de la operación y el funcionamiento del aparato.
  • Page 93: Envasar Al Vacío En Una Bolsa

    48.4 Envasar al vacío en una bolsa Coloque el aparato en un lugar seco. Coloque en la bolsa los alimentos que desea guardar. Asegúrese de que el extremo abierto de la bolsa se encuentra dentro de la cámara de vacío. Cierre la tapa y presione firmemente hacia abajo el mango.
  • Page 94: Uso De La Función " Envasado Al Vacío Manual

    Nota ► Para envasar alimentos como tortillas, crepes, hamburguesas o empanadillas, sepárelos con papel encerado o de pergamino, así se pueden apilar mejor. Después podrá coger una parte de los alimentos fácilmente y volver a envasar y congelar el resto. 48.5 Uso de la función "...
  • Page 95: Almacenamiento De La Envasadora

    5. También puede regular la intensidad del proceso de envasado al vacío mediante la tecla vacío manual e interrumpir el proceso cuando lo desee. 6. Retire primero tubo flexible de vacío de la tapa del recipiente y luego de la conexión del aparato.
  • Page 96: Limpieza

    49.2 Limpieza ◆ Superficie externa del aparato Limpie la superficie externa del aparato con un trapo húmedo o utilice jabón suave no abrasivo. ◆ Superficie interior del aparato Limpie la superficie interior del aparato con papel de cocina para eliminar restos de comida y líquidos.
  • Page 97: Problemas, Causas Y Remedios

    50.2 Problemas, causas y remedios La siguiente tabla le ayudará a localizar y remediar pequeños problemas. Problema Posible causa Remedio Enchufe no conectado Conectar el enchufe La envasadora no Cable o enchufe defectuoso. Contacte al Servicio al Cliente. funciona Toma de red defectuosa Escoger otra toma de red El primer sellado de la Siga los pasos del capítulo...
  • Page 98: Garantía

    Para hacer valer una declaración de garantía, antes de devolver el aparato (siempre con presentación del recibo de compra), póngase en contacto con nosotros. 53 Datos técnicos Aparato Envasadora al vacío Denominación VRH 490 advanced Nº de art 1525 220 V – 240 V; 50 Hz Conexión Consumo de potencia...
  • Page 99 Руководство по эксплуатации Вакуумный упаковщик VRH 490 advanced Артикул 1525...
  • Page 100: Руководство По Эксплуатации

    54 Руководство по эксплуатации 55 Общие сведения Прочтите содержащуюся здесь информацию, чтобы быстро ознакомиться со своим прибором и в полной мере использовать все его функции. Надлежащее обращение и уход положительно влияют на срок службы устройства. Желаем приятного пользования. 55.1 Информация о данной инструкции Это...
  • Page 101: Ограничение Ответственности

    Примечание Примечание обозначает дополнительную информацию, облегчающую обращение с прибором. 55.3 Ограничение ответственности Все содержащиеся в данном Руководстве по использованию технические сведения, данные и указания по установке, использованию и уходу за прибором актуальны на момент печати и учитывают весь наш опыт и знания. Сведения, рисунки...
  • Page 102: Общие Требования Техники Безопасности

    Предостережение Опасность из-за ненадлежащего использования! При использовании не по назначению и/или использовании, отличном от указанного в Руководстве по использованию, прибор может являться источником опасностей. ► Используйте прибор только по назначению. ► Соблюдайте порядок действий, описанный в данном Руководстве по использованию. Исключаются...
  • Page 103 Примечание ► Устройство может использоваться людьми с ограниченными физическими, сенсорными или умственными способностями, или с недостаточным опытом или знаниями, при условии, что они находятся под наблюдением или проинструктированы о безопасном использовании устройства и понимают связанные с этим опасности. ► Ремонт прибора может выполняться только сервисной...
  • Page 104: Источники Опасности

    56.3 Источники опасности Опасность ожога 56.3.1 Предостережение Сварная планка прибора очень сильно нагревается. Соблюдайте следующие правила безопасности, чтобы не обжечь себя и других: ► В целях предотвращения возможных ожогов ни в коем случае не прикасайтесь к сваривающей планке непосредственно после операции запаивания. Опасность...
  • Page 105: Правила Безопасности При Хранении Продуктов Питания

    Опасность ► Прибор нельзя использовать, если его соединительный провод или штекер повреждены, если прибор работает со сбоями, упал или получил повреждения. Во избежание опасности в случае повреждения соединительного провода или штекера прибора его замена должна осуществляться производителем или его уполномоченным представителем...
  • Page 106: Ввод В Эксплуатацию

    ► Упаковочные материалы не предназначены для игры. Существует опасность удушья. 58.2 Комплектация и осмотр после транспортировки В стандартный объем поставки устройства входят следующие компоненты: • VRH 490 advanced  10 пакетов для профессиональной вакуумной упаковки (20 x 30 см) • Руководство по эксплуатации...
  • Page 107: Распаковка

    • Упаковывайте такие сухие продукты питания, как, например, бобы, орехи, мюсли и т.д., чтобы их срок хранения стал намного дольше. • Используйте свой вакууматор для непищевых целей: инвентарь для кемпинга, такой как, например, спички, аптечка и одежда, остается чистым и сухим, серебро...
  • Page 108: Подключение К Электросети

    58.7 Подключение к электросети Для обеспечения безопасной и бесперебойной работы прибора при подключении к сети необходимо соблюдать нижеперечисленные указания: • Перед подключением прибора к сети сравните технические параметры подключения (напряжение и частоту) на заводской табличке прибора с техническими параметрами Вашей сети. Во избежание повреждения прибора...
  • Page 109: Общее Описание

    59.1 Общее описание 1 шланг для вакуумирования емкостей 2 Верхний уплотнитель + 6 нижний уплотнитель 3 ручка 4 Резиновая прокладка (прижимает пакет к сварочной планке) 5 Крючок для фиксации 7 Вакуумная камера с отсоединяемым поддоном для жидкости 8 Сваривающая пластина и тефлоновая лента: включает в себя нагревательный...
  • Page 110: Элементы Управления

    Примечание ► Не снимайте тефлоновую ленту (Т)! 59.2 Элементы управления Кнопки (выбранная функция отображается соотвутствующим световым индикатором) Кнопка Вакуум и запаивание/ Отмена Для автоматического вакуумирования и запаивания пакета. Нажмите на кнопку еще раз для отмены действия. Кнопка "Запаивание" Для запаивания пакета без вакуумирования. Ручное...
  • Page 111: Обслуживание И Эксплуатация

    60 Обслуживание и эксплуатация В этой главе содержатся важные указания по обслуживанию прибора. Следуйте этим указаниям, чтобы избежать опасностей и повреждений. 60.1 Ввод в эксплуатацию Перед каждым использованием и после каждого процесса запечатывания следует тщательно очистить как сам прибор, так и все принадлежности, контактирующие...
  • Page 112: Вакуумная Упаковка В Пакете

    60.4 Вакуумная упаковка в пакете Установка в соответствии с пунктом 60.3. Положите продукты в пакет. Разместите открытый конец пакета в камере для вакуумирования. Закройте крышку и опустите ручку. Установите нужное время запаивания. Нажмите кнопку "Вакуумирование и запаивание / Отмена", пакет будет автоматически...
  • Page 113: Использование Функции "Ручное Вакуумирование

    Использование функции "Ручное вакуумирование" 60.5 Так как для некоторых продуктов питания давление вакуумирования является слишком большим, и они могут оказаться в пакете раздавленными, с помощью функции "регулируемая интенсивность вакуумирования" можно регулировать длительность и тем самым интенсивность процесса вакуумирования. Тем самым Вы можете скорректировать интенсивность вакуумирования в зависимости...
  • Page 114: Хранение Вакуумного Упаковщика

    Сначала снимите шланг для вакуумирования с крышки емкости, а только затем из разъема на приборе. Вы можете отменить процесс в любой момент, нажав на кнопку "Вакуумирование и запайка / Отмена". 60.7 Хранение вакуумного упаковщика Храните прибор на ровном и устойчивом месте, в месте, недоступном для детей.
  • Page 115: Очистка

    61.1 Очистка ◆ Наружная сторона прибора Снаружи протрите прибор влажной тряпкой или с использованием мягкого, не абразивного мыльного раствора. ◆ Внутренняя сторона прибора Внутреннюю сторону прибора очистите кухонным полотенцем для удаления остатков пищи и жидкостей. Снимите поддон из камеры вакуумирования и ополосните его в теплой воде с небольшим...
  • Page 116: Причины Неисправностей И Их Устранение

    62.2 Причины неисправностей и их устранение Следующая таблица помогает при локализации и устранении мелких неисправностей. Ошибка Возможная причина Устранение Вилка не вставлена в Вставить вилку в розетку розетку Вакуумный упаковщик Неисправность Обратитесь в сервисную службу. не работает питающего кабеля или вилки...
  • Page 117: Утилизация Отслужившего Устройства

    63 Утилизация отслужившего устройства Отслужившие электрические и электронные приборы содержат еще много ценных материалов. Но они содержат также и вредные вещества, которые были необходимы для их работы и безопасности. В бытовых отходах или при неправильном обращении они могут быть опасны для...
  • Page 118: Технические Характеристики

    65 Технические характеристики Прибор Вакуумный упаковщик Наименование VRH 490 advanced № артикула 1525 Параметры подключения 220 В - 240 В; 50 Гц Мощность 110 Вт Габаритные размеры 40 x 10 x 17,5 см (Ш/В/Г) Вес 2 кг...

Ce manuel est également adapté pour:

1525

Table des Matières