Table des Matières

Publicité

Les langues disponibles
  • FR

Les langues disponibles

  • FRANÇAIS, page 45
D
Bedienungsanleitung
GB
Operating Instructions
F
Mode d'emploi
I
Instruzioni d'uso
E
Instrucciones de empleo
NL
Gebruiksaanwijzing
CZ
Návod k obsluze
D
GB
F
I
E
NL
CZ

Publicité

Table des Matières
loading

Sommaire des Matières pour Grasslin Talento 672

  • Page 1 Bedienungsanleitung Operating Instructions Mode d’emploi Instruzioni d’uso Instrucciones de empleo Gebruiksaanwijzing Návod k obsluze...
  • Page 2: Table Des Matières

    Inhaltsangabe Inhalt Seite Hinweise zur Sicherheit Montage, Inbetriebnahme, Anschluß Bedienelemente Anzeige Werkseitige Einstellung Einstellungen ändern Uhrzeit und Wochentag Kalendermonat und -Tag wählen 7.2.1 AU = automatische Umstellung 7.2.2 cHA = Wochentagsbezogene Umstellung 9 - 10 7.2.3 no = keine Umstellung Standard-Schaltbefehle Blockbildung von Wochentagen Impuls-Schaltbefehle...
  • Page 3: Hinweise Zur Sicherheit

    2. Hinweise zur Sicherheit Die Installation muß von einer Fachkraft oder unter deren Leitung und Aufsicht durchgeführt und geprüft werden. Für die Montage: • geeignet für den Einsatz bei Umgebungsbedingungen mit üblicher Verunreinigung • für Wandaufbau das entsprechende Zubehör von Grässlin verwenden.
  • Page 4: Montage, Inbetriebnahme, Anschluß

    Montage, Inbetriebnahme, Anschluß Montage Schaltuhr montieren • auf DIN-Schiene • Option Wandaufbau Aufbauset für 2 und 3 TE Art.-Nr. 03.53.0083.2 Inbetriebnahme Die Uhrzeit und das Datum wurden im Werk eingestellt. Die Schaltuhr ist im Stromspar-Modus, nur der Doppelpunkt blinkt. Drücken Sie eine beliebige Taste: •...
  • Page 5: Bedienelemente

    4. Bedienelemente Programmeingabe beginnen Handschalter Uhrzeit einstellen, Programmeingabe Impuls/Zyklus beenden eingeben Wochentag(e) Reset auswählen Schaltzeit löschen Minuten, Monat, Jahr einstellen Stunden, Tag, Jahr einstellen Sommer-/Winterzeit-Umstellung 5. Anzeige date = Datum 1234567 = Wochentag Sommerzeit- Anzeige AM/PM- Stunden - aktuelle Zeit Anzeige Kalendertag - aktuelles Datum - Anfang/Ende...
  • Page 6: Werkseitige Einstellung

    Werkseitige Einstellung Die Vorgaben entsprechen der mitteleuropäischen Zeit (MEZ). Die Schaltuhr bietet 3 Betriebsarten. Das Datum und die Uhrzeit sowie Betriebsart AU sind eingestellt. Betriebsarten: • AU Automatische Umstellung der Sommerzeit- Regelung, siehe 7.2.1 Die Umstellung erfolgt an den vom Gesetzgeber vorbestimmten Daten.
  • Page 7: Einstellungen Ändern

    Einstellungen ändern Hinweis: Bei allen Einstellungen, Änderungen die Sie vornehmen, ist mit -Taste der Ausstieg/Abschluß jederzeit möglich. Uhrzeit und Wochentag -Taste 1x drücken Doppelpunkt blinkt nicht! Uhrzeit einstellen: mit h-Taste Stunden mit m-Taste Minuten Hinweis: Wenn Betriebsart no = keine Umstellung - siehe 7.2.3 gewählt wurde, muß...
  • Page 8: Kalendermonat Und -Tag Wählen

    7.2 Kalendermonat- und Tag – Betriebsart wählen 7.2.1 AU oder 7.2.2 cHA oder 7.2.3 no 7.2.1 AU = automatische Umstellung -Taste 1x drücken Doppelpunkt blinkt nicht! + 1h-Taste 1x drücken, AU erscheint Prog-Taste 1x drücken Aktuelles Jahr einstellen: mit m-Taste oder h-Taste Prog-Taste 1x drücken Aktuellen Monat und Tag einstellen:...
  • Page 9: Cha = Wochentagsbezogene Umstellung

    7.2.2 cHA = Wochentagsbezogene Umstellung -Taste 1x drücken Doppelpunkt blinkt nicht! + 1h-Taste so oft drücken, bis cHA erscheint Prog-Taste 1x drücken Aktuelles Jahr einstellen: mit m-Taste oder h-Taste mit Prog-Taste bestätigen Aktuellen Monat und Tag einstellen: mit h-Taste Kalendertag mit m-Taste Kalendermonat...
  • Page 10 mit Prog-Taste bestätigen Sommerzeit-Beginn ist angezeigt. Individuellen Sommerzeit- Beginn einstellen: mit m-Taste Monat mit h-Taste Tag mit Prog-Taste bestätigen Sommerzeit-Ende ist angezeigt Individuelles Sommerzeit- Ende einstellen: mit m-Taste Monat mit h-Taste Tag -Taste 1x drücken, Eingabe ist beendet.
  • Page 11: No = Keine Umstellung

    7.2.3 no = keine Umstellung -Taste 1x drücken Doppelpunkt blinkt nicht! + 1h-Taste so oft drücken, bis no erscheint Diese Schaltuhr arbeitet ohne Datum! -Taste 1x drücken Eingabe ist beendet! Hinweis: Wochentag einstellen siehe Punkt 7.1...
  • Page 12: Standard-Schaltbefehle

    8. Standard-Schaltbefehle Sie bestimmen die Schaltzeiten und den Schaltzustand für den jeweili- gen Schaltausgang (Kanal). Symbol: CH1: = Kanal 1 EIN CH2: = Kanal 2 AUS Diese Zuordnungen sind möglich: • Schaltbefehle nur für Kanal 1 • Schaltbefehle nur für Kanal 2 •...
  • Page 13: Blockbildung Von Wochentagen

    9. Blockbildung von Wochentagen (beliebige Kombination der Wochentage) Sie bestimmen die Wochentage für Ihr Schaltprogramm. 1 – Montag, 2 – Dienstag, 3 – Mittwoch ..., 7 – Sonntag Beispiel: Montag + Mittwoch + Freitag (8.00 Uhr EIN; 22.00 Uhr AUS) freien Speicherplatz wählen: Prog so oft drücken, bis –...
  • Page 14 -Taste 1x drücken, Auswahl Wochentage ist beendet. Hinweis: Die Schaltzeiten sowie der Schaltzustand = EIN = AUS für den jeweiligen Schaltausgang (Kanal) eingeben, Standard-Schaltbefehle siehe Punkt 8 Impuls-Schaltbefehle siehe Punkt 10 Zyklus-Schaltbefehle siehe Punkt 11 Hinweis: nach den Vorgängen • Uhrzeit, Datum, Schalt- programm lesen, ändern oder löschen •...
  • Page 15: Impuls-Schaltbefehle

    10. Impuls-Schaltbefehle Wird ein Verbraucher mit hoher Schalthäufigkeit – im Sekundenbereich – EIN- und AUS-geschaltet, muß sichergestellt sein, daß Rückwirkungen auf die Qualität von Beleuchtungseinrichtungen (Flicker) und Störungen im Rundfunk- und Fernsehempfang vermieden werden. Sie bestimmen die Zeiten für Impuls-Schaltbefehle. Diese werden zum jeweils programmierten Zeitpunkt einmalig ausgeführt.
  • Page 16 Schaltausgang wählen: -Taste CH1 und/oder CH2 mit Prog-Taste bestätigen Vorwahl für EIN-Schaltdauer: – Sekunden – Minuten mit m-Taste EIN-Schaltdauer einstellen: -Taste 01...99 mit Prog-Taste bestätigen Eingabe ist beendet. Ein freier Speicherplatz ist angezeigt für weitere Einstellungen oder -Taste 1x drücken, Eingabe ist beendet.
  • Page 17: Zyklus-Schaltbefehle

    11. Zyklus-Schaltbefehle Sie bestimmen die Zeiten für zyklische Schaltbefehle Symbole: = EIN-Schaltdauer (1...99 Sek. oder 1...99 Min.) = Zyklus-Dauer (1...99 Sek. oder 1...99 Min.) Die Vorwahl für Sekunden oder Minuten siehe nächste Seite. Ein Zyklus-Schaltbefehl besteht aus: • Startzeit • EIN-Schaltdauer •...
  • Page 18 Freier Speicherplatz wählen: Prog-Taste so oft drücken, bis – –:– – erscheint. Startzeit einstellen: Wochentag(e) einstellen siehe Punkt 9 mit m-Taste Minuten mit h-Taste Stunden Vorwahl für Zyklus = -Taste Zyklus- Schaltbefehl markieren (2x drücken) Schaltausgang wählen: -Taste CH1 und/oder CH2 mit Prog-Taste bestätigen Vorwahl für EIN-Schaltdauer: - Sekunden...
  • Page 19 Vorwahl für Zyklus-Dauer: - Sekunden - Minuten mit m-Taste Zyklus-Dauer einstellen: -Taste 01...99 mit Prog-Taste bestätigen Hier ist eine AUS-Schaltzeit mit 00:00 für alle 7 Wochentage vorge- geben. Diese können Sie individuell ändern oder mit Clear löschen (unendlicher Zyklus). Eingabe ist beendet. Ein freier Speicherplatz ist angezeigt für weitere Einstellungen oder -Taste 1x drücken, Ein- gabe ist beendet.
  • Page 20: Lesen - Ändern - Löschen - Reset

    12. Lesen – Ändern – Löschen – Reset • Sie lesen die Programminhalte schrittweise • Sie ändern, überschreiben die Programminhalte • Sie löschen die Programminhalte • Sie löschen Datum und Uhrzeit Lesen Prog-Taste schrittweise drücken. Jeder einzelne Inhalt wird ange- zeigt, bis zum Programmende.
  • Page 21 Löschen - alle Schaltbefehle Prog-Taste so oft drücken, bis FRxx erscheint Clear-Taste 1x drücken, im Display steht CL Clear-Taste drücken und festhalten. Alle Speicherplätze werden gelöscht! Das Display zeigt die Zahl der max. Speicherplätze. Reset Reset-Taste 1x drücken Das eingestellte Datum und die Uhrzeit werden zurückgestellt.
  • Page 22: Handschalter

    13. Handschalter Sie verändern – manuell – den momentanen Schaltzustand. Das individuell eingestellte Schaltprogramm bleibt jedoch erhalten. 1 für Kanal 1 2 für Kanal 2 = Automatik = Handbetrieb FIX = Dauerbetrieb = AUS = EIN FIX = Dauer EIN = EIN = AUS FIX = Dauer AUS...
  • Page 23: Technische Daten

    15. Technische Daten 1 bzw. 2 Kanal 1 bzw. 2 Kanal Wochenuhr Wochenuhr Maße (H x B x T) mm 45 x 36 x 60 45 x 54 x 60 Verteilerausschnitt mm 45 x 36 45 x 54 Gewicht g (ca.) Anschluß...
  • Page 24 Contents Contents Page Assembly, putting into operation, connection Control elements Display Factory setting Changing settings Time and day of the week Calendar month and day 6.2.1 AU = Automatic changeover 6.2.2 cHA = Weekday-related time change 8 - 9 6.2.3 no = no changeover Standard switching commands Weekday block formation...
  • Page 25: Assembly, Putting Into Operation, Connection

    Assembly, putting into operation, connection Assembly Fit the time switch • on a DIN rail • optional wall surface-mounting Surface-mounting set for 2 and 3 module spacings Article No. 03.53.0083.2 Putting into operation The time and date are set at the factory. The time switch is in Energy-saving mode.
  • Page 26: Control Elements

    3. Control elements Start program input Hand switch Set time, end program input Enter pulse/ cycle Select day(s) Reset of the week Delete switching time Set minutes, month, year Set hours, day, year Summer time/winter time switchover 4. Display Date 1234567 = days of the week Summer time...
  • Page 27: Factory Setting

    Factory setting The selections correspond to Central European Time. The time switch offers 3 Operating modes. The date and time, and also the Operating mode AU are set. Operating modes: • AU Automatic summer time controller switchover see 6.2.1 The switchover occurs on the dates defined by the legislator.
  • Page 28: Changing Settings

    Changing settings Note: You can exit/conclude any adjustments, changes you make at any time with the key Time and day of the week Press the key once. Set the time: With the h key – hours With the m key – minutes Note: If the Operating mode no = no change...
  • Page 29: Calendar Month And Day

    6.2 Calendar month and day – Select the Operating mode 6.2.1 AU or 6.2.2 cHA or 6.2.3 no 6.2.1 AU = Automatic changeover Press the key once Press the + 1h key once, AU appears Press the Prog key once Set the current year: With the m key or the h key Confirm with the Prog key...
  • Page 30: Cha = Weekday-Related Time Change

    6.2.2 cHA = Weekday – related time change Press the key once Press the + 1h key as often as necessary until cHA appears Press the Prog key once Set the current year: With the m key or the h key Confirm with the Prog key Set the current month and day:...
  • Page 31 Confirm with the Prog key The start of summer time is displayed. Set the individual summer time start: With the m key – month With the h key – day Confirm with the Prog key Set individual summer time end: With the m key –...
  • Page 32: No = No Changeover

    6.2.3 no = no changeover Press the key once Press the + 1h as often as necessary until no appears. The time switch operators without a date! Press the key once. The input is ended. Note: Select day of the week see 6.1...
  • Page 33: Standard Switching Commands

    7. Standard switching commands You determine the switching times and the switching state for the relevant switching output (channel.) Symbol: CH1: (ON) = Channel 1 CH2: (OFF) = Channel 2 These assignments are possible: • Switching commands only for channel 1 •...
  • Page 34 8. Block formation of weekdays Any combination of weekdays You determine the weekdays for your switching program. 1 - Monday, 2 - Tuesday, 3 - Wednesday ..., 7 - Sunday Example: Monday + Wednesday + Friday (8:00 ON; 20:00 OFF) Select free memory location: Press Prog as often as necessary until –...
  • Page 35 Press the key once. The weekday selection is ended. Note: Enter the switching times and the switching state = ON = OFF for the relevant switching state (channel). For standard switching commands, see 7 For Impulse switching commands, see 9 For cycle switching commands, see 10 Note:...
  • Page 36: Impulse Switching Commands

    Impulse switching commands If a load is switched ON and OFF with a high switching frequency in the seconds range, it must be ensured that effects on the quality of lighting units (flickering) and interference with radio and TV reception are avoided.
  • Page 37 Selecting the switching output: With the CH1 and/or CH2 Confirm with the Prog key. Preselection for: – Seconds – Minutes with the m key Set the ON switching duration: With the key 01...99 Confirm with the Prog key. The input is ended. A free memory location is displayed for further settings press the...
  • Page 38: Cycle Switching Commands

    10. Cycle switching commands You determine the times for cycle switching commands Symbols: = ON switching duration (1...99 sec. or 1...99 min.) = cycle duration (1...99 sec. or 1...99 min.) The preselection for seconds or minutes is explained at the given time. A cycle switching command consists of: •...
  • Page 39 Select free memory location: Press the Prog key as often as necessary until – –:– – appears. Set the start time: Set the day(s) of the week, see 8 With the m key – minutes With the h key – hours Preselection for Cycle = Mark the cycle switching command with the...
  • Page 40 Preselection for: - Seconds - Minutes with the m key Set the ON switching duration: with the key 01...99 Confirm with the Prog key A switching OFF time is displayed here with 00:00 for all 7 days of the week. You can change these individually or delete them with Clear. The input is ended.
  • Page 41: Read - Change - Delete - Reset

    11. Read – change – delete – reset • You can read the program contents stepwise • You can change or overtype the program contents • You can delete the program contents • You can delete the date and time Read Press the Prog key step by step Each individual content is displayed...
  • Page 42 Delete - All switching commands Press the Prog key as often as necessary until FRxx appears Press the Clear key once. CL is in the display Press the Clear key and hold it down. All memory locations are deleted! The display shows the number of the max.
  • Page 43: Hand Switch

    12. Hand switch You change – manually – the current switching state. However, the individually set switching program is preserved. 1 for channel 1 2 for channel 2 = automatic = Manual mode FIX = continuous operation = OFF = ON FIX = Continuous ON = ON = OFF...
  • Page 44: Dcf77 Radio Operation

    14. Technical data 1 channel weekly program 1 channel weekly program 2 channel weekly program 2 channel weekly program Dimensions (H x W x D) mm 45 x 36 x 60 45 x 54 x 60 Distributor cut-out mm 45 x 36 45 x 54 Weight g (approx.) Connection...
  • Page 45 Sommaire Sommaire Page Montage, mise en service, raccordement Touches de programmation Affichage Programme usine Modifier le programme Date et heure Mois et jour 6.2.1 AU = changement automatique 6.2.2 cHA = Passage été/hiver selon les jours de la semaine 9 - 10 6.2.3 no = pas de changement Fonctions standard...
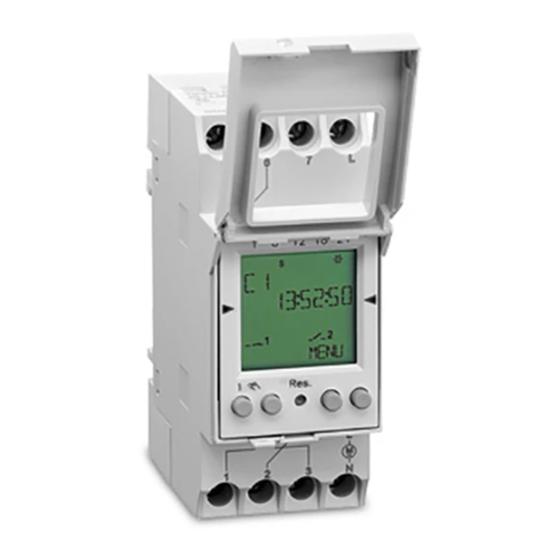
  • Page 46: Montage, Mise En Service, Raccordement

    Montage, mise en service, raccordement Montage Monter l’horloge • sur rail DIN • option murale, kit de montage pour 2 et 3 TE article no. 03.53.0083.2 Mise en service L’heure et la date sont programmées en usine. L’horloge est en mode éco: seuls 2 points clignotent. Appuyer sur une touche: •...
  • Page 47: Touches De Programmation

    3. Touches de programmation Démarrer la programmation Interrupteur manuel Régler l’heure, terminer la Entrer l’impulsion/ programmation le cycle Choisir les jours Remise à zéro Effacer Entrer les minutes, mois, année 2 dernièrs chiffres Entrer les heures, jour, année 2 premiers chiffres Passage été/hiver 4.
  • Page 48: Programme Usine

    Programme usine Les données sont conformes MEZ. L’horloge dispose de 3 modes de fonctionnement. La date, l’heure et le mode de fonctionnement AU sont pré-réglés. Modes de fonctionnement: • AU Passage automatique été/hiver, voir 6.2.1 le passage se fait selon les dates officielles. •...
  • Page 49: Changer Les Configurations

    Changer les configurations Remarque: Vous pouvez terminer/annuler toute modification en appuyant sur la touche Date et heure Appuyer une fois sur la touche Entrer l’heure: Les heures avec la touche h Les minutes avec la touche m Remarque: Si vous avez choisi le mode no = pas de changement - siehe 6.2.3 vous devez entrez maintenant...
  • Page 50: Mois Et Jour

    6.2 Mois et jour (choisir un mode) 6.2.1 AU ou 6.2.2 cHA ou 6.2.3 no 6.2.1 AU = changement automatique Appuyer une fois sur la touche Appuyer 1x sur la touche + 1h, AU apparaît à l’écran Appuyer sur Prog une fois Entrer l’année en cours: avec la touche m ou h Confirmer avec Prog...
  • Page 51: Cha = Passage Été/Hiver Selon Les Jours De La Semaine

    6.2.2 cHA = Passage été/hiver selon les jours de la semaine Appuyer une fois sur Appuyer autant de fois sur la touche + 1h jusqu’à apparition de cHA Appuyer 1x sur Prog Entrer l’année actuelle: avec la touche m ou h Confirmer avec la touche Prog Entrer le mois: avec la touche m et le jour...
  • Page 52 Confirmer avec la touche Prog, l’heure d’été est indiquée. Entrer le début de la période d’été individuelle: avec la touche m pour le mois et h pour le jour Confirmer avec la touche Prog Entrer la fin de la période d’été individuelle: avec la touche m pour le mois et h pour le jour Appuyer une fois sur...
  • Page 53: No = Pas De Changement

    6.2.3 no = pas de changement Appuyer une fois sur Appuyer autant de fois sur la touche + 1h jusqu’à apparition de no. L’horloge fonctionne sans date! Appuyer une fois sur L’entrée des données est finie Remarque: Mettre à la daté voir point 6.1...
  • Page 54: Fonctions Standard

    7. Fonctions standards Vous déterminez les temps et états de commutations pour chaque canal. Symboles: CH1: = canal 1 marche CH2: = canal 2 arrêt Possibilités: • Commutations seulement sur le canal 1 • Commutations seulement sur le canal 2 •...
  • Page 55: Formation De Blocs De Jours

    8. Formation de blocs de jours Blocs de jours libres Vous fixez les jours pour vos programmes de commutations. 1 - lundi, 2 - mardi, 3 - mercredi ..., 7 - dimanche Exemple: lundi + mercredi + vendredi (marche à 8 h et arrêt a 22 h) Choisir un emplacement de mémoire libre: Appuyer sur la touche Prog jusqu’à...
  • Page 56 Appuyer 1x sur , le choix des jours est terminé. Remarque: Entrer les temps et les états marche /arrêt commutation pour chaque canal Fonctions standard voir point 7 Fonction impulsion voir point 9 Fonction cycle voir point 10 Remarque: Après les étapes suivantes: •...
  • Page 57: Fonction Impulsion

    Fonction impulsion Si un utilisateur veut commuter très pour une période très courte (quelques secondes), il faut s’assurer qu’il n’y ait pas d’incidence sur la qualité d’unités d’éclairage ou de parasites dans la réception radio ou TV Vous déterminez les durées pour les impulsions Ceux-ci seront valable une fois pour le moment programmé.
  • Page 58 Choisir la sortie de commutation: Avec la touche CH1 et/ou CH2 Confirmer avec Prog Indication pour: – secondes – minutes avec la touche m Régler la durée de commutation: avec la touche 01...99 Confirmer avec Prog Programmation terminée Un emplacement de mémoire libre est indiqué...
  • Page 59: Fonction Cycle

    10. Fonction cycle Vous déterminez les durées pour des cycles de commutations Symboles: = Durée de la commutation (1...99 sec. ou 1...99 min.) = Durée du cycle (1...99 sec. ou 1...99 min.) L’indication des secondes ou minutes sera expliquée par la suite. Un cycle se compose: •...
  • Page 60: Avec La Touche Ch1 Et/Ou Ch2

    Choisir un emplacement de mémoire libre: Appuyer sur la touche Prog jusqu’à ce que ––:–– apparaisse Entrer le début de l’enclenchement: Entrer les jours, voir point 8 Min. avec la touche m Sec. avec la touche h Indication pour Cycle = Appuyer 2 x sur la touche pour entrer le cycle Choisir la sortie de commutation:...
  • Page 61 Indication pour: - secondes - minutes avec la touche m Régler la durée de commutation: avec la touche 01...99 Confirmer avec Prog Apparition de la fin de 00:00 pour les 7 jours. Vous pouvez les modifier individuellement ou les annuler avec la touche clear. La programmation est finie.
  • Page 62: Lire - Modifier - Effacer - Remise À Zéro

    11. Lire – Modifier – Effacer – Remise à zéro • Vous lisez le contenu des programmes pas à pas • Vous modifiez le contenu des programmes • Vous effacez le contenu des programmes • Vous effacez la date et l’heure Lire Appuyez progressivement sur Prog Chaque contenu sera indiqué...
  • Page 63 Effacer toutes les commutations Appuyer sur Prog jusqu’à ce que FRxx apparaisse Appuyer 1 x sur la touche Clear, l’écran indique CL Appuyer et maintenir la touche Clear enfoncée. Toutes les mémoires seront effacées! L’écran indique le nombre max. d’enplacement de mémoires. Mise à...
  • Page 64: Commutateur Manuel

    12. Commutateur manuel Vous modifiez manuellement l’état de commutation momentané. Le programmation individualisé de commutation reste inchangé. 1 pour canal 1 2 pour canal 2 = mode programme = mode manuel FIX = mode permanent = arrêt = marche FIX = marche permanente = marche = arrêt FIX = arrêt permanente...
  • Page 65: Réception Radio Dcf 77

    14. Caractéristiques techniques 1 ou 2 canal horloge 1 ou 2 canal horloge Dimensions (H x L x P) mm 45 x 36 x 60 45 x 54 x 60 Découpe du panneau mm 45 x 36 45 x 54 Poids g (env.) Raccordement Voir schéma sur appareil...
  • Page 66 Istruzioni d’uso Indice Pagina Montaggio, collegamento, messa in funzione Elementi di comando Indicazioni Display Impostazione dalla fabbrica Modifica delle impostazioni Ora e giorno settimanale Mese e giorno 6.2.1 AU = Commutazione automatica dell’ora legale 6.2.2 cHA = Commutazione semiautomatica dell’ora legale 8 - 9 6.2.3 no = Nessuna commutazione Comandi standard...
  • Page 67: Montaggio, Collegamento, Messa In Funzione

    Montaggio, collegamento, messa in funzione Montaggio Montate l’interruttore orario: • su barra DIN • su parete (opzionale) Set per montaggio a parete per 2 e 3 TE art. 03.53.0083.2 Collegamento Vedi dati tecnici sull’apparecchio Premete un tasto qualsiasi: • l’interruttore orario è attivo •...
  • Page 68: Elementi Di Comando

    3. Elementi di comando Impostazione programma Interruttore manuale Impostazione orario. Termine impostazione Impostazione coman- del programma di impulsi/ciclo Per scegliere il giorno/ Reset giorni settimanali Per cancellare i tempi di comando Impostazione minuti, mese, anno Impostazione ore, giorno, anno Commutazione ora solare/ora legale 4.
  • Page 69: Impostazione Dalla Fabbrica

    Impostazione dalla fabbrica Preimpostazione secondo l’orario estivo MEZ (ora dell’Europa centrale). Ci sono 3 tipi di funzionamento. La data e l’ora nonchè l’uso AU sono preimpostati. Modi d’uso: • AU Commutazione automatica dell’ora legale, vedi punto 6.2.1 La commutazione avviene automaticamente all’ora legale.
  • Page 70: Modifica Delle Impostazioni

    Modifica delle impostazioni Attenzione: Con il tasto si può in ogni istante uscire o concludere le impostazioni o le modifiche. Orario e data Premete il tasto una volta Impostare l’ora: le ore con il tasto h i minuti con il tasto m Attenzione: Se l’impostazione è...
  • Page 71: Mese E Giorno

    6.2 Mese e giorno – scegliere il tipo di funzionamento 6.2.1 AU o 6.2.2 cHA o 6.2.3 no 6.2.1 AU = Commutazione automatica dell’ora legale Premete una volta il tasto I due punti non lampeggiano Premete una volta il tasto ‘1h‘, appare AU Premete una volta il tasto Prog Impostare l’anno attuale:...
  • Page 72: Cha = Commutazione Semiautomatica Dell'ora Legale

    6.2.2 cHA = Commutazione semiautomatica dell’ora legale Premete una volta il tasto I due punti non lampeggiano Premete il tasto ‘+ 1h‘ finchè non appare cHA Premete una volta il tasto ‘Prog‘ Impostare l’anno attuale: con i tasti ‘m‘ o ‘h‘ Confermate con il tasto ‘Prog‘...
  • Page 73 Confermate con il tasto ‘Prog‘, e vi apparirà l’inizio dell’ora legale Impostare l’inizio dell’ora legale individuale: con il tasto ‘m‘ il mese con il tasto ‘h‘ il giorno Confermate con il tasto ‘Prog‘ Apparirà la fine dell’ora legale Impostare la fine dell’ora legale individuale: con il tasto ‘m‘...
  • Page 74: No = Nessuna Commutazione

    6.2.3 no = Nessuna commutazione Premete una volta il tasto I due punti non lampeggiano Premete il tasto ‘+ 1h‘ finchè non appare no L’interruttore orario lavora senza data! Premete una volta il tasto per terminare l’impostazione Attenzione: Impostazione del giorno settimanale vedi punto 6.1...
  • Page 75: Comandi Standard

    7. Comandi standard Scegliete i tempi di commutazione e lo stato di comando per il singolo canale. Simboli: CH1: = canale 1 ON CH2: = canale 2 OFF Sono possibili le seguenti scelte: • comandi solo per canale1 • comandi solo per canale 2 •...
  • Page 76: Formazione Di Blocchi Settimanali

    8. Formazione di blocchi settimanali Combinazione di giorni a scelta Voi scegliete i giorni per il Vostro programma. 1 - lunedi, 2 - martedi, 3 - mercoledi ..., 7 - domenica Esempio: lunedi - mercoledi - venerdi (ore 8:00 ON; ore 22:00 OFF) Scegliere un posto di memoria libero: Premete il tasto ’Prog’...
  • Page 77 Premete il tasto una volta, per terminare la scelta dei giorni. Attenzione: Inserite i tempi di commutazione e lo stato di comando = ON = OFF per singolo canale. Comandi standard vedi punto 7 Comandi ciclici vedi punto 10 Comandi ad impulsi vedi punto 9 Attenzione: A seguito della...
  • Page 78: Comandi Ad Impulsi

    Comandi ad impulsi Se un’utenza viene comandata continuamente ON/OFF – con comandi della durata dell’ordine di secondi – bisogna assicurarsi che siano evitati gli effetti retroattivi degli impianti d’illuminazione (Flicker) e i disturbi nella ricezione radio e TV. Scegliete i tempi per i comandi ad impulso. Questi vengono eseguiti nei tempi programmati una volta sola.
  • Page 79 Scegliere il canale d‘uscita: con il tasto CH1 e/o CH2 Confermate il tutto con il tasto ’Prog’ Preselezione per – secondi – minuti con il tasto ’m’ Impostate la durata del comando ON: con il tasto 01...99 Confermate con il tasto ’Prog’ L’impostazione è...
  • Page 80: Comandi Ciclici

    10. Comandi ciclici Scegliete i tempi per i comandi ciclici Simboli: = Durata del comando ON (1...99 sec. oppure 1...99 min.) = Durata del ciclo (1...99 sec. oppure 1...99 min.) La preselezione per secondi o minuti verrà spiegata alla pagina seguente. Un comando ciclico è...
  • Page 81 Scegliere un posto di memoria libero: Premete il tasto ’Prog’ finchè non appare – –:– –. Impostare il tempo di partenza: Inserite il giorno/i giorni vedi punto 8 con il tasto ’m’ i minuti con il tasto ’h’ le ore Preselezione per ciclo = con il tasto inserisce il comando ciclico...
  • Page 82 Preselezione per la durata ciclica - secondi - minuti con il tasto ’m’ Impostate la durata ciclica con il tasto 01...99 Confermate con il tasto ’Prog’ Qui è indicato un tempo di comando OFF con 00:00 per tutti i 7 giorni. Questi possono essere modificati singolarmente oppure cancellati con il tasto Clear.
  • Page 83: Lettura - Modifica - Cancellazione - Reset

    11. Lettura – modifica – cancellarzione – Reset • leggete i contenuti dei programmi passo passo • modificate, scrivendo sopra il contenuto del programma • cancellate il contenuto dei programmi • cancellate la data e l’ora Lettura Premete il tasto ’Prog’ passo passo Ogni singolo contenuto viene eviden- ziato, fino alla fine del programma.
  • Page 84 Cancellazione - di tutti i comandi Premete il tasto ’Prog’ finchè non appare FRxx Premete una volta il tasto Clear, nel Display appare CL Mantenete premuto il tasto Clear Tutti i posto di memoria vengono cancellati! Nel Display appare il numero totale dei posti di memoria.
  • Page 85: Interruttore Manuale

    12. Interruttore manuale Potete modificare manualmente lo stato di comando momentaneo. Il programma individuale impostato rimane attivo. 1 per canale 1 2 per canale 2 = automatico = funzionamento manuale FIX = funzionamento fisso = OFF = ON FIX = fisso ON = ON = OFF FIX = fisso OFF...
  • Page 86: Dati Tecnici

    14. Dati tecnici Interruttore orario 1 canale Interruttore orario 1 canale Interruttore orario 2 canali Interruttore orario 2 canali Dimensioni (A x L x P) mm 45 x 36 x 60 45 x 54 x 60 Dima di foratura mm 45 x 36 45 x 54 Peso g (circa)
  • Page 87 Contenido Contenido Pagina Advertencias de seguridad Montaje, puesta en marcha, conexión Panel de botones Pantalla Ajuste de fábrica Cambiar los ajustes Hora y día de la semana Mes y día 7.2.1 AU = Ajuste automático 7.2.2 cHA = Ajuste del horario de verano por días 9 - 10 7.2.3 no = sin horario de verano...
  • Page 88: Advertencias De Seguridad

    2. Advertencias de seguridad La instalación de la unidad ha de ser llevada a cabo por un técnico cualificado o bajo su dirección y supervisión. Advertencias acerca del montaje: • Utilizar exclusivamente cables con aislamiento • Montar solo en lugar adecuado y protegido •...
  • Page 89: Montaje, Puesta En Marcha, Conexión

    Montaje, puesta en marcha, conexión Montaje El aparato puede montarse • Sobre carril • Opcionalmente sobre pared con: Accesorio de montaje para 2/3 módulos Código 03.53.0083.2 Puesta en marcha La hora y la fecha vienen ajustadas de fábrica. El reloj trabaja en modo de ahorro de energía, sólo los dos puntos parpadean.
  • Page 90: Panel De Botones

    4. Panel de botones Iniciar la programación Interruptores manuales Ajustar hora, finalizar la Seleccionar programación impulso/ciclo Seleccionar día(s) Reset de la semana Borrar hora de conmutación Ajustar minutos, mes y año Ajustar hora, día y año Ajuste horario de verano/invierno 5.
  • Page 91: Ajuste De Fábrica

    Ajuste de fábrica La hora ajustada corresponde a la zona horaria de Europa Central. El reloj ofrece 3 modos de funcionamiento. Viene preajustado con la fecha y la hora así como el modo de servicio AU (cambio automático de horario de verano). Modos de servicio: •...
  • Page 92: Cambiar Los Ajustes

    Cambiar ajustes Advertencia: Todos los ajustes o cambios que se realizan se pueden finalizar o interrumpir en cualquier momento con el botón Hora y día de la semana Pulsar una vez el botón Fijar hora: con el botón h se ajusta la hora con el botón m se ajustan los minutos Advertencia:...
  • Page 93: Mes Y Día

    7.2 Mes y día – Modo de servicio 7.2.1 AU o 7.2.2 cHA o 7.2.3 no 7.2.1 AU = Ajuste automático Pulsar el botón 1 vez Pulsar botón + 1h 1 vez, ahora aparece AU Pulsar botón Prog 1 vez Ajustar el año: mediante el botón m o h Confirmar pulsando el botón Prog...
  • Page 94: Cha = Ajuste Del Horario De Verano Por Días

    7.2.2 cHA = Ajuste del horario de verano por días predeterminados Pulsar una vez el botón Pulsar repetidamente el botón + 1h hasta que aparezca cHA Pulsar una vez el botón Prog Ajustar el año: mediante el botón m o h Confirmar con el botón Prog Ajustar mes y día: El mes con el botón m...
  • Page 95 Confirmar con el botón Prog Se indicará el inicio del horario de verano. Ajuste de inicio individual del horario de verano: El mes con el botón m El día con el botón h Confirmar con el botón Prog Ajuste de fin individual del horario de verano: El mes con el botón m El día con el botón h...
  • Page 96: No = Sin Horario De Verano

    7.2.3 no = sin horario de verano Pulsar una vez el botón Pulsar repetidamente el botón + 1h hasta que aparezca no ¡El reloj trabajará sin fecha! Pulsar una vez el botón Fin del ajuste. Nota: Fijar día de la semana, ver punto 9.
  • Page 97 8. Ordenes estándar de conmutación Las horas y estados de conmutación para cada salida (canal) se ajustan individualmente. Símbolos: CH1: = canal 1 encendido CH2: = canal 2 apagado Las siguientes combinaciones son posibles: • Ordenes soló para el canal 1 •...
  • Page 98 9. Seleccionar días (Combinaciones libres de los días de la semana) Los días de la semana, en los que el programa de conmutación debe estar activo, se ajustan de la siguiente manera: 1 - lunes, 2 - martes, 3 - miércoles ..., 7 - domingo Ejemplo: lunes - miércoles - viernes (encender a las 8 horas y apagar a las 22 horas) Elegir posición de memoria libre: Pulsar repetidamente el botón...
  • Page 99: Ordenes Estándar

    Pulsar una vez el botón se finalizará la selección de los días Advertencia: Indicar las horas y estados = encendido = apagado para la salida (canal) en cuestión, Para ordenes estándar ver punto 8 Para ordenes de impulso ver punto 10 Para ordenes cíclicas ver punto 11 Nota:...
  • Page 100: Ordenes De Impulso

    10. Ordenes de impulso Si un aparato es encendido y apagado con mucha frecuencia - del orden de segundos - han de evitarse los efectos negativos sobre la calidad de los sistemas de iluminación (parpadeo) e interferencias en receptores de radio y televisión. Han de programarse las horas de inicio para las ordenes de impulso.
  • Page 101 Elegir canal: mediante el botón CH1 y/o CH2 Confirmar con el botón Prog Seleccionar: – segundos o – minutos mediante el botón m Ajustar duración de la orden: mediante el botón 01...99 Confirmar con el botón Prog La programación estará finalizada.
  • Page 102 11. Ordenas cíclicas Las horas para las ordenes cíclicas han de programarse. Símbolos: = Duración del encendido (1...99 seg. o 1...99 min.) = Duración del ciclo (1...99 seg. o 1...99 min.) El ajuste de la duración en segundos o minutos se explicará más adelante. Una orden cíclica consiste en: •...
  • Page 103 Seleccionar posición de memoria libre: Pulsar repetidamente el botòn Prog hasta que aparezca una posición libre – –:– –. Ajustar hora de inicio: Ajustar días de la semana (ver punto 9) Ajustar los minutos con el botón m Ajustar las horas con el botón h Seleccionar orden cíclica ciclo = seleccionar...
  • Page 104 Elegir: - los segundos o - los minutos mediante el botón m Ajustar duración del ciclo: ) mediante el botón 01...99 Confirmar con el botón Prog Aquí se indica la hora de apagado con 00:00 para los 7 días de la semana.
  • Page 105: Ordenes Cíclicas

    12. Lectura – modificación – borrado – reset • Para leer paso por paso el contenido del programa • Para cambiar o sobreescribir los contenidos del programa • Para borrar los contenidos del programa • Para borrar fecha y hora Lectura Ir pulsando el botón Prog Se verán todos los pasos del...
  • Page 106 Borrar todas las ordenes Pulsar tantas veces el botón Prog hasta que aparezca FRxx Pulsar una vez el botón Clear, en la pantalla aparecerá CL Mantener pulsando el botón Clear ¡Todas las posiciones de memoria se borrarán! En la pantalla aparecerá el número máximo de posiciones de memoria.
  • Page 107: Interruptor Manual

    13. Interruptor manual Para cambiar - de forma manual - el estado de conmutación actual. El programa en sí no se ve afectado por esta operación. 1 para el canal 1 2 para el canal 2 = Modo automático = Modo manual FIX = Modo continuo = Apagado = Encendido...
  • Page 108: Datos Técnicos

    15. Datos técnicos Programmador 1 circuito Programmador 1 circuito Programmador 2 circuitos Programmador 2 circuitos Dimensiones (A x A x P) mm 45 x 36 x 60 45 x 54 x 60 Recorte en el cuadro de distribución 45 x 36 45 x 54 Peso en g (aprox.) Conexión...
  • Page 109 Inhoud Inhoud Blz. Montage, ingebruikname, aansluiting Verklaring van de toetsen Verklaring van Display Fabrieksmatige instelling Instellingen veranderen Tijd en dag Maand en dag 6.2.1 AU = automatische omschakeling 6.2.2 cHA = halfautomatische tijdomschakeling 8 - 9 6.2.3 no = geen omschakeling Standaard –...
  • Page 110: Montage, Ingebruikname, Aansluiting

    Montage, ingebruikname, aansluiting Montage Schakelklok monteren • op DIN-rail • optie wandopbouw opbouwset voor 2 en 3 TE Art. nr. 03.53.0083.2 Ingebruikname De tijd en de datum worden ingesteld. De schakelklok zit in de “stand-by“ modus, alleen de “dubbele punt“ knippert. Druk op een willekeurige toets: •...
  • Page 111: Verklaring Van De Toetsen

    3. Verklaring van de toetsen Programma invoer beginnen Handschakelaar Tijd instellen, programma invoer Impuls/Cyclus beeindingen invoeren Dagen Reset kiezen Schakeltijd verwijderen minuten, maand, jaar instellen Uren, dag, jaar instellen Zomer- wintertijd omschakeling 4. Verklaring van het display date = datum 1234567 = dagen zomertijd-...
  • Page 112: Fabrieksmatige Instelling

    Fabrieksmatige instelling De ingestelde gegevens voldoen aan MEZ. De schakelklok biedt 3 bedrijfssoorten. De datum en de tijd evenals bedrijfssoort AU zijn ingesteld. Bedrijfssoorten: • AU automatische omschakeling van de zomertijdregeling, zie 6.2.1 De omschakeling gebeurt volgens de wettelijk aangegeven data. •...
  • Page 113: Instellingen Veranderen

    Instellingen veranderen Aanwijzing: Bij alle instellingen, veranderingen die u doorvoert, is met de toets de beeindiging op elk moment mogelijk. Tijd en dag -toets 1x indrukken Tijd instellen: Met de h-toets uren Met de m.toets minuten Aanwijzing: Wanneer bedrijfssoort no = geen omschakeling - zie 6.2.3 wordt gekozen, moet nu de dag ingesteld worden.
  • Page 114: Au = Automatische Omschakeling

    6.2 Kalendermaand – en dag – bedrijfssoort kiezen 6.2.1 AU of 6.2.2 cHA of 6.2.3 no 6.2.1 AU = automatische omschakeling -toets 1x indrukken + 1h-toets 1x indrukken, AU verschijnt Prog-toets 1x indrukken Actueel jaar instellen: met m-toets of h-toets met Prog-toets bevestigen Actuele maand en dag instellen: met m-toets kalendermaand...
  • Page 115: Cha = Halfautomatische Tijdomschakeling

    6.2.2 cHA = halfautomatische tijdomschakeling -toets 1x indrukken + 1h-toets zo vaak indrukken totdat cHA verschijnt Prog-toets 1x indrukken Aktueel jaar instellen: Met m-toets of h-toets met Prog-toets bevestigen Aktuele maand en dag instellen: met m-toets maand met h-toets dag...
  • Page 116 met Prog-toets bevestigen begin zomertijd is aangegeven. Individueel begin van de zomertijd instellen: met m-toets maand met h-toets dag met Prog-toets bevestigen Individueel einde zomertijd instellen: met m-toets maand met h-toets dag -toets 1x indrukken, programmering is beeindigd.
  • Page 117: No = Geen Omschakeling

    6.2.3 no = geen omschakeling -toets 1x indrukken + 1h toets zo vaak indrukken, totdat no verschijnt. De schakelklok werkt zonder datum! -toets 1x indrukken programmering is beeindigd. Aanwijzing: Dag instellen zie 6.1...
  • Page 118: Standaard - Schakelcommando's

    7. Standaard – schakelcommando’s U bepaalt de schakeltijden en de schakeltoestand voor de desbetreffende schakeluitgang (kanaal). Symbool: CH1: = kanaal 1 AAN CH2: = kanaal 2 UIT Deze indelingen zijn mogelijk: • schakelcommando voor alleen kanaal 1 • schakelcommando voor alleen kanaal 2 •...
  • Page 119: Blokvorming Van De Dagen

    8. Blokvorming van de dagen Willekeurige combinaties van de dagen U bepaalt welke dagen u wilt schakelen. 1 - maandag, 2 - dinsdag, 3 - woensdag ..., 7 - zondag Voorbeeld: maandag - woensdag - vrijdag (8.00 uur AAN; 22.00 uur UIT) Vrije geheugenplaatsen kiezen: Prog-toets zo vaak indrukken, totdat –...
  • Page 120 -toets 1x indrukken, keuze dag is beeindigd Aanwijzing: Zowel de schakeltijden als de schakeltoestand = AAN = UIT voor de gekozen schakeltijd (kanaal) ingeven. Standaard schakelcommando’s zie 7 Impuls schakelcommando’s zie 9 Cyclus schakelcommando’s zie 10 Aanwijzing: Volgens de voorgangers •...
  • Page 121: Impuls - Schakelcommando's

    Impuls – schakelcommando’s Wordt een verbruiker met een hoge schakelfrequentie - in seconden - bereik - AAN en UIT geschakeld, moet men verzekerd zijn, dat terugwerking op de kwaliteit van verlichting (geflikker) en storingen in radio- en tv-ontvangst vermeden wordt. U bepaalt de tijden voor de Impuls-schakelcommando’s.
  • Page 122 Schakeluitgang kiezen: -toets CH1 en/of CH2 met Prog-toets bevestigen. Voorkeuze voor AAN-inschakelduur: – seconden – minuten met m-toets AAN-inschakelduur instellen: -toets 01...99 met Prog-toets bevestigen programmering is beeindigd. Een vrije geheugenplaats is aangeduid voor verdere programmering -toets 1x indrukken, programmering beeindigd Het display toont de aktuele tijd.
  • Page 123: Cyclus - Schakelcommando's

    10. Cyclus – schakelcommando’s U bepaalt de tijden voor de Cyclus-schakelcommando’s Symbolen: = AAN-inschakelduur (1...99 sec. of 1...99 min.) = Cyclus-duur (1...99 sec. of 1...99 min.) De keuze voor seconden of minuten wordt t.z.t. verklaart.. Een Cyclus-schakelcommando bestaat uit: • Starttijd •...
  • Page 124 Vrije geheugenplaatsen kiezen: Prog-toets zo vaak indrukken, totdat – –:– – verschijnt. Starttijd instellen: Dag(en) instellen zie 8 met m-toets minuten met h-toets uren Voorkeuze voor Cyclus = toets Cyclus schakel- commando markeren (2 x drukken) Schakeluitgang kiezen: -toets CH1 en/of CH2 met Prog-toets bevestigen Voorkeuze voor: - seconden...
  • Page 125 Voorkeuze voor Cyclus tijd: - seconden - minuten met m-toets AAN-inschakelduur instellen: -toets 01...99 met Prog-toets bevestigen Hier is een UIT - schakeltijd met 00:00 voor alle 7 dagen aangeduid. Deze kunt u individueel veranderen of met CLEAR verwijderen. Ingave is beeindigd. Een vrije geheugenplaats is aangeduid voor verdere programmering of -toets 1 x indrukken, programmering is beeindigd.
  • Page 126: Lezen - Veranderen - Verwijderen - Reset

    11. Lezen – veranderen – verwijderen – Reset • U leest de programmainhoud stapsgewijs • U veranderd, overschrijft de programma inhoud • U verwijderd de programma inhoud • U verwijderd datum en tijd Lezen Prog-toets stapsgewijs indrukken Elk deel van de inhoud wordt getoont, tot aan het programma einde.
  • Page 127 Verwijderen - van alle schakelcommando’s Prog-toets zo vaak indrukken, totdat FRxx verschijnt Clear-toets 1x indrukken, in het display staat CL Clear-toets indrukken en vasthouden. Alle geheugenplaatsen worden verwijderd! Het display toont het aantal max. geheugenplaatsen. Reset Reset-toets 1x indrukken De ingestelde datum en tijd worden teruggezet.
  • Page 128: Handschakelaar

    12. Handschakelaar U verandert - handmatig - de huidige schakeltoestand. Het individueel ingestelde schakelprogramma blijft echter wel behouden. 1 voor kanaal 1 2 voor kanaal 2 = automatisch = handmatigbedrijf FIX = continuebedrijf = UIT = AAN FIX = duur AAN = AAN = UIT FIX = duur UIT...
  • Page 129: Dcf 77 Antenneontvangst

    14. Technische gegevens 1 kanaals schakelklok 1 kanaals schakelklok 2 kanaals schakelklok 2 kanaals schakelklok Maten (H x B x D) mm 45 x 36 x 60 45 x 54 x 60 Verdeeluitsparing mm 45 x 36 45 x 54 Gewicht gr.
  • Page 130 Obsah Obsah Strana Montáž, uvedení do provozu a připojení Ovládací prvky Displej Výchozí nastavení Změna nastavení Ćasový údaj a den v týdnu Kalendářní měsíc a den 6.2.1 AU = Automatický přechod na letni čas 6.2.2 cHA = Přechod na letní čas s ohledem na den v týdnu 8 - 9 6.2.3 no = Bez přechodu na letní...
  • Page 131: Montáž, Uvedení Do Provozu A Připojení

    Montáž, uvedení do provozu a připojení Montáž Spínací hodiny montujte • na DIN-lištu • volitelně na povrch, na stěnu tento montážní soubor má výrobkové číslo 03.53.0083.2 Uvedení do provozu Časový údaj a datum byly nastaveny již ve výrobním závodě. Spínací hodiny jsou v úsporném režimu, bliká...
  • Page 132: Ovládací Prvky

    3. Ovládací prvky Začátek vkládání programu Ruční přepínač Nastavení času, konec vkládání Zadání programu impulsu/cyklu Volba dne Reset v týdnu Zrušení času sepnutí Nastavení minut, měsíce a roku Nastavení hodin, dne a roku Přepnutí letního/zimního času 4. Displej Datum 1234567 = Dny v týdnu Zobrazení...
  • Page 133: Výchozí Nastavení

    Výchozí nastavení Vložené časové údaje odpovídají SEČ (středoevropský čas). Spínací hodiny nabízí 3 provozní režimy. Přednastaveny jsou datum a čas a rovněž provozní režim AU. Provoznĺ režimy: • AU Automatický přechod na letní čas, viz 6.2.1 Přestavení času se provede ve dnech stanovených zákonem.
  • Page 134: Změna Nastavení

    Změna nastavení Poznámka: Všechna nastavení, změny které provedete je možno vždy ukončit tlačítkem Časový údaj a den v týdnu Stiskněte 1 x tlačítko Nastavení časového údaje: hodiny tlačítkem h minuty tlačítkem m Poznámka: Jestliže byl zvolen provozní režim no = bez přechodu na letní čas - viz 6.2.3 je třeba nyní...
  • Page 135: Kalendářní Měsíc A Den

    Kalendářní měsíc a den – volba provozního režimu 6.2.1 AU nebo 6.2.2 cHA nebo 6.2.3 no 6.2.1 AU = Automatický přechod na letni čas Stiskněte 1 x tlačítko Stiskněte 1 x tlačítko + 1h, zobrazí se AU Stiskněte 1 x tlačítko Prog Nastavení...
  • Page 136: Cha = Přechod Na Letní Čas S Ohledem Na Den V Týdnu

    6.2.2 cHA = Přechod na letní čas s ohledem na den v týdnu Stiskněte 1 x tlačítko Stiskejte tlačítko + 1h, až se zobrazí cHA Stiskněte 1 x tlačítko Prog Nastavení aktuálního roku: tlačítkem m nebo tlačítkem h Potvrd´te tlačítkem Prog Nastavení...
  • Page 137 Potvrd´te tlačítkem Prog zobrazí se začátek letního času. Nastavení individuálního začátku letního času: Kalendářní měsíc tlačítkem m Kalendářní den tlačítkem h Potvrd´te tlačítkem Prog Nastavení individuálního konce letního času: Kalendářní měsíc tlačítkem m Kalendářní den tlačítkem h Stiskněte 1 x tlačítko zadání...
  • Page 138: No = Bez Přechodu Na Letní Čas

    6.2.3 no = Bez přechodu na letní čas Stiskněte 1 x tlačítko Stiskejte tlačítko + 1h, až se zobrazí no Spínací hodiny pracují bez datumu! Stiskněte 1 x tlačítko zadání je ukončeno Poznámka: Nastavení dne v týdnu viz odstavec 6.1...
  • Page 139: Standardní Spínací Povely

    7. Standardní spínací povely Nastavení spínacích časů a stavů sepnutí pro určitý spínaný výstup (kanál). Symbol: CH1: = kanál 1 ZAP CH2: = kanál 2 VYP Jsou možná následujĺcĺ přiřazení: • Spínací povel pouze pro kanál 1 • Spínací povel pouze pro kanál 2 •...
  • Page 140: Vytváření Bloků Dnů V Týdnu

    8. Vytváření bloků dnů v týdnu Libovolná kombinace dnů v týdnu Nastavení dnů v týdnu ve Vašem programu spínání. 1 - pondělí, 2 - úterý, 3 - středa ..., 7 - neděle Příklad: pondělí - středa - pátek (8:00 hod. ZAP; 22:00 hod. VYP) Nalezení...
  • Page 141 Stiskněte 1 x tlačítko výběr dnů v týdnu je ukončen Poznámka: Vložení časů a rovněž stavů sepnutí = ZAP = VYP Standardní spínací povely, viz kapitola 7 Krátké spínací povely, viz kapitola 9 Cyklické spínací povely viz kapitola 10 Upozornění: Jestliže se provede •...
  • Page 142: Krátké Spínací Povely - Impuls

    Krátké spínací povely – impuls Jestliže se má nějaký spotřebič zapínat s vyšší četností spínání řádově v sekundách mezi ZAP a VYP je třeba zajistit, aby se zamezilo zpětnému účinku na kvalitu osvětlovacího zařízení (blikání) a rušení rozhlasového a televizního příjmu. Nastavení...
  • Page 143 Zvolení spínacího výstupu: Zvolte CH1 a/nebo CH2 tlačítkem Potvrd´te tlačítkem Prog Nastavení pro sekundy/minuty tlačítkem m Nastavení doby sepnutí: v rozsahu 01...99 tlačítkem Potvrd´te tlačítkem Prog Zadání je ukončeno. Zobrazí se volné pamět´ové místo pro další nastavení nebo Stiskněte 1 x tlačítko zadání...
  • Page 144: Cyklické Spínací Povely

    Cyklické spínací povely Nastavení časů pro cyklické spínací povely. Symboly: = ZAP - doba sepnutí (1...99 sek. nebo 1...99 min.) = doba cyklu (1...99 sek. nebo 1...99 min.) Volba sekund nebo minut bude vysvětlena u příslušného časového bodu. Cyklický povel sepnutí sestává z: •...
  • Page 145 Nalezení volného pamět´ového místa: Stiskejte tlačítko Prog tak dlouho, až se zobrazí volné místo --:--. Nastavení času startu: Nastavení dnů v týdnu, viz kapitola 8 minuty tlačítkem m hodiny tlačítkem h Nastavení pro cyklus = Označte cyklický povel sepnutí tlačítkem ( 2 x stisknout) Zvolení...
  • Page 146 Nastavení pro cyklus = sekundy/minuty tlačítkem m Nastavení doba cyklu: v rozsazu 01...99 tlačítkem Potvrd´te tlačítkem Prog Zde se zobrazí čas vypnutí 00:00 pro všech 7 dnů v týdnu tento údaj můžete individuelně změnit nebo tlačítkem Clear smazat. Zadání je ukončeno. Zobrazí...
  • Page 147: Čtení Změna A Zrušení Povelů/Reset

    11. Čtení, změna a zrušení povelů/RESET • Obsah programových míst můžete číst krok po kroku • Obsah programových míst můžete měnit a přepisovat • Obsah programových míst můžete smazat • Můžete smazat datum a čas Čtení Postupně stiskávejte tlačítko Prog Zobrazí...
  • Page 148 Zrušení všech povelů sepnutí Postupně stiskávejte tlačítko Prog až se zobrazí FRxx Stiskněte 1 x tlačítko Clear, na displeji se zobrazí CL Stiskněte tlačítko Clear a držte ho sepnuté Všechna pamět´ová místa jsou smazána! Na displeji se zobrazí maximální počet pamět´ových míst Reset Stiskněte 1 x tlačítko Reset Nastavený...
  • Page 149: Ruční Přepínač

    Ruční přepínač Můžete ručně změnit aktuální stav sepnutí. Individuální nastavení programu spínání zůstane však nezměněno. 1 platí pro kanál 1 2 platí pro kanál 2 = automatika = ruční režim FIX = Dauerbetrieb = VYP = ZAP FIX = trvale ZAP = ZAP = VYP FIX = trvale VYP...
  • Page 150: Technické Údaje

    Technické údaje 1-kanálové/2-kanálové 1-kanálové/2-kanálové spínací hodiny spínací hodiny s příjmem DCF 45 x 36 x 60 45 x 54 x 60 Rozměry (V x Š x H) mm 45 x 36 45 x 54 Rozvaděčový výřez Váha cca (g) viz značky na přístroji viz značky na přístroji Připojení...
  • Page 151 WA-EKF 3676/04.99/S:MMS/D:Bau/80.10.0883.7...

Ce manuel est également adapté pour:

Talento 671Talento 471Talento 472Talento 372

Table des Matières