Masquer les pouces Voir aussi pour 3DGFLEX:

Publicité

Les langues disponibles

Les langues disponibles

Liens rapides

3DGFLEX
ISTRUZIONI PER L'USO - OPERATING INSTRUCTIONS
INSTRUCTIONS D'EMPLOI - BEDIENUNGSANLEITUNG

Publicité

Table des Matières
loading

Sommaire des Matières pour Fracarro 3DGFLEX

  • Page 1 3DGFLEX ISTRUZIONI PER L’USO - OPERATING INSTRUCTIONS INSTRUCTIONS D’EMPLOI - BEDIENUNGSANLEITUNG...
  • Page 2: Avvertenze Per La Sicurezza

    1. AVVERTENZE PER LA SICUREZZA • L’installazione del prodotto deve essere eseguita da personale qualificato in conformità alle leggi e normative locali sulla sicurezza. Fracarro Radioindustrie di conseguenza è esonerata da qualsivoglia responsabilità civile o penale conseguente a violazioni delle norme giuridiche vigenti in materia e derivanti dall’improprio uso del prodotto da parte...
  • Page 3: Descrizione Del Prodotto

    2. DESCRIZIONE DEL PRODOTTO La centrale 3DGflex è dotata di un cabinet che consente di alloggiare fino ad un massimo di 6 moduli di vario tipo e una unità di controllo che svolge svariate funzioni. La control unit presente nel primo slot consente infatti di: •...
  • Page 4: Installazione Del Prodotto

    Si preveda lo spazio necessario per l’eventuale scollegamento del cavo di alimentazione e dell’apertura del pannello frontale. È possibile anche installare la centrale sugli armadi rack da 19’’ (Fig. 3) consultare il catalogo Fracarro per quanto ri- guarda i formati degli armadi. Per agevolare il raffreddamento mediante convezione natu- rale si raccomanda di inserire la centrale come da figure e consentire così...
  • Page 5: Istruzioni Per L'utilizzo

    1. Inserire i moduli nel cabinet come descritto nel precedente paragrafo (3.1). 2. Accendere la centrale collegando il cavo di alimentazione e attenderne l’inizializzazione, compare il logo Fracarro sul display (solo per versione 3DG-BOX). 3. Solo per versione 3DG-BOX: accedere al menu premendo il tasto √, digitare il codice utente (default 1234) e ripremere √;...
  • Page 6 Si tenga presente che la control unit, una volta alimentata, necessita di qualche minuto per ese- guire il boot, si prega di fare riferimento allo stato dei led per riconoscere lo stato della centrale. ATTENZIONE: in questa condizione la lingua di default è l’inglese. Dopo un reset default potrebbe essere necessario ri-programmare i parametri, perché...
  • Page 7 Dopo 3 inserimenti errati Pin errato INSERIRE PIN PIN NON VALIDO FACTORY RESET Pin corretto MODULI TROVATI STATO SCHEDE 1 <Nome scheda> Menu della scheda 2 <Nome scheda> Menu della scheda 3 <Nome scheda> Menu della scheda 4 <Nome scheda> Menu della scheda 5 <Nome scheda>...
  • Page 9 Stato schede: viene visualizzato lo stato delle schede della centrale: • V : scheda presente che funziona correttamente • E : scheda presente che non funziona correttamente (errore su scheda) • B: scheda presente in aggiornamento • - : scheda non presente Abilita DHCP: permette di abilitare/disabilitare il DHCP, funzione per l’assegnazione automa- tica dell’indirizzo IP dalla rete.
  • Page 10 2. Collegare il PC al modulo per mezzo di un cavo RJ-45 di CAT-5E; 3. Avviare il browser internet (browser consigliati: Google Chrome, Mozilla); 4. Digitare nella barra degli indirizzi l’indirizzo IP associato alla 3DGflex; verrà visualizzata la HOME PAGE seguente.
  • Page 11 Nella prima parte “impostazione impianto” è possibile impostare: • il nome dell’impianto scrivendolo nell’apposito spazio (3DGflex system di default) • il contrasto del display LCD con le apposite freccet te di incremento/decremento (scala di valori da 1 a 16) È anche possibile visualizzare la versione software...
  • Page 12 Email mittente: permette di impostare l’indirizzo email dal quale verrà inviato il messaggio di monitoraggio (default 3dg_flex@fracarro.com). È inoltre possibile inviare, cliccando sull’apposito pulsante “invio mail di test”, una mail di prova per verificare il funzionamento della funzione di posta elettronica.
  • Page 13 Dalla barra delle opzioni in alto in verde selezionando “Configurazione” “Monitoraggio”  “Storico” si accede alla seguente schemata: Da questa finestra è possibile visualizzare e ricercare lo storico degli eventi rilevati nel moni- toraggio. È infatti riportato l’ID dell’evento, il relativo modulo, la data, l’ora, il valore, se genera un allar- me o no e la descrizione dell’evento.
  • Page 14 LAN. I passi da seguire per poter gestire da remoto la centrale 3DGflex sono i seguenti: 1. Affinché ogni singolo modulo della centrale sia visibile dalla rete WEB, creare il corretto re-indirizzamento della centrale mediante l’impostazione delle opportune regole NAT/PAT...
  • Page 15: Aggiornamento Firmware

    - 2006/95/EC, Direttiva Bassa Tensione (LVD) Le informazioni riportate in questo manuale sono state compilate con cura, tuttavia Fracarro Radioindustrie S.p.A. si riserva il diritto di apportare in ogni momento e senza preavviso, miglioramenti e/o modifiche ai prodotti descritti nel...
  • Page 16: Safety Recommendations

    • The product can only be installed by qualified personnel in compliance with local safety laws and regulations. Fracarro Radioindustrie is free from all civil and criminal responsibility due to breaches of the current legislation derived from the improper use of the product by the installer, user or third parties.
  • Page 17: Product Description

    2. PRODUCT DESCRIPTION The 3DGflex headend is equipped with a cabinet that can contain up to 6 different modules and a control unit that performs various functions. The control unit is located in the first slot and performs the following: •...
  • Page 18: Control Unit

    Leave some gaps for disconnecting the power cable and opening the front panel. The headend can be installed on 19” rack cabinets (see Fig. 3). See the Fracarro Catalog to know more about the sizes of the cabinets. To favor natural cooling, we recommend inserting the hea- dend as shown in the figure so that air can flow from down to up.
  • Page 19 2. Plug in the cord and switch the headend ON; wait for the headend initialization: the Fracarro logo is displayed (only for 3DG-BOX version). 3. Only for 3DG-BOX version: press the √ key and enter the menu; enter the user’s code (1234 by default) and press √...
  • Page 20 ATTENTION: the default language is English. After resetting, you can set the parameters again as default parameters might not meet your needs. The two front LEDs (red and green) of the control unit indicate the module status (i.e. ON, under alarm, under lockage, under booting or programming). The following table helps understand the luminous signalizations.
  • Page 21 After 3 wrong entries Wrong PIN INSERT PIN PIN NOT VALID FACTORY RESET Pin corretto MODULES FOUND MODULE STATUS 1 <module name> module menu 2 <module name> module menu 3 <module name> module menu 4 <module name> module menu 5 <module name> module menu 6 <module name>...
  • Page 22 NETWORK TIMING TIME & DATE ENABLE DHCP YEAR MONTH HOUR MINUTES MONITORING MONITOR ENABLE HISTORY LIFE SAVE HISTORY CLEAR HISTORY READ ACCOUNT SEND TEST MAIL SEND TEST MAIL...
  • Page 23 Card status: shows the status of the headend’s cards • V : the card is present and works correctly • E : the card is present and does not work correctly (card faulty) • B: card under updating • - : card missing Enable DHCP: enable/disable the DHCP, this function automatically assigns the IP address from the network.
  • Page 24 Proceed as follows: 1. Modify the IP address in the 3DGflex headend’s control unit and set an address that be longs to the same subnetwork of the address set in the Properties of the local network board of the PC (only for 3DG-BOX version). For example: a.
  • Page 25 • name of the installation, enter the name in the proper box (by default, the name is 3DGflex) • the contrast of the LCD display by using the up and down arrow (the values range is from 1 to 16).
  • Page 26 Receiver email: for setting the email address where the monitoring message will be sent. Addressee email: for setting the email address from which the monitoring message will be sent (default: 3dg_glex@fracarro.com). Furthermore, by clicking the key “send test email,” you can send a test email to make sure that the email works properly.
  • Page 27 From the green option bar on the top, select “Configuration” “Monitoring” ”Historical” to enter the following window From this window, you can display and search the history of events detected by monitoring. The page reports the event ID, the relevant module, the date, the time, the value, if an alarm was generated or not, and the description of the event.
  • Page 28  ”restart” to start the module again or reset the unit to the factory’s settings. 4.3 REMOTE MANAGEMENT OF THE HEADEND PREAMBLE: to manage the 3DGflex remotely (via Internet), you must know the network structure to which the headend is inserted. Other devices, such as network switches, fi- rewall and server proxy (hardware or software), configurations or addressing regulations and routing tables, might compromise the correct remote management of the installation.
  • Page 29: Firmware Update

    - 2006/95/EC, Low Voltage Directive (LVD) Information given in this manual is prepared carefully, despite Fracarro Radioindustrie S.p.A. reserves the right to modify it without notice and to improve and/or modify the product described in this manual. See the website www.
  • Page 30: Consignes De Sécurité

    1. CONSIGNES DE SÉCURITÉ • Le produit doit être installé par du personnel qualifié, conformément aux lois et réglementations locales en matière de sécurité. Fracarro Radioindustrie est par conséquent déchargée de toute responsabilité civile ou pénale conséquente à des violations des normes juridiques en vigueur en la matière et dérivant de l’usage incorrect du produit de la part de l’installateur, de l’utilisateur ou de tiers.
  • Page 31: Description Du Produit

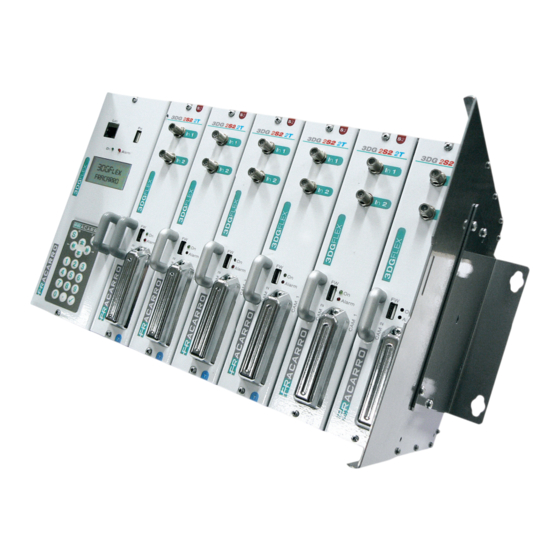
    2. DESCRIPTION DU PRODUIT L'unité centrale 3DGflex est dotée d'un coffret permettant de loger jusqu’à 6 modules différents et une unité de contrôle ayant plusieurs fonctions. L'unité de contrôle présente dans le premier logement permet : • D'alimenter jusqu'à 6 cartes •...
  • Page 32: Unité De Contrôle (Control Unit))

    Il est également possible d'installer l'unité centrale dans des armoires rack de 19'' (Fig.3). Pour les formats des armoires, voir le catalogue Fracarro. Pour faciliter le refroidissement par convection naturelle, insérer l'unité centrale comme dans les figures pour permettre le passage de l'air du bas vers le haut.
  • Page 33: Remplacement/Insertion Des Modules

    1. Insérer les modules dans le rack come décrit dans le paragraphe ci-dessus (3.1) 2. Allumer l’unité centrale en branchant le câble d’alimentation et attendre l’initialisation: le logo Fracarro apparaît sur l’écran (Seulement pour version 3DG-BOX) 3. Seulement pour version 3DG-BOX: accéder au menu en appuyant sur la touche V, taper le code utilisateur (par défaut 1234) et appuyer de nouveau sur la touche V ;...
  • Page 34: Programmation De Base Depuis Le Clavier (Seulement Pour Version 3Dg-Box)

    ATTENTION : dans ce mode, la langue par défaut est l’anglais. Après la réinitialisation par défaut, il peut être nécessaire de reprogrammer les paramètres étant donné que ceux d’usine pourraient ne pas correspondre à ceux désirés. Les deux leds (rouge et verte) de l’unité de contrôle indiquent l’état du module (allumé, en alarme, bloqué, en phase de réinitialisation et en phase de programmation).
  • Page 35 Après 3 saisies erronées Code PIN erroné ENTRER PIN PIN NON VALIDE RESET USINE? Code PIN correct MODULES TROUVE ETAT DE L’APPAR. 1 <Nom de la carte> Menu de la carte 2 <Nom de la carte> Menu de la carte 3 <Nom de la carte>...
  • Page 37 État des cartes : l’état des cartes de l’unité centrale est affiché • V : carte présente fonctionnant correctement • E : carte présente ne fonctionnant pas correctement (erreur sur la carte) • B : carte présente en phase de mise à jour •...
  • Page 38 3. Démarrer le logiciel de navigation internet (logiciels de navigation conseillés : Google Chrome, Mozilla) ; 4. Taper dans la barre des adresses l’adresse IP associée à 3DGflex ; l’ACCUEIL suivant sera affiché. NOTE : pour accéder à l’interface web, il est nécessaire de s’identifier une seule fois en sai- sissant le nom d’utilisateur et le mot de passe par défaut.
  • Page 39 Avant tout, sélectionner la langue pour les menus de l’interface WEB (anglais, italien, français, allemand). L’état général de l’unité centrale 3DGflex est visible dans ce menu. Le premier module toujours présent est l’u- nité de contrôle 3DG-CU, les autres modu- les de la position 1 à...
  • Page 40 Email de l’expéditeur : permet de programmer l’adresse email de laquelle le message de monitorage sera envoyé (par défaut : 3dg_flex@fracarro.com). Il est également possible d’envoyer, en cliquant sur la touche « envoyer email de test », un email de test pour vérifier le fonctionnement de la fonction d’email.
  • Page 41 Depuis la barre des options en haut, en sélectionnant « Configuration »  « Monitorage »  « Historique » la page-écran suivante apparaît : Depuis cette fenêtre, il est possible d’afficher et de rechercher l’historique des événements détectés lors du monitorage. L’ID de l’événement, le module correspondant, la date, l’heure, la valeur, l’alarme éventuelle- ment déclenchée et la description de l’événement sont en effet indiqués.
  • Page 42: Gestion De L'unité Centrale Par Connexion À Distance

    IMPORTANT : pour les aspects liés à la sécurité informatique, toutes les précautions pour l’accès à la programmation à distance de l’unité centrale 3DGflex sont à la charge de l’admi- nistrateur du réseau (ex. accès limité à certains PC de configurations, etc.).
  • Page 43: Mise À Jour Du Micrologiciel

    Les informations indiquées dans ce mode d’emploi ont été renseignées soigneusement ; to- utefois, Fracarro Radioindustrie S.p.A. se réserve le droit d’améliorer et/ou de modifier à tout moment et sans préavis les produits décrits dans ce mode d’emploi. Consulter le site www.
  • Page 44: Sicherheitshinweise

    1. SICHERHEITSHINWEISE • Die Installation des Produkts muss von Fachpersonal in Übereinstimmung mit den Gesetzen und den lokalen Sicherheitsvorschriften vorgenommen werden. Fracarro Radioindustrie Spa ist daher von einer zivil- oder strafrechtlichen Haftung gleich welcher Art entbunden, die sich aus der Verletzung der diesbezüglich gültigen Rechtsnormen oder dem unsachgemäßen Einsatz des Produkts durch den Installateur, den Benutzer...
  • Page 45: Lieferumfang

    2. PRODUKTBESCHREIBUNG Die Kopfstation 3DGFLEX verfügt über ein Gehäuse, mit Steckplätzen für 6 Module unterschiedlichen Typs und einer Control Unit mit verschiedenen Funktionen. Die Control Unit befindet sich im ersten Einschub links und ermöglicht die: • Stromversorgung von maximal 6 Modulen •...
  • Page 46 Öffnen der Tür des Gehäuses gelassen werden. Die Kopfstation kann auch in ein 19 Zoll Rack eingebaut werden (siehe Abb. 3). Nähere Informationen zu den Formaten der Gehäuse können dem Fracarro Katalog entnommen werden. Um eine optimale Kühlung durch natürliche Luftzirkulation zu gewährleisten, muss die Kopfstation wie auf den Abbildungen montiert werden, damit die Luft von unten nach oben strömen kann.
  • Page 47 1. Die Module wie in Abschnitt (3.1) beschrieben in die Kopfstation einsetzen. 2. Die Kopfstation einschalten und dazu das Stromkabel einstecken. Die Initialisierung abwarten: das Fracarro Logo erscheint auf dem Display (nur bei Version 3DG-BOX). 3. Nur bei Version 3DG-BOX das Menü aufrufen und dazu die Taste V drücken. Das Passwort eingeben (Default: 1234) und die Taste V nochmals drücken.
  • Page 48 Als Alternative zu Punkt 3 kann die Programmierung der Module über das Web-Interface mit einem PC durchgeführt werden (siehe Abschnitt 4.3). Bei Bedarf können die Module mit den Werksparametern (Default) rückgestellt werden (siehe Anweisungen der Control Unit). ACHTUNG: Als Werkseinstellung ist englisch als Sprache gesetzt. Nach einem Werks-Reset müssen die Parameter neu programmiert werden, da die Werksparameter eventuell nicht den gewünschten Einstellungen entsprechen.
  • Page 49 falscher PIN 3x falscher PIN PIN eingeben PIN ungültig Werkseinstellungen korrekter PIN Module gefunden Modul Status 1 <Modul Name> Modul Menü 2 <Modul Name> Modul Menü 3 <Modul Name> Modul Menü 4 <Modul Name> Modul Menü 5 <Modul Name> Modul Menü 6 <Modul Name>...
  • Page 50 Netzwerk Zeiteinstellung Datum & Uhrzeit DHCP aktivieren Jahr Monat Stunde Minuten Überwachung Überwachung aktivieren Verlauf Verlauf speichern Verlauf löschen Bericht lesen Test E-Mail senden Test E-Mail senden...
  • Page 51 Modul Status, zeigt den Zustand der Module in der Kopfstation an: • V: Modul vorhanden und funktioniert korrekt • E: Modul vorhanden und funktioniert nicht korrekt • B: vorhandenes Modul wird aktualisiert • - : Modul nicht vorhanden DHCP aktivieren: Damit kann DHCP aktiviert/deaktiviert werden. Diese Funktion weist automatisch die IP Adresse vom Router zu.
  • Page 52 Dazu wie folgt vorgehen: 1. In der Control Unit der Kopfstelle 3DGFLEX die IP Adresse ändern und eine IP Adresse einstellen, die zum gleichen Subnet gehört, das in den Einstellungen der lokalen Netzkarte vom PC eingestellt ist (nur bei Version 3DG-BOX). Beispiel: a.
  • Page 53 Im ersten Bereich "Einstellung Anlage" können folgende Parameter eingestellt werden: • Name der Anlage: Den Namen in das Feld eingeben (3DGFLEX System ist als Default vorgegeben). • Kontrast des LCD-Displays: Den Kontrast mit den Pfeilen erhöhen/verringern (Skala von 1 bis 16).
  • Page 54 Überwachung gesendet werden sollen. Absender E-Mail: Damit kann die E-Mail Adresse eingestellt werden, von der die Nachrichten der Überwachung gesendet werden (default: 3dg_flex@fracarro.com). Durch Anklicken der Schaltfläche „Test-Mail senden“ wird eine Test-Mail gesendet um so die die Funktion des E-Mail Versandes zu prüfen.
  • Page 55 In der grünen Menüleiste am oberen Rand Konfiguration > Überwachung > Verlauf auswählen, um die Seite Verlauf aufzurufen: Auf dieser Seite kann der Verlauf der Ereignisse, die bei der Überwachung ermittelt wurden, angezeigt und gesucht werden. Folgende Daten werden angezeigt: ID des Ereignisses, das entsprechende Modul, das Datum, die Uhrzeit, der Wert, ob Alarm ausgelöst oder nicht, und die Beschreibung des Ereignisses.
  • Page 56 3. Nach erfolgter Anmeldung (Eingabe von Benutzername und Passwort) die Kontrollen oder die ggf. erforderliche Neuprogrammierung durchführen. WICHTIGER HINWEIS: Was die Sicherheit der Netzwerke betrifft, so gehen alle Sicherheitsmaßnahmen für den Zugriff auf die remote Programmierung der Kopfstation 3DGFLEX zu Lasten des Netzadministrators (z.B. Zugangsbeschränkung auf einige Zugangs-PC‘s usw.).
  • Page 57: Aktualisierung Der Firmware

    47 – 862MHz Einfügedämpfung 2.5dB 6. KONFORMITÄT Fracarro Radioindustrie SpA erklärt hiermit, dass das Produkt mit den folgenden harmonisierten Normen konform ist: EN 50083-2, EN 60065 und dass es damit den wesentlichen Anforderungen der nachfolgenden Richtlinien entspricht (einschließlich aller anwendbaren Änderungen): - 2004/108/EG, Richtlinie zur elektromagnetischen Verträglichkeit (EMV),...
  • Page 60 Garantito da/ Guaranteed by/ Garanti par/ Garantizado por/ Garantido por/ Garantiert durch/ Zajamčena od/ Garantirano od/ Garantovano od/ Gwarantowane przez / Εγγυημένο από/ Гарантировано Fracarro Radioindustrie S.p.A., Via Cazzaro n. 3, 31033 Castelfranco Veneto (Tv) – Italy supportotecnico@fracarro.com Fracarro Radioindustrie S.p.A.

Table des Matières