Table des Matières
Publicité
Les langues disponibles
Les langues disponibles
Liens rapides
Publicité
Chapitres
Table des Matières

Manuels Connexes pour Next Systems CTR50

Sommaire des Matières pour Next Systems CTR50
- Page 1 MANUALE D’ISTRUZIONI INSTRUCTIONS MANUAL MANUEL D’EMPLOI...
- Page 2 ITALIANO ENGLISH FRANCAIS La casa costruttrice si riserva il diritto di apportare modifiche o miglioramenti al prodotto senza preavviso. Eventuali errori riscontrati nella presente edizione saranno corretti nella prossima. The manufacturer reserves the right to modify or improve the product without prior notice. Any inaccuracies or errors found in this manual will be corrected in the next edition.
-
Page 3: Table Des Matières
ITALIANO INDICE GENERALE Manutenzione………………………………… Destinazione dell’apparecchiatura……….. Limitazioni d’uso…………………………….. Dichiarazione di conformità……………….. Installazione…………………………………... Programmazione scheda…………………... Funzionamento………………………………. Schema generale…………………………….. Comandi…………………………………………………….. Dispositivi di sicurezza…………………………………….. Uscite………………………………………………………... Alimentazioni………………………………………………... Ingressi / uscite accessorie……………………………….. Segnalazioni ottiche………………………………………... Trimmer……………………………………………………… Selezione programmi………………………………………. Tasti programmazione..……………………………………. D.10 Fusibili di protezione……………………………………….. D.11 Caratteristiche tecniche……………………………………. D.12 Logica di funzionamento…………………………………... -
Page 4: Destinazione Dell'apparecchiatura
ITALIANO A) Destinazione dell’apparecchiatura Quadro elettronico universale adibito al comando di 1 o 2 motori alimentati con tensione 12Vcc o 24Vcc destinato all’automazione di un cancello elettrico. B) - Limitazioni d’uso Attenzione : Prima di mettere in servizio l’apparato elettronico assicurarsi che siano state rispettate le note di seguito riportate. Nota 1 - Leggere attentamente e per intero la documentazione tecnica di costruzione. -
Page 5: C Installazione
ITALIANO C) – Installazione 1) Dopo aver tolto il coperchio svitando le apposite viti assicurarsi dell’ integrità dell’apparato elettronico. In caso di dubbio non mettere in servizio l’apparecchiatura e rivolgersi a personale professionalmente qualificato. Gli elementi accessori del contenitore (viti, passacavi) non devono essere lasciati alla portata dei bambini in quanto potenziali fonti di pericolo. - Page 6 ITALIANO Fotostop Ingresso che fa capo ad una barriera ottica avente lo scopo di intercettare e segnalare il passaggio di persone o autovetture lungo il percorso che attraversa il cancello o nella zona che sta in prossimità del medesimo. Finecorsa apertura Ingresso che fa capo ad uno switch esterno all’apparato che viene azionato quando l’anta ha completato la corsa in apertura.
- Page 7 ITALIANO DL2 - Led rete (verde) Si accende in presenza della tensione 12Vac o 20Vac sull’ingresso AC IN. DL3 - Led start pedonale (verde) Si accende al comando di start pedonale. DL4 - Led start (verde) Si accende al comando di start . DL5 - Led stop (rosso) Segnala lo stato di blocco del cancello.
- Page 8 ITALIANO Dip switch 5 (Attenzione: impostando il Dip switch 5 in ON, il Dip switch 3 deve tassativamente essere posizionato in OFF) Azzera o meno il ritardo tra la partenza di un’anta rispetto all’altra. ON=Sfasamento 0 sec OFF=Sfasamento abilitato Dip switch 6 Determina il funzionamento dell’uscita 9-10 sul connettore J1.
-
Page 9: D.11 Caratteristiche Tecniche
ITALIANO 9) Definizione tasti programmazione P1 - Tasto per l’inserimento o la cancellazione dei codici radiocomando in memoria P2 - Tasto per l’impostazione del tempo di lavoro dei motori e sfasamento in chiusura P3 - Tasto per l’impostazione del tempo di pausa 10) Definizione fusibili di protezione F2 - Fusibile Batteria (10A - Rapido) Sconnette la Batteria tampone dalla scheda elettronica in caso di cortocircuito o di anomalia nei consumi di corrente. -
Page 10: D.12 Logica Di Funzionamento
ITALIANO Lampeggiatore La scheda elettronica fornisce un comando on / off (intermittenza) alla lampada con una logica che permette di visualizzare lo stato di funzionamento del cancello. Lampeggio veloce : segnala la fase di apertura Lampeggio lento : segnala la fase di chiusura Luce fissa : segnala che il cancello è... - Page 11 ITALIANO Importante : Il primo comando di Start fornito dopo aver alimentato la scheda elettronica determina sempre l’avvio di un ciclo di apertura qualunque sia la logica selezionata. Logica “ passo - passo “ Dopo aver fornito la tensione di alimentazione alla scheda elettronica il primo comando di start avvia un ciclo di apertura. Durante la fase di rallentamento, la fine del tempo di lavoro o l’intervento dei Finecorsa per entrambi i motori, determina l’arresto del cancello.
-
Page 12: D.13 Caratteristiche Elettriche E Meccaniche
ITALIANO Fotocellula.: È influente solamente durante la fase di chiusura o nel periodo di pausa. Se un ostacolo oscura la fotocellula durante la chiusura provoca l’arresto e l’inversione di marcia dopo circa 1,5 secondi. L’intervento della fotocellula durante il tempo di pausa ricarica il medesimo allungando il periodo che precede la chiusura automatica. -
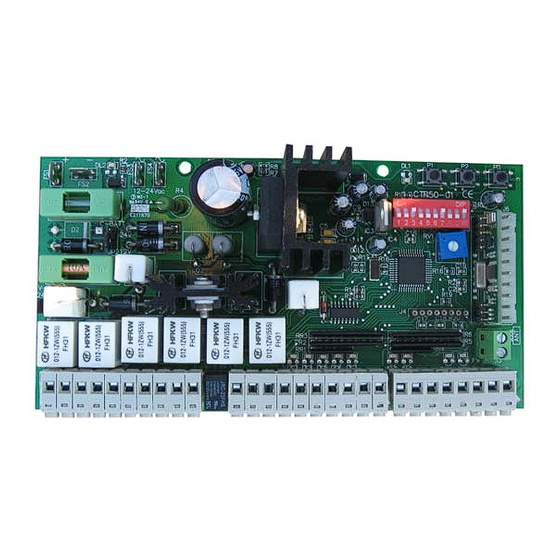
Page 13: D.14 Collegamenti Elettrici
ITALIANO 14) Collegamenti elettrici Sulla scheda si distinguono 7 connettori elettrici : 1) J2 morsettiera estraibile a 10 poli per il collegamento dei comandi e dispositivi di sicurezza 2) J6 connettore a 10 poli per il collegamento di scheda radioricevitore accessoria 3) J5 morsettiera a 2 poli per il collegamento cavo dell’antenna 4) J1 morsettiera estraibile a 10 poli per il collegamento dei dispositivi di potenza 5) J3 morsettiera estraibile a 8 poli per il collegamento dei Finecorsa e/o Encoder... - Page 14 ITALIANO Morsettiera J1 Morsetto 1 - Positivo alimentazione fotocellule o altri dispositivi Morsetto 2 - Negativo alimentazione fotocellule o altri dispositivi (comune) Attenzione : Le polarità della tensione di alimentazione devono essere rigorosamente rispettate. Morsetto 3 - Positivo alimentazione lampeggiatore Morsetto 4 - Negativo alimentazione lampeggiatore (comune) Morsetto 5 - Alimentazione motore M1 Morsetto 6 - Alimentazione motore M1...
- Page 15 ITALIANO CTR50 - Connessione dispositivi Motore 1 – Morsetti 5 e 6 di J1 Motore 2 – Morsetti 7 e 8 di J1 Lampeggiatore – Morsetti 3 e 4 di J1 Serratura elettrica – Morsetti 9 e 10 di J1 Alimentazione fotocellule –...
-
Page 16: Manutenzione
Descrizione dell’apparecchiatura: Quadro elettronico adibito al comando di 1 o 2 motori in bassa tensione destinati all’automazione di un cancello. Modello: CTR50 Norme di riferimento applicate : EN 50081-1, EN 50082-1, EN 55014 Norme di base applicate : EN 61000-6-3 + A11 (2004), EN 61000-6-1, EN 301 489-1, EN 301 489-3, EN 300 220-2, EN 300 220-1... -
Page 17: Programmazione Scheda
ITALIANO G) Programmazione scheda 1 2 3 4 5 6 7 8 9 10 Logica Passo-Passo 1 2 3 4 5 6 7 8 9 10 Azzeramento ritardo II anta (sfasamento nullo) Posizionare il dip switch 1 e 2 in OFF. Posizionare il dip switch 5 in ON. - Page 18 ITALIANO Impostazione automatica dei tempi di lavoro: Assicurarsi che il cancello sia completamente aperto, in caso contrario posizionarlo manualmente. Posizionare il trimmer RV1 a metà corsa e successivamente premere il tasto P2 una volta. Dopo alcuni secondi il cancello eseguirà una serie di operazioni le quali consentiranno all’apparecchiatura di apprendere automaticamente i tempi di lavoro.
- Page 19 ITALIANO Collegamento ANTENNA Radioricevitore ENCODER M2 1 2 3 4 5 6 7 8 9 10 FINECORSA CHIUSURA M2 FINECORSA APERTURA M2 ENCODER M1 FC CHIUSURA M2 FINECORSA CHIUSURA M1 FC APERTURA M2 FINECORSA APERTURA M1 FC CHIUSURA M1 FC APERTURA M1 USCITA II°...
- Page 20 ENGLISH TABLE OF CONTENTS Scope of the device Maintenance ……………………………. ……………………………………….. Limits to use ………………………………………. Conformity declaration ……………………….. Installation ………………………………………….. Board programming …………………………… Operation ……………………………………………. General diagram …………………………………. Controls…………………………………………………. Safety devices………………………………………….. Outputs………………………………………………….. Power supply…………………………………………… Accessory inputs/outputs……………………………… Optical signals………………………………………….. Trimmers………………………………………………... Dip switches…………………………………………….. Programming keys……………………………………...
-
Page 21: Scope Of The Device
ENGLISH A) – Scope of the device The electronic board controls one or two low voltage motors that operate at 12Vdc or 24Vdc for the electric gate automation. B) – Limits to use Caution : Before operating the electronic unit make sure the following operations have been carried out. Note 1 –... -
Page 22: C Installation
ENGLISH C) – Installation Unscrew the screws of the cover and lift the cover. Check that the electronic unit is in good order. In case of doubt do not install the unit and ask for the intervention of qualified personnel. The container’s accessories (screws, round seal, cable glands) must not be left within the reach of children since they are a potential danger. -
Page 23: Electric Lock
ENGLISH 3) Definitions of Outputs Blinker Lamp’s on/off control. The lamp functions as a warning and optical signaller of potential danger for the gate’s motion. Motor 1 Outputs for the opening/closure control of the motor which drives the first gate wing during the closing phase. Motor 2 Outputs for the opening/closure control of the motor which drives the gate wing delayed during the closing phase. - Page 24 ENGLISH DL6 – Photo-cell led (yellow) It signals the optical barrier’s state. The led goes off when the photo-cell is covered by persons or vehicles DL7 – Photostop led (yellow) It signals the optical barrier’s state. The led goes off when the photo-cell is covered by persons or vehicles. DL8 - Opening limit switch led (yellow) It signals the opening limit switch state for Motor 1.
- Page 25 ENGLISH Dip switch 7 (Attention: Dip switch must be positioned obligatorily in ON if the photocells are not used) It excludes the photocells operation test before the gate departure. ON= Test OFF OFF= Test ON Dip switch 8 It chooses the sensibility of the Motor 1 Amperometric stop. ON= Low OFF= High Dip switch 9...
-
Page 26: Technical Features
ENGLISH F1 – Services fuse (1A - Slow) It protects the electronic unit in case of short circuits or overcurrents on photo-cells or any other accessory devices connected to the card. 11) Technical features Power supply The electric power is supplied to the electronic card and the motors by means of an electric transformer fitted with a protection fuse. The appliance may be connected to an optional backup battery (12Vdc or 24Vdc / 7 Ah) for the automation system to work in case of absence of Mains power supply. -
Page 27: Operation Modes
ENGLISH Blinker The electronic card supplies an on/off control (flashing light) to the lamp. The logic of the blinking allows displaying the gate’s operating. Quick flashing light : it signals the opening phase Slow flashing light : it signals the closing phase Fixed light : it signals that the gate is blocked in wait that the obstacle that covers the photocell or photostop to be removed. - Page 28 ENGLISH “Automatic” mode After the power is supplied to the electronic card the first start command determines an opening cycle. During the slow-down phase, at the end of the two work times or after the Limit switches have operated for both motors, the gate stops. The pause period starts (blinker off). At the end of the pause period the gate closes automatically.
-
Page 29: Electrical And Mechanical Specifications
ENGLISH Pedestrian start: The pedestrian start command operates in the same way as the other start command, but in this case only the (M2) wing fitted with the electric lock will be opened or closed. The pedestrian start command has no effect during a start cycle and up to the end of the closing phase (closed gate). - Page 30 ENGLISH Terminal board J2 Terminal1 - Common terminal for all electric contacts of commands Terminal2 - Pedestrian start push-button’s normally open electric contact Terminal3 - Start push-button’s normally open electric contact Terminal4 - Common terminal for all electric contacts of stop push-button and photo-cell Terminal5 - Emergency push-button’s normally closed electric contact (stop) Terminal6 - Photo-cell’s normally closed electric contact Terminal7 - Common terminal for the electric contact of photostop...
- Page 31 ENGLISH Terminal board J3 Terminal1 - Motor 1 opening Limit switch normally closed electric contact Terminal2 - Motor 1 closing Limit switch normally closed electric contact Terminal3 - Motor 1 Encoder signal input Terminal4 - Common terminal for Motor 1 Limit switches and Encoder Terminal5 - Motor 2 opening Limit switch normally closed electric contact Terminal6 - Motor 2 closing Limit switch normally closed electric contact Terminal7 - Motor 2 Encoder signal input...
- Page 32 ENGLISH CTR50 - Connection of the devices Motor 1 – Terminals 5 and 6 on J1 Motor 2 – Terminals 7 and 8 on J1 Blinker – Terminals 3 and 4 on J1 Electric lock – Terminals 9 e 10 on J1 Photo-cells power supply –...
-
Page 33: Maintenance
Company name and registered office : Description of the appliance : Electronic board for the control of 1 or 2 low voltage motors for gate automation. Model : CTR50 Reference rules applied : EN 50081-1, EN 50082-1, EN 55014 Basic rules applied :... - Page 34 ENGLISH G) Programming the board 1 2 3 4 5 6 7 8 9 10 Step-by-step logic 1 2 3 4 5 6 7 8 9 10 2nd wing delay reset (zero delay) Set the dip switches 1 and 2 to OFF Set the dip switch 5 to ON The state of the other dip switches has no effect The dip switch 3 must be positioned in OFF...
- Page 35 ENGLISH Automatic Setting of the work times Make sure the gate is completely opened. If not, position it manually. Position the trimmer RV1 to half race and then press once the key P2. After a few seconds the gate will perform a series of operations which will allow the equipment to automatically learn the work times. Attention : during the operations of the work times auto-learning all the safety devices are ignored.
- Page 36 ENGLISH AERIAL CABLE Radio-Receiver M2 ENCODER SIGNAL 1 2 3 4 5 6 7 8 9 10 M2 CLOSING LIMIT SWITCH M2 OPENING LIMIT SWITCH M1 ENCODER SIGNAL M2 CLOSING L.S. M1 CLOSING LIMIT SWITCH M2 OPENING L.S. M1 OPENING LIMIT SWITCH M1 CLOSING L.S.
- Page 37 FRANCAIS TABLE GENERALE Emploi de le tableau électronique Entretien ………. ………………………………………………. Les limitations d’emploi ……………………... Déclaration de conformité ……………………. Installation ………………………………………….. Programmation de la carte électronique Fonctionnement …………………………………. Schéma général …………………………………… Commandes……………………………………………. Dispositifs de sécurité…………………………………. Sorties…………………………………………………... Alimentations…………………………………………… Entrées/sorties accessoires…………………………… Signaux optiques………………………………………. Trimmer………………………………………………….
-
Page 38: Les Diverses Plages D'application De Le Tableau Électronique
FRANCAIS A) – Les diverses plages d’application de le tableau électronique Un tableau électronique pour commander 1 ou 2 moteurs alimentés à 12Vdc ou 24Vdc tout à fait indiqué pour l’automation d’un portail électrique. B) – Les limitations d’emploi Attention : Avant de mettre en service le tableau électronique il faut s’assurer que les notes ci-dessous reportées aient bien été respectées. Note 1 - Lire attentivement et entièrement la documentation technique relative à... -
Page 39: L'installation
FRANCAIS C) – L’installation Après avoir enlevé le couvercle en dévissant les vis spéciale à cet effet, s’assurer si tout l’équipement électronique est bien intact. En cas de doute ne pas mettre en marche le tableau électronique et s’adresser à des personnes professionnellement qualifiées en la matière. Les éléments accessoires de la boîte ( les vis, les chaumards) ne doivent pas être laissés à... -
Page 40: La Définition Des Sorties Le Clignotant
FRANCAIS La photostop Il s’agit d’une entrée qui est reliée à une barrière optique ayant pour objectif celui d’intercepter et de signaler le passage des personnes ou bien des voitures le long du parcours qui traverse le portail ou bien dans la zone qui se trouve près de ce dernier. Le Fin de course pour l’ouverture Il s’agit d’une entrée qui est reliée à... - Page 41 FRANCAIS 6) La définition des signaux optiques DL1 - Led de programmation (rouge) Il s’allume (en même temps que le clignotant) en phase de programmation et pendant le mouvement du portail. DL2 - Led alimentation du réseau (vert) Il s’allume en présence de la tension 12Vac ou 20Vac sur l’entrée AC IN. DL3 - Led start de piéton (vert) Il s’allume dès la réception de la commande de Start de piéton.
- Page 42 FRANCAIS Le dip switch 4 Il autorise ou n’autorise pas à effectuer la procédure du coup de bélier (pendant la phase d’ouverture quand le portail est fermé), ainsi que de l’extracoup de fermeture. ON= L’autorisation du coup de bélier OFF= sans aucune incidence Le dip switch 5 (Important: si vous placez le Dip-switch 5 sur ON, le Dip-switch 3 doit être placé...
-
Page 43: La Définition Des Boutons De Programmation
FRANCAIS 9) La définition des boutons de programmation P1 - Il s’agit du bouton qui sert à introduire ou à effacer les codes de radiocommande dans la mémoire. P2 - Il s’agit du bouton qui sert à afficher le temps de travail des moteurs ainsi que le déphasage en fermeture. P3 - Il s’agit du bouton qui sert à... -
Page 44: La Logique De Fonctionnement Introduction
FRANCAIS Le temps de travail Le temps de fonctionnement des moteurs est contrôlé par deux Timers digitaux indépendants. Si une quelconque commande interrompt la course du battant avant la fin, le Timer s’arrête et le temps qui s’est écoulé est mémorisé. Le tableau électronique est donc en mesure d’établir, avec une certaine approximation, le temps de travail partiel nécessaire pour faire terminer la course du battant. -
Page 45: La Logique Automatique
FRANCAIS Très important : La première commande de Start fournie après avoir alimenté la carte électronique détermine toujours le démarrage d’un cycle d’ouverture quelque soit la logique sélectionnée. La logique du pas-à-pas Après avoir fourni la tension d’alimentation à la carte électronique, la première commande de Start fait commencer un cycle d’ouverture. Pendant la phase de ralentissement, la fin du temps de travail ou l’intervention des Fin de course par les deux moteurs provoque l’arrêt du portail. -
Page 46: Les Caractéristiques Électriques Et Mécaniques
FRANCAIS Quelque soit la logique de fonctionnement utilisée, l’intervention des dispositifs de sécurité produit les effets décrits ci-dessous: Stop : Si la commande Stop est mise en service, elle empêche le démarrage de n’importe quel cycle et rend la commande Start sans incidence. Une commande Stop fournie pendant le mouvement provoque l’arrêt immédiat du portail en interrompant le cycle de travail. -
Page 47: Les Branchements Électriques
FRANCAIS ne rentrent pas dans les valeurs limites ci-dessus indiquées. Le non respect peut causer des dommages aux personnes, aux animaux et aux choses, vis à vis desquels le constructeur ne peut pas être considéré responsable. 14) Les branchements électriques Sur la carte on distingue 7 connecteurs électriques : 1) J2 Une boîte à... - Page 48 FRANCAIS Boîte à bornes J1 Borne 1 – Alimentation positif pour la photocellule ou d’autres dispositifs Borne 2 – Alimentation négatif pour la photocellule ou d’autres dispositifs (commun) Attention : Les polarités de la tension d’alimentation doivent être rigoureusement respectées. Borne 3 –...
-
Page 49: Ctr50 - La Connexion Des Dispositifs
FRANCAIS CTR50 - La connexion des dispositifs Moteur 1 – Bornes 5 et 6 de J1 Moteur 2 – Bornes 7 et 8 de J1 Clignotant - Bornes 3 et 4 de J1 Serrure électrique - Bornes 9 et 10 de J1... -
Page 50: Entretien
Modèle : CTR50 Normes de référence appliquées : EN 50081-1, EN 50082-1, EN 55014 Normes de base appliquées : EN 61000-6-3 + A11 (2004), EN 61000-6-1, EN 301 489-1, EN 301 489-3, EN 300 220-2, EN 300 220-1 Laboratoire pour l’essai : NEMKO SPA... -
Page 51: Programmation De La Carte Électronique
FRANCAIS G) Programmation de la carte électronique 1 2 3 4 5 6 7 8 9 10 Logique Pas-à-Pas 1 2 3 4 5 6 7 8 9 10 Zérotage retard du II° battant (déphasage nul) Positionner les dip switch 1 et 2 sur OFF Positionner le dip switch 5 sur ON Le dip switch 3 doit être placé... - Page 52 FRANCAIS La programmation automatique des temps de travail S’assurer que le portail soit complètement ouvert, dans le cas contraire le positionner manuellement. Positionner le trimmer RV1 à la moitié corse et successivement presser le bouton P2 une fois. Après quelques secondes le portail exécutera une série d'opérations qui consentiront à l’équipement électronique d'apprendre les temps de travail automatiquement.
- Page 53 FRANCAIS ANTENNE Recepteur Radio SIGNAL ENCODER M2 1 2 3 4 5 6 7 8 9 10 FIN DE COURSE FERMETURE M2 FIN DE COURSE OUVERTURE M2 SIGNAL ENCODER M1 M2 FERMETURE F.C. FIN DE COURSE FERMETURE M1 M2 OUVERTURE F.C. FIN DE COURSE OUVERTURE M1 M1 FERMETURE F.C.