Masquer les pouces Voir aussi pour Expand-It RYSNW00:

Publicité

Les langues disponibles

Les langues disponibles

Liens rapides

OPERATOR'S MANUAL
MANUEL D'UTILISATION
MANUAL DEL OPERADOR
SNOW THROWER ATTACHMENT
ACCESSOIRE DES SOUFFLEUSE À NEIGE
ACCESORIO DE EQUIPO QUITANIEVE
RYSNW00
Your snow thrower attachment has been engineered and manufactured to our high standard for dependability, ease of
operation, and operator safety. When properly cared for, it will give you years of rugged, trouble-free performance.
WARNING:
To reduce the risk of injury, the user must read and understand the operator's manual before using
this product.
Thank you for your purchase.
SAVE THIS MANUAL FOR FUTURE REFERENCE
L'accessoire des souffleuse à neigea été conçue et fabriquée
conformément à nos strictes normes de fiabilité, simplicité
d'emploi et sécurité d'utilisation. Correctement entretenue, elle
vous donnera des années de fonctionnement robuste et sans
problème.
AVERTISSEMENT :
blessures, l'utilisateur doit lire et veiller à bien comprendre le
manuel d'utilisation avant d'employer ce produit.
Merci de votre achat.
CONSERVER CE MANUEL POUR
FUTURE RÉFÉRENCE
Pour réduire les risques de
Su accesorio de equipo quitanieve ha sido diseñada y fabricada
de conformidad con las estrictas normas para brindar fiabilidad,
facilidad de uso y seguridad para el operador. Con el debido cuidado,
le brindará muchos años de sólido y eficiente funcionamiento.
ADVERTENCIA:
el usuario debe leer y comprender el manual del operador antes
de usar este producto.
Le agradecemos su compra.
GUARDE ESTE MANUAL PARA
FUTURAS CONSULTAS
Para reducir el riesgo de lesiones,

Publicité

Table des Matières
loading

Sommaire des Matières pour Ryobi Expand-It RYSNW00

  • Page 1 OPERATOR’S MANUAL MANUEL D’UTILISATION MANUAL DEL OPERADOR SNOW THROWER ATTACHMENT ACCESSOIRE DES SOUFFLEUSE À NEIGE ACCESORIO DE EQUIPO QUITANIEVE RYSNW00 Your snow thrower attachment has been engineered and manufactured to our high standard for dependability, ease of operation, and operator safety. When properly cared for, it will give you years of rugged, trouble-free performance. WARNING: To reduce the risk of injury, the user must read and understand the operator’s manual before using this product.
  • Page 2 See this fold-out section for all of the figures referenced in the operator’s manual. Consulter l’encart à volets afin d’examiner toutes les figures mentionnées dans le manuel d’utilisation. Consulte esta sección desplegable para ver todas las figuras a las que se hace referencia en el manual del operador.
  • Page 3 Fig. 1 Fig.3 PROPER OPERATING POSITION / BONNE POSITION DE TRAVAIL / POSICIÓN CORRECTA PARA EL MANEJO DE LA HERRAMIENTA Fig. 4 A - Hole (trou, orificio) A - Hanger cap (capuchon de suspension, tapa B - Snow thrower shaft (arbre du souffleuse à B - Secondary hole (trou secondaire, orificio de suspensión) neige, eje de equipo quitanieve)
  • Page 4: Table Des Matières

    TABLE OF CONTENTS TABLE DES MATIÈRES / ÍNDICE DE CONTENIDO  Introduction ..................................2 Introduction / Introducción  General Safety Rules ................................ 3 Règles de sécurité générales / Reglas de seguridad generales  Specific Safety Rules ................................ 4 Règles de sécurité particulières / Reglas de seguridad específicas  Symbols ....................................
  • Page 5: General Safety Rules

    GENERAL SAFETY RULES  Avoid dangerous environments. Do not use the attach- WARNING: ment in damp or wet locations. Do not use in rain.  Use the right attachment. Do not use attachment for any Read and understand all instructions. Failure to follow job except that for which it is intended.
  • Page 6: Specific Safety Rules

    SPECIFIC SAFETY RULES  The snow thrower is designed to move loose or powdery  Wear rubber boots when operating the snow thrower. Protective footwear will protect your feet and improve snow that has not been compacted. Attempting to remove your footing on slippery surfaces.
  • Page 7: Symbols

    SYMBOLS The following signal words and meanings are intended to explain the levels of risk associated with this product. SYMBOL SIGNAL MEANING Indicates a hazardous situation, which, if not avoided, will result in death or DANGER: serious injury. Indicates a hazardous situation, which, if not avoided, could result in death or WARNING: serious injury.
  • Page 8: Features

    FEATURES KNOW YOUR SNOW THROWER PRODUCT SPECIFICATIONS ATTACHMENT Clearing Width ............12 in. See Figure 1. Clearing Depth ............. 4 in. The safe use of this product requires an understanding of Impeller Diameter ............6 in. the information on the product and in this operator’s manual as well as a knowledge of the project you are attempting.
  • Page 9: Operation

    ASSEMBLY REMOVING THE ATTACHMENT FROM THE  Push in the button located on the snow thrower attachment. Align the button with the guide recess on the POWER HEAD power head coupler and slide the two shafts together.  Stop the engine or motor and remove the spark plug wire, Rotate attachment shaft until button locks into the posi- disconnect from the power supply, or remove the battery tioning hole.
  • Page 10 OPERATION When using the snow thrower attachment, hold the unit with WARNING: your right hand on the rear handle and your left hand on the front handle. Keep a firm grip with both hands while in Never use snow thrower on frozen lakes, rivers, or similar operation.
  • Page 11: Maintenance

    CALL US FIRST For any questions about operating or maintaining your product, call the Ryobi Help Line! Your product has been fully tested prior to shipment to ensure your complete satisfaction.
  • Page 12: Warranty

    Straps, Guide Bars, Saw Chains purchase. Techtronic Industries North America, Inc., reserves the right  Three years if the product is used for personal, family to change or improve the design of any RYOBI brand ™ or household use;...
  • Page 13: Règles De Sécurité Générales

    RÈGLES DE SÉCURITÉ GÉNÉRALES  Éviter les environnements dangereux. Ne pas utiliser AVERTISSEMENT : l’accessoire dans des endroits humides ou mouillés. Ne pas utiliser sous la pluie. Lire et veiller à bien comprendre toutes les  Utiliser l’accessoire approprié. Ne pas utiliser l’accessoire instructions.
  • Page 14: Règles De Sécurité Particulières

    RÈGLES DE SÉCURITÉ PARTICULIÈRES  Ne jamais utiliser la souffleuse à neige sur un toit ou  Porter des bottes de caoutchouc lors de l’utilisation de la d’autres surfaces instables pour éviter les blessures souffleuse à neige. Chaussures de protection aura pour graves ou mortelles.
  • Page 15 SYMBOLES Les termes de mise en garde suivants et leur signification ont pour but d’expliquer le degré de risques associé à l’utilisation de ce produit. SYMBOLE SIGNAL SIGNIFICATION Indique une situation dangereuse qui, si elle n’est pas évitée, aura pour DANGER : conséquences des blessures graves ou mortelles.
  • Page 16: Caractéristiques

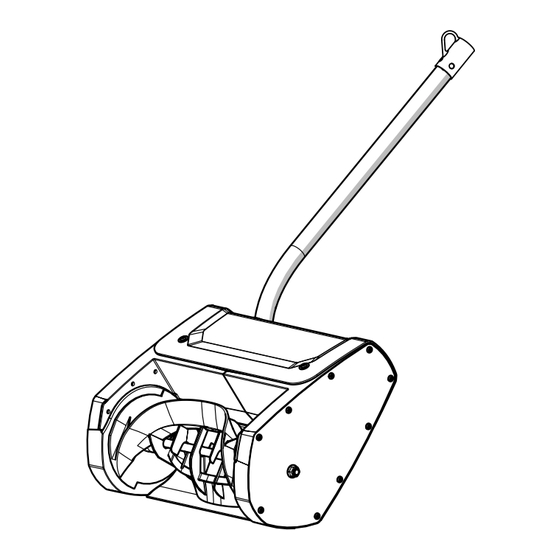
    CARACTÉRISTIQUES FICHE TECHNIQUE APPRENDRE À CONNAÎTRE L’ACCESSOIRE DES SOUFFLEUSE À NEIGE Largeur de déblaiement ......304,8 mm (12 po) Voir la figure 1. Profondeur de dégagement ...... 101,6 mm (4 po) La sécurité d’utilisation de ce produit exige la compréhension Diamètre de la tarière ........
  • Page 17: Utilisation

    ASSEMBLAGE  Appuyer sur le bouton se trouvant sur l’accessoire des AVERTISSEMENT : souffleuse à neige. Aligner le bouton sur la rainure guide du bloc moteur et emboîter les deux arbres. Tourner S’assurer que le bouton est bien serré avant d’utiliser l’arbre de l’accessoire jusqu’à...
  • Page 18 UTILISATION NOTE : Lorsqu’il est utilisé avec un ensemble moteur à AVERTISSEMENT : essence, toujours faire fonctionner l’outil à pleine puissance. Une opération de coupe prolongée à une puissance Ne jamais utiliser la souffleuse à neige sur les lacs et les partielle peut entraîner une fuite d’huile du silencieux.
  • Page 19: Entretien Général

    NOUS APPELER D’ABORD Pour toute question concernant l’utilisation ou l’entretien utiliser ce produit , appeler le service d’assistance téléphonique Ryobi ! Le taille-bordures à été entièrement testé avant expédition pour assurer la complète satisfaction de l’utilisateur.
  • Page 20: Énoncé De La Garantie Limitée

    Le produit, y compris toutes les pièces défectueuses devront DIX JOURS. LES OBLIGATIONS DE TECHTRONIC être retournés à un centre de réparations Ryobi agréé, avant INDUSTRIES NORTH AMERICA, INC., DANS LE CADRE expiration de la période de garantie. Les frais d’expédition DE CETTE GARANTIE SE LIMITENT EXCLUSIVEMENT À...
  • Page 21: Reglas De Seguridad Generales

    REGLAS DE SEGURIDAD GENERALES  En ninguna circunstancia, use accesorio o accesorio ADVERTENCIA: alguno en este producto, que no se haya suministrado con el producto mismo, o que no esté identificado como Lea y comprenda todas las instrucciones. El apropiado para el uso con este producto en el manual incumplimiento de las instrucciones señaladas abajo del operador.
  • Page 22: Reglas De Seguridad Específicas

    REGLAS DE SEGURIDAD ESPECÍFICAS  El equipo quitanieve está diseñado para mover nieve  Utilice botas de goma cuando haga funcionar el equipo quitanieve. Calzado de seguridad protegerá sus pies y suelta o no compactada. Si intenta mover cargas pesadas mejore su postura en superficies resbaladizas.
  • Page 23 SÍMBOLOS Las siguientes palabras de señalización y sus significados tienen el objeto de explicar los niveles de riesgo relacionados con este producto. SÍMBOLO SEÑAL SIGNIFICADO Indica una situación peligrosa, la cual, si no se evita, causará la muerte PELIGRO: o lesiones serias. Indica una situación peligrosa, la cual, si no se evita, podría causar la ADVERTENCIA: muerte o lesiones serias.
  • Page 24: Características

    CARACTERÍSTICAS FAMILIARÍCESE CON EL ACCESORIO DE ESPECIFICACIONES DEL PRODUCTO EQUIPO QUITANIEVE Ancho de limpieza ....... 304,8 mm (12 pulg.) Vea la figura 1. Profundidad de limpieza ......101,6 mm (4 pulg.) Para usar este producto con la debida seguridad se debe Diámetro del impulsor ......
  • Page 25 ARMADO  Oprima el botón situado en el accesorio de equipo ADVERTENCIA: quitanieve. Alinee el botón con el hueco guía situado en el acoplador del eje del cabezal motor y con un movimiento Asegúrese de que esté bien apretada la perilla antes de de deslizamiento una los dos ejes.
  • Page 26 FUNCIONAMIENTO NOTA: Cuando se utiliza con un cabezal motor a gas, haga trabajar la unidad siempre a la máxima aceleración. Si ADVERTENCIA: realiza cortes a una aceleración parcial durante un tiempo Nunca utilice de equipo de nieve en lagos, ríos o prolongado, goteará...
  • Page 27 LLÁMENOS PRIMERO Si tiene preguntas sobre el funcionamiento o el mantenimiento este producto, llame al teléfono de atención al consumidor de Ryobi! La recortadora ha sido probada enteramente antes de embarcarse para asegurar la satisfacción del consumidor.
  • Page 28 EN PARTICULAR, O DE CUALQUIER TIPO, PIERDEN reparado o reemplazado por un centro de servicio autorizado TOTALMENTE SU VALIDEZ DESPUÉS DEL VENCIMIENTO de herramientas para uso en el exterior de la marca RYOBI ™ DEL PERÍODO DE GARANTÍA CORRESPONDIENTE DE sin cargo alguno al comprador por concepto de piezas y mano TRES AÑOS O NOVENTA DÍAS.
  • Page 29 NOTES / NOTAS...
  • Page 30: Accessoire Des Souffleuse À Neige Accesorio De Equipo Quitanieve

    CÓMO LOCALIZAR UN CENTRO DE SERVICIO: Puede encontrar los par Ryobi Limited. centros de servicio visitando nuestro sitio en la red mundial, en la dirección RYOBI es una marca de Ryobi Limited y se www.ryobitools.com or by calling 1-800-860-4050. utiliza conforme a una licencia otorgada por CÓMO OBTENER SERVICIO O ASISTENCIA TÉCNICA AL CONSUMIDOR: Para...

Table des Matières