Sony CDX-R30M Mode D'emploi
Masquer les pouces
Voir aussi pour CDX-R30M:
- Mode d'emploi (40 pages) ,
- Installation/connexions (3 pages)
Table des Matières
Les langues disponibles
Les langues disponibles
Liens rapides
FM/AM
Compact Disc
Player
Operating Instructions
Mode d'emploi
Owner's Record
The model and serial numbers are located on the bottom of the unit.
Record the serial number in the space provided below.
Refer to these numbers whenever you call upon your Sony dealer regarding this product.
Model No. CDX-R30M Serial No.
To cancel the demonstration (DEMO) display, see page 9.
Pour annuler l'affichage de démonstration (DEMO), reportez-vous à la page 10.
CDX-R30M
© 2006 Sony Corporation
2-671-367-11 (1)
US
FR
Chapitres
Table des Matières
Dépannage

Manuels Connexes pour Sony CDX-R30M


Sommaire des Matières pour Sony CDX-R30M
- Page 18 – Vous pouvez mémoriser jusqu’à 6 stations par séparément). Consultez votre détaillant agréé bande de fréquences (FM1, FM2, FM3, AM1 Sony le plus proche pour en savoir plus sur le et AM2). fonctionnement du module tuner radio satellite. – Fonction BTM (mémorisation des meilleurs «...
- Page 19 Table des matières Préparation Autres fonctions Réinitialisation de l’appareil ....4 Modification des réglages du son ... 8 Réglage de l’horloge .
-
Page 20: Préparation Réinitialisation De L'appareil
Retrait de la façade Préparation Réinitialisation de Vous pouvez retirer la façade de cet appareil pour le protéger du vol. l’appareil Alarme d’avertissement Avant la première mise en service de l’appareil, Si vous mettez la clé de contact en position OFF après avoir remplacé... -
Page 21: Insertion Du Disque Dans L'appareil
Insertion du disque dans Éjection du disque l’appareil Ouvrez le volet. Ouvrez le volet. Insérez le côté imprimé du disque vers le haut. Rabattez le volet jusqu’au déclic. La lecture commence. Cliquez Fermez le volet. Le disque est éjecté. Remarques •... -
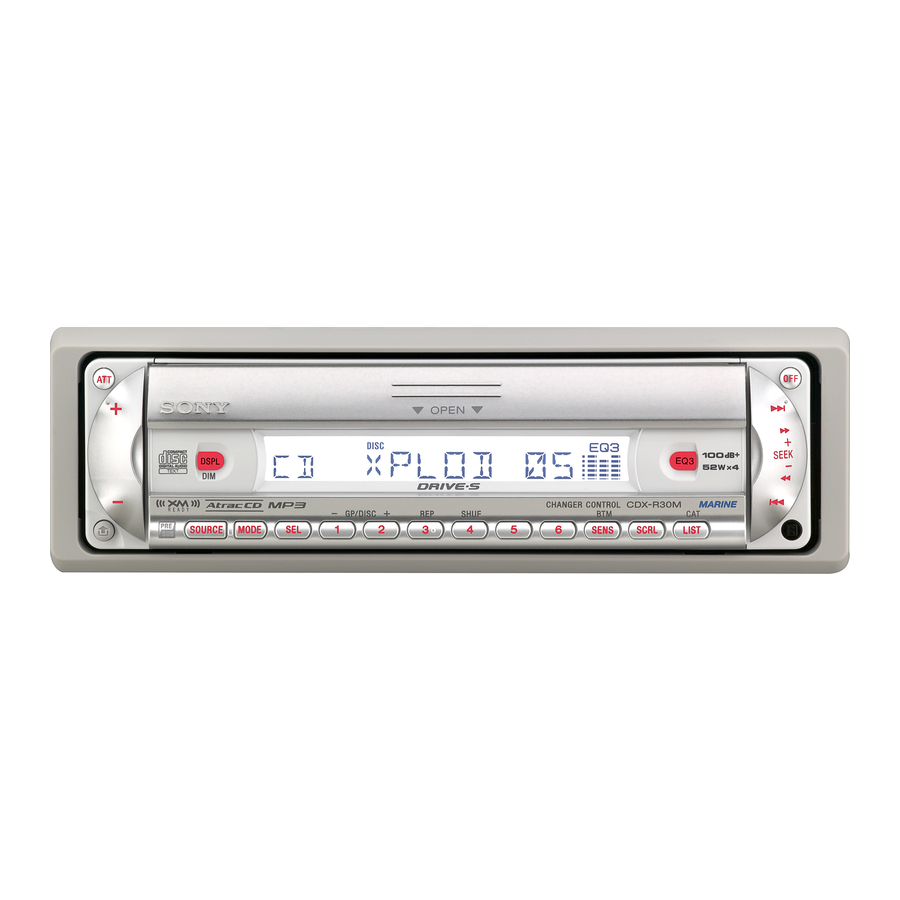
Page 22: Emplacement Des Commandes Et Opérations De Base
– GP/DISC + SHUF SOURCE MODE SENS SCRL LIST CDX-R30M 0 qa qs qd qh qj qk k Touche MODE 7, 10 Pour plus de détails, reportez-vous aux numéros de pages indiqués. Sélection de la bande radio (FM/AM)/ a Touche de volume +/–... -
Page 23: Rubriques D'affichage
Radio Réception et mémorisation Pour plus de détails sur la sélection d’un changeur CD/MD, reportez-vous à la page 10. des stations Rubriques d’affichage Attention Pour régler des stations pendant que vous conduisez, utilisez la fonction de mémorisation des meilleurs accords (BTM) afin d’éviter tout accident. -
Page 24: Recherche Automatique Des Fréquences
Autres fonctions Recherche automatique des fréquences Modification des réglages du son Sélectionnez la bande, puis appuyez sur (SEEK) +/– pour rechercher la station. Le balayage s’interrompt lorsque l’appareil Réglage des caractéristiques capte une station. Répétez cette procédure du son — BAL/FAD/SUB jusqu’à... -
Page 25: Identification D'une Station Ou D'un Disque
• Vous pouvez identifier un disque sur l’appareil si un changeur doté de la fonction CUSTOM FILE est raccordé. • « REP-TRACK » et toutes les fonctions de lecture Répétez les étapes 2 et 3 pour régler la courbe répétée sont interrompues jusqu’à ce que de l’égaliseur. -
Page 26: Si Vous Utilisez Un Appareil En Option
Les paramètres suivants peuvent être réglés Si vous utilisez un appareil (reportez-vous à la page indiquée pour plus de en option détails) : « » indique les réglages par défaut. CLOCK-ADJ (page 4) Changeur de CD/MD (réglage de l’horloge) Sélection du changeur BEEP Pour régler «... -
Page 27: Mini-Télécommande Rm-X114
Recherche d’un disque par son nom • Touches M/m (DISC*/PRESET +/–) Commande du lecteur de CD, identique à (1)/ — Affichage automatique des titres (2) –/+ de l’appareil. (Pour plus de détails sur Vous pouvez sélectionner un disque dans la liste d’autres opérations, reportez-vous à... -
Page 28: Satellite De Commande Rm-X4S
Modification du sens de Satellite de commande RM-X4S fonctionnement Le sens de fonctionnement des commandes est réglé par défaut comme indiqué dans Apposition de l’étiquette l’illustration ci-dessous. Apposez l’étiquette indicative suivant la position de montage du satellite de commande. Pour augmenter Pour diminuer D S P L SE L... -
Page 29: Informations Complémentaires
• Les disques de forme non standard (par ex. : en Informations complémentaires forme de cœur, de carré ou d’étoile) ne peuvent pas être lus avec cet appareil. Vous risquez Précautions d’endommager votre appareil si vous essayez de le faire. N’utilisez pas de tels disques. •... -
Page 30: À Propos Des Fichiers Mp3
1.1. Si vous avez des questions ou des problèmes concernant cet appareil qui ne sont pas abordés dans ce mode d’emploi, contactez votre détaillant Sony. Remarques • Veillez à finaliser le disque avant de l’utiliser sur l’appareil. • Lors de l’identification d’un fichier MP3, veillez à... -
Page 31: Entretien
Orientez les clés de défectueux. Dans ce cas, contactez votre déblocage comme illustré. détaillant Sony le plus proche. 3 Tirez sur les clés de déblocage pour retirer le cadre de sûreté. Nettoyage des connecteurs L’appareil peut ne pas fonctionner correctement si les connecteurs entre l’appareil et la façade... -
Page 32: Caractéristiques Techniques
Cet appareil ne doit pas être branché à un Réponse en fréquence : 30 à 15 000 Hz préamplificateur numérique ni à un égaliseur compatible avec le système Sony BUS. Plage de syntonisation : La conception et les caractéristiques techniques sont 531 à... -
Page 33: Dépannage
Lecture avec un changeur de CD compatible lecture. MP3 de Sony ou cet appareil. La lecture des types de disques suivants exige un Aucun bip n’est émis. délai de démarrage plus long : –... -
Page 34: Affichage Des Erreurs/Messages
Les touches de commande ne fonctionnent Affichage des erreurs/ pas. messages Impossible d’éjecter le disque. Appuyez sur la touche RESET (page 4). BLANK* Aucune plage n’a été enregistrée sur le MD. Réception radio t Insérez un MD contenant des plages Impossible de capter des stations. - Page 35 Il se peut que l’appareil soit défectueux. t Vérifiez le raccordement. Si le message d’erreur ne disparaît pas de l’affichage, contactez votre détaillant Sony le plus proche. READ L’appareil lit toutes les informations relatives aux plages et aux groupes sur le disque.