Table des Matières

Publicité

Les langues disponibles

Les langues disponibles

Liens rapides

Airless – Hochdruck Spritzgerät
Airless high-pressure spraying unit
Appareil de pulvérisation à haute pres-
sion Airless
Apparecchio di verniciatura a spruzzo
Airless ad alta pressione
NESPRAY PLUS
2318108
08 / 2014
Originalbetriebsanleitung
Betriebsanleitung
Operating manual
Mode d'emploi
Istruzioni per l'uso
2
35
73
108

Publicité

Table des Matières
loading

Sommaire des Matières pour WAGNER NESPRAY PLUS

  • Page 1 Originalbetriebsanleitung Airless – Hochdruck Spritzgerät Betriebsanleitung Operating manual Mode d’emploi Airless high-pressure spraying unit Istruzioni per l‘uso Appareil de pulvérisation à haute pres- sion Airless Apparecchio di verniciatura a spruzzo Airless ad alta pressione NESPRAY PLUS 2318108 08 / 2014...
  • Page 2 Vor jeder Inbetriebnahme sind gemäß Betriebsanleitung folgende Punkte zu beachten: 1. Fehlerhafte Geräte dürfen nicht benutzt werden. 2. Wagner-Spritzpistole sichern mit Sicherungshebel am Abzugsbügel. 3. Erdung sicherstellen. 4. Zulässigen Betriebsdruck vom Hochdruckschlauch und Spritzpistole überprüfen. 5. Alle Verbindungsteile auf Dichtheit prüfen.
  • Page 3: Table Des Matières

    Funktion des Gerätes __________________________7 12.14 Fehlercodes an der Heizschlauchtrommel________ 25 Erklärungsbild ________________________________8 ERSATZEILE UND ZUBEHÖR _________________ 26 Anzeigen am Gerät ____________________________9 13.1 Zubehör für NESPRAY PLUS ___________________ 26 Heizschlauchtrommel __________________________9 13.2 Ersatzteilliste Pumpenkopf ___________________ 27 Technische Daten ___________________________ 10 13.3...
  • Page 4: Sicherheitsvorschriften Für Das Airless-Spritzen

    NESPRAY PLUS SICHERHEITSVORSCHRIFTEN letzungen verursachen. Bei Kontakt mit dem SICHERHEITSVORSCHRIFTEN FÜR Spritzstrahl kann Beschichtungsstoff in die DAS AIRLESS-SPRITZEN Haut injiziert werden. Behandeln Sie eine Spritzverletzung nicht als harmlose Schnitt- Alle gültigen lokalen Sicherheitsanforderungen sind zu be- verletzung. Bei einer Hautverletzung durch achten.
  • Page 5: Elektrostatische Aufladung (Funken- Oder Flammenbildung)

    NESPRAY PLUS SICHERHEITSVORSCHRIFTEN Hochdruckschlauch vor jeder Benutzung gründlich über- Im WAGNER Zubehörprogramm finden prüfen. Sie mobile elektrische Personenschutzvor- Beschädigten Hochdruckschlauch sofort ersetzen. richtungen, die Sie auch mit anderen elek- Niemals defekten Hochdruckschlauch selbst reparieren! trischen Geräten verwenden können. Scharfes Biegen oder Knicken vermeiden, kleinster Bie- geradius etwa 20 cm.
  • Page 6: Arbeiten Oder Reparaturen An Der Elektrischen Ausrüstung

    Filter auf Beschädigung oder Verschmutzung ist drin- gend zu empfehlen. ANWENDUNGSÜBERSICHT EINSATZGEBIETE NESPRAY PLUS wurde im Rahmen eines Forschungsprojektes in Zusammenarbeit mit der Fa. Caparol zur nebelfreien Zer- stäubung von Dispersionen entwickelt. Die Gerätetechnik, inkl. des zum Lieferumfang gehörenden Zubehörs, sowie die Farben in NespriTec Ausführung bilden...
  • Page 7: Beschichtungsstoffe Mit Scharfkantigen Zusatzstoffen

    Beschichtungsstoff (hier speziell Farben in NespriTec Ausführung) bei großen Flächen und hohem Materialeinsatz speziell an Fassaden. Beim Gerät NESPRAY PLUS saugt eine Membranpumpe den Beschichtungsstoff an und fördert ihn über einen Hochdruck- filter und den elektrisch beheizten Hochdruckschlauch zur speziellen Doppeldüse.
  • Page 8: Erklärungsbild

    NESPRAY PLUS GERÄTEBESCHREIBUNG ERKLÄRUNGSBILD 13 Manometer 14 Werkzeugbox Spritzpistole 15 Öse zum Einhängen der Spritzpistole Steckdose für Heizschlauch mit Abdeckkappe 16 Netzkabel der Heizschlauchtrommel Einlassventildrücker 17 Kurzanleitung Anschluss zur Reinigung mit der Spritzpistole 18 Heizschlauchtrommel mit Hochdruckschlauch Ansaugrohr 19 Display Rücklaufrohr...
  • Page 9: Anzeigen Am Gerät

    NESPRAY PLUS GERÄTEBESCHREIBUNG ANZEIGEN AM GERÄT A) Grüne Kontrollleuchte (1) am Multifunktionsschalter zeigt an, dass Netzspannung am Gerät anliegt. Liegt Spannung an, aber die grüne Kontrollleuchte leuch- tet dennoch nicht, kann die Überlastsicherung des Ge- rätes angesprochen haben. Nach Abkühlung des Motors gibt die Sicherung das Gerät wieder frei und die grüne...
  • Page 10: Technische Daten

    NESPRAY PLUS GERÄTEBESCHREIBUNG TECHNISCHE DATEN TRANSPORT Gerät schieben oder ziehen. Spannung : 230 Volt ~, 50 Hz Klemmhülsen (Pos.1) an der Deichsel durch Linksdrehung Absicherung : 16 A träge lösen. Deichsel auf Länge nach Wunsch herausziehen und Klemmhülsen wieder von Hand mit einer Rechtsdrehung an- Spannung am ziehen.
  • Page 11: Inbetriebnahme

    NESPRAY PLUS INBETRIEBNAHME 2. Bei der Montage der Düsenverlängerung die Flachdich- INBETRIEBNAHME tung (4) aus Kunststoff (liegt in der Spritzpistolenverpa- ckung) zwischen Pistole und Düsenverlängerung einle- GERÄT MIT ANSAUGSYSTEM gen und fest anziehen. 1. Staubschutzkappe (Pos. 1) abschrauben. 3. Den Düsenhalter mit der ausgewählten Düse (5) auf die 2.
  • Page 12: Anschluss An Das Stromnetz

    NESPRAY PLUS INBETRIEBNAHME GERÄT MIT BESCHICHTUNGSSTOFF IN BETRIEB 7. Netzstecker (6) der Schlauchtrommel in Gerätesteckdose NEHMEN (7) einstecken. Die Anschlüsse zwischen Gerät und Schlauchtrommel können zu einem Unfall mit Schaden für Mensch und Maschine füh- ren (stolpern). ANSCHLUSS AN DAS STROMNETZ Der Anschluss muss immer über eine vor-...
  • Page 13: Spritztechnik

    Die Doppeldüse D316 ist für den Einsatz auf glatten bis leicht strukturierten Fassaden- und Innenflächen konzipiert, die Aus Gründen der Funktion, Sicherheit und Doppeldüse D317 für den Einsatz auf Fassadenflächen. Lebensdauer nur WAGNER Original-Hoch- druckschlauch mit Innenheizung verwenden. HANDHABUNG DES HOCHDRUCKSCHLAUCHES...
  • Page 14: Gerätereinigung

    NESPRAY PLUS GERÄTEREINIGUNG 12. Ansaugrohr etwa 3 Minuten reinigen. GERÄTEREINIGUNG 13. Im Kreislauf spülen – Multifunktionsschalter auf (EIN) stellen. Sauberkeit ist die sicherste Gewährleistung für einen stö- 14. Spritzpistole schließen. rungsfreien Betrieb. Nach Beendigung der Spritzarbeiten Ge- 15. Bei Reinigung mit Wasser, den Vorgang etwa drei Minuten rät reinigen.
  • Page 15: Gerätereinigung Von Außen

    NESPRAY PLUS GERÄTEREINIGUNG 7. Filtergehäuse bis auf Anschlag von Hand aufschrau- GERÄTEREINIGUNG VON AUSSEN ben (eine hohe Anzugskraft erschwert nur eine spä- Zuerst Netzstecker aus der Steckdose ziehen. tere Demontage). Kurzschlussgefahr durch eindringendes Was- ser! Gerät niemals mit Hochdruck- oder Dampf- hochdruckreiniger abspritzen.
  • Page 16: Airless-Doppeldüse

    NESPRAY PLUS AIRLESS-DOPPELDÜSE AIRLESS–DOPPELDÜSE Die Airless – Doppeldüse ist speziell für die Verarbeitung von Fassadenfarbe in NespriTec Ausführung entwickelt worden. Auf Grund ihrer besonderen Konstruktion ist sie mit mehr Sorgfalt zu behandeln als ge- wöhnliche Airless – Düsen. Montieren Sie die Düse immer bis zum Anschlag des Kunst- stoffgriffes im Düsenhalter.
  • Page 17: Wartung

    Prüfung vorgeschrie- ben - inklusive des Nachweises dafür. 12.1 EINLASSVENTILDRÜCKER Die Wartung des Gerätes können Sie vom Wagner-Service durchführen lassen. Mit Ser- 1. Einlassventildrücker mit Schlüssel (17mm) herausschrau- ben. vicevertrag und/oder Wartungspaketen kön- nen Sie günstige Konditionen vereinbaren.
  • Page 18: Auslassventil

    NESPRAY PLUS REPARATUREN AM GERÄT 12.3 Montage AUSLASSVENTIL 1. Auslassventil mit Schlüssel (22mm) aus der Farbstufe he- 1. Einlassventil (3) in das Drückergehäuse (1) einsetzen und rausschrauben. mit Spange (4) sichern. Darauf achten, dass (schwarze) 2. Vorsichtig Spange (1) mit beiliegendem Schraubendreher Dichtung (6) im Drückergehäuse montiert ist.
  • Page 19: Entlastungsventil

    NESPRAY PLUS REPARATUREN AM GERÄT 12.5 ENTLASTUNGSVENTIL Gerät ausschalten (AUS). Vor allen Reparaturen – Netzstecker aus der Steckdose ziehen. 1. Aus dem Drehknopf (Abb.A, Pos.1) in Schalterstellung (Spritzen), die Arretierschraube (2) herausschrauben. 2. Drehknopf abnehmen. 3. Schrauben (Abb. B, Pos. 3) aus Schaltergehäuse (4) heraus- schrauben.
  • Page 20: Geräteanschlussleitung Austauschen

    NESPRAY PLUS REPARATUREN AM GERÄT 12.7 GERÄTEANSCHLUSSLEITUNG AUSTAUSCHEN Gerät ausschalten (AUS). Vor allen Reparaturen – Netzstecker aus der Steckdose ziehen. 1. Wagen demontieren. 2. Gerätesteckdose für Heizschlauchtrommel aus dem Ge- häuse herausschrauben und Anschlüsse lösen. 3. Gehäusehälfte (mit Steckdosenöffnung) abschrauben und abnehmen.
  • Page 21: Anschlussleitung Der Heizschlauchtrommel Austauschen

    NESPRAY PLUS REPARATUREN AM GERÄT 12.8 12.9 GERÄTEANSCHLUSSLEITUNG DER ISOLATIONSPRÜFUNG MIT 1000 VOLT DC HEIZSCHLAUCHTROMMEL AUSTAUSCHEN BEI DER GERÄTEÜBERPRÜFUNG DURCH DEN SERVICE Gerät ausschalten. Vor allen Reparaturen – Netzstecker aus der Gerät ausschalten. Steckdose ziehen. Vor allen Reparaturen – Netzstecker aus der Arbeiten oder Reparaturen an der elek- Steckdose ziehen.
  • Page 22: Schaltplan Grundgerät

    NESPRAY PLUS REPARATUREN AM GERÄT 12.11 SCHALTPLAN GRUNDGERÄT...
  • Page 23: Schaltplan Heizschlauchtrommel

    NESPRAY PLUS REPARATUREN AM GERÄT 12.12 SCHALTPLAN HEIZSCHLAUCHTROMMEL...
  • Page 24: Hilfe Bei Störungen

    NESPRAY PLUS REPARATUREN AM GERÄT 12.13 HILFE BEI STÖRUNGEN ART DER STÖRUNG WAS NOCH? MÖGLICHE URSACHE MASSNAHMEN ZUR BEHEBUNG DER STÖRUNG Gerät läuft grüne Kontrollleuchte leuch- Keine Spannung vorhan- Spannungsversorgung prüfen nicht an/ tet nicht Keine Anzeige an Gerätesicherung hat an- Motor abkühlen lassen, bis Kontrollleuchte...
  • Page 25: Fehlercodes An Der Heizschlauchtrommel

    Platinen Warten Sie ca. 30 Sekunden und schalten Sie es wieder ein. Falls der Fehlercode noch immer angezeigt wird, wenden Sie sich an den Wagner Kunden- dienst. Err2 Steuerplatine erhält keine Rückmeldung Trennen Sie das Gerät vom Netz.
  • Page 26: Ersatzeile Und Zubehör

    NESPRAY PLUS ERSATZTEILE UND ZUBEHÖR ERSATZEILE UND ZUBEHÖR 13.1 ZUBEHÖR FÜR NESPRAY PLUS POS. BESTELL-NR. BENENNUNG 0257 016 Spritzpistole AG14 (Edelstahlausführung) Auslegerpistole 0096 004 Länge 30 cm 0096 019 Länge 100 cm 0096 005 Länge 150 cm 0096 006 Länge 270 cm Düsenverlängerung...
  • Page 27: Ersatzteilliste Pumpenkopf

    NESPRAY PLUS ERSATZTEILE UND ZUBEHÖR NESPRAY - Doppeldüse DÜSENGRÖSSE ANWENDUNG BESTELL-NR 9970 109 Dichtring 0341 702 Auslassventil, Service Set Feine Beschneidearbeiten im 1009 213 Innenbereich 0341 325 Ventilführung D 215 Feine Beschneidearbeiten an 1009 215 0341 488 Anodenring der Fassade...
  • Page 28: Ersatzteilliste Pumpen-Aggregat

    NESPRAY PLUS ERSATZTEILE UND ZUBEHÖR 13.3 ERSATZTEILLISTE PUMPEN-AGGREGAT POS. BESTELL-NR BENENNUNG POS. BESTELL-NR BENENNUNG 9900 336 Zylinderschraube M6x40 (2) 0341 413 Arretierschraube 0340 303 Fuß (2) 9971 365 O-Ring 9,25x1,78 0340 223 Druckregelventil * 2317 529 Gehäuse kpl. (2 Halbschalen) 9951 880 LED –...
  • Page 29 NESPRAY PLUS ERSATZTEILE UND ZUBEHÖR Ersatzteilbild Pumpenaggregat...
  • Page 30: Ersatzteilliste Hochdruckfilter

    NESPRAY PLUS ERSATZTEILE UND ZUBEHÖR 13.4 13.5 ERSATZTEILLISTE HOCHDRUCKFILTER ERSATZTEILLISTE WAGEN POS. BESTELL-NR BENENNUNG POS. BESTELL-NR BENENNUNG 0097 123 Hochdruckfilter HF- 01 kpl. 2316 870 Wagen kpl. 0097 301 Filterblock 9920 701 Scheibe 0097 302 Filtergehäuse 0348 349 Rad, luftbereift...
  • Page 31: Ersatzteilliste Heizschlauchtrommel

    NESPRAY PLUS ERSATZTEILE UND ZUBEHÖR POS. BESTELL-NR BENENNUNG 13.6 ERSATZTEILLISTE HEIZSCHLAUCHTROMMEL 2311 153 Gewindestange POS. BESTELL-NR BENENNUNG 2311 148 Rohr kpl. 2313 048 Frontdeckel komplett 9901 319 Gewindeeinsatz (Pos. 1-7,33,34,36,38) 9906 003 Gewindefurchende Schraube M6x25 2320 429 Display DIN 7500 (4)
  • Page 32 NESPRAY PLUS ERSATZTEILE UND ZUBEHÖR 3 4 5 6 7 8 9 10 11 12 13 14 15 16 18 19 44 45 46 48 49 39 40 41 42 43 Ersatzteilbild Schlauchtrommel...
  • Page 33: Ersatzteilliste Heizschlauch

    NESPRAY PLUS ERSATZTEILE UND ZUBEHÖR 13.7 ERSATZTEILLISTE HEIZSCHLAUCH 2311657 POS. BESTELL-NR BENENNUNG POS. BESTELL-NR BENENNUNG 2308 887 Doppelstutzen 2312 111 Litze braun (2) 9970 103 Dichtring (2) 2313 390 Hülse (2) 0341 464 Schlauchstutzen 9900 325 Zylinderschraube M6x16 DIN 912 (4) 2311 135 Durchführungsgehäuse...
  • Page 34: Ersatzteilliste Ansaugsystem

    NESPRAY PLUS ERSATZTEILE UND ZUBEHÖR 13.8 ERSATZTEILLISTE ANSAUGSYSTEM POS. BESTELL-NR BENENNUNG 0341 263 Ansaugsystem kpl. 0341 435 Filter, Maschenweite 1 mm Optional: 0253 244 Filter, Maschenweite 0,8 mm 0253 211 Rücklaufrohr Verschlussmutter mit Kette und Klam- 0341 260 0341 367...
  • Page 35: Servicenetz In Deutschland

    Heidersdorf in Sachsen J. Wagner GmbH Service-Stützpunkt Olbernhauer Straße 11 09526 Heidersdorf Tel. 03 73 61 / 1 57 07 Telefax 03 73 61 / 1 57 08 WAGNER KONTAKTNETZ DEUTSCHLAND, IM INTERNET ZU FINDEN UNTER: WWW.WAGNER-GROUP.COM/PROFI...
  • Page 36: Prüfung Des Gerätes

    Tag der Lieferung durch den autorisierten Fachhandel entsprechend den nachfolgenden Bestimmungen registriert. Die Registrierung erfolgt im Internet unter Ihr WAGNER - Altgerät wird von uns, bzw. unseren Handels- www.wagner-group.com/profi-guarantee. vertretungen zurückgenommen und für Sie umweltgerecht Als Bestätigung gilt das Garantiezertifikat, sowie der Original- entsorgt.
  • Page 37 NESPRAY PLUS GARANTIEERKLÄRUNG 3. Abwicklung Zeigen sich innerhalb der Garantiezeit Fehler in Material, Ver- bei Produkten, die teilweise oder komplett zerlegt worden arbeitung oder Leistung des Geräts, so sind Garantieansprü- sind. che unverzüglich, spätestens jedoch in einer Frist von 2 Wo- 5.
  • Page 38: Ensure Safety

    1. Faulty units may not be used. 2. Secure a Wagner spray gun with the securing lever at the trigger guard. 3. Ensure earthing. 4. Check the permissible operating pressure of the high-pressure hose and spray gun.
  • Page 39 12.14 Error codes in heated hose system _____________ 60 STARTUP _________________________________ 47 SPARE PARTS AND ACCESSORIES ____________ 62 Unit with suction system _____________________ 47 13.1 NESPRAY PLUS accessories ____________________ 62 Spray gun _________________________________ 47 13.2 Spare parts list of pump head _________________ 63 Heating hose drum __________________________ 47 13.3...
  • Page 40: Safety Regulations For Airless Spraying

    NESPRAY PLUS SAFETY REGULATIONS spray jet, coating material can be injected SAFETY REGULATIONS FOR into the skin. Do not treat a spray injury as a AIRLESS SPRAYING harmless cut. In case of injury to the skin by coating material or solvents, consult a doctor for quick and correct treatment.
  • Page 41 (with protective cap or connected ≤ 30 mA. hose drum cable). When cleaning sockets and multifunction switches unplug the power plug. Wagner‘s accessories program also includes a mobile operator protection device for the electronic supply, which can also be used 1.21 WORK OR REPAIRS AT THE ELECTRICAL with other electronical equipment.
  • Page 42: Work At Electrical Components

    GENERAL VIEW OF APPLICATION APPLICATION NESPRAY PLUS was developed as part of a research project in cooperation with the Caparol company relating to the mist- free atomisation of dispersions. The equipment technology including the accessories included in the scope of delivery and the NespriTec paints form a unit which enables mist-free spraying, e.g.
  • Page 43: Description Of Unit

    At the NESPRAY PLUS unit a diaphragm pump takes in the coating materials and transports it via a high-pressure filter and the electrically heated high-pressure hose to the special dual tip.
  • Page 44: Explanatory Diagram

    NESPRAY PLUS DESCRIPTION OF UNIT EXPLANATORY DIAGRAM 13 Manometer 14 Tool box Spray gun 15 Eye for suspending the spray gun Outlet for heating hose with cover 16 Power cord of the heating hose drum Inlet valve button 17 Quick-start guide...
  • Page 45: Displays At The Unit

    NESPRAY PLUS DESCRIPTION OF UNIT DISPLAYS AT THE UNIT A) The green indicating lamp (1) at the multifunction switch indicates that mains voltage is applied at the unit. If voltage is applied but the green indicating lamp does not light up, the overload fuse of the unit may have trig- gered.
  • Page 46: Technical Data

    NESPRAY PLUS DESCRIPTION OF UNIT TECHNICAL DATA TRANSPORTATION Push or pull the unit Voltage : 230 V AC, 50 Hz Loosen the clamping rings (Item 1) at the shaft by turning Fuses : 16 A time-lag them to the left. Pull the shaft out to the desired length and...
  • Page 47: Startup

    NESPRAY PLUS STARTUP 1. Equip the spray gun (1) with the tip extension (2) and tip STARTUP carrier (3). 2. When mounting the tip extension insert the plastic flat UNIT WITH SUCTION SYSTEM packing (4) (enclosed in the spray gun packaging) be- 1.
  • Page 48: Connection To The Mains Network

    NESPRAY PLUS STARTUP 7. Connect the power plug (6) on the heating hose drum to TAKING THE UNIT INTO OPERATION WITH the socket in the device (7). COATING MATERIAL The connections between the unit and the hose drum can lead to accidents with dam- age to persons and property (stumbling).
  • Page 49: Spraying Technique

    Two tip types are supplied with the coating spraying unit. The Only use WAGNER original-high-pressure Dual tip D316 is designed for use on smooth to lightly textured hoses with internal heating in order to ensure facade and internal surfaces, while dual tip D317 is designed functionality, safety and durability.
  • Page 50: Cleaning The Unit

    NESPRAY PLUS CLEANING THE UNIT 15. When cleaning with water repeat the procedure about 3 CLEANING THE UNIT minutes long with clear water. 16. Switch the unit off – set the multifunction switch to A clean state is the best method of ensuring operation with- (OFF).
  • Page 51: Suction Filter At The Rigid Suction Tube

    NESPRAY PLUS CLEANING THE UNIT SUCTION FILTER AT THE RIGID SUCTION TUBE CLEANING THE AIRLESS SPRAY GUN 1. Rinse the Airless spray gun with a suitable cleaning agent Clean filters always ensure maximum volume, under lower operating pressure. constant spray pressure and problem-free 2.
  • Page 52: Airless Dual Tip

    Carry out a high-voltage test on the resistance wire in the high- pressure hose using 1000 V DC. Special measuring equipment is required to this purpose. Have the electric tests carried by the Wagner Service. The risk of damage rises with the age of the high-pressure hose.
  • Page 53: Repairs At The Unit

    NESPRAY PLUS REPAIRS AT THE UNIT REPAIRS AT THE UNIT Installation Switch the unit off (OFF). Before all repair work: Unplug the power 1. Insert the inlet valve (3) into the trigger housing (1) and plug from the outlet. secure with the clasp (4). Ensure that the (black) seal (6) is mounted in the trigger housing.
  • Page 54: Outlet Valve

    NESPRAY PLUS REPAIRS AT THE UNIT 12.3 12.5 OUTLET VALVE RELIEF VALVE 1. Use a 22 mm wrench to screw the outlet valve from the Switch the unit off (OFF). paint section. Before all repair work: Unplug the power 2. Carefully pull of the clasp (1) using the enclosed screw- plug from the outlet.
  • Page 55: Replacing The Diaphragm

    NESPRAY PLUS REPAIRS AT THE UNIT Fig. B 12.6 REPLACING THE DIAPHRAGM Switch the unit off (OFF). Before all repair work: Unplug the power plug from the outlet. 1. Remove the locking screw, rotary knob and switch hous- Before mounting the new diaphragm, clean the insert as well ing as described in Section 12.5 Relief valve, Items 1 to 4.
  • Page 56: Replacing The Unit Connecting Line

    NESPRAY PLUS REPAIRS AT THE UNIT 12.7 12.8 REPLACING THE UNIT CONNECTING LINE HOW TO REPLACE THE POWER CONNECTION CABLES IN THE HEATING HOSE DRUM Switch the unit off (OFF). Switch the unit off. Before all repair work: Unplug the power Before all repair work: Unplug the power plug from the outlet.
  • Page 57: Insulation Test With 1000 Volts Dc During Device Inspection By Service

    NESPRAY PLUS REPAIRS AT THE UNIT 12.9 INSULATION TEST WITH 1000 VOLTS DC DURING DEVICE INSPECTION BY SERVICE Switch the unit off. Before all repair work: Unplug the power plug from the outlet. 1. Open the front cover of the heating hose drum.
  • Page 58: Circuit Diagram For Basic Device

    NESPRAY PLUS REPAIRS AT THE UNIT 12.11 CIRCUIT DIAGRAM FOR BASIC DEVICE...
  • Page 59: Circuit Diagram For Heating Hose Drum

    NESPRAY PLUS REPAIRS AT THE UNIT 12.12 CIRCUIT DIAGRAM FOR HEATING HOSE DRUM...
  • Page 60: Remedy In Case Of Faults

    NESPRAY PLUS REPAIRS AT THE UNIT 12.13 REMEDY IN CASE OF FAULTS TYPE OF MALFUNCTION WHAT ELSE? POSSIBLE CAUSE MEASURES FOR ELIMINATING THE MALFUNCTION Unit does not start/ Green indicating lamp No voltage applied Check voltage supply No display on heating...
  • Page 61 Wait approx. 30 seconds and switch it back on. If the error code is still displayed, contact Wag- ner Customer Service. In the case of all abovementioned errors, a task that has been started can still be fin- ished with the Nespray Plus heating system switched off.
  • Page 62: Spare Parts And Accessories

    NESPRAY PLUS SPARE PARTS AND ACCESSORIES SPARE PARTS AND ACCESSORIES 13.1 ACCESSORIES NESPRAY PLUS POS. ORTDER-NO DESIGNATION 0257 016 Spray gun AG14 (stainless steel) Pole gun 0096 004 Length 30 cm 0096 019 Length 100 cm 0096 005 Length 150 cm...
  • Page 63: Spare Parts List Of Pump Head

    NESPRAY PLUS SPARE PARTS AND ACCESSORIES NESPRAY dual tip TIP SIZE APPLICATION ORDER NO. 0341 702 Outlet valve, service set Fine trimming work for in- 0341 325 Valve bushing 1009 213 side walls 0341 488 Anode ring D 215 Fine trimming work...
  • Page 64: Spare Parts List Of Pump Aggregate

    NESPRAY PLUS SPARE PARTS AND ACCESSORIES 13.3 SPARE PARTS LIST OF PUMP AGGREGATE ITEM ORDER NO. DESIGNATION 0341 237 Rotary knob 9900 336 Cylinder head screw M6x40 (2) 0341 413 Locking screw 0340 303 Base (2) 9971 365 O-ring 9.25x1.78...
  • Page 65 NESPRAY PLUS SPARE PARTS AND ACCESSORIES Spare parts diagram for pump unit...
  • Page 66: Spare Parts List Of High-Pressure Filter

    NESPRAY PLUS 13.4 13.5 SPARE PARTS LIST OF HIGH-PRESSURE FILTER SPARE PARTS LIST OF CARRIAGE ITEM ORDER NO. DESIGNATION ITEM ORDER NO.: DESIGNATION 0097 123 High-pressure filter HF- 01 compl. 2316 870 Carriage compl. 0097 301 Filter block 9920 701...
  • Page 67: Spare Parts List Of Heating Hose Drum

    NESPRAY PLUS SPARE PARTS AND ACCESSORIES 13.6 POS. ORTDER-NO DESIGNATION SPARE PARTS LIST OF HEATING HOSE DRUM 2311 153 Threaded rod POS. ORTDER-NO DESIGNATION 2311 148 Tube assy. 2313 048 Front cover assy. 9901 319 Threaded insert (pos. 1-7,33,34,36,38) 9906 003...
  • Page 68 NESPRAY PLUS SPARE PARTS AND ACCESSORIES 3 4 5 6 7 8 9 10 11 12 13 14 15 16 18 19 44 45 46 48 49 39 40 41 42 43 Spare parts diagram Heating hose drum...
  • Page 69: Spare Parts List Heating Hose

    NESPRAY PLUS SPARE PARTS AND ACCESSORIES 13.7 SPARE PARTS LIST HEATING HOSE 2311657 POS. ORTDER-NO DESIGNATION POS. ORTDER-NO DESIGNATION 2308 887 Double-ended union 2312 111 Wire brown (2) 9970 103 Sealing ring (2) 2313 390 Ferrule (2) 0341 464 Hose connector...
  • Page 70: Spare Parts List Of Suction System

    NESPRAY PLUS 13.8 SPARE PARTS LIST OF SUCTION SYSTEM ITEM ORDER NO. DESIGNATION 0341 263 Suction system compl. 0341 435 Filter, mesh width 1 mm Optional: 0253 244 Filter, mesh width 0.8 mm 0253 211 Return tube Hexagon cap nut with chain and...
  • Page 71: Testing Of The Unit

    Registration can be completed on the Internet under www.wagner-group.com/profi-guarantee. Wagner or one of our dealers will take back your used Wagner The guarantee certificate is valid as confirmation, as is the waste electrical or electronic equipment and will dispose of original purchase document that carries the date of the pur- chase.
  • Page 72 Wagner parts. for products to which modifications or additions have been carried out.
  • Page 73 1. Les appareils défectueux ne peuvent pas être utilisés. 2. Verrouiller le pistolet de pulvérisation Wagner avec le levier de protection sur la gâchette 3. Vérifier la mise à la terre 4. Vérifier la pression de service admissible du tuyau flexible haute pression et du pistolet de pulvérisation...
  • Page 74 Affichages sur l‘appareil ______________________ 80 PIÈCES DE RECHANGE ET ACCESSOIRES ______ 97 Enrouler pour tuyau chauffant _________________ 80 13.1 Accessoires pour NESPRAY PLUS _______________ 97 Caractéristiques techniques ___________________ 81 13.2 Liste de pièces de rechange de tête de pompe ___ 98 Transport __________________________________ 81 13.3...
  • Page 75: Prescriptions De Sécurité Pour La Pulvérisation Airless

    NESPRAY PLUS PRESCRIPTIONS DE SÉCURITÉ Le jet de pulvérisation ne peut pas entrer en PRESCRIPTIONS DE SÉCURITÉ contact avec une partie du corps. POUR LA PULVÉRISATION AIRLESS Les pressions très élevées occasionnées par l’emploi des pistolets Airless peuvent causer des blessures très graves. En cas de contact Les prescriptions de sécurité...
  • Page 76 Éviter de le plier ou courber de manière trop prononcée, avec INF ≤ 30 mA. rayon de courbure minimum d‘env. 20 cm. Dans le programme d'accessoires WAGNER, Protéger le flexible contre le passage de véhicules et évi- vous trouverez des dispositifs électriques ter le frottement sur des arêtes vives.
  • Page 77: Prise De Courant Pour Enrouler Pour Tuyau Chauffant Sur L'appareil

    Ne jamais nettoyer l‘appareil à l’aide d’un jet d’eau ou de vapeur sous pression. Mis au point dans le cadre d’un projet de recherche en col- laboration avec la société Caparol, NESPRAY PLUS est destiné à la pulvérisation sans brouillard de dispersions. 1.20 PRISE DE COURANT POUR ENROULER POUR La technique de l’appareil et des accessoires compris dans...
  • Page 78: Produits De Revêtement Avec Additifs Àarêtes Vives

    FONCTIONNEMENT DE L‘APPAREIL Pour mieux comprendre le fonctionnement, voici une brève description de la conception technique: NESPRAY PLUS est un appareil de pulvérisation de peinture à haute pression avec échauffement de la peinture à entraîne- ment électrique.
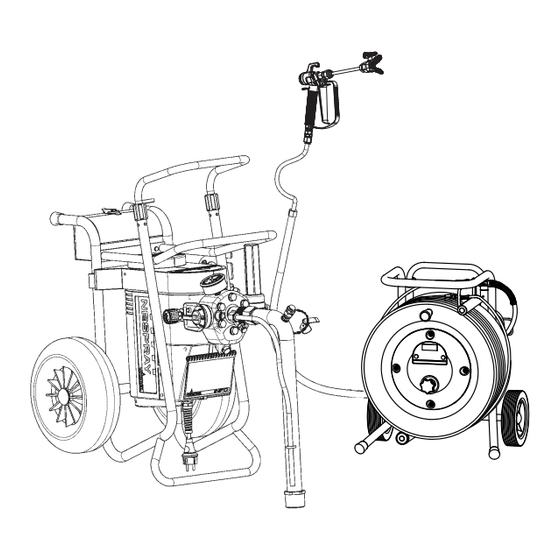
  • Page 79: Illustration Du Matériel

    NESPRAY PLUS DESCRIPTION DE L‘APPAREIL ILLUSTRATION DU MATÉRIEL 12 Compteur d‘heures de fonctionnement 13 Manomètre Pistolet de pulvérisation 14 Boîte à outils Prise de courant avec capuchon pour tuyau de peinture 15 Oeillet d‘accrochage du pistolet de pulvérisation chauffant 16 Cordon d‘alimentation du enrouler pour tuyau chauffant Poussoir de la vanne d’aspiration...
  • Page 80: Affichages Sur L'appareil

    NESPRAY PLUS DESCRIPTION DE L‘APPAREIL AFFICHAGES SUR L’APPAREIL A) Le voyant de contrôle vert (1) sur le commutateur multi- fonction indique que la tension de réseau est présente à l‘appareil. Si la tension est présente, mais que le voyant de contrôle vert ne s‘allume pas, le fusible de surcharge de l‘appareil...
  • Page 81: Caractéristiques Techniques

    NESPRAY PLUS DESCRIPTION DE L‘APPAREIL CARACTÉRISTIQUES TECHNIQUES TRANSPORT Pousser ou tirer l‘appareil. Tension : 230 volts ~, 50 Hz Desserrer les douilles de fixation (réf. 1) au timon par rotation Fusible : 16 A lent vers la gauche. Tirer le timon à la longueur désirée et serrer à...
  • Page 82: Mise En Service

    NESPRAY PLUS MISE EN SERVICE 1. Equiper le pistolet de pulvérisation (1) de la rallonge de MISE EN SERVICE buse (2) et du porte-buse (3). 2. Lors du montage de la rallonge de buse, placer le joint APPAREIL AVEC SYSTÈME D‘ASPIRATION plat (4) en matière plastique (il se trouve dans l‘emballage...
  • Page 83: Raccordement Au Réseau Électrique

    NESPRAY PLUS MISE EN SERVICE L’utilisation du capuchon (5) permet de chan- 7. Diriger la buse du pistolet de pulvérisation dans un réci- ger de lieu sans salir le poste de travail. pient de collecte ouvert et tirer sur la gâchette du pistolet de pulvérisation.
  • Page 84: Technique De Pulvérisatione

    D317 étant réservée à la des tuyaux flexibles à haute pression avec mise en œuvre sur des surfaces de façades. chauffage intérieur d‘origine de WAGNER. MANIPULATION DU TUYAU FLEXIBLE HAUTE PRESSION INTERRUPTION DE TRAVAIL Le tuyau flexible haute pression est équipé...
  • Page 85: Nettoyage De L'appareil

    NESPRAY PLUS NETTOYAGE DE L‘APPAREIL Indication: La chauffage du flexible ne fonc- Prudence! Ne pas pomper ou pulvériser dans tionne pas lorsque l‘appareil est mis hors ser- un récipient n’ayant qu’une seule petite vice. Lorsqu‘on poursuit le travail, tenir comp- ouverture (bonde)! te du temps d‘échauffement de 5-6 min après...
  • Page 86: Nettoyage Extérieur De L'appareil

    NESPRAY PLUS NETTOYAGE DE L‘APPAREIL NETTOYAGE EXTÉRIEUR DE L‘APPAREIL que le joint torique du boîtier de filtre n‘est pas détérioré. 7. Visser le boîtier de filtre à la main jusqu‘à la butée (une Tirer d‘abord la fiche secteur de la prise de force de serrage excessive ne fait que compliquer un dé-...
  • Page 87: Buse Double Airless

    NESPRAY PLUS BUSE DOUBLE AIRLESS BUSE DOUBLE AIRLESS La buse double Airless a été spécialement mise au point pour la mise en œuvre de peinture pour façades de type NespriTec. En raison de sa construction particulière, elle doit être manipulée avec plus de soin que les buses Airless habituelles.
  • Page 88: Maintenance

    Vous pouvez faire effectuer la maintenance de l‘appareil par le service après-vente de 1. Dévisser le poussoir de la vanne d’aspiration avec une clé Wagner. Vous pouvez convenir de conditions de 17 mm. favorables dans le cadre d‘un contrat de 2.
  • Page 89: Clapet De Refoulement

    NESPRAY PLUS RÉPARATIONS SUR L‘APPAREIL 12.3 Montage CLAPET DE REFOULEMENT 1. Placer la vanne d’aspiration (3) dans le corps de poussoir 1. Déviseser le clapet de refoulement avec la clé de 22 mm (1) et la fixer avec l‘agrafe (4). Veiller à ce que le joint (noir) de l‘étage de peinture.
  • Page 90: Vanne De Décharge

    NESPRAY PLUS RÉPARATIONS SUR L‘APPAREIL 12.5 VANNE DE DÉCHARGE Mettre l‘appareil hors service (ARRET). Lors de toutes les interventions, tirer la fiche de la prise de courant. 1. Le bouton (1) étant en position (pulvérisation), dévis- ser la vis d’arrêt (2).
  • Page 91: Remplacement Du Cordon D'alimentation

    NESPRAY PLUS RÉPARATIONS SUR L‘APPAREIL 12.7 REMPLACEMENT DU CORDON D’ALIMENTATION Mettre l‘appareil hors service (ARRET). Lors de toutes les interventions, tirer la fiche de la prise de courant. 1. Démonter le chariot. 2. Dévisser du boîtier la prise de l’appareil destinée au en- rouler pour tuyau chauffant et défaire les raccords.
  • Page 92: Remplacer Le Cordon D'alimentation Du Enrouler Pour Tuyau Chauffant

    NESPRAY PLUS RÉPARATIONS SUR L‘APPAREIL 12.8 12.9 REMPLACER LE CORDON D‘ALIMENTATION DU CONTRÔLE DE L‘ISOLATION AVEC 1000 VOLT CC ENROULER POUR TUYAU CHAUFFANT AU CONTRÔLE DE L‘APPAREIL PAR LE SERVICE TECHNIQUE Arrêter l'appareil. Avant toutes réparations, tirer la fiche de la Arrêter l'appareil.
  • Page 93: Schéma De Câblage De L'appareil De Base

    NESPRAY PLUS RÉPARATIONS SUR L‘APPAREIL 12.11 SCHÉMA DE CÂBLAGE DE L‘APPAREIL DE BASE...
  • Page 94: Schéma De Câblage Du Enrouler Pour Tuyau Chauffant

    NESPRAY PLUS RÉPARATIONS SUR L‘APPAREIL 12.12 SCHÉMA DE CÂBLAGE DU ENROULER POUR TUYAU CHAUFFANT...
  • Page 95: Aide En Cas De Dérangements

    NESPRAY PLUS RÉPARATIONS SUR L‘APPAREIL 12.13 AIDE EN CAS DE DÉRANGEMENTS TYPE DE LA PANNE QUOI ENCORE? CAUSE POSSIBLE MESURES DE DÉPANNAGE L‘appareil ne dé- Le voyant de contrôle vert ne Pas de courant Contrôler l‘alimentation marre pas/ s‘allume pas Pas d’indication...
  • Page 96: Codes D'erreur Sur Le Enrouler Pour Tuyau Chauffant

    Si le code d‘erreur ne s‘affiche toujours pas, adressez-vous au service après-vente Wagner. Dans le cas des erreurs susmentionnées, le travail en cours peut être achevé une fois que le système chauffant Nespray Plus a été mis hors tension.
  • Page 97: Pièces De Rechange Et Accessoires

    NESPRAY PLUS PIÈCES DE RECHANGE ET ACCESSOIRES PIÈCES DE RECHANGE ET ACCESSOIRES 13.1 ACCESSOIRES NESPRAY PLUS N° RÉFÉRENCE DÉSIGNATION 0257 016 Pistolet de pulvérisation AG14(modèle en acier inoxydable) Pistolet à rallonge 0096 004 Longueur 30 cm 0096 019 Longueur 100 cm...
  • Page 98: Liste De Pièces De Rechange De Tête De Pompe

    NESPRAY PLUS PIÈCES DE RECHANGE ET ACCESSOIRES Buse double NESPRAY TAILLE DE 9991 953 Manomètre APPLICATION RÉFÉRENCE BUSE 9970 109 Bague d‘étanchéité Clapet de refoulement, kit de main- Travaux de raccord fins 1009 213 0341 702 tenance D 215 Travaux de raccord fins...
  • Page 99: Liste De Pièces De Rechange De Groupe De Pompage

    NESPRAY PLUS PIÈCES DE RECHANGE ET ACCESSOIRES 13.3 LISTE DE PIÈCES DE RECHANGE DE GROUPE DE POMPAGE N° RÉFÉRENCE DÉSIGNATION 0341 235 Commutateur multifonction 9900 336 Vis cylindrique M6x40 (2) 3050 639 Vis cylindrique M4x40 DIN (3) 0340 303 Pied (2)
  • Page 100 NESPRAY PLUS PIÈCES DE RECHANGE ET ACCESSOIRES Illustration des pièces de rechange du groupe de pompage...
  • Page 101: Liste De Pièces De Rechange De Filtre Haute Pression

    NESPRAY PLUS 13.4 13.5 LISTE DE PIÈCES DE RECHANGE DE FILTRE LISTE DE PIÈCES DE RECHANGE DU CHARIOT HAUTE PRESSION N° RÉFÉRENCE DÉSIGNATION N° RÉFÉRENCE DÉSIGNATION 0097 123 Filtre haute pression HF- 01 cpl. 2316 870 Chariot cpl. 0097 301...
  • Page 102: Liste De Pièces De Rechange De Enrouler Pour Tuyau Chauffant

    NESPRAY PLUS PIÈCES DE RECHANGE ET ACCESSOIRES 13.6 N° RÉFÉRENCE DÉSIGNATION LISTE DE PIÈCES DE RECHANGE ENROULER POUR TUYAU CHAUFFANT 2311 153 Tige filetée N° RÉFÉRENCE DÉSIGNATION 2311 148 Tuyau cpl. Couvercle avant cpl. 2313 048 9901 319 Insert fileté...
  • Page 103 NESPRAY PLUS PIÈCES DE RECHANGE ET ACCESSOIRES 3 4 5 6 7 8 9 10 11 12 13 14 15 16 18 19 44 45 46 48 49 39 40 41 42 43 Illustration des pièces de rechange Enrouler pour tuyau chauffant...
  • Page 104: Liste De Pièces De Rechange Tuyau De Peinture Chauffant

    NESPRAY PLUS PIÈCES DE RECHANGE ET ACCESSOIRES 13.7 LISTE DE PIÈCES DE RECHANGE TUYAU DE PEINTURE CHAUFFANT 2311657 N° RÉFÉRENCE DÉSIGNATION N° RÉFÉRENCE DÉSIGNATION 2308 887 Raccord double 2312 111 Tresse brun (2) 9970 103 Bague d‘étanchéité (2) 2313 390...
  • Page 105: Liste De Pièces De Rechange Du Système D'aspiration

    NESPRAY PLUS PIÈCES DE RECHANGE ET ACCESSOIRES 13.8 LISTE DE PIÈCES DE RECHANGE DU SYSTÈME D‘ASPIRATION N° RÉFÉRENCE DÉSIGNATION 0341 263 Système d‘aspiration cplt 0341 435 Filtre, ouverture de maille 1 mm En option: 0253 244 Filtre, ouverture de maille 0,8 mm...
  • Page 106: Contrôle De L'appareil

    L’enregistrement s’effectue sur Internet à l’adresse www.wagner-group.com/profi-guarantee. Le certificat de garantie, ainsi que l’original du justificatif Votre ancien appareil WAGNER sera repris par nos soins ou d’achat prouvant la date de l’achat servent de confirmation. par nos représentations commerciales et éliminé de manière Un enregistrement est ensuite uniquement possible, lorsque compatible avec l'environnement.
  • Page 107 En cas de défauts sur l’appareil qui ont été causés par l’utilisation d’accessoires, de pièces complémentaires ou de rechange qui ne sont pas des pièces originales de Wagner ; Dans le cas de produits sur lesquels des modifications ou des compléments ont été...
  • Page 108 1. Non è consentito impiegare apparecchi difettosi. 2. Attivare il dispositivo di sicurezza dell‘aerografo Wagner con la leva situata sul grilletto. 3. Assicurarsi che l‘impianto sia collegato a terra. 4. Verificare la pressione di esercizio massima ammissibile del tubo flessibile e dell‘aerogra- 5.
  • Page 109 Tamburo del tubo flessibile di riscaldamento ____ 117 RICAMBI ED ACCESSORI ___________________ 132 Allacciamento alla rete elettrica _______________ 118 13.1 Accessori per NESPRAY PLUS _________________ 132 Prima messa in servizio rimozione della sostanza 13.2 Elenco dei ricambi per la testa della pompa _____ 133 conservante _______________________________ 118 13.3...
  • Page 110: Norme Di Sicurezza Per Il Sistema Di Spruzzatura Airless

    NESPRAY PLUS NORME DI SICUREZZA Le alte pressioni di spruzzatura degli aero- NORME DI SICUREZZA PER IL grafi Airless possono causare lesioni molto SISTEMA DI SPRUZZATURA pericolose. In caso di contatto con il getto, quest‘ultimo può iniettare materiale attra- AIRLESS verso la pelle.
  • Page 111 20 cm. sicurezza per correnti di guasto (DIN ≤ 30 mA). Proteggere il tubo flessibile ad alta pressione dal calpe- Nel programma di accessori WAGNER si tro- stio, da oggetti taglienti e da spigoli vivi. vano dispositivi elettrici mobili di protezione...
  • Page 112: Lavori O Riparazioni Sull'equipaggiamento Elettrico

    PANORAMICA SULL‘IMPIEGO CAMPI DI APPLICAZIONE NESPRAY PLUS è un prodotto sviluppato nel contesto di un pro- getto di ricerca in collaborazione con la ditta Caparol per una spruzzatura di dispersioni in assenza di nebbia.
  • Page 113: Materiali Di Copertura Con Pigmenti Aspigoli Taglienti

    Per capire meglio il funzionamento dell‘apparecchio viene for- nita una breve descrizione della sua struttura tecnica: NESPRAY PLUS è un apparecchio elettrico per la verniciatura a spruzzo con riscaldamento della vernice. Il motore elettrico ( 1) aziona la pompa idraulica per mezzo di una cinghia dentata (2).
  • Page 114: Figura Illustrativa

    NESPRAY PLUS DESCRIZIONE DELL‘APPARECCHIO FIGURA ILLUSTRATIVA 14 Cassetta degli attrezzi 15 Occhiello di aggancio dell‘aerografo Aerografo 16 Cavo di rete del tamburo del tubo flessibile di riscalda- Presa per il tubo flessibile di riscaldamento con coperchio mento Pulsante della valvola di entrata 17 Guida rapida all‘uso...
  • Page 115: Indicatori Dell'apparecchio

    NESPRAY PLUS DESCRIZIONE DELL‘APPARECCHIO INDICATORI DELL’APPARECCHIO A) La lampada spia verde (1) dell‘interruttore multifunzione segnala che l‘apparecchio è sotto tensione. Se è applicata tensione e la lampada spia verde non è ac- cesa, probabilmente è intervenuto il limitatore di sovrac- carico dell‘apparecchio.
  • Page 116: Dati Tecnici

    NESPRAY PLUS DESCRIZIONE DELL‘APPARECCHIO DATI TECNICI TRASPORTO Tensione : 230 V AC, 50 Hz Spingere o tirare l‘apparecchio. Allentare i manicotti di bloccaggio (pos. 1) del manubrio ruo- Fusibile : 16 A ritardato tandoli in senso antiorario. Estrarre il manubrio sulla lunghez- za desiderata e riavvitare i manicotti di bloccaggio ruotandoli Tensione dell‘interruttore...
  • Page 117: Messa In Servizio

    NESPRAY PLUS MESSA IN SERVIZIO 1. Montare la prolunga dell‘ugello (2) ed il portaugello (3) MESSA IN SERVIZIO sull‘aerografo (1). 2. Per montare la prolunga dell‘ugello, applicare e serrare a APPARECCHIO CON SISTEMA DI ASPIRAZIONE fondo la guarnizione piatta di plastica (4) (nella confezio- 1.
  • Page 118: Allacciamento Alla Rete Elettrica

    NESPRAY PLUS MESSA IN SERVIZIO L’utilizzo del cappuccio protettivo (5) può 8. Spruzzare il detergente dall‘apparecchio nel recipiente spostare il sistema senza spostare il posto di aperto per circa 1-2 minuti (~ 5 litri). lavoro. 7. Inserire nella presa elettrica dell’apparecchio (7) la spina MESSA IN FUNZIONE DELL‘APPARECCHIO CON...
  • Page 119: Tecnica Di Spruzzatura

    L’utilizzo di tubi flessibili obsoleti incrementa tempo di preriscaldamento aumenta. il rischio di danneggiamento. Rilasciare brevemente il grilletto Wagner raccomanda di sostituire il tubo fles- dell'aerografo alla fine di un movimento di sibile una volta trascorsi sei anni. spruzzatura, affinché il materiale di copertura Il modo migliore per lavorare con il tubo fles- si possa scaldare meglio.
  • Page 120: Pulizia Dell'apparecchio

    NESPRAY PLUS PULIZIA DELL‘APPARECCHIO Se si usano materiali di copertura ad essicca- 5. Immergere il sistema di aspirazione in un detergente ade- zione rapida o a due componenti, per evitare guato (per i colori in versione NespriTec utilizzare acqua). notevoli complicazioni l‘apparecchio va pu- 6.
  • Page 121: Pulizia Dell'esterno Dell'apparecchio

    NESPRAY PLUS PULIZIA DELL‘APPARECCHIO PULIZIA DELL‘ESTERNO DELL‘APPARECCHIO 6. Nel rimontaggio del filtro verificare la posizione corretta della rondella (4) nella cartuccia filtrante e controllare se Estrarre innanzitutto la spina di rete dalla pre- l‘O-Ring sulla scatola del filtro è danneggiato.
  • Page 122: Ugello Doppio Airless

    NESPRAY PLUS UGELLO DOPPIO AIRLESS UGELLO DOPPIO AIRLESS Il doppio ugello airless è stato sviluppato appositamente per l’elaborazione di colori per facciate in versione NespriTec. A causa della sua struttura particolare, que- sto tipo di ugello va trattato con più cura dei normali ugelli Airless.
  • Page 123: Manutenzione

    8. Controllare l‘integrità di tutti i componenti della valvola. In caso di usura visibile, sostituire la valvola di entrata. L’utilizzo di tubi flessibili obsoleti incrementa il rischio di danneggiamento. Wagner raccomanda di sostituire il tubo fles- sibile una volta trascorsi sei anni.
  • Page 124: Valvola Di Scarico

    NESPRAY PLUS RIPARAZIONE DELL‘APPARECCHIO 12.3 Montaggio VALVOLA DI SCARICO 1. Svitare la valvola di scarico dallo stadio della vernice con la 1. Collocare la valvola di entrata (3) nella scatola del pulsante chiave da 22 mm. (1) e bloccare con il fermo (4). Verificare che la guarnizione 2.
  • Page 125: Valvola Di Sfiato

    NESPRAY PLUS RIPARAZIONE DELL‘APPARECCHIO 12.5 VALVOLA DI SFIATO Spegnere l‘apparecchio (OFF). Prima di qualsiasi riparazione – disinserire la spina di rete dalla presa di corrente. 1. Svitare la vite di arresto (2) dalla manopola (Fig. A, 1) in posizione (spruzzatura).
  • Page 126: Sostituzione Del Cavo Di Alimentazione Elettrica

    NESPRAY PLUS RIPARAZIONE DELL‘APPARECCHIO 12.7 SOSTITUZIONE DEL CAVO DI ALIMENTAZIONE ELETTRICA Spegnere l‘apparecchio (OFF). Prima di qualsiasi riparazione – disinserire la spina di rete dalla presa di corrente. 1. Smontare il carrello. 2. Svitare via dall’involucro la presa elettrica dell’apparec- chio per il tamburo per il tubo flessibile di riscaldamento e disconnettere i collegamenti.
  • Page 127: Sostituire Il Cavo Che Collega L'apparecchio Al Tamburo Per Il Tubo Flessibile Di Riscaldamento

    I lavori e le riparazioni alle apparecchiature elettriche devono essere eseguiti solo da un elettricista specializzato. Wagner declina 1. Aprire il coperchio frontale del tamburo per il tubo flessi- qualsiasi responsabilità in caso di installazio- bile di riscaldamento.
  • Page 128: Schema Dei Collegamenti Elettrici Dell'apparecchio Base

    NESPRAY PLUS RIPARAZIONE DELL‘APPARECCHIO 12.11 SCHEMA DEI COLLEGAMENTI ELETTRICI DELL‘APPARECCHIO BASE...
  • Page 129: Schema Dei Collegamenti Elettrici Del Tamburo Per Il Tubo Flessibile Di Riscaldamento

    NESPRAY PLUS RIPARAZIONE DELL‘APPARECCHIO 12.12 SCHEMA DEI COLLEGAMENTI ELETTRICI DEL TAMBURO PER IL TUBO FLESSIBILE DI RISCALDAMENTO...
  • Page 130: Eliminazione Di Anomalie

    NESPRAY PLUS RIPARAZIONE DELL‘APPARECCHIO 12.13 ELIMINAZIONE DI ANOMALIE TIPO DI ANOMALIA ALTRI SINTOMI POSSIBILE CAUSA MISURE DA ADOTTARE PER ELIMINARE L‘ANOMALIA L‘apparecchio non La lampada spia verde non è Mancanza di tensione elettrica Controllare la tensione di alimentazione si mette in fun-...
  • Page 131: Codici Di Errore Nel Tamburo Per Il Tubo Flessibile Di Riscaldamento

    Attendete circa 30 secondi e riaccendete. Qualora il codice di errore venga visualizzato di nuovo, contattare il Servizio Clienti della Wagner. Per tutti i succitati errori un lavoro iniziato può ancora essere terminato anche se il siste- ma di riscaldamento Nespray Plus si spegne.
  • Page 132: Ricambi Ed Accessori

    NESPRAY PLUS RICAMBI ED ACCESSORI RICAMBI ED ACCESSORI 13.1 ACCESSORI NESPRAY PLUS POS. N° ORD. NOME 0257 016 Aerografo AG14 (modello in acciaio inox) Aerografo con prolunga 0096 004 Lunghezza 30 cm 0096 019 Lunghezza 100 cm 0096 005 Lunghezza 150 cm...
  • Page 133: Elenco Dei Ricambi Per La Testa Della Pompa

    NESPRAY PLUS RICAMBI ED ACCESSORI Ugello doppio NESPRAY DIMENSIONI 0341 311 Pistone IMPIEGO N° ORD. DELL‘UGELLO 9991 953 Manometro Precisi lavori di ritocco 1009 213 9970 109 Anello di tenuta 0341 702 Valvola di scarico, set di servizio D 215...
  • Page 134: Elenco Dei Ricambi Per Il Gruppo Pompa

    NESPRAY PLUS RICAMBI ED ACCESSORI 13.3 ELENCO DEI RICAMBI PER IL GRUPPO POMPA POS. N° ORD. NOME 0341 235 Interruttore multifunzione 3050 639 Vite a testa cilindrica M4x40 DIN (3) 9900 336 Vite a testa cilindrica M6x40 (2) 0341 237...
  • Page 135 NESPRAY PLUS RICAMBI ED ACCESSORI Figura dei ricambi gruppo pompa...
  • Page 136: Elenco Dei Ricambi Per Il Filtro Ad Alta Pressione

    NESPRAY PLUS RICAMBI ED ACCESSORI 13.4 13.5 ELENCO DEI RICAMBI PER IL FILTRO AD ALTA ELENCO DEI RICAMBI PER IL CARRELLO PRESSIONE POS. N° ORD. NOME POS. N° ORD. NOME 0097 123 Filtro ad alta pressione HF - 01 com-...
  • Page 137: Elenco Dei Ricambi Per Il Tamburo Del Tubo Flessibile Di Riscaldamento

    NESPRAY PLUS RICAMBI ED ACCESSORI 13.6 ELENCO DEI RICAMBI TAMBURO DEL TUBO FLESSIBILE DI RISCALDAMENTO POS. N° ORD. NOME POS. N° ORD. NOME 2313 048 Copertura frontale cpl. 2311 153 Asta filettata (Pos. 1-7,33,34,36,38) 2311 148 Tubo cpl. 2320 429 Display...
  • Page 138 NESPRAY PLUS RICAMBI ED ACCESSORI 3 4 5 6 7 8 9 10 11 12 13 14 15 16 18 19 44 45 46 48 49 39 40 41 42 43 Figura dei ricambi Tamburo del tubo flessibile di riscaldamento...
  • Page 139 NESPRAY PLUS RICAMBI ED ACCESSORI 13.7 ELENCO DEI RICAMBI TUBO FLESSIBILE DI RISCALDAMENTO 2311657 POS. N° ORD. NOME POS. N° ORD. NOME 2308 887 Raccordo doppio 2312 111 Cavetto marrone (2) 9970 103 Anello di tenuta (2) 2313 390 Bussola (2)
  • Page 140: Elenco Dei Ricambi Per Il Sistema Di Aspirazione

    NESPRAY PLUS RICAMBI ED ACCESSORI 13.8 ELENCO DEI RICAMBI PER IL SISTEMA DI ASPIRAZIONE POS. N° ORD. NOME 0341 263 Sistema di aspirazione completo 0341 435 Filtro, larghezza di maglia 1 mm opzionale: 0253 244 filtro, larghezza di maglia 0,8 mm...
  • Page 141: Controllo Dell'apparecchio

    2. Durata della garanzia e registrazione Con gli accessori ed i ricambi originali WAGNER si ha la garan- zia del rispetto di tutte le norme di sicurezza. Il periodo di garanzia è di 36 mesi, in caso di uso industriale o di uso che comporta pari sollecitazioni, come in particolare il funzionamento durante più...
  • Page 142 NESPRAY PLUS DICHIARAZIONE DI GARANZIA 3. Espletamento ranzia, le spese di riparazione saranno a carico dell’acquiren- Se durante il periodo di garanzia appaiono difetti di materiale, Le suddette disposizioni regolano in modo conclusivo il rap- di lavorazione o di prestazioni dell’apparecchio, allora si devo- porto giuridico con noi instaurato.
  • Page 143 NESPRAY PLUS...
  • Page 144 EUROPA-SERVICENETZ / EUROPEAN SERVICE NETWORK / RÉSEAU DE SERVICE APRÈS-VENTE EN EUROPE RETE DI ASSISTENZA EUROPEA / EUROPA – SERVICENETWERK / EUROPA – SERVICENÄT J. Wagner Ges.m.b.H. Wagner Spraytech Wagner Spraytech (UK) Limited Ottogasse 2/20 Scandinavia A/S The Coach House 2333 Leopoldsdorf Helgeshøj Allé...

Table des Matières