
Manuels Connexes pour Oceanic OCEATI2Z2B


Sommaire des Matières pour Oceanic OCEATI2Z2B
- Page 1 TABLE DE CUISSON INDUCTION Guide d'utilisation INDUCTION HOB User manual OCEATI2Z2B...
-
Page 2: Avertissements Et Instructions De Sécurité Importantes
Avertissements et instructions de sécurité importantes Lisez les mises en garde de sécurité dans leur intégralité avec d'utiliser l'appareil, et gardez la notice d'installation d'utilisation afin pouvoir vous y référer ultérieurement. Mises en garde importantes ATTENTION: parties accessibles l'appareil sont portées à haute température en cours d'utilisation. - Page 3 été appréhendés. Ne laissez jamais un enfant jouer avec l'appareil. Les manipulations de nettoyage ou d'entretien ne doivent pas être effectuées par un enfant sans surveillance. ATTENTION: Il peut être dangereux de laisser chauffer de la graisse ou de l'huile sans surveillance sur une table de cuisson car cela peut provoquer un incendie.
- Page 4 ATTENTION: N'utilisez que les dispositifs de sécurité de table de cuisson conçues par le fabricant plaque cuisson et/ou intégrées à l'appareil et/ou indiquées par le fabricant dans la notice d’utilisation comme convenant à l'appareil. L'utilisation dispositifs de protections de sécurité de table de cuisson inappropriées peut être à...
- Page 5 • Un moyen de déconnexion doit être prévu dans les canalisations fixes conformément aux règles d’installation afin d’assurer coupure complète de l’alimentation électrique. • Toute installation incorrecte de l'appareil peut rendre caduque la garantie et annuler les droits de réclamation. •...
-
Page 6: Risque De Choc Électrique
autre manipulation réparation doit être effectuée par un technicien dûment qualifié. • N'essayez pas de nettoyer la table de cuisson avec un nettoyeur à vapeur. • Aucun objet lourd ne doit tomber ou être posé sur la table de cuisson. •... -
Page 7: Risque De Coupure
un choc électrique voir une électrocution mortelle. Risque de coupure • Soyez vigilant: les arêtes des panneaux sont très coupantes. • Faute de quoi, vous vous risqueriez des blessures ou des coupures. Risque de choc électrique • N'utilisez pas une plaque de cuisson cassée ou fissurée. - Page 8 surface en verre tant qu'elle n'a pas refroidi. • Les objets métalliques, comme les couteaux, les fourchettes, les cuillères et les couvercles ne doivent pas être placés sur la plaque chauffante car ils pourraient devenir brûlants. • Les enfants doivent rester à distance. •...
- Page 9 Informations sur la signification du marquage de conformité Le marquage indique que le produit répond aux principales exigences des Directives Européenne 2014/35/EU (Basse Tension), 2014/30/EU (Compatibilité Electromagnétique), 2011/65/UE (Réduction de l'emploi de certaines substances dangereuses dans les EEE).
-
Page 10: Table Des Matières
SOMMAIRE I - Description de l’appareil Page 11 Caractéristiques techniques Page 11 II - Installation Page 12 A - Déballage de l’appareil Page 12 B - Découpe du plan de travail Page 13 C – Branchement de la table de cuisson Page 14 III –... -
Page 11: I - Description De L'appareil
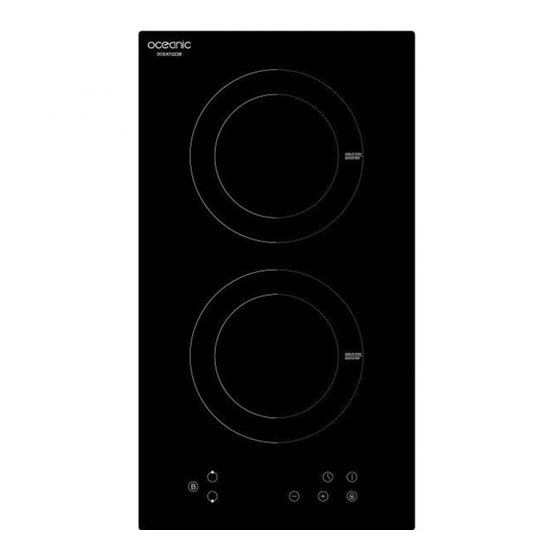
6. Contrôle Boost 1. Zone de cuisson 2000W (avec fonction d’amplification) 2. Zone de cuisson 1500W 3. Contrôles des fonctions principales 4. Contrôle de la fonction d’amplification Caractéristiques techniques Référence OCEATI2Z2B Modèle YL-ID3501 Plaques de cuisson 2 plaques Tension d'alimentation 220-240V~ 50-60Hz Puissance électrique totale... -
Page 12: Installation
II - Installation A - Déballage de l’appareil Retirez tous les matériaux d'emballage, le film protecteur et la bande de fixation de l'appareil. • Le carton d’emballage est recyclable. Il doit être jeté dans les bacs de collecte prévus à cet effet. -
Page 13: B - Découpe Du Plan De Travail
Longueur Largeur Hauteur Diamètre A (mm) B (mm) X (mm) (mm) (mm) (mm) (mm) OCEATI2Z2B 62.5 58.5 268±4 500±4 50 mini A = 760mm B = 50mm (min) C = 20mm (min) D = Espacement / Entrée d'air E = Sortie d'air (5mm) -
Page 14: C - Branchement De La Table De Cuisson
Fixez les attaches comme illustré ci-dessous : Côté inférieur de la support fixation trou de fixation plaque C – Branchement de la table de cuisson Cette appareil a une puissance totale de 3500W et doit être « câblé » en un ancrage avec fusible approprié... -
Page 15: Fonctionnement De L'appareil
Message important pour les patients ayant un stimulateur cardiaque Cette plaque à induction génère des champs magnétiques dans l'environnement immédiat. Votre stimulateur cardiaque doit être conçu en conformité avec les règlements correspondants pour qu'aucune interférence ne puisse être causée entre le stimulateur et la plaque de cuisson. Consultez le fabricant du stimulateur cardiaque ou votre médecin pour déterminer s'il est conforme à... -
Page 16: B - Panneau De Contrôle
- N'utilisez pas d'ustensiles avec des bords dentelés ou un fond bombé. - La base de l'ustensile doit être lisse, reposer à plat sur le verre et être de même taille que la plaque. Placez toujours l'ustensile bien au centre de la plaque. - Retirez toujours les ustensiles des plaques en les soulevant, jamais en les faisant glisser dessus, faute de quoi ils pourraient rayer le verre. -
Page 17: C - Fonctions De Puissance, Cuisson Et Minuteur
Utilisation des touches tactiles Les touches tactiles répondent au simple touché, il n’est pas nécessaire d’appliquer une pression importante du doigt. Les touches tactiles sont actionnées lorsque la première phalange est entièrement positionnée sur la touche (cf. schéma). A chaque pression, un ‘bip’ est émis pour indiquer la prise en compte de l’action demandée. Veuillez-vous assurer que les touches de contrôle sont tout le temps propres et sèches et qu’aucun objet ne perturbe leur fonctionnement. - Page 18 C.3. Amplificateur de puissance Vous pouvez utiliser la fonction «Amplification» (Boost) pour augmenter la puissance de la zone de cuisson durant 5 minutes au maximum. - Pour activer la fonction «Amplification», appuyez sur la touche de sélection de la zone de cuisson désirée (zone d'amplification seulement), puis appuyez sur la touche d'amplification (6).
-
Page 19: Nettoyage Et Entretien
C.6. Indicateur d'alerte de surface chaude Veuillez noter que l'indicateur de surface chaude (H) s'allume lorsque l'une ou plusieurs zones de cuisson ont été utilisées - cet indicateur s'éteindra lorsque la(les) zone(s) sera (seront) complètement refroidie(s). IV – Nettoyage et entretien Avant d'effectuer toute procédure d'entretien ou de nettoyage, DÉBRANCHEZ l'appareil de la prise d'alimentation et veillez à... -
Page 20: Diagnostic Des Pannes
V – Diagnostic des pannes Vérifiez s'il n'y a pas de coupure de courant. Vérifiez si la prise électrique / l'appareil est connecté correctement. L'appareil n'est pas alimenté Vérifiez si le minuteur n'a pas éteint automatiquement l'appareil. (Voir le paragraphe C.4.) C’est l'indicateur de surface chaude. - Page 21 (4) toute opération impropre d'entretien, utilisation non conforme aux instructions concernant le produit ou branchement à une tension incorrecte ; (5) toute utilisation d'accessoires non fournis ou approuvés par Oceanic. La garantie sera annulée en cas d'élimination de la plaque signalétique et/ou du...
-
Page 22: Mise Au Rebut
Européenne 2014/35/CE (Basse Tension), 2014/30/CE (Comptabilité Electromagnétique), 2011/65/UE (Réduction de l'emploi de certaines substances dangereuses dans les EEE). Oceanic – 120-126 Quai de Bacalan – CS 11584 – 33000 Bordeaux Importé par SCHNEIDER CONSUMER GROUP 12, rue Jules Ferry, 93110 Rosny-sous-Bois, FRANCE... - Page 23 Informations concernant les plaques de cuisson domestiques électriques Symbole Valeur Unité OCEATI2Z2B Identification du modèle (YL-ID3501) Type de plaque Vitrocéramique Nombre de zones et/ou aires de cuisson Technologie de chauffage (zones et aires de cuisson par induction, Zones de zones de cuisson conventionnelle, cuisson radiante plaques électriques)
-
Page 24: Safety Warnings
Safety Warnings Your safety is important to us. Please read this information before using your cooktop. Installation Electrical Shock Hazard • Disconnect the appliance from the mains electricity supply before carrying out any work or maintenance on it. • Connection to a good earth wiring system is essential and mandatory. -
Page 25: Health Hazard
• This appliance is to be properly installed and earthed only by a suitably qualified person. • This appliance should be connected to a circuit which incorporates an isolating switch providing full disconnection from the power supply. • Failure to install the appliance correctly could invalidate any warranty or liability claims. -
Page 26: Cut Hazard
• Metallic objects such as knives, forks, spoons and lids should not be placed on the hob surface since they can get hot • Keep children away. • Handles of saucepans may be hot to touch. Check saucepan handles do not overhang other cooking zones that are on. - Page 27 • Do not allow children to play with the appliance or sit, stand, or climb on it. • Do not store items of interest to children in cabinets above the appliance. Children climbing on the cooktop could be seriously injured. •...
- Page 28 • If the supply cord is damaged, it must be replaced by the manufacturer, its service agent or similarly qualified persons in order to avoid a hazard. •This appliance is intended to be used in household and similar applications such as: -staff kitchen areas in shops, offices and other working environments;...
- Page 29 •WARNING: Unattended cooking on a hob with fat or oil can be dangerous and may result in fire. NEVER try to extinguish a fire with water, but switch off the appliance and then cover flame e.g. with a lid or a fire blanket. •WARNING: Danger of fire: do not store items on the cooking surfaces.
- Page 30 SUMMARY Safety Warnings Presentation of the product A word on induction cooking Using the Boost Locking the setting controls Using the Timer Cooking instructions Heat settings Maintenance and cleaning Tricks and tips Control and display of faults Technical specifications Installation This user guide is available in the following languages: - FR (original version) - EN (translated from the original)
-
Page 31: Presentation Of The Product
Presentation of the product Top View Control panel 1. ON/OFF control 2. Heating zone selection controls 3. Power / Timer regulating controls 4. keylock control 5. Timer control 1. Heating zone 2000W 6. Boost control 2. Heating zone 1500W 3. Control pannel 4. - Page 32 Before using your new induction cooking hob • Read this guide, paying special attention to the “safety instructions”. • Remove any protective film remaining on your induction cooking hob. Use of setting controls • The setting controls respond to the touch, so there is no need to press. •...
-
Page 33: Using Your Induction Hob
Ensure the bottom of your pot is smooth, rests flat against the glass and is level with the cooking zone. Use pots with a diameter larger than the outline of the zone selected. Using a slightly wider pan produces maximum efficiency. If you use a smaller pan, efficiency might be less than desired. - Page 34 4. Select a heat setting by touching the “-” or “+” control. • If you don’t choose a heat setting within 1 minute, the Induction hob will automatically switch off. You will need to start again at step 1. • You can modify the heat setting at any time during cooking.
-
Page 35: Using The Boost
4. Beware of hot surfaces “H” will show which cooking zone is hot to touch. It will disappear when the surface has cooled down to a safe temperature. It can also be used as an energy saving function if you want to heat further pans, use the hotplate that is still hot. -
Page 36: Restrictions When Using
If you want to cancel the Boost during these 5 minutes, touch the heating zone selection button, an indicator next to the key will flash. And then touch the Boost button. The heating zone will go back to the power stage which was set before boost. -
Page 37: Using The Timer
Detection of small objects When the shape of a pot is not suitable, or if the pot is not magnetic (e.g. made of aluminium), or certain small items (e.g. knife, fork, keys) have been left on the hob, the cooking hob automatically switches to standby mode in 1 minute. The fan maintains cooking for a further minute while the induction hob cools. -
Page 38: Setting The Timer To Turn One Cooking Zone Off
3. Adjust the timer setting by touch the “-” or “+” controls. The minute minder indicator will start flashing and will show in the timer display. Hint: Touch the “-” or “+” control of the timer once to decrease or increase by 1 minute. Touch and hold the “-”... - Page 39 3. Set the time by touching the “-” or “+” control of the timer Hint: Touch the “-” or “+” control of the timer once will decrease or increase by 1 minute. Touch and hold the “-” or “+” control of the timer will decrease or increase by 10 minutes.
-
Page 40: Cooking Instructions
(set to 6 minutes) (set to 3 minutes) 2. When cooking timer expires, the corresponding cooking zone will be switch off automatically and show “H”. NOTE: If you want to change the time after the timer is set, you have to start from step 1 Cooking instructions Pay attention when frying, because oil and fat heat up very quickly, particularly if using the PowerBoost function. -
Page 41: Heat Settings
3. Coat the two sides of the steak with oil. Drizzle a little oil in the hot pan and then place the meat in. 4. Turn the steak once only during cooking. The exact cooking time depends on the thickness of the steak and the cooking you desire. The time may vary from 2 to 8 minutes each side. -
Page 42: Maintenance And Cleaning
• stir-fry • searing • bringing soup to the boil • boiling water Maintenance and cleaning What? How? Important! Every day stains on 1. Cut power to cooking hob. • When the electric power is cut, the glass (finger and 2. -
Page 43: Tricks And Tips
Tricks and tips Problem Possible causes Necessary action Induction hob No electric power Ensure induction hob is connected cannot be switched to the power and it is switched on. Check whether there is a power cut in your building or region. If the problem persists after checking, call a qualified technician. -
Page 44: Control And Display Of Faults
The induction hob or Technical fault. Please note the error code in a cooking zone letters and numbers, unplug switches off induction hob from the mains and unexpectedly, a contact a qualified technician. beep sounds and an error code shows (generally alternately with one or two figures... -
Page 45: Technical Specifications
Technical specifications Cooking hob OCEATI2Z2B Cooking zones 2 zones Voltage 220-240 V ~50-60Hz Electric power installed 3000-3800W Dimensions L×W × H(mm) 288 X 520 X 62 Housing dimensions A × B (mm) 268 X 500 The weight and dimensions are approximate. We are continually improving our products, and we may modify the specifications, designs and models without notice. -
Page 46: Before Locating The Fixing Brackets
Remark: the safety distance between hob and furniture above it should be at least 760 mm. A(mm) B(mm) C(mm) 50 mini 20 mini Air inlet Air outlet 5 mm Before locating the fixing brackets The unit should be placed on a stable, smooth surface (use the packaging). Do not apply force onto the controls protruding from the hob. -
Page 47: Connecting The Hob To The Mains Power Supply
Cautions 1. The ceramic cooker hob must be installed by qualified personnel or technicians. We have professionals at your service. Please never conduct the operation by yourself. 2. The ceramic cooker hob shall not be mounted to cooling equipment, dishwashers and rotary dryers. 3. - Page 48 Oceanic – 120-126 Quai de Bacalan – CS 11584 – 33000 Bordeaux Importé par SCHNEIDER CONSUMER GROUP 12, rue Jules Ferry, 93110 Rosny-sous-Bois, FRANCE...
- Page 49 Information concerning domestic electric cooking hobs Symbol Value Unit Identification of model OCEATI2Z2B Type of hob Induction Number of zones and/or cooking zones Heating technology (zones and induction cooking zones, Induction conventional cooking zones, cooking zones electric hobs) For circular cooking zones:...
- Page 50 OCEATI2Z2B_IM_FR_112020_V1...