Saeco Odea Go Mode D'emploi
Masquer les pouces
Voir aussi pour Odea Go:
- Mode d'emploi (44 pages) ,
- Manuel de service (115 pages) ,
- Mode d'emploi (35 pages)
Table des Matières
Publicité
Les langues disponibles
Les langues disponibles
Liens rapides
Publicité
Chapitres
Table des Matières

Manuels Connexes pour Saeco Odea Go


Sommaire des Matières pour Saeco Odea Go
-
Page 22: Important
IMPORTANT Lors de l’utilisation d’appareils électriques, il est important de prendre les précautions suivantes, afin d’éviter les décharges électriques, les courts circuits et les accidents corporels. 1 Lire toutes les instructions et les indications données dans cette brochure, ainsi que toute autre information que contient l’emballage, avant de mettre la machine en marche. -
Page 23: Précautions
PRÉCAUTIONS Machine est réservée à un usage domestique. Tout entretien, en dehors du nettoyage et de l’entretien usuel par l’usager, doit être fait par un service après- vente autorisé. Ne pas plonger la base dans l’eau. Pour éviter les courts-circuits et les décharges électriques, ne pas démonter la base. - Page 24 TABLE DES MATIÈRES GÉNÉRALITÉS ........................5 APPAREIL ..........................6 ACCESSOIRES ..............................6 MONTAGE .........................7 MISE EN MARCHE DE LA MACHINE ......................7 FILTRE « AQUA PRIMA » (EN OPTION) ......................8 TABLEAU DE COMMANDE ....................9 RÉGLAGES ........................10 QUANTITE DU CAFÉ EN TASSE .........................10 RÉGLAGE DE LA HAUTEUR DU BAC D’ÉGOUTTEMENT .................10 RÉGLAGE DU MOULIN ..........................10 DISTRIBUTION DE CAFÉ...
-
Page 25: Généralités
GÉNÉRALITÉS Cette machine à café est prévue pour la préparation de café expresso avec du café en grains et dispose d’un dispositif pour la distribution d’eau chaude et de vapeur. Au design élégant, cet appareil a été conçu exclusivement pour un usage domestique et n’est donc pas indiqué... -
Page 26: Appareil
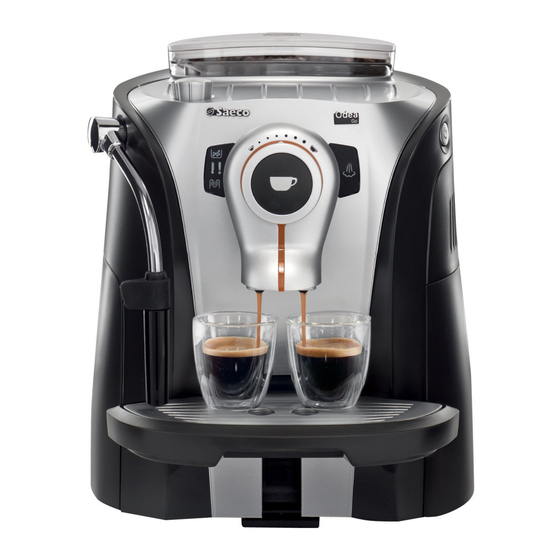
APPAREIL Réservoir à café en grains Plaque pour poser les tasses Couvercle du réservoir à café en grains Interrupteur général Tableau de commande Distributeur Porte de service Tiroir à marc Bac d’égouttement + Bouton robinet eau- chaude/vapeur Tuyau de distribution de l’eau chaude/vapeur Réservoir d’eau Groupe de distribution... -
Page 27: Montage
MONTAGE MISE EN MARCHE DE LA MACHINE reportées sur la plaque signalétique située sur la partie inférieure. Soulever le couvercle du Remplir le réservoir à café Retirer le réservoir de l’eau.Il réservoir à café en grains. en grains Fermer à l’aide du couvercle en le positionnant «... -
Page 28: Filtre « Aqua Prima » (En Option)
Tourner le bouton jusqu’à la Retirer le récipient. La machine est prête. position de repos ( ). Lorsque la température de fonctionnement est atteinte, la machine effectue un cycle de rinçage des circuits internes. Une petite quantité d’eau est distribuée ; pendant cette phase les DELS (diodes lumineuses) clignotent régulièrement dans le sens contraire aux aiguilles d’une montre. -
Page 29: Tableau De Commande
TABLEAU DE COMMANDE DEL (diode lumineuse) alarme vider le marc : signale le besoin de vider les marcs ; cette opération doit être effectuée quand la machine est allumée (Points 4 et 5 page 16). Bouton pour régler la quantité du café en tasse (voir page 10). Bouton de distribution du café... -
Page 30: Réglages
RÉGLAGES QUANTITE DU CAFÉ EN TASSE Café moyen Pour régler la quantité de café distribuée dans une tasse. Ce réglage a un effet immédiat sur la distribution sélectionnée. Café expresso Café allongé RÉGLAGE DE LA HAUTEUR DU BAC D’ÉGOUTTEMENT Bac d’égouttement réglable en hauteur. Pour régler le bac d’égouttement, le lever ou le baisser manuellement jusqu’à... -
Page 31: Distribution De Café Et D'eau Chaude
DISTRIBUTION DE CAFÉ ET D’EAU CHAUDE DISTRIBUTION DE CAFÉ Le cycle de distribution du café peut être interrompu à tout moment en appuyant sur la touche Pour la préparation de 2 tasses, la machine distribue la moitié de la quantité réglée et interrompt brièvement la distribution pour moudre la seconde dose de café. -
Page 32: Distribution D'eau Chaude - Cappuccino
DISTRIBUTION D’EAU CHAUDE – CAPPUCCINO Attendre que le récipient soit Tourner le bouton jusqu’à la Retirer le bac contenant l’eau rempli jusqu’à la quantité d’eau position de repos ( ). chaude. désirée. CAPPUCCINO Régler la hauteur du bac Remplir 1/3 de la tasse avec du Placer un récipient sous la buse d’égouttement. - Page 33 CAPPUCCINO Évacuer l’eau de condensation Tourner le bouton jusqu’à la Plonger la buse de vapeur dans éventuelle et attendre jusqu’à ce position de repos ( ). le lait. qu’il n’y ait que de la vapeur qui sorte. Émulsionner le lait en faisant de Tourner le bouton jusqu’à...
-
Page 34: Détartrage
Lorsqu’on procède au détartrage, il faut être présent pendant toute la durée du processus Le détartrage doit être effectué lorsque la machine le signale. Utiliser un détartrant non toxique ou non nocif. Nous recommandons l’emploi de la solution détartrante SAECO disponible auprès de votre revendeur ou de votre SAV.. - Page 35 Appuyer sur le bouton pour Répéter les opérations du point Rincer et remplir le réservoir éteindre la machine. Après 10 3 au point 7 jusqu’à ce qu’il n’y avec de l’eau fraîche potable. minutes, allumer de nouveau la ait plus de solution détartrante machine.
-
Page 36: Nettoyage Et Entretien
NETTOYAGE ET ENTRETIEN NETTOYAGE DE LA MACHINE Le nettoyage de la machine doit être effectué au moins une fois par semaine. Éteindre la machine et Retirer le bac d’égouttement et débrancher la prise. laver le réservoir à eau. le laver à l’eau courante. Retirer le tiroir à... -
Page 37: Nettoyer Le Groupe De Distribution
NETTOYER LE GROUPE DE DISTRIBUTION Le nettoyage du groupe de distribution doit s’effectuer au moins une fois par semaine. Avant de retirer groupe de distribution, introduire le tiroir à marc et fermer la porte de service. Pour retirer le groupe de Laver le groupe de distribution de S’assurer que le groupe de distribution, appuyer sur la... - Page 38 ROBLÈMES AUSES EMÈDES La machine ne s’allume pas La machine n’est pas branchée sur Brancher la machine sur le réseau le réseau électrique. électrique. prise située au dos de la machine. machine. Le café n'est pas assez chaud. Les tasses sont froides. Réchauffer les tasses en y distribuant de l’eau chaude.
-
Page 39: Consignes De Sécurité
CONSIGNES DE SÉCURITÉ ’ N CAS D URGENCE ’ TILISER EXCLUSIVEMENT L APPAREIL - Dans un lieu fermé. - Pour la préparation de café, d’eau chaude, pour faire monter le lait ou pour réchauffer des boissons avec la vapeur. - Pour l’utilisation domestique. - Par des adultes en conditions psychophysiques non altérées. - Page 40 CONSIGNES DE SÉCURITÉ ANNES - Les éventuelles réparations doivent être effectuées par un service d’assistance agréé. - Ne pas utiliser un appareil présentant un câble d’alimentation défectueux. Si le câble d’alimentation est abîmé, celui-ci doit être remplacé par le constructeur ou par son service clients. (Danger ! Courant électrique !). - Éteindre d’appareil avant d’ouvrir la porte de service.
-
Page 41: Données Techniques
DONNÉES TECHNIQUES DONNÉES TECHNIQUES • Tension nominale Voir plaque signalétique placée sur l’appareil. • Puissance nominale Voir plaque signalétique placée sur l’appareil. • Alimentation Voir plaque signalétique placée sur l’appareil. • Matériau du corps ABS - Thermoplastique • Dimensions (l x h x p) (mm) 290 x 370 x 385 •... - Page 44 Tel: + 39 0534 771111 Fax: + 39 0534 31025 www.saeco.com The manufacturer reserves the right to change the features of the product without prior notice. Le producteur se réserve le droit d“apporter toutes modifications sans préavis. © Saeco International Group S.p.A.