Publicité
Les langues disponibles
Les langues disponibles
Liens rapides
Publicité

Manuels Connexes pour LEGRAND DAKER DK Plus Serie


Sommaire des Matières pour LEGRAND DAKER DK Plus Serie
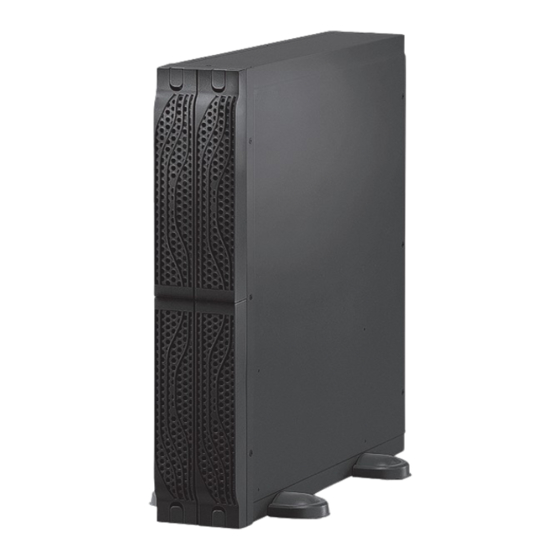
- Page 1 ИНСТРУКЦИЯ Legrand Батарея для DAKER DK Plus 5000ВА, 6000ВА...
- Page 2 DAKER DK Plus Battery Cabinets Manuel d’installation • Installation manual Part. LE09779AC-03/18-01 GF...
- Page 3 DAKER DK Plus Battery Cabinets FRANÇAIS ENGLISH ITALIANO DEUTSCH SPANISH PУСCKИЙ...
- Page 4 DAKER DK Plus Armoire batterie Table des matières 1 Introduction 1.1 Utilisation du manuel 1.2 Conditions de garantie 1.3 Copyright 2. Consignes de Sécurité 3. Installation 3.1 Contenu de l’emballage 3.2 Configuration Tower 3.2.1 Armoire batteries 3.2.2 Onduleur + armoire batteries (option) 3.3 Configuration Rack 3.4 Panneau arrière 3.5 Procédure d’installation...
- Page 5 écrit par le constructeur, effectuée par photocopie ou autre système, scansion électronique com- prise, constitue une violation des droits de propriété intellectuelle et comme telle est passible de poursuites. Tous droits réservés. LEGRAND interdit la reproduction du présent document, y compris partiel, sans autorisation écrite.
- Page 7 Tous les produits Legrand doivent exclusivement être ouverts et réparés par du personnel formé et habilité par Legrand. Toute ouverture ou répa- ration non autorisée annule l’intégralité des responsabilités, droits à remplacement et garanties.
- Page 8 2 Consignes de Sécurité f. Établir si la batterie n’est pas reliée à la terre par inadvertance. Si c’est le cas, débrancher la source de la terre. Tout contact avec une partie d’une batterie reliée à la terre expose à un risque d’électrocution.
- Page 9 DAKER DK Plus Armoire batterie 3 Installation Contenu de l’emballage Contrôler le contenu de l’emballage : - manuel d’installation ; - câbles et fixations (uniquement pour armoires batteries vides) ; - kit accessoires tower/rack comme indiqué sur la figure suivante :...
- Page 10 3 Installation Configuration Tower 3.2.1 Armoire batterie...
- Page 11 DAKER DK Plus Armoire batterie 3.2.2 Onduleur + armoire batteries Phase 1 CETTE PARTIE PROVIENT DE L’ARMOIRE DES BATTERIES x8: DE L'ONDULEUR x8: DE L'ARMOIRE DES BATTERIES Phase 2 CETTE PARTIE PROVIENT DE L'ARMOIRE DES BATTERIES...
- Page 13 3 Installation Configuration Rack INDICATION Pour la configuration Rack, il est également possible d’utiliser le kit de soutien pour rack (3 109 52). Dans ce cas, se reporter à la fiche des instructions fournie avec le kit. Phase 1 Phase 2 Phase 3...
- Page 14 DAKER DK Plus Armoire batterie Phase 4 Phase 5...
- Page 15 3 Installation Panneau arrière 1. Interrupteur DC 2. Borne terre 3. Connecteur batteries 4. Câble d’alimentation DC...
- Page 16 DAKER DK Plus Armoire batterie Procédure d’installation ATTENTION Lire les consignes de sécurité du chapitre 2 avant de procéder à l’installation de l’armoire batterie. 1. S’assurer que l’armoire de batterie choisie est compatible avec l’onduleur. ATTENTION Dans le tableau du chapitre 6, figurent les indications de compatibilité entre onduleur et armoires de batterie.
- Page 17 3 Installation 3. S’assurer que l’onduleur n’est pas en marche. Brancher le câble d’alimentation CC au connecteur ex- terne batterie de l’onduleur en respectant les opérations décrites sur les figures qui suivent : Phase 1 Phase 2 Phase 3 Phase 4 Phase 5 Phase 6 4.
- Page 19 DAKER DK Plus Armoire batterie 4 Réglages INDICATION Ce chapitre est valable pour tous les onduleurs des séries Daker DK Plus (sauf 3-1 version 3 101 78). Si l’onduleur est branché à une ou plusieurs armoires de batteries, il est nécessaire d’en régler le nombre sur la base d’un temps de back-up plausible.
- Page 20 ATTENTION L’armoire batterie ne doit jamais être entreposé si les batteries sont partiellement ou tota- lement déchargées. LEGRAND décline toute responsabilité en cas de dommages ou de mauvais fonctionnement causés par le stockage de l’armoire batterie dans de mauvaises conditions.
- Page 21 DAKER DK Plus Armoire batterie 6 Caractéristiques techniques 3 106 63 3 106 64 3 106 60 3 106 61 3 106 62 3 106 65 * 3 106 66 * 3 106 67 * 3 106 68 * 3 106 69 * Caractéristiques générales 3 101 73 À...
- Page 22 7 Changement des batteries La batterie peut constituer un risque de décharge électrique et de courant élevé de court-cir- cuit. Sur un électricien et un personnel d’entretien qualifiés sont autorisés à changer les batteries. Les batteries doivent être remplacées en nombre identique et doivent être de même type. Les batteries doivent être neuves et l’écart de tension entre les chaînes doit être inférieur à...
- Page 23 DAKER DK Plus Battery Cabinets Table of Contents 1. Introduction 1.1 Use of the manual 1.2 Guarantee terms 1.3 Copyright 2. Safety Instructions 3. Installation 3.1 Package content 3.2 Tower configuration setup 3.2.1 Battery cabinet 3.2.2 UPS + battery cabinet 3.3 Rack configuration setup 3.4 Rear panel 3.5 Installation procedure...
- Page 25 - modifications made to the equipment, software, functioning logic unless they have been author- ized by the Manufacturer in writing; - repairs that have not been authorized by the LEGRAND Technical Support Service; - damage caused intentionally, through negligence, by acts of God, natural phenomena, fire or liquid infiltration.
- Page 26 Do not open up, dismantle, alter or modify the device except where specifically required to do so by the instructions. All Legrand products must be opened and repaired ex- clusively by personnel trained and approved by Legrand. Any unauthorised opening or repair completely cancels all liabilities and the rights to replacement and guarantees.
- Page 27 2 Safety Instructions The likelihood of such shock can be reduced if such grounds are removed during installa- tion and maintenance (applicable to equipment and remote battery supplies not having a grounded supply circuit). CAUTION: Do not dispose of batteries in a fire. The batteries may explode. CAUTION: Do not open or mutilate batteries.
- Page 28 DAKER DK Plus Battery Cabinets 3 Installation Package content Check for the following package content: - installation manual; - wires and cable ties (only for the empty battery cabinets); - tower/rack accessories kit as shown in the following figure:...
- Page 29 3 Installation Tower configuration setup 3.2.1 Battery cabinet...
- Page 31 DAKER DK Plus Battery Cabinets 3.2.2 UPS + battery cabinet...
- Page 32 3 Installation Rack configuration setup INDICATION For the rack configuration setup it is also possible to use the rack support bracket kit 3 109 52. In this case, follow the instruction sheet contained in the kit.
- Page 33 DAKER DK Plus Battery Cabinets...
- Page 34 3 Installation Rear panel 1. DC breaker 2. Earth terminal 3. Battery connector 4. DC power cord...
- Page 35 DAKER DK Plus Battery Cabinets Installation procedure WARNING Read the safety instructions on chapter 2 before installing the battery cabinet. 1. Ensure that the battery cabinet chosen is compatible with the UPS ATTENTION The table on chapter 6 indicates the compatibility between UPS and battery cabinets. Wrong installations are hazardous for people and cause irreversible damages to the UPS and the battery cabinet.
- Page 37 3 Installation 3. Ensure the UPS is not functioning. Connect the DC power cord to the external battery connector of the UPS respecting the steps illustrated in the following figure: 4. If the battery cabinet must be connected to another battery unit, connect the DC power cord to the external battery connector of the existing battery cabinet following the steps illustrated in the previous figure.
- Page 38 DAKER DK Plus Battery Cabinets 4 Setting INDICATION This chapter is valid for all the UPSs of the Daker DK Plus series excluding the 3-1 version 3 101 78. If the UPS is connected to one or more battery cabinets, it is necessary to set their number to fore- cast a realistic backup time.
- Page 39 +25°C (+77°F). CAUTION The battery cabinet must never be stored if the batteries are partially or totally discharged. LEGRAND is not liable for any damage or bad functioning caused to the UPS by wrong warehousing. Dismantling DANGER Dismantling and disposal operations may only be done by a qualified electrician.
- Page 40 DAKER DK Plus Battery Cabinets 6 Technical specifications 3 106 63 3 106 64 3 106 60 3 106 61 3 106 62 3 106 65 * 3 106 66 * 3 106 67 * 3 106 68 * 3 106 69 * General characteristics 3 101 73 to be installed with...
- Page 41 Batteries may only be replaced with the same number and type. Batteries must be brand new and the voltage difference between the strings must be less than 1V. If the battery brand is different from the one originally installed by Legrand, the estimated battery autonomy indicated on the display of the UPS may not be reliable.
- Page 43 DAKER DK Plus Armadi batterie Indice 1. Introduzione 1.1 Uso del manuale 1.2 Termini di garanzia 1.3 Copyright 2. Istruzioni di Sicurezza 3. Installazione 3.1 Contenuto della confezione 3.2 Impostazione configurazione tower 3.2.1 Armadio batterie 3.2.2 UPS + armadio batterie 3.3 Impostazione configurazione rack 3.4 Pannello posteriore 3.5 Procedura d’installazione...
- Page 44 LEGRAND si riserva i diritti di proprietà della presente pubblicazione e diffida dalla riproduzione totale o parziale della stessa senza preventiva autorizzazione scritta.
- Page 45 Non aprire, smontare, alterare o modificare il dispositivo eccetto speciale menzione indicata nel manuale. Tutti i prodotti Legrand devono essere esclusivamente aperti e riparati da personale adeguatamente formato e autorizzato da Legrand. Qualsivoglia apertura o riparazio- ne non autorizzata comporta l’esclusione di eventuali responsabilità, diritti alla sostituzione e...
- Page 46 2 Istruzioni di sicurezza f ) Verificare se la batteria sia stata inavvertitamente collegata a terra. In questo caso, scol- legare la sorgente da terra. Il contatto con una parte qualsiasi della batteria messa a ter- ra può causare una scossa elettrica. La probabilità può essere ridotta se i collegamenti di terra vengono interrotti durante l’installazione e la manutenzione (applicabile alle apparecchiature e ad alimentazioni a batteria poste a distanza prive di un circuito di alimentazione messo a terra).
- Page 47 DAKER DK Plus Armadi batterie 3 Installazione Contenuto della confezione Verificare che nella confezione siano presenti: - manuale d’installazione; - cavi e fascette (solamente per gli armadi batterie vuoti); - kit accessori tower/rack come illustrato nella seguente figura: 4 pezzi 1 pezzo 1 pezzo 2 pezzi...
- Page 49 3 Installazione Impostazione configurazione tower 3.2.1 Armadio batterie Fase 1 Fase 2...
- Page 50 DAKER DK Plus Armadi batterie 3.2.2 UPS + armadio batterie Fase 1 QUESTA PARTE VIENE DALL’ARMADIO BATTERIA x8: DALL’UPS x8: DALL’ARMADIO BATTERIE Fase 2 QUESTA PARTE VIENE DALL’ARMADIO BATTERIE...
- Page 51 3 Installazione Impostazione configurazione rack INDICAZIONI Per l’impostazione della configurazione rack è possibile anche utilizzare il kit con staffe di supporto 3 109 52. In tal caso, seguire le istruzioni contenute nel kit. Fase 1 Fase 2 Fase 3...
- Page 52 DAKER DK Plus Armadi batterie Fase 4 Fase 5...
- Page 53 3 Installazione Pannello posteriore 1. Interruttore DC 2. Morsetto di terra 3. Connettore batteria 4. Cavo di alimentazione DC...
- Page 55 DAKER DK Plus Armadi batterie Procedura d’installazione ATTENZIONE Leggere le avvertenze di sicurezza al capitolo 2 prima di installare l’armadio batterie. 1. Verificare che l’armadio batterie scelto sia compatibile con l’UPS. ATTENZIONE La tabella al capitolo 6 indica la compatibilità tra gli UPS e gli armadi batteria. Installazioni errate sono pericolose per le persone e causano danni irreversibili all’UPS e all’arma- dio batterie.
- Page 56 3 Installazione 3. Accertarsi che l’UPS non sia in funzione. Collegare il cavo di alimentazione DC al connettore delle batterie esterne dell’UPS, rispettando i passaggi illustrati nella seguente figura: Fase 1 Fase 2 Fase 3 Fase 4 Fase 5 Fase 6 4.
- Page 57 DAKER DK Plus Armadi batterie 4 Impostazioni INDICAZIONI Questo capitolo è valido per tutti gli UPS delle serie Daker DK Plus ad eccezione del modello trifa- se-monofase 3 101 78. Se l’UPS è collegato a uno o più armadi batteria, è necessario impostarne il numero per prevede- re un tempo di backup realistico.
- Page 58 è superiore a +25°C (+77°F). ATTENZIONE L’armadio batteria non deve mai essere immagazzinato se le batterie sono parzialmente o totalmen- te scariche. LEGRAND declina ogni responsabilità per danni o malfunzionamenti causati da un errato immagaz- zinamento dell’UPS. Smontaggio PERICOLO Le operazioni di smontaggio e smaltimento devono essere effettuate soltanto da elettricisti qua- lificati.
- Page 59 DAKER DK Plus Armadi batterie 6 Specifiche Tecniche 3 106 63 3 106 64 3 106 60 3 106 61 3 106 62 3 106 65 * 3 106 66 * 3 106 67 * 3 106 68 * 3 106 69 * Caratteristiche generali 3 101 73 3 101 74...
- Page 61 1V. Se la marca della batteria è diversa da quella originariamente installata da Legrand, l’autonomia stimata per il funzionamento a batteria indicata sul display dell’UPS potrebbe non essere affidabile.
- Page 62 DAKER DK Plus Batterieschränke Inhaltsverzeichnis 1 Einleitung 1.1 Gebrauch des Handbuchs 1.2 Garantiebedingungen 1.3 Copyright 2. Sicherheitshinweise 3. Installation 3.1 Packungsinhalt 3.2 Tower Konfiguration Setup 3.2.1 Batterieschrank 3.2.2 USV + Batterieschrank 3.3 Rack Konfiguration Setup 3.4 Rückseite 3.5 Installationsprozedur 4. Einstellungen 5.
- Page 63 Scannen der Bedienungsanleitung, die vom Hersteller nicht schrift- lich bestätigt wurde, verstößt gegen das Urheberrecht und kann strafrechtlich verfolgt werden. LEGRAND behält sich das Urheberrecht an dieser Publikation vor und verbietet seine Vervielfälti- gung ganz oder teilweise ohne vorherige schriftliche Genehmigung.
- Page 64 Anleitung zu lesen und der produkspezifische Aufstellort zu beachten. Das Gerät vor- behaltlich besonderer, in der Betriebsanleitung angegebener Hinweise nicht öffnen, zerlegen, beschädigen oder abändern. Alle Produkte von Legrand dürfen ausschließlich durch Legrand geschultes und anerkanntes Personal geöffnet und repariert werden. Durch unbefugte Öffnung oder Reparatur erlöschen alle Haftungs-, Ersatz- und Gewährleistungsansprüche.
- Page 65 2 Sicherheitshinweise f ) Kontrollieren Sie, ob die Batterie unbeabsichtigt geerdet ist. Sollte dies der Fall sein, trennen Sie die Quelle von der Erde ab. Der Kontakt mit einer geerdeten Batterie stellt Stromschlag- gefahr dar. Die Wahrscheinlichkeit eines Stromschlags kann reduziert werden, wenn die Erdung bei der Installation und Wartung abgetrennt ist (gilt für Geräte und ferngeschaltete Batterieversor- gung, ohne einen geerdeten Versorgung).
- Page 67 DAKER DK Plus Batterieschränke 3 Installation Packungsinhalt Überprüfen Sie folgenden Packungsinhalt: - Installationsanweisungen; - Verbinder und Kabelbinder (nur für leere Batterieschränke) - Zubehörkit für die Tower/Rack wie in der folgenden Abbildung gezeigt: 4 St. 1 St. 1 St. 2 St. Ein Satz je nach Modell 2 St.
- Page 68 3 Installation Tower Konfiguration Setup 3.2.1 Batterieschrank Schritt 1 Schritt 2...
- Page 69 DAKER DK Plus Batterieschränke 3.2.2 USV + Batterieschrank Schritt 1 DIESES TEIL KOMMT VOM BATTERIESCHRANK x8: VON DER USV x8: VOM BATTERIESCHRANK Schritt 2 DIESES TEIL KOMMT VOM BATTERIESCHRANK...
- Page 70 3 Installation Rack Konfiguration Setup HINWEIS Um den Batterieschrank in ein Rack montieren zu können, sollte das Rack Haltebügel Set (310952) verwendet werden. In diesem Fall folgen Sie der Bedienungsanleitung des Bausatzes. Schritt 1 Schritt 2 Schritt 3...
- Page 71 DAKER DK Plus Batterieschränke Schritt 4 Schritt 5...
- Page 73 3 Installation Rückseite 1. DC-Sicherung 2. Erdungsanschluss 3. Batterieanschluss (Bat. Rack) 4. DC Anschluss USV...
- Page 74 DAKER DK Plus Batterieschränke Installationsprozedur WARNUNG Lesen Sie die Sicherheitshinweise in Kapitel 2, bevor Sie den Batterieschrank installieren. 1. Vergewissern Sie sich, dass der gewählte Batterieschrank mit der USV kompatibel ist. ACHTUNG: Die Tabelle in Kapitel 6 zeigt die Kompatibilität zwischen USV und Batteri- eschränken.
- Page 75 3 Installation 3. Stellen Sie sicher, das die USV nicht in Betrieb ist. Schließen Sie das Batteriekabel an den Batteriean- schluss der USV an und folgen Sie dazu den nachfolgend beschriebenen Schritten: Schritt 1 Schritt 2 Schritt 3 Schritt 4 Schritt 5 Schritt 6 4.
- Page 76 DAKER DK Plus Batterieschränke 4 Einstellungen HINWEIS Dieses Kapitel gilt für alle USV der Serie Daker DK Plus außer für das die 3ph/1ph Version (Artikel- nummer 310178). Wenn die USV an einen oder mehreren Batterieschränken angeschlossen ist, muss ihre Anzahl ein- gestellt werden, um eine realistische Überbrückungszeit berechnen zu können.
- Page 77 Lagertemperatur über + 25°C (+ 77°F) liegt. ACHTUNG Der Batterieschrank darf niemals gelagert werden, wenn die Batterien teilweise oder vollständig ent- laden sind. LEGRAND haftet nicht für Schäden oder einen fehlerhaften Betrieb, die durch unsachgemäße Lage- rung der USV verursacht werden. Demontage GEFAHR Demontage und Entsorgung dürfen nur von einem Elektrofachmann durchgeführt werden.
- Page 79 DAKER DK Plus Batterieschränke 6 Technische Spezifikationen 3 106 63 3 106 64 3 106 60 3 106 61 3 106 62 3 106 65 * 3 106 66 * 3 106 67 * 3 106 68 * 3 106 69 * Allgemeine Daten 3 101 73 zu installieren mit...
- Page 80 Es dürfen nur neue Batterien eingesetzt werden und der Spannungsunterschied zwi- schen den Zellen muss weniger als 1V betragen. Wenn eine andere Batteriemarke als die Originalbatterie von Legrand installiert wird, könnte die am Display angegebene Batterieautonomie nicht zuverlässig sein.
- Page 81 DAKER DK Plus Armarios batería Índice 1 Introducción 1.1 Uso del manual 1.2 Términos de garantía 1.3 Copyright 2. Instrucciones de seguridad 3. Instalación 3.1 Contenido del paquete 3.2 Ajuste de la configuración de la torre 3.2.1 Armario batería 3.2.2 SAI + armario batería 3.3 Ajuste de la configuración del bastidor 3.4 Panel posterior 3.5 Procedimiento de instalación...
- Page 82 LEGRAND se reserva el copyright de esta publicación y prohíbe su reproducción, total o parcialmente, sin contar con la autorización previa escrita.
- Page 83 Todos los productos Legrand deben ser abiertos y reparados exclusivamente por personal formado y habilitado por Legrand. Cualquier apertura o reparación no autorizada anula la totalidad de las responsabi- lidades, derechos a sustitución y garantías.
- Page 85 2 Instrucciones de seguridad e) Desconectar la fuente de carga antes de conectar o desconectar la batería. f ) Determinar si la batería se ha puesto a tierra de forma involuntariamente. En caso de haber- se puesto a tierra involuntariamente, retirar la fuente de la tierra. El contacto con una parte de una batería puesta a tierra puede causar un choque eléctrico.
- Page 86 DAKER DK Plus Armarios batería 3 Instalación Contenido del paquete Controlar el contenido del embalaje: - manual de instalación; - hilos y cables de enlace (solamente para los armarios batería vacíos); - kit de accesorios torre/bastidor como se muestra en la siguiente figura: 4 pcs 1 pcs 1 pcs...
- Page 87 3 Instalación Ajuste de la configuración de la torre 3.2.1 Armario batería Paso 1 Paso 2...
- Page 88 DAKER DK Plus Armarios batería 3.2.2 SAI + armario batería Paso 1 ESTA PARTE PROCEDE DEL ARMARIO BATERÍA x8: DE SAI x8: DE ARMARIO BATERÍA Paso 2 ESTA PARTE PROCEDE DEL ARMARIO BATERÍA...
- Page 89 3 Instalación Ajuste de la configuración del bastidor INDICACIÓN Para el ajuste de la configuración del bastidor, también se puede usar el kit abrazadera soporte bastidor 3 109 52 En este caso, seguir la hoja de instrucciones contenidas en el kit. Paso 1 Paso 2 Paso 3...
- Page 91 DAKER DK Plus Armarios batería Paso 4 Paso 5...
- Page 92 3 Instalación Panel posterior 1. Interruptor CC 2. Borne de tierra 3. Conector batería 4. Cable potencia CC...
- Page 93 DAKER DK Plus Armarios batería Procedimiento de instalación ADVERTENCIA Leer las instrucciones de seguridad, contenidas en el capítulo 2, antes de instalar el armario batería. 1. Asegurarse de que el armario para la batería elegido sea compatible con el SAI. ATENCIÓN La tabla del capítulo 6 indica la compatibilidad entre el SAI y los armarios para la batería.
- Page 94 3 Instalación 3. Asegurarse de que el armario batería no está encendido. Conectar el cable de potencia CC al conector batería externo del SAI siguiendo los pasos ilustrados en la siguiente figura: Paso 1 Paso 2 Paso 3 Paso 4 Paso 5 Paso 6 4.
- Page 95 DAKER DK Plus Armarios batería 4 Ajuste INDICACIÓN Este capítulo es válido para todos los SAI de la serie Daker DK Plus salvo la 3-1 versión 3 101 78. Si el SAI se conecta a uno o a varios armarios batería, se ha de ajustar el número para calcular un tiempo de reserva real.
- Page 97 +25°C (+77°F). ATENCIÓN El armario batería no se ha de guardar nunca con las baterías parcial o totalmente descargadas. LEGRAND queda eximido de los daños o de un funcionamiento incorrecto causados al SAI por un almacenaje incorrecto. Desmontaje PELIGRO Las operaciones de desmontaje y eliminación pueden ser realizadas solamente por un electricista...
- Page 98 DAKER DK Plus Armarios batería 6 Especificaciones técnicas 3 106 63 3 106 64 3 106 60 3 106 61 3 106 62 3 106 65 * 3 106 66 * 3 106 67 * 3 106 68 * 3 106 69 * Características generales 3 101 73 que instalar con SAI...
- Page 99 1V. Si la marca de la batería no es la misma que la de la original instalada por Legrand, la autonomía estimada indicada de la batería en la pantalla del SAI no es fiable.
- Page 100 ИБП DAKER DK Plus Батарейные модули Содержание 1 Введение 1.1 О данном Руководстве 1.2 Гарантийные обязательства 1.3 Авторское право 2. Меры безопасности 3. Монтаж 3.1 Комплект поставки 3.2 Монтаж в вертикальном положении 3.2.1 Батарейный модуль 3.2.2 ИБП + батарейный модуль 3.3 Монтаж...
- Page 101 Частичное или полное воспроизведение настоящего Руководства путем фотокопирования, сканирования и другими способами является нарушением законодательства об авторском праве и преследуется по закону. Компания Legrand является обладателем авторских прав и запрещает частичное или полное воспроизведение данного Руководства без своего пись- менного разрешения.
- Page 103 мательно изучите инструкции и требования к месту установки изделия. Не вскрывайте корпус и не изменяйте или модифицируйте изделие за исключением случаев, указанных в инструкциях. Открывать и ремонтировать все изделия Legrand разрешается только специ- алистам, подготовленным и уполномоченным компанией Legrand. Любая несанкциониро- ванная...
- Page 104 2 Меры безопасности е) Убедитесь, что батарея не была непреднамеренно подключена к земле. Если это не так, то отсоедините ее от земли. Прикосновение к любой части батареи, подключен- ной к земле, может вызвать поражение электрическим током. Следует принять меры к исключению возникновения соединений с землей во время монта- жа...
- Page 105 ИБП DAKER DK Plus Батарейные модули 3 Монтаж Комплект поставки Проверьте комплект поставки: - руководство по эксплуатации; - провода и кабельные стяжки (только для пустых батарейных модулей); - комплект для монтажа в вертикальном положении / стойке, показанный на следующем рисунке: 4 шт.
- Page 106 3 Монтаж Монтаж в вертикальном положении 3.2.1 Батарейный модуль Шаг 1 Шаг 2...
- Page 107 ИБП DAKER DK Plus Батарейные модули 3.2.2 ИБП + батарейный модуль Шаг 1 ДАННАЯ ДЕТАЛЬ ИЗ КОМПЛЕКТА БАТАРЕЙНОГО МОДУЛЯ х8: ИЗ КОМПЛЕКТА ИБП х8: ИЗ КОМПЛЕКТА БАТАРЕЙНОГО МОДУЛЯ Шаг 2 ДАННАЯ ДЕТАЛЬ ИЗ КОМПЛЕКТА БАТАРЕЙНОГО МОДУЛЯ...
- Page 109 3 Монтаж Монтаж в стойке УКАЗАНИЕ Для установки в стойке также можно использовать комплект кронштейнов для установки в стойке Кат. № 3 109 52. В этом случае руководствуйтесь инструкцией, поставляемой с дан- ным комплектом. Шаг 1 Шаг 2 Шаг 3...
- Page 110 ИБП DAKER DK Plus Батарейные модули Шаг 4 Шаг 5...
- Page 111 3 Монтаж Задняя панель 1. Выключатель постоянного тока 2. Вывод заземления 3. Разъем для подключения батарейного модуля 4. Разъем подключения к ИБП...
- Page 112 ИБП DAKER DK Plus Батарейные модули Процедура монтажа ВНИМАНИЕ Перед монтажом изделия внимательно прочтите инструкцию по технике безопасности из раздела 2. 1. Убедитесь, что выбранный батарейный шкаф совместим с ИБП. ВНИМАНИЕ! В таблице раздела 6 приведены данные о совместимости ИБП с батарейными шкафами. Неправильный...
- Page 113 3 Монтаж 3. Проверьте, что ИБП не включен. Подсоедините кабель питания постоянным током к разъ- ему для подключения батарейного модуля на ИБП. Порядок действий показан на рисунке: Шаг 1 Шаг 2 Шаг 3 Шаг 4 Шаг 5 Шаг 6 4. Если батарейный модуль нужно подключить к другому батарейному модулю, то соедините их...
- Page 115 ИБП DAKER DK Plus Батарейные модули 4 Настройка УКАЗАНИЕ Данная глава действительна для всех ИБП серии Daker DK кроме модели Кат. № 3 101 78 (с трехфазным входом и однофазным выходом). Количество батарейных модулей, подключаемых к ИБП для достижения нужного времени автономной...
- Page 116 модуль к ИБП и включив выключатель постоянного тока на задней панели модуля. При тем- пературе хранения более +25°C повторяйте эту процедуру каждые два месяца. ОСТРОЖНО Запрещается хранить модуль с полностью или частично разряженными батареями. Компания Legrand не несет ответственности за любые повреждения или некорректную работу изделия вследствие нарушения правил хранения. Утилизация ОПАСНО! Демонтаж...
- Page 117 ИБП DAKER DK Plus Батарейные модули 6 Технические характеристики 3 106 63 3 106 64 3 106 60 3 106 61 3 106 62 3 106 65 * 3 106 66 * 3 106 67 * 3 106 68 * 3 106 69 * Общие...
- Page 118 7 Замена батарей Батарея представляет риск с точки зрения поражения электрическим током и коротко- го замыкания. Обслуживать батареи разрешается только персоналу, имеющему соответству- ющий допуск по электробезопасности. Перед заменой батарей следует обязательно изучить главу 2. Батареи следует заменять бата- реями такого же типа и емкости. УКАЗАНИЕ...
- Page 119 DAKER DK Plus Battery Cabinets Appendix - Battery replacement 3 106 60 - 3 106 65...
- Page 121 Appendix - Battery replacement CHANGEMENT DES BATTERIES / BATTERY REPLACEMENT / SOSTITUZIONE BATTERIA / BATTERIE ERSETZEN / SUSTITUCIÓN BATERÍA / ЗАМЕНА БАТАРЕЙ 3 106 60 – 3 106 65 PHASE 1 / STEP 1 / FASE 1 / SCHRITT 1 / PASO 1 / ШАГ 1 FR – Placer les batteries sur le pack batterie.
- Page 122 DAKER DK Plus Armoire batterie CHANGEMENT DES BATTERIES / BATTERY REPLACEMENT / SOSTITUZIONE BATTERIA / BATTERIE ERSETZEN / SUSTITUCIÓN BATERÍA / ЗАМЕНА БАТАРЕЙ 3 106 60 – 3 106 65 PHASE 3 / STEP 3 / FASE 3 / SCHRITT 3 / PASO 3 / ШАГ 3 FR – Brancher les batteries en respectant la polarité...
- Page 123 Appendix - Battery replacement CHANGEMENT DES BATTERIES / BATTERY REPLACEMENT / SOSTITUZIONE BATTERIA / BATTERIE ERSETZEN / SUSTITUCIÓN BATERÍA / ЗАМЕНА БАТАРЕЙ 3 106 60 – 3 106 65 PHASE 5 / STEP 5 / FASE 5 / SCHRITT 5 / PASO 5 / ШАГ 5 FR – Fixer le pack batterie avec deux fixations de câble.
- Page 124 DAKER DK Plus Battery Cabinets CHANGEMENT DES BATTERIES / BATTERY REPLACEMENT / SOSTITUZIONE BATTERIA / BATTERIE ERSETZEN / SUSTITUCIÓN BATERÍA / ЗАМЕНА БАТАРЕЙ 3 106 60 – 3 106 65 PHASE 8 / STEP 8 / FASE 8 / SCHRITT 8 / PASO 8 / ШАГ 8 FR – Suivre les phases 1 à 7 pour préparer les trois autres chaînes de batteries.
- Page 125 Appendix - Battery replacement CHANGEMENT DES BATTERIES / BATTERY REPLACEMENT / SOSTITUZIONE BATTERIA / BATTERIE ERSETZEN / SUSTITUCIÓN BATERÍA / ЗАМЕНА БАТАРЕЙ 3 106 60 – 3 106 65 PHASE 10 / STEP 10 / FASE 10 / SCHRITT 10 / FR –...
- Page 127 DAKER DK Plus Battery Cabinets 3 106 61 - 3 106 62 - 3 106 66 - 3 106 67...
- Page 128 Appendix - Battery replacement CHANGEMENT DES BATTERIES / BATTERY REPLACEMENT / SOSTITUZIONE BATTERIA / BATTERIE ERSETZEN / SUSTITUCIÓN BATERÍA / ЗАМЕНА БАТАРЕЙ 3 106 61 – 3 106 62 - 3 106 66 – 3 106 67 PHASE 1 / STEP 1 / FASE 1 / SCHRITT 1 / PASO 1 / ШАГ 1 FR –...
- Page 129 DAKER DK Plus Battery Cabinets CHANGEMENT DES BATTERIES / BATTERY REPLACEMENT / SOSTITUZIONE BATTERIA / BATTERIE ERSETZEN / SUSTITUCIÓN BATERÍA / ЗАМЕНА БАТАРЕЙ 3 106 61 – 3 106 62 - 3 106 66 – 3 106 67 PHASE 4 / STEP 4 / FASE 4 / SCHRITT 4 / PASO 4 / ШАГ 4 FR –...
- Page 130 Appendix - Battery replacement CHANGEMENT DES BATTERIES / BATTERY REPLACEMENT / SOSTITUZIONE BATTERIA / BATTERIE ERSETZEN / SUSTITUCIÓN BATERÍA / ЗАМЕНА БАТАРЕЙ 3 106 61 – 3 106 62 - 3 106 66 – 3 106 67 PHASE 6 / STEP 6 / FASE 6 / SCHRITT 6 / PASO 6 / ШАГ 6 FR –...
- Page 131 DAKER DK Plus Battery Cabinets CHANGEMENT DES BATTERIES / BATTERY REPLACEMENT / SOSTITUZIONE BATTERIA / BATTERIE ERSETZEN / SUSTITUCIÓN BATERÍA / ЗАМЕНА БАТАРЕЙ 3 106 61 – 3 106 62 - 3 106 66 – 3 106 67 PHASE 8 / STEP 8 / FASE 8 / SCHRITT 8 / PASO 8 / ШАГ 8 FR –...
- Page 133 Appendix - Battery replacement 3 106 63 - 3 106 68...
- Page 134 DAKER DK Plus Battery Cabinets CHANGEMENT DES BATTERIES / BATTERY REPLACEMENT / SOSTITUZIONE BATTERIA / BATTERIE ERSETZEN / SUSTITUCIÓN BATERÍA / ЗАМЕНА БАТАРЕЙ 3 106 63 – 3 106 68 PHASE 1 / STEP 1 / FASE 1 / SCHRITT 1 / PASO 1 / ШАГ 1 FR –...
- Page 135 Appendix - Battery replacement CHANGEMENT DES BATTERIES / BATTERY REPLACEMENT / SOSTITUZIONE BATTERIA / BATTERIE ERSETZEN / SUSTITUCIÓN BATERÍA / ЗАМЕНА БАТАРЕЙ 3 106 63 – 3 106 68 PHASE 4 / STEP 4 / FASE 4 / SCHRITT 4 / PASO 4 / ШАГ 4 FR –...
- Page 136 DAKER DK Plus Battery Cabinets CHANGEMENT DES BATTERIES / BATTERY REPLACEMENT / SOSTITUZIONE BATTERIA / BATTERIE ERSETZEN / SUSTITUCIÓN BATERÍA / ЗАМЕНА БАТАРЕЙ 3 106 63 – 3 106 68 PHASE 6 / STEP 6 / FASE 6 / SCHRITT 6 / PASO 6 / ШАГ 6 FR –...
- Page 137 Appendix - Battery replacement CHANGEMENT DES BATTERIES / BATTERY REPLACEMENT / SOSTITUZIONE BATTERIA / BATTERIE ERSETZEN / SUSTITUCIÓN BATERÍA / ЗАМЕНА БАТАРЕЙ 3 106 63 – 3 106 68 PHASE 8 / STEP 8 / FASE 8 / SCHRITT 8 / PASO 8 / ШАГ 8 FR –...
- Page 139 DAKER DK Plus Battery Cabinets 3 106 64 - 3 106 69...
- Page 140 Appendix - Battery replacement CHANGEMENT DES BATTERIES / BATTERY REPLACEMENT / SOSTITUZIONE BATTERIA / SUSTITUCIÓN BATERÍA / ЗАМЕНА БАТАРЕЙ 3 106 64 – 3 106 69 PHASE 1 / STEP 1 / FASE 1 / SCHRITT 1 / PASO 1 / ШАГ 1 FR – Placer les batteries sur le pack batterie.
- Page 141 DAKER DK Plus Battery Cabinets CHANGEMENT DES BATTERIES / BATTERY REPLACEMENT / SOSTITUZIONE BATTERIA / SUSTITUCIÓN BATERÍA / ЗАМЕНА БАТАРЕЙ 3 106 64 – 3 106 69 PHASE 3 / STEP 3 / FASE 3 / SCHRITT 3 / PASO 3 / ШАГ 3 FR – Brancher les batteries comme indiqué...
- Page 142 Appendix - Battery replacement CHANGEMENT DES BATTERIES / BATTERY REPLACEMENT / SOSTITUZIONE BATTERIA / SUSTITUCIÓN BATERÍA / ЗАМЕНА БАТАРЕЙ 3 106 64 – 3 106 69 PHASE 5 / STEP 5 / FASE 5 / SCHRITT 5 / PASO 5 / ШАГ 5 FR – Fixer le pack batterie avec du ruban adhésif.
- Page 143 DAKER DK Plus Battery Cabinets CHANGEMENT DES BATTERIES / BATTERY REPLACEMENT / SOSTITUZIONE BATTERIA / SUSTITUCIÓN BATERÍA / ЗАМЕНА БАТАРЕЙ 3 106 64 – 3 106 69 PHASE 7 / STEP 7 / FASE 7 / SCHRITT 7 / PASO 7 / ШАГ 7 FR –...
- Page 145 Appendix - Battery replacement CHANGEMENT DES BATTERIES / BATTERY REPLACEMENT / SOSTITUZIONE BATTERIA / SUSTITUCIÓN BATERÍA / ЗАМЕНА БАТАРЕЙ 3 106 64 – 3 106 69 PHASE 9 / STEP 9 / FASE 9 / SCHRITT 9 / PASO 9 / ШАГ 9 FR – Fixer le bloc batterie à l’armoire. EN –...
- Page 149 LEGRAND Pro and Consumer Service BP 30076 - 87002 LIMOGES CEDEX FRANCE www.legrand.com Legrand se réserve le droit de modifier à tout moment le contenu de cet imprimé et de communiquer, sous n’importe quelle forme et modalité, les changements apportés.