
Manuels Connexes pour Sportplus SPEED RACER


Sommaire des Matières pour Sportplus SPEED RACER
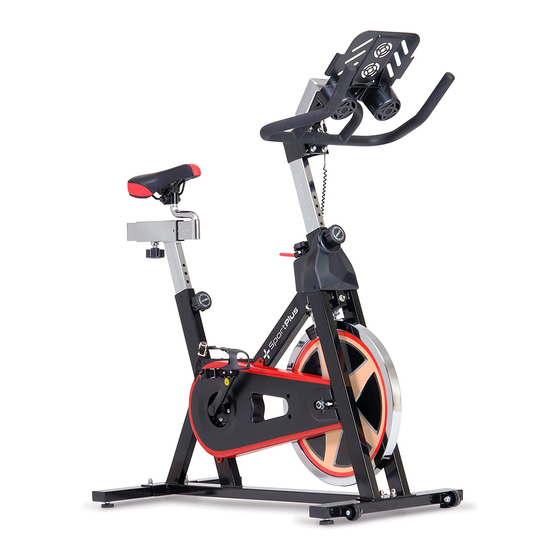
- Page 1 BEDIENUNGSANLEITUNG SPEED RACER USER MANUAL SPEED RACER MODE D’EMPLOI SPEED RACER ISTRUZIONI OPERATIVE SPEED RACER MANUAL DE INSTRUCCIONES SPEED RACER SP-SRP-2100-i...
-
Page 2: Table Des Matières
Sehr geehrte Kundin, Sehr geehrter Kunde, Wir gratulieren Ihnen zu Ihrem neuen SportPlus Produkt und sind überzeugt, dass Sie mit diesem Produkt zufrieden sein werden. • Um eine stets optimale Funktion und Leistungsbereitschaft Ihres Produktes zu gewährleisten, haben wir eine Bitte an Sie: •... -
Page 3: Technische Daten
1. TECHNISCHE DATEN Produktinformationen Abmessungen (L x B x H): ca. 127 x 50,5 x 119 cm Gesamtgewicht: ca. 34,5 kg Klasse: H.C. (Heimbereich), EN 957-1, -10 Maximales Benutzergewicht: 150 kg Computerinformationen Modell SP-SRP-2100-i Batterieanzahl Batterietyp Computerfunktionen Zeit, Geschwindigkeit, Strecke, ca. Kalorienverbrauch, Puls, RPM SICHERHEITSHINWEISE VERWENDUNGSZWECK... - Page 4 VORSICHT – VERLETZUNGSGEFAHR • Benutzen Sie kein beschädigtes oder defektes Produkt. Wenden Sie sich in diesem Fall an eine Fachwerkstatt oder unseren Kundendienst. • Prüfen Sie das Produkt vor jeder Benutzung auf einwandfreien Zustand. Defekte Teile müssen sofort ausgetauscht werden, da sonst Funktion und Sicherheit beeinträchtigt werden.
- Page 5 HINWEISE ZUR MONTAGE • Die Montage des Produkts muss sorgfältig und von einer erwachsenen Person vorgenommen werden. Nehmen Sie im Zweifelsfall die Hilfe einer weiteren, technisch versierten Person in Anspruch. • Bevor Sie mit dem Zusammenbau des Produkts beginnen, lesen Sie die Aufbauschritte sorgfältig durch und sehen Sie sich die Bauzeichnung an.
-
Page 6: Explosionszeichnung
3. EXPLOSIONSZEICHNUNG 57 32 47 26 24... -
Page 7: Teileliste
4. TEILELISTE Beschreibung Anzahl Hauptrahmen Vorderer Standfuß Hinterer Standfuß Sensorkabel Sattelstütze Lenkerstütze Handgriff Verstellbare Sattelschiene Sattel Handgriffabdeckung Innere Kettenabdeckung Äußere Kettenabdeckun Linke Abdeckkappe Rechte Abdeckkappe Welle des Schwungrades Kugellager Tretkurbel Riemenscheibe Riemen Schwungrad Linke Tretkurbel Rechte Tretkurbel Llinke Pedale Rechte Pedale Endkappe Kurbelabdeckung Höhenverstellbarer Standfuß... - Page 8 Beschreibung Anzahl M8 Hutmutter Verschlußmutter M8 Schraube M8*45 Computer Schraube Bremsbefestigung Abdeckung für Schwugrad Manschette Unterlegscheibe D12*01 Feststellmutter M12 Feststellmutter M8 Federscheibe Φ20 Computerhalterung Ablage für Tablet/Smartphone Drehknauf Sicherungsplatte Computerschraube Schraube M5*10 Bremshebel Feststellmutter M6 Feststellmutter M6 Mutter M12 Befestigungshülse Φ12 Unterlegscheibe D12*02 Federscheibe D20 Schraube M4-15...
-
Page 9: Montageanleitung
5. MONTAGEANLEITUNG Schritt 1: • Befestigen Sie den vorderen Standfuß (2) und den hinteren Standfuß (3) am Hauptrahmen (1). • Verwenden Sie dazu jeweils 2 Sätze flache Unterlegscheiben (35), Federscheiben (36), Hutmuttern (37) and M8*45 Befestigungsschrauben (34). - Page 10 Schritt 2: • Schrauben Sie das linke Pedal (23) per Hand (gegen den Uhrzeigersinn) in die linke Tretkurbel (21), bis es sich nicht mehr bewegen lässt. • Schrauben Sie das rechte Pedal (24) per Hand (im Uhrzeigersinn) in die rechte Tretkurbel (22), bis es sich nicht mehr bewegen lässt.
- Page 11 Schritt 3: • Lösen Sie den Drehknopf (28). • Stecken Sie die Sattelstütze (5) in die Manschette des Hauptrahmens (1). • Stecken Sie die verstellbare Sattelschiene (8) auf die Sattelstütze (5). • Fixieren Sie die Sattelschiene mit dem Drehknopf (28). •...
- Page 12 Schritt 4: • Lösen Sie den Drehknopf (28). • Stecken Sie die Lenkerstütze (6) in die Manschette des Hauptrahmens (1). • Entfernen Sie die Schrauben und Federscheiben von der Lenkerstütze (6). Befestifgen Sie den Handgriff (7) und den Computerhalterung (49) an der Lenkerstütze (6) mit 4 Federscheiben , Unterlegscheiben und Schrauben (41).
- Page 13 Schritt 5: • Entnehmen Sie alle Schrauben vom Computer (40), befestigen Sie den Computer (40) an der Computerhalterung (49). Sichern Sie mit 4 Computerschrauben (53). • Stecken Sie das Sensorkabel in die Öffnung auf der Rückseite des Computers (40).
-
Page 14: Bedienung Des Computers
6. BEDIENUNG DES COMPUTERS STEUERUNG ÜBER APP Sie können den Computer über Bluetooth® 4.0 mit Ihrem Smartphone / Tablet verbin- den. Hierzu laden Sie sich bitte eine kompatible App (z. B. Kinomap) über den Play Store bei Android bzw. über den App Store bei iOS herunter. Computerspezifikationen U/min 0 bis 199 U/min... - Page 15 Bedienung Drücken Sie die Tasten UP / DOWN, um den Wert für Zeit/ Zeit/ Distanz einstellen Distanz zu wählen. Bestätigen Sie mit der Taste MODE/SET. Drücken Sie die Taste START/STOP um das Training zu Training starten starten Wenn das eingestellte Ziel erreicht ist, ertönt ein akustisches Training beenden Signal.
- Page 16 FEHLERBEHEBUNG Keine Anzeige auf dem Computer • Rufen Sie mit einer beliebigen Taste den Schnellstartmodus auf. • Stellen Sie sicher, dass die Batterien korrekt in den Computer eingelegt sind. • Legen Sie gegebenenfalls neue Batterien ein. Keine Anzeige des Herzfrequenzsignals •...
-
Page 17: Wartung, Reinigung Und Pflege
7. WARTUNG, REINIGUNG UND PFLEGE • Überprüfen Sie nach dem Zusammenbau und vor dem Einsatz des Gerätes, ob alle Bolzen/Muttern korrekt angezogen sind. • Reinigen Sie das Gerat regelmäßig mit einem leicht angefeuchteten Tuch unter Einsatz eines milden Reinigers. Verwenden Sie keine Lösungsmittel zum Reinigen. •... -
Page 18: Reklamationen & Gewährleistungen
Servicezeit: Montag bis Freitag von 9.00 bis 18.00 Uhr Servicehotline: +49 (0)40 - 780 896 – 35* E-Mail: Service@SportPlus.org URL: http://www.sportplus.de/ *Nationales Festnetz, Gesprächsgebühren sind von Ihrem Telefonanbieter / Ihrem Telefonvertrag abhängig. Bitte achten Sie darauf, dass Sie hierzu folgende Informationen zur Hand haben. -
Page 19: Gewährleistungsbestimmungen
10. GEWÄHRLEISTUNGSBESTIMMUNGEN SportPlus versichert, dass das Produkt, auf das sich die Gewährleistung bezieht, aus qualitativ hochwertigen Materialien hergestellt und mit äußerster Sorgfalt überprüft wurde. Voraussetzung für die Gewährleistung ist die Bedienung und der ordentliche Aufbau gemäß Bedienungsanleitung. Durch unsachgemäße Nutzung und / oder unsachgemäßen Transport kann die Gewährleistung entfallen. - Page 20 Dear Customer, Congratulations for choosing a SportPlus product. We have every expectation that you will be fully satisfied with your new purchase. • To guarantee optimal function of this product, please adhere to the following instructions: • Before using this product for the first time, please read the manual carefully! •...
-
Page 21: Technical Data
1. TECHNICAL DATA Product information Dimensions (W x H x D): approx. 127 x 50.5 x 119 cm Total weight: Approx. 34.5 kg Class: H.C. (domestic use), EN 957-1, -10 Maximum user weight: 150 kg Computer information Model SP-SRP-2100-i Number of batteries Battery type Computer functions Time, speed, distance, approx. - Page 22 CAUTION - RISK OF INJURY • Do not use the product if it is damaged or defective. In this case, contact a professional workshop or our customer service. • Always verify that the product is in impeccable condition before use. Defective components must be replaced immediately as failure to do so may impair the functioning and safety of the unit.
- Page 23 INFORMATION ON ASSEMBLY • The product should be carefully assembled by a responsible adult. Ask for the assistance of another, technically-skilled person in case of doubt. • Before beginning assembly of the product, read all assembly steps carefully and review the diagram. •...
-
Page 24: Exploded Diagram
3. EXPLODED DIAGRAM 57 32 47 26 24... -
Page 25: Part List
4. PART LIST Description Quantity Frame Front stabilizer Rear stabilizer Sensor cable Seat post Handlebar post Handle Adjustable seat track Saddle Handle cover Inner chain guard Outer chain guard Left end cover Right end cover Flywheel shaft Ball bearings Foot treadle Belt wheel Belt Flywheel... - Page 26 Description Quantity M8 Cap nut Lock nut M8 Screw M8*45 Computer Screw Brake clamp Flywheel cover Cuff Washer D12*01 Lock nut M12 Lock nut M8 Spring washer Φ20 Computer mount Tablet/smartphone tray Turn knob Locking plate Computer screw Screw M5*10 Brake lever Lock nut M6 Lock nut M6...
-
Page 27: Assembly Instructions
5. ASSEMBLY INSTRUCTIONS Step 1: • Fasten the front stand (2) and the rear stand (3) to the main device (1). • Use 2 sets of flat washers (35), spring washers (36), cap nuts (37) and M8*45 fastening screws (34). - Page 28 Step 2: • Screw the left pedal (23) by hand (counter clockwise) into the left crank (21) until it stops. • Screw the right pedal (24) by hand (clockwise) into the right crank (22) until it stops. • Tighten both pedals. •...
- Page 29 Step 3: • Loosen the knob (28). • Insert the seat post (5) into the cuff on the main device (1). • Attach the adjustable seat track (8) to the seat post (5). • Fasten the seat track using the knob (28). •...
- Page 30 Step 4: • Loosen the knob (28). • Insert the handlebar post (6) into the cuff on the main device (1). • Remove the screws and spring washers from the handlebar post(6). Attach the handle (7) and the computer mount (49) to the handlebar post (6) with 4 spring washers, washers and screws (41).
- Page 31 Step 5: • Remove all screws from the computer (40) and mount the computer (40) to the computer mount (49). Fasten with 4 computer screws (53). • Insert the sensor cable through the opening on the back of the computer (40).
-
Page 32: Using The Computer
6. USING THE COMPUTER CONTROL VIA APP You can connect the computer via Bluetooth® 4.0 to your smartphone/tablet. Please download a compatible app (e.g. Kinomap) from the Google Play Store for Android or the Apple App Store for iOS. Computer Specifications 0 ~ 199 RPM Speed 0 ~ 99 KM/H... - Page 33 Operation Use the UP / DOWN buttons to set the value for time/ Setting time/distance distance. Press the MODE/SET button to confirm. Starting training Press the START/STOP button to start training. Ending training A beep sounds when you reach your set goal. You can set more than one goal.
- Page 34 TROUBLESHOOTING No display on the computer • Start quick-start mode by pressing any button. • Make sure that the batteries are correctly inserted in the computer. • Insert new batteries if necessary. No Heart Rate signal displayed • Ensure that your chest strap is worn correctly, and that there is moisture under the electrodes of the chest strap.
-
Page 35: Maintenance, Cleaning And Care
7. MAINTENANCE, CLEANING AND CARE • Make sure that all bolts/nuts are correctly tightened after assembly and before use. • Clean the unit regularly with a slightly damp cloth and a mild cleaning agent. Do not use any solvents to clean the unit. •... -
Page 36: Complaints & Warranty
Service time: Monday to Friday from 9:00 am to 6:00 pm Service hotline: +44 - 203 318 4415* Email: Service@SportPlus.org URL: http://www.sportplus.de/ *National fixed-line network, call charges depend on your phone company/your phone contract. Please have the following information at hand when you call. -
Page 37: Terms Of Warranty
10. TERMS OF WARRANTY SportPlus guarantees that the product under warranty has been manufactured from the highest quality materials and has been checked with the utmost care. The operation and assembly of the product according to the operating instructions is a precondition of this warranty. - Page 38 Chère cliente, Cher client, Nous vous félicitons pour l'achat de votre nouveau produit SportPlus et sommes convaincus que vous en serez satisfait. • Afin de garantir un fonctionnement parfait et un rendement toujours plus optimal de votre produit, nous vous prions de suivre les consignes suivantes : •...
-
Page 39: Données Techniques
1. DONNÉES TECHNIQUES Informations sur le produit Dimensions (L x l x H) : env. 127 x 50,5 x 119 cm Poids total : env. 34,5 kg Classe : H.C. (domaine privé), EN 957-1, -10 Poids maximum de 150 kg l’utilisateur : Informations de l'ordinateur Modèle... -
Page 40: Indications Relatives À La Manipulation Des Piles
ATTENTION - RISQUE DE BLESSURES ! • N'utilisez jamais le produit lorsqu’il est endommagé ou défectueux ! Dans ce cas, adressez-vous à un service technique ou à notre service après-vente. • Avant chaque utilisation, contrôlez le produit afin de vérifier son parfait état. Les pièces défectueuses doivent être remplacées immédiatement, car le fonctionnement et la sécurité... -
Page 41: Instructions Relatives Au Montage
INSTRUCTIONS RELATIVES AU MONTAGE • Le montage du produit doit être effectué avec précaution et par un adulte. En cas de doute, demandez l’aide d’une autre personne techniquement expérimentée. • Avant de commencer le montage du produit, veuillez lire attentivement les étapes de montage et regardez les illustrations les représentant. -
Page 42: Vue Éclatée
3. VUE ÉCLATÉE 57 32 47 26 24... -
Page 43: Liste Des Pièces
4. LISTE DES PIÈCES N° Description Quantité Cadre principal Pied de support avant Pied de support arrière Câble du capteur Tige de selle Appui pour guidon Poignée Rail de la selle réglable Selle Capuchon de poignée Couvercle de chaîne interne Couvercle de chaîne externe Capuchon de gauche Capuchon de droite... - Page 44 N° Description Quantité Écrou borgne M8 Écrou de verrouillage M8 Vis M8*45 Ordinateur Fixation de freinage Cache pour volant Manchette Rondelle plate D12*01 Écrou de blocage M12 Écrou de blocage M8 Rondelle ressort Φ20 Support de l'ordinateur Support pour tablette/smartphone Bouton rotatif Plaque de verrouillage Vis de l'ordinateur...
-
Page 45: Notice De Montage
5. NOTICE DE MONTAGE étape : • Fixez le pied de support avant (2) et le pied de support arrière (3) sur le cadre principal (1). • Utilisez pour cette opération 2 jeux de rondelles plates (35), des rondelles ressorts (36), des écrous borgnes (37) et des vis de fixation M8*45 (34). - Page 46 étape : • Vissez la pédale de gauche (23) à la main (dans le sens inverse des aiguilles d’une montre) dans le pédalier gauche (21) jusqu’à ce qu’elle ne puisse plus bouger. • Vissez la pédale de droite (24) à la main (dans le sens des aiguilles d’une montre) dans le pédalier droit (22) jusqu’à...
- Page 47 étape : • Desserrez le bouton rotatif (28). • Placez la tige de la selle (5) dans la manchette du cadre principal (1). • Placez le rail de la selle réglable (8) sur la tige de la selle (5). • Fixez le rail de la selle à...
- Page 48 étape : • Desserrez le bouton rotatif (28). • Placez l'appui pour guidon (6) dans la manchette du cadre principal (1). • Retirez les vis et les rondelles ressorts de l'appui pour guidon (6). Fixez la poignée (7) et le support de l’ordinateur (49) sur l’appui pour guidon (6) à l’aide de 4 rondelles ressorts, rondelles plates et vis (41).
- Page 49 étape : • Retirez toutes les vis de l’ordinateur (40), puis fixez l'ordinateur (40) sur le support de l'ordinateur (49). Sécurisez à l’aide des 4 vis de l'ordinateur (53). • Placez le câble du capteur dans l'ouverture au dos de l'ordinateur (40).
-
Page 50: Utilisation De L'ordinateur
6. UTILISATION DE L'ORDINATEUR COMMANDE VIA L’APPLICATION Vous pouvez connecter l'ordinateur à votre smartphone/tablette via Bluetooth® 4.0. Pour cette connexion, veuillez télécharger une application compatible (par ex. Kinomap) depuis Play Store pour Android ou depuis App Store pour iOS. Spécifications de l'ordinateur r/mn de 0 à... - Page 51 Fonctionnement Réglage de la durée/ Appuyez sur la touche UP/DOWN pour sélectionner la valeur distance de la durée/distance. Validez avec la touche MODE/SET. Démarrer Appuyez sur la touche START/STOP pour commencer l'entraînement l'entraînement. Arrêter l'entraînement Si l'objectif réglé est atteint, un signal sonore retentit. Vous pouvez régler plusieurs objectifs.
-
Page 52: Dépannage
DÉPANNAGE Pas d'affichage sur l'ordinateur • Appelez avec n'importe quelle touche le mode de démarrage rapide. • Assurez-vous que les piles sont insérées correctement dans l'ordinateur. • Insérez au besoin de nouvelles piles. Pas d'affichage du signal de fréquence cardiaque •... -
Page 53: Maintenance, Nettoyage Et Entretien
7. MAINTENANCE, NETTOYAGE ET ENTRETIEN • Contrôlez après le montage et avant toute utilisation de l'appareil que tous les boulons/écrous sont correctement serrés. • Nettoyez régulièrement l’appareil à l’aide d’un chiffon légèrement humide et en appliquant si besoin un produit de nettoyage doux. N'utilisez pas de produits solvants pour le nettoyage. -
Page 54: Réclamations Et Garanties
Heures d’ouverture : du lundi au vendredi de 9 h 00 à 18 h 00 Service hotline : +33 (0)1 76 36 14 93* Adresse Service@SportPlus.org électronique : Site Internet : http://www.sportplus.de/ *Réseau national, les frais d’appel dépendent de votre opérateur/votre abonnement téléphonique. -
Page 55: Dispositions De La Garantie
10. DISPOSITIONS DE LA GARANTIE SportPlus certifie que le produit, auquel se réfère la garantie, a été fabriqué avec des matériaux d’excellente qualité et vérifié avec le plus grand soin. Les conditions indispensables pour le recours à la garantie sont une utilisation et un assemblage corrects selon le mode d'emploi. - Page 56 Gentile Cliente, congratulazioni per l'acquisto del Suo nuovo prodotto SportPlus, che siamo certi Le garantirà la massima soddisfazione. • Per garantire funzionamento e prestazioni sempre ottimali del Suo prodotto, La preghiamo di rispettare le condizioni che seguono: • Prima del primo utilizzo del prodotto, leggere con attenzione questo manuale.
-
Page 57: Dati Tecnici
1. DATI TECNICI Informazioni sul prodotto Dimensioni (L x A x P): circa 127 x 50,5 x 119 cm Peso totale: Circa 34,5 kg Classe: H.C. (uso domestico), EN 957-1, -10 Peso utente max.: 150 kg Informazioni computer Modello SP-SRP-2100-i Numero di batterie Tipo batteria Funzioni computer... -
Page 58: Consigli Riguardo Le Batterie
ATTENZIONE - PERICOLO DI LESIONI • Non utilizzare un prodotto danneggiato o difettoso. In tal caso, rivolgersi a un'officina specializzata o al servizio clienti della Società. • Prima di ogni utilizzo, esaminare il prodotto per verificare l'assenza di danni. Sostituire immediatamente le parti difettose, così da non compromettere la funzionalità... - Page 59 INFORMAZIONI SUL MONTAGGIO • Il prodotto dovrebbe essere montato con attenzione da un adulto responsabile. In caso di dubbio, chiedere l'assistenza di altra persona tecnicamente qualificata. • Prima di iniziare il montaggio del prodotto, leggere con attenzione tutti i passaggi del montaggio e osservare il diagramma.
-
Page 60: Diagramma Esploso
3. DIAGRAMMA ESPLOSO 57 32 47 26 24... -
Page 61: Elenco Componenti
4. ELENCO COMPONENTI N° Descrizione Quantità Telaio Stabilizzatore anteriore Stabilizzatore posteriore Cavo sensore Canna sellino Canna manubrio Impugnatura Binario sellino regolabile Sellino Copertura impugnatura Protezione interna catena Protezione esterna catena Copertura estremità sinistra Copertura estremità destra Albero volano Cuscinetti a sfere Asse pedali Ruota della cinghia Cinghia... - Page 62 N° Descrizione Quantità Dado di protezione M8 Dado di bloccaggio M8 Vite M8*45 Computer Vite Pinza freno Copertura volano Manicotto Rondella D12*01 Dado di bloccaggio M12 Dado di bloccaggio M8 Rondella a molla Φ20 Supporto computer Vassoio tablet/smartphone Manopola di rotazione Piastra di bloccaggio Vite computer Vite M5*10...
-
Page 63: Istruzioni Per Il Montaggio
5. ISTRUZIONI PER IL MONTAGGIO Passaggio 1: • Fissare lo stabilizzatore anteriore (2) e lo stabilizzatore posteriore (3) al telaio (1). • Usare 2 set di rondelle piatte(35), rondelle a molla (36), dadi di protezione (37) e viti di fissaggio M8*45 (34). - Page 64 Passaggio 2: • Avvitare il pedale sinistro (23) a mano (senso antiorario) nella manovella sinistra (21) finché non si arresta. • Avvita il pedale destro (24) a mano (senso orario) nella manovella destra (22) finché non si arresta. • Stringere entrambi i pedali. •...
- Page 65 Passaggio 3: • Allentare la manopola (28). • Inserire il palo del sellino (5) nel manicotto sul telaio principale (1). • Attaccare il binario regolabile del sellino (8) al palo del sellino (5). • Stringere il binario del sellino usando manopola (28). •...
- Page 66 Passaggio 4: • Allentare la manopola (28). • Inserire la canna del manubrio (6) nel manicotto sul telaio principale (1). • Rimuovere le viti e le rondelle a molla dalla canna del manubrio(6). Attaccare l’impugnatura (7) e il supporto computer (49) alla canna del manubrio (6) con 4 rondelle a molla, rondelle e viti (41).
- Page 67 Passaggio 5: • Rimuovere tutte le viti dal computer (40) e montare il computer (40) al supporto computer (49). Stringere con 4 viti da computer (53). • Inserire il cavo sensore attraverso la fessura sul retro del computer (40).
-
Page 68: Utilizzo Del Computer
6. UTILIZZO DEL COMPUTER CONTROLLO TRAMITE APP Si può collegare il computer tramite Bluetooth® 4.0 al vostro smartphone/tablet. A tal fine, scaricare un’app compatibile (ad es., Kinomap) dal Play Store per Android o dall’App Store per iOS. Specifiche Computer 0 ~ 199 RPM Velocità... - Page 69 Funzionamento Usare i pulsanti UP / DOWN per impostare il valore per Impostazione tempo/ tempo/distanza. Premere il pulsante MODE/SET per distanza confermare. Iniziare allenamento Premere il pulsante START/STOP per iniziare ad allenarsi. Un suono viene emesso quando si raggiunge il proprio Terminare allenamento obiettivo impostato.
-
Page 70: Risoluzione Dei Problemi
RISOLUZIONE DEI PROBLEMI Nessuna visualizzazione sul computer • Inizia modalità di avvio-rapido premendo qualsiasi pulsante. • Assicurarsi che le batterie siano inserite correttamente nel computer. • Inserire nuove batterie se necessario. Nessun segnale di frequenza cardiaca visualizzato • Assicurarsi che il vostro cinturino toracico sia indossato correttamente, e che ci sia un po’... -
Page 71: Manutenzione, Pulizia E Cura
7. MANUTENZIONE, PULIZIA E CURA • Assicurarsi che tutti i dadi/bulloni siano stretti correttamente dopo l’assemblaggio e prima dell’uso. • Pulire regolarmente l'attrezzo con un panno leggermente umido e un detergente delicato. Non utilizzare solventi per pulire l'attrezzo. • Ciò è particolarmente importante per i manubri e il sedile in quanto queste parti sono in costate contatto con le parti del corpo durante l’allenamento. -
Page 72: Reclami E Garanzia
- ven, 9:00 - 18:00 Linea diretta per +39 - 069 480 1459* l'assistenza: E-mail: Service@SportPlus.org URL: http://www.sportplus.de/ *Rete fissa nazionale, le tariffe di chiamata dipendono dal proprio gestore telefonico / contratto di telefonia. Assicurarsi di avere a disposizione le informazioni seguenti quando si chiama. -
Page 73: Termini Di Garanzia
10. TERMINI DI GARANZIA La SportPlus garantisce che il prodotto coperto da garanzia è stato prodotto con materiali della più elevata qualità ed è stato controllato con la massima attenzione. Il funzionamento e l’assemblaggio del prodotto in accordo alle istruzioni operative è una condizione indispensabile per questa garanzia. - Page 74 Estimada cliente, Estimado cliente, Le felicitamos por su nuevo producto SportPlus, y estamos convencidos de que quedará completamente satisfecho con él. • Para garantizar un funcionamiento y capacidad de rendimiento óptimos de su producto, le pedimos que: • ¡Antes de usar el producto por primera vez, lea con atención el siguiente manual de instrucciones! •...
-
Page 75: Datos Técnicos
1. DATOS TÉCNICOS Información del producto Dimensiones (L x A x Al): aprox. 127 x 50,5 x 119 cm Peso total: aprox. 34,5 kg Clase: H.C. (Uso doméstico), EN 957-1, -10 Peso máximo del usuario: 150 kg Información del ordenador Modelo SP-SRP-2100-i Número de pilas... - Page 76 PRECAUCIÓN - RIESGO DE LESIONES • No utilice un producto dañado o defectuoso. En ese caso, diríjase a un taller especializado o a nuestro servicio de atención al cliente. • Compruebe que el producto está en perfectas condiciones antes de cada uso. Las piezas defectuosas se deberán cambiar de inmediato, ya que pueden afectar a su funcionalidad y seguridad.
- Page 77 INDICACIONES SOBRE EL MONTAJE • El montaje del producto lo deberá realizar cuidadosamente una persona adulta. En caso de duda, busque la ayuda de una persona con conocimientos técnicos. • Antes de empezar a montar el producto, lea los pasos cuidadosamente y vea atentamente el dibujo de montaje.
-
Page 78: Plano Detallado
3. PLANO DETALLADO 57 32 47 26 24... -
Page 79: Lista De Piezas
4. LISTA DE PIEZAS Nº. Descripción Cantidad Cuadro principal Pata de apoyo delantera Pata de apoyo trasera Cable del sensor Refuerzo del sillín Soporte del manillar Mango Riel de sillín regulable Sillín Tapa de mango Protector interior de cadena Protector exterior de cadena Caperuza izquierda Caperuza derecha Eje del volante... - Page 80 Nº. Descripción Cantidad Tuerca de sombrerete M8 Tuerca de bloqueo M8 Tornillo M8*45 Ordenador Tornillo Pinza de freno Tapa para volante Manguito Arandela D12*01 Tuerca de apriete M12 Tuerca de apriete M8 Arandela de resorte Φ20 Soporte de ordenador Bandeja para tablet/smartphone Perilla giratoria Placa de fijación Tornillo para ordenador...
-
Page 81: Manual De Montaje
5. MANUAL DE MONTAJE Paso 1: • Fije la pata de apoyo delantera (2) y la trasera (3) al cuadro principal (1). • Utilice 2 juegos de arandelas planas (35), arandelas de resorte (36), tuercas de sombrerete (37) y tornillos de fijación M8*45 (34). - Page 82 Paso 2: • Enrosque a mano el pedal izquierdo (23) (sentido antihorario) en la biela izquierda (21), hasta que no se pueda girar más. • Enrosque a mano el pedal derecho (24) (sentido horario) en la biela derecha (22), hasta que no se pueda girar más. •...
- Page 83 Paso 3: • Afloje el botón giratorio (28). • Introduzca el refuerzo del sillín (5) en el manguito del cuadro principal (1). • Introduzca el riel de sillín (8) en el refuerzo (5). • Fije el riel con el botón giratorio (28). •...
- Page 84 Paso 4: • Afloje el botón giratorio (28). • Introduzca el soporte del manillar (6) en el manguito del cuadro principal (1). • Quite los tornillos y las arandelas de resorte del soporte del manillar (6). Fije el mango (7) y el soporte del ordenador (49) al soporte del manillar (6) con 4 arandelas de resorte, arandelas y tornillos (41).
- Page 85 Paso 5: • Quite todos los tornillos del ordenador (40), fije el ordenador (40) al soporte (49). Asegure con 4 tornillos de ordenador (53). • Introduzca el cable del sensor en la apertura de la parte posterior del ordenador (40).
-
Page 86: Funcionamiento Del Ordenador
6. FUNCIONAMIENTO DEL ORDENADOR CONTROL A TRAVÉS DE LA APP Si lo desea, puede conectar el ordenador a su smartphone / tablet mediante Bluetooth® 4.0. Para ello, descargue una aplicación compatible (p. ej., Kinomap) a través de Play Store para Android o App Store para iOS. Especificaciones del ordenador 0 a 199 rpm Velocidad... - Page 87 Funcionamiento Ajustar tiempo/ Pulse las teclas UP / DOWN para seleccionar tiempo/ distancia distancia. Confirme con la tecla MODE/SET. Iniciar el Pulse la tecla START/STOP para empezar con el entrenamiento entrenamiento Finalizar el Una vez alcanzado el objetivo fijado, sonará una señal entrenamiento acústica.
-
Page 88: Subsanación De Errores
SUBSANACIÓN DE ERRORES Ninguna indicación en el ordenador • Acceda al modo de inicio rápido con cualquier tecla. • Asegúrese de que las pilas hayan sido introducidas correctamente en el ordenador. • En ese caso, coloque pilas nuevas. Ninguna indicación de la señal de frecuencia cardíaca •... -
Page 89: Limpieza, Cuidado Y Mantenimiento
7. LIMPIEZA, CUIDADO Y MANTENIMIENTO • Compruebe después del montaje y antes de cada uso del aparato si están todos los pernos/tuercas, y si están correctamente apretados. • Limpie el aparato regularmente con un paño ligeramente humedecido en un detergente suave. No limpie nunca con disolventes. •... -
Page 90: Reclamaciones Y Garantías
Lunes a viernes, de 9:00 h a 18:00 h Línea telefónica: +34 - 932 204 048* Correo electrónico: Service@SportPlus.org URL: http://www.sportplus.de/ *Llamadas a teléfonos fijos nacionales, las tasas de llamada serán sufragadas por su compañía telefónica / su contrato de teléfono. -
Page 91: Términos De Garantía
10. TÉRMINOS DE GARANTÍA SportPlus garantiza que el producto, en lo que se refiere a la garantía, ha sido fabricado con materiales de alta calidad y comprobado con la máxima atención. Para que la garantía tenga validez, resulta esencial que el uso y montaje se realice conforme al manual de instrucciones. - Page 92 Servicehotline: +49 (0) 40 - 780 896 – 35 (Nationales Festnetz, Gesprächsgebühren sind von Ihrem Telefonanbieter / Ihrem Telefonvertrag abhängig.) E-Mail: service@sportplus.org URL: http://www.sportplus.de/ Servicehotline: +44 - 203 318 4415 (Call charges depend on your phone company / your phone contract.) E-Mail: service@sportplus.org...