Sony TA-A1ES Mode D'emploi
Table des Matières
Les langues disponibles
Les langues disponibles
Liens rapides
Chapitres
Table des Matières
Dépannage

Manuels Connexes pour Sony TA-A1ES


Sommaire des Matières pour Sony TA-A1ES
-
Page 22: Pour Les Clients Résidant Aux États-Unis
Vous devrez vous y référer lors d’un appel à votre revendeur Pour réduire le risque d’incendie ou d’électrocution, n’exposez pas cet Sony au sujet de ce produit. appareil à des éclaboussures ou des gouttes d’eau et ne posez pas dessus des objets remplis de liquides, notamment des vases. -
Page 23: Consignes De Sécurité Importantes
Consignes de sécurité importantes La déclaration de la FCC suivante s’applique uniquement à la version de ce modèle fabriquée pour la vente aux États-Unis. Il se peut que les autres 1) Lisez ces instructions. versions ne soient pas conformes aux réglementations techniques de la 2) Conservez ces instructions. -
Page 24: Pour Les Clients Au Canada
ATTENTION Vous êtes prévenu que toute modification ou changement non expressément approuvé dans ce manuel peut annuler votre autorisation à utiliser cet appareil. Pour les clients au Canada Il est impératif d’utiliser des câbles et des connecteurs correctement blindés et mis à la terre pour la connexion à des ordinateurs hôtes et/ou aux périphériques. - Page 25 Table des matières Principales fonctions de l’amplificateur ........6 Description et emplacement des pièces Panneau avant ................7 Panneau arrière ................8 Télécommande ................9 Mise en route Branchement des enceintes ............ 10 Branchement d’un appareil audio .......... 12 Préparation de l’amplificateur et de la télécommande ..14 Écoute du son Profiter du son de l’appareil branché...
-
Page 26: Principales Fonctions De L'amplificateur
Grandes bornes d’enceinte avec une nouvelle Principales fonctions de l’amplificateur conception Les bornes de cet amplificateur réduisent la détérioration de la qualité Amplificateur de puissance utilisant une sortie sonore. Les griffes en Y et les fils de l’enceinte peuvent être attachés symétrique solidement. -
Page 27: Description Et Emplacement Des Pièces
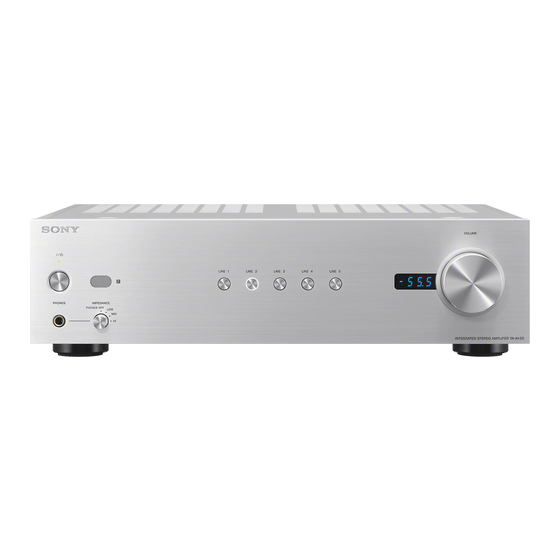
Pièces Fonctions Bouton/témoin Description et emplacement des pièces Allume ou éteint l’amplificateur (Allumé/Veille) (page 14). Le témoin s’allume en vert lorsque l’amplificateur est allumé. Panneau avant Capteur de la Reçoit des signaux de la télécommande télécommande. Boutons LINE 1/2/3/4/5 Permettent de sélectionner une source d’entrée (page 16). -
Page 28: Panneau Arrière
Pièces Fonctions Panneau arrière Bornes SPEAKER (RIGHT) Permettent de brancher une enceinte à droite (page 10). Commutateur SPEAKER Réglez le commutateur sur IMPEDANCE (4 Ω/8 Ω) l’impédance de l’enceinte branchée (page 10). Prise IR REMOTE Permet de brancher un répétiteur infrarouge (non fourni) (page 13). -
Page 29: Télécommande
Pièces Fonctions Télécommande Bouton (Allumé/Veille) Allume ou éteint l’amplificateur (page 14). Boutons LINE 1/2/3/4/5 Permettent de sélectionner une source d’entrée (page 16). Boutons VOLUME +/– Ajustent le niveau sonore des enceintes ou du casque (page 16). Le niveau peut être réglé... -
Page 30: Mise En Route
Réglage de l’impédance de l’enceinte Veillez à éteindre l’appareil avant de régler le commutateur SPEAKER Mise en route IMPEDANCE. Lorsque l’appareil est allumé, le commutateur ne fonctionne pas. Lorsque vous branchez les enceintes avec une impédance nominale Branchement des enceintes de 8 ohms ou plus, réglez le commutateur SPEAKER IMPEDANCE sur «... - Page 31 Enceinte droite Enceinte gauche...
-
Page 32: Branchement D'un Appareil Audio
Remarques Branchement d’un appareil audio Comme le câble XLR (équilibré) est verrouillé, vous ne pouvez pas débrancher le câble en tirant dessus. Vous pouvez brancher un appareil avec des prises audio analogiques, Si vous transportez l’amplificateur ou l’appareil audio avec le câble tel qu’un lecteur Super Audio CD ou un lecteur CD, à... - Page 33 • Branchez les câbles en fonction des prises de votre appareil. Conseil Si vous branchez l’amplificateur à un produit Sony avec la prise de sortie d’un répétiteur infrarouge, vous pouvez faire fonctionner l’amplificateur à partir du produit branché. Pour plus de détails, consultez le mode d’emploi...
-
Page 34: Préparation De L'amplificateur Et De La Télécommande
Remarques Préparation de l’amplificateur et de la Avant de brancher des enceintes et un appareil audio, assurez-vous de débrancher le cordon d’alimentation secteur. télécommande Ne branchez pas le cordon d’alimentation secteur tant que tous les branchements ne sont pas effectués. ... -
Page 35: Mise En Place Des Piles Dans La Télécommande
Mise en place des piles dans la télécommande Insérez deux piles R03 (taille AAA) dans la télécommande. Respectez les polarités correctes lors de la mise en place des piles. Remarques Ne laissez pas la télécommande dans un endroit très chaud ou très humide. -
Page 36: Écoute Du Son
Allumez l’appareil sur lequel vous voulez écouter du son. Appuyez sur les boutons LINE 1/2/3/4/5 pour sélectionner Écoute du son l’entrée de l’appareil sur lequel vous voulez écouter du son. Démarrez la lecture sur l’appareil. Profiter du son de l’appareil branché Tournez le bouton rotatif VOLUME pour régler le volume. -
Page 37: Réglage Du Casque
Si le bouton rotatif est placé en position PHONES OFF, vous n’entendez aucun son dans le casque. Réglage du casque S’il est placé en position LOW/MID/HI, vous n’entendez aucun son dans les enceintes. Bouton rotatif IMPEDANCE Réglage de la fonction de mise en veille automatique Commutateur AUTO STANDBY Réglez l’impédance du casque à... -
Page 38: Autres
Pour toute question au sujet de l’amplificateur ou tout problème, Si un objet ou un liquide pénètre dans le boîtier de l’amplificateur, adressez-vous au revendeur Sony le plus proche. débranchez l’amplificateur et faites-le vérifier par un technicien qualifié avant de le remettre sous tension. -
Page 39: Dépannage
L’appareil spécifique n’émet aucun son. problème. Si un problème persiste, adressez-vous au revendeur Sony Vérifiez que les câbles sont bien insérés dans les prises sur le plus proche. l’amplificateur et sur l’appareil. -
Page 40: Initialisation De L'amplificateur
Télécommande Initialisation de l’amplificateur La télécommande ne fonctionne pas. Dirigez la télécommande vers le capteur de la télécommande de Lorsque l’amplificateur est éteint, maintenez enfoncé le bouton l’amplificateur. Retirez tout obstacle entre la télécommande et l’amplificateur. sur l’amplificateur pendant environ 5 secondes. L’amplificateur est ... -
Page 41: Spécifications
Section amplificateur du casque Spécifications Impédance prise en charge LOW : de 8 ohms à moins de 50 ohms Section amplificateur MID : de 50 ohms à moins de 300 ohms (+10 dB par rapport à LOW) HI : 300 ohms ou plus (+16 dB par rapport à LOW) PUISSANCE DE SORTIE PUISSANCE DE SORTIE ET DISTORSION HARMONIQUE TOTALE : Distorsion... - Page 44 ©2013 Sony Corporation Printed in Malaysia 4-475-012-11(1)