Sony TA-ZH1ES Manuel D'instructions
Masquer les pouces Voir aussi pour TA-ZH1ES:
Table des Matières

Publicité

Les langues disponibles

Les langues disponibles

Liens rapides

Headphone Amplifier
TA-ZH1ES
Operating Instructions
Manuel d'instructions
GB
FR
CT

Publicité

Table des Matières
loading

Sommaire des Matières pour Sony TA-ZH1ES

  • Page 1 Headphone Amplifier Operating Instructions Manuel d’instructions TA-ZH1ES...
  • Page 2: Supplied Accessories

    About manuals supplied The two following manuals are included. Operating instructions (this manual) Provides you with instructions on how to use. Precautions/Specifications (separate manual) Provides you with precautions and product specifications. Supplied Accessories  Headphone amplifier  Remote control  AC power cord (mains lead)  R03 (size AAA) batteries  Operating instructions (this manual)
  • Page 3: Table Des Matières

    Table of Contents Supplied Accessories ..............2 Guide to Parts and Controls ............4 Connection: Connection 1: Connecting the Input Equipment ......10 WALKMAN® ................. 10 Smartphone ................10 AV Equipment ................11 Computer ..................13 Connection 2: Connecting the Headphones ........ 14 Connecting with the Balanced Connection ........
  • Page 4: Guide To Parts And Controls

    Guide to Parts and Controls Front Panel  Volume knob Adjusts the volume level.  DSEE HX indicator Lights while the DSEE HX function works (page 28). While an unsupported input signal is input, this indicator lights and turns off immediately when the DSEE HX function is turned on.
  • Page 5 While selecting the headphone jack, the indicator on the selected headphone jack lights. Headphone jack of the amplifier Plug and shape of the headphones  3-pole mini headphone jack (balanced L– G or OPEN connection, 3.5 mm in diameter) × 2 L side R side R–...
  • Page 6: Right Side Panel

    Right Side Panel  WALKMAN port (for WALKMAN®/ Xperia™ connection) (page 10) Rear Panel  PRE OUT L/R jacks (page 17)  COAX (coaxial) IN jack (page 11)  LINE IN L/R jacks (page 11)  OPT (optical) IN jack (page 12)  USB-B port (page 13) ...
  • Page 7: Top Panel

    Top Panel   (power) button  MENU/BACK button Turns the amplifier on/off. The indicator Displays the menu in the display lights when the amplifier turns on. window. When pressing this button while the menu is displayed, the display  INPUT button returns to the playback display.
  • Page 8: Remote Control

    Remote Control  DIMMER button Adjusts the brightness of the display window. Each time you press the button, the brightness of the display window changes as follows: Bright  Dark  Off  Bright ... When the display window is turned off, the indicators on the front panel of the amplifier are turned off.
  • Page 9 DSEE HX function works. For details about the DSEE HX function, see “Menu Item List” (page 28). To insert batteries Notes Do not leave the remote control in an extremely • hot or humid place. Do not use a new battery and an old one •...
  • Page 10: Connection 1: Connecting The Input Equipment

    Connection 1: Connecting the Input Equipment WALKMAN® Connect the digital output supported WALKMAN® to the WALKMAN port (for WALKMAN®/ Xperia connection) of the amplifier. Digital cable for WALKMAN® (supplied) You can charge the WALKMAN® while playing if it supports the digital cable for WALKMAN® (supplied). Smartphone Connect the smartphone (Xperia) to the WALKMAN port (for WALKMAN®/Xperia connection) of the amplifier.
  • Page 11: Av Equipment

    AV Equipment Select the connecting method for the output jack of your equipment.  Equipment with analog audio (LINE) output jacks Connect equipment with analog audio (LINE) output jacks such as a record player (PS-HX500) to the LINE IN L/R jacks of the amplifier. To the analog audio (LINE) output (L/R) jacks...
  • Page 12  Equipment with a digital optical output jack Connect equipment with a digital optical output jack such as a CD player to the OPT IN jack of the amplifier. To the digital optical output jack Digital optical cable (not supplied)
  • Page 13: Computer

    Computer Connect the USB-B port of the amplifier to your computer. USB cable (USB-A/USB-B) (supplied) To listen to the music of your computer, you need to install the driver for the USB port and “Hi-Res Audio Player” to the computer. For details, see “To install the driver for the USB port” (page 21) and “To install the “Hi-Res Audio Player”...
  • Page 14: Connection 2: Connecting The Headphones

    Connection 2: Connecting the Headphones Connecting with the Balanced Connection Select the headphone jack for your headphones.  Headphones with balanced standard plug (4.4 mm in diameter)  Headphones with 3-pole mini plug (3.5 mm in diameter) (x 2)
  • Page 15  Headphones with XLR4 plug (balanced 4-pin)
  • Page 16: Connecting With The Unbalanced Connection

    Connecting with the Unbalanced Connection Select the headphone jack for your headphones.  Headphones with standard plug (6.3 mm in diameter)  Headphones with stereo mini plug (3.5 mm in diameter)
  • Page 17: Connecting The Audio Output Jacks (Pre Out) Without Using The Headphone Jack

    Connecting the Audio Output Jacks (PRE OUT) without Using the Headphone Jack When connecting equipment such as an integrated amplifier, active speaker, etc. to the PRE OUT L/R jacks of the amplifier, you can enjoy the sound by outputting sound from the speakers.
  • Page 18: Connection 3: Connecting The Ac Power Cord (Mains Lead)

    Connection 3: Connecting the AC Power Cord (Mains Lead) Connect the AC IN jack of the amplifier to a wall outlet (wall socket) with the AC power cord (mains lead) (supplied). AC power cord (mains lead) (supplied) Press  (power) to turn the amplifier on.
  • Page 19: Listening To The Music Source Of Your Walkman®, Smartphone, Or Av Equipment

    Listening to the Music Source of Your WALKMAN®, Smartphone, or AV Equipment For details about the supported format, see “Specifications” of “Precautions/Specifications” (separate manual). WALKMAN port (for WALKMAN®/ Xperia connection) Volume knob Make the connection for playback (pages 10 to 18). Press OUTPUT repeatedly to select the headphone jack for output.
  • Page 20 Check that the indicator on the selected headphone jack lights up. When selecting the PRE OUT L/R jacks, all the indicators on the headphone jacks turn off. Press INPUT repeatedly to display the input name of the equipment of the music source in the display window. Equipment and input name WALKMAN®/Smartphone: [WALKMAN] Equipment with analog audio (LINE) output jacks: [ANALOG (LINE)]...
  • Page 21: Listening To The Music Source Of Your Computer

    The driver for the USB port is installed automatically when the amplifier is detected by the computer.  Windows Vista Visit the website from the URL below. In the website, input “TA-ZH1ES” in the search window, download drivers for the USB port, then install it. For customers in Europe: http://support.sony-europe.com/ For customers in the U.S.A.
  • Page 22 If the driver is not installed for Windows 7/Windows 8/Windows 8.1/Windows 10, visit the website from the URL below. In the website, input “TA-ZH1ES” in the search window, download drivers for the USB port, then install it. For customers in Europe: http://support.sony-europe.com/ For customers in the U.S.A.
  • Page 23 Features of Hi-Res Audio Player “Hi-Res Audio Player” is player software that allows you to play back high-quality audio files with simple operation. Easy playback of high-resolution audio files • You can play back high-resolution audio files, such as DSD files, purchased in music distribution sites, etc., by connecting the device to your computer, and making simple software settings.
  • Page 24: Playing The Music Source Of The Computer

    Playing the Music Source of the Computer Play the music source with the “Hi-Res Audio Player” software that is installed on the computer. Volume knob Press OUTPUT repeatedly to select the headphone jack for output. The selected output name appears in the display window. [XLR4] [BALANCED-2] [BALANCED-1]...
  • Page 25 Press INPUT repeatedly to select [PC (USB-B)]. [PC (USB-B)] appears in the display window. Start “Hi-Res Audio Player” and play the music source. For details about “Hi-Res Audio Player,” see page 23. Turn the volume knob to adjust the volume level. Depending on the headphones, the volume may remain low.
  • Page 26: Changing The Display Window

    Changing the Display Window You can change the displayed items in the Normal playback display [NORMAL] display window by pressing DISPLAY on the remote control or operating the menu.  Input name  Volume level  Format of the input signal Input/output signal display [FORMAT] ...
  • Page 27: Operating The Menu

    Operating the Menu You can make various settings on the menu Press / to select the setting that is displayed in the display window. value, then press ENTER. The selected value is reflected and the display returns to the playback display (page 26).
  • Page 28 Menu Item List You can set the following items on the menu. The default settings are underlined. Setting items Setting value [DSEE HX] [OFF]: Off • Upscales compressed or CD quality sound [STANDARD]: Standard mode • source to near hi-resolution sound quality. [FEMALE VOCAL]: Suitable mode for female •...
  • Page 29 Setting items Setting value [AUTO VOLUME DOWN] [OFF]: Off • Turns down the volume level of the amplifier [ON]: On • automatically when changing the output, Note inserting/removing the headphone plug, This function is available for the headphones level changing the GAIN select switch setting, or only.
  • Page 30: Troubleshooting

    Remove the AC power cord (mains lead) from the amplifier, then turn the amplifier on again. • Should any problem persist, consult your nearest Sony dealer. AUTO STANDBY function does not work. When connecting the digital cable for WALKMAN® (supplied), the AUTO STANDBY function does •...
  • Page 31 If multiple playback software are started, the sound may not be output. In this case, start only the • playback software that you want to play. Check that the playback device on your computer is set to “Sony Headphone Amplifier Driver.” If it • is not, change the OS setting of the computer.
  • Page 32 When the connected computer is Windows, check that the dedicated driver is installed on the • computer (page 21). Check that the playback device on your computer is set to “Sony Headphone Amplifier Driver.” If it • is not, change the OS setting of the computer.
  • Page 33: Index

    Index Precautions/Specifications ....... 2 PRE OUT ..........17, 29 PROTECTOR ..........30 Active speaker ......... 17 ANALOG IN FORMAT ....... 29 Record player ........... 11 Audio output jacks ........17 Remote control ......... 8 AUTO STANDBY ........29 AUTO VOLUME DOWN ......29 AV equipment ..........
  • Page 34: Manuels Fournis

    Manuels fournis Les deux manuels qui suivent sont inclus. Manuel d’instructions (le présent manuel) Vous fournit les instructions d’utilisation. Précautions/Caractéristiques techniques (manuel distinct) Vous fournit les précautions et les spécifications du produit. Accessoires fournis  Amplificateur pour casque  Télécommande  Cordon d’alimentation  Piles R03 (format AAA)  Manuel d’instructions (le présent manuel)
  • Page 35 Table des matières Accessoires fournis ............... 2 Guide des pièces et commandes ..........4 Raccordement : Raccordement 1 : Raccordement de l’appareil d’entrée ....10 WALKMAN® ................. 10 Téléphone intelligent ..............10 Appareil AV ................... 11 Ordinateur ..................13 Raccordement 2 : Raccordement du casque d’écoute ....14 Raccordement à...
  • Page 36: Guide Des Pièces Et Commandes

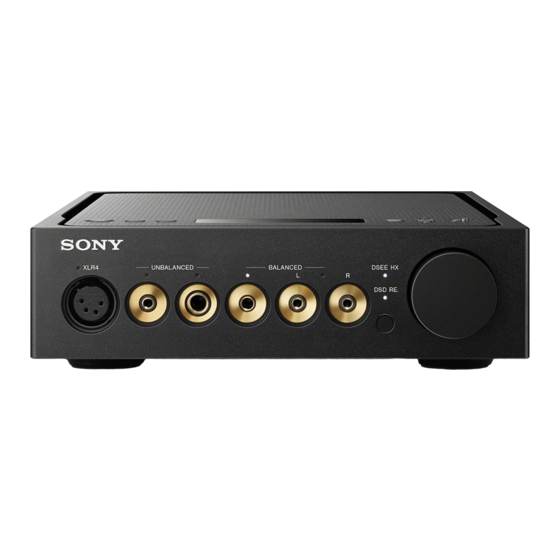
    Guide des pièces et commandes Panneau avant  Bouton de volume Permet de régler le niveau de volume.  Témoin DSEE HX S’allume lorsque la fonction DSEE HX est activée (page 28). Conseil Pendant qu’un signal d’entrée non pris en charge est présent en entrée, ce témoin s’allume et s’éteint immédiatement lorsque la fonction DSEE HX est activée.
  • Page 37 Pendant qu’une prise pour casque d’écoute est sélectionnée, le témoin de la prise pour casque d’écoute sélectionnée s’allume. Prise pour casque d’écoute de l’amplificateur Fiche et forme du casque d’écoute  Mini-prise pour casque d’écoute à 3 pôles M ou OUVERT G–...
  • Page 38: Panneau Du Côté Droit

    Panneau du côté droit  Port WALKMAN (pour raccordement d’un WALKMAN®/Xperia™) (page 10) Panneau arrière  Prises PRE OUT L/R (page 17)  Prise COAX (coaxiale) IN (page 11)  Prises LINE IN L/R (page 11)  Prise OPT (optique) IN (page 12)  Port USB-B (page 13) ...
  • Page 39: Panneau Supérieur

    Panneau supérieur  Touche  (alimentation)  Touche MENU/BACK Permet de mettre en marche/d’éteindre Affiche le menu dans la fenêtre l’amplificateur. Le témoin s’allume d’affichage. Lorsque vous appuyez sur lorsque l’appareil est mis en marche. cette touche pendant que le menu est affiché, l’affichage retourne à...
  • Page 40: Télécommande

    Télécommande  Touche DIMMER Permet de régler la luminosité de la fenêtre d’affichage. Chaque fois que vous appuyez sur la touche, la luminosité de la fenêtre d’affichage change comme suit : Lumineuse  Sombre  Désactivée  Lumineuse... Lorsque la fenêtre d’affichage est éteinte, les témoins du panneau avant de l’amplificateur sont éteints.
  • Page 41: Pour Insérer Les Piles

     Touche DSEE HX Active/désactive la fonction DSEE HX. Lorsque vous activez DSEE HX en appuyant sur la touche, le réglage [DSEE HX] défini dans le menu est rappelé. Le témoin DSEE HX s’allume pendant que la fonction DSEE HX est activée. Pour plus de détails sur la fonction DSEE HX, consultez « Liste des options de menu »...
  • Page 42: Raccordement 1 : Raccordement De L'appareil D'entrée

    Raccordement 1 : Raccordement de l’appareil d’entrée WALKMAN® Raccordez le WALKMAN® avec prise en charge de sortie numérique au port WALKMAN (pour raccordement d’un WALKMAN®/Xperia) de l’amplificateur. Câble numérique pour WALKMAN® (fourni) Conseil Vous pouvez charger le WALKMAN® pendant la lecture s’il prend en charge le câble numérique pour WALKMAN®...
  • Page 43: Appareil Av

    Appareil AV Sélectionnez la méthode de raccordement adaptée à la prise de sortie de votre appareil.  Appareil avec prises de sortie (LINE) audio analogiques Raccordez un appareil avec prises de sortie (LINE) audio analogiques tel qu’un tourne-disque (PS-HX500) aux prises LINE IN L/R de l’amplificateur. Vers les prises de sortie (LINE) audio analogiques (L/R)
  • Page 44: Appareil Avec Prise De Sortie Optique Numérique

     Appareil avec prise de sortie optique numérique Raccordez un appareil avec prise de sortie optique numérique tel qu’un lecteur de CD à la prise OPT IN de l’amplificateur. Vers la prise de sortie optique numérique Câble optique numérique (non fourni)
  • Page 45: Ordinateur

    Ordinateur Raccordez le port USB-B de l’amplificateur à votre ordinateur. Câble USB (USB-A/USB-B) (fourni) Conseil Pour écouter la musique de votre ordinateur, vous devez installer le pilote du port USB et « Hi-Res Audio Player » sur l’ordinateur. Pour plus de détails, consultez « Pour installer le pilote du port USB » (page 21) et « Pour installer le logiciel « Hi-Res Audio Player » »...
  • Page 46: Raccordement 2 : Raccordement Du Casque D'écoute

    Raccordement 2 : Raccordement du casque d’écoute Raccordement à l’aide d’une connexion symétrique Sélectionnez la prise pour casque d’écoute à utiliser avec votre casque d’écoute.  Casque d’écoute avec fiche standard symétrique (4,4 mm de diamètre)  Casque d’écoute avec mini-fiche à 3 pôles (3,5 mm de diamètre) (x 2)
  • Page 47  Casque d’écoute avec fiche XLR4 (symétrique 4 broches)
  • Page 48: Raccordement À L'aide D'une Connexion Asymétrique

    Raccordement à l’aide d’une connexion asymétrique Sélectionnez la prise pour casque d’écoute à utiliser avec votre casque d’écoute.  Casque d’écoute avec fiche standard (6,3 mm de diamètre)  Casque d’écoute avec mini-fiche stéréo (3,5 mm de diamètre)
  • Page 49: Raccordement Des Prises De Sortie Audio (Pre Out) Sans Utiliser La Prise Pour Casque D'écoute

    Raccordement des prises de sortie audio (PRE OUT) sans utiliser la prise pour casque d’écoute Lors du raccordement d’un appareil tel qu’un amplificateur intégré, une enceinte active, etc. aux prises PRE OUT L/R de l’amplificateur, vous pouvez écouter le son en le restituant par les enceintes.
  • Page 50: Raccordement 3 : Raccordement Du Cordon D'alimentation

    Raccordement 3 : Raccordement du cordon d’alimentation Raccordez la prise AC IN de l’amplificateur à une prise de courant murale à l’aide du cordon d’alimentation (fourni). Cordon d’alimentation (fourni) Appuyez sur  (alimentation) pour mettre en marche l’amplificateur.
  • Page 51: Écoute De La Source Musicale De Votre Walkman®, Téléphone Intelligent Ou Appareil Av

    Écoute de la source musicale de votre WALKMAN®, téléphone intelligent ou appareil AV Pour plus de détails sur les formats pris en charge, consultez « Caractéristiques techniques » dans « Précautions/Caractéristiques techniques » (manuel distinct). Port WALKMAN (pour raccordement d’un WALKMAN®/Xperia) Bouton de volume Effectuez le raccordement pour la lecture (pages 10 à...
  • Page 52 Vérifiez que le témoin de la prise pour casque d’écoute sélectionnée s’allume. Conseil Lors de la sélection des prises PRE OUT L/R, tous les témoins des prises pour casque d’écoute s’éteignent. Appuyez plusieurs fois sur INPUT pour afficher le nom d’entrée de l’appareil de la source musicale dans la fenêtre d’affichage.
  • Page 53: Écoute De La Source Musicale De Votre Ordinateur

    Le pilote du port USB est installé automatiquement lorsque l’amplificateur est détecté par l’ordinateur.  Windows Vista Visitez le site Web à l’adresse URL ci-dessous. Sur le site Web, saisissez « TA-ZH1ES » dans la fenêtre de recherche, téléchargez les pilotes pour le port USB, puis installez-les. Pour les clients en Europe : http://support.sony-europe.com/ Pour les clients aux États-Unis et au Canada : http://esupport.sony.com/...
  • Page 54 Si le pilote n’est pas installé pour Windows 7/Windows 8/Windows 8.1/Windows 10, visitez le site Web à l’adresse URL ci-dessous. Sur le site Web, saisissez « TA-ZH1ES » dans la fenêtre de recherche, téléchargez les pilotes pour le port USB, puis installez-les.
  • Page 55: Fonctionnalités De Hi-Res Audio Player

    Fonctionnalités de Hi-Res Audio Player « Hi-Res Audio Player » est un logiciel de lecteur vous permettant d’effectuer la lecture de fichiers audio de haute qualité avec un fonctionnement très simple. Lecture facile de fichiers audio haute résolution • Vous pouvez effectuer la lecture de fichiers audio haute résolution, tels que des fichiers DSD, achetés sur des sites de distribution de musique, etc., en raccordant l’appareil à...
  • Page 56: Lecture De La Source Musicale De L'ordinateur

    Lecture de la source musicale de l’ordinateur Effectuez la lecture de la source musicale avec le logiciel « Hi-Res Audio Player » installé sur l’ordinateur. Bouton de volume Appuyez plusieurs fois sur OUTPUT pour sélectionner la prise pour casque d’écoute comme sortie. Le nom de la sortie sélectionnée apparaît dans la fenêtre d’affichage.
  • Page 57 Vérifiez que le témoin de la prise pour casque d’écoute sélectionnée s’allume. Conseil Lors de la sélection des prises PRE OUT L/R, tous les témoins des prises pour casque d’écoute s’éteignent. Appuyez plusieurs fois sur INPUT pour sélectionner [PC (USB-B)]. [PC (USB-B)] apparaît dans la fenêtre d’affichage.
  • Page 58: Changement De La Fenêtre D'affichage

    Changement de la fenêtre d’affichage Vous pouvez changer les éléments affichés Affichage de lecture normal [NORMAL] dans la fenêtre d’affichage en appuyant sur DISPLAY sur la télécommande ou en utilisant le menu.  Nom d’entrée  Niveau de volume  Format du signal d’entrée Affichage du signal d’entrée/de sortie [FORMAT] ...
  • Page 59: Utilisation Du Menu

    Utilisation du menu Vous pouvez effectuer divers réglages Appuyez sur / pour à partir du menu affiché dans la fenêtre sélectionner la valeur de d’affichage. réglage, puis appuyez sur ENTER. La valeur sélectionnée est reflétée et Fenêtre d’affichage l’affichage retourne à l’affichage de lecture (page 26).
  • Page 60: Liste Des Options De Menu

    Liste des options de menu Vous pouvez régler les options suivantes dans le menu. Les réglages par défaut sont soulignés. Options de réglage Valeur de réglage [DSEE HX] [OFF] : Désactivation • Convertit la source sonore compressée ou [STANDARD] : Mode standard •...
  • Page 61 Options de réglage Valeur de réglage [DISPLAY] [NORMAL] : Affichage de lecture normal • Permet de modifier l’affichage de la fenêtre (nom de l’entrée, signal d’entrée, niveau de d’affichage pendant la lecture. volume) Ce réglage fonctionne de la même façon [FORMAT] : Affichage du signal d’entrée/de •...
  • Page 62: Guide De Dépannage

    Retirez le cordon d’alimentation de l’amplificateur, puis remettez l’amplificateur en marche. Si le • problème persiste, consultez votre détaillant Sony le plus proche. La fonction AUTO STANDBY ne fonctionne pas. Lors du raccordement du câble numérique pour WALKMAN® (fourni), la fonction AUTO STANDBY •...
  • Page 63 • démarrez uniquement le logiciel de lecture que vous souhaitez utiliser. Vérifiez que l’appareil de lecture sur votre ordinateur est réglé à « Sony Headphone Amplifier • Driver ». Si ce n’est pas le cas, modifiez le paramètre du système d’exploitation de l’ordinateur.
  • Page 64 Si l’ordinateur raccordé utilise Windows, vérifiez que le pilote dédié est installé sur l’ordinateur • (page 21). Vérifiez que l’appareil de lecture sur votre ordinateur est réglé à « Sony Headphone Amplifier • Driver ». Si ce n’est pas le cas, modifiez le paramètre du système d’exploitation de l’ordinateur.
  • Page 65: Index

    Index Pile ............. 9 Pilote du port USB ........21 Précautions/Caractéristiques techniques ..........2 Amplificateur intégré ....... 17 PRE OUT ..........17, 29 ANALOG IN FORMAT ....... 29 Prise pour casque d’écoute ...... 5 Appareil AV ..........11 Prises de sortie audio ......17 AUTO STANDBY ........
  • Page 66 關於隨附的手冊 隨附以下兩本手冊。 使用說明書(本手冊) 提供有關如何使用的指示。 注意事項/規格(另冊) 提供注意事項和產品規格。 隨附配件  耳機放大器  遙控器  交流電源線  R03(尺寸AAA)電池  使用說明書(本手冊)  注意事項/規格  USB電纜(USB-A/USB-B)  WALKMAN®專用數位連接線...
  • Page 67 目錄 隨附配件..........2 組件與控制器指南..........4 連接: 連接1:連接輸入設備..........10 WALKMAN®..........10 智慧型手機..........10 AV設備........... 11 電腦............. 13 連接2:連接耳機..........14 透過平衡連接進行連接........14 透過非平衡連接進行連接........16 連接音訊輸出插孔(PRE.OUT)而不使用耳機插孔....17 連接3:連接交流電源線........18 聆聽音樂: 聆聽WALKMAN®、智慧型手機或AV設備的音樂來源....19 聆聽電腦的音樂來源...........21 準備電腦..........21 播放電腦的音樂來源........24 使用各種功能: 變更顯示窗...........26 操作選單.............27 疑難排除.............30 索引............33...
  • Page 68: 組件與控制器指南

    組件與控制器指南 前面板 .音量旋鈕 調整音量等級。 .DSEE.HX指示燈 DSEE.HX功能啟動時亮起(第28頁)。 提示 輸入不支援的輸入訊號時,如果DSEE.HX功能啟動,此指示燈亮起並立即熄滅。 .DSD.RE.指示燈 DSD重新錄製功能啟動時亮起(第28頁)。 .遙控器感應器...
  • Page 69 選擇耳機插孔時,所選耳機插孔上的指示燈會亮起。 放大器的耳機插孔 耳機的插頭和形狀 .3極點迷你耳機插孔(平衡連接,直徑3.5.mm). G或OPEN ×.2 L側 R側 G或OPEN .平衡標準耳機插孔(直徑4.4.mm) OPEN .標準耳機插孔(直徑6.3.mm) G.(COMMON) .立體聲迷你耳機插孔(直徑3.5.mm) G.(COMMON)  XLR4耳機插孔(平衡4針) 註 當您將平衡連接轉換成非平衡連接時,放大器可能受損。...
  • Page 70 右側面板 .WALKMAN連接埠(用於WALKMAN®/ Xperia™連接)(第10頁) 後面板 .PRE.OUT.L/R插孔(第17頁) .COAX(同軸)IN插孔(第11頁) .LINE.IN.L/R插孔(第11頁) .OPT(光纖)IN插孔(第12頁) .USB-B連接埠(第13頁) .AC.IN插孔(第18頁) 提示 切勿撕去“FOR.SERVICE”標籤。此標籤僅供維修人 員使用。...
  • Page 71 頂部面板  (電源)按鈕 .MENU/BACK按鈕 開啟/關閉放大器。放大器開啟時,指示 在顯示窗中顯示選單。在顯示選單時按下 燈亮起。 此按鈕,顯示幕會返回播放顯示。 .INPUT按鈕  //ENTER按鈕 反覆按此按鈕選擇音樂來源的設備。顯示 按下/選擇顯示窗中的選單項目或設定 窗中會出現所選輸入名稱(第19頁)。 值,然後按下ENTER決定選擇。 .OUTPUT按鈕  GAIN(H/L)選擇開關 反覆按此按鈕選擇耳機插孔或用於輸出的 調整耳機插孔的增益。. PRE.OUT.L/R插孔。顯示窗中會出現所選輸 如果耳機音量較小,請先將音量調低,再 出名稱(第19頁)。 設定為“H”。一般使用時,設定為“L” 選擇用於輸出的PRE.OUT.L/R插孔時,請參 (第19、24頁)。 閱“連接音訊輸出插孔(PRE.OUT)而不使 用耳機插孔”(第17頁)。. .顯示窗 顯示輸入名稱、輸入訊號格式、選單項目 等(第26頁)。...
  • Page 72 遙控器 .DIMMER按鈕 調整顯示窗亮度。 每按一次按鈕,顯示窗的亮度就會如下 變更: 亮..暗..熄滅..亮... 當顯示窗關閉時,放大器前面板上的指示 燈會熄滅。 .VOLUME.+/–按鈕 調整音量等級。 .MUTING按鈕 暫時關閉聲音。靜音開啟時,顯示窗中會 出現[MUTING]。 再次按下此按鈕或是使用遙控器上的 VOLUME.+增加音量等級可取消靜音。  DISPLAY按鈕 播放時變更顯示窗中的顯示。您可以選擇 標準播放顯示[NORMAL]或輸入/輸出訊號 顯示[FORMAT]。關於播放時顯示內容的詳 細資訊,請參閱“變更顯示窗”(第26 頁)。 .OUTPUT按鈕 反覆按此按鈕選擇耳機插孔或用於輸出的 PRE.OUT.L/R插孔。顯示窗中會出現所選輸 出名稱(第19頁)。 選擇用於輸出的PRE.OUT.L/R插孔時,請參 閱“連接音訊輸出插孔(PRE.OUT)而不使 用耳機插孔”(第17頁)。.  (電源)按鈕 .DSEE.HX按鈕 開啟/關閉放大器。. 開啟/關閉DSEE.HX功能。透過按下此按 .INPUT按鈕 鈕開啟DSEE.HX時,會調用在選單中設 反覆按此按鈕選擇音樂來源的設備。顯示 定的[DSEE.HX]設定。DSEE.HX功能啟動 窗中會出現所選輸入名稱(第19頁)。 時,DSEE.HX指示燈會亮起。關於DSEE.HX 功能的詳細資訊,請參閱“選單項目清 .DSD.REMASTERING按鈕 單”(第28頁)。...
  • Page 73 裝入電池 註 請勿將遙控器留在非常炎熱或潮濕的地方。 • 請勿將新電池與舊電池共用。 • 請勿混用不同類型的電池。 • 如果長時間不打算使用遙控器,請取出電池以避免 • 因電池漏液和腐蝕而造成損壞。...
  • Page 74: 連接1:連接輸入設備

    連接1:連接輸入設備 WALKMAN® 將支援數位輸出的WALKMAN®連接到放大器的WALKMAN連接埠(用於WALKMAN®/Xperia連接)。 WALKMAN®專用數位連接線(附件) 提示 如果WALKMAN®支援WALKMAN®專用數位連接線(附件),可以在播放時充電。 智慧型手機 將智慧型手機(Xperia)連接到放大器的WALKMAN連接埠(用於WALKMAN®/Xperia連接)。 USB轉接器(非附件) 使用為您的智慧型手機另售的USB轉接 器。將其連接至智慧型手機。 Micro.USB電纜(非附件)...
  • Page 75: Av設備

    AV設備 選擇設備輸出插孔的連接方式。  配備類比音訊(LINE)輸出插孔的設備 將配備類比音訊(LINE)輸出插孔的設備,例如唱片播放機(PS-HX500),連接到放大器的LINE. IN.L/R插孔。 至類比音訊(LINE) 輸出(L/R)插孔 白色 紅色 白色 音訊電纜(非附件) 紅色  配備數位同軸輸出插孔的設備 將配備數位同軸輸出插孔的設備,例如CD播放機,連接到放大器的COAX.IN插孔。 至數位同軸輸出插孔 數位同軸電纜(非附件)...
  • Page 76  配備數位光纖輸出插孔的設備 將配備數位光纖輸出插孔的設備,例如CD播放機,連接到放大器的OPT.IN插孔。 至數位光纖輸出插孔 數位光纖電纜(非附件)...
  • Page 77 電腦 將放大器的USB-B連接埠連接到電腦。 USB電纜(USB-A/USB-B)(附件) 提示 若要聆聽電腦的音樂,您必須將USB連接埠的驅動程式和“Hi-Res.Audio.Player”安裝到電腦。有關詳細資訊, 請參閱“安裝USB連接埠驅動程式”(第21頁)和“安裝“Hi-Res.Audio.Player”軟體”(第22頁)。...
  • Page 78: 連接2:連接耳機

    連接2:連接耳機 透過平衡連接進行連接 選擇耳機的耳機插孔。  具有平衡標準插頭(直徑4.4.mm)的耳機  具有3極點迷你插頭(直徑3.5.mm)(x.2)的耳機...
  • Page 79  具有XLR4插頭(平衡4針)的耳機...
  • Page 80: 透過非平衡連接進行連接

    透過非平衡連接進行連接 選擇耳機的耳機插孔。  具有標準插頭(直徑6.3.mm)的耳機  具有立體聲迷你插頭(直徑3.5.mm)的耳機...
  • Page 81: 連接音訊輸出插孔(Pre.out)而不使用耳機插孔

    連接音訊輸出插孔(PRE.OUT)而不使用耳機插孔 將整合式放大器、主動式揚聲器等設備連接到放大器的PRE.OUT.L/R插孔時,可以透過從揚聲器輸 出聲音欣賞聲音。 至類比音訊輸入 (L/R)插孔 白色 紅色 白色 音訊電纜(非附件) 紅色 提示 您可以透過操作選單變更[PRE.OUT]設定。有關詳細資訊,請參閱第29頁。...
  • Page 82: 連接3:連接交流電源線

    連接3:連接交流電源線 透過交流電源線(附件)將放大器的AC.IN插孔連接牆上的電源插座。 交流電源線(附件) 按下(電源)以開啟放大器。...
  • Page 83: 聆聽Walkman®、智慧型手機或Av設備的音樂來源

    聆聽WALKMAN®、智慧型手機或AV設備的 音樂來源 關於支援格式的詳細資訊,請參閱“注意事項/規格”(另冊)的“規格”。 WALKMAN連接埠(用 於WALKMAN®/Xperia 連接) 音量旋鈕 建立播放連接(第10至18頁)。 反覆按OUTPUT選擇耳機插孔進行輸出。 顯示窗中會出現所選輸出名稱。 [XLR4] [BALANCED-2] [UNBALANCED-1] [BALANCED-1] [UNBALANCED-2] 提示 選擇PRE.OUT.L/R插孔時,顯示窗中會出現[PRE.OUT]。...
  • Page 84 檢查所選耳機插孔上的指示燈是否亮起。 提示 選擇PRE.OUT.L/R插孔時,耳機插孔上所有的指示燈都會熄滅。 反覆按INPUT,在顯示窗中顯示音樂來源設備的輸入名稱。 設備和輸入名稱 WALKMAN®/智慧型手機:[WALKMAN] 配備類比音訊(LINE)輸出插孔的設備:[ANALOG.(LINE)] 配備數位同軸輸出插孔的設備:[DIGITAL.(COAX)] 配備數位光纖輸出插孔的設備:[DIGITAL.(OPT)] 播放音樂來源設備。 旋轉音量旋鈕以調整音量等級。 視耳機而定,音量可能保持較低等級。此時,請調低音量後,再將GAIN設定為“H”。一般使 用時,GAIN應設定為“L”。...
  • Page 85: 聆聽電腦的音樂來源

    聆聽電腦的音樂來源 準備電腦 安裝USB連接埠驅動程式 反覆按INPUT選擇[PC.(USB-B)]。 顯示窗中會出現[PC.(USB-B)]。 開啟電腦,然後安裝放大器的USB連接埠驅動程式。 驅動程式的安裝方式因所連接電腦的作業系統而異。  Windows.7/Windows.8/Windows.8.1/Windows.10 當電腦偵測到放大器時,會自動安裝USB連接埠驅動程式。  Windows.Vista 請造訪以下URL網站。在該網站的搜尋視窗中輸入“TA-ZH1ES”,下載USB連接埠驅動程式, 然後進行安裝。 歐洲顧客:http://support.sony-europe.com/ 美國和加拿大顧客:http://esupport.sony.com/ 其他地區的顧客:http://www.sony-asia.com/support.  Mac 不需要安裝驅動程式。 提示 如果Windows.7/Windows.8/Windows.8.1/Windows.10沒有安裝驅動程式,請造訪以下URL網站。在該網站的搜尋 視窗中輸入“TA-ZH1ES”,下載USB連接埠驅動程式,然後進行安裝。 歐洲顧客:http://support.sony-europe.com/ 美國和加拿大顧客:http://esupport.sony.com/ 其他地區的顧客:http://www.sony-asia.com/support.
  • Page 86 安裝“Hi-Res.Audio.Player”軟體 將“Hi-Res.Audio.Player”安裝到已安裝USB連接埠驅動程式的電腦。 請造訪以下URL網站。在該網站的搜尋視窗中輸入“TA-ZH1ES”,下載“Hi-Res.Audio. Player”,然後進行安裝。關於安裝和操作的步驟,請參閱同一URL。 歐洲顧客:http://support.sony-europe.com/ 美國和加拿大顧客:http://esupport.sony.com/ 其他地區的顧客:http://www.sony-asia.com/support. 啟動安裝於電腦上的“Hi-Res.Audio.Player”。 從“Hi-Res.Audio.Player”的工具列選擇[設定].-.[裝置],然後將[裝置] 選擇為[Sony.Headphone.Amplifier.Driver]。 電腦準備完成。...
  • Page 87 Hi-Res.Audio.Player的特色 “Hi-Res.Audio.Player”是可讓您透過簡單操作播放高品質音訊檔案的播放器軟體。 輕鬆播放高解析度音訊檔案 • 您可以透過將裝置連接電腦並進行簡易軟體設定,播放自音樂發行網站等購入的高解析度音訊 檔案,例如DSD檔案。 播放清單功能 • 藉由將音樂檔案拖放到“Hi-Res.Audio.Player”,您可以建立播放清單以依照想要的順序聆聽 喜愛的曲目。可以儲存與編輯建立的播放清單。 以較高音質播放音樂 • 在播放前將音訊資料儲存在電腦的現用記憶體中,可以減少CPU負載,並以更穩定的音質播放音 樂檔案。 支援的格式 Hi-Res.Audio.Player支援以下音訊檔案格式。 DSF(.dsf):2.8.MHz/5.6.MHz/11.2.MHz/22.4.MHz • DSDIFF(.dff):2.8.MHz/5.6.MHz/11.2.MHz/22.4.MHz • PCM(.wav/.aiff/.aif):44.1.kHz.-.768.kHz,16位元-.32位元 • FLAC(.flac):44.1.kHz.-.384.kHz,16位元-.32位元 • ALAC(.m4a):44.1.kHz.-.384.kHz,16位元-.32位元 • MP3(.mp3):32.kbps.-.320.kbps •...
  • Page 88: 播放電腦的音樂來源

    播放電腦的音樂來源 以電腦上安裝的“Hi-Res.Audio.Player”軟體播放音樂來源。 音量旋鈕 反覆按OUTPUT選擇耳機插孔進行輸出。 顯示窗中會出現所選輸出名稱。 [BALANCED-2] [XLR4] [BALANCED-1] [UNBALANCED-1] [UNBALANCED-2] 提示 選擇PRE.OUT.L/R插孔時,顯示窗中會出現[PRE.OUT]。 檢查所選耳機插孔上的指示燈是否亮起。 提示 選擇PRE.OUT.L/R插孔時,耳機插孔上所有的指示燈都會熄滅。...
  • Page 89 反覆按INPUT選擇[PC.(USB-B)]。 顯示窗中會出現[PC.(USB-B)]。 啟動“Hi-Res.Audio.Player”並播放音樂來源。 如需“Hi-Res.Audio.Player”的詳細資訊,請參閱第23頁。 旋轉音量旋鈕以調整音量等級。 視耳機而定,音量可能保持較低等級。此時,請調低音量後,再將GAIN設定為“H”。一般使 用時,GAIN應設定為“L”。...
  • Page 90: 變更顯示窗

    變更顯示窗 透過按下遙控器上的DISPLAY或操作選單,可 標準播放顯示[NORMAL] 以變更顯示窗中的顯示項目。 .輸入名稱 .音量等級 .輸入訊號格式 輸入/輸出訊號顯示[FORMAT] .輸入訊號格式 按遙控器上的DISPLAY。 .輸入訊號的採樣頻率 顯示窗如下變更。 .輸入訊號的位元數 視輸入訊號而定,可能不會正確顯示此 項。 .輸出訊號的位元數 .輸出訊號的採樣頻率 .輸出訊號格式...
  • Page 91: 操作選單

    操作選單 您可以在顯示窗中顯示的選單上進行各種設 按/選擇設定值,然後按 定。 ENTER。 所選設定值會反映出來,而且顯示幕會回到播 放顯示(第26頁)。 顯示窗 提示 如果在操作選單時按下MENU/BACK,選單操作會取 消,而且顯示幕會回到播放顯示。. 將設定重設為原廠預設值 您可以將輸入、音量和選單設定重設為原廠 預設值。 按MENU/BACK。 按下(電源)以關閉放大器。 顯示窗中會出現選單。 按住(電源)超過7秒。 顯示窗中出現[MEMORY.CLEARED!],然後設定 重設為原廠預設值。 按/選擇選單項目,然後按 ENTER。 選單項目 設定值 捲動列 設定值左側會出現或,然後您可 以選擇設定值。 關於設定項目的詳細資訊,請參閱“選單項目 清單”(第28頁)。...
  • Page 92 選單項目清單 您可以在選單上設定以下項目。 預設設定會以底線標示。 設定項目 設定值 [DSEE.HX] [OFF]:關閉 • 將壓縮或CD品質音源提升到接近高解析度音質。 [STANDARD]:標準模式 • 您也可以透過按下遙控器上的DSEE.HX開啟/關閉 [FEMALE.VOCAL]:適合女聲的模式 • DSEE.HX功能。設定為開啟時,會調用在此選單 [MALE.VOCAL]:適合男聲的模式 • 上選取的設定。 [PERCUSSION]:適合打擊樂器音源的模式 • DSEE.HX功能運作於下列PCM訊號。 [STRINGS]:適合弦樂器音源的模式 • 採樣頻率 位元數 32.kHz、44.1.kHz、48.kHz 16位元、24位元、. 32位元 88.2.kHz、96.kHz、. 16位元、24位元 176.4.kHz、192.kHz、. 352.8.kHz、384.kHz [DSD.REMASTERING] [OFF]:關閉 • 將所有PCM訊號轉換為11.2.MHz或12.2.MHz的DSD [ON]:開啟 • 訊號。 此設定的操作方式與按下遙控器上的DSD. REMASTERING相同。...
  • Page 93 設定項目 設定值 [ANALOG.IN.FORMAT] 從以下格式中選擇。 選擇從LINE.IN.L/R插孔輸入的音訊訊號的播放 [PCM48kHz]/[PCM96kHz]/[PCM192kHz]/ 格式。 [DSD2.8MHz]/[DSD5.6MHz]/[DSD11.2MHz] 註 只有在選取[PCM48kHz]時,DSEE.HX功能才有效。 [PRE.OUT] [OFF]:關閉 • 從PRE.OUT.L/R插孔輸出聲音。. [VARIABLE]:在放大器上調整音量等級時,選 • 擇此項。 [FIXED]:在所連接設備上調整音量等級時, • 選擇此項。以固定音量等級輸出聲音。 註 當您設定為[OFF]時,[PRE.OUT]不會顯示為由OUTPUT選 取的輸出目標。 [AUTO.STANDBY] [OFF]:關閉 • 在靜音狀態下約20分鐘未操作放大器時,自動關 [ON]:開啟 • 閉放大器。 註 預設設定視地區而異。 [LR.BALANCE] 從以下範圍中調整。 調整從耳機插孔或PRE.OUT.L/R插孔輸出的輸出 [L+6.00dB].-.[CENTER].-.[R+6.00dB](以. 訊號的左右平衡。 0.25.dB遞增) 提示 您可以分別設定耳機插孔和PRE.OUT.L/R插孔的[LR. BALANCE]。...
  • Page 94: 疑難排除

    疑難排除 一般 電源沒有開啟。. 檢查交流電源線連接是否牢固。 • 遙控器不運作。. 將遙控器對準放大器上的遙控器感應器(第4頁)。 • 將遙控器和放大器之間的所有障礙物移走。 • 將遙控器的所有電池換新(第9頁)。 • 即便啟動DSEE.HX功能,DSEE.HX指示燈也不亮起。 根據輸入訊號而定,DSEE.HX功能不起作用。輸入不支援的輸入訊號時,如果DSEE.HX功能啟動,DSEE. • HX指示燈亮起並立即熄滅。有關支援的輸入訊號的詳細資訊,請參閱第28頁。 放大器自動關閉。. 如果選單設定項目[AUTO.STANDBY]設定為[ON],在靜音狀態下約20分鐘未操作放大器時,放大器會自 • 動關閉。在放大器關閉前1分鐘,顯示窗中會出現放大器關閉之前的等待時間。 將交流電源線從放大器拔出,然後再次開啟放大器。如果無法解決問題,請就近與Sony經銷商聯絡。 • AUTO.STANDBY功能無效。 當連接WALKMAN®專用數位連接線(附件)時,AUTO.STANDBY功能無效。 • 由於操作音根據電腦設定而播放,因此AUTO.STANDBY功能可能會無效。 • 顯示窗中出現[PROTECTOR]。. 如果耳機插孔負載異常電流,或是放大器溫度異常升高,會出現[PROTECTOR]。此時,請從放大器拔出 • 耳機插頭,然後按下(電源)。...
  • Page 95 顯示窗中出現[OVER.CURRENT]。. 如果WALKMAN連接埠(用於WALKMAN®/Xperia連接)的USB電纜負載異常電流,會出現[OVER.CURRENT]。 • 此時,請從放大器拔出USB電纜,然後按下(電源)。 顯示窗中沒有出現項目。 檢查選單設定項目[DIMMER]是否設定為[DISPLAY.OFF].(第28頁)。 • 按下遙控器上的DIMMER調整顯示窗的亮度。 • 聲音 放大器沒有輸出聲音。 請在放大器上檢查以下原因的說明。. 檢查音量等級,或是取消靜音(第8頁)。 • 檢查耳機插孔上的指示燈是否亮起。如果熄滅,請反覆按OUTPUT選擇耳機插孔(第4、19、24 • 頁)。 檢查耳機插頭是否牢牢插入耳機插孔。 • 檢查是否選取適當的輸入插孔。 • 檢查放大器和連接的設備是否開啟。 • 檢查輸入音訊格式是否與放大器相容。關於支援格式的詳細資訊,請參閱“注意事項/規格”(另冊) • 的“規格”。 請在電腦上檢查以下原因的說明。. 將電腦(Windows)連接到放大器的USB-B連接埠時,檢查電腦上是否安裝專用的驅動程式. • (第21頁)。 檢查作業系統或播放軟體的音量等級是否正確設定,或是否設定為靜音狀態。 • 如果啟動多個播放軟體,聲音可能不會輸出。在此情況下,請僅啟動您要播放的播放軟體。 • 檢查電腦上的播放裝置是否設定為“Sony.Headphone.Amplifier.Driver”。否則請變更電腦的作業系 • 統設定。 無法播放多聲道音源。 放大器僅支援2聲道音樂來源。 •...
  • Page 96 PRE.OUT.L/R插孔沒有輸出聲音。 檢查選單設定項目[PRE.OUT]是否設定為[OFF].(第29頁)。 • 音量等級自動變更。 音量等級設定為高時,如果變更輸出、插入/拔出耳機插頭、變更GAIN開關設定或開啟放大器,會自動 • 調低放大器的音量等級。如果您不要使用此功能,請將選單設定項目[AUTO.VOLUME.DOWN]設定為[OFF]. (第28頁)。 產生噪音。 在以下狀態使用電腦時,可能會產生噪音。 正在執行多個播放軟體程式(“Hi-Res.Audio.Player”或其他第三方播放軟體),並且輪流使用。 • 視播放時其他執行中的軟體操作而定,可能會產生噪音。 • 下列狀況中可能會產生噪音。 當具有防噪功能的耳機連接至放大器時,如果播放DSD訊號,可能會產生噪音。 • 下列狀況中可能會聽見放大器發出干擾雜音。 當選擇PRE.OUT.L/R插孔用於輸出時,可能會聽見放大器發出干擾雜音。 • USB-B 偵測不到USB裝置。 關閉放大器,移除USB裝置,然後再次開啟放大器,並連接USB裝置。 • USB裝置可能無法正常操作。請參閱其使用說明書解決問題。 • 聲音從所連接電腦的揚聲器輸出。 所連接電腦的作業系統為Windows時,檢查電腦上是否安裝專用的驅動程式(第21頁)。 • 檢查電腦上的播放裝置是否設定為“Sony.Headphone.Amplifier.Driver”。否則請變更電腦的作業系 • 統設定。...
  • Page 97 索引 WALKMAN®......10 Windows......21 ANALOG.IN.FORMAT.....29 顯示窗.......26 AUTO.STANDBY......29 XLR4........5 AUTO.VOLUME.DOWN.....28 選單項目清單......28 AV設備.......11 遙控器........8 CD播放機......11 音訊輸出插孔......17 唱片播放機......11 整合式放大器......17 D.C.PHASE.LINEARIZER....28 智慧型手機......10 電池........9 主動式揚聲器......17 電腦....... ..13 注意事項/規格......2 DIMMER......
  • Page 100 ©2016 Sony Corporation Printed in Malaysia 4-598-254-12(1)

Table des Matières