Table des Matières
Publicité
Les langues disponibles
Les langues disponibles
Liens rapides
Publicité
Table des Matières
Dépannage

Manuels Connexes pour Keurig Hot K3000SE


Sommaire des Matières pour Keurig Hot K3000SE
- Page 1 OWNER’ S MANUAL Keurig K-Cup K3000SE Brewer ® ® MANUEL D’UTILISATION Système d'infusion Keurig K-Cup K3000SE ® ® K3000SE COMMERCIALE Série SINGLE SERVE COFFEE MAKER SYSTÈME D’INFUSION UNE TASSE À LA FOIS...
-
Page 2: Important Safeguards
IMPORTANT SAFEGUARDS Safe Operation & Use When using electrical appliances, basic damaged cord or plug or after the Consult a qualified electrician if appliance malfunctions or is damaged the grounding instructions are not safety precautions should be followed, in any manner. Contact Keurig completely understood, or if doubt including the following: Customer Service to report any... -
Page 3: Table Des Matières
Pod Holder. To avoid risk ® ® of injury, do not put your fingers in the K-Cup Pod Assembly Housing. KEURIG K3000SE - COMMERCIAL SERIES ® ® SINGLE SERVE COFFEE MAKER CAUTION: There is extremely hot water in the K-Cup Pod Holder during the ®... -
Page 4: Brewer Overview
Brewer Overview Helpful Hints page 3 of this guide. The serial number can be found on the side of the brewer box or on the 5. Brewing into a travel mug. bottom of the brewer. 1. Plug the brewer into its own grounded outlet. To brew into a travel mug, simply flip the If the electric circuit is overloaded with other Upper Drip Tray upwards by 90 degrees. -
Page 5: Features
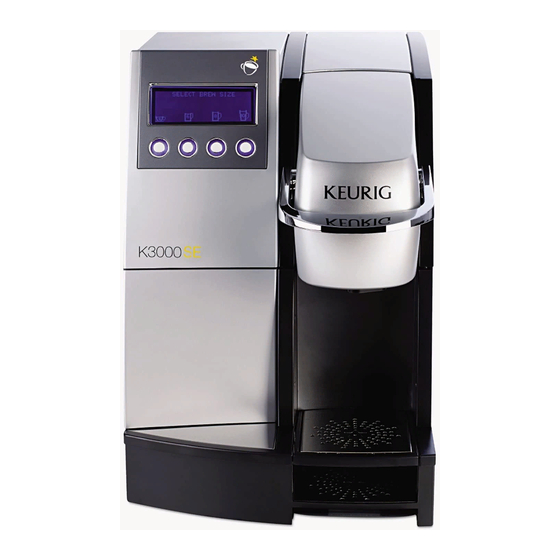
Features K3000SE Brewer READY - CHOSE K-CUP LIFT HANDLE Español Français Water K3000SE Brewer LCD Screen K-Cup Drip Tray Base Omnipure KQ8A Brewer Inlet Connect ® Assembly Housing Water Filter (N and User Interface Buttons Handle Drain Plugs O are the Filter Kit... -
Page 6: Section 1 Setup & First Brew
SECTION 1 Setup & First Brew Plumbing Fitting Connections You cannot use your Keurig brewer ® IMPORTANT: until it has been set up for its first use. fig. Screws ( 4 x ) If the brewer has been exposed to temperatures NOTE: below freezing, allow the brewer at least two hours Filter Mounting Bracket... -
Page 7: Setting Up Your Brewer
Turn on water supply and allow at least 4 gallons of water to flush through Attach the Filter Mounting Bracket to the Omnipure KQ8A Water Filter the filter. Turn off water supply. using the four screws provided (fig. 1). NOTE: The top of the Omnipure KQ8A Water Filter has two ports labeled IN PORT and OUT PORT. - Page 8 Setup & First Brew SECTION 1 Lift the Handle (fig. 8). The K-Cup ® fig. Holder will open toward you. Select a K-Cup pod. ® The brewer will automatically fill the internal READY - CHOSE K-CUP PACK fig. LIFT HANDLE NOTE: Do not remove the hot water tank with water and then the Español...
- Page 9 Refer to page 13 for instructions. Brewing Hot Water CAUTION: K-Cup pod will be hot. ® Enjoy your first cup of Keurig HOT ™ fig. Your brewer is able to produce hot water for use in gourmet coffee, tea, hot cocoa, or other beverage! fig.
-
Page 10: Menu Controls & Indicators
SECTION 2 Menu Controls & Indicators Menu Mode SET VEND/NO VEND fig. fig. To enable or disable the use of a coin unit press the "ADJUST" button. The options are "NO VEND" To enter the MENU MODE switch the power off. Open the K-Cup Pod Bin and "VEND AT SET PRICE."... -
Page 11: Language Setting For A Single Brew
Language Setting For a Single Brew HOT WATER DISPENSE fig. Disable the plain Hot Water button by pressing the "ADJUST" button. The K3000SE brewer allows users to temporarily SELECT BREW SIZE change the language for a single brew. Simply press READY - CHOSE K-CUP PACK Select which cup sizes you want the brewer to dispense. -
Page 12: Section 3 - Cleaning & Maintenance Cleaning
SECTION 3 Cleaning & Maintenance Cleaning External Parts the K-Cup Pod Holder (fig. 15). Lift the entire ® fig. K-Cup Pod Holder Assembly away from the ® Regular cleaning of the brewer’s external components is recommended. puncture mechanism. After cleaning, align the The following section provides instruction for standard cleaning procedures. -
Page 13: Descaling Your Brewer
Emptying the Descaling Your Brewer fig. K-Cup Pod Bin ® Depending on the mineral content of your water, calcium deposits or scale may build up in your brewer. Scale is non-toxic but if left unattended can The used K-Cup pods are ®... - Page 14 Cleaning & Maintenance SECTION 3 • Power up the brewer and follow the "PRIMING" procedure again, perform several (10) cleansing brews to remove any residual taste from the the Keurig Descaling Solution. ™ STEP 1: FILL AND CLEAN fig. NOTE: The cleaning action of the Keurig Descaling Solution may result in a ™...
-
Page 15: Section 4 Troubleshooting
SECTION 4 Draining Your Brewer Troubleshooting If you wish to drain the brewer, the following steps should be followed: SITUATION SOLUTION Power off the brewer and unplug Power Cord. Brewer does not • Plug brewer into an independent outlet. Turn the brewer around (shut off water and disconnect power supply if have power •... - Page 16 Critical Error Messages ERROR MEANING/LIKELY CAUSES MENU TEXT ERROR MEANING/LIKELY CAUSES MENU TEXT Brew Tank TCO is Open BREW TCO OPEN The float switch is sensed higher than it RUNAWAY FILL (no Heater on brew tank). HWT DRAINED should be during a brew cycle. The inlet MODULES: POWER, CWT Likely Causes: Draining and MODULES: POWER, HWT...
-
Page 17: Section 5 Warranty
Limited One-Year Warranty damages, so the above limitation or exclusion may not apply to you depending on the state or province of purchase. Nor does this warranty cover damages caused by use of non Keurig HOT K-Cup brand pods or ™... -
Page 18: Règles De Sécurité Importantes
RÈGLES DE SÉCURITÉ IMPORTANTES Fonctionnement et utilisation sans danger Lorsque vous utilisez des appareils 10. Ne jamais utiliser un appareil dont la fiche 17. Il ne faut en aucun cas couper ou enlever ou le cordon d’alimentation est endommagé la troisième broche (mise à la terre) de la électriques, vous devriez suivre les ou un appareil qui présente un trouble de fiche du cordon d’alimentation, ni utiliser... - Page 19 . Pour éviter tout risque de blessure, ne ® pas mettre les doigts dans le boîtier du support à capsule K-Cup KEURIG K3000SE - SÉRIE COMMERCIALE SYSTÈME D'INFUSION ® ® UNE TASSE À LA FOIS — Utilisation du système d'infusion ATTENTION : L’eau se trouvant dans le support à...
-
Page 20: Aperçu Du Système D'infusion
Aperçu du système d'infusion Conseils utiles préparer la boisson idéale pour vous. Pour une Tirez délicatement l’emballage de polymousse boisson forte au goût prononcé, choisissez une vers vous pour le sortir de la boîte. Le système capsule K-Cup très intense, qui contient 30 % d'infusion est encastré... -
Page 21: Caractéristiques
Caractéristiques Système d'infusion K3000SE READY - CHOSE K-CUP LIFT HANDLE Español Français Water Système d'infusion K3000SE Écran ACL Boîtier du support à Base de la cuvette Filtre Omnipure KQ8A Bouchons de vidange capsule K-Cup d’égouttage (N et O forment ®... -
Page 22: Préparation Et Première Infusion
SECTION 1 Préparation et première infusion Instructions de raccordement à la plomberie IMPORTANT : N’utilisez pas votre système d'infusion Keurig avant de l’avoir ® Vis (4) fig. préparé pour une première utilisation. REMARQUE : Si le système d'infusion a été placé dans un endroit où la Support de montage ORIFICE DE SORTIE température était inférieure au point de congélation, laissez-le reposer au... -
Page 23: Préparation De Votre Système D'infusion
Fixez le support de montage du filtre au filtre à eau Omnipure KQ8A à FILTRE AU SYSTÈME D'INFUSION TOUT DE SUITE. l’aide des quatre vis fournies à cet effet (fig. 1). REMARQUE : La partie Le filtre à eau Omnipure KQ8A doit d’abord être rincé pour éliminer les supérieure du filtre à... -
Page 24: Infusion De Votre Première Tasse
Préparation et première infusion SECTION 1 Placez une tasse sur le plateau à tasse. fig. Soulevez la poignée (fig. 8). Le support à capsule K-Cup s’ouvrira vers vous. ® sur le bouton clignotant « CONT. ». L’écran PRÊT – CHOISIR CAPSULE K-CUP fig. -
Page 25: Infusion De Boissons Glacées
Votre système d'infusion permet de chauffer de l’eau première tasse de café gourmet, de thé ou de pour cuisiner, faire des soupes, du gruau, etc. L’eau chocolat chaud Keurig HOT PRÊT – CHOISIR CAPSULE K-CUP chaude n'est pas acheminée de la même manière CHOISIR LE FORMAT SOULEVER LA POIGNÉE... -
Page 26: Menu Des Commandes Et Voyants
SECTION 2 Menu des commandes et voyants Mode MENU RÉGLER VENTE/GRATUIT fig. fig. Pour activer ou désactiver l’utilisation d’un Pour passer en MODE MENU, éteignez monnayeur, appuyez sur le bouton « RÉGLER ». le système d'infusion. Ouvrez la porte Vous pouvez choisir entre « GRATUIT » et RÉGLER LA LANGUE Français du bac à... - Page 27 Désactivez le bouton d’eau chaude en appuyant sur le bouton « RÉGLER ». seule infusion CHOISIR LE FORMAT PRÊT – CHOISIR CAPSULE K-CUP Le système d'infusion K3000SE permet aux Choisissez le format d'infusion désiré. Quatre formats d'infusion sont SOULEVER LA POIGNÉE utilisateurs de changer temporairement la langue Español...
-
Page 28: Nettoyage Et Entretien
SECTION 3 Nettoyage et entretien Nettoyage des pièces externes dessus du support à K-Cup d’une main tout en ® fig. serrant de l’autre les languettes de retenue à Il est recommandé de nettoyer régulièrement les éléments externes du l’arrière du support (fig 15). Soulevez le support système d'infusion. -
Page 29: Vidange De La Cuvette D'égouttage
Vidage du bac à capsules Détartrage de votre système d'infusion fig. K-Cup ® La teneur en minéraux de l’eau varie d’un endroit à un autre. Selon la teneur en minéraux de l’eau de votre région, il peut y avoir accumulation de dépôts Les capsules K-Cup usagées sont ®... -
Page 30: Réparation
Nettoyage et entretien SECTION 3 • Raccordez le système d'infusion à l’alimentation en eau froide filtrée et suivez la procédure de PRÉPARATION pour remplir le système d'infusion. • Une fois la préparation terminée, éteignez le système d'infusion et ÉTAPE : REMPLISSAGE ET NETTOYAGE fig. -
Page 31: Dépannage
SECTION 4 Vidange du système d'infusion Dépannage Pour vidanger le système d'infusion, suivez les étapes ci-dessous : PROBLÈME SOLUTION Éteignez le système d'infusion et débranchez le cordon d’alimentation. Le système • Branchez le système d'infusion dans une prise indépendante. Retournez le système d'infusion (coupez l’alimentation en eau) de façon à d'infusion ne •... - Page 32 MESSAGES D’ERREUR IMPORTANTS ERREUR SIGNIFICATION/CAUSES PROBABLES TEXTE MENU ERREUR SIGNIFICATION/CAUSES PROBABLES TEXTE MENU Le CCT du réservoir d’infusion s’est CCT INFUS. DÉCLENCHÉ L'interrupteur à flotteur est plus haut qu’il ne REMPLIS. EXCESSIF devrait l’être pendant un cycle d’infusion. La déclenché (le chauffe-eau du réservoir REC VIDANGÉ...
-
Page 33: Garantie Limitée De Un An
à la garantie. Seuls les pas s’appliquer, selon la province ou l’État où vous avez acheté l'appareil. capsules et les accessoires de marque Keurig HOT K-Cup assurent le ®... - Page 36 To learn more about Keurig, visit www.Keurig.com or call 1.866.901.BREW (2739) Pour en savoir plus sur Keurig, rendez-vous à www.Keurig.ca ou composez le 1 866 901-2739 © 2016 Keurig Green Mountain, Inc. For Commercial Use Only All rights reserved Tous droits réservés Keurig Green Mountain, Inc.