Table des Matières
Publicité
Les langues disponibles
Les langues disponibles
Liens rapides
Publicité
Chapitres
Table des Matières
Dépannage

Manuels Connexes pour Keurig Hot COMMERCIALE Série


Sommaire des Matières pour Keurig Hot COMMERCIALE Série
- Page 1 P1 20162461 T5274_K150P_UCG_FINAL.pdf 4C(CMYK) ZB2319 2016-11-02 Size:8.5X5.5in Owner’ s manual Keurig K-Cup K150P Brewer ® ® manuel D’uTIlIsaTIOn Système d’infusion Keurig K-Cup K150P ® ® K150P Série COMMERCIALE SINGLE SERVE COFFEE MAKER SYSTÈME D’INFUSION UNE TASSE À LA FOIS...
-
Page 2: Important Safeguards
P2 20162461 T5274_K150P_UCG_FINAL.pdf 4C(CMYK) ZB2319 2016-11-02 Size:8.5X5.5in IMPORTANT SAFEGUARDS Safe Operation & Use When using electrical appliances, basic For best operation, plug the appliance If the outlet is a standard 2-prong wall into its own electrical outlet on a outlet, it is your personal responsibility safety precautions should be followed, dedicated circuit to prevent flickering and obligation to have it replaced with a... -
Page 3: Table Des Matières
P3 20162461 T5274_K150P_UCG_FINAL.pdf 4C(CMYK) ZB2319 2016-11-02 Size:8.5X5.5in TABLE OF CONTENTS WarnInG To uSerS anD ParenTS 1. Do noT permit children to use brewer unless there is adult supervision. Brewer dispenses very hot water. KEURIG K150P - COMMERCIAL SERIES ® 2. SPecIaL noTIce For hoT cocoa uSerS: IMMeDIaTeLY aFTer SINGLE SERVE COFFEE MAKER uSInG a hoT cocoa K-cuP PoD, run a hot Water Brew cycle... -
Page 4: Brewer Overview
P4 20162461 T5274_K150P_UCG_FINAL.pdf 4C(CMYK) ZB2319 2016-11-02 Size:8.5X5.5in Brewer Overview helpful hints 10 oz., and 12 oz.) your Keurig brewer gives Carefully pull the foam insert toward you and ® you endless options to customize the size, out of the box. The brewer will still be encased 1. -
Page 5: Features
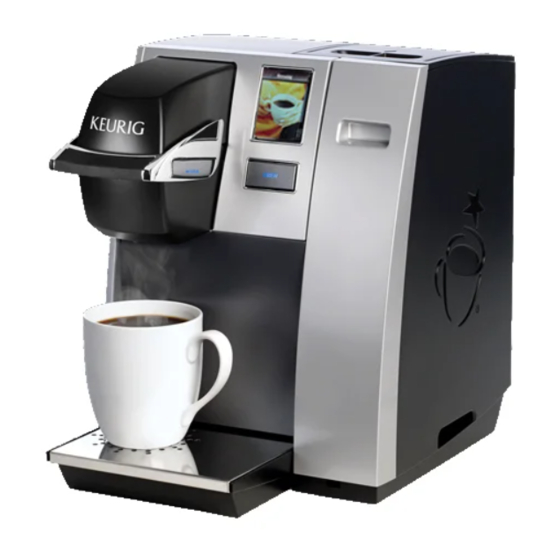
P5 20162461 T5274_K150P_UCG_FINAL.pdf 4C(CMYK) ZB2319 2016-11-02 Size:8.5X5.5in Features K150P Brewer Back view with optional Omnipure KQ8A Water Filter #5572 connected. K150P Brewer Handle Funnel Drip Tray Power Cord (not included) Brewer Inlet Connect (N and O are the K-Cup Pod Holder Drip Tray Base Filter Mounting Drain Hatch and Knob... -
Page 6: Section 1 Setup & First Brew
P6 20162461 T5274_K150P_UCG_FINAL.pdf 4C(CMYK) ZB2319 2016-11-02 Size:8.5X5.5in SECTION 1 Setup & First Brew You cannot use your Keurig brewer ® IMPorTanT: Loosen the two mounting screws located on fig. until it has been set up for its first use. the upper-rear of the brewer and hang the Omnipure KQ8A Water Filter (#5572). -
Page 7: Setting Up Your Brewer
P7 20162461 T5274_K150P_UCG_FINAL.pdf 4C(CMYK) ZB2319 2016-11-02 Size:8.5X5.5in Turn off water supply. The BREW Button will now be illuminated. fig. fig. Press the BREW Button to start a cleansing Cut the tubing to proper length and connect to brew. NOTE: A K-Cup pod should not be used ®... -
Page 8: Stopping The Brew Process
Lift the Handle, remove and dispose of the used K-Cup pod. ® 6 Oz. 8 Oz. CAUTION: K-Cup pod will be hot. ® Enjoy your first cup of Keurig HOT ™ 10 Oz. 12 Oz. gourmet coffee, tea, hot cocoa, or other beverage! -
Page 9: Adding Water
P9 20162461 T5274_K150P_UCG_FINAL.pdf 4C(CMYK) ZB2319 2016-11-02 Size:8.5X5.5in SECTION 2 adding Water Menu Controls & Indicators Your brewer has been configured at the factory to be direct plumbed, however, the brewer can also be converted into a pour over model with a Cold Water Tank Spare Part. To order, please call Menu controls your Keurig Authorized Distributor. - Page 10 P10 20162461 T5274_K150P_UCG_FINAL.pdf 4C(CMYK) ZB2319 2016-11-02 Size:8.5X5.5in SECTION 2 Menu Controls & Indicators Language This brewer is shipped with English as the default language. To change the language, follow the instructions on page 13. Menu Mode navigation Contact The contact setting features allows you to program the contact information Home you need for brewer support and help.
-
Page 11: Setting The Clock
P11 20162461 T5274_K150P_UCG_FINAL.pdf 4C(CMYK) ZB2319 2016-11-02 Size:8.5X5.5in Setting the clock Programming Brew Temperature (188° – 198° F) The brewer brews at a preset temperature of 193˚F. You can adjust this Setting the clock is optional. When the clock is set, the time will appear on the LCD Home Screen. -
Page 12: Programming Brew Size
P12 20162461 T5274_K150P_UCG_FINAL.pdf 4C(CMYK) ZB2319 2016-11-02 Size:8.5X5.5in Programming on/off Features SECTION 2 Menu Controls & Indicators The brewer provides three modes so that you can enjoy gourmet coffee, tea, Programming Your Brew Size hot cocoa, or other beverage on your own schedule. 1. -
Page 13: Language Settings
P13 20162461 T5274_K150P_UCG_FINAL.pdf 4C(CMYK) ZB2319 2016-11-02 Size:8.5X5.5in contact Screen Settings a. After setting the correct time (see “Setting fig. fig. The Clock” page 11), return to the Menu Mode and press “ON/OFF TIME.” The contact screen is pre-programmed with the following information: Keurig Green b. -
Page 14: Section 3 - Cleaning & Maintenance Cleaning
P14 20162461 T5274_K150P_UCG_FINAL.pdf 4C(CMYK) ZB2319 2016-11-02 Size:8.5X5.5in SECTION 3 Cleaning & Maintenance SECTION 2 Menu Controls & Indicators cleaning external Parts b. Press “OK” to save your changes and fig. return to the Main Contact Screen. Regular cleaning of the brewer’s external components is recommended. NOTE: Pressing the Back Arrow Key will The following section provides instruction for standard cleaning procedures. -
Page 15: Descaling
P15 20162461 T5274_K150P_UCG_FINAL.pdf 4C(CMYK) ZB2319 2016-11-02 Size:8.5X5.5in Grasp the top of the K-Cup Pod Holder with CAUTION: There are sharp needles that puncture the K-Cup pod above the ® ® fig. one hand while pushing up on the bottom of the K-Cup Pod Holder and in the bottom of the K-Cup Pod Holder. -
Page 16: Descaling Procedure
P16 20162461 T5274_K150P_UCG_FINAL.pdf 4C(CMYK) ZB2319 2016-11-02 Size:8.5X5.5in SECTION 3 Cleaning & Maintenance • If there is Keurig Descaling Solution in the cold water tank, discard the ® contents through the drain tubes, (follow Draining the Brewer instructions on page 17), rinse the Water Reservoir thoroughly and refill with water. Descaling Procedure • Plug the brewer back in, power on, and repeat the Step 3 Fresh Water Rinse cycle. -
Page 17: Draining The Brewer
P17 20162461 T5274_K150P_UCG_FINAL.pdf 4C(CMYK) ZB2319 2016-11-02 Size:8.5X5.5in Purging the Brewer Pull both the tubes downwards until the ends are free. Over a large fig. pitcher, remove the plugs (fig. 29) and drain the water from the cold and If your brewer has not been used for more hot water tanks, respectively. -
Page 18: Section 4 Troubleshooting
P18 20162461 T5274_K150P_UCG_FINAL.pdf 4C(CMYK) ZB2319 2016-11-02 Size:8.5X5.5in SECTION 4 Troubleshooting SITUATION SOLUTION SITUATION SOLUTION Brewer does not Plug the brewer into an independent outlet. Chlorine or mineral Be sure to use filtered water. If you have any • • have power Check to be sure that it is plugged in securely. -
Page 19: Section 5 Warranty
Limited one-Year Warranty depending on the state or province of purchase. Nor does this warranty cover damages caused by use of non Keurig HOT K-Cup brand pods or ™... -
Page 20: Règles De Sécurité Importantes
P20 20162461 T5274_K150P_UCG_FINAL.pdf 4C(CMYK) ZB2319 2016-11-02 Size:8.5X5.5in RÈGLES DE SÉCURITÉ IMPORTANTES Fonctionnement et utilisation sans danger Lors de l’utilisation de tout appareil électrique, lumières vacillent, que les fusibles sautent ou Il ne faut en aucun cas couper ou enlever la des mesures de sécurité... - Page 21 P21 20162461 T5274_K150P_UCG_FINAL.pdf 4C(CMYK) ZB2319 2016-11-02 Size:8.5X5.5in TABLE DES MATIÈRES ATTENTION : La capsule K-Cup est perforée par deux aiguilles, une au-dessus ® et l’autre au fond du support à capsule K-Cup . Pour éviter tout risque de bles- ® KEURIG K150P - SÉRIE COMMERCIALE SYSTÈME D’INFUSION UNE ®...
-
Page 22: Aperçu Du Système D'infusion
P22 20162461 T5274_K150P_UCG_FINAL.pdf 4C(CMYK) ZB2319 2016-11-02 Size:8.5X5.5in Aperçu du système d’infusion conseils utiles 4. Choisissez le format, l’intensité et l’infusion que Saisissez l’emballage de polymousse vous aimez. contenant le système d’infusion. Avec une variété de plus de 250 capsules 1. Branchez le système d’infusion sur un circuit Tirez délicatement l’emballage de polymousse K-Cup et cinq formats d’infusion (118 ml/4 oz,... -
Page 23: Caractéristiques
P23 20162461 T5274_K150P_UCG_FINAL.pdf 4C(CMYK) ZB2319 2016-11-02 Size:8.5X5.5in Caractéristiques Système d’infusion K150P Vue arrière avec ensemble de filtration 5572 en option installé. Système d’infusion K150P Poignée Support à capsule Base de la cuvette Cordon d’alimentation Raccord de boyau ¾ po, Tuyaux de vidange K-Cup (E et F forment d’égouttage... -
Page 24: Section 1 Préparation Et Première Infusion
P24 20162461 T5274_K150P_UCG_FINAL.pdf 4C(CMYK) ZB2319 2016-11-02 Size:8.5X5.5in SECTION 1 Préparation et première infusion IMPorTanT : N’utilisez pas votre système d’infusion Keurig avant REMARQUE : Le filtre Omnipure KQ8A (n 5572) ® fig. de l’avoir préparé pour une première utilisation. est doté d’orifices d’alimentation et de sortie de 1/4 po à... -
Page 25: Préparation De Votre Système D'infusion
P25 20162461 T5274_K150P_UCG_FINAL.pdf 4C(CMYK) ZB2319 2016-11-02 Size:8.5X5.5in de boyau 3/4 po de Keurig Green Mountain, Inc. bouton d’infusion (BREW) pour effectuer une fig. fig. infusion de nettoyage. pour valve d’arrivée d’eau (non inclus; n REMARQUE : Ce cycle se fait sans capsule K-Cup pièce 50-201004-010) (fig. -
Page 26: Annulation D'une Infusion
8 Oz. une infusion de nettoyage à l’eau seulement première tasse de café gourmet, de thé ou après l’annulation d’une infusion. Votre de chocolat chaud Keurig HOT 10 Oz. 12 Oz. prochaine infusion vous donnera ensuite la REMARQUE : Après avoir infusé une capsule... -
Page 27: Ajout D'eau
P27 20162461 T5274_K150P_UCG_FINAL.pdf 4C(CMYK) ZB2319 2016-11-02 Size:8.5X5.5in SECTION 2 ajout d’eau Menu des commandes et voyants Votre système d’infusion a été configué en usine pour être raccordé directe- ment à la plomberie. Il peut toutefois être converti en système d’infusion à remplissage manuel avec le réservoir d’eau froide de rechange. -
Page 28: Navigation Dans Les Menus
P28 20162461 T5274_K150P_UCG_FINAL.pdf 4C(CMYK) ZB2319 2016-11-02 Size:8.5X5.5in Menu des commandes et voyants Langue SECTION 2 La langue par défaut utilisée sur ce système d’infusion est l’anglais. Pour changer la langue d’affichage, suivez les instructions à la page 31. navigation dans les menus Coordonnées La fonction Coordonnées vous permet de programmer les coordonnées dont Accueil... -
Page 29: Réglage De La Température D'infusion
P29 20162461 T5274_K150P_UCG_FINAL.pdf 4C(CMYK) ZB2319 2016-11-02 Size:8.5X5.5in réglage de la température d’infusion Dans le mode Menu, appuyez sur fig. « HORLOGE ». (88,7 °c/188 °F – 92,2 °c/198 °F) L’écran de réglage de l’horloge affiche Le système d’infusion infuse à une température préréglée de 89,4 °C/193 °F. «... -
Page 30: Programmation Du Format D'infusion
P30 20162461 T5274_K150P_UCG_FINAL.pdf 4C(CMYK) ZB2319 2016-11-02 Size:8.5X5.5in Menu des commandes et voyants SECTION 2 SECTION 2 permettre de savourer du café gourmet, du thé ou du chocolat chaud comme il vous convient. 1. Système d’infusion laissé allumé (ON) Programmation du format d’infusion fig. -
Page 31: Réglage De La Langue
P31 20162461 T5274_K150P_UCG_FINAL.pdf 4C(CMYK) ZB2319 2016-11-02 Size:8.5X5.5in b. Pour régler l’heure de mise en marche « ON », renseignements suivants : Keurig Green fig. fig. appuyez sur « DÉSACTIVÉ ». Une heure Mountain, Inc. et www.Keurig.com. s’affiche à l’écran. Appuyez sur « H » pour Vous pouvez reprogrammer le système d’infusion régler les heures et sur «... -
Page 32: Nettoyage Et Entretien
P32 20162461 T5274_K150P_UCG_FINAL.pdf 4C(CMYK) ZB2319 2016-11-02 Size:8.5X5.5in SECTION 3 Menu des commandes et voyants Nettoyage et entretien SECTION 2 nettoyage des pièces externes changements soient sauvegardés. fig. Il est recommandé de nettoyer régulièrement les éléments externes Appuyez sur l’onglet du centre (n de téléphone). -
Page 33: Détartrage
P33 20162461 T5274_K150P_UCG_FINAL.pdf 4C(CMYK) ZB2319 2016-11-02 Size:8.5X5.5in Saisissez le dessus du support à capsule K-Cup vers l’avant (fig. 27). Une fois la plaque enlevée, brossez-la avec du détergent ® fig. d’une main et, de l’autre main, poussez le fond jusqu’à ce qu’elle soit propre, puis rincez-la au besoin. Après le nettoyage, remettez-la bien en place pour assurer le bon fonctionnement de l’appareil. - Page 34 P34 20162461 T5274_K150P_UCG_FINAL.pdf 4C(CMYK) ZB2319 2016-11-02 Size:8.5X5.5in SECTION 3 Nettoyage et entretien utiliser de capsule K-Cup . Jetez le contenu de la tasse dans l’évier. ® • Répétez au moins 12 cycles d’infusion en choisissant le plus grand format d’infusion. Vous aurez probablement à remplir le réservoir d’eau froide au Enlevez les deux vis situées à l’arrière du système d’infusion, en haut à moins une fois durant le processus.
-
Page 35: Purge Du Système D'infusion
P35 20162461 T5274_K150P_UCG_FINAL.pdf 4C(CMYK) ZB2319 2016-11-02 Size:8.5X5.5in vidange du système d’infusion serrée, vous pourriez devoir utiliser un tournevis plat. fig. Tirez les deux tuyaux vers le bas pour en dégager les extrémités. Si le système d’infusion n’a pas été utilisé pendant Enlevez les bouchons (fig. -
Page 36: Section 4 Dépannage
P36 20162461 T5274_K150P_UCG_FINAL.pdf 4C(CMYK) ZB2319 2016-11-02 Size:8.5X5.5in SECTION 4 Dépannage PROBLÈME SOLUTION PROBLÈME SOLUTION Le système Branchez le système d’infusion séparément. Goût de Essayez d’utiliser de l’eau filtrée. Pour toute • • d’infusion ne Vérifiez que le système d’infusion est bien branché. chlore ou question, veuillez communiquer avec votre distributeur •... -
Page 37: Section 5 Garantie
à la garantie. Seuls les l’État où vous avez acheté l’appareil. capsules et les accessoires de marque Keurig HOT, K-Cup assurent le bon ®... - Page 38 P38 20162461_V01 T5274_K150P_UCG_FINAL.p38R1.pdf 4C(CMYK) ZB2319 2016-11-25 Size:8.5X5.5in P38 20162461 T5274_K150P_UCG_FINAL.pdf 4C(CMYK) ZB2319 2016-11-02 Size:8.5X5.5in To learn more about Keurig, visit www.Keurig.com or call 1.888.CUP.BREW (287.2739) Pour en savoir plus sur Keurig, rendez-vous à www.Keurig.ca ou composez le 1 866 901-2739. ©...