JVC RX-5000VBK Manual D'instructions
Table des Matières
Les langues disponibles
Les langues disponibles
AUDIO/VIDEO CONTROL RECEIVER
RECEPTEUR DE CONTROL AUDIO/VIDEO
RX-5000VBK
POWER
CD
TV
VCR
AUDIO
TAPE/MD
DELAY
TEST
SURROUND
5
1
2
3
FM/AM
EFFECT
– CENTER +
4
5
6
VCR
– REAR•L +
5
7/P
8
9
SOUND
MENU
DVD
CONTROL
– REAR•R +
10
+10
ENT
DVD MULTI
CD-DISC
TV VOL.
–
+
PHONO
TV/VIDEO
TV CH
–
+
ONE TOUCH
OPERATION
+
+
VOLUME
VCR CH
MUTING
–
–
£
SLEEP
8
4
4
1
1
7
RM-SR558U REMOTE CONTROL
RX-5000V[C]COVER/f
All manuals and user guides at all-guides.com
RX-5000V
AUDIO/VIDEO CONTROL RECEIVER
STANDBY
POWER
DVD MULTI
DVD
VCR
SPEAKERS
CD
PHONO
TAPE/MD
PHONES
1
2
SOURCE NAME
_ ON
— OFF
INSTRUCTIONS
MANUAL D'INSTRUCTIONS
1
MASTER VOLUME
–
BASS BOOST
ADJUST
SETTING
MEMORY
FM
SURROUND
MULTI CURSOR
ONE TOUCH OPERATION
AM
INPUT ATT.
00.2.3, 9:30 PM
+
For Customer Use:
Enter below the Model No. and Serial
No. which are located either on the rear,
bottom or side of the cabinet. Retain this
information for future reference.
Model No.
Serial No.
LVT0384-002A
[C]
Chapitres
Table des Matières
Dépannage

Manuels Connexes pour JVC RX-5000VBK


Sommaire des Matières pour JVC RX-5000VBK
- Page 29 ............ 16 Ajustement des modes 3D-PHONIC ........17 Ajustement des modes DAP ............. 17 Ajustement des modes surround — Dolby Surround et JVC Theater Surround ............... 18 Mise en service des modes DSP ..........19 Utilisation du mode de lecture DVD MULTI ... 20 Mise en service du mode de lecture DVD MULTI ....
-
Page 30: Identification Des Parties
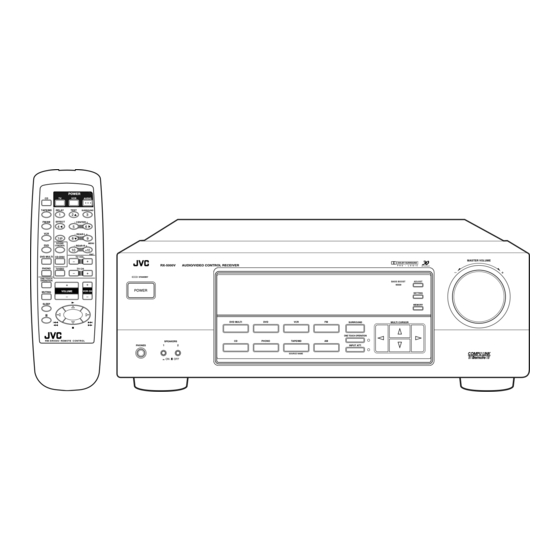
All manuals and user guides at all-guides.com Identification des parties Se familiariser avec les touches et les commandes avant d'utiliser l'ampli-tuner. Pour plus d’informations, se référer aux pages indiquées entre parenthèse. MASTER VOLUME RX-5000V AUDIO/VIDEO CONTROL RECEIVER – STANDBY BASS BOOST ADJUST POWER SETTING... -
Page 31: Pour Commencer
All manuals and user guides at all-guides.com Pour commencer Cette section explique comment connecter les appareils audio/vidéo et les enceintes à l'ampli-tuner, et comment connecter l'appareil au secteur. Avant l'installation Connexion des antennes FM et AM Général Connexion de l'antenne FM •... -
Page 32: Connexion Des Enceintes
All manuals and user guides at all-guides.com Procédure de connexion de base Connexion de l'antenne AM Insérer les languettes du cadre dans ANTENNA les fentes de la base pour assembler FM 75 l'antenne cadre AM. COAXIAL 1 Couper, tordre et retirer l’isolant à l’extrémité de Antenne cadre AM LOOP chaque câble de signal d’enceinte. -
Page 33: Connexion Du Caisson De Grave
All manuals and user guides at all-guides.com Connexion du caisson de grave Tourne-disque Il est possible d'améliorer les graves en connectant un caisson de Si le tourne-disque grave. est muni d’un câble Connecter la prise d'entrée d'un caisson de grave actif à la prise ANTENNA de mise à... -
Page 34: Connexion Des Appareils Vidéo
All manuals and user guides at all-guides.com Connexion des appareils vidéo Lecteur de DVD Utiliser des câbles munis de fiches cinch (non fournis). • Lors de la connexion du lecteur de DVD avec les prises de sortie Connecter la fiche blanche à la prise audio gauche, la prise rouge à stéréo: la fiche audio droite et la fiche jaune à... -
Page 35: Connexion Du Cordon D'alimentation Secteur
All manuals and user guides at all-guides.com Connexion du cordon d'alimentation Mise en place des piles dans la télécommande secteur Avant de brancher l'ampli-tuner sur une prise d'alimentation secteur, Avant d'utiliser la télécommande, mettre d'abord en place les deux s'assurer que toutes les connexions ont été faites. piles fournies. -
Page 36: Opérations De Base
All manuals and user guides at all-guides.com Opérations de base Les opérations suivantes sont utilisées ordinairement lors de la reproduction de n'importe quelle source. Mise de l'appareil sous et hors tension (attente) MUTE TUNED SLEEP 3D-PHONIC AUTO STEREO PRO LOGIC 3CH LOGIC HALL LOUDNESS VOLUME... -
Page 37: Ajustement Du Volume
All manuals and user guides at all-guides.com Écoute privée avec le casque d’écoute Ajustement du volume 1. Connecter un casque d’écoute à la prise PHONES sur le Sur le panneau avant: panneau avant. 2. Mettre SPEAKERS 1 et SPEAKERS 2 en position — OFF. Pour augmenter le volume, tourner MASTER VOLUME MASTER VOLUME dans le sens... -
Page 38: Atténuation Du Signal D'entrée
All manuals and user guides at all-guides.com Atténuation du signal d’entrée Renforcement des graves Quand le niveau d’entrée de la source sonore est trop élevé, les sons Avec cette fonction de renforcement des graves, il est possible sont déformés. Si cela se produit, il faut atténuer le niveau du signal d’accentuer le niveau des graves. -
Page 39: Réglages De Base
All manuals and user guides at all-guides.com Réglages de base Certains des réglages suivants sont requis après la connexion et le positionnement de vos enceintes dans votre salle d'écoute, tandis que les autres faciliteront l'utilisation de l'ampli-tuner. MULTI CURSOR 3. Appuyer sur MULTI CURSOR Modification du nom de la source @ / # pour choisir la taille de l’enceinte centrale. -
Page 40: Mémorisation Des Ajustements Et Des Réglages De Base - Fonctionnement Monotouche
SLEEP l’heure de mise hors tension change comme suit (en minutes): Le fonctionnement monotouche de JVC est utilisé pour attribuer et mémoriser différents réglages sonores pour chaque source différente. En utilisant cette fonction, il n'est pas nécessaire de changer les réglages chaque fois que la source est changée. -
Page 41: Réception D'émissions De Radio
All manuals and user guides at all-guides.com Réception d'émissions de radio Vous pouvez parcourir toutes les stations ou utiliser la fonction de préréglage pour aller directement à une station particulière. Utilisation de l'accord par préréglage Accord manuel d’une station Une fois qu'une station est affectée à un numéro de canal, la station Sur le panneau avant UNIQUEMENT: peut être accordée rapidement. -
Page 42: Sélection Du Mode De Réception Fm
All manuals and user guides at all-guides.com Pour accorder une station préréglée Sélection du mode de réception FM Sur le panneau avant: 1. Appuyer sur FM ou AM. Quand une émission FM stéréo est difficile à recevoir ou parasitée La dernière station de la bande choisie est accordée. -
Page 43: Utilisation Des Modes Dsp
Utilisation des modes DSP Le processeur surround intégré offre trois types de mode DSP (Digital Signal Processor) — le mode 3D-PHONIC, le mode DAP (Digital Acoustic Processor) et le mode surround (Dolby Pro Logic et JVC Theater Surround). Modes surround Modes 3D-PHONIC Il est possible d’utiliser deux types de mode surround avec cet... -
Page 44: Modes Dsp Disponibles En Fonction De La Disposition Des Enceintes
All manuals and user guides at all-guides.com Modes DSP disponibles en fonction de la disposition des enceintes Les modes DSP disponibles varient en fonction du nombre d’enceintes utilisées avec cet ampli-tuner. S’assurer que les informations des enceintes ont été réglées correctement (voir page 11). Disposition des enceintes Modes DSP disponibles Chaque fois que la touche SURROUND est pressée, les modes... -
Page 45: Ajustement Des Modes 3D-Phonic
All manuals and user guides at all-guides.com Ajustement des modes 3D-PHONIC Ajustement des modes DAP Avant de commencer, se rappeler... Avant de commencer, se rappeler... • S’assurer que les informations sur les enceintes ont été réglées • S’assurer que les informations sur les enceintes ont été réglées correctement (voir page 11). -
Page 46: Ajustement Des Modes Surround - Dolby Surround Et Jvc Theater Surround
à partir de l’étape 1. EFFECT 4 EFFECT 5 • Le niveau d’effet peut être ajusté uniquement quand JVC Theater Surround est choisi. Plus le numéro est élevé, plus l’effet du mode JVC Theater •... -
Page 47: Mise En Service Des Modes Dsp
STEREO” ou “THEATER” — EFFECT 5 EFFECT 4 apparaît sur l’affichage. Plus le numéro est élevé, plus l’effet du mode JVC Theater L’indicateur PRO LOGIC s’allume aussi sur l’affichage. Surround devient fort. 2. Appuyer sur ADJUST de façon que ADJUST MULTI CURSOR % / fi... -
Page 48: Utilisation Du Mode De Lecture Dvd Multi
All manuals and user guides at all-guides.com Utilisation du mode de lecture DVD MULTI Cet ampli-tuner possède un mode de lecture DVD MULTI pour reproduire le mode de sortie analogique discrète des lecteurs DVD. Avant de reproduire un DVD, se référer aussi au monde d’emploi fourni avec le lecteur DVD. MULTI CURSOR 7. -
Page 49: Système De Commande À Distance Compu Link
All manuals and user guides at all-guides.com Système de commande à distance COMPU LINK Le système de commande à distance COMPU LINK vous permet de commander les appareils audio JVC à travers le capteur de télécommande de l'ampli-tuner. Mise sous et hors tension (Attente) automatique: Pour utiliser ce système de commande à... -
Page 50: Commande D'appareils Audio/Vidéo Jvc
All manuals and user guides at all-guides.com Commande d'appareils audio/vidéo JVC Vous pouvez commander des appareils audio et vidéo JVC avec la télécommande de cet ampli-tuner car les signaux de commande des appareils JVC sont préréglés dans la télécommande. Section de commande sonore (Amplificateur) IMPORTANT: Après appuyer sur SOUND CONTROL, il est possible de réaliser... - Page 51 All manuals and user guides at all-guides.com Lecteur-changeur de CD IIMPORTANT: Pour commander des appareils vidéo JVC en utilisant cette Après appuyer sur CD-DISC, il est possible de réaliser les télécommande: opérations suivantes sur un lecteur-changeur de CD: • Diriger la télécommande directement sur le capteur de Démarrer la lecture.
-
Page 52: Guide De Dépannage
All manuals and user guides at all-guides.com Guide de dépannage Utilisez ce tableau pour vous aider à résoudre les problèmes de fonctionnement quotidiens. Si certains problèmes ne peuvent pas être résolus, contacter un centre de réparation JVC. PROBLEME CAUSE POSSIBLE SOLUTION L'affichage ne s'allume pas. -
Page 53: Spécifications
8 Ω à 1 kHz avec moins de 0,8% de distorsion harmonique totale Distorsion harmonique totale (8 Ω, 1 kHz): 0,8%* avec une sortie de 100 W (* Mesuré par le système d'analyse audio de JVC) Audio Sensibilité d'entrée audio/Impédance (1 kHz): 2,7 mV/47 k Ω PHONO (MM): CD, TAPE/MD, VCR, DVD: 220 mV/47 k Ω... - Page 54 All manuals and user guides at all-guides.com Tuner FM (IHF) Plage d'accord: 87,5 MHz à 108,0 MHz Monaural: 12,8 dBf (1,20 µV/75 Ω) Sensibilité utile: Sensibilité utile à 50 dB: 21,3 dBf (3,2 µV/75 Ω) Monaural: 41,3 dBf (31,5 µV/75 Ω) Stéréo: Rapport signal sur bruit (IHF-A pondéré): Monaural:...