V2 GOLD400D Mode D'emploi
Table des Matières
Les langues disponibles
Les langues disponibles
Liens rapides
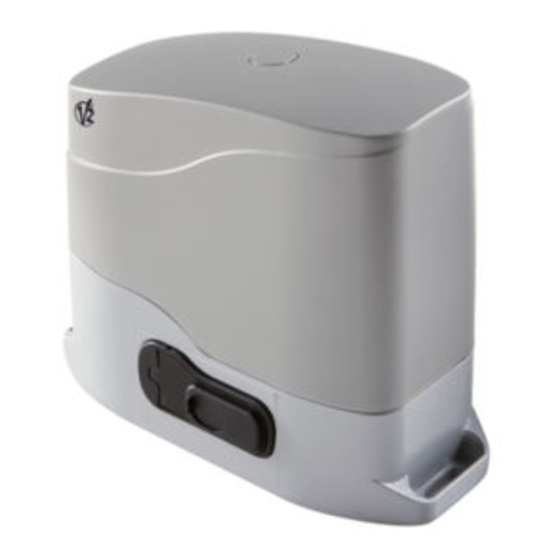
GOLD400D - GOLD800D
ATTUATORE ELETTROMECCANICO 230V / 120V IRREVERSIBILE A
I
CREMAGLIERA PER CANCELLI SCORREVOLI FINO A 400/800/1200 KG.
CENTRALE DI COMANDO DIGITALE INCORPORATA
230V / 120V ELECTRO-MECHANICAL IRREVERSIBLE RACK ACTUATOR
GB
FOR SLIDING GATES UP TO 400/800/1200 KG.
BUILT-IN DIGITAL CONTROL UNIT
OPERATEUR ELECTROMECANIQUE 230V / 120V IRREVERSIBLE A
F
CREMAILLERE POUR PORTAILS COULISSANTS JUSQU'A 400/800/1200 KG
DE POIDS. ARMOIRE DE COMMANDE NUMÉRIQUE INCORPORÉE
MOTORREDUCTOR ELECTROMECÁNICO 230V / 120V IRREVERSIBLE A
E
CREMALLERA PARA PUERTAS CORREDERAS HASTA 400/800/1200 KG
DE PESO. CUADRO DE MANIOBRAS DIGITAL INCORPORADO
ACTUADOR ELECTROMECÂNICO 230V / 120V IRREVERSÍVEL PARA
P
ACCIONAR PORTÕES DE CORRER ATÉ 600 / 400 KG
DE PESO. QUADRO ELÉCTRICO DIGITAL INTEGRADO
ELEKTROMECHANISCHER IRREVERSIBLER SCHIEBETORANTRIEB 230V
D
UND 120V FÜR TORE BIS 600 / 400 KG GEWICHT.
EINGEBAUTE DIGITALSTEUERUNG
ELEKTROMECHANISCHE ONOMKEERBARE ACTUATOR
NL
230V / 120V MET HEUGEL VOOR SCHUIFHEKKEN TOT EEN
GEWICHT VAN 600 / 400 KG. DIGITALE STUURCENTRALE
All manuals and user guides at all-guides.com
V2 S.p.A.
GOLD1200D
Table des Matières

Manuels Connexes pour V2 GOLD400D


Sommaire des Matières pour V2 GOLD400D
- Page 51 All manuals and user guides at all-guides.com INDEX...
-
Page 52: Conseils Importants
All manuals and user guides at all-guides.com CONSEILS IMPORTANTS V2 S.p.A. V2 S.p.A. se réserve le droit d’apporter d’éventuelles DÉCLARATION D'INCORPORATION POUR LES modifications au produit sans préavis; elle décline en outre QUASI-MACHINES toute responsabilité pour tous types de dommages aux (DIRECTIVE 2006/42/CE, ANNEXE II-B) personnes ou aux choses dus à... -
Page 53: Caractéristiques Techniques
All manuals and user guides at all-guides.com CARACTÉRISTIQUES GOLD400D GOLD800D GOLD1200D GOLD400D GOLD800D GOLD1200D TECHNIQUES (230V) (230V) (230V) (120V) (120V) (120V) Description Q.té (que dans les modèles avec fin de course magnétique) (que dans les modèles avec fin de course magnétique) (que dans les modèles... -
Page 54: Opérations Préliminaires
All manuals and user guides at all-guides.com OPÉRATIONS PRÉLIMINAIRES ATTENTION: introduire la garniture dans le trou de passage des câbles comme dans le dessin. Percer la garniture pour faire passer les câbles à connecter à la centrale, en faisant attention à en limiter les dimensions pour éviter qu’... -
Page 55: Installation Des Fins De Course Magnetiques
All manuals and user guides at all-guides.com INSTALLATION DES FINS DE COURSE MAGNETIQUES BLEU ROUGE INSTALLATION DES FINS DE COURSE MECANIQUES ATTENTION: vérifier que l'étrier fin course interviens de façon efficace sur le ressort fin course du moteur. Evenctuelment ajouter des épaisseurs entre la partie inferieure de la crémaillere et l'étriere fin course de façon à respecter la quota du dessin. -
Page 56: Deverrouillage Moteur
All manuals and user guides at all-guides.com DEVERROUILLAGE MOTEUR ATTENTION: Dans le cas que le portail va a en butées de fin de course (ex.: mauvaise régulation des fin course), avant de débloquer le moteur avec la procédure sous décrite, il faut desserrer le moteur par la barre tournevis que se trouve sur arbre rotor 2. -
Page 57: Description De La Centrale
All manuals and user guides at all-guides.com DESCRIPTION DE LA CENTRALE CLIGNOTANT Pd8-120V PHOTOCELLULE Photocellules type 1: ATTENTION: les photocellules type 1 doivent être installées de façon à couvrir entièrement l’aire d’ouverture du portail. Photocellules type 2: INSTALLATION ALIMENTATION Pd8-120V ATTENTION: MOTEUR 15 16... -
Page 58: Barres Palpeuses
All manuals and user guides at all-guides.com BARRES PALPEUSES FIN COURSE 22 23 24 ATTENTION: Ne renverser jamais vers le connecteur. Barres palpeuses type 1 STOP Barres palpeuses type 2 ATTENTION: barres palpeuses WIRELESS type 2 ne sont pas active en ouverture ENTREES DE ACTIVATION Strt Mode standard:... -
Page 59: Panneau De Controle
All manuals and user guides at all-guides.com Mode Horloge: ANTENNE PANNEAU DE CONTROLE 8.8.8.8 Pr I.9 RECEPTEUR EMBROCHABLE ATTENTION: Avant de faire ces opérations, couper l'alimentation à la centrale de commande. Faire bien attention au vers de branchement des modules extraibles. ATTENTION: Pour la programmation des 4 canaux et des logiques de fonctionnement, lire attentivement les notices jointes au récepteur MR1. -
Page 60: Empli Des Touches Down Et Up Pour La Programmation
All manuals and user guides at all-guides.com EMPLI DES TOUCHES DOWN ET UP POUR LA Postage des menus de temps PROGRAMMATION DOWN, MENU t.AP FinE 0.0" ATTENTION: si on ne s’effectue pas aucune opération pour plus d’un minute, l’armoire va sortir du mode programmation sans sauver les postages et les 0.0"... -
Page 61: Configuration Rapide
All manuals and user guides at all-guides.com CONFIGURATION RAPIDE StoP, Fot1, Fot2, CoS1, CoS2 FC.En APPr Procedure d’auto apprentissage CONFIGURATION DE L’ARMOIRE FinE. -
Page 62: Chargement Des Parametres Implicites
All manuals and user guides at all-guides.com CHARGEMENT DES PARAMETRES IMPLICITES dE.-9 dE-1 ATTENTION: Pr I.9 Temps ouverture Temps ouverture partielle (accès piétonne) t.AP Temps de fermeture t.AP Temps de fermeture partielle (accès piétonne) t.CH t.APP... -
Page 63: Temps Clignotement Préalable
All manuals and user guides at all-guides.com Temps clignotement préalable t.PrE Direction du Portail ATTENTION: Pour direction du portail il faut considérer cela qu’on voit de l’interne Puissance Moteur Démarrage Démarrage ralenti... - Page 64 All manuals and user guides at all-guides.com Temps ralenti t.AP ATTENTION: t.APP t.AP Start en ouverture PAUS ChiU PAUS Start en fermeture StoP APEr StoP APEr Start en pause ChiU ChiU...
-
Page 65: Fermeture Automatique
All manuals and user guides at all-guides.com Start piétonne en ouverture partielle PAUS ChiU ATTENTION: Un commande de Start reçu en n’importe quelle phase de l’ouverture cause une ouverture totale; le commande de Start Piétonne est toujours ignoré pendant une ouverture totale Fermeture automatique St.PA St.PA... -
Page 66: Fonction Des Entrées De Start
All manuals and user guides at all-guides.com Fonction des entrées de Start StAn AP.CH PrES oroL Fonction Frein 1÷10 ATTENTION: Chaque freinage entraîne un stress mécanique aux composants du moteur. On conseille de régler la valeur minimum par laquelle on obtient un espace d'arrêt satisfaisante. Entree stop ProS invE... -
Page 67: Entrée Photo
Test des dispositifs de sécurité Foto CoSt Ft.Co ATTENTION: V2 conseille de maintenir active le Test des dispositifs de sécurité avec le but de garantir une sécurite plus haute du systéme. ATTENTION: il n'est possible tester les barres palpeuses qu'en ayant installée une centrale prévue pour cette fonction. -
Page 68: Activation Du Capteur D'obstacles
All manuals and user guides at all-guides.com Entrée Barre palpeuse 2 Activation barres palpeuses WIRELESS Entrées butées de fin de course Anti-patinage ATTENTION: Si la fonction ASM est des-habilitée, la manoeuvre de renversement continue jusqu'è quand le portail n'est pas à butée. En cette phase l'armoire n'active pas le ralentissement avant d'être arrivé... -
Page 69: Visualisation Des Compteurs
All manuals and user guides at all-guides.com Visualisation des compteurs Apprentissage automatique des temps de travail ATTENTION: La procédure d'apprentissage automatique des temps de travail peut être démarrée seul si la centrale est préréglée en mode d’opération STANDARD (Stan). Fin de programmation LES DONNEES PREREGLEES ONT ETE MEMORISEES: LA CENTRALE EST DESORMAIS PRETE POUR L'UTILISATION. -
Page 70: Lecture Du Compteurs De Cycles
All manuals and user guides at all-guides.com LECTURE DU COMPTEURS DE CYCLES Cont Serv Cont L’aire 1 L’aire 2 L’aire 3 Signalisation de la nécessité d’entretien ATTENTION: les opération d’entretien doivent être faites seulement par personnel qualifié. -
Page 71: Fonctionnement Du Détecteur Obstacles
All manuals and user guides at all-guides.com FONCTIONNEMENT DU Erreur 1 DÉTECTEUR OBSTACLES Sens Erreur 2 ATTENTION: n’import quelle sensibilité établit, le système détecte l’obstacle seulement si le portail est fermé; ne sont pas détectés obstacles que freinent le portail sans réussir à le fermer. En plus le système de détection ne fonctionne pas quand le portail bougent à... - Page 72 All manuals and user guides at all-guides.com TABLEAU FONCTIONS Pd8 MEMO DISPLAY DONNES DESCRIPTION DEFAULT DONNES t.AP 0.0" ÷ 2.0' 15.0" t.APP 0.0" ÷ t.AP1 6.0" t.Ch 0.0" ÷ 2.0' 16.0" t.ChP 0.0" ÷ t.Ch 7.0" t.PrE 0.5" ÷ 2.0' 1.0"...
- Page 73 All manuals and user guides at all-guides.com TABLEAU FONCTIONS Pd8 MEMO DISPLAY DONNES DESCRIPTION DEFAULT DONNES St.rt StAn StAn AP.CH PrES oroL FrEn 0 ÷ 10 StoP invE ProS Fot 1 APCh Fot 2 CFCh CFCh tESt Foto CoSt Ft.Co CoS1 no/Si CoS2...
- Page 74 All manuals and user guides at all-guides.com TABLEAU BRANCHEMENTS ELECTRIQUES 22 - 23 - 24 - 25 26 - 27 Pd8-120V MAINS OVERLOAD 10 - 11 11 - 12 OPEN PAUSE 13 - 14 Pd8-120V CLOSE 15 - 16 -...