Publicité

Les langues disponibles
  • FR

Les langues disponibles

  • FRANÇAIS, page 26

Liens rapides

L854200212
06/2020 rev 0
ROMEO
IT
EN
DE
FR
ES
PL

Publicité

Table des Matières
loading

Sommaire des Matières pour CAB ROMEO

  • Page 1 L854200212 06/2020 rev 0 ROMEO...
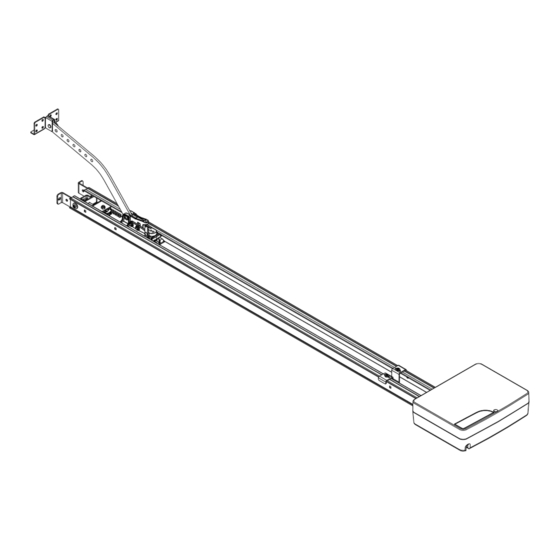
  • Page 3 3024 2660 4+4 M6x16 PTC3 9B...
  • Page 4 4,8x38 Ø 6,5mm PTC.STOP (Optional) PTC.OPEN (Standard)
  • Page 6 art. CB.SW (optional) 2 ÷ 3 cm art. AU.C25 (optional)
  • Page 7 art. PTC.AR (optional) EXT. BOX 2x12V Battery Charger Battery (Optional) Service Light -24V 24Vdc / 500mA max +24V BLINK LAMP 24Vdc BLINK PHOT STOP P.P. SHIELD X.BE F1 T2A...
  • Page 8: Avvertenze

    AUTOSET ATTENZIONE!: LA PROCEDURA DI AUTOSET DESCRITTA DI SEGUITO È OBBLIGATORIA! Durante la fase di AUTOSET la centrale effettua alcune manovre di apertura e chiusura durante le quali vengono impostati indispensabili parametri di funzionamento, tra i quali: - I punti di inizio e fine corsa. - L’inizio delle fasi di rallentamento.
  • Page 9: Notizie Generali

    40mm (fig.2); la porta deve potersi aprire e chiudere tirando e spingendo orizzontalmente sul suo bordo superiore (fig.2); le manovre manuali devono risultare dolci e regolari. Al motoriduttore ROMEO possono essere abbinate le seguenti rotaie: Mod. Lunghezza Cinghia Altezza max.
  • Page 10: Collegamenti Elettrici

    - Verificando che sia PERFETTAMENTE A PIOMBO, fissare il braccio nella parte inferiore della porta (rif.B) - Se presente rimuovere dal pattino di trascinamento il braccio curvo fornito con ROMEO (rif.C) - Fissare al suo posto il braccio dritto regolabile fornito con AU.C25 (rif.D) - Utilizzando le due viti e i 4 distanziali forniti in dotazione fissare il braccio dritto al braccio AU.C25 (rif.E)
  • Page 11 Premere il tasto nascosto del trasmettitore da memorizzare, la luce di cortesia “Service Light” resta accesa fissa. Premere entro 5s il tasto desiderato da associare al ricevitore, la luce di cortesia “Service Light” emette alcuni lampeggi veloci a conferma della ricezione, poi torna a lampeggiare.
  • Page 12: Tensionamento Della Cinghia

    On: Funzione condominiale abilitata. L’impulso P.P. o del tras mettitore non ha effetto durante la fase di apertura e durante la pausa TCA . Off: Funzione condominiale disabilitata (default). DIP 4 Disabilita la funzione risparmio energetico ESA. Con la funzione ESA abilitata una volta terminata la manovra di apertura o chiusura, la centrale si pone nella condizione di massima efficienza energetica, riducendo al minimo l’assorbimento e disalimentando le uscite accessori.
  • Page 13 Questo prodotto è compatibile con lo standard KNX è può essere connesso ad una rete KNX tramite l’accessorio opzionale X.BE. Fate riferimento alle istruzioni fornite con X.BE per ulteriori informazioni. RESET TOTALE La procedura riporta le condizioni di fabbrica della centrale. ATTENZIONE: Vengono cancellati anche tutti i trasmettitori memorizzati.
  • Page 14 AUTOSET CAUTION! THE AUTOSET PROCEDURE DESCRIBED BELOW IS MANDATORY! During the AUTOSET phase, the control unit performs a number of opening and closing movements during which essential operating parameters are set, including: - Start- and end-of-run positions. - Start of the slowdown phases. - Torque values applied during panel movement.
  • Page 15: General Information

    - it has to be possible to open and close the door by pulling and pushing horizontally its top edge (fig.2). - manual moves must be smooth and regular. The geared motor ROMEO can be coupled with the following rails: Mod.
  • Page 16: Electric Connections

    4) ASSEMBLING ONTO BALANCING DOORS Overhead door with balanceweights (fig.15): these doors need the special arm art. AU.C25. In order to assemble it make sure that: • the arm is fixed to the top edge of the door. • the arm is levelled. AU.C25 is an accessory which allows the installation of the automatic system of counterweight balancing doors.
  • Page 17 QUICK PROGRAMMING STEPS Remove mains supply if present, then restore mains voltage. The “Service Light” of the control unit starts to flash. Press the hidden key of the transmitter to be stored, the “Service Light” stays on. Press the desired key to associate with the receiver within 5s, the “Service Light” flashes a few times to confirm receipt, then flashes again. Repeat steps 3 and 4 for the following transmitters to be stored, up to a maximum of 64 transmitters.
  • Page 18: Belt Tensioning

    DIP 4 Disabling of the ESA energy saving function. With the ESA function enabled once opening or closing movements have been completed, the control unit is in maximum energy efficiency condition, reducing absorption to minimum and disconnecting accessory outputs. On: ESA energy saving function disabled. Off: ESA energy saving function enabled (default).
  • Page 19 KNX COMMUNICATION INTERFACE Today, KNX is the open global standard, compliant with the main European and international standards, allowing the automated and decentralized management of technological systems of a wide range of structures: commercial buildings, industries, offices, homes, public premises, schools and many more.
  • Page 20 AUTOSET VORSICHT: DER UNTEN BESCHRIEBENE AUTOSET-VORGANG IST OBLIGATORISCH! Während der AUTOSET-Phase führt das Steuergerät einige Öffnungs- und Schließmanöver durch, bei denen wesentliche Betriebsparameter eingestellt werden, darunter: - Start- und Endpunkte. - Der Beginn der Verlangsamungsphasen. - Die Drehmomentwerte, die während der Bewegung der Tür angewendet werden. - Erkennung des an den PHOT-Eingang angeschlossenen Geräts.
  • Page 21: Allgemeine Information

    - das Tor muß zu öffnen und zu schließen sein, indem man es an seinem Oberrand zieht und schiebt (Abb. 2). - Die Handgriffe müssen sanft und regelmäßig sein. Der Getriebemotor ROMEO die folgenden Spurrillen verbunden werden können: Mod. Länge Riemen max.
  • Page 22: Elektrische Anschlüsse

    4) MONTAGE AN SCHWENKTÜREN Kipptor mit Gegengewichten (Bild 15): Kipptore mit Gegengewichten erfordern den Sonderarm Teil. AU.C25. Bei seiner Anbringung ist nur zu beachten: • Arm an der oberen Kante des Tores befestigen, • Arm lotrecht stellen. AU.C25 ist ein Zubehör, das der Installation der Automatik an Schwingtoren mit Gegengewicht dient. Die Installation des Arms AU.C25 erfolgt folgendermaßen (Abb.
  • Page 23 Drücken Sie innerhalb von 5 Sekunden die gewünschte dem Empfänger zuzuweisende Taste. Das Servicelicht blinkt einige Male, um den Empfang zu bestätigen, und blinkt dann erneut. Wiederholen Sie die Operationen der Punkte 3 und 4 für die folgenden zu speichernden Sender, bis zu einer Höchstanzahl von 64. Um in die folgende Autoset-Phase zu gelangen, drücken und halten Sie die Taste eines bereits gespeicherten Senders gedrückt, bis die AUTOSET-Phase beginnt.
  • Page 24 DIP 3 Aktiviert oder deaktiviert die Wohnanlagenfunktion. On: Wohnanlagenfunktion aktiviert. Der Impuls P.P. oder der Sender haben keinen Einfluss während der Öffnungsphase und während der TCA-Pause. Off: Wohnanlagenfunktion deaktiviert (Standard). DIP 4 Deaktiviert die Energieeinsparung ESA. Wenn die ESA-Funktion nach Abschluss des Öffnungs- oder Schließvorgangs aktiviert ist, befindet sich das Steuergerät im Zustand maximaler Energieeffizienz, reduziert die Stromaufnahme auf ein Minimum und versorgt die Zubehörausgänge nicht.
  • Page 25 Löschen aller Sender aus dem Speicher - Halten Sie die PU2-Taste 15 Sekunden lang gedrückt, die LED LD1/2/3 und das Servicelicht beginnen schnell zu blinken und erlöschen, wenn der Löschvorgang abgeschlossen ist. - Lassen Sie die PU2-Taste los, der Speicher wurde gelöscht. HINWEIS: Aus Sicherheitsgründen ist es nicht möglich, Sender während der Öffnungs-/Schließphasen des Motors zu speichern.
  • Page 26: Avertissements

    AUTOSET ATTENTION!: LA PROCÉDURE D’AUTOSET DÉCRITE CI-APRÈS EST OBLIGATOIRE! Durant la phase de AUTOSET, la centrale effectue certaines manœuvres d’ouverture et de fermeture durant lesquelles sont configurés des paramètres de fonctionnement indispensables, dont: - Les points de début et de butée. - Le début des phases de ralentissement.
  • Page 27: Données Techniques

    être au minimum de 40mm (fig.2) la porte devra pouvoir être ouverte et fermée en tirant et en poussant horizontalement sur son bord supérieur (fig.2). les opérations manuelles doivent résulter douces et règulières. Le motoréducteur ROMEO peuvent être associés les rails suivants : Mod. Longueur Courroie Hauteur max.
  • Page 28: Montages Sur Les Portes Basculantes

    4) MONTAGES SUR LES PORTES BASCULANTES Portes basculantes à contrepoids (fig.15): les portes basculantes à contrepoids nécessitent un bras approprié art. AU.C25. Les seuls moyens pour le montage de ce dernier sont: • fixer le bras sur l’arête supérieure de la porte; •...
  • Page 29: Phases De Programmation Rapide

    PHASES DE PROGRAMMATION RAPIDE Couper l’alimentation de réseau, si présente, puis redonner de la tension de réseau. La veilleuse «Service Light» de la centrale commence à clignoter. Appuyer sur la touche cachée de l’émetteur à mémoriser, la veilleuse «Service Light» reste allumée fixe. Appuyer dans les 5s sur la touche désirée à...
  • Page 30: Mise En Tension Des Courroies

    DIP 3 Activer ou désactiver la fonction de copropriété. On: Fonction copropriété activée. L’impulsion P.P. ou de l’émetteur n’a pas d’effet durant la phase d’ouverture et durant la pause TCA . Off: Fonction copropriété désactivée (défaut). DIP 4 Désactive la fonction épargne d’énergie ESA. Avec la fonction ESA activée, une fois terminée la manœuvre d’ouverture ou de fermeture, la centrale se place dans la condition d’efficacité...
  • Page 31: Reset Total

    INTERFACE COMMUNICATION KNX KNX est aujourd’hui le standard mondial, ouvert, conforme aux principales réglementations européennes et internationales qui permet une gestion automatisée et décentralisée des systèmes technologiques d’un ample type de structures: bâtiments commerciaux, industries, bureaux, habitations, locaux publics, écoles et autres encore. Ce produit est compatible avec le standard KNX et peut être connecté...
  • Page 32 AUTOCONFIGURACIÓN ¡ATENCIÓN!: ¡EL PROCEDIMIENTO DE AUTOCONFIGURACIÓN DESCRITO A CONTINUACIÓN ES OBLIGATORIO! Durante la fase de AUTOCONFIGURACIÓN la central realiza algunas maniobras de apertura y cierre durante las cuales se configuran los parámetros operativos de funcionamiento, entre los cuales: - Los puntos de inicio y final de carrera. - El inicio de las fases de ralentización.
  • Page 33 40mm. (fig.2); la puerta deberá poder abrir o cerrarse tirando o empujando horizontalmente sobre el borde superior (fig.2); las maniobras manuales deben resultar suaves y regulares. El motorreductor ROMEO pueden combinarse los siguientes carriles: Mod. Longitud Correa Altura máx.
  • Page 34: Conexiones Eléctricas

    4) MONTAJES EN PUERTAS BASCULANTES Las basculantes de contrapesos (fig.15) necesitan el correspondiente brazo art. AU.C25. Las únicas particularidades para este último montaje son: • fijar el brazo sobre la arista superior de la puerta. • aplomar bien dicho brazo. AU.C25 es un accesorio que permite instalar la automatización en puertas basculantes con contrapesos.
  • Page 35 Fases de Programación Rápida Quitar, si la hubiera, la alimentación de red, después volver a conectarla. La luz de cortesía “Luz de servicio” de la central empieza a parpadear. Apretar la tecla oculta del transmisor a memorizar, la luz de cortesía “Luz de servicio” permanece encendida fija. Apretar antes de 5 segundos la tecla que desea asociar al receptor, la luz de cortesía “Luz de servicio”...
  • Page 36 ATENCIÓN: Al final de la programación volver a llevar el DIP 2 a OFF, la luz de cortesía comienza a parpadear, dar un comando P.P., se acciona una maniobra de apertura (o de cierre) durante la cual se actualizan los parámetros de funcionamiento. Al final de la maniobra se apaga la luz de cortesía. DIP 3 Habilita o deshabilita la función comunidad.
  • Page 37 NOTA: Por razones de seguridad no es posible memorizar los transmisores durante las fases de apertura/cierre del motor. INTERFAZ DE COMUNICACIÓN KNX KNX es hoy día el estándar mundial, abierto, conforme con las normas europeas e internacionales principales, que permite la gestión automatizada y descentralizada de los sistemas tecnológicos de una amplia gama de estructuras: edificios comerciales, industrias, oficinas, viviendas, locales públicos, escuelas y otros muchos.
  • Page 38 AUTOUSTAWIANIE UWAGA! OPISANA PONIŻEJ PROCEDURA AUTOUSTAWIANIA JEST OBOWIĄZKOWA! Podczas fazy AUTOUSTAWIANIA, centralka wykonuje kilka manewrów otwarcia i zamknięcia podczas, których są ustawianie wymagane parametry funkcjonowania, między innymi: - Punkty początku i końca biegu. - Początek faz zwalniania. - Wartości pary zastosowane podczas przebiegu trasy drzwi. - Rozpoznanie urządzenia podłączonego do wejścia PHOT.
  • Page 39: Informacje Ogólne

    40 mm (rys.2); brama musi się otwierać i zamykać poprzez poziome pociąganie i popychanie górnej krawędzi (rys.2); ręczna obsługa bramy musi przebiegać w sposób łagodny i regularny. Motoreduktor ROMEO do których można podłączać następujące szyny:: Mod. Długość...
  • Page 40: Połączenia Elektryczne

    4) MONTOWANIE DO BRAM WAHADŁOWYCH Wahadłowe z przeciwwagą (rys.15): w przypadku bram wahadłowych z przeciwwagą wymagane jest domontowanie specjalnego ramienia art. AU.C25. Dla zamontowania ramienia należy jedynie: • przymocować ramię do górnego prętu bramy • ustawić ramię w pozycji pionowej AU.C25 to dodatkowy osprzęt umożliwiający zainstalowanie napędu w bramach uchylnych z przeciwwagą.
  • Page 41 Aby przejść do kolejnej fazy AUTOUSTAWIANIA, nacisnąć i przytrzymać wciśnięty klawisz nadajnika już zapisanego, aż do uruchomienia fazy AUTOUSTAWIANIA. DIODY LD1/2/3 zapalą się cyklicznie i automatycznie zostaną wykonane pewne manewry, obliczając optymalne parametry działania. Jeśli procedura autoustawiania przebiegnie pomyślnie, drzwi zatrzymują się w pozycji otwartej a DIODY zaczną świecić na stałe przez 5 sek. potwierdzając poprawny przebieg AUTOUSTAWIANIA.
  • Page 42 DIP 3 Włącza lub wyłącza funkcję blokową. On: Funkcja blokowa aktywna. Impuls P.P. lub nadajnika nie działa podczas fazy otwierania lub podczas przerwy TCA. Off: Funkcja blokowa nieaktywna (domyślnie). DIP 4 Wyłącza funkcję oszczędzania energii ESA. Jeśli funkcja ESA jest aktywna, po zakończeniu otwierania lub zamykania, centralka ustawia się w warunkach maksymalnego oszczędzania energii, zmniejszając do minimum pobór energii i wyłączając wyjścia urządzeń...
  • Page 43 INTERFEJS KOMUNIKACJI KNX KNX jest obecnie światowym standardem, otwartym i zgodnym z głównymi europejskimi i międzynarodowymi standardami, który umożliwia automatyczne i zdecentralizowanie zarządzanie różnymi liniami technologicznymi wszelkiego rodzaju konstrukcji: budynkami handlowymi, przemysłowymi, biurami, mieszkaniami, lokalami użyteczności publicznej, szkołami i innymi. Produkt jest kompatybilny z normą...
  • Page 44 ROMEO Istruzioni per l’utilizzatore User’s handbook Handbuch für den Verbraucher Manuel d’instructions pour l’utilisateur Manual de instrucciones para el usuario Instrukcja obsługi dla użytkownika Tirare verso il basso per poter eseguire la manovra manuale. Spingere per ripristinare il funzionamento automatico.
  • Page 45: Sicherheitsvorschriften

    DEUTSCH ESPAŇOL Sicherheitsvorschriften Normas de seguridad • Nicht im Öffnungsbereich verweilen. • No pararse en la zona de movimiento de la puerta. • Kinder nicht mit den Steuerungen oder in der Nähe des Tores spielen lassen. • No dejar que los niños jueguen con los mando o en proximidad de la puerta. •...
  • Page 46 Ref. ROMEO Note 968601835 968601418 9686682 9688253 968601836...
  • Page 47: Eu Declaration Of Conformity (Doc)

    EU Certificato di Conformità (DOC) EU Declaration of Conformity (DOC) Nome del produttore: Automatismi CAB Manufacturer’s name: Automatismi CAB Indirizzo: Via della Tecnica, 10 (Z.I.) Postal Address: Via della Tecnica, 10 (Z.I.) Codice postale e Città: 36010 - Velo d'Astico (VI) - Italia...
  • Page 48 AUTOMATISMI CAB Srl - Via della Tecnica,10 (z.i.) - 36010 Velo d’Astico (VI) (Italia) - Tel. 0445 741215 - Fax 0445 742094 info@automatismicab.com - www.automatismicab.com...

Table des Matières